10g (9.0.4)
Part Number B10188-01
Home |
Solution Area |
Contents |
Index |
| Oracle Application Server Wireless Administrator's Guide 10g (9.0.4) Part Number B10188-01 |
|
The chapter includes the following sections:
This chapter describes integrating Wireless with the Oracle Application Server components: Oracle Internet Directory (OID), WebCache and OracleAS Portal. In this release, user information is stored centrally in OID. The SSO (Single Sign-On) server uses an OID repository to authenticate users. Table 16-1 describes the attribute mapping between PanamaUser (stored in Oracle Application Server Wireless repository) and orclUserV2 user attributes (stored in OID).
Administrators use tools such as Delegated Administrative Services (DAS), to create a new User in OID or to modify attributes of an existing user. Alternatively, Wireless customers can implement their own user administrator tool to create, modify, or delete users with the Wireless model APIs.
The user information is synchronized between Wireless and OID repositories using the following mechanisms:
For information on authenticating users through SSO, see Chapter 11, "Mobile Single Sign-On".
Wireless synchronizes user information which is stored in the Wireless repository with OID after SSO authentication.
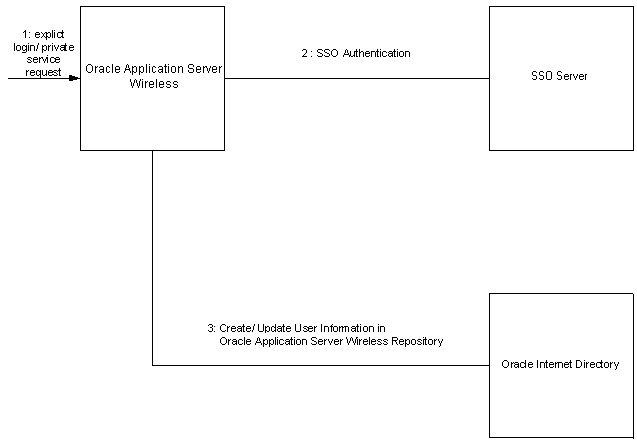
The authentication sequence (as depicted in Figure 16-1) is as follows:
|
Note: The user attributes must be synchronized with OID because the PL/SQL notification mechanism does not guarantee real-time notifications. |
The Oracle Application Server Wireless installation registers a PL/SQL procedure with OID. The PL/SQL procedure is invoked when a user is modified or deleted in OID.
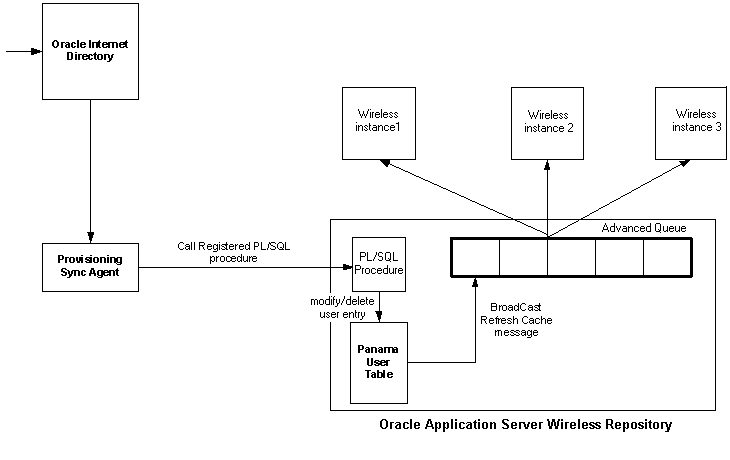
Figure 16-2 depicts the events triggered when a user is modified in OID. The sequence is as follows:
The ModelFactory.createUser() method creates a corresponding User in the OID repository.
The User.set methods update the corresponding User entry in OID for all of the attributes. The User.delete() method removes the corresponding User from the OID repository. The current semantics of commit is preserved for the User modifications.
In Wireless integration mode, when you create a user through the User Manager, the request is first redirected to OID DAS (Delegated Administration Service), for entering Oracle Application Server User Common Attribute Values. After that, the request is redirected back to the User Manager page for entering Wireless-specific attribute values.
The same applies for editing a registered Wireless user. The user is first edited through DAS and then through the User Manager.
Oracle Application Server Wireless is integrated with Oracle WebCache to improve page rendering performance and scalability. WebCache is not deployed in the traditional sense with Oracle Application Server Wireless; WebCache is usually deployed in front of Web-servers serving HTML content, and interacting with HTML clients and the Web-server to cache dynamic content. However, with Oracle Application Server Wireless, the wireless runtime determines the content that must be inserted into WebCache and when to expire the content in the cache. WebCache, in this case, acts as a device adaptation cache rather than a reverse-proxy cache.
Since markup content is cached using WebCache, the performance and scalability benefits derive from two factors: reduced device adaptation costs and significantly reduced adapter invocation costs. Content, which can be shared across users and sessions is essentially transformed only once (per device) from its Mobile XML format resulting in a reduction of adaptation costs. Secondly, since the content is not generated every time by an adapter, the total adapter invocation cost is significantly reduced for a site that has a large subset of cacheable pages.
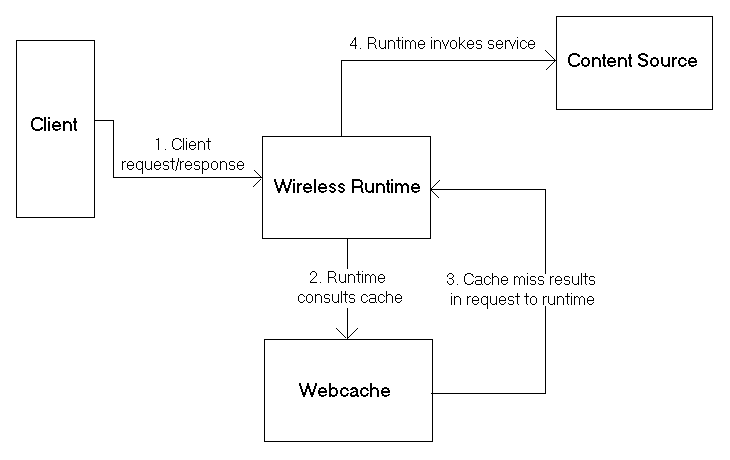
A cache miss scenario (as depicted in Figure 16-3) is as follows:
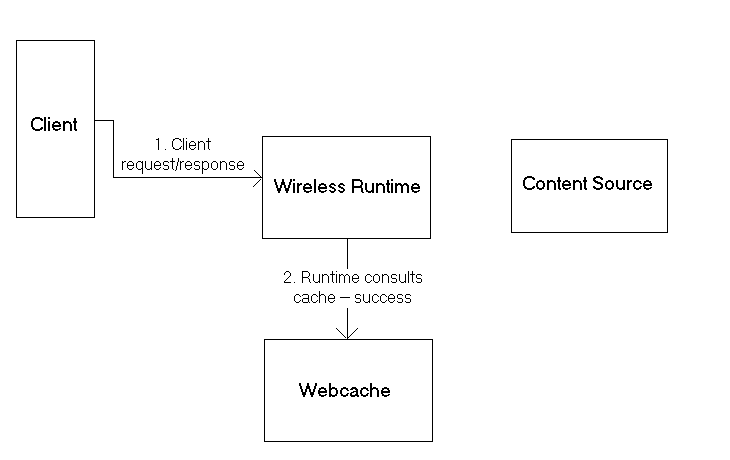
In this case, an incoming request from a client is for a page that has been cached by WebCache. This sequence (depicted in Figure 16-4) is as follows:
This section describes how to configure caching for dynamic content for the Wireless Site using the System Manager and how to enable caching for a master application using the Service Manager.
To cache dynamic content, you use the System Manager's WebCache configuration page, which you access by clicking the WebCache link in the System Manager's Administration page (Figure 16-5).
To configure the WebCache:
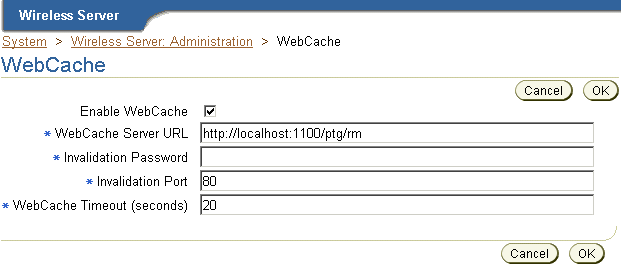
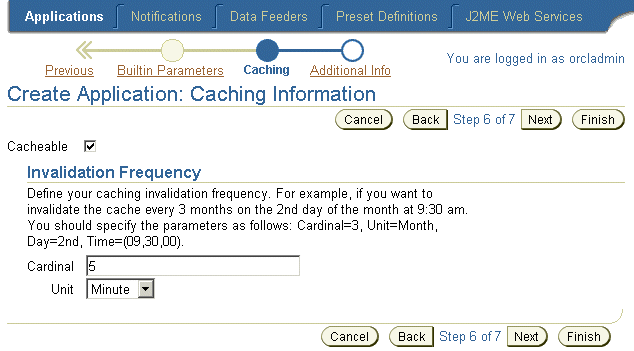
The steps detailed in Section 16.2.1.1 described how to enable caching for the Wireless site. For the cache to be of use, you must create master applications that can be cacheable. To do this, you use the Caching Information page of the Service Manager's Application Creation Wizard. You access this wizard by clicking Create Application in the application browsing screen. If you opted to create an Multi-Channel application based on the HTTP Adapter, the Caching Information page appears as Step 6 in the wizard; for an application that is based on another adapter (a non-HTTP Mulitchannel Application), the Caching Information page appears as Step 2 (Figure 16-6). For more information on creating applications, see the Oracle Application Server Wireless Developer's Guide.
To cache-enable an application, check the Cacheable checkbox. In the Invalidation Frequency section, specify the frequency at which pages corresponding to the application must be removed from the cache.
When the Content Manager publishes a cacheable master application, the resulting application link is automatically cacheable. For more information on creating application links with the Content Manager, see Section 5.3.4.
For any caching mechanism to be effective, The invalidation of the cached contents must be performed at appropriate intervals. The Invalidation of Wireless content residing in WebCache can be either policy-based or asynchronous.
It is possible to specify in advance if a page should be cacheable or not. One of the ways to do this is by specifying the invalidation frequency of an application (as described in Section 16.2.1.2). When a page is inserted into the cache, the invalidation frequency of the application to which it belongs is taken into account while determining how long the page should live in the cache.
It is also possible to dynamically specify the cacheability of a page. This is done at the content-source. If the page is to be specified as cacheable, the SimpleResult element should have a SimpleMeta child element. This element has a required attribute cache, which when set to yes, enables caching for the page and when set to no disables caching. An optional attribute to be used in conjunction with a yes value for the cache attribute is ttl. This can be used to specify in seconds the number of seconds the page should be cached before expiring it. For example:
<SimpleResult>
<SimpleMeta cache="no"/>
.....
</SimpleResult>
results in the page being non-cacheable, as below:
<SimpleResult>
<SimpleMeta cache="yes" ttl="300"/>
....
</SimpleResult>
results in the page being cached for 300 seconds.
Apart from using the SimpleMeta tag to specify cacheability, it is possible to use standard HTTP cache-control headers and ESI headers to specify cacheability for a page. Refer to your documentation on WebCache on how to specify cacheability using ESI headers.
The order in which cacheability for a given page is evaluated is as follows:
SimpleMeta headers are present, the default cacheability policy for the application is applied to the page.
Despite specifying the cacheability policy for a page at the time of application creation or during the generation of the page, it may be necessary to explicitly invalidate content in the cache. It is possible to invalidate and refresh content in the cache based on a master application or a device.
You use the System Manager's WebCache Refresh Utilities screens to explicitly invalidate the content in the cache. You access these screens from the Utilities section of the System Manager's Administration page.
The WebCache Utilities section contains two screens:
To invalidate all pages belonging to a master application, click Refresh WebCache - Master Application. In the WebCache Refresh -- Master Application screen, select a master application in the table and then click Refresh.
To invalidate all pages with a given device markup, click Refresh WebCache - Device. In the WebCache Refresh -- Device screen, select a device from the table and then click Refresh.
If WebCache is reinstalled on a different machine or port, you must reconfigure the the WebCache settings as detailed in section Section 16.2.1.1.
If the Wireless instance is reinstalled on a different machine, you must modify the location of the Wireless instance should be modified in the `Application Servers' of WebCache's administration console. See the WebCache Configuration Guide for details on how to perform this task.
In this section describes how to build a sample application that is cacheable using WebCache. This section also describes methods of controlling the cacheability of such an application dynamically.
The sample application displays the current time and therefore immediately demonstrates the cached status of the page.
To create the application:
<%@ page language="java" %>
<%@ page import="java.text.SimpleDateFormat"%>
<%@ page import="java.util.Date"%>

<%@ page session="false" %>
<%@ page contentType="text/html; charset=iso-8859-1" %>
        <SimpleResult>
        <SimpleContainer>
        <SimpleText>
        <SimpleTextItem>
        <%
                Date date = new Date();
                SimpleDateFormat formatter =
new SimpleDateFormat("yyyy.MM.dd G 'at' hh:mm:ss a zzz");
        %>
         <%=formatter.format(date)%>

        </SimpleTextItem>
        </SimpleText>
        </SimpleContainer>
        </SimpleResult>
You can now access the application from the device portal. The time-stamp displayed as a result of invoking DateService does not change for 40 seconds, indicating that the application has been cached for 40 seconds and invalidated after. When the page in the cache expires, content is fetched from the content source only on a by-demand basis. That is, after 40 seconds elapse, WebCache does not refresh the content immediately, but will do so only after a new request for the page is received.
The time for which the cache can retain the page without refreshing it has been set to 40 seconds during the application creation. However, this value can be changed dynamically at the time of generation of the Mobile XML. This can be done in two ways:
In this case, the generated Mobile XML can have a SimpleMeta tag to attain this. For more information, see Policy-based Invalidation described in Section 16.2.1.3. For the sample application, the JSP is as follows to ensure that the page expires after 10 seconds (rather than the default of 40 seconds):
<%@ page language="java" %>
<%@ page import="java.text.SimpleDateFormat"%>
<%@ page import="java.util.Date"%>

<%@ page session="false" %>
<%@ page contentType="text/html; charset=iso-8859-1" %>
        <SimpleResult>
    <SimpleMeta cache="yes" ttl="300"/>
        <SimpleContainer>
        <SimpleText>
        <SimpleTextItem>
        <%
                Date date = new Date();
                SimpleDateFormat formatter =
new SimpleDateFormat("yyyy.MM.dd G 'at' hh:mm:ss a zzz");
        %>
         <%=formatter.format(date)%>

        </SimpleTextItem>
        </SimpleText>
        </SimpleContainer>
        </SimpleResult>
Responses from the content source may contain ESI headers as part of HTTP headers that can dictate cache expiration behavior. Using ESI headers entail no changes to the Mobile XML. The following ESI header expires the page is 30 seconds.
Surrogate-Control: max-age=30+60, content="ESI/1.0"
For more information on ESI headers, please refer to the WebCache Developer's Guide.
Oracle Application Server Portal (OracleAS Portal) is a Web-based application model for building and deploying e-business portals. It provides an environment for accessing and interacting with enterprise software services and information resources. OracleAS Portal provides a framework that integrates Web-based resources such as Web pages, applications, business intelligence reports, and syndicated content feeds, within standardized, reusable information components called portlets.
A portlet is an area of HTML/XML located within a defined area of a Web page. Portlets communicate with the portal through an entity called a provider. Portlets form the fundamental building blocks of an OracleAS Portal page. Each portal page consists of content presented through one or more portlets and links that allow the user to navigate to another page to take some action.
Portlets summarize, promote, or provide basic access to an information resource. The portlets allow information resources to be personalized and managed as an application of OracleAS Portal. The portal framework provides additional services including single sign-on, content classification, enterprise search, directory integration, and access control. OracleAS Portal supports Desktop PC Web browsers and enables OracleAS Portal pages to be accessed from wireless devices. OraclePortal, working in conjunction with Wireless, automatically transforms the portal page structure that is appropriate for the wireless devices. OracleAS Portal generates the Page structure in Wireless XML, for all request from wireless device, and rendered to the device by Wireless. This allows portlets to provide wireless interface using OracleAS Portal through Wireless.
OracleAS Portal must be deployed as a Wireless application in the Wireless repository to enable Wireless access to OracleAS Portal . Each OracleAS Portal installation is deployed as an HTTP Adapter-based application in Wireless. Multiple Portals may be deployed on a single Wireless instance. The HTTP adapter application accepts a URL as a configuration parameter and must be set to the URL of the OracleAS Portal's home page. To create a Wireless application, a master application definition based on an HTTP adapter must be created using the Service Manager. Also, you must create an OraclePortal Service based on the HTTP adapter master application.
OracleAS Portal redirects requests from a Wireless device to an Wireless server. The Wireless Server accepts the request and invokes the OracleAS Portal home page over HTTP and accepts the response generated (in Wireless XML), from OracleAS Portal. The XML response, generated by OracleAS Portal, is then adapted to the native device markup by the Wireless server. All further requests and responses between Wireless device and OracleAS Portal is mediated by the Wireless Server.
Wireless devices make the first request to OracleAS Portal server. OracleAS Portal redirects the device request to Wireless Server. The OracleAS Portal appends two parameters to the redirected URL, the two query parameters appended are PAoid and PAhome. Both PAoid and PAhome contain the value of the object id (service-id in the Wireless repository) of the Portal's HTTP adapter service. The syntax of the redirected URL is:
http://9iASWSerrver:port/ptg/rm?PAoid=<OraclePortal object
id>&PAhome=<OraclePortal object id>
The PAoid parameter allows the Wireless server to directly launch the Portal home page, without having to navigate through the Wireless server's folder and service hierarchy. The PAhome sets the Portals Home Page as the home page for the current wireless session.
Portlets are owned by entities called providers. One provider can manage one or many portlets. Providers are the backbone behind the Portlets being displayed on each page. Portal supports a Web Provider framework that is written as a web application. It is installed and hosted on a web server and is remote from the Portal. A portlet exposed as a Web Provider can be developed in any web language. A Web Provider communicates with Oracle Application Server Portal using SOAP(XML).
OraclePortal supports a Java based Portal Developer Kit (PDK) framework to develop portlets and services. The Java PDK Framework is a set of services that enable Java programmers to easily create portlets from existing Java-based applications (Java, Java Servlets, and JSPs). It provides an abstraction to handle communication with Oracle Application Server Portal, default classes to simplify portlet creation, and exposes APIs for end-user customization, session storage, security, and logging.
For Wireless devices, OraclePortal supports Portlets that generate Wireless XML. To enable wireless access, Portlets must generate Wireless XML and indicate this capability using the Java PDK framework. The Java PDK framework uses a Provider.xml file to discover the capabilities of the Portlets supported by a Provider. Refer to OraclePortal's PDK-Java User's Guide for more information.
Following is a overview of tags (in the Provider.xml file) that indicates the wireless capabilities of a Portlet.
1.<acceptContentType>
           Usage:
<acceptContentType>text/vnd.oracle.mobilexml</acceptContentType>
This value "text/vnd.oracle.mobilexml" indicates that the portlet is capable of generating Wireless XML required for Wireless access. A portlet can be enabled for both HTML (PC Desktop) and Wireless Access by indicating it can accept both the content types such as:
<acceptContentType>text/vnd.oracle.mobilexml</acceptContentType>
            <acceptContentType>text/html</acceptContentType>
If the Portlet is capable of generating only Wireless XML (text/vnd.oracle.mobilexml), then (unless otherwise indicated) the Portlet will transform the Wireless XML to HTML for PC Desktop clients.
2.<mobileFlags>
           Usage: <mobileFlags>MOBILE_ONLY</mobileFlags>
Portlets can set this value to MOBILE_ONLY and hence indicate that this Portlet must be rendered in wireless devices only. This will prevent the default behavior of a Portal to transform Wireless XML, generated by the Portlet and rendered to PC Desktop clients.
3.<showLink>
           Usage:<showLink>true</showLink>
Portal renders all the Portlets on Wireless devices as links. Portlets must set this value to True to be rendered on a wireless device. A value of True allows the Portal to generate a Link, pointing to the Portlet content, on the wireless device.
4.<linkPage>
           Usage:<linkPage
class="oracle.portal.provider.v2.render.http.ResourceRenderer">
                       <resourcePath>/mypath/mypage.jsp</resourcePath>
                       <contentType>text/vnd.oracle.mobilexml</contentType>
                       </linkPage>
This tags holds the pointer to the resource which generates the required link that is rendered on a wireless device. This resource must generate Wireless XML. Below is a sample link page implemented in JSP.
           <%@ page session="false" contentType="text/vnd.oracle.mobilexml" %>
               <SimpleHref target="/mypath/mywireless.jsp" label="Go">
                     Wireless HelloWorld
               </SimpleHref>
The new version JPDK has been updated to understand these wireless properties of a Portlet. The JPDK also supports wireless specific request information like location and device information, which can be accessed by the Portlets through the JPDK APIs.
Both Oracle Portal and Wireless depend on Oracle's SSO solution for user authentication and login. This integration allows the user to invoke protected applications defined on both systems and eliminates multiple login dialog boxes for users.
Wireless Server upgrades the session context of a user to an "authenticated" state when any service or application (HTTP Adapter applications) validates the user credentials with the SSO server. When Oracle Portal, a mobile application, validates the credentials of a user with the SSO Server, the session context in Wireless is also updated. This allows wireless Portlets deployed on Oracle Portal to use services such as User Location Picker, Routing, Mobile Positioning supported by the Wireless Server.
You can use Oracle Portal's applications to provide a PC Desktop view of your Wireless services. You can use Portal's JPDK framework to provide a "showPage" and "editPage", for Web-based customizations.
Since the Portal itself can be accessed from a wireless device, you must also provide a mobile Portlet. On a wireless device, the mobile Portlets are rendered as links and can be made to point to an application deployed on the Wireless server. You can use Portal's JPDK framework to provide a "linkPage" that generates the appropriate link for your wireless service. To point to a wireless service from a mobile portlet you can use following URL syntax in the Wireless XML:
target="___REQUEST_NAME__?___SESSION__&PAoid=<PAoid of Wireless Service>"
The Wireless server will replace all "___<Name>__" to the correct values at runtime and will invoke an application defined in the Wireless repository.
The following is a sample link page:
<%@ page session="false" contentType="text/vnd.oracle.mobilexml" %> <SimpleHref target="/___REQUEST_NAME__?PAoid="+PAoid + "&___ SESSION__" label="Go"> My Wireless Service </SimpleHref>
Mobile devices make the first request to OraclePortal server. Portal redirects the device request to Wireless Server, over HTTP, and appends two parameters to the redirected URL. The two query parameters are PAoid and PAhome. Both PAoid and PAhome contain the Portal's object and service ID. The typical syntax of the redirected URL are:
http://Oracle Application Server WirelessSerrver:port/ptg/rm?PAoid=<OraclePortalServiceid>&PAhome=<OraclePortalService id>
The PAoid parameter allows the Wireless server to directly launch the Portal home page, without having to navigate through the Wireless server's folder and service hierarchy. The PAhome sets the Portals Home Page as the home page for the current wireless session.
The post-installer automatically registers the Wireless Tools and Customization as two Oracle Portal Providers. Thus, if an Oracle Portal user selects the two providers, the user then sees two portlets: one for the Wireless Tools, and one for Customization. If the URL for tools or Customization is changed, the provider can be registered from Wireless System Manager, part of Oracle Enterprise Manager.
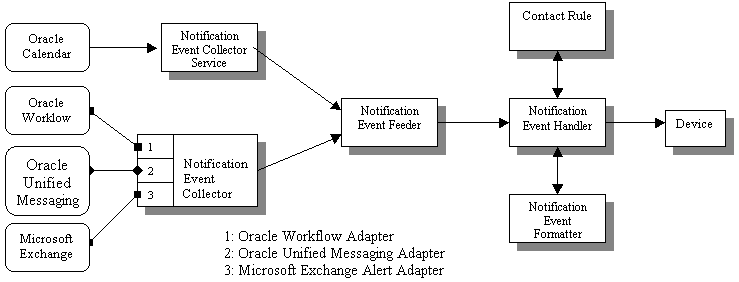
The application event notification process uses the Wireless Notification Engine to deliver notifications to wireless devices. It adds components that collect application events, process user contact rules, and formats notification contents. Figure 16-7 presents an architectural overview of the various components of the notification process.
Applications outside of Wireless can use two different mechanisms to interface with the Notification Engine: the push interface and the pull interface.
Using the push interface, applications send notification events over HTTP to the Notification Event Collector Service, which is based on a servlet. The Notification Event Collector Service then passes the notification event data to the Notification Event Feeder, which is a customized data feeder to the Notification Engine.
The pull interface enables the notification event collector process to connect to the application and retrieve the notification events. The notification event data is then passed onto the Notification Event Feeder. The notification event collector process consists of a number of different adapters; each adapter is specific for a particular application. You can enable and disable adapters by configuring the notification collector process. Using the System Manager, you can start or stop a notification event collector process.
The notification event handler is a customized system-level notification application that reads data from the notification event feeder. The data indicates the target user for this notification, as well as the type of notification and other notification-specific data.
The notification event handler then looks up the target user's active contact rule to determine the user's preferred notification device type and address. The notification event formatter is then invoked, which generates the content of the notification, customized for the user's device type. The generated notification content is delivered to user's devices by the notification engine.
The notification event handler is a system-level notification application; users do not need to explicitly create a notification subscription on this process to receive notifications. Instead, only the administrator user, ORCLADMIN, is subscribed to this process. Depending on the application, users can specify (either in the Wireless Customization Portal, or in the actual application itself), the events for which they want to receive notifications. For each notification processed, the system looks up the contact rule of the target user and make sure that the correct user receives the notification. Use the System Manager to start, stop or configure notification event process. For more information, see Section 3.3.4.
The notification event collector and notification event handler are two separate processes. Both of them must be running at the same time for the system to process application event notifications.
Oracle Workflow integration includes two components: a notification service which receives notifications from the Oracle Workflow Notification queues and sends them to the user's mobile device and an Oracle Workflow Notification Worklist service which can be accessed through the Wireless portal.
Since Oracle Workflow and Wireless are both components of Oracle Application Server, Wireless has the ability to connect to Oracle Workflow through OID. And since Wireless connects to Oracle Workflow through OID, they share the same user repository.
Oracle Workflow provides a queue which contains all of the outgoing notifications for that particular instance. Each message in the queue contains all of the necessary information for the notification and for the user to which it is sent. Wireless dequeues these messages and uses XMS to construct a message to be sent to the end user. The user can then respond to this notification. The response is directed to a Wireless service which will then update Oracle Workflow according to the user's response.
This is the equivalent of the Oracle Workflow Notification Worklist through the Wireless portal. Using OID, the Worklist Service will connect to Workflow to retrieve a list of all the user's open notifications. Each notification can be closed or responded to (depending on the type of notification).
|
|
 Copyright © 2003 Oracle Corporation. All Rights Reserved. |
|