| Oracle® TopLink Developer's Guide 10g Release 3 (10.1.3.1.0) Part Number B28218-01 |
|
|
View PDF |
| Oracle® TopLink Developer's Guide 10g Release 3 (10.1.3.1.0) Part Number B28218-01 |
|
|
View PDF |
This chapter describes how to configure TopLink projects.
Table 19-1 lists the types of TopLink projects that you can configure and provides a cross-reference to the type-specific chapter that lists the configurable options supported by that type.
Table 19-1 Configuring TopLink Projects
| If you are creating... | See also... |
|---|---|
|
|
Chapter 20, "Configuring a Relational Project" |
|
|
Chapter 21, "Configuring an EIS Project" |
|
|
Chapter 22, "Configuring an XML Project" |
Table 19-2 lists the configurable options shared by two or more TopLink project types.
For more information, see the following:
Table 19-2 lists the configurable options shared by two or more TopLink project types. In addition to the configurable options described here, you must also configure the options described for the specific TopLink Project Types, as shown in Table 19-1.
Table 19-2 Common Project Options
| Option | Type | TopLink Workbench | Java |
|---|---|---|---|
|
"Configuring Project Save Location" |
Basic |
 |
 |
|
"Configuring Project Classpath" |
Basic |
 |
 |
|
"Configuring Mapped Field Access at the Project Level" |
Basic |
 |
 |
|
"Configuring Persistence Type" |
Basic |
 |
 |
|
"Configuring Default Descriptor Advanced Properties" |
Advanced |
 |
 |
|
"Configuring Existence Checking at the Project Level" |
Advanced |
 |
 |
|
"Configuring Project Deployment XML Options" |
Advanced |
 |
 |
|
"Configuring Model Java Source Code Options" |
Advanced |
 |
 |
|
"Configuring Deprecated Direct Mappings" |
Advanced |
 |
 |
|
"Configuring Cache Type and Size at the Project Level" |
Advanced |
 |
 |
|
"Configuring Cache Isolation at the Project Level" |
Advanced |
 |
 |
|
"Configuring Cache Coordination Change Propagation at the Project Level" |
Advanced |
 |
 |
|
"Configuring Cache Expiration at the Project Level" |
Advanced |
 |
 |
|
"Configuring Project Comments" |
Advanced |
 |
 |
See Also
You can configure a project save location only when using TopLink Workbench.
Table 19-3 summarizes which projects support a project save location.
Table 19-3 Project Support for Project Save Location
| Descriptor | Using TopLink Workbench |
Using Java |
|---|---|---|
|
Relational Projects |
|
 |
|
EIS Projects |
|
 |
|
XML Projects |
|
 |
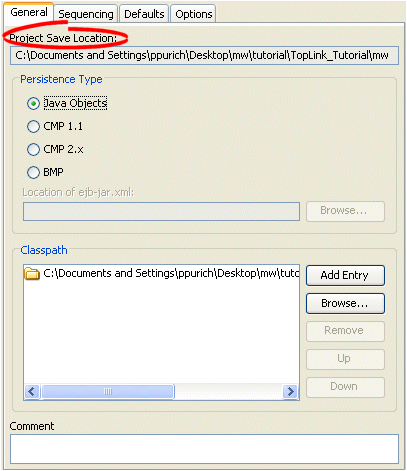
The Project Save Location field on the project's General tab is for display only. This field shows the full directory path for the project. All relative locations used in the project are based on this location.
Figure 19-1 General Tab, Project Save Location
To select a new location, right-click on the project in the Navigator and select Save As from the context menu. See "Saving Projects" for more information.
The TopLink project uses a classpath–a set of directories, JAR files, and ZIP files–when importing Java classes and defining object types.
Table 19-4 summarizes which projects support project classpath configuration.
Table 19-4 Project Support for Project Classpath
| Descriptor | Using TopLink Workbench |
Using Java |
|---|---|---|
|
Relational Projects |
|
 |
|
EIS Projects |
|
 |
|
XML Projects |
|
 |
Do not include JDBC drivers or other elements required to access the data source in the project classpath. Use the setenv file to specify these application-level settings (see "Configuring the TopLink Workbench Environment").
After you configure the project classpath, you can use TopLink Workbench to import classes into your project (see "Importing and Updating Classes").
To specify the project classpath information, use this procedure:
Select the project object in the Navigator.
Click the General tab in the Editor. The General tab appears.
Figure 19-2 General Tab, Classpath Options
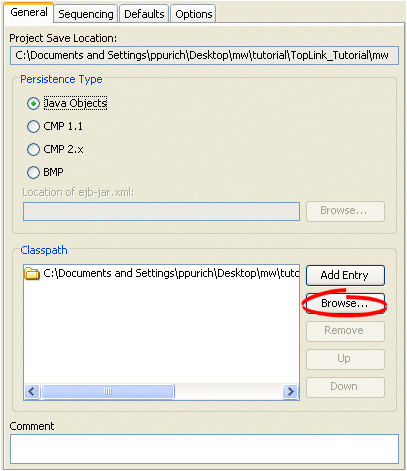
To add a new classpath entry, click Add Entry or Browse and select the directory, .jar file, or .zip file for this project. To create a relative classpath, select an entry and edit the path, as necessary. The path will be relative to the Project Save Location.
To remove a classpath entry, select the entry and click Remove.
To change the order of the entries, select the entry and click Up or Down.
By default, when TopLink performs a persistence operation, it accesses the persistent attributes of an object directly: this is known as direct field access. Alternatively, you can configure TopLink to access persistent attributes using accessor methods of the object: this is known as method access.
Oracle recommends using field access for mappings. Not only is it more efficient, but using method access may cause issues if the method produces unexpected side-effects.
Table 19-5 summarizes which projects support mapped field access configuration.
Table 19-5 Project Support for Mapped Field Access
| Descriptor | Using TopLink Workbench |
Using Java |
|---|---|---|
|
Relational Projects |
|
 |
|
EIS Projects |
|
 |
|
XML Projects |
|
 |
This section describes configuring mapped field access at the project level: by default, this configuration applies to all descriptors and their mappings.
|
Note: If you change the access default, existing mappings retain their current access settings, but new mappings will be created with the new default. |
You can also configure mapped field access at the mapping level to override this project-level configuration on a mapping-by-mapping basis. For more information, see "Configuring Method Accessing".
To specify the field access method information, use this procedure:
Select the project object in the Navigator.
Select the Defaults tab in the Editor. The Defaults tab appears.
Figure 19-3 Defaults Tab, Field Accessing Options
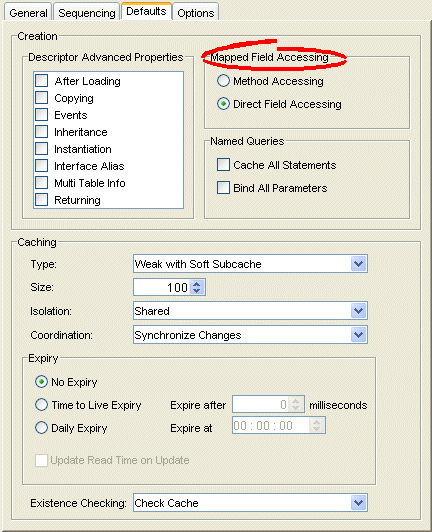
Use this table to enter data in the following fields of the tab to specify the default field access method for newly created descriptors:
| Field | Description |
|---|---|
| Method Accessing | Use Method Accessing as the default field access method. |
| Direct Field Accessing | Use Direct Field Accessing as the default field access method. |
You can configure your project persistence type only when using TopLink Workbench.
Using TopLink Workbench, you can specify the persistence type to use with the project. For example, your TopLink project may use plain Java objects, entity beans with container-managed persistence, or entity beans with bean-managed persistence (BMP).
Table 19-6 summarizes which projects support a persistence type configuration.
Table 19-6 Project Support for Persistence Type
| Descriptor | Using TopLink Workbench |
Using Java |
|---|---|---|
|
Relational Projects |
|
 |
|
EIS Projects |
|
 |
|
XML Projects |
 |
 |
To create a TopLink descriptor for a persistent class, TopLink Workbench reads a compiled Java .class file to read its attributes and relationships. See "Descriptors" for more information on TopLink descriptors.
For EJB projects, you can specify an ejb-jar.xml file from which TopLink will read and to which it will write the necessary persistence information. You use the ejb-jar.xml file to map the virtual fields of the entity beans with container-managed persistence (called container-managed fields, defined by <cmp-field> tag) or relationships (called container-managed relationship, defined by <cmr-field> tag) to a data source.
![]()
TopLink Workbench defines all descriptors for entity classes (as defined in the ejb-jar.xml file) as EJB descriptors. TopLink Workbench does not create (or remove) descriptors for the interfaces and primary key class for the entity when refreshing from the ejb-jar.xml file.
|
Note: TopLink Workbench creates class descriptors for entity classes not defined in theejb-jar.xml file. You must manually change the descriptor type (see "Configuring a Descriptor With EJB Information"). |
To update your project from the XML file, right-click an EJB descriptor and select Update Descriptors from ejb-jar.xml. You can also update the project by choosing Selected > Update Descriptors from ebj-jar.xml from the menu.
For more information on creating and using deployment files such as the ejb-jar.xml file, see the following:
To specify the persistence information, use this procedure:
Select the project object in the Navigator.
Select the General tab in the Editor. The General tab appears.
Figure 19-4 General Tab, Persistence Type Options
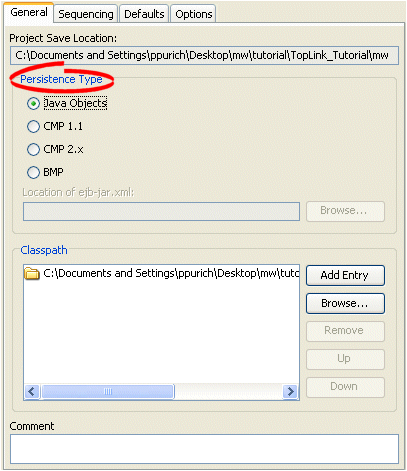
Use this table to enter data in the following fields on the project's General tab to configure the persistence options:
| Field | Description |
|---|---|
| Persistence Type | Specify the persistence type of the project: Java Objects, CMP 1.1, CMP 2.x, or BMP. For EJB projects, specify the location of the ejb-jar.xml file.
Note: This field does not apply to XML projects. |
| Location of ejb-jar.xml | Specify the location of the ejb-jar.xml file for this project. "Working With the ejb-jar.xml File" for more information.
Note: This field applies to EJB projects only. |
You can configure default descriptor advanced properties only when using TopLink Workbench.
By default, TopLink Workbench displays a subset of features for each descriptor type. You can modify this subset so that descriptors include additional advanced properties by default.
You can also select specific advanced properties for individual descriptors (see Chapter 25, "Configuring a Descriptor").
Table 19-7 summarizes which projects support default descriptor advanced property configuration.
Table 19-7 Project Support for Default Descriptor Advanced Properties
| Descriptor | Using TopLink Workbench |
Using Java |
|---|---|---|
|
Relational Projects |
|
 |
|
EIS Projects |
|
 |
|
XML Projects |
|
 |
To specify the default advanced properties for newly created descriptors in your project, use this procedure:
Select the project object in the Navigator.
Select the Defaults tab in the Editor. The Defaults tab appears.
Figure 19-5 Defaults Tab, Descriptor Advanced Properties
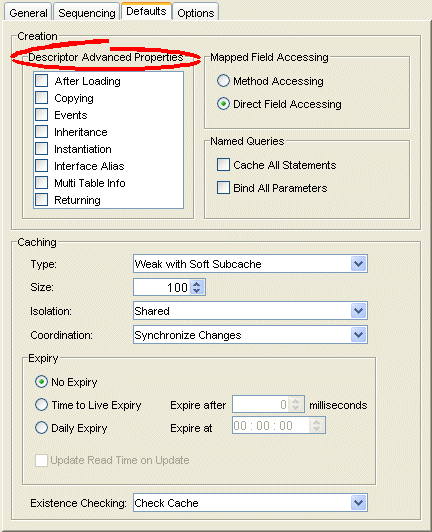
Select which Descriptor Advanced Properties to add to newly created descriptors. The list of advanced properties will vary, depending on the project type.
See Chapter 25, "Configuring a Descriptor" for detailed information on each advanced property.
When TopLink writes an object to the database, it runs an existence check to determine whether to perform an insert or an update operation.
By default, TopLink checks against the cache. Oracle recommends that you use this default existence check option for most applications. Checking the database for existence can cause a performance bottleneck in your application.
Table 19-8 summarizes which projects support existence checking configuration.
Table 19-8 Project Support for Existence Checking
| Descriptor | Using TopLink Workbench |
Using Java |
|---|---|---|
|
Relational Projects |
|
|
|
EIS Projects |
|
|
|
XML Projects |
 |
 |
By default, this configuration applies to all descriptors in a project. You can also configure existence checking at the descriptor level to override this project-level configuration on a descriptor-by-descriptor basis. For more information, see "Configuring Cache Existence Checking at the Descriptor Level".
For more information see the following:
To specify the existence checking information, use this procedure:
Select the project object in the Navigator.
Select the Defaults tab in the Editor. The Defaults tab appears.
Figure 19-6 Defaults Tab, Existence Checking Options
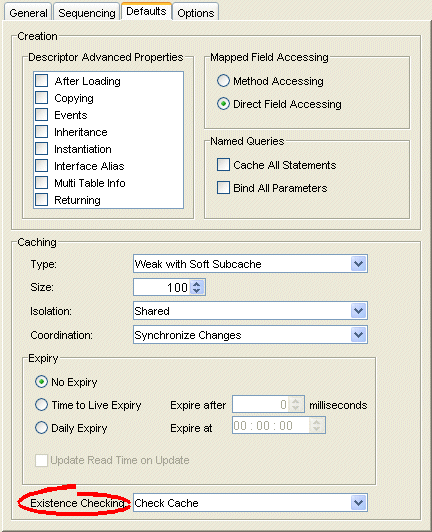
Use this table to enter data in following fields to specify the existence checking options for newly created descriptors:
| Field | Description |
|---|---|
| Check Cache | Check the session cache. If the object is not in the cache, assume that the object does not exist (do an insert). If the object is in the cache, assume that the object exists (do an update).
Oracle recommends using this option for most applications. |
| Check Database | If an object is not in the cache, query the database to determine if the object exists. If the object exists, do an update. Otherwise, do an insert.
Selecting this option may negatively impact performance. For more information, see "Check Database". |
| Assume Existence | Always assume objects exist: always do an update (never do an insert).
For more information, see "Assume Existence". |
| Assume Nonexistence | Always assume objects do not exist: always do an insert (never do an update).
For more information, see "Assume Nonexistence". |
You can configure project deployment XML options only when using TopLink Workbench.
Using TopLink Workbench, you can specify the default file names, class names, and directories, when exporting or generating deployment XML. Directories are relative to the project save location (see "Configuring Project Save Location"), and will contain folders for each generated package.
Table 19-9 summarizes which projects support deployment XML options.
Table 19-9 Project Support for Project Deployment XML Options
| Descriptor | Using TopLink Workbench |
Using Java |
|---|---|---|
|
Relational Projects |
|
 |
|
EIS Projects |
|
 |
|
XML Projects |
|
 |
To specify the default export options, use this procedure:
Select the project object in the Navigator.
Select the Options tab in the Editor. The Options tab appears.
Figure 19-7 Options Tab, Project Deployment XML Options
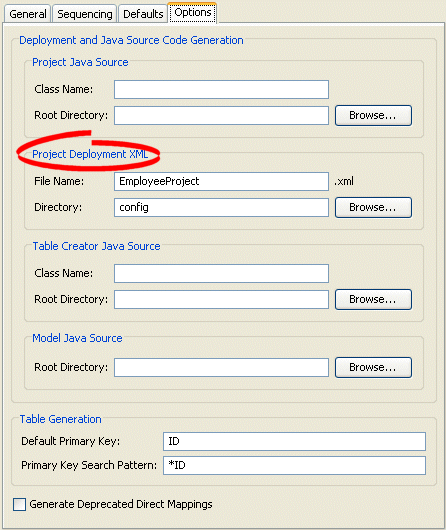
Use this table to enter data in following fields to specify the default Project Deployment XML options:
| Field | Description |
|---|---|
| File Name | File name (such as project.xml) to use when generating project deployment XML. |
| Directory | Directory in which to save the generated deployment XML file. |
You can configure model java source code options only when using TopLink Workbench.
Using TopLink Workbench, you can specify the default file names, class names, and directories, when exporting or generating Java source code for your domain objects. Directories are relative to the project save location (see "Configuring Project Save Location"), and will contain folders for each generated package.
Table 19-10 summarizes which projects support model Java source code options.
Table 19-10 Project Support for Model Java Source Options
| Descriptor | Using TopLink Workbench |
Using Java |
|---|---|---|
|
Relational Projects |
|
 |
|
EIS Projects |
|
 |
|
XML Projects |
|
 |
To specify the default export options, use this procedure:
Select the project object in the Navigator.
Select the Options tab in the Editor. The Options tab appears.
Figure 19-8 Options Tab, Model Java Source options
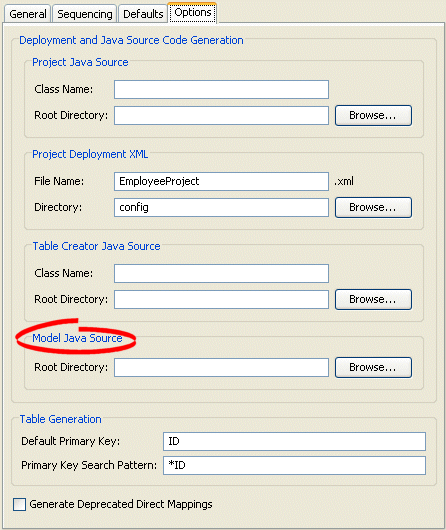
Specify the project root directory to which TopLink Workbench generates model Java source files. For more information, see "Generating Java Code for Descriptors".
You can configure deprecated direct mapping options only when using TopLink Workbench.
Starting with this release, TopLink no longer uses the following direct mapping types:
Type conversion
Object type
Serialized object
Instead, TopLink uses a direct-to-field mapping with a specialized converter.
To generate backward-compatible deployment XML and Java source code files, use the Generate Deprecated Direct Mappings option.
Table 19-11 summarizes which projects support deprecated direct mapping options.
Table 19-11 Project Support for Deprecated Direct Mapping Options
| Descriptor | Using TopLink Workbench |
Using Java |
|---|---|---|
|
Relational Projects |
|
 |
|
EIS Projects |
 |
 |
|
XML Projects |
 |
 |
To specify if TopLink Workbench should generate the deprecated direct mappings (instead of using the converter) when exporting projects, use this procedure:
Select the project object in the Navigator.
Select the Options tab in the Editor. The Options tab appears.
Figure 19-9 Options Tab, Generate Deprecated Direct Mappings Option
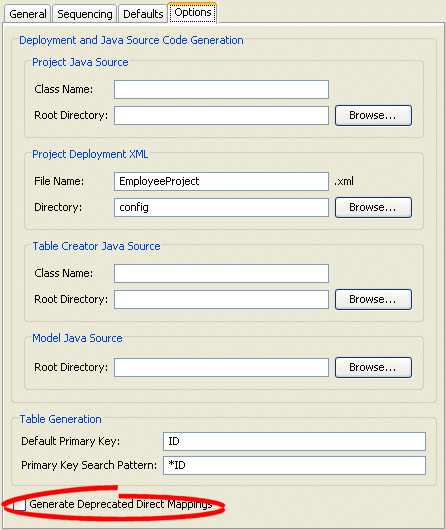
Select the Generate Deprecated Direct Mappings option on the tab to specify that TopLink Workbench should generate backward-compatible code (using the deprecated direct mappings, instead of the converter).
The TopLink cache is an in-memory repository that stores recently read or written objects based on class and primary key values. TopLink uses the cache to:
improve performance by holding recently read or written objects and accessing them in-memory to minimize database access
manage locking and isolation level
manage object identity
Table 19-12 summarizes which projects support identity map configuration.
Table 19-12 Project Support for Identity Map Configuration
| Descriptor | Using TopLink Workbench |
Using Java |
|---|---|---|
|
Relational Projects |
|
|
|
EIS Projects |
|
|
|
XML Projects |
 |
 |
The cache options you configure at the project level apply globally to all descriptors. Use this section to define global cache options for a TopLink project.
You can override the project-level identity map configuration by defining identity map configuration at the descriptor level. For information on caching and defining identity map configuration for a specific descriptor, see "Configuring Cache Type and Size at the Descriptor Level".
|
Note: When using TopLink Workbench, changing the project's default identity map does not affect descriptors that already exist in the project; only newly added descriptors ar affected. |
For detailed information on caching and object identity, and the recommended settings to maximize TopLink performance, see to "Cache Type and Object Identity".
For more information about the cache, see Chapter 87, "Understanding the Cache".
To specify the cache identity map, use this procedure:
Select the project object in the Navigator.
Select the Defaults tab in the Editor. The Defaults tab appears.
Figure 19-10 Defaults Tab, Cache Identity Map Options
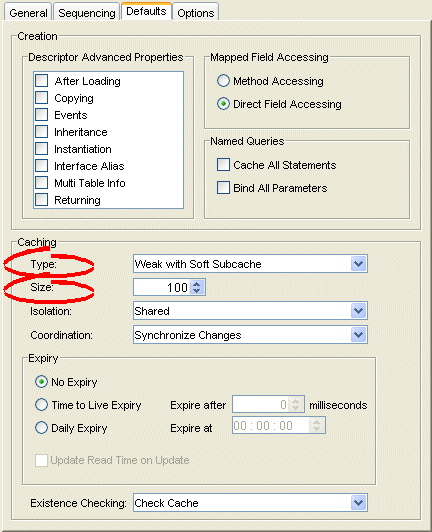
Use this table to enter data in each of the following fields to specify the caching options:
| Field | Description |
|---|---|
| Type | Use the Type list to choose the identity map:
For more information, see "Cache Type and Object Identity". Changing the project's default identity map does not affect descriptors that already exist in the project. |
| Size | Specify the size of the cache:
|
If you plan to use isolated sessions (see "Cache Isolation"), you must configure descriptors as isolated for any object that you want confined to an isolated session cache.
Configuring a descriptor to be isolated means that TopLink will not store the object in the shared session cache and the object will not be shared across client sessions. This means that each client will have their own object read directly from the database. Objects in an isolated client session cache can reference objects in their parent server session's shared session cache, but no objects in the shared session cache can reference objects in an isolated client session cache. Isolation is required when using Oracle Database Virtual Private Database (VPD) support or database user-based read security. Isolation can also be used if caching is not desired across client sessions.
Table 19-12 summarizes which projects support cache isolation configuration.
Table 19-13 Project Support for Cache Isolation Configuration
| Descriptor | Using TopLink Workbench |
Using Java |
|---|---|---|
|
Relational Projects |
|
|
|
EIS Projects |
|
|
|
XML Projects |
 |
 |
The cache isolation options you configure at the project level apply globally to all descriptors. Use this section to define global options for a TopLink project.
You can override the project-level configuration by defining cache isolation options at the descriptor level. For information, see "Configuring Cache Isolation at the Descriptor Level".
|
Note: When using TopLink Workbench, changing the project's default cache isolation option does not affect descriptors that already exist in the project; only newly added descriptors ar affected. |
To specify the cache isolation options, use this procedure:
Select the project object in the Navigator.
Select the Defaults tab in the Editor. The Defaults tab appears.
Figure 19-11 Defaults Tab, Cache Isolation Options
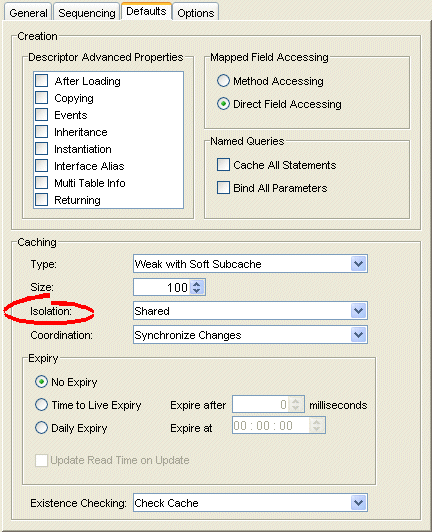
Use the Isolation list to choose one of the following:
Isolated–if you want all objects confined to an isolated client session cache. For more information, see "Cache Isolation".
Shared–if you want all objects visible in the shared session cache (default).
If you plan to use a coordinated cache (see "Understanding Cache Coordination"), you can configure how and under what conditions a coordinated cache propagates changes.
Table 19-12 summarizes which projects support cache coordination change propagation configuration.
Table 19-14 Project Support for Cache Coordination Change Propagation Configuration
| Descriptor | Using TopLink Workbench |
Using Java |
|---|---|---|
|
Relational Projects |
|
|
|
EIS Projects |
|
|
|
XML Projects |
 |
 |
The cache coordination change propagation options you configure at the project level apply globally to all descriptors. Use this section to define global options for a TopLink project.
You can override the project-level configuration by defining cache coordination change propagation options at the descriptor level. For information, see "Configuring Cache Coordination Change Propagation at the Descriptor Level".
To complete your coordinated cache configuration, see Chapter 88, "Configuring a Coordinated Cache".
|
Note: When using TopLink Workbench, changing the project's default cache coordination change propagation option does not affect descriptors that already exist in the project; only newly added descriptors ar affected. |
To specify the coordinated cache change propagation options, use this procedure:
Select the project object in the Navigator.
Select the Defaults tab in the Editor. The Defaults tab appears.
Figure 19-12 Defaults Tab, Coordination Options
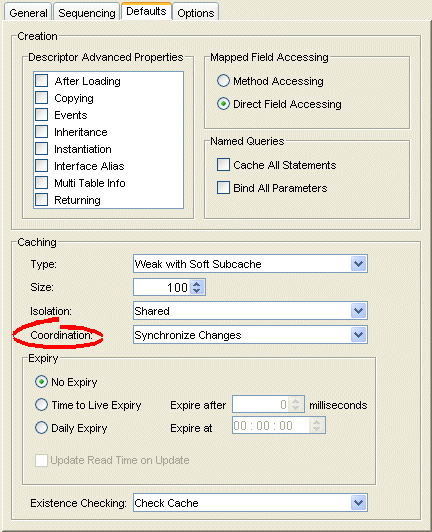
Use the following information to enter data in the Coordination field:
| Coordination Option | Description | When to Use |
|---|---|---|
| None | For both existing and new instances, do not propagate a change notification. | Infrequently read or changed objects. |
| Synchronize Changes | For an existing instance, propagate a change notification that contains each changed attribute.
For a new instance, propagate an object creation (along with all the new instance's attributes) only if the new instance is related to other existing objects that are also configured with this change propagation option. |
Frequently read or changed objects that contain few attributes or in cases where only a few attributes are frequently changed.
Objects that have many or complex relationships. |
| Synchronize Changes and New Objects | For an existing instance, propagate a change notification that contains each changed attribute.
For a new instance, propagate an object creation (along with all the new instance's attributes). |
Frequently read or changed objects that contain few attributes or in cases where only a few attributes are frequently changed.
Objects that have few or simple relationships. |
| Invalidate Changed Objects | For an existing instance, propagate an object invalidation that marks the object as invalid in all other sessions. This tells other sessions that they must update their cache from the data source the next time this object is read.
For a new instance, no change notification is propagated. |
Frequently read or changed objects that contain many attributes in cases where many of the attributes are frequently changed. |
By default, objects remain in the cache until they are explicitly deleted (see "Deleting Objects") or garbage-collected when using a weak identity map (see "Configuring Cache Type and Size at the Project Level"). Alternatively, you can configure an object with a CacheInvalidationPolicy that lets you specify, either automatically or manually, that an object is invalid: when any query attempts to read an invalid object, TopLink will go to the data source for the most up-to-date version of that object and update the cache with this information.
Using cache invalidation ensures that your application does not use stale data. It provides a better performing alternative to refreshing (see "Configuring Cache Refreshing").
Table 19-15 summarizes which projects support cache invalidation configuration.
Table 19-15 Project Support for Cache Invalidation Configuration
| Descriptor | Using TopLink Workbench |
Using Java |
|---|---|---|
|
Relational Projects |
|
|
|
EIS Projects |
|
|
|
XML Projects |
 |
 |
The cache invalidation options you configure at the project level apply globally to all descriptors. Use this section to define global cache invalidation options for a TopLink project.
You can override the project-level cache invalidation configuration by defining cache invalidation at the descriptor (see "Configuring Cache Expiration at the Descriptor Level") or query level (see "Configuring Cache Expiration at the Query Level").
You can customize how TopLink communicates the fact that an object has been declared invalid to improve efficiency if you are using a coordinated cache. For more information, see "Configuring Cache Coordination Change Propagation at the Descriptor Level".
|
Note: When using TopLink Workbench, changing the project's default cache invalidation does not affect descriptors that already exist in the project; only newly added descriptors are affected. |
For more information, see "Cache Invalidation".
To specify the cache invalidation options for the project, use this procedure:
Select the project object in the Navigator.
Select the Defaults tab in the Editor. The Defaults tab appears.
Figure 19-13 Defaults Tab, Cache Expiry Options
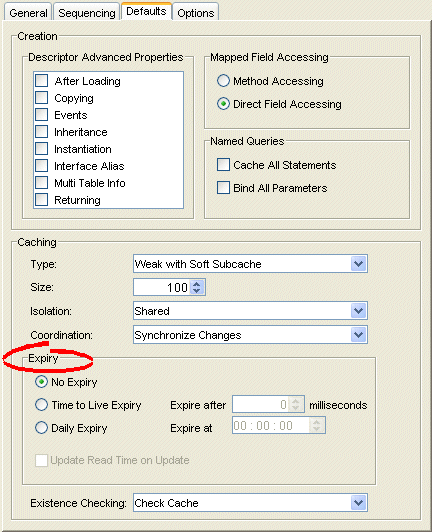
Use this table to enter data in the following fields on this tab:
| Field | Description |
|---|---|
| No Expiry | Specify that objects in the cache do not expire. |
| Time to Live Expiry | Specify that objects in the cache will expire after a specified amount of time. Use the Expire After field to indicate the time (in milliseconds) after which the objects will expire. |
| Daily Expiry | Specify that objects in the cache will expire at a specific time each day. Use the Expire At field to indicate the exact time to the second (using a 24-hour clock) at which the objects will expire. |
| Update Read Time on Update | Specify if the expiry time should be reset after updating an object. |
You can define a free-form textual comment for each project. You can use these comments however you whish: for example, to record important project implementation details such as the purpose or importance of a project.
Comments are stored in the TopLink Workbench project, in the TopLink deployment XML file. There is no Java API for this feature.
Table 19-16 summarizes which projects support this option.
Table 19-16 Project Support for Project Comments
| Project Type | Using TopLink Workbench |
Using Java |
|---|---|---|
|
Relational Projects |
|
 |
|
EIS Projects |
|
 |
|
XML Projects |
|
 |
To specify a comment for the project, use this procedure:
Select the project object in the Navigator.
Select the General tab in the Editor. The General tab appears.
Figure 19-14 General Tab, Comments Options
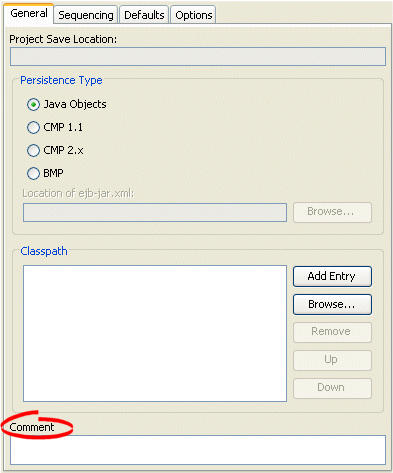
Enter descriptive text information in the Comment field.