| Oracle® Distributed Document Capture/Oracle® Document Capture Administrator's Guide Release 10gR3 E13871-01 |
|
 Previous |
 Next |
| Oracle® Distributed Document Capture/Oracle® Document Capture Administrator's Guide Release 10gR3 E13871-01 |
|
 Previous |
 Next |
This chapter contains information about the user interface for Oracle Document Capture servers. The following main topics are described in this chapter:
Commit Server includes the following screens and dialog boxes:
The Commit Server screen is displayed when you start Commit Server. Use this screen to create batch jobs, schedule when jobs are run, and view job processing statistics and errors.
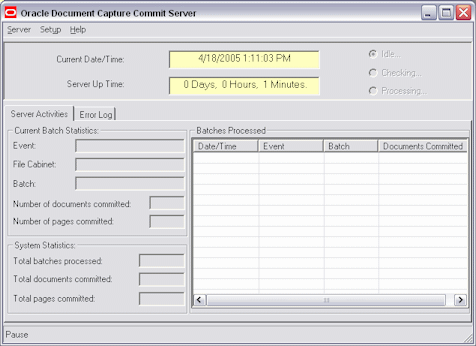
To display this screen, choose Oracle Document Capture, then Commit Server from the Start menu.
|
Note: If there are jobs scheduled, Commit Server starts in an active state. However, Commit Server does not begin processing jobs for one minute, which gives you a chance to deactivate the server if you do not want it to process any scheduled jobs. |
During processing, a Cancel button displays that allows you to stop processing. When canceled, the server completes processing the current batch and then pauses. After activating the server, you will need a scheduled event to resume processing the batch job on which you paused.
The Commit Server screen contains the following menus:
The Commit Server screen contains the following menus:
| Menu | Options |
|---|---|
| Server | Activate: Starts the server, if paused. Selecting Activate changes the command to Pause. Choose Pause to deactivate the server to create and schedule batch jobs or change settings.
Schedule: Create batch job processing events. See "Scheduler". |
| Setup | General Settings: View or change Commit Server settings. See "Commit Server Settings".
Batch Jobs: Add or edit batch jobs that identify batches to be processed by Commit Server. See "Batch Jobs, General Tab". Batch Setup: Specify where Capture batches are stored and committed, and configure and initialize the Capture database. See "Capture Batch Setup Screen". |
The Commit Server displays status in the following fields:
| Element | Description |
|---|---|
| Current Date/Time | Displays the date and time using current system settings. |
| Server Up Time | Displays the current session length in days, hours, and minutes. |
| Status | Displays the server's status, where:
|
The Server Activities tab displays information about jobs that are currently processing or have been processed since the server began running. This information is deleted when a session ends (when Commit Server is shut down). For each file cabinet being processed, Commit Server displays the number of batches processed, documents created from those batches, and images in those documents. Commit Server updates this list after each batch in a job finishes processing.
Processing details are displayed in the Current Batch Statistics and System Statistics areas. Information about batches processed is displayed in the Batches Processed table.
The Error Log tab displays information about any errors that occurred during processing. Information in this screen is periodically removed from the display to conserve memory. If an error occurred, the date and time at which it occurred and a description of the error are shown.
A symbol is displayed next to messages. Informational messages display an i symbol, caution messages display an exclamation point symbol and error messages display a stop sign symbol.
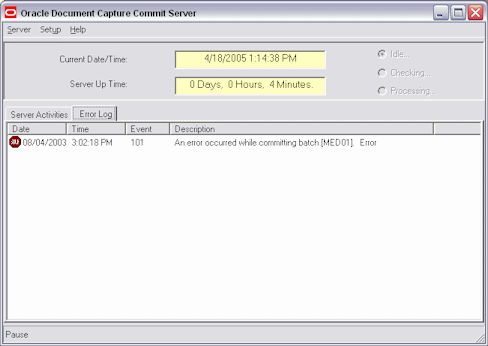
You select error-related settings in the Commit Server Settings dialog box, as described in "Commit Server Settings".
Use the Scheduler screen to schedule or remove batch job processing events.
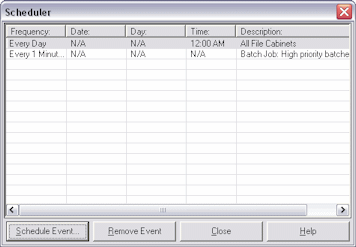
To display this screen, pause the server if needed (choose Pause from the Server menu) and select Schedule from the Server menu of Commit Server.
| Element | Description |
|---|---|
| Events | Lists scheduled events, including their frequency, date, day, time and description. |
| Schedule Event | Click to schedule a new event. |
| Remove Event | Click to delete a selected event |
Use the Schedule New Event screen to create an event.
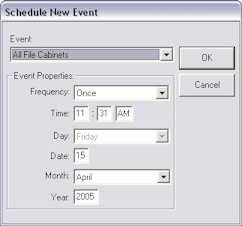
To display this screen, pause the server if needed (choose Pause from the Server menu), select Schedule from the Server menu of Commit Server and click Schedule Event.
| Element | Description |
|---|---|
| Event | Select the batch job to be processed. This field lists all file cabinets, each file cabinet separately and batch jobs that have been created in Commit Server. It also contains an option called Delete Old Log Files, which you use to remove old log files that are no longer needed, and an option called Shut Down, which you can use to automatically shut down Commit Server at a designated time. |
| Frequency | Select how often you want the job processed. You can schedule the job to run once, every 1, 5, 15 or 30 seconds or minutes, every hour, every day, or every week. |
| Time, Day, Date, Month and Year | If you selected Once in the Frequency field, specify when in these fields. Time fields. If you select Every Week, specify a day and time. |
Use the following tabs on this screen to view or change Commit Server settings.
To display this screen, choose General Settings from the Setup menu of Commit Server (if needed, choose Pause from the Server menu first).
Commit Server Settings tabs include:
Use the Login tab to enter unattended login information so that login is not required when Commit Server is started. For example, you might include Commit Server in a Windows reboot configuration; if the server goes down, it will reboot according to this configuration, and Commit Server will start up without requiring login information.
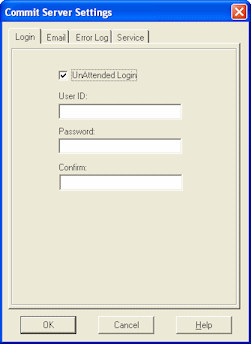
The Commit Server Settings Login tab contains the following fields:
| Element | Description |
|---|---|
| UnAttended Login | Select this field, then enter your user ID in the User ID field and enter your password in the Password and Confirm fields. |
|
Note: If you selected Windows domain security as your security model, use the format \\domain\userID in the User ID field (for example, \\domain2\jdoe) to specify the domain along with the user name. For unattended login, the user must be added as an individual Capture user. See "About Users in Capture". |
Use these options to specify who should receive an email if Commit Server encounters an error while performing commit processing. The subject of the error email is Notification of Commit Server Error; it identifies the batch being committed when the error occurred and describes the error.
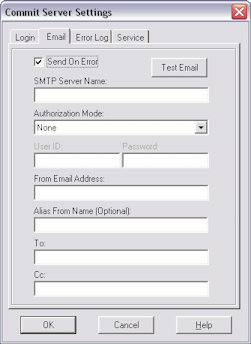
The Commit Server Settings Email tab contains the following fields:
| Element | Description |
|---|---|
| Send On Error | Select this field if you want an email sent. |
| SMTP Server Name | Specify the name of the server you are using to send emails. |
| Authorization Mode | Select a mode for which to authorize email sending. You can choose: None, AUTH LOGIN or CRAM-MD5. |
| User ID and Password | Enter a username and password for email authorization. If you selected None in the Authorization Mode field, you do not need to enter a user ID and password. |
| From Email Address | Enter the email address from which the error emails will be sent. |
| Alias From Name | Enter an alternate name from whom the emails will be sent. |
| To, Cc | Enter the email addresses of people to send the email to. Separate multiple email addresses in either field with a semi-colon (;). |
| Test Email | Click this button to send a test email. Commit Server verifies the SMTP settings you specified, and sends a test email to all users specified in the To and Cc fields. |
Use the options to specify how you want error messages saved. These errors are also displayed on the Error Log tab.
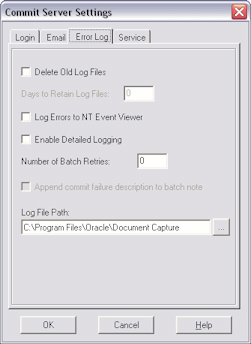
The Commit Server Settings Error Log tab contains the following fields:
| Element | Description |
|---|---|
| Delete Old Log Files | Select this field to delete log files that exceed the number of days specified in the Days to Retain Log Files field. For example, type 14 to retain log files for two weeks. Note that in addition to selecting this field, you must also schedule this event in order to delete old log files; see "Scheduler". |
| Log Errors to NT Event Viewer | Select this field to write logs to the Windows Event Viewer. (Refer to your Windows documentation for more information.) |
| Enable Detailed Logging | Select this field to activate logging in addition to standard error logging. When checked, the Commit Server also logs the following:
|
| Number of Batch Retries | Enter the number of times you want Commit Server to retry committing a batch. For example, if you enter 1, Commit Server will attempt to commit the batch one additional time if it fails on the first try. When set to 0 (the default), Commit Server infinitely retries committing. Note that if the last retry fails, Commit Server generates a critical error and sends an email, if specified.
Note that restarting Commit Server restarts the retry count. |
| Append commit failure description to batch note | Select this field to add a description of the commit failure to a batch note on the last retry. The note appends rather than overwrites any current batch note. This checkbox is available only when the Number of Batch Retries field contains a number other than 0. |
| Log File Path | Specify a folder in which to store log files. The name of the log file will be CSmm-dd-yyyy.LOG, where mm-dd-yyyy reflects the date on which the log was last updated. |
If running Commit Server as a service, use this tab to specify how long to wait for the service to shut down normally. For more information, see "Guidelines For Running Servers as Services".
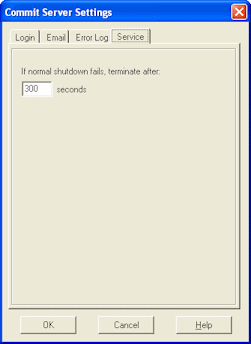
The Commit Server Settings Service tab contains the following fields:
| Element | Description |
|---|---|
| If normal shutdown fails, terminate after __ seconds | Specify the number of seconds (30-900) to wait for the service to shut down normally. (The default is 300 seconds.) If the server application does not shut down in this time, the server will be terminated. This could happen in instances where a large batch is still being processed or the application is not responding. |
Use this tab to apply general settings to the selected Commit Server batch job.
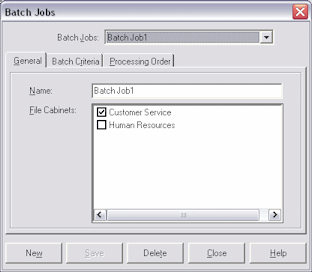
To display this tab, choose Batch Jobs from the Setup menu (if needed, choose Pause from the Server menu to pause the server).
| Element | Description |
|---|---|
| Name | Enter a name for the batch job. To change it, type a new name of up to 50 alphanumeric characters; you can include spaces. |
| File Cabinets | Select each file cabinet you want included in the job. You can use options on the Batch Criteria tab to specify particular batches from selected file cabinets you want processed. |
Use this tab to specify the batches in the selected file cabinet(s) you want processed.
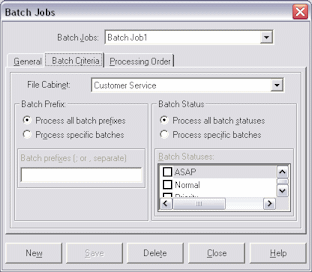
To display this tab, choose Batch Jobs from the Setup menu (if needed, choose Pause from the Server menu to pause the server) and click the Batch Criteria tab.
| Element | Description |
|---|---|
| File Cabinet | Lists the file cabinet(s) you selected for the job on the General tab. Select the file cabinet for which you want to specify batch criteria. You can specify different batch criteria for each file cabinet if multiple ones are selected. |
| Batch Prefix | By default, Commit Server processes all batches in the selected file cabinet. To process certain batches only based on their prefix, click the Process specific batches radio button and enter the prefix(es) in the Batch prefixes field, separating them with a semi-colon. |
| Batch Status | To process certain batches only based on their status, click the Process specific batches field and select statuses from the Batch Statuses field. |
Use this tab to specify the order in which you want selected batches committed. For example, you might want all batches committed by priority, in descending order from highest to lowest.

To display this tab, choose Batch Jobs from the Setup menu (if needed, choose Pause from the Server menu to pause the server) and click the Processing Order tab.
| Element | Description |
|---|---|
| Sort batches prior to committing | Select this field to sort batches according to the criteria specified below. |
| Batches sort criteria | Select the order in which you want batches committed (by Batch Name, Scan Date or Priority) in the Order by field. Then select Ascending or Descending to indicate the order in which you want them sorted. These fields are disabled if the Sort batches prior to committing field is deselected. |
The following screens are used in Recognition Server.
The Recognition Server screen is displayed when you start Recognition Server. Use this screen to create batch jobs, schedule when jobs are run and view job processing statistics and errors.
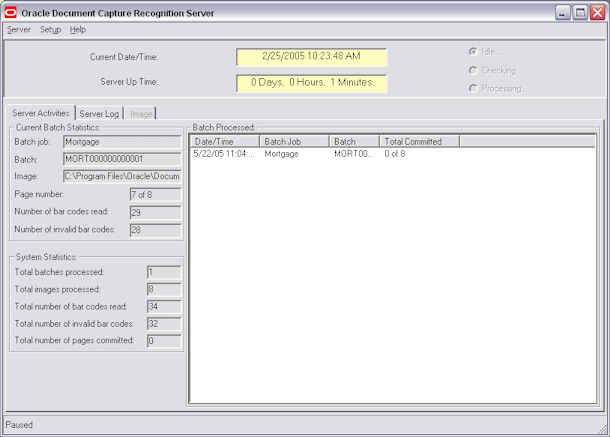
To display this screen, choose Oracle Document Capture, then Recognition Server from the Start menu.
|
Note: If there are jobs scheduled, Recognition Server starts in an active state. However, Recognition Server does not begin processing jobs for one minute, which gives you a chance to deactivate the server if you do not want it to process any scheduled jobs.During processing, a Cancel button displays that allows you to stop processing. When canceled, the server completes processing the current batch and then pauses. After activating the server, you will need a scheduled event to resume processing the batch job on which you paused. |
The Recognition Server screen contains the following items:
Recognition Server contains these menus:
| Element | Description |
|---|---|
| Server Menu |
|
| Setup Menu |
|
Recognition Server displays status in the following fields:
| Element | Description |
|---|---|
| Current Date/Time | Displays the date and time using current system settings. |
| Server Up Time | Displays the current session length in days, hours, and minutes.
|
The Server Activities tab displays information about jobs that are currently processing or have been processed since the server began running. This information is deleted when a session ends (when Recognition Server is shut down). For each file cabinet being processed, Recognition Server displays the number of batches processed, documents created from those batches, and images in those documents. Recognition Server updates this list after each batch in a job finishes processing.
Processing details are displayed in the Current Batch Statistics and System Statistics areas. Information about batches processed is displayed in the Batches Processed table.
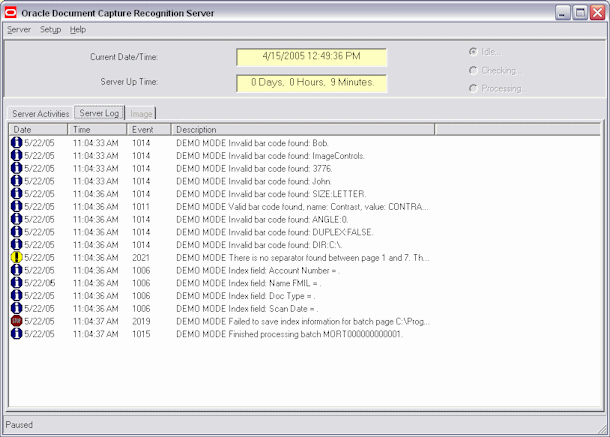
This tab displays processing messages generated since the server began running. These messages are also written to a log file.
As each image is processed by Recognition Server, this tab displays the image and highlights any bar codes found.
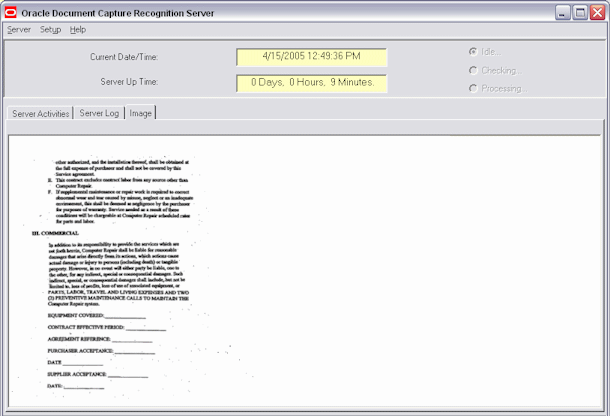
Use the Scheduler dialog box to schedule or remove batch job processing events.

To display this screen, pause the server if needed (choose Pause from the Server menu) and select Schedule from the Server menu of Recognition Server.
| Element | Description |
|---|---|
| Events | Lists scheduled events, including their frequency, date, day, time and description. |
| Schedule Event | Click to schedule a new event. |
| Remove Event | Click to delete a selected event. |
Use the Schedule New Event dialog box to create an event.

To display this screen, pause the server if needed (choose Pause from the Server menu), select Schedule from the Server menu of Recognition Server and click Schedule Event.
| Element | Description |
|---|---|
| Event | Select the batch job to be processed. This field lists all file cabinets, each file cabinet separately and batch jobs that have been created in Recognition Server. It also contains an option called Delete Old Log Files, which you use to remove old log files that are no longer needed, and an option called Shut Down, which you can use to shut down Recognition Server unattended. |
| Frequency | Select how often you want the job processed. You can schedule the job to run once, every 1, 5, 15 or 30 seconds or minutes, every hour, every day, or every week. |
| Time, Day, Date, Month and Year | If you selected Once in the Frequency field, specify when in these fields. Time fields. If you select Every Week, specify a day and time. |
Use this screen to generate a request, activate, or remove a Recognition Server license.
|
Note: You may use these Recognition Server component for an evaluation period of up to 30 days under the terms of a valid license agreement, after which you must activate its license. |
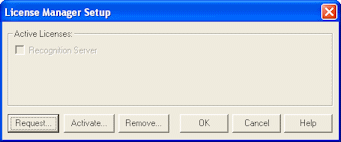
To display this screen, choose License Manager Setup from the Setup menu of Recognition Server.
| Element | Description |
|---|---|
| Recognition Server | This display only field is selected if a license is active and deselected if no license is found. |
| Request | Initiate a request for a Recognition Server license for the workstation. |
| Activate | Apply the new Recognition Server license after receiving a response key from Oracle. |
| Remove | Remove the Recognition Server license from the current workstation. You might remove the license, for example, in order to use it on another workstation. |
Use the following tabs on this dialog box to view or change Recognition Server settings.
To display this dialog box, choose General Settings from the Setup menu of Recognition Server (if needed, choose Pause from the Server menu first).
Recognition Server Settings tabs include:
Use the Login tab to enter a user name and password so logging in is not required when Recognition Server is started. For example, you might include Recognition Server in a Windows reboot configuration; if the server goes down, it will reboot according to this configuration, and Recognition Server will start up without requiring login information.
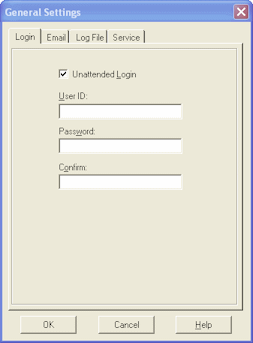
The Login tab contains the following elements:
| Element | Description |
|---|---|
| UnAttended Login | Select this field, then enter your user ID in the User ID field and enter your password in the Password and Confirm fields. |
|
Note: If you selected Windows domain security as your security model, use the format \\domain\userID in the User ID field (for example, \\domain2\jdoe) to specify the domain along with the user name. For unattended login, the user must be added as an individual Capture user. See "About Users in Capture". |
Use these options to specify who should receive an email if Recognition Server encounters an error during processing. The subject of the error email is Notification of Recognition Server Error; it identifies the batch being processed when the error occurred and describes the error.
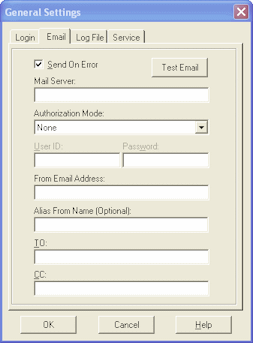
The Email tab contains the following elements:
| Element | Description |
|---|---|
| Send On Error | Select this field if you want an email sent. |
| SMTP Server Name | Specify the name of the server you are using to send emails. |
| Authorization Mode | Select a mode for which to authorize email sending. You can choose: None, AUTH LOGIN or CRAM-MD5. |
| User ID and Password | Enter a username and password for email authorization. If you selected None in the Authorization Mode field, you do not need to enter a user ID and password. |
| From Email Address | Enter the email address from which the error emails will be sent. |
| Alias From Name | Enter an alternate name from whom the emails will be sent. |
| To, Cc | Enter the email addresses of people to send the email to. Separate multiple email addresses in either field with a semi-colon (;). |
| Test Email | Click this button to send a test email. Recognition Server verifies the SMTP settings you specified, and sends a test email to all users specified in the To and Cc fields. |
Use these options to specify how you want log messages saved. These log messages are also displayed on the Server Log tab.
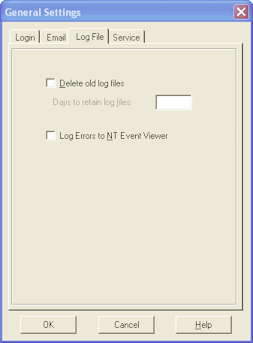
| Element | Description |
|---|---|
| Allow Scheduled Deletion of Log Files | Select this field to delete log files that exceed the number of days specified in the Days to Retain Log Files field. For example, type 14 to retain log files for two weeks. Note that in addition to selecting this field, you must also schedule this event in order to delete old log files; see "Scheduler". |
| Log Errors to NT Event Viewer | Select this field to write logs to the Windows Event Viewer. (Refer to your Windows documentation for more information.) |
If running Recognition Server as a service, use this tab to specify how long to wait for the service to shut down normally. For more information, see "Guidelines For Running Servers as Services".
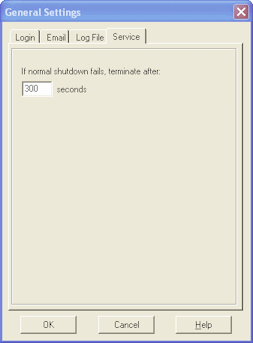
| Element | Description |
|---|---|
| If normal shutdown fails, terminate after __ seconds | Specify the number of seconds (30-900) to wait for the service to shut down normally. (The default is 300 seconds.) If the server application does not shut down in this time, the server will be terminated. This could happen in instances where a large batch is still being processed or the application is not responding. |
Use this tab to apply general settings to the selected Recognition Server batch job.
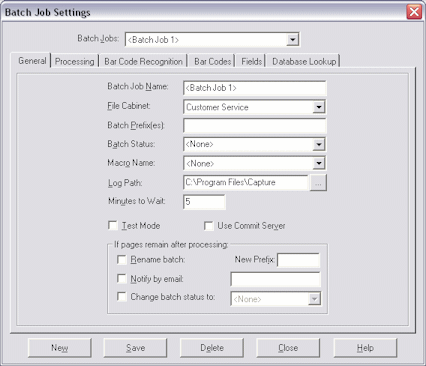
| Element | Description |
|---|---|
| Batch Job Name | Enter a name for the selected batch job. You can enter up to 50 alphanumeric characters, including spaces. |
| File Cabinet | Select the file cabinet in which scanned batches are assigned. File cabinets and their fields are defined within Capture administration. |
| Batch Prefix(es) | Limits the batches Recognition Server will process to those with the prefix(es) you specify in this field. For example, type Mort in this field to process batches that begin with Mort only. A batch prefix may contain up to eight characters. Separate multiple prefixes with a semi-colon or comma. If you leave this field blank, the batch job will process all batches in the selected file cabinet. |
| Batch Status | Limits the batches Recognition Server will process to those with the batch status(es) you select in this field. For example, if you select a status of Rush, only batches with a Rush status will be processed. If <None> is selected, Recognition Server processes batches with any status. (This field lists available batch statuses, which are defined within Capture administration.) |
| Macro Name | Select a macro (VBA-compliant source code file) to apply to the processing. For example, you might use a macro to automatically increment a bar code value on each image; a macro could read the first bar code, keep track and increment by one on each image. |
| Log Path | Specify where to store the log files Recognition Server creates each day. Log files are named using their date, in the format RSMM-DD-YYYY.log (as in RS05-31-2008.log). |
| Minutes to Wait | Specify how long you want Recognition Server to wait, after detecting a newly scanned batch, before starting scheduled processing. As soon as batches are scanned, they are available to Recognition Server, and if scheduled for every minute, processing might begin before the scanning user has had a chance to review the batch and make changes. This field temporarily withholds the batch from Recognition Server until the specified number of minutes has elapsed. |
| Test Mode | Select this field to process without archiving images into your content management system. This option allows you to test Recognition Server settings and macros without having to re-scan batches. You can examine the log file to observe server activity. |
| Use Commit Server | Select this field to process the batches using Commit Server. If checked, Recognition Server marks each batch as ready to be committed by Commit Server after bar code recognition, instead of actually committing it. |
| Rename batch, New Prefix (if pages remain after processing) | Select the Rename batch field if you want Recognition Server to rename a batch if images remain after processing, using the prefix specified in the New Prefix field. For example, an image might remain if Recognition Server is unable to read its bar code. Entering a prefix such as ERR allows you to easily locate these images for manual indexing. |
| Notify by email (if pages remain after processing) | Select this field if you want Recognition Server to send an email if images remain after processing a batch (see above option). In the event that images remain, you will most likely want to notify an Index user rather than the administrator. In the adjacent text field, enter the email address of the person to notify; separate multiple email addresses with a semi-colon (;). The email is then sent to this email address instead of the address identified in the General Settings dialog box. |
| Change batch status to (if pages remain after processing) | Use this option to automatically change a batch status if pages remain after processing. For example, you might define a batch status called Error in Capture Administration and assign it to this field to mark batches containing errors. |
Use this tab to specify how Recognition Server processes the batch job's images. For example, specify how images in each batch were divided into documents and scanned, and how documents were separated (in batches with multiple documents).
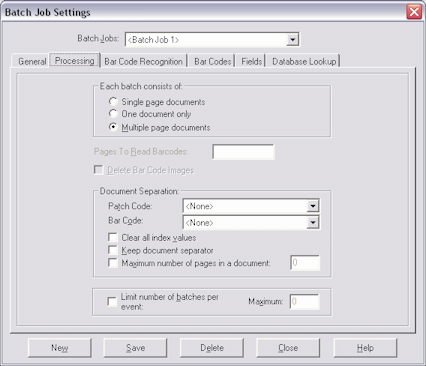
| Element | Description |
|---|---|
| Each batch consists of | From these options, specify how images were divided into documents in the job's batches. The method you select in this field affects which options are available elsewhere on the tab. Methods include:
|
| Pages to Read Bar Codes | Specify the page number containing the document's bar code. For example, type 1 to indicate that bar codes are placed on the first page. Type 0 if you want Recognition Server to perform bar code recognition on all pages. Note that this will increase processing time. (This option is available when the One document only option is selected.) |
| Delete Bar Code Images | Select this field to remove images containing bar codes after they are read. (This option is available when the One document only field is selected.) |
| Patch Code | Use this field to indicate that documents are separated using patch codes by selecting the patch code type used. Note that you must also enable patch code detection by selecting the Patch Code field on the Bar Code Recognition tab (see "Batch Job Settings, Bar Code Recognition Tab"). (This option is available when the Multiple page documents option is selected.)
Note: You can specify a patch code and a bar code separator, as an added safeguard against a separator being missed. |
| Bar Code | Use this field to indicate that documents are separated using a bar code by selecting the appropriate bar code definition from this field. You create bar code definitions on the Bar Codes tab (see "Batch Job Settings, Bar Codes Tab"). (This option is available when the Multiple page documents option is selected.) |
| Clear all index values | Select this field to clear all index values between documents. In general, it is recommended that you clear values, so residual values are not left and incorrectly assigned to the next document. However, if documents are related, you may want to retain index values between documents. (This option is available when the Multiple page documents is selected.) |
| Keep document separator | Select this field to include the document separator as the first page of the document. Otherwise, document separator pages are deleted after processing. |
| Maximum number of pages in a document | Use this field to limit the number of images permitted in a document, in case a document separator was not detected. If Recognition Server reaches this number, images between the last valid document and the next separator sheet detected remain in the batch for manual indexing. For example, if you know that documents in the job's batches do not exceed 25 pages, enter this number to ensure that multiple documents are not filed together if a document separator page is not detected. (This option is available when the Multiple page documents option is selected.) |
| Limit batches per event | Select this field to limit the number of batches Recognition Server will process for a scheduled event before checking for other scheduled events and beginning their processing. Specify a number in the Maximum field. |
| Maximum | Enter the maximum number of batches to process. For example, suppose you have two events: the first contains 1,000 batches, the second contains 100, and the first event starts processing first. You may not want to wait until the first event completes before processing the second. Typing 100 in the Maximum field would halt processing after 100 batches are complete and Recognition Server would proceed to the other event. (The first event would not resume processing until its next scheduled time.) |
Use this tab to specify which bar codes you want Recognition Server to recognize (if known) and how to read them. While accurate bar code recognition is most important, keep in mind that the more specific you can be about which bar codes are used, the faster Recognition Server can process batches in the job.
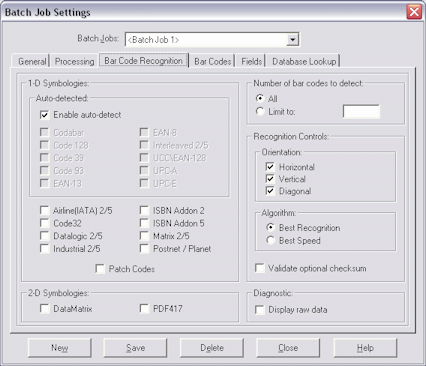
| Element | Description |
|---|---|
| 1-D and 2-D Symbologies | Select all bar code symbologies you want Recognition Server to search for.
|
| Enable auto-detect | If you do not know which bar code symbologies are used, select this field, and Recognition Server will check for the most common bar codes. It is recommended to explicitly set the bar code symbology to recognize. |
| Patch Codes | Select this field if you want Recognition Server to detect patch codes for document separation. Then specify the actual patch code type you want detected in the Patch Code field on the Processing tab (see "Batch Job Settings, Processing Tab"). |
| Number of bar codes to detect | By default, Recognition Server searches for as many bar codes as it can find on each image before going on to the next (All option). If you want Recognition Server to stop reading bar codes after finding a specified number, enter the number in the Limit to field. |
| Orientations | Specify the bar code orientations for which you want Recognition Server to search. Checking all three orientations (Horizontal, Vertical and Diagonal) is recommended. |
| Algorithm | Specify whether you want Recognition Server to focus on accuracy (Best Recognition) or speed (Best Speed) in reading bar codes. By default, Best Recognition is selected and recommended. |
| Validate optional checksum | Select this diagnostic option to enable checksum validation of bar codes. Checksum validation is optional in certain symbologies. It is recommended that you select this option if your bar code contains a check sum value. For example, if a Code 39 bar code does not contain a checksum, this setting prevents the bar code from being recognized. Also, if this option is not selected and a Code 39 bar code with a checksum is recognized, the checksum character will be included in the bar code data. |
| Display raw data | Select this diagnostic option to return any other characters within a bar code. Bar codes sometimes contain extra characters as part of their symbology. For example, the Code 39 symbology contains an asterisk at the beginning and end of its bar codes. |
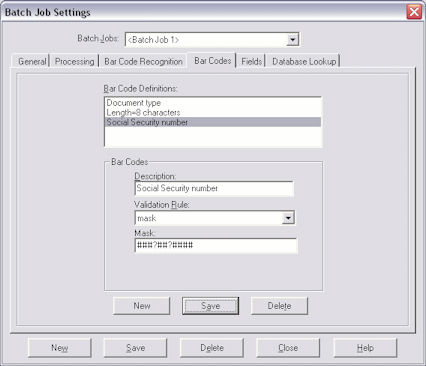
Use this tab to define the bar codes to be read in the selected job's batches. For example, specify the number of characters in the bar code, its input mask, or its possible values. You can add, edit and delete bar code definitions on this tab.
As Recognition Server recognizes bar codes, they are assigned to their respective bar code definition based on their data characteristics. If a recognized bar code cannot be assigned to a bar code definition, it will be logged as an invalid bar code. You define bar codes by specifying their validation rule (bar code length, mask or pick-list) and corresponding value.
| Element | Description |
|---|---|
| Validation Rule | Specify how Recognition Server should validate the bar code: by its length, using an Bar Code Definition Using an Input Mask, or from a pick-list created in Capture Administration. After you select a rule, additional value options are displayed. |
| Value | Specify how Recognition Server should validate the bar code: by its length, using an input mask, or from a pick-list created in Capture Administration. After you select a rule, additional value options are displayed.
|
To specify an input mask, select Mask in the Validation Rule field and enter a mask that describes the bar code value in the Mask field displayed. A recognized bar code will be assigned to this bar code definition if the value meets the requirements of the mask you specify. A mask may include the following characters listed in Table 9-1.
Table 9-1 Input Mask Characters
| Mask Characters | Matches | Explanation |
|---|---|---|
|
? |
Any single character |
Use to match any single character. |
|
* |
Zero or more characters |
Use to match zero, one, or more characters. |
|
# |
Any single digit (0-9) |
Use to match any single number. If a batch job contains documents with a Social Security number, the mask would be ###?##?####. |
|
[charlist] |
Any single character in charlist |
Use to match any single character from a group of one or more characters defined in charlist. Be sure to include the brackets ([]). To search for a specific barcode such as claim, the format would be [c][l][a][i][m]. Use a hyphen (-) to specify a range of characters. Character ranges must be specified in ascending order ([A-Z], not [Z-A]). For example, [A-Z] results in a match if a character in the A-Z range is found. |
|
[!charlist] |
Any single character not in charlist |
Functions the same as [charlist], except that with the exclamation point, a match results if any character except the characters specified in [charlist] is found. |
|
Note: To match special characters (such as brackets ([) (]), question mark (?), number sign (#), and asterisk (#)), enclose them in brackets. An exclamation point used outside the [char] brackets matches itself. |
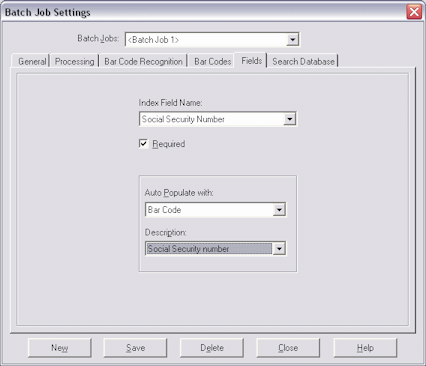
Use this tab to make one or more index fields required or to autopopulate an index field during processing.
| Element | Description |
|---|---|
| Index Field Name | Select an index field from those defined for the file cabinet selected for the batch job. |
| Required | Select this field to make the field required. If required fields are not populated during processing (for example, if a bar code cannot be read), affected images are not committed and remain in the batch, and a warning message is logged. |
| Auto Populate with | Select the value you want to assign to the selected index field. You can use the following:
|
Use this tab to set a bar code value to search a table in an external database and populate fields using values returned from the table. Use this tab to specify the database lookup profile and configure the search. Note that you create database lookup profiles in Capture Administration.
For example, a document's bar code might contain a customer transaction number. By searching using this bar code's value, you could search a database and populate all index fields (for example, customer name and customer number) from the database lookup table.
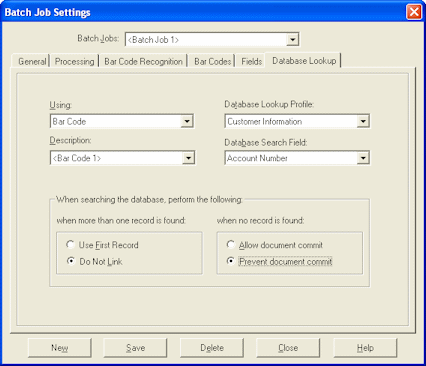
To use the database lookup feature, first create a database lookup profile in Capture Administration. See "About Database Lookups".
| Element | Description |
|---|---|
| Using | Specify the method by which you want to perform the search. Select Bar Code or by Batch Name. (The Batch Name option is used in special cases only.) |
| Description | Select the bar code you want to use to search. You set up bar code descriptions on the Bar Codes tab (see "Batch Job Settings, Bar Codes Tab"). |
| Database Lookup Profile | Select the database profile you created in Capture Administration. |
| Database Search Field | Select a search field from those defined in the database lookup profile. |
| When more than one record is found | Specify what happens if a database search matches more than one record in the specified database. Recognition Server can either return values for the first record it finds (Use First Record) or return no values (Do Not Link). |
| When no record is found | Specify what happens if Recognition Server finds no match in the specified database. You can either allow or prevent the affected document from being committed. |
Import Server includes the following screens and dialog boxes:
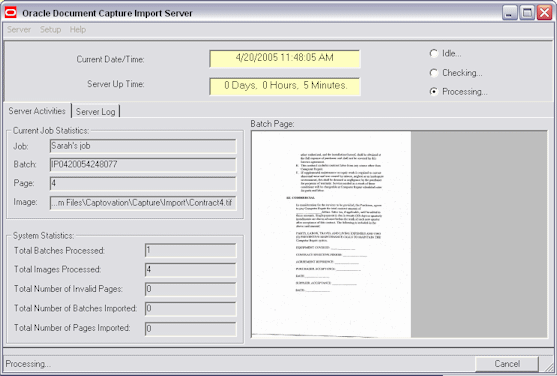
The Import Server screen is displayed when you start Import Server. Use this screen to create batch jobs, schedule when jobs are run, and view job processing statistics and errors.
To display this screen, choose Oracle Document Capture, then Import Server from the Start menu.
|
Note: If there are jobs scheduled, Import Server starts in an active state. However, Import Server does not begin processing jobs for one minute, which gives you a chance to deactivate the server if you do not want it to process any scheduled jobs. |
During processing, a Cancel button displays that allows you to stop processing. When canceled, the server completes processing the current batch and then pauses. After activating the server, you will need a scheduled event to resume processing the batch job on which you paused.
The Import Server screen contains the following items.
The Import Server contains these menus:
| Element | Description |
|---|---|
| Server Menu |
|
| Setup Menu |
|
The Import Server displays status in the following fields:
| Element | Description |
|---|---|
| Current Date/Time | Displays the date and time using current system settings. |
| Server Up Time | Displays the current session length in days, hours, and minutes. |
| Status | Displays the server's status, where:
|
The Server Activities tab displays information about jobs that are currently processing or have been processed since the server began running. This information is deleted when a session ends (when Import Server is shut down). For each file cabinet being processed, Import Server displays the number of batches processed, documents created from those batches, and images in those documents. Import Server updates this list after each batch in a job finishes processing.
Processing details are displayed in the Current Batch Statistics and System Statistics areas. Information about batches processed is displayed in the Batches Processed table.
This tab displays processing messages generated since the server began running. These messages are also written to the log file. Information in this screen is periodically removed from the display to conserve memory.
A symbol is displayed next to messages. Informational messages display an i symbol, caution messages display an exclamation point symbol and error messages display a stop sign symbol.
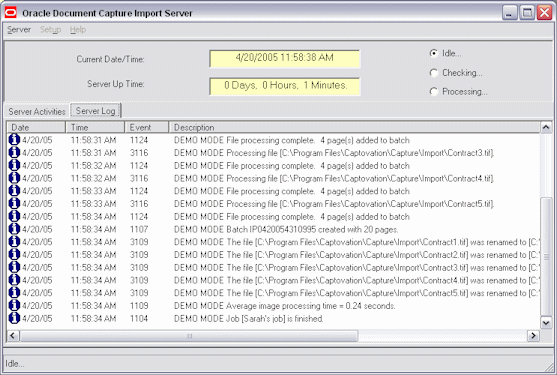
You select error-related settings in the Import Server Settings dialog box, as described in "Import Server General Settings".
Use the Scheduler dialog box to schedule or remove batch job processing events.
To display this screen, pause the server if needed (choose Pause from the Server menu) and select Schedule from the Server menu of Import Server.

The following elements are on the Scheduler dialog box:
| Element | Description |
|---|---|
| Events | Lists scheduled events, including their frequency, date, day, time and description. |
| Schedule Event | Click to schedule a new event. |
| Remove Event | Click to delete a selected event. |
Use the Schedule New Event dialog box to create an event.
To display this screen, pause the server if needed (choose Pause from the Server menu), select Schedule from the Server menu of Import Server and click Schedule Event.

| Element | Description |
|---|---|
| Event | Select the batch job to be processed. This field lists all file cabinets, each file cabinet separately and batch jobs that have been created in Import Server. It also contains an option called Delete Old Log Files, which you use to remove old log files that are no longer needed, and an option called Shut Down, which you can use to shut down Import Server unattended. |
| Frequency | Select how often you want the job processed. You can schedule the job to run once, every 1, 5, 15 or 30 seconds or minutes, every hour, every day, or every week. |
| Time, Day, Date, Month and Year | If you selected Once in the Frequency field, specify when in these fields. Time fields. If you select Every Week, specify a day and time. |
Use the following tabs on this dialog box to view or change Import Server settings.
To display this dialog box, choose General Settings from the Setup menu of Import Server (if needed, choose Pause from the Server menu first).
Import Server Settings tabs include:
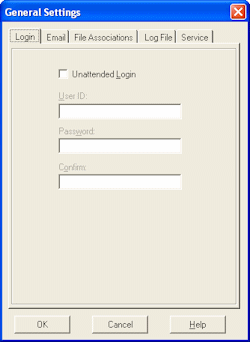
Use the Login tab to enter a user name and password so logging in is not required when Import Server is started. For example, you might include Import Server in a Windows reboot configuration; if the server goes down, it will reboot according to this configuration, and Import Server will start up without requiring login information.
| Element | Description |
|---|---|
| UnAttended Login | Select this field, then enter your user ID in the User ID field and enter your password in the Password and Confirm fields. |
|
Note: If you selected Windows domain security as your security model, use the format \\domain\userID in the User ID field (for example, \\domain2\jdoe) to specify the domain along with the user name. For unattended login, the user must be added as an individual Capture user. For more information, see "About Users in Capture". |
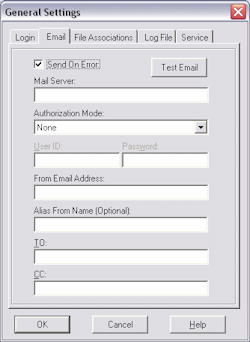
Use these options to specify who should receive an email if Import Server encounters an error while processing batch jobs. The subject of the error email is Import Server - Critical Error Occurred; it identifies the batch being processed when the error occurred and describes the error.
| Element | Description |
|---|---|
| Send On Error | Select this field if you want an email sent. |
| SMTP Server Name | Specify the name of the server you are using to send emails. |
| Authorization Mode | Select a mode for which to authorize email sending. You can choose: None, AUTH LOGIN or CRAM-MD5. |
| User ID and Password | Enter a username and password for email authorization. If you selected None in the Authorization Mode field, you do not need to enter a user ID and password. |
| From Email Address | Enter the email address from which the error emails will be sent. |
| Alias From Name | Enter an alternate name from whom the emails will be sent. |
| To, Cc | Enter the email addresses of people to send the email to. Separate multiple email addresses in either field with a semi-colon (;). |
| Test Email | Click this button to send a test email. Import Server verifies the SMTP settings you specified, and sends a test email to all users specified in the To and Cc fields. |
Use this tab to change the extensions of non-image files before they are printed by the Import Server and converted to images. This allows a different program to print a document file without having to change the Windows print associations for a particular document type.
For more information on when to use this option, see "How Import Server Converts Non-Images to Images".
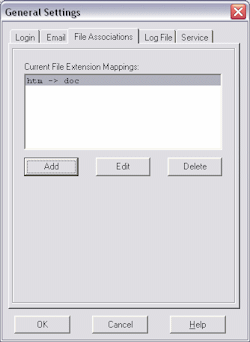
| Element | Description |
|---|---|
| Add | Click to add a file association. In the dialog box that displays, enter the old and new extensions. |
| Edit | Make changes to a selected file association. |
| Delete | Click to delete a selected file association. |
Use these options to specify how you want log messages saved. These log messages are also displayed on the Server Log tab.
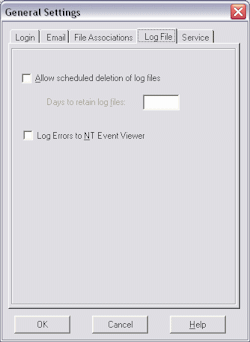
| Element | Description |
|---|---|
| Delete Old Log Files | Select this field to delete log files that exceed the number of days specified in the Days to Retain Log Files field. For example, type 14 to retain log files for two weeks. Note that in addition to selecting this field, you must also schedule this event in order to delete old log files; see "Scheduler". |
| Log Errors to NT Event Viewer | Select this field to write logs to the Windows Event Viewer. (Refer to your Windows documentation for more information.) |
If running Import Server as a service, use this tab to specify how long to wait for the service to shut down normally. For more information, see "Guidelines For Running Servers as Services".
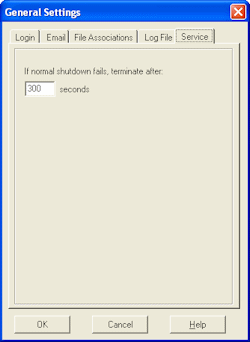
| Element | Description |
|---|---|
| If normal shutdown fails, terminate after __ seconds | Specify the number of seconds (30-900) to wait for the service to shut down normally. (The default is 300 seconds.) If the server application does not shut down in this time, the server will be terminated. This could happen in instances where a large batch is still being processed or the application is not responding. |
Use this screen to add or edit batch jobs containing settings that identify images to import and how to import them.
To display this screen, choose Oracle Document Capture, then Import Server from the Start menu.
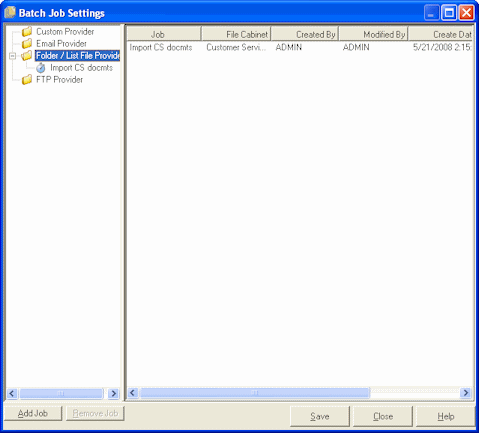
The side pane displays folders for installed providers. Depending on installed providers, some available import providers may not be displayed in the tree view. A plus (+) sign indicates jobs of the provider type.
The main pane lists details about a provider's jobs when a provider folder is selected. When a batch job is selected, this pane displays standard settings (on the General, Processing, and Image Output tabs) and provider-specific settings (on an additional tab). See information about the following tabs:
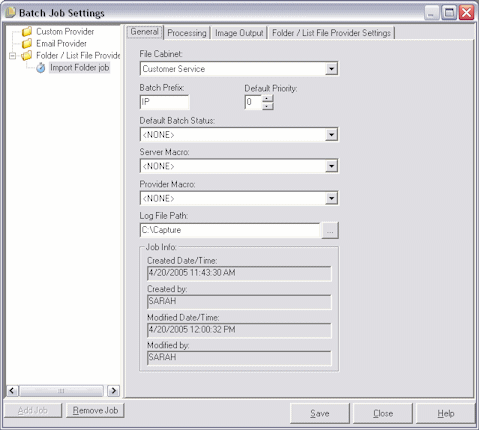
Use this tab to apply general settings to the selected batch job.
| Element | Description |
|---|---|
| File Cabinet | Select the Capture file cabinet to use when creating batches and importing images. File cabinets and their fields are defined in Capture Administration. |
| Batch Prefix | Specify a prefix to use at the beginning of batch names when creating batches. Batch prefixes are useful to help identify different types of batches within the same file cabinet. For example, type AP in this field to save imported images using an AP (for Accounts Payable) prefix. See "How Import Server Names Batches". A batch prefix may contain up to eight characters. To omit a prefix, leave this field blank. |
| Default Priority, Default Batch Status | Specify a priority and/or status to be assigned to batches when they are created. Users can change the status or priority you select. You define statuses in Capture Administration. |
| Server Macro | Select a macro (VBA-compliant source code file) to be applied to the Import Server processing. For more information about Import Server macros, see the Developer's Guide for Oracle Document Capture. |
| Provider Macro | Select a macro (VBA-compliant source code file) to be applied to the import provider (Email, Folder or List File or Custom Provider) processing. For more information about Import Server macros, see the Developer's Guide for Oracle Document Capture. |
| Log File Path | Specify where Import Server stores the log files it creates each day. Log files are named using IS as a file prefix followed by the current date (for example, IS01-01-2008.log). |
| Job Info | The Created Date/Time, Created By, Modified Date/Time and Modified By fields are display-only fields that indicate the administrator who created and last modified the batch job. |
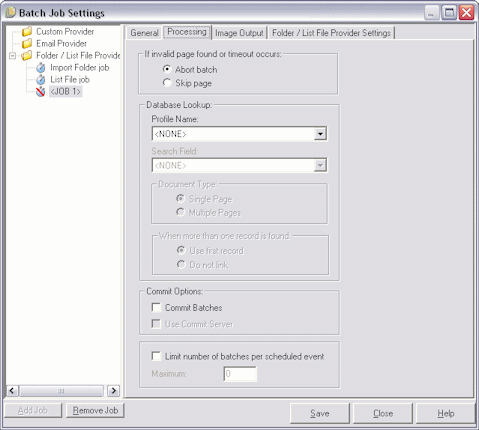
Use this tab to select processing settings for the selected batch job.
| Element | Description |
|---|---|
| If invalid page found or timeout occurs | Specify what Import Server should do if it encounters an image page that fails validation or a non-image file times out during conversion (cancel creating the batch or skip the invalid page).
If you choose Skip page and a processing error occurs, Import Server writes an *.ERR file that identifies the offending file and the reason for the import failure. This allows you to fix the problem, and if using a list file, rename the *.ERR file to *.LST for reprocessing. |
| Database Lookup | Use these options to configure a database lookup profile for use in this batch job. You create database lookup profiles in Capture Administration, as described in "About Database Lookups".
|
| Commit Options | Use these options to specify how batches imported into Import Server are committed.
|
| Limit number of batches per scheduled event | Select this field to limit the number of batches Import Server will process for a scheduled event before checking for other scheduled events and beginning their processing. Specify a number in the Maximum field. For example, suppose you have two events: the first contains 1,000 batches, the second contains 100, and the first event starts processing first. You may not want to wait until the first event completes before processing the second. |
| Maximum | Enter the maximum number of batches to process. Entering 100 in the Maximum field would cause the first event to halt processing after 100 batches are complete and Import Server would proceed to the second event. The first event would not resume processing until its next scheduled time. |
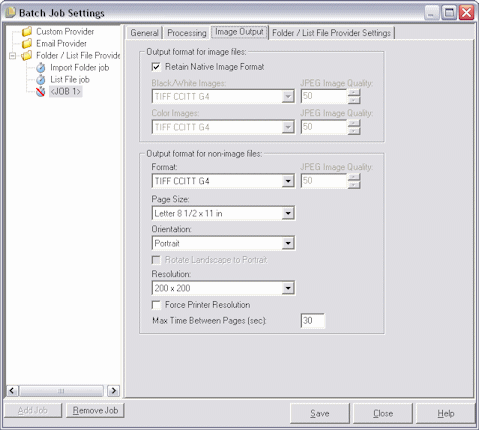
Use this tab to specify a different format for image and non-image files. Non-image files refer to files saved in PDF, text or DOC (Microsoft Word) format, for example. During importing, images can be converted to a standard format.
|
Note: You can also configure a file cabinet's commit profile to convert images to a different output format when they are committed. For more information, see "About Document Output Formats". |
Use the Output format for image files options to save image files you import in a standard format.
Use the Output format for non-image files options to convert non-image electronic files you import, such as PDF documents, HTML files, Microsoft Word documents, and text documents. Converting these documents into industry-accepted image formats is useful for long-term preservation of documents. For more information, see "How Import Server Converts Non-Images to Images".
The Image Output tab of the Batch Job Settings screen contains the following field elements:
| Element | Description |
|---|---|
| Retain Native Image Format | Select this field to keep images in the format in which they are imported. This is the default setting.
Note: Images will still be validated to ensure they work correctly within Capture. |
| Black/White Images, Color Images | To convert images, select a JPG or TIFF format. If you choose a JPG format, specify a value in the JPG Image Quality field from between 0 and 99, where 99 is the highest quality and 50 is the default setting. |
| Format | Select the output format into which you want non-image files converted. If you choose the JPG format, specify a value in the JPG Image Quality field from between 0 and 99, where 99 is the highest quality and 50 is the default setting. |
| Page Size | Select the page format you want used for converted non-image files. |
| Orientation | Select the page orientation you want used for converted non-image files: Portrait (default) or Landscape. If you select Landscape, select the Rotate Landscape to Portrait field to rotate landscape images to a portrait orientation. |
| Resolution | Select the resolution at which you want the converted images saved. Select the Force Printer Resolution field to use the resolution set in the printer's print references. |
| Max Time Between Pages (sec) | Use this setting to specify the number of seconds to allow image conversion processing before aborting and proceeding to the next file. The default setting is 30 seconds. |
Use the Email Provider Settings tab to specify settings for a selected Email Provider batch job. When the job is activated, the provider checks the specified email accounts for messages, looks for emails and attachments containing specified text or particular file extensions, processes the attachments, populates index fields with email data, and deletes and optionally forwards the messages.
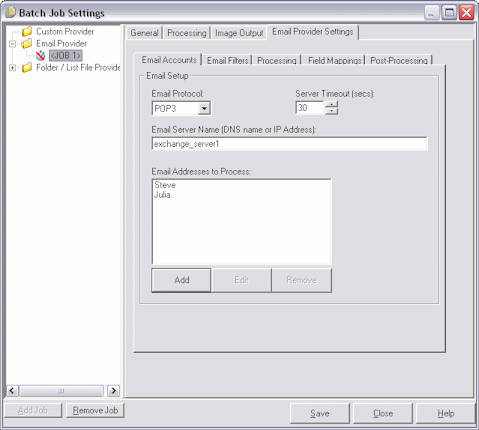
The Email Provider Settings tab contains these tabs:
Use this tab to configure the email accounts that Import Server will check for messages when the batch job is run.

| Element | Description |
|---|---|
| Email Protocol | Select the protocol to be used when receiving emails from specified accounts. You can choose POP3 or IMAP. |
| Server Timeout | Specify the number of seconds Import Server attempts to communicate with the email server before it times out. |
| Email Server Name | Specify the server name where the email accounts reside. You can enter the DNS name or the IP Address. |
| Email Addresses to Process | Lists the email addresses to be checked for messages. Click Add to add a new address or Edit to change a selected address. (Click Remove to delete a selected address, and it is removed.) In the Add/Edit Email Address dialog box that displays, enter the email account username (no @ symbol or company address are needed) and password, then click Verify to verify it; Import Server displays a message, informing you if it successfully connected to the specified server and found email messages in that user's mailbox. |
Use this tab to define the emails you want Import Server to search for and process.
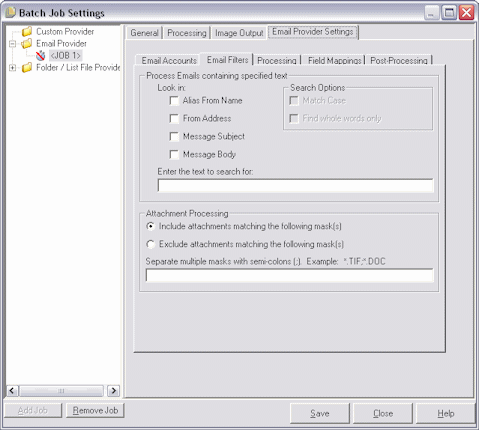
|
Note: The Email Provider searches a user's main Inbox only, ignoring any emails in subfolders. |
| Element | Description |
|---|---|
| Process emails containing specified text | Use this area to specify email text that Import Server must find in order to process an email. |
| Enter the text to search for | Enter characters in this field, then select where the text may appear by checking the appropriate Look in boxes. Note that Import Server will import the email if it finds the specified text in any of the places chosen. For example, if it is looking for Image import and the Message Subject and Message Body boxes are checked, Import Server imports the email if it finds the text in either the subject OR the body. |
| Match Case | Select this field if the case of each character in the specified text must match in order to import the email. If this field is selected, for example, Email and email would not match. |
| Find Whole Words Only | Select this field if only complete words can result in a match. |
| Attachment Processing | Use this section to specify one or more masks that must match in order for Import Server to either process or not process an attachment.
Enter the mask(s) in the text field, separating masks with a semi-colon. For example, you might select the Include radio button and enter *.TIF;*.JPG in the text field. This would instruct Import Server to import all email attachments with a TIF or JPG extension. Note: To process all attachments, set the mask to *.*. Or, you might select the Exclude radio button and enter *.DOC;*.EXE in the text field. This would instruct Import Server NOT to import email attachments with a DOC or EXE extension. |
Use this tab to specify how you want the email messages and their attachments processed. For example, specify the information you want to include in a batch note, and the priority number you want assigned to batches, based on their assigned email priority.
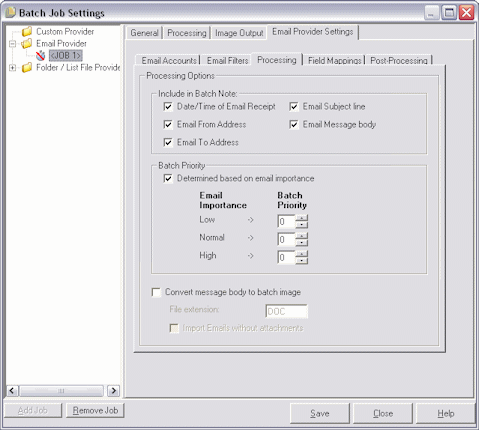
| Element | Description |
|---|---|
| Include in Batch Note | Select the fields corresponding to the email details you want included. Import Server will enter them into a note attached to the Capture batch it creates when importing the email. For example, you might want the email's subject and from address imported into each batch's note for reference purposes. |
| Batch Priority | Select this field to automatically assign a priority to each new batch based on its email's priority. Then specify a number from 0 to 10 to assign to low, normal and high priority emails. For example, if you enter 2, 5 and 8 in the Low, Normal and High fields respectively, Import Server would assign all low priority emails a batch priority of 2 in Capture, all normal priority emails a batch priority of 5, and all high priority emails a batch priority of 8. Note that emails not assigned a priority are considered normal priority. |
| Convert message body to batch image | Use these options to print email message text to images using the Capture virtual print driver. If this field is not checked (the default setting), Import Server imports emails with attachments only and ignores message body text.
|
Use this tab to assign key email values to Capture index fields. Email values are assigned to all images within the batch associated with the specified email.
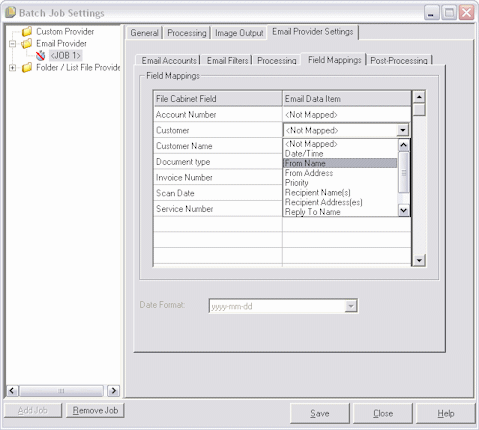
| Element | Description |
|---|---|
| File Cabinet Field | text |
| Email Data Item | Lists Capture index fields for the selected file cabinet.
|
| Date Format | If you map an index field to an email date field, choose the format in which you want the date stored in the field. |
Use this tab to specify what happens to email messages after importing. When deleting messages, do you also want them forwarded to another account? For example, you might delete messages that were successfully imported, but forward messages that failed import.
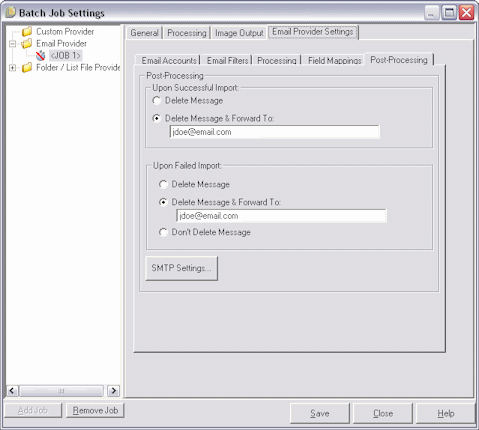
| Element | Description |
|---|---|
| Upon Successful Import | Specify whether you want emails deleted or deleted and forwarded to specified email address(es). Separate multiple email addresses with a semicolon (;). If you specify a forwarding address, click SMTP Settings and configure the email server and account to use when forwarding the message. |
| Upon Failed Import | Specify whether you want emails deleted, deleted and forwarded to specified email address(es), or not deleted. Separate multiple email addresses with a semicolon (;). If you specify a forwarding address, click SMTP Settings and configure the email server and account to use when forwarding the message. |
The SMTP Email Settings dialog box is accessed by clicking SMTP settings on the Post-Processing tab of the Email Provider Settings tab on the Batch Job Settings screen.
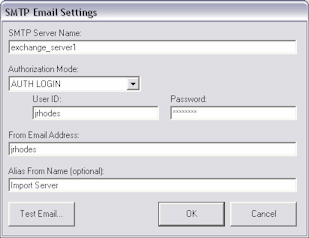
The SMTP Email Settings dialog box contains the following options:
| Element | Description |
|---|---|
| SMTP Server Name | Specify the name of the server you are using to forward emails. |
| Authorization Mode | Select a mode for which to authorize email forwarding. You can choose: None, AUTH LOGIN or CRAM-MD5. |
| User ID and Password | Enter a username and password for mail forwarding authorization. If you selected None in the Authorization Mode field, you do not need to enter a user ID and password. |
| From Email Address | Enter the email address from which the emails will be forwarded. |
| Alias From Name | Enter an alternate name from whom the emails will be forwarded. |
| Test Email | Click this button to send a test email. Import Server verifies the SMTP settings you specified, and sends the recipients you specify in the dialog box below an email with the results. |
Use this tab to apply folder or list file settings to the selected batch job.
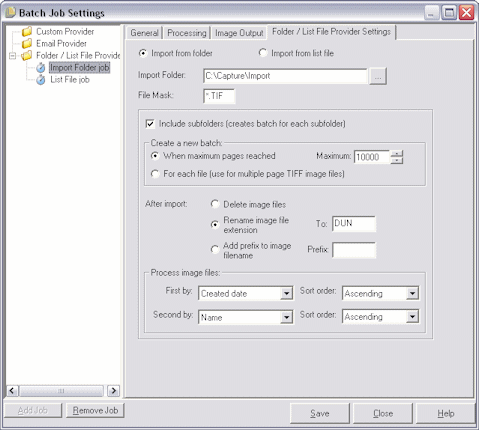
This tab's options change, depending on the selected import setting. See the following settings:
Select Import from folder to display the Folder options on the Folder/List File Provider Settings tab.
| Element | Description |
|---|---|
| Import Folder | Folder in which Import Server will look for files to import. You can use folders that are representative of mapped drive letters or UNC (Universal Naming Convention) paths. |
| File Mask | Controls which files Import Server imports from the specified import folder. For example, type *.TIF to import TIFF images or *.* to import all files. |
| Include subfolders | Select this field if you want Import Server to also search subfolders beneath the selected import folder; leave the field deselected to ignore subfolders.
Note: Import Server always creates a new batch for each subfolder processed. |
| Create a new batch | Specify how you want Import Server to complete processing one batch and start a new one. You can select When maximum pages reached and enter a number in the Maximum field. Or, if you are importing files containing multiple images (for example, multiple page TIFF files), choose For each file to create a batch for each file imported. |
| After import | Specify how you want image files changed, so they are not imported again if the batch job is run continuously. You can either delete the files, change their extension (for example, to DUN to indicate that they are done), or add a prefix to them (for example, IMPD). |
| Process image files | Specify the order in which you want files in the import folder imported. You can import them by None, Name, Extension, Created date, Modified date or Accessed date. You can specify a primary and secondary sort order, and choose Ascending or Descending. |
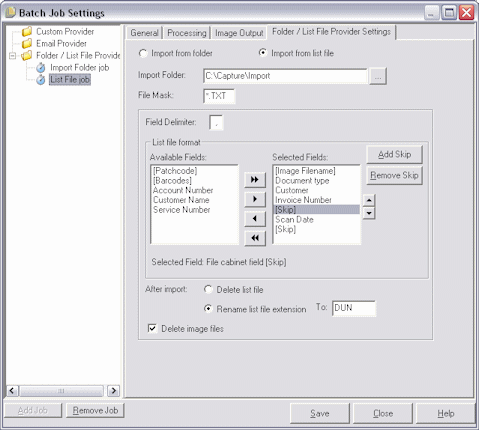
Select Import from list file to display the List File options on the Folder/List File Provider Settings tab.
A list file contains records of delimited data, including the names of files to be imported. A list file may also include index values to pass into a Capture batch or values to be matched against a database file.
| Element | Description |
|---|---|
| Import Folder | Folder in which Import Server will look for list files to process. |
| File Mask | Controls the type of list files Import Server processes. For example, type *.LST to specify list files with an LST extension. |
| Field Delimiter | Specifies how fields are delimited in the list file. You can specify any character. For example, use | (pipe), , (comma) or ~ (tilde). |
| List file format | Use this area to identify how fields are formatted in the list file, by moving available fields to the Selected Fields field and placing them in the same order as they reside in the list file. Fields in brackets are system-defined fields; non-bracket fields are index fields defined for the selected Capture file cabinet. You must include the [Image Filename] field, which identifies the name and path of files to be imported. Include the [Skip] field to skip reading a field in the list file. |
| After import | Specify if you want the list file changed or deleted, so it is not read again if the batch job is run continuously. You can either delete the list file or change its extension (for example, to DUN to indicate that it is done). |
| Delete image files | Select this field if you want image files deleted after they are successfully imported. |
Use the FaxPress Provider Settings tab to specify settings for the selected FaxPress batch job. When a FaxPress job is activated, the FaxPress Provider logs into the specified FaxPress fax server appliance, checks the user's Inbox for faxes, and if found, imports and then deletes the faxes.

|
Note: Before importing faxes using the FaxPress Provider, install and configure the Castelle FaxPress Client on the Import Server. |
| Element | Description |
|---|---|
| FaxPress Server Name | Specify the name of the FaxPress Server from which you want to import faxes. This field lists all FaxPress Servers that were detected. Click the Refresh button to detect servers again. If the server you want still does not appear in the list, verify that you can view the server on this workstation by running the FaxPress client. |
| FaxPress UserID, FaxPress Password | Specify the name and password of the user you want Import Server to log in as. (This user account must be configured in FaxPress.) Click the Test button to verify that the Server, UserName and Password combination is valid.
Note: To import faxes from multiple FaxPress inboxes, configure multiple batch jobs for each user ID. |
| Discard first page | Select this field to omit the first page of each fax from the batch. You would do this, for example, if you know that the first page of each fax being received by the FaxPress Provider contains a cover page. The FaxPress Provider will ignore the first page and import all pages after it. |
Use the FTP Provider Settings tab to specify settings for the selected FTP Provider batch job. When the job is activated, the provider connects to the specified FTP Server, looks for images and/or documents and processes them, importing each page as an image.
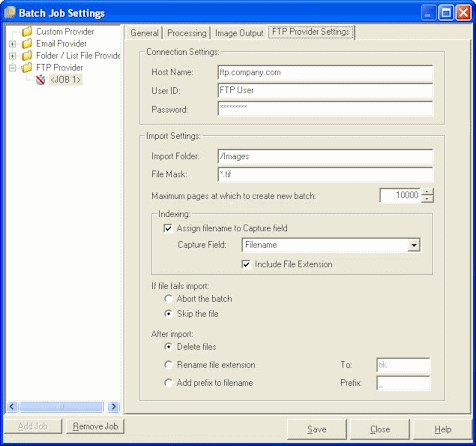
| Element | Description |
|---|---|
| Connection Settings | Specify the host name of the FTP server, and a user ID and password with which to connect to it. |
| Import Folder | Specify the folder on the FTP server from which to download and import documents. |
| File Mask | To limit the type of files imported from the specified import folder, enter an extension. For example, type *.TIF to import TIFF images or *.* to import all files. |
| Maximum pages at which to create new batch | Specify the maximum number of pages to allow in a batch before Import Server creates a new batch. The default is 10,000. |
| Indexing | Use these options to automatically assign the imported file's name to a Capture index value. Select Assign filename to Capture field and select the Capture field to which to write the filename, selecting the Include File Extension field to include the extension in the index value. |
| If file fails import | Specifies what Import Server should do if it encounters a file that fails importing (cancel creating the batch or skip the failed file). |
| After import | Specify if you want the imported files changed or deleted after they are successfully imported, so they are not imported again if the batch job is run continuously. You can delete the files, change their extension or add a prefix to their filenames. If renaming their extension, specify a new extension in the To field. If adding a prefix, specify the prefix in the Prefix field.
Note: Ensure that the FTP login account has permission to delete or rename files. |
Follow these guidelines when running Commit Server, Recognition Server or Import Server as a service instead of an application.
If a license for Recognition Server cannot be found, an error is logged and the service is stopped.
To prevent access issues, use local or UNC paths (rather than mapped drives) to identify folders the server will read from and write to. (This includes batch and commit folders and folders to be read by the Import Server.)
Two instances of a server cannot run at the same time. However, users can run the server as a service and then open the server as a program to change settings. When launching the program, a message displays that the application is running as a service and warns that you will be allowed to change settings only. The submenu commands for Activate/Pause change to Start Service/Stop Service, respectively.
Messages that appear during startup or processing when running the servers as programs do not appear when running as services, but are logged to the event log instead.
If the service does not start as expected, open the Windows Event Viewer, view VBRuntime errors and view details. For example, if you fail to enter the correct password on the Unattended Login tab, the service cannot start because the user authentication fails.