16 Integrating the Announcements Service
This chapter explains how to integrate the Announcements service into a custom WebCenter application at design time. For more information about managing and including announcements, see:
-
"Managing the Announcements and Discussions Services" in the Oracle Fusion Middleware Administrator's Guide for Oracle WebCenter
-
"Working with the Announcements Service" in the Oracle Fusion Middleware User's Guide for Oracle WebCenter
This chapter includes the following sections:
-
Section 16.2, "Basic Configuration for the Announcements Service"
-
Section 16.3, "Advanced Information for the Announcements Service"
16.1 Introduction to Announcements
The Announcements service lets you create and expose announcements on your application pages. Access to announcements boosts community participation, problem resolution, and knowledge sharing.
You can use the Links service to link announcements to other services, such as Events or Discussions. For example, suppose your company is announcing a new product, you can link from the announcement directly to a discussion forum, where potential customers can ask other customers about the product, or link to an instant messenger to speak directly with a customer service representative to purchase the product.
Announcements can show either forum-level announcements or global announcements (that is, system announcements not specific to a forum).
This section contains the following subsections:
16.1.1 Understanding the Announcements Service
With the Announcements service, you can do the following:
-
Create an announcement by clicking the Create icon, and then send it to a distribution list.
-
Edit an existing announcement by clicking the Edit icon next to the announcement.
-
Delete an existing announcement by clicking the Delete icon next to the announcement.
-
See the latest announcement data by clicking the Refresh icon on the Announcement view.
-
Personalize the Announcements view. You can select to display announcements sent today, this week, this month, or all announcements. A Show list provides options for displaying announcements created within the selected time range.
-
Manage announcements, such as publishing announcements on a later date and specifying auto-expire on certain dates.
The Announcements service is integrated with many WebCenter services, such as RSS, Search (to search announcement text), Instant Messaging and Presence (IMP), and Recent Activities. Use the Links service to link announcements to other services, such as Discussions.
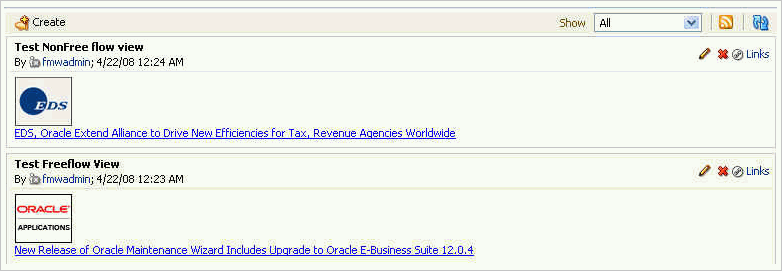
Figure 16-1 shows a sample announcement.
Figure 16-1 Sample Announcement From the Announcement Task Flow
Description of "Figure 16-1 Sample Announcement From the Announcement Task Flow"
16.1.2 Requirements for Announcements
The Announcements service requires a discussions server. You must install and configure the discussions server that comes with Oracle Fusion Middleware.
For information on installing the discussions server, see Oracle Fusion Middleware Installation Guide for Oracle WebCenter.
16.1.3 What Happens at Runtime
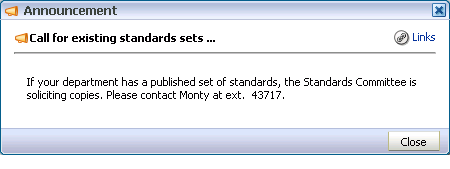
At runtime, user who have been granted the permission to do so can post announcements to all authenticated users. For example, an application administrator can use this service to announce the availability of a new feature or the need to shut down the application temporarily for maintenance (Figure 16-2).
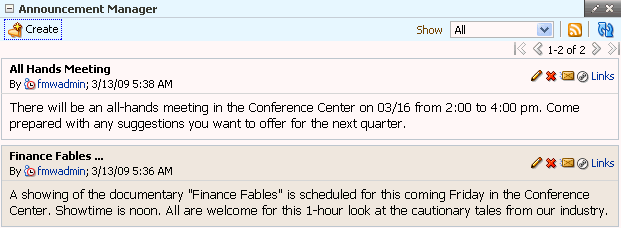
Application administrators in custom WebCenter applications can access the Announcement Manager, which provides Create, RSS, and Refresh icons, and a Show dropdown list to control the display of announcements on the page. Edit, Delete, Mail, and Links icons are available for each announcement in the list.
Depending on the privileges users have on the page and whether the required WebCenter services are configured in the application, users may see only a subset of these options in the Announcement Manager. For example, the Mail icon displays only if the Mail service is configured in your application, and the Delete icon is displayed only to users with grant privilege. By default, this privilege is available to application administrators.
To view announcements in the Announcement Manager, ensure that the Announcements task flow has been added to your application. Then log in to your custom WebCenter application and click the Open Announcement Manager icon in the Announcements task flow (Figure 16-3).
Notes:
The Open Announcement Manager icon does not display in the Announcements task flow if you do not have the required privileges.When the Announcement Manager is opened from the sidebar view, it shows global announcements, not announcements for a particular forum in the discussions server.
The task flow opens in a new window (Figure 16-4).
Figure 16-4 Announcement Manager Task Flow
Description of "Figure 16-4 Announcement Manager Task Flow"
For more information about the service at runtime, see Oracle Fusion Middleware User's Guide for Oracle WebCenter.
Note:
You can see the Announcements service in action in the sample application, as described in Chapter 2, "Introduction to the WebCenter Sample Application."16.2 Basic Configuration for the Announcements Service
This section describes required steps for adding this service to your application. It contains the following subsections:
16.2.1 Setting Up a Connection for Announcements
To take advantage of the Announcements service, you must first create a connection to the discussions server from your custom WebCenter application. To do so, ensure that you have the connection information for the discussions server.
16.2.1.1 Announcements Connections
The Announcements service requires a WebCenter Discussion connection to the discussions server. You can register additional WebCenter Discussion connections, but only one connection is active at a time.
When you create a WebCenter Discussion connection or set a connection as active, both the Announcements and Discussions services use this same connection. If you have an existing connection, then you can skip this section and see Section 16.2.2, "Adding the Announcements Service at Design Time."
If you do not have an existing connection, then you must create a new WebCenter Discussion connection.
Note:
While you can set up the connections to back-end servers at design time in Oracle JDeveloper, you can later add, delete, or modify connections in your deployed environment using Enterprise Manager Fusion Middleware Control. For more information, see Oracle Fusion Middleware Administrator's Guide for Oracle WebCenter.16.2.1.2 How to Set Up Connections for Announcements
To set up the Announcements connection:
-
In Oracle JDeveloper, open the application in which you plan to consume Announcements.
Note:
If you created a WebCenter Discussion connection for the Discussions service, then that is used by default for the Announcements service. No extra configuration is required. -
In the Resource Palette, click the New icon and select New Connection, WebCenter Discussion Connection.
-
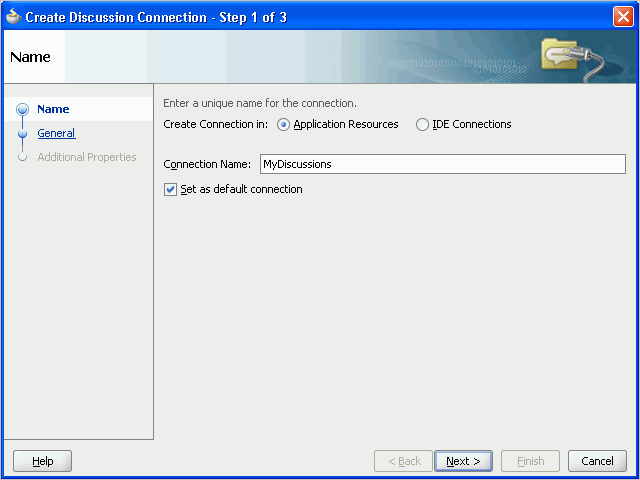
On the Name page, select to create the connection in Application Resources. (A connection in Application Resources is available only for that application, while a connection in IDE Connections is available for all applications you create. If you plan to use the connection in other applications, then select IDE Connections so you do not need to re-create it.)
Note:
If you create a connection in IDE and not in the application, then the connection must be added to the application. For example, in the Resource Palette under IDE Connections, right-click the connection and select Add to Application. -
For Connection Name, enter a meaningful name; for example,
MyDiscussions. -
Select the Set as default connection checkbox. You can have multiple connections, but only one can be active (default). If you have different discussions servers (for example, for each page in a space), then do not select the checkbox, but the service requires that one connection be marked as the active connection (Figure 16-5).
Note:
After you create a connection as the active connection, you cannot edit it so that it is not the default. To use a different default connection, you must create a new connection and mark that as the default connection.Figure 16-5 Create Discussion Connections, Step 1
Description of "Figure 16-5 Create Discussion Connections, Step 1"
-
Click Next.
-
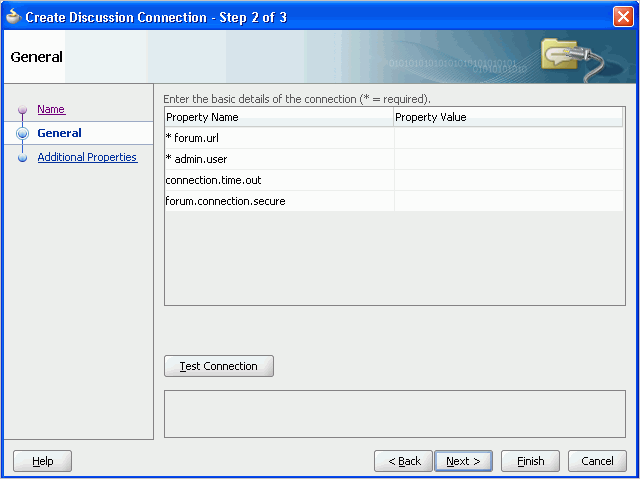
On the General page, enter values for the required parameters:
-
forum.url: The URL for your discussions server instance. For example:http://discussions.example.com:8888/owc_discussions. -
admin.user: The user name of your WebCenter Discussions Server administrator; for example,admin. This account is used by the Discussions and Announcement services to perform administrative operations on behalf of WebCenter users. -
forum.connection.secure: Indicates that a secure communication is required between the custom WebCenter application and the discussions server. You must set this value to true.The default value is false. When set to
true(secured mode), all Web Services calls from the custom WebCenter application are sent with a user name token and client certificate, and additional configuration about Web Services Security (WS-Security) is required on the next page. For more information, see the chapter "Configuring WS-Security for WebCenter Applications and Components" in the Oracle Fusion Middleware Administrator's Guide for Oracle WebCenter and see the Oracle Fusion Middleware Security and Administrator's Guide for Web Services.
-
-
Optionally, enter a value for the other parameter:
connection.time.out: The time (in seconds) the service should wait for the server to respond while making the connection. If the discussions server does not respond in the given time, then it cancels the connection and reports an error. -
Figure 16-6 Create Discussions Connection, Step 2
Description of "Figure 16-6 Create Discussions Connection, Step 2"
-
Click Test Connection, and if it is successful, then click Next.
-
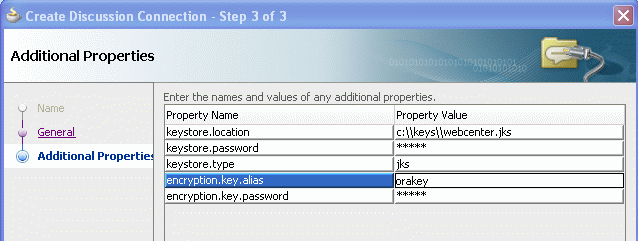
On the Create Discussion Connection - Step 3 of 3 page, you must configure client-side WS-Security (Figure 16-7).
First obtain the client-side certificate and store it in a local directory. For more information, see the chapter "Configuring WS-Security for WebCenter Applications and Components" in the Oracle Fusion Middleware Administrator's Guide for Oracle WebCenter.
Click the Add Property or Add Secured Property button to add each of the following WS-Security parameters:
-
keystore.location: The certificate file (webcenter.jks) path in your local directory. -
keystore.password: The keystore password. Add this as a secured property. -
keystore.type: The keystore type associated with the certificate, for example, JKS. -
encryption.key.alias: The key alias to be used for encryption. -
encryption.key.password: The password for accessing the encryption key. Add this is as a secured property.
Note:
To encrypt property values, such as passwords, click the Add Secured Property button.Ensure that the property values match those in the certificate.
Figure 16-7 Create Discussions Connection, Step 3
Description of "Figure 16-7 Create Discussions Connection, Step 3"
-
-
Click Finish. Your connection should now appear as a node under Application Resources - Connections.
16.2.2 Adding the Announcements Service at Design Time
This section explains a basic incorporation of the Announcement service.
16.2.2.1 Announcements Task Flows
The announcement task flows let you add a main view or a sidebar view of announcements to your page.
Table 16-1 Announcement Task Flows
| Task Flow | Required Parameters | Description |
|---|---|---|
parentId |
This task flow displays a view that allows the user to see all current announcements and perform operations based on their privileges. For a Moderator, all command buttons are shown, but for a Reader, only the refresh and personalization options are shown. The personalization option lets users select the number of days to display announcements. The |
|
parentId |
This task flow displays a view that shows various categories of quick links to announcements. The The look and feel of this view changes with the optional parameter values given for rendering the task flow region. For information on how to add this task flow, see Section 16.3.1, "How to Add the Announcements - Sidebar View Task Flow." |
16.2.2.2 How to Add Announcements to Your Application
The Announcements task flow provides a complete view of your announcements. To add the Announcements task flow to your custom WebCenter application:
-
Follow the steps described in Chapter 3, "Preparing Your Development Environment" to implement security and create a new customizable page in your application.
-
Open the page on which you want to add the service.
-
In the Resource Palette, expand My Catalogs, WebCenter Services Catalog, and Task Flows.
-
Drag Announcements from the Resource Palette and drop it onto the page inside of the
af:formbeginandendtags. -
When prompted, select Region as the way to create the task flow (and confirm with Add Library). This operation may take a moment to complete.
-
In the Edit Task Flow Binding dialog, you can enter a value for the
parentIdparameter.-
If global announcements are required, then do not specify a value for
parentId. -
If announcements from a specific forum are required (for example, when a forum is reserved for each group), then enter a value for
parentId; for example,${2}.
-
-
Click OK.
-
Save and run your page.
Figure 16-8 shows the Announcements view at runtime. The runtime view is based on the value that was provided for the
parentIdparameter.Figure 16-8 Announcements View at Runtime

Description of "Figure 16-8 Announcements View at Runtime"
16.2.3 Setting Security for Announcements
In a non-secured custom WebCenter application, identity propagation cannot happen. A user is a guest (or anonymous) user who can view only public categories and forums. In a non-secured application, the parentId (forum ID) from which announcements are fetched should be a public forum. If the forum is not public, then an error is reported. If the parentId parameter is not specified, then WebCenter cannot fetch global announcements (that is, announcements not scoped to a forum): global announcements are not available for public users.
In an ADF-secured custom WebCenter application, identity propagation is enabled. Based on the identity, appropriate permissions are matched and corresponding actions are enabled.
The user name that you use to log in to the application is used to log in to the discussions server. The recommended approach is to have the discussions server and the custom WebCenter application point to the same identity store. To simplify the login process for your custom WebCenter application, you should use the same login credentials for the application as you do for the discussions server. This way, your users can log in to the application one time and automatically connect to the discussions server.
Note:
The Announcements services requires that the identity store be LDAP-based; that is, not file-based withjazn-data.xml.For information about configuring ADF security, see Section 3.5, "Implementing Security in Your Application."
16.3 Advanced Information for the Announcements Service
This section describes optional features available with this service. It contains the following subsections:
-
Section 16.3.1, "How to Add the Announcements - Sidebar View Task Flow"
-
Section 16.3.3, "Obtaining Group Space RSS News Feed URL for the Announcements Service"
16.3.1 How to Add the Announcements - Sidebar View Task Flow
The Announcements - Sidebar View is similar to the Announcements view in that it displays announcements and provides tools to create, edit, and delete announcements. It also provides controls for determining when an announcement is published and when it expires. After you create an announcement, you can select the Mail icon next to the announcement to mail the announcement to anyone you choose.
The Announcements - Sidebar View task flow lets you present announcements to end users where manage controls are not needed. Based on the content, it can render in a default view or a custom view.
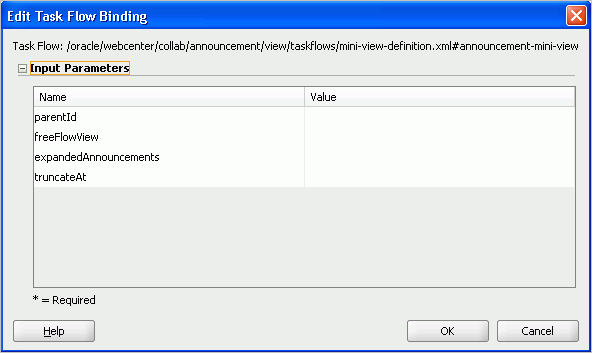
To add the Announcements - Sidebar View to your custom WebCenter application, follow the same instructions that you did for the Announcements task flow in Section 16.2.2, "Adding the Announcements Service at Design Time," but drag and drop Announcements - Sidebar View onto the page.
Figure 16-9 Edit Task Flow Binding Dialog for Announcements - Sidebar View
Description of "Figure 16-9 Edit Task Flow Binding Dialog for Announcements - Sidebar View"
Table 16-2 describes the Announcements - Sidebar View parameters. The look and feel of the Announcements - Sidebar View changes with the values provided for these parameters. For more information, see Section 16.3.2, "Customizing Announcements Views."
Table 16-2 Announcements - Sidebar View Task Flow Parameters
| Parameter | Description |
|---|---|
|
|
The forum ID in the discussions server under which announcement objects are maintained. For example, If this parameter is not specified, then announcements default to global announcements. |
|
|
A Boolean value representing whether to remove the announcement title (subject) and show the announcement body as is. The default value is Enter |
|
|
The number of announcements to display announcement details in plain text (that is, the body of the announcement). Users can click the title to display the full announcement content in rich text mode. The value you enter for |
|
|
For announcements that display announcement body in plain text, this value specifies how many characters to display for each announcement. Enter an Expression Language (EL) expression. For example, when the value is set to the EL expression If no value is specified, then it displays 200 characters. If a non-valid positive integer value is specified, then it displays all characters in plain text. This parameter takes effect with |
16.3.2 Customizing Announcements Views
You can change the look and feel of the Announcements - Sidebar View with the parameter values. This section shows two examples of this.
Figure 16-10 shows the Announcements - Sidebar View at runtime with the freeFlowView parameter set to ${true}.
Figure 16-10 Announcements - Sidebar View with freeFlowView Parameter

Description of "Figure 16-10 Announcements - Sidebar View with freeFlowView Parameter"
Figure 16-11 shows the Announcements - Sidebar View at runtime with the freeFlowView parameter set to false (or empty), the expandedAnnouncements parameter set to 2, and the truncateAt parameter set to 20.
Figure 16-11 Announcements - Sidebar View with Optional Parameters

Description of "Figure 16-11 Announcements - Sidebar View with Optional Parameters"
16.3.3 Obtaining Group Space RSS News Feed URL for the Announcements Service
You can expose Oracle WebCenter Spaces functionality in a custom WebCenter application. Your custom application users can find out what is happening in a specific group space through RSS news feeds.
Configure RSS news feeds for the Announcements service to enable users to view group space announcements from within a custom application. To obtain the group space RSS news feed URL for the Announcements service, use either of the following WebCenter Spaces APIs:
-
getServiceRSSFeedURL -
getServiceRSSFeedURLbyGuid
To obtain an RSS feed URL, you must identify the group space (by name or GUID) and specify the service required (by service ID). The service ID for the Announcements service is GroupSpaceWSClient.ANNOUNCEMENT_SERVICE_ID.
For information about how to use these APIs, see Section 27.2.5.3.8, "Retrieving RSS Feed URLs for Group Space Services."
