


|
|
BEA's WebLogic Integration server provides WebLogic Platform components with business-process management (BPM) capabilities. A business process coordinates interaction among various resources to perform a complete set of specific tasks. WebLogic Integration business processes are designed using visual components available, such as Process controls, in WebLogic Workshop.
By bringing WebLogic Integration and BEA AquaLogic Data Services Platform together, developers can achieve sophisticated programming scenarios that might otherwise be difficult, at best.
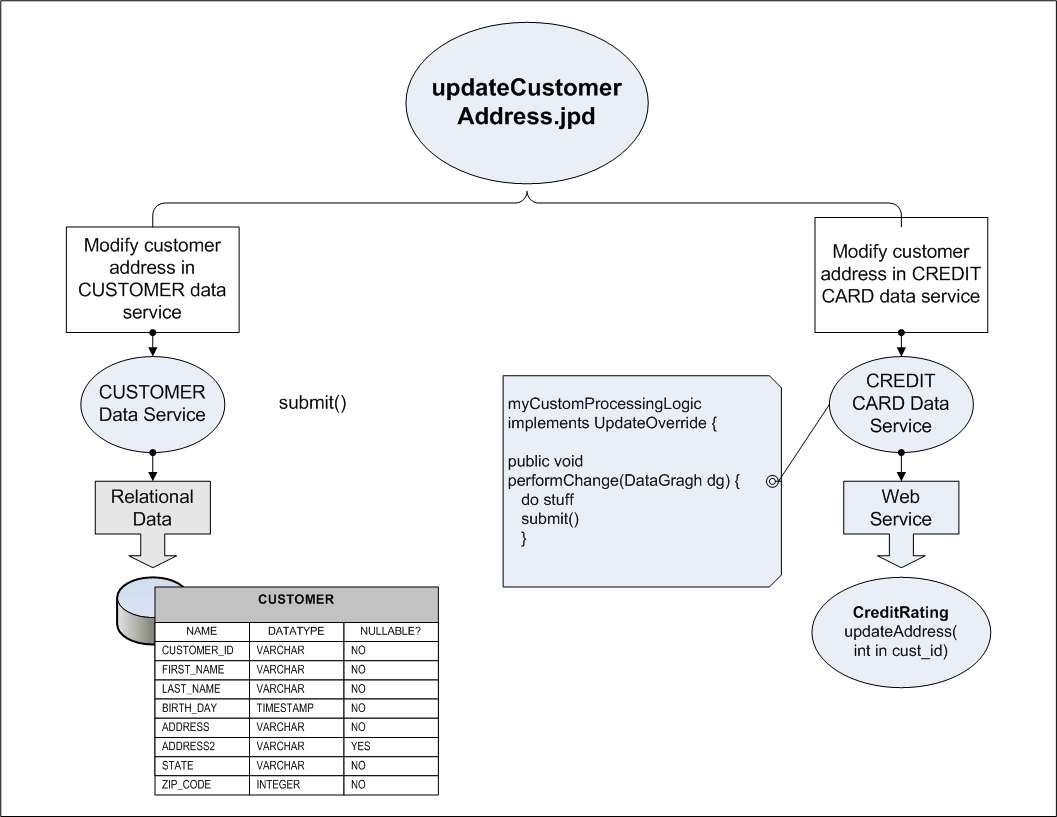
For example, a WebLogic Integration process (JPD) can be defined that encompasses multiple DSP data services, and that uses the JPD to enforce distributed transactional semantics without using XA and to reduce the number of locks held on disparate data sources (such as Web services or other non-XA-compliant data sources) that might not otherwise be able to participate in the same transaction. In other words JPD is used to achieve atomicity over disparate data sources (see Figure 7-1).
This chapter provides information about such topics as these, and includes information about how to develop server-side workflow-and-DSP-enabled applications. It includes these topics:
Much of the underlying Java code for the Process (defined in a Java class, as a Java Process Definition, or JPD) is generated or created automatically. Processes coordinate interactions among resources by means of Java controls (Java Control Extensions, or JCX) that are specific to these process definitions. Using WebLogic Workshop, developers can add various components, including Data Service controls, and customize behavior in the business process, as needed, to accomplish the specifics of the workflow.
WebLogic Workshop leverages the Java Extension Control (or simply, controls) mechanism to simplify working with J2EE resources.
A Java Control is an abstraction layer that simplifies working with J2EE resources in WebLogic Workshop.
Controls provide a runtime behavior for accessing functionality and resources using Java classes. WebLogic Workshop provides Controls for numerous WebLogic and AquaLogic components, including Data Service controls for DSP and Process controls for WebLogic Integration.
WLI Process controls enable Web services, business processes, or pageflows to send requests to, and receive callbacks from, a business process (JPD).
See Accessing Data Services from WebLogic Workshop Applications for more information about Data Service controls.
For more information about WebLogic Integration, process controls, and business-process management in general, see the WebLogic Integration documentation page at:
DSP and JPD can be integrated in two different ways:
Once the JPD is created, it can be called from a data service instance using the JpdService API, a server-side Mediator API that can be invoked in an update override. See Invoking JPDs from Data Services Platform for details.
By default, a JPD converts XML objects to an XML proxy class; the class implements the ProcessXML interface. The ProcessXML interface does not know how to handle SDO objects, such as change summaries.
You must override the default behavior in the JPD by editing the source code.
You can use Data Services Platform in WebLogic Integration (WLI) business process applications through a Data Service control. For example, you might add DSP-based information to decision-making logic in the business process.
There are three basic steps to adding Data Services Platform queries to WebLogic Integration business processes:
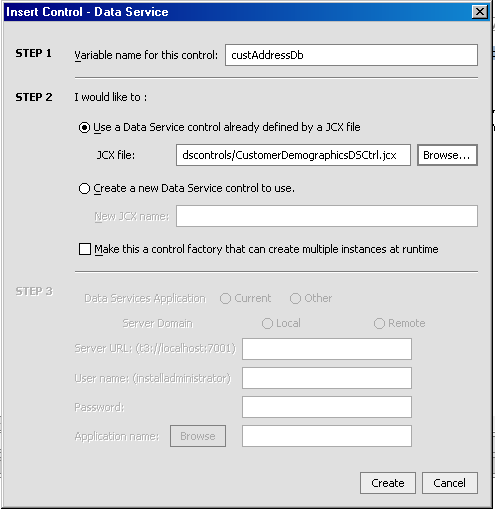
Before you can execute a Data Services Platform query from a WLI business process, you must create a Data Service control that accesses the query or queries you want to run in your business process.
See Accessing Data Services from WebLogic Workshop Applications for more information about creating Data Service controls.
For complete details, see Data Service Controls.
Once you have created a Data Service control, you can add it to a business process the same way you add any other control to a business process. For example, you can drag and drop the control into the WebLogic Integration business process in the place where you want to run your Data Services Platform query or you can add the Data Service control to the WebLogic Workshop Data Palette.
The Data Service controls must be created in the same project as the JPD.
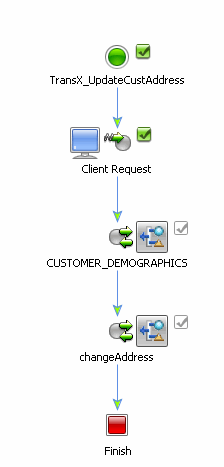
Once the Data Service control has been added to the business process, its functions are available. As shown in Figure 7-3, you must select the query in the General Settings section of the Data Service control portion of the business process, specify input parameters for the query in the Send Data section, and specify the output of the query in the Receive Data section.

Figure 7-4 shows the WebLogic Workshop rendering of a business process accessing a Data Service Control.
By default, a business process (Java process definition, or JPD) converts XML objects to an XML proxy class by implementing the ProcessXML interface. However, ProcessXML is not completely compatible with SDO. In particular, it does not accommodate SDO specific features such as change summaries. As a result, the default XML processing performed in a business process must be overridden.
You can override the business process by performing the following steps in the workflow:
XmlObjectVariableFactory.unset().
Data architects writing Java custom update classes can create a JPD workflow to handle the updates to different data services. Data Services Platform developers can then write server-side Java code that initiates synchronous or asynchronous JPDs using the JpdService interface.
As with other types of DSP server-side custom functionality, the update override interface facilitates the implementation.
Update overrides are user-defined Java classes that implement DSP's UpdateOverride interface (from the sdoupdate package). Update overrides are registered in DSP and invoked by the Update Data Mediator when an SDO is submitted for an update. As its name implies, an update override implements custom processing on the server, for data updates. Update overrides are required to update non-relational data sources. See Customizing Data Service Update Behavior, for more information.
The JPD and the data service containing the Java update override can be running in the same WebLogic Server domain or in different WebLogic Server domains.
An update override can use a JPD to process requests. The JpdService is invoked with the name of the JPD, the start method of the JPD, the service URI, and the server location and credentials for the JPD, as shown in this example:
JpdService jpd = JpdService.getInstance("CustOrderV1",
  "clientRequestwithReturn", env);
|
JPD provides a public interface (as a JAR file containing the compiled class file for the JPD public contract or interface). Transparently to developers, the JpdService object uses the standard Java reflection API to find the JPD class that implements the JPD public contract.
The server-side update overrides Java code and then passes the DataGraph as an argument to the invoke method:
Object jpd.invoke( DataGraph sdoDataGraph ); |
The returned object is dependent on the JPD being invoked and may be null. Typically, if any top level SDO is being inserted and its primary key is autogenerated, then this should be returned from the JPD (see Listing 7-1).
Any keys for the top-level DataObject in the serialized UpdatePlan are returned to the calling function as a Properties object (comprising a byte array). Thus, the return value from the workflow must be a serialized byte array, as in:
Properties [] jpd.invoke( byte[] serializedUpdatePlan ); |
The array returned is a Properties object array representing any keys for the top-level DataObject in the UpdatePlan that was serialized and sent to the workflow.
Support for JPDs from DSP is provided through two server-side APIs that can be invoked from within an UpdateOverride implementation (see Table 7-5).
Listing 7-1 shows how to invoke a JPD from an UpdateOverride. The code sample assumes that a JPD exists comprising a series of data services configured as part of a workflow.
public boolean performChange( DataGraph ) {
  ChangeSummary changeSum = dataGraph.getChangeSummary();
  //Size of 0 means no changes so there's nothing to do
  if (changeSum.getChangedDataObjects().size()==0) {
      return true;
   }
   Environment env = new Environment();
   env.setProviderUrl( "t3://localhost:7001" );
   env.setSecurityPrincipal( "weblogic" );
   env.setSecurityCredentials( "weblogic" );
   try {
      JpdService jpd = JpdService.getInstance(
                       "CustOrderV1",
                        "clientRequestwithReturn",
                        env);
      UpdatePlan updatePlan = DataServiceMediatorContext.
                    currentContext().getCurrentUpdatePlan( dataGraph );
      byte[] bytePlan =  UpdatePlan.getSerializedBytes( updatePlan );
      Properties (Properties) returnProps = jpd.invoke( bytePlan );
     }
     catch( Exception e )
     {
        e.printStackTrace();
        throw e;
     }
     return false;
   }
}Data Services Platform supports JPD invocations both synchronously and asynchronously; both styles of invocation are handled the same way in the DSP update override code. Invoke the JPD and get the response back as a byte array, as shown in Listing 7-1 above.
You must write your own error-handling code with the JPD. Calling a non-existent JPD raises the standard Java "ClassNotFoundException."
Using callbacks in your JPD is not supported. Business processes that include client callbacks will fail at runtime since the callback is sent to the JPD Proxy rather than the originating client that started the JPD.


|