User's Guide
|
|
Get Adobe Reader |
Network Gatekeeper Management Tool
The following sections describe the Network Gatekeeper Management Tool:
- About the Network Gatekeeper Management Tool
- Graphical Network Gatekeeper Management Tool interface
- Main window
- Network Gatekeeper SLEE manager window
- Invoke method window
- Installing an Network Gatekeeper Management Tool (Unix)
- Installing an Network Gatekeeper Management Tool (Windows 2000/XP)
- Starting an Network Gatekeeper Management Tool and adding a SLEE
- Working with the Network Gatekeeper Management Tool
- Text based Network Gatekeeper Management Tool
- Installing a text based Network Gatekeeper Management Tool
- Using the text based Network Gatekeeper Management Tool
About the Network Gatekeeper Management Tool
The SLEEs and the SLEE services are managed through the Network Gatekeeper Management Tool. It provides a graphical and a text based interface.
Both the graphical and the text based interface tool can access the SLEEs through a CORBA connection and support execution of OAM batch files (scripts). The text based management tool may also be used through a remote connection such as telnet.
Graphical Network Gatekeeper Management Tool interface
The SLEE services are displayed in the Network Gatekeeper Management Tool. When selecting one of the SLEE services, the administrative methods available for that service are displayed. Depending on the logged in user's authority level and service group belonging, different sets of SLEE services and methods are displayed. A user has one of the following authority levels:
The authority and service group concepts are further described in the chapter User Administration.
Main window
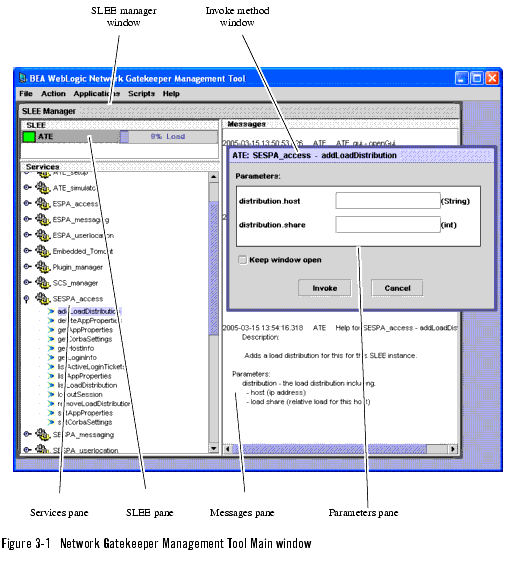
All management can be performed through the Network Gatekeeper Management Tool's main window. The window and its components are shown in Figure 3-1, Network Gatekeeper Management Tool Main window, on page 3-3.
From the menu bar in the Main window you can initiate a number of actions related to the Network Gatekeeper Management Tool itself and to connecting and disconnecting SLEEs to the SLEE manager.
File menu
File - Auto saving configurations
If the check box is selected, the SLEEs you have added to the management tool window and the installed management plug-ins will automatically appear in the Network Gatekeeper Management Tool the next time you log on.
File - Exit
Exits and logs off the Network Gatekeeper Management Tool.
Actions menu
Actions - Add SLEE...
Opens a dialog box where you can add a SLEE to the SLEEs pane.
Actions - Remove SLEE...
Opens a dialog box where you can remove a SLEE from the SLEEs pane.
Actions - Reload SLEE...
Opens a dialog box where you can reload a SLEE's services and methods.
Actions - Add as alarm listener
Adds the Network Gatekeeper Management Tool as an alarm listener for the SLEEs in the SLEE pane. The alarms will be displayed in the Messages pane.
Actions - Remove as alarm listener
Removes the Network Gatekeeper Management Tool as an alarm listener for the SLEEs in the SLEE pane. The alarms will no longer be displayed in the Messages pane.
Actions - Set alarm severity...
Opens a dialog box where you can set the lowest severity of the alarms to be displayed.
Applications menu
Applications - Start Certificate Builder
Starts the Certificate Builder where you can generate your own user certificates and private keys.
Applications - Start Rule Development Tool
Starts the Rule Development Tool if installed.
Applications - SLEE manager - View SLEE manager
Clear the check box if you do not want to view the SLEE manager window.
Applications - SLEE manager - Logout
Logs off a user without exiting the Network Gatekeeper Management Tool.
Applications - Plug-in - Add plug-in...
Opens a dialog box where you can add a management plug-in. Added plug-ins appear in the menu.
Applications - Plug-in - Remove plug-in...
Opens a dialog box where you can remove a management plug-in.
Scripts menu
Scripts - Run script...
Opens a dialog box where you can select and run an OAM batch file. The file could be a recorded OAM session or written from scratch. The result is presented in a separate window in the Network Gatekeeper Management Tool.
Scripts - Recording a test case - Set file name...
Opens a dialog box where you can specify a file name for file where the recorded OAM session will stored.
Scripts - Recording a test case - Start recording
Starts recording the OAM activities performed through the Network Gatekeeper Management Tool. The output file can be run as an OAM batch file.
Scripts - Recording a test case - Stop recording
Stops recording the OAM activities performed through the Network Gatekeeper Management Tool.
Help menu
Help - User's Guide...
Opens a user's guide describing the Network Gatekeeper Management Tool and the tasks you can perform with it.
Help - About...
Opens the About dialog box.
Network Gatekeeper SLEE manager window
SLEE pane
This pane contains a list displaying the status, name and load of the SLEEs connected to the Network Gatekeeper Management Tool. Clicking on a SLEE displays the SLEE's services in the Services pane.
Right-clicking on a SLEE in the list displays a menu where the SLEE's process can be started or stopped, and the SLEE's state can be changed. You can also select to view a SLEE's load by right-clicking on a SLEE.
A SLEE's status is indicated by an icon, see Table 3-1.
During SLEE status change, for example from Shutdown to Running, the change is indicated by adding a little dot with the color reflecting the "status-to-be" in the icon's upper right corner.
Services pane
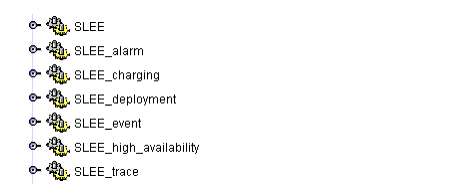
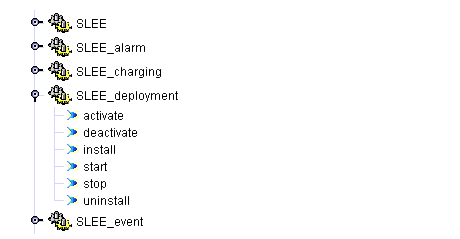
When a SLEE is selected in the SLEEs pane, this pane contains a list of all the SLEE's services. Double-clicking on a service displays all administrative methods related to the service.
Double-clicking on a methods displays the method and its parameters in the invoke method window.
Right-clicking on a method displays a menu where you can select Help to display a short help text in the Messages pane. The help text describes the purpose of the method and the parameters used by the method.
Messages pane
This pane displays the results of method invocations and the alarms raised from the SLEE. Also, the Messages pane is used for displaying the method help texts.
Invoke method window
All methods are invoked from the invoke method window. For the methods that uses parameters, the parameter values are set in this window before the method is invoked.
Installing an Network Gatekeeper Management Tool (Unix)
The following instruction tells you how to install an Network Gatekeeper Management Tool on a Unix workstation. That is, how to install an Network Gatekeeper Management Tool on a machine that is not a BEA WebLogic Network Gatekeeper.
Follow the instructions provided by the installation script. It is recommended to use the default settings.
- The Network Gatekeeper Management Tool software is contained in the software bundle for WebLogic Network Gatekeeper. Copy the file
wng_manager.zipto the local file system. The file is found in the directory where you extracted the binaries, see Extract the binaries for Linux or Extract the binaries for HP-UX.
./install.sh
Installing an Network Gatekeeper Management Tool (Windows 2000/XP)
The following instruction tells you how to install an Network Gatekeeper Management Tool on a Windows PC. That is, how to install a Network Gatekeeper Management Tool on a machine that is not a BEA WebLogic Network Gatekeepers.
- Run the installation wizard. The file name might differ depending on the current version available for download.
Follow the instructions provided by the installation wizard. It is recommended to use the default settings.
- The Network Gatekeeper Management Tool software is contained in the software bundle for WebLogic Network Gatekeeper. Copy the file
wng_manager.zipto the local file system. The file is found in the directory where you extracted the binaries, see Extract the binaries for Linux or Extract the binaries for HP-UX.
http://java.sun.com/j2se
Note: Be careful when working with path variables, your computer may not work properly if existing variables are removed or altered.
Starting an Network Gatekeeper Management Tool and adding a SLEE
The following instructions tells you how to start an Network Gatekeeper Management Tool and connect it to a SLEE.
- Start the Network Gatekeeper Management Tool. Depending if you are using a Unix workstation or Windows PC, do one of the following:
On a PC, you can also start the Network Gatekeeper Management Tool by double-clicking on the
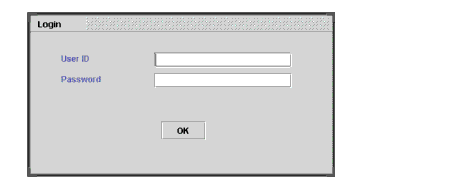
runSleeManager.batfile in the installation directory. But, if you start the Network Gatekeeper Management Tool through therunSleeManager.batfile you will have to add the SLEEs to the Network Gatekeeper Management Tool every time you log in. If you start through the start menu, the SLEEs you have added will automatically be displayed at log in.This displays the Network Gatekeeper Management Tool's Login window.
You are now logged on to the Network Gatekeeper Management Tool. The SLEEs connected to the SLEE manger are displayed in the SLEEs pane. If there are no SLEE in the SLEEs pane or if you want to add more SLEEs to the management tool, continue with Step 7. below.
- In the SLEEs pane, right-click on the background and select Add SLEE... from menu, or open the Actions menu and select Add SLEE...
- Select if the SLEE connection shall be made using IP address and port numbers, or name service and object references files.
- Enter IP address and port number, or name service references file data according to the table below:
Note: For the SLEE name parameter, it is recommended use the SLEE name as defined when the SLEE was installed.
Note: If bi-directional CORBA is used on BEA WebLogic Network Gatekeeper the SLEE belongs to, the connection has to be made using name service and object reference files.
Working with the Network Gatekeeper Management Tool
The following instruction describes a general workflow on how to work with SLEE Services.
- Start an Network Gatekeeper Management Tool, see Starting an Network Gatekeeper Management Tool and adding a SLEE.
This displays all services available in the SLEE in the Services pane.
If the SLEE you wan to work with is not displayed in the SLEEs pane, right-click in the background of the SLEEs pane and select Add SLEE... in the displayed menu.
Text based Network Gatekeeper Management Tool
The text based Network Gatekeeper Management Tool is a command line management interface providing the same basic functions as the graphical Network Gatekeeper Management Tool. The two main benefits with the text based management tool are that you use it to manage a SLEE over a remote connection, such as Telnet, and that it can execute batch files containing SLEE commands. For more information about writing and executing batch files, see Writing OAM Batch Files.
Besides the method descriptions the text based Network Gatekeeper Management Tool also provides help on the tool itself
Installing a text based Network Gatekeeper Management Tool
The text based Network Gatekeeper Management Tool uses the same software package as the GUI based Network Gatekeeper Management Tool. That is, the text based Network Gatekeeper Management Tool is installed together with the GUI based using the procedures Installing an Network Gatekeeper Management Tool (Unix) and Installing an Network Gatekeeper Management Tool (Windows 2000/XP).
Using the text based Network Gatekeeper Management Tool
Follow the instruction below to start and execute commands using the text based Network Gatekeeper Management Tool.
Note: It is not possible to start and stop the SLEE process through the text based Network Gatekeeper Management Tool. To start and stop a SLEE, login to the host where the SLEE executes and use the startSlee and stopSlee scripts located as described below.
On a computer where the Network Gatekeeper Management Tool is installed. Depending if you are on a Unix workstation or Windows PC, do one of the following:
This prompts you for SLEE connection parameters. The connection can be made using IP-address and port or through the name service and object reference files.
Note: If bi-directional CORBA is used on BEA WebLogic Network Gatekeeper the SLEE belongs to, the connection has to be made using name service and object reference files.
- Enter connection parameters according to the table below:
The alias will be used in the commands written in the text based management tool and in the OAM batch files.
addslee
help
[help]
Displays this general help text.
[addslee]
Adds a SLEE. User will be prompted for necessary parameters.
[slee <sleealias>]
Selects a specific SLEE. SLEE aliases can contain spaces and
must be typed using ""
[service <servicename>]
Selects a specific service.
[method <methodname>]
Selects a specific method.
[<sleealias>:<servicename:<methodname> <param1> <param2> <paramN>]
Invokes a method directly.
(e.g. "SLEE 1":MyService:addPerson "John" 45)
        Note that string parameters always must be typed with
        surrounding "".
[<servicename>:<methodname> <param1> <param2> <paramN>]
Invokes a method directly. (e.g. MyService:addPerson "John" 45)
        Note that string parameters always must be typed with
        surrounding "".
[<methodname> <param1> <param2> <paramN>]
        Invokes a method when a service is selected.
        (e.g. addPerson "John" 45)
[<param1> <param2> <paramN>]
Invokes the method which is currently selected. (e.g. "John" 45)
[back]
Steps back. (i.e. unselect service or method)
[exec <filename>]
Executes a file as batch. This file can contain any
command that can be typed at the prompt.
[help <servicename>:<methodname>]
Shows the help(description) associated with a method.
[help <methodname>]
Shows the help(description) associated with a method of the
currently selected service.
[info]
        Shows a list of what services or methods are available.
        If a method is selected, the method parameters and
        description will appear.
[reg_al]
        Register the management tool as alarm listener for
        the selected SLEE.
[unreg_al]
        Register the management tool as alarm listener for the
        selected SLEE.
[wait(millisec)]
        Wait the specified number of milliseconds. Useful when
        running scripts.
[exit]
Exits


