

|
|
|
|
|
|
Creating and Modifying C-Hubs
The following sections provide key concepts and procedures for configuring and working with c-hubs on the C-Hub Administration Console:
What Is a C-Hub?
E-market is the generic term for an environment or container through which businesses can conduct B2B e-commerce. The c-hub, as the centerpiece of WebLogic Collaborate, provides an e-market environment. As such, the c-hub is responsible for routing messages between various WebLogic Collaborate c-enabler components and for managing the lifecycle of the conversations between the participating trading partners. The c-hub offers a set of services to conduct, manage, and orchestrate conversations (collaborations) between trading partners. These conversations are defined by message vocabularies, business models, process classifications, roles, and other metadata. The WebLogic Collaborate e-market environment consists of one or more collaboration spaces, and a central c-hub.
A collaboration space (also known as a c-space) is an abstract entity in which trading partners conduct and coordinate conversations for a specific business purpose.
A c-hub is a point of control and exchange that represents an e-market owner. The c-hub enables an e-market owner to create and host a c-space. The e-market owner, through the c-hub, can host any number of c-spaces concurrently, with each c-space supporting any number of trading partners. Trading partners can participate in any number of conversations. Each trading partner uses a c-enabler to communicate with other trading partners, with all communication going through the c-hub.
Collaborators can communicate with each other by means of the c-hub. The c-hub provides shared services to BEA participant (c-enabler) nodes such as conversation and subscription management, security, administration, routing, local logging, and XML services.
For a complete explanation of the c-hub, trading partners, conversations, c-spaces, and other related concepts, see BEA WebLogic Collaborate Getting Started, particularly the Overview.
Creating a New C-Hub
You must first create a c-hub before you can do any other configuration tasks, such as configuring trading partners, documents, conversations and so on. There are two ways to create a new c-hub:
Creating a New C-Hub Through the Administration Console
To create a new c-hub:
Figure 9-1 C-Hub Configuration
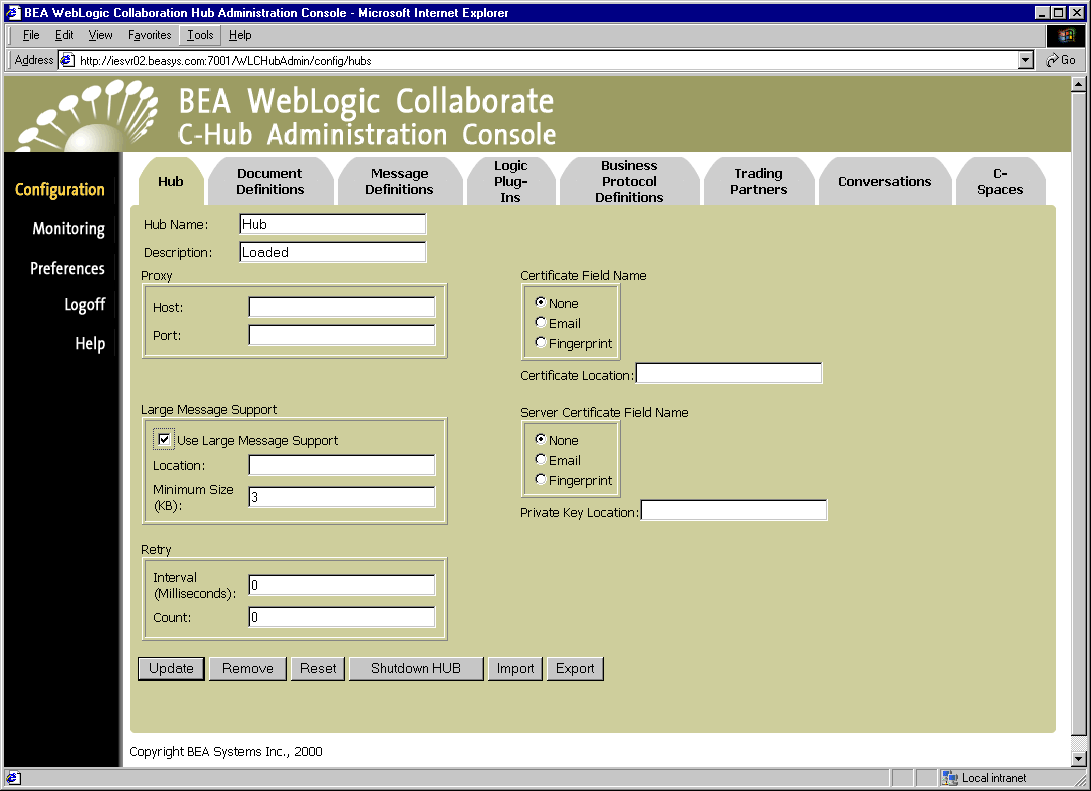
Note: For this release, WebLogic Collaborate supports only one c-hub per repository, so the Administration Console allows only one c-hub to be created.)
You can also click Reset to discard your current changes and start again.
Creating a New C-Hub by Importing an XML File
As an alternative to creating a new c-hub through the user interface fields, you can import into the c-hub repository any properly formatted c-hub XML data file that describes the c-hub you want to create. C-hub XML data files for all WebLogic Collaborate examples are available for import. For more information on using both the import and export features, see Loading Data Into the C-Hub or Exporting C-Hub Data to a File.
Modifying an Existing C-Hub
You can modify the definition for an existing c-hub. (Note that modifying the name of an existing c-hub is not allowed.)
To modify the definition for an existing c-hub:
Figure 9-2 Modifying a C-Hub Configuration
You can also click Reset to discard your current changes and start again.
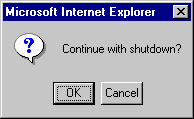
Shutting Down a Running C-Hub
You can shut down or stop a c-hub that is currently running from either the c-hub Configuration tab or the c-hub Monitoring tab:
or
Click on Configuration in the left navigation bar, then click on the Hub tab (if not already displayed).
A confirmation dialog asks if you want to continue with the shutdown.
Removing an Existing C-Hub
You can remove an existing c-hub. This operation can be performed on a running c-hub; however, we recommend that you shut down the c-hub first.
To remove an existing c-hub:
A confirmation dialog is displayed. If you click OK, the current c-hub is removed from the database.
Note: When you remove a c-hub, you are removing all objects that it contains (document definitions, message definitions, logic plug-ins, trading partners, and so on.) If you want to save the current c-hub configuration data, be sure to export the data to a c-hub XML data file before you remove the c-hub. (See Exporting Data for a C-Hub to an XML File.) See also Table 8-2 for details on relationships and dependencies that can exist among configured c-hub objects.
Loading Data Into the C-Hub or Exporting C-Hub Data to a File
You can use the WebLogic Collaborate C-Hub Administration Console to import and export c-hub data. (The Administration Console automatically accesses the Bulk Loader to accomplish this.) As an alternative to creating a new c-hub through the user interface fields described in Creating a New C-Hub Through the Administration Console, you can import into the Administration Console any properly formatted c-hub XML data file that describes the c-hub you want to create. You can also export data you have input through the Administration Console from the current c-hub repository to an XML file for later use.
A typical scenario is one in which you create a first c-hub by means of the Administration Console Hub tab, then export that new c-hub description to a c-hub XML data file. As you create new c-hubs through the Administration Console, you export them to c-hub XML data files for safekeeping. Once you have established a collection of c-hub XML data files, you can import them as needed.
You can also begin by importing a default c-hub XML data file to use as a template for creating new c-hubs.
You can also use the bulk loading utility by working directly with the Bulk Loader configuration files and DOS or UNIX commands on the command line.
For more information on this, see Working with the Bulk Loader.
Importing a C-Hub XML File
To import a c-hub XML file into the c-hub repository:
Figure 9-3 Import Screen
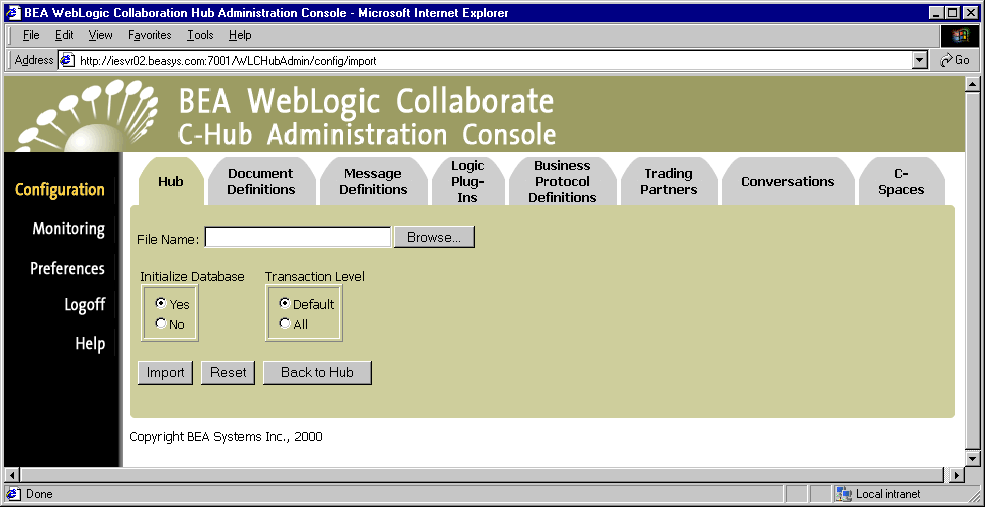
(You can also click Reset to discard your current changes and start again.)
Exporting Data for a C-Hub to an XML File
To export data for an existing c-hub from a repository created with the Administration Console to an XML file:
Figure 9-4 Export Screen
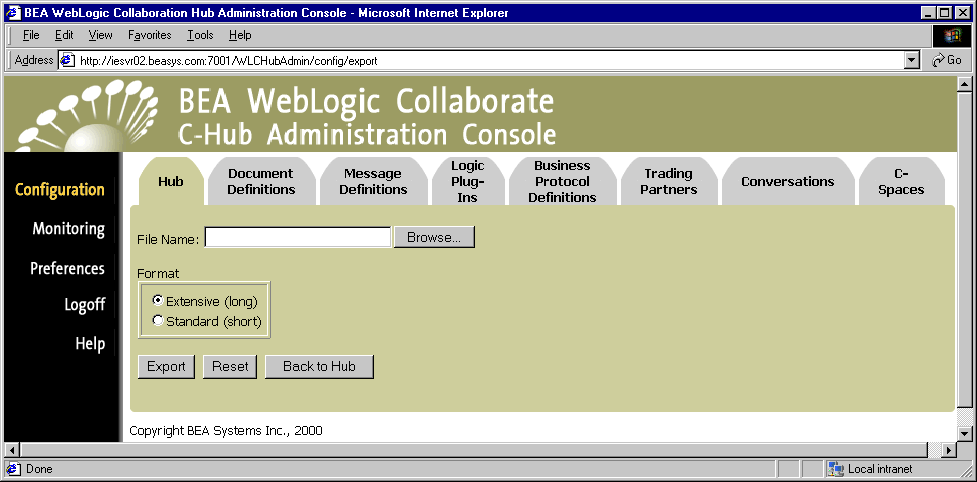
(You can also click Reset to discard your current changes and start again.)
Monitoring a C-Hub
You can monitor the trading activity on a running c-hub by viewing reports on c-spaces, trading partners, conversations, statistics, and error logs. For information on how to monitor a c-hub, see Monitoring the C-Hub.

|

|

|
|
|
|
Copyright © 2001 BEA Systems, Inc. All rights reserved.
|