


|

|
|
|
|
Running the WebLogic Process Integrator Verifier Example
The WebLogic Process Integrator Verifier example application (wlpiverifier), uses WebLogic Process Integrator workflows to exchange business messages in the WebLogic Collaborate environment. This example application demonstrates how WebLogic Process Integrator workflows are integrated into the WebLogic Collaborate environment, and how data is passed between two WebLogic Process Integrator partner workflows (trading partners) in a conversation.
The following sections describe how to run the Verifier example, and how WebLogic Process Integrator workflows are integrated in the WebLogic Collaborate environment:
Note: An installation Verifier example is also provided with WebLogic Collaborate to verify that the product is correctly installed. Before running the WebLogic Process Integrator Verifier example, run the installation Verifier example to ensure that your WebLogic Collaborate environment is configured so that the procedures described in the following sections will work. For information on how to run the installation Verifier example, refer to the BEA WebLogic Collaborate Installation Guide.
Setting Up and Running the WebLogic Process Integrator Verifier Example
You can configure the WebLogic Process Integrator Verifier example to run on one or two instances of WebLogic Server. Execute it on two instances of WebLogic Server before attempting to run it on a single instance.
Running the Example on Two WebLogic Server Instances
The WebLogic Process Integrator Verifier example is in the following location:
Windows
%WLC_HOME%\examples\wlpiverifier
UNIX
$WLC_HOME/examples/wlpiverifier
This example is configured to run on two instances of WebLogic Server. In this example, you start the c-hub on one instance of WebLogic Server, and two c-enablers on the second instance.
Complete the following procedures to set up and run the Verifier example:
Step 1: Configuring WebLogic Collaborate for WebLogic Process Integrator
This ensures that your environment is configured to run WebLogic Process Integrator and WebLogic Server.
Step 2: Building the Example
To build the WebLogic Process Integrator Verifier example application, complete the following procedure:
Windows
prompt> cd %WLC_HOME%
prompt> setEnv.cmd
UNIX
prompt> cd $WLC_HOME
prompt> . ./setenv.sh
Windows
prompt> cd %WLC_HOME%\examples\wlpiverifier
prompt> build.cmd
UNIX
prompt> cd $WLC_HOME/examples/wlpiverifier
prompt> . ./build.sh
Step 3: Starting the C-Hub
To start WebLogic Server and the c-hub, execute the following commands:
Windows
prompt> cd %WLC_HOME%\hub\config\mydomain
prompt> startweblogic.cmd
UNIX
prompt> cd $WLC_HOME/hub/config/mydomain
prompt> . ./startweblogic.sh
Note: Make sure WebLogic Server is still running before proceeding to Step 5: Importing and Deploying the Workflow Templates.
Step 4: Starting the C-Enabler
Windows
prompt> cd %WLC_HOME%
prompt> setEnv.cmd
UNIX
prompt> cd $WLC_HOME
prompt> . ./setenv.sh
Windows
%WLC_HOME%\enabler\config\mydomain
UNIX
$WLC_HOME/enabler/config/mydomain
Listing 3-1 wlpiverifier Example
<!-- for wlpiverifier example
    <StartupClass

Arguments="ConfigFile=xml/enablers.xml,SessionName=caller-session,User=bea,P
assword=12345678,OrgName=BEA"
      ClassName="com.bea.b2b.wlpi.Start"
      Name="WlpiVerifierCaller"
      Targets="myserver"
    />

    <StartupClass

Arguments="ConfigFile=xml/enablers.xml,SessionName=callee-session,User=bea,P
assword=12345678,OrgName=BEA"
      ClassName="com.bea.b2b.wlpi.Start"
      Name="WlpiVerifierCallee"
      Targets="myserver"
    />
 -->
Windows
prompt> startweblogic.cmd
UNIX
prompt> . ./startweblogic.sh
Note: You may get warning messages in the WebLogic Server log indicating that there are no active WebLogic Process Integrator templates for session caller-session in organization BEA. You can ignore these messages and continue to Step 5: Importing and Deploying the Workflow Templates.
For more information about configuring the c-enabler, see the BEA WebLogic Collaborate C-Enabler Administration Guide.
Step 5: Importing and Deploying the Workflow Templates
A WebLogic Process Integrator workflow template is a folder or a container for workflow template definitions. Each workflow template can hold one or more WebLogic Process Integrator workflow template definitions.
To import the workflow templates from the templates directory into WebLogic Process Integrator Studio, and deploy them in WebLogic Process Integrator Studio, complete the following procedure:
Windows
prompt> cd %WLC_HOME%
prompt> setEnv.cmd
UNIX
prompt> cd $WLC_HOME
prompt> . ./setenv.sh
Windows
%WLC_HOME%\wlpi
UNIX
$WLC_HOME/wlpi
Windows
prompt> Studio.cmd
UNIX
prompt> . ./studio.sh
The WebLogic Process Integrator Studio login dialog box is displayed.
Figure 3-1 Logon to WebLogic Process Integrator Dialog Box
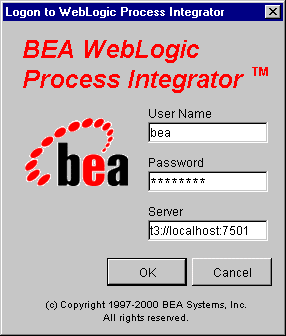
t3://localhost:7501
where localhost represents the name of your machine.
Figure 3-2 WebLogic Process Integrator Studio Main Window
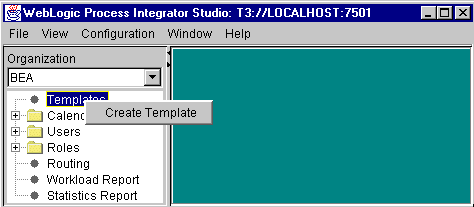
Figure 3-3 Template Properties Dialog Box
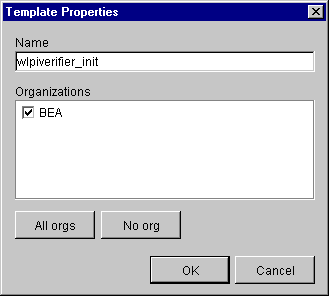
The WebLogic Process Integrator Studio screen displays the two workflow template folders you created.
Figure 3-4 WebLogic Process Integrator Import Template Definitions Menu
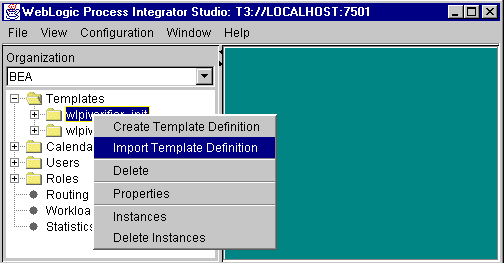
The templates are imported from the templates directory into WebLogic Process Integrator Studio, and displayed as subfolders under the wlpiverifier_init and wlpiverifier_partner folders. The workflow template definitions subfolders are identified by an effective date (see Figure 3-5).
Figure 3-5 WebLogic Process Integrator Workflow Template Folders
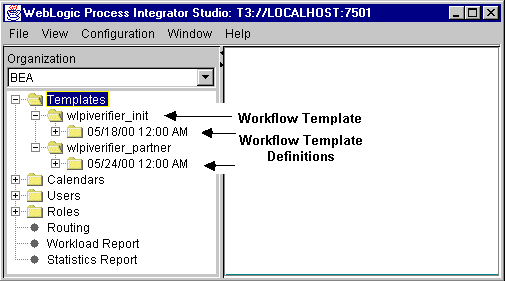
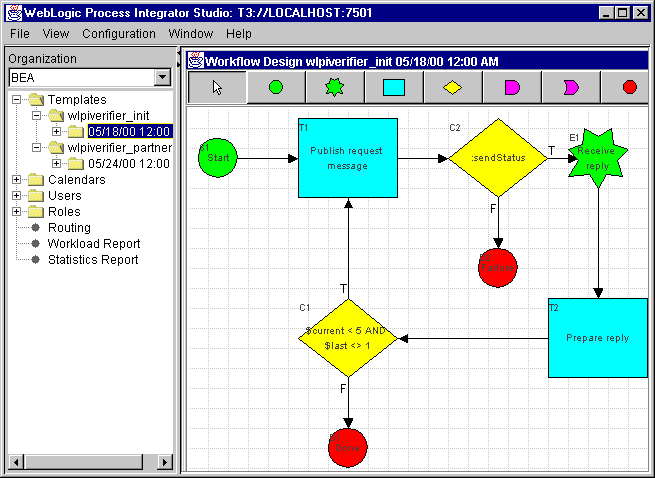
Figure 3-6 WebLogic Process Integrator Workflow Template Definition
The Template Definition dialog box is displayed.
Figure 3-7 Template Definition Dialog Box
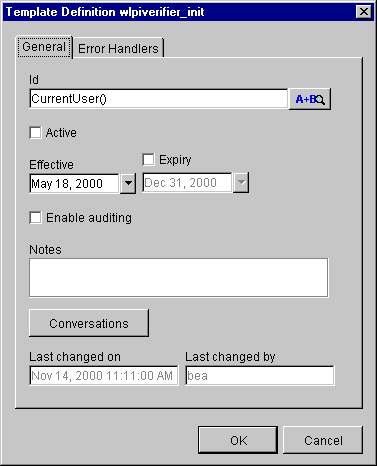
Figure 3-8 Save Workflow Definition Menu
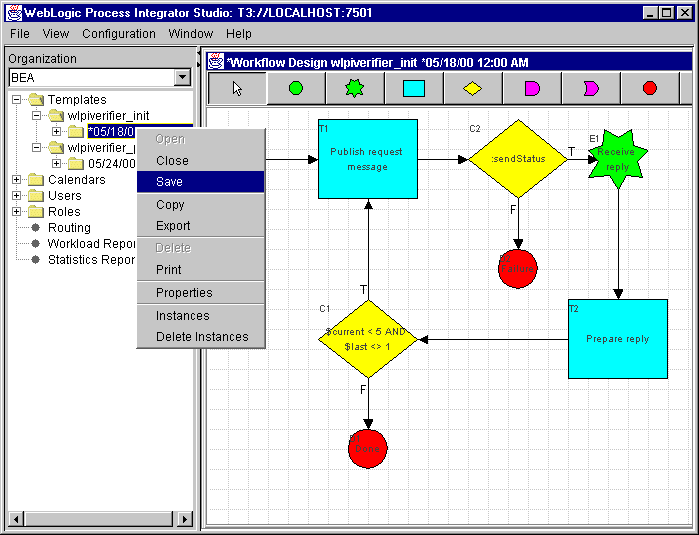
The Template Deployment dialog box is displayed.
Note: This dialog box is displayed only if matching templates were not found by the c-enabler when it started. In that case, you would have seen error messages when you started the c-enabler (see Step 4: Starting the C-Enabler).
Figure 3-9 Template Deployment Dialog Box
The steps to import and deploy the wlpiverifier_init workflow template are complete.
Step 6: Running the Example
To run the WebLogic Process Integrator Verifier example application, complete the following procedure:
http://localhost:7501/wlpiVerifier.html
where localhost represents the name of your machine.
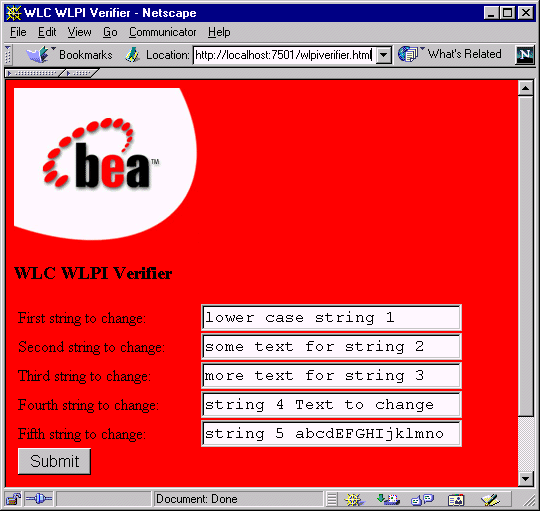
The HTML page used to start the example application is displayed in your browser.
Figure 3-10 WebLogic Process Integrator Verifier Example Start Page
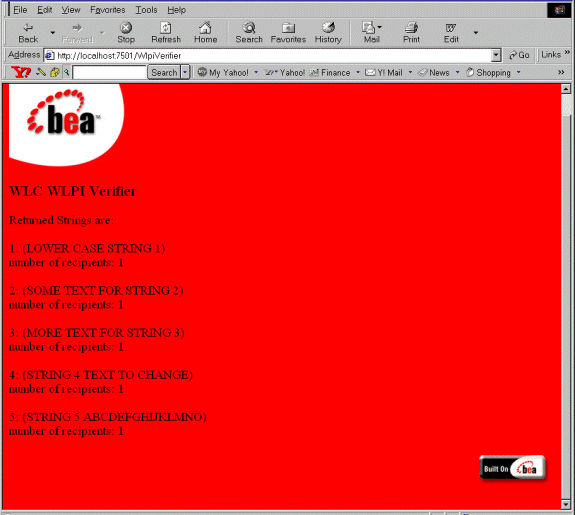
The application starts. If the application executes successfully, a report containing the results is displayed in the browser.
Figure 3-11 WebLogic Process Integrator Verifier Example Report Page
Running the Example on a Single WebLogic Server Instance
When you configure your system to execute the example application on a single instance of WebLogic Server, the c-hub and two c-enablers are colocated on that same instance.
Make sure that the following conditions are met before running the colocated example:
Warning: This procedure deletes your current c-hub configuration. Before proceeding, you can save the existing c-hub configuration by using the C-Hub Administration Console to export it. For more information, see Working With the Bulk Loader in the BEA WebLogic Collaborate C-Hub Administration Guide.
To initialize and reload the c-hub database, complete the following procedure:
Windows
prompt> createDB.cmd [oracle|cloudscape|mssql]
UNIX
prompt> createDB.sh [oracle|cloudscape|mssql]
where the database name you use corresponds to your database.
Windows
prompt> cd %WLC_HOME%\examples\verifier
prompt> bulkloader.cmd [BulkloadOracleconfig.xml | BulkloadCloudscapeconfig.xml |
BulkloadMSSQLconfig.xml]
UNIX
prompt> cd $WLC_HOME/examples/verifier
prompt> bulkloader.sh [BulkloadOracleconfig.xml | BulkloadCloudscapeconfig.xml]
where the XML file you use corresponds to your database.
Configure the Verifier
To configure the Verifier example application to execute on a single instance of WebLogic Server, complete the following procedure.
Windows
prompt> cd %WLC_HOME%
prompt> setEnv.cmd
UNIX
prompt> cd $WLC_HOME
prompt> . ./setenv.sh
Windows
%WLC_HOME%\hub\config\mydomain
UNIX
$WLC_HOME/hub/config/mydomain
Warning: Any comments you add to config.xml are lost when WebLogic Server restarts. Before editing config.xml with an editor, or before restarting WebLogic Server, you should make a backup copy of config.xml by copying it to an alternative location. You can use the backup copy as a guide, if required, to the contents of the config.xml file. Although we have provided code snippets from config.xml in this manual, it is not necessary nor even desirable for you to manually edit config.xml. The code snippets are to allow you to compare your installation to a known working model. You should use the the WebLogic Server Administration Console to modify the server parameters.
    <<StartupClass
      ClassName="com.bea.b2b.hub.Startup"
      Name="WLCStartup"
      Targets="myserver"
      />
    <<JMSServer
      Name="WLCJMSServer"
      Targets="myserver"
    />
config.xml file that applies to the Weblogic Process Integrator example
application running on colocated c-enablers.
<<!-- uncomment next thru JMSServer
element for WLPI colocated with hub -->
Uncomment all the code in the section of the config.xml file. You should uncomment only one of the wlpiPool definitions (the one for the database you are using).
 <<!-- Cloudscape settings -->
    <<JDBCConnectionPool
      CapacityIncrement="1"
      DriverName="COM.cloudscape.core.JDBCDriver"
      InitialCapacity="1"
      LoginDelaySeconds="1"
      MaxCapacity="10"
      Name="wlpiPool"
      Properties="user=none;password=none"
      RefreshMinutes="0"
      ShrinkPeriodMinutes="15"
      ShrinkingEnabled="true"
      Targets="myserver"
      URL="jdbc:cloudscape:wlpidb"
    />
 <<!-- Oracle settings -->
 <<!--
    <<JDBCConnectionPool
      CapacityIncrement="1"
      DriverName="weblogic.jdbc.oci.Driver"
      InitialCapacity="1"
      LoginDelaySeconds="1"
      MaxCapacity="10"
      Name="wlpiPool"
Properties="user=<<ORACLE_USER>;password=<<ORACLE_PASSWORD>;server=<<ORACLE_SERVICENAME>"
      RefreshMinutes="0"
      ShrinkPeriodMinutes="15"
      ShrinkingEnabled="true"
      Targets="myserver"
      URL="jdbc:weblogic:oracle"
      />
  -->
  <<!-- SQL Server settings (MSSQL) -->
  <<!--
    <<JDBCConnectionPool
      CapacityIncrement="1"
      DriverName="weblogic.jdbc.mssqlserver4.Driver"
      InitialCapacity="1"
      LoginDelaySeconds="1"
      MaxCapacity="10"
      Name="wlpiPool"
      Properties="user=<<MSSQL_USER>;password=<<MSSQL_PASSWORD>"
      RefreshMinutes="0"
      ShrinkPeriodMinutes="15"
      ShrinkingEnabled="true"
      Targets="myserver"
      URL="jdbc:weblogic:mssqlserver4:WLCDB@<<MSSQL_HOSTNAME>"
    />
 <<Application
    Name="WLPI Application"
    Path="D:/bea/wlcollaborate1.0.1/lib"
  >
    <<EJBComponent
      Name="wlpi-ejb.jar"
      Targets="myserver"
      URI="wlpi-ejb.jar"
    />
    <<EJBComponent
      Name="wlpi-mdb-ejb.jar"
      Targets="myserver"
      URI="wlpi-mdb-ejb.jar"
    />
  <</Application>
Ensure that the pathname is correct for the WebLogic Collaborate
lib directory on your system.
# Start of WLPI Verifier example
#WLCStartup.WLPIVerifierCaller=com.bea.b2b.wlpi.Start
#ConfigFile=xml/enablers.xml
#SessionName=caller-session
#User=bea
#Password=12345678
#OrgName=BEA
#WLCStartup.WLPIVerifierCallee=com.bea.b2b.wlpi.Start
#ConfigFile=xml/enablers.xml
#SessionName=callee-session
#User=bea
#Password=12345678
#OrgName=BEA# end of WLPIVerifier example
# End of WLPI Verifier example
$WLC_HOME/hub/config/mydomain/applications/DefaultWebApp_myserver/WEB-INF
And search for the following string:
<<!-- uncomment the following for
colocated WLPI verifier example -->
Uncomment that section to register the WlpiVerifier Servlet.
Windows
prompt> startweblogic.cmd
UNIX
prompt> . ./startweblogic.sh
http://localhost:7001/wlpiverifier.html
where
Note: The port number is 7001 for the c-hub instance of WebLogic Server; the port number for the c-enabler instance is 7501 (Step 6: Running the Example).
Understanding the WebLogic Process Integrator Verifier Example
This section describes workflow definitions for the WebLogic Process Integrator Verifier example application. For complete details about integrating workflow templates with WebLogic Collaborate, see Using Workflows to Exchange Business Messages in the BEA WebLogic Collaborate Developer Guide.
Data is passed between WebLogic Process Integrator partner workflows (trading partners) in a WebLogic Collaborate conversation. During execution of the WebLogic Process Integrator Verifier example, the following events occur:
The application code manipulates the business messages that a workflow sends and receives using a class that implements the com.bea.b2b.wlpi.MessageManipulator interface.
Note: When you are using WebLogic Process Integrator Studio, you can view details for actions in any workflow task by double-clicking on the task in the workflow diagram. In the Actions box, click Activated. Select the action and click Update. A dialog box containing Class name, Input variable, and Output variable fields is displayed; the fields contain the name of the Java class to call, the name of a workflow variable to pass to the class, and name of the workflow variable that will be assigned the result of the class execution, respectively.
The wlpiverifier_init Workflow
This section describes the tasks in the wlpiverifier_init workflow diagram, and the variables associated with the wlpiverifier_init workflow.
Note: The variables associated with a workflow are displayed in a subfolder under the workflow template folder. To view the properties for a variable, right-click the variable name in the folder.
The following variables are associated with the wlpiverifier_init workflow:
The following figure shows the wlpiverifier_init workflow.
Figure 3-12 The wlpiverifier_init Workflow
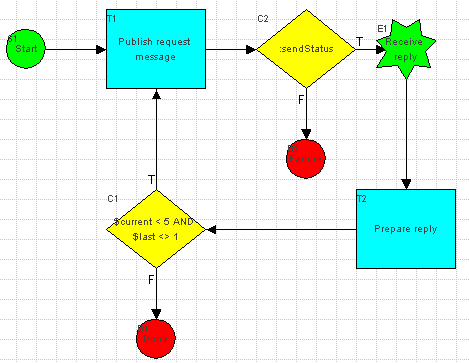
Start Node (Green Circle)
This is the beginning of the workflow. It is started programmatically by WlpiVerifierServlet.java. To see how this is done, refer to the startworkflow method in the servlet class.
Publish Request Message (Blue Box)
This is the first task in the workflow. It consists of the following three actions:
This action makes a request to the specified class. The class is a user implemented class that implements the MessageManipulator interface. (See <WLC_HOME>/examples/wlpiverifier/PrepareQuery.java.) This class implements the manipulate method. The method takes the appropriate workflow variables (requestString) and constructs an XOCP business message. The constructed message is the return value of the method.
This action sends the request message. Associated with this action are the Source variable that holds the request message, the Router Expression that holds the trading partner's name for the message, and the Target role that is the role of the receiver of the message; their values are requestMsg, callee, and string-changer, respectively.
The partner workflow is linked with the conversation and role. A generic conversation handler is registered when the c-enabler session is created. When the first message comes in for the subordinate handler, the handler looks for an entry in the workflow table. Since it does not find one, it starts the workflow and passes it the first message.
This ends the task and moves to the next stage of the workflow.
Decision Box:Send Status (Yellow Diamond)
This decision box determines whether the workflow should end or continue. The value placed in Send Status is evaluated to determine whether the message was sent successfully. If the evaluation is true, the workflow proceeds to the Receive Reply task, if the evaluation is false, the workflow fails and moves to the failure node. This failure node issues a conversation terminate failure to all participants in the conversation.
Receive Reply (Green Star)
This task waits for a business message to arrive, that is, it waits for a response message from the callee (wlpiverifier_partner). Associated with this action is a Target variable (replyMsg). The received business message is assigned to this variable.
Prepare Reply (Blue Box)
This task contains the following actions:
This action is similar to the Manipulate business message using class examples.wlpiverifier.PrepareQuery action in the Publish Request Message task, except that this class processes the returned message and assigns the results from the message to the replyMsg variable. (The replyMsg workflow variable is extracted by the WebLogic Process Integrator Verifier example application to get the data.)
Increments the workflow variable current by 1.
This ends the task and moves to the next stage of the workflow.
Decision Box (Yellow Diamond)
This decision box determines if the count is less than five, and if the last variable is set to true or false. If the action is true, another iteration is performed, sending another message. If the action is false, the workflow terminates.
Done Node (Red Circle)
Terminates the workflow. A conversation terminate success is issued to all participants of the conversation.
The wlpiverifier_partner Workflow
This section describes the tasks in the wlpiverifier_partner workflow diagram, and the variables associated with the wlpiverifier_partner workflow.
Note: The variables associated with a workflow are displayed in a subfolder under the workflow template folder. To view the properties for a variable, right-click the variable name in the folder.
The following variables are associated with the wlpiverifier_partner workflow:
The following figure shows the wlpiverifier_partner workflow.
Figure 3-13 The wlpiverifier_partner Workflow
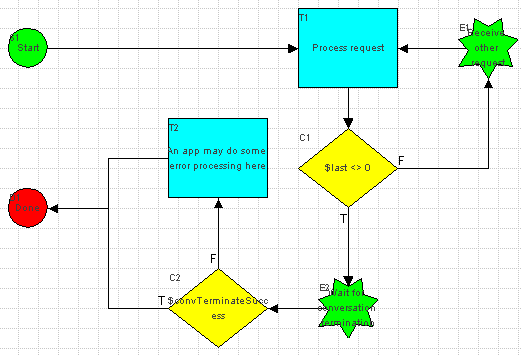
Start Node (Green Circle)
This is the beginning of the wlpiverifier_partner workflow. When a message intended for this workflow arrives, the workflow is started by the c-enabler code. The message is then ready for processing. The format for the business message is specified in the requestMsg variable.
Process Request (Blue Box)
This task consists of the following actions:
This action makes a request to the specified class. The class is a user implemented class that implements the MessageManipulator interface. (See <WLC_HOME>/examples/wlpiverifier/ProcessRequest.java.) This class implements the manipulate method. This method takes the requestMsg workflow input variable, processes the data, and creates a reply message. The reply message is returned in the replyMsg output variable.
This action sends the business message. Associated with this action are the Source variable that holds the request message, the router expression that holds the trading partner's name for the message, and the target role that is the role of the receiver of the message; their values are replyMsg, senderName, and initiator, respectively.
This ends the task and moves to the next stage of the workflow.
Decision (Yellow Diamond)
This decision box determines if the workflow should finish based on the value of the workflow Boolean variable last. If last is set to false, the workflow proceeds to receive another request. If true, the workflow waits for conversation termination.
Receive Other Request (Green Star)
This task waits for a business message to arrive, that is, the Receive Other Request event waits for the next message from the caller (wlpiverifier_init). Associated with this action is a Target variable (requestMsg), and a Sender's Name (senderName ).
Wait for Conversation Termination (Green Star)
This task blocks and waits for the initiator of the conversation (wlpiverifier_init) to terminate the conversation, if the last message has been received. It places the Termination Status in the defined workflow variable (convTerminateSuccess).
Decision (Yellow Diamond)
This decision box determines whether to end the conversation based on the value of the workflow Boolean variable convTerminateSuccess.
An Application May Do Some Error Processing Here (Blue Box)
Error processing tasks can happen at this node in the workflow.
Done Node (Red Circle)
End of the workflow. A conversation leave is issued.
Understanding WebLogic Process Integrator Java Classes
Business operations use WebLogic Process Integrator variables and Java code to manipulate business messages that are exchanged between trading partners. In general, the workflows sequence the flow of data, and Java classes process the data. The Java classes read and write the workflow variables using the WebLogic Process Integrator API.
The following Java classes are used in the WebLogic Process Integrator Verifier example application. For more details about business operations, see Using Workflows to Exchange Business Messages in the BEA WebLogic Collaborate Developer Guide.

|

|

|
|
|
|
Copyright © 2001 BEA Systems, Inc. All rights reserved.
|