

|
|
|
|
|
|
Using Workflows to Exchange Business Messages
You can use WebLogic Process Integrator workflows to exchange XOCP business messages in the WebLogic Collaborate environment. WebLogic Process Integrator accelerates application development by providing a visual design tool for designing workflows (process models); a run-time Process Engine for executing workflows; and process monitoring capabilities. Using WebLogic Process Integrator in the WebLogic Collaborate environment involves a combination of design, programming, and administrative tasks.
The following sections describe how to exchange business messages in WebLogic Collaborate by using WebLogic Process Integrator workflows:
The WebLogic Process Integrator Verifier program provides an example of using WebLogic Process Integrator workflows to exchange business messages in WebLogic Collaborate. For more information, see Running the WebLogic Process Integrator Verifier Example in BEA WebLogic Collaborate Getting Started.
About Using Workflows
The following sections describe key concepts for using WebLogic Process Integrator workflows in WebLogic Collaborate applications:
About This WebLogic Process Integrator Version
The version of WebLogic Process Integrator that is bundled with WebLogic Collaborate provides all of the functionality of WebLogic Process Integrator version 1.2, which ships separately. It also provides additional functionality for integrating with the WebLogic Collaborate environment, including:
For more information about the WebLogic Process Integrator application, see the following documents:
Architectural Overview
This section describes how WebLogic Process Integrator integrates with the WebLogic Collaborate architecture.
Architecture Diagram
The following figure shows the WebLogic Collaborate c-enabler architecture with WebLogic Process Integrator components.
Figure 2-1 C-Enabler Architecture
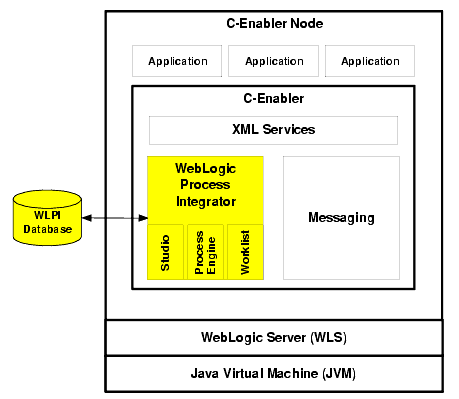
WebLogic Process Integrator is started automatically upon c-enabler startup.
WebLogic Process Integrator Components in WebLogic Collaborate
WebLogic Collaborate provides the following WebLogic Process Integrator components:
For an introduction to these WebLogic Process Integrator components, see WebLogic Process Integrator Overview in the BEA WebLogic Process Integrator Studio User Guide.
Key Concepts
This section describes key concepts that you need to understand before using WebLogic Process Integrator workflows in WebLogic Collaborate applications.
Workflows, Workflow Templates, and Workflow Template Definitions
This section describes the following key WebLogic Process Integrator concepts:
For detailed information about these concepts, see WebLogic Process Integrator Overview in the BEA WebLogic Process Integrator Studio User Guide.
Conversations, Conversation Definitions, and Business Messages
This section defines the following key WebLogic Collaborate concepts:
For detailed information about these concepts, see Overview in BEA WebLogic Collaborate Getting Started.
Initiators and Participants
A conversation involves an initiator who starts the conversation and participants who participate in the conversation once it has started. Each perspective requires a different kind of workflow.
In the context of a business process, these two types of workflows are interlocking. For example, suppose a buyer wanted to obtain bids from various sellers. This business process could be described as follows.
Figure 2-2 Sample Business Process with Two Workflows
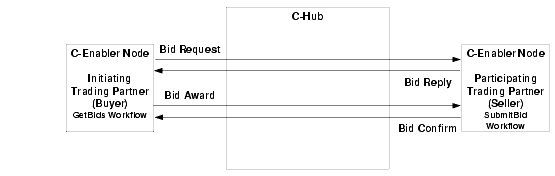
Note: The GetBids workflow is defined with conversation properties and a Manual start property. It is started programmatically by using a Java application.
The SubmitBid workflow processes the incoming bid request, determines whether to submit a bid or not and, if so, constructs and sends a business message (containing a bid reply in the form of an XML document), and awaits the results of the bid selection.
Note: The SubmitBid workflow is defined with conversation properties and a Message Start property.
The GetBids workflow then awaits a bid confirmation from the winning seller.
Alternatively, the seller could return a different business message (containing another XML document, such as a purchase order request) to the seller that would continue the conversation.
Sent and Received Business Messages
When trading partners exchange business messages, initiator and participant workflows both typically send and receive business messages.
It is important to keep in mind which parts of the workflow send business messages and which parts receive them. For example, a buyer might submit a bid request (a business message) to a seller. In this case, the buyer workflow is sending the business message and the seller workflow is receiving it. When the seller replies to the request with a bid (another business message), then the roles are reversed: the seller workflow is the sender and the buyer is the recipient workflow.
The design and programming tasks differ for sending and receiving business messages. However, in both cases, you must define certain properties in the workflow template definition and write application code (that implements the com.bea.b2b.wlpi.MessageManipulator interface) to manipulate the business message.
For more information about working with business messages, see Working with Business Messages.
Run-Time Prerequisites
Before exchanging messages at run time, the following prerequisites must be met:
Summary of Workflow Integration Tasks
Using WebLogic Process Integrator workflows to exchange business messages in WebLogic Collaborate requires a combination of administrative, design, and programming tasks.
Administrative Tasks
Integrating WebLogic Process Integrator workflows requires the following administrative tasks:
Note: Every WebLogic Process Integrator workflow template definition requires a conversation definition.
Design Tasks
Integrating WebLogic Process Integrator workflows requires the following design tasks that you perform in WebLogic Process Integrator Studio:
You can create workflows from scratch, as described in Defining and Maintaining Workflows in the BEA WebLogic Process Integrator Studio User Guide.
Alternatively, you can import workflows created in other versions of WebLogic Process Integrator, as described in Using Workflow Templates Created in Other WebLogic Process Integrator Versions.
In addition to defining the standard workflow properties, you must also define properties that link the workflow to the WebLogic Collaborate messaging system. The remaining tasks in this sequence apply to integrating workflows into WebLogic Collaborate.
You can also assign information from the message token that is returned from a sent message to WebLogic Process Integrator variables, as described in Assigning Message Token Information to WebLogic Process Integrator Variables.
For comprehensive information about workflow design tasks, see Designing Workflows for Exchanging Business Messages.
Note: You can run WebLogic Process Integrator workflows in the WebLogic Collaborate environment even if they are not integrated with WebLogic Collaborate features. For example, you can run workflows created in WebLogic Process Integrator version 1.2 (shipped separately from WebLogic Collaborate) without specifically adapting them to integrate with WebLogic Collaborate.
Programming Tasks
Programming tasks depend on the specific needs of each application that makes use of a workflow. The following tasks are required:
Designing Workflows for Exchanging Business Messages
To use workflows to exchange business messages in WebLogic Collaborate, design workflow template definitions by using WebLogic Process Integrator Studio. In addition to the standard properties described in Defining and Maintaining Workflows in the BEA WebLogic Process Integrator Studio User Guide, you must define additional workflow properties, not described in that document, that allows the workflow to be used in the WebLogic Collaborate environment.
For example, you link a workflow template definition to a particular role in a conversation definition in the c-hub repository. You also define some additional attributes, including the message delivery Quality of Service, message token handling, and conversation termination.
The following sections describe how to design workflows to exchange business messages in the WebLogic Collaborate environment:
Using Workflow Templates Created in Other WebLogic Process Integrator Versions
The version of WebLogic Process Integrator that ships with WebLogic Collaborate is designed to work seamlessly within the WebLogic Collaborate environment. If you have workflows that were designed in other versions of WebLogic Process Integrator, you can use still these workflows in WebLogic Collaborate, but you must complete the following additional tasks to adapt them for use in WebLogic Collaborate:
Note: Standalone versions of WebLogic Process Integrator cannot use workflows that were created or modified using the version of WebLogic Process Integrator Studio that ships with WebLogic Collaborate.
Exporting Workflow Template Definitions
To export a workflow template definition from a WebLogic Process Integrator version that shipped separately from WebLogic Collaborate:
Importing Workflow Template Definitions
To import a previously exported workflow template definition (see Exporting Workflow Template Definitions) into the version of WebLogic Process Integrator that ships with WebLogic Collaborate:
Defining Conversation Properties
Before you use a WebLogic Process Integrator workflow to exchange business messages in WebLogic Collaborate, you define certain conversation properties that are specific to the WebLogic Collaborate environment. For detailed information about defining workflow templates, see Defining and Maintaining Workflows in the BEA WebLogic Process Integrator Studio User Guide.
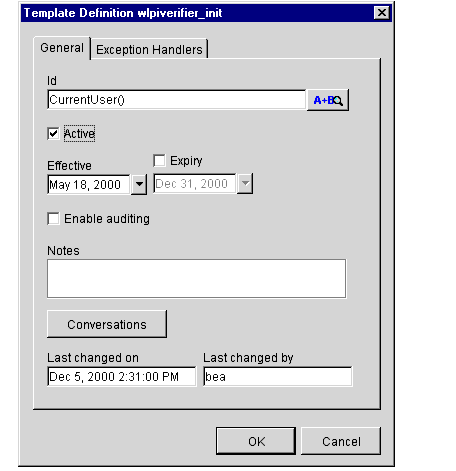
Opening Workflow Template Definitions
To define a workflow template definition in WebLogic Process Integrator Studio:
Figure 2-3 Template Definition Dialog Box
Linking Workflows to Conversations
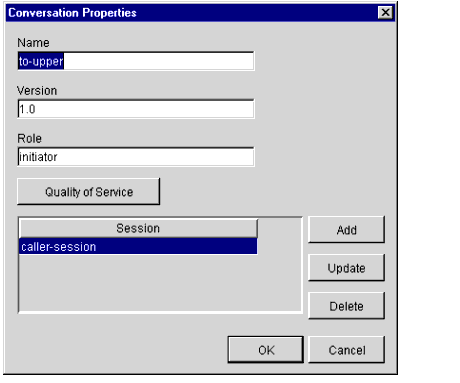
Before you use a WebLogic Process Integrator workflow to exchange business messages in WebLogic Collaborate, you first link the workflow template definition in WebLogic Process Integrator with a particular conversation type (a conversation name, version, and WebLogic Collaborate role) in the WebLogic Collaborate c-hub repository.
To link a workflow template definition with conversation type:
Figure 2-4 Conversation Properties Dialog Box
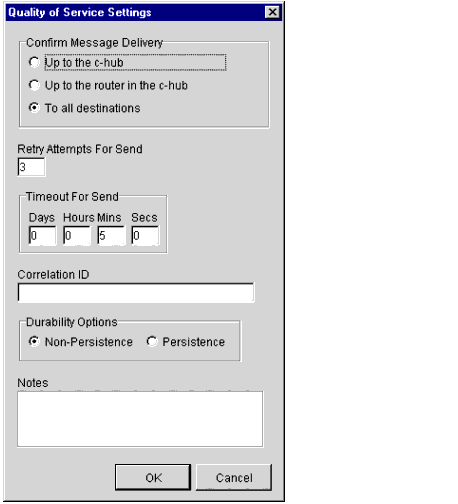
Defining the Quality of Service for Message Delivery at the Template Level
The Quality of Service (QoS) is a set of attributes that are defined for reliable business message publishing. In WebLogic Process Integrator, you can define the QoS at the following levels:
To specify the Quality of Service at the workflow template definition level:
Figure 2-5 Quality of Service Settings Dialog Box
Linking C-Enabler Session Names to a Workflow Template Definition
You can associate a workflow template definition with one or more workflow c-enabler session names. At a minimum, you must link at least one c-enabler session name. The WebLogic Process Integrator Studio allows you to add, update, and delete linked session names.
A workflow template definition can have more than one defined session name. This allows the same workflow template definition (different instances) to be used by different c-enablers in the same conversation. For example, a workflow template definition could be defined with three different session names (such as sessionA, sessionB, and sessionC). Each trading partner in the conversation can then use the appropriate session when providing their own implementation (manipulate message) to process the request.
Session names are defined in the c-enabler XML configuration file. Each session name refers to one session entry in a c-enabler configuration file (which is known only at run time). Each session entry in the c-enabler XML configuration file refers to a specific c-hub, c-space, and trading partner.
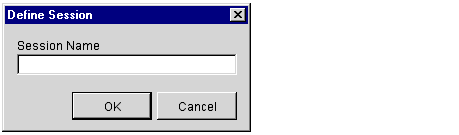
Adding Sessions
To add a session:
Figure 2-6 Define Session dialog box
Updating Sessions
To update a session:
Figure 2-7 Define Session dialog box
Deleting Sessions
To delete a session:
Figure 2-8 Delete Session dialog box

Defining Start Actions
You define a start action based on the type of workflow and according to the following rules:
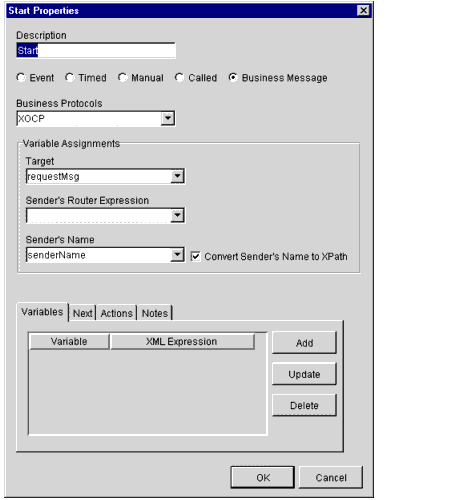
Defining the Start for a Conversation Initiator Workflow
A conversation initiator workflow is started programmatically and must therefore have a Manual start property. For more information, see Developing Applications That Start Conversation Initiator Workflows.
To define the Manual start property for a conversation initiator workflow:
Figure 2-9 Start Properties Dialog Box: Manual Start
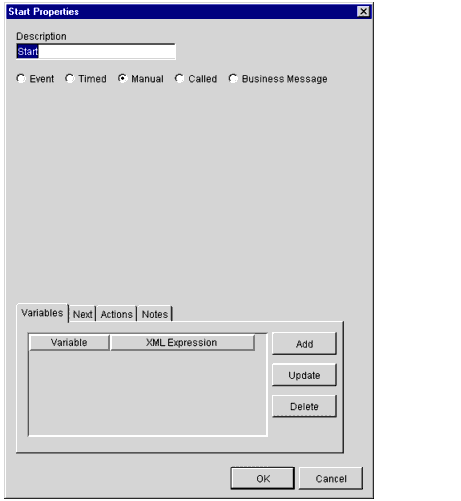
Otherwise, select any other option except Business Message as appropriate. For more information about these options, see Working with Workflow Components in the BEA WebLogic Process Integrator Studio User Guide.
Defining the Start for a Conversation Participant Workflow
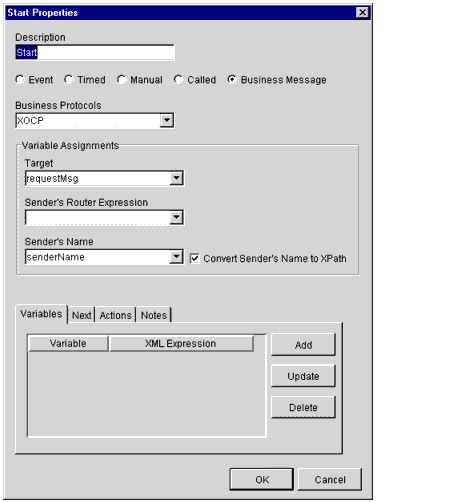
A conversation participant workflow is started when it receives an initial business message from a conversation initiator workflow. You must define a Business Message start state for such workflows.
To define the Business Message start state for a conversation participant workflow:
Figure 2-10 Start Properties Dialog Box: Business Message Start
Defining Conversation Termination
A conversation is terminated when the conversation initiator workflow reaches a done state. Conversation participant workflows can end their participation in a conversation before the conversation is terminated.
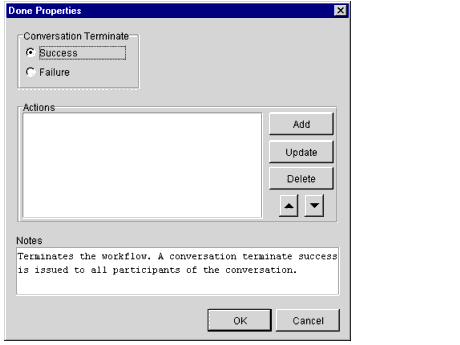
Defining the Termination of Conversation Initiator Workflows
For a conversation initiator workflow, you define the conversation termination property (terminate with success or failure) for any done node in the workflow. Once a done node is reached in the workflow, the running instance of the workflow is marked done, regardless of whether the active workflow has reach all the done nodes. A conversation initiator workflow can terminate a conversation, but other participants in the conversation cannot.
To define the termination for a conversation initiator workflow:
Figure 2-11 Done Properties Dialog Box
Defining the End of Conversation Participant Workflows
A conversation participant workflow has defined conversation properties, a Business Message start property, and (optionally) a Conversation Terminate event. The Conversation Terminate event is used in a participant workflow to wait for a conversation termination signal from the conversation initiator. It allows a participant workflow to perform additional processing (such as housekeeping operations) based on the status of the conversation termination.
Note: The use of this event is optional. A workflow that does not wait for this event can leave the conversation by simply ending the workflow (a Done node).
A workflow event shape represents a notification node. The workflow waits for a conversation terminate to trigger the event. Upon that trigger, actions defined within the event can be executed and/or workflow variables can be set.
To add a Conversation Terminate event to a conversation participant workflow:
Figure 2-12 Event Properties Dialog Box
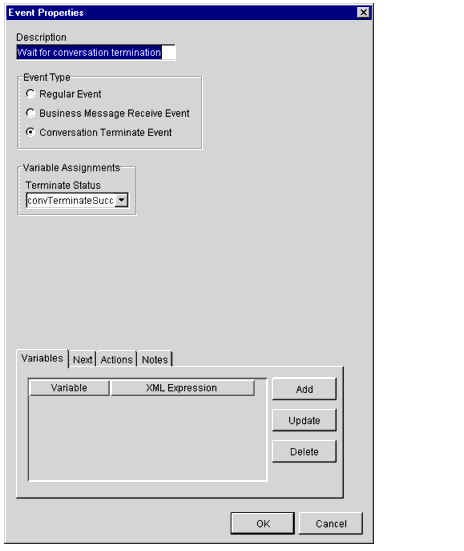
Note: You must explicitly create this Boolean variable before selecting it in this dialog box. For more information, see Defining WebLogic Process Integrator Variables for Business Messages.
WebLogic Process Integrator assigns the conversation terminate status value to a WebLogic Process Integrator Boolean variable, which can be accessed by the workflow or passed to a business operation. The developer of the workflow should take appropriate actions based on this value.
Defining WebLogic Process Integrator Variables for Workflows
A WebLogic Process Integrator variable is typically used to store application-specific information required by the workflow at run time. Variables are created and assigned values largely to "control" the logical path through a workflow instance; the same workflow template definition is instantiated multiple times and can be traversed in different ways if the flow contains decision nodes, which evaluate workflow variable values and branch to either the next True or next False within the workflow, as appropriate.
You must define WebLogic Process Integrator variables for a workflow template definition that contains processes that require variables during run time. During workflow execution, you can access a WebLogic Process Integrator variable in the following ways:
Associations Between WebLogic Process Integrator Variables and Java Data Types
If you access a WebLogic Process Integrator variable within a business operation, you need to know how WebLogic Process Integrator variable types correspond to Java data types. The following table shows how they are related.
Rules for Defining WebLogic Process Integrator Variables
When defining WebLogic Process Integrator variables, comply with the following rules:
Defining Input Variables
Before a WebLogic Collaborate application can set an input variable, you must define it in WebLogic Process Integrator Studio.
To define an input variable:
Figure 2-13 Variables Properties Dialog Box for an Input Variable
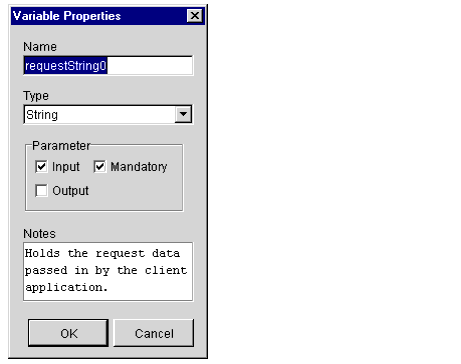
In the preceding example, the variable named requestString0 is declared as an input variable. It is also declared as mandatory, which means that the workflow instance will start only if the WebLogic Collaborate application explicitly sets its value before attempting to start the workflow instance. For more information, see Developing Applications That Start Conversation Initiator Workflows.
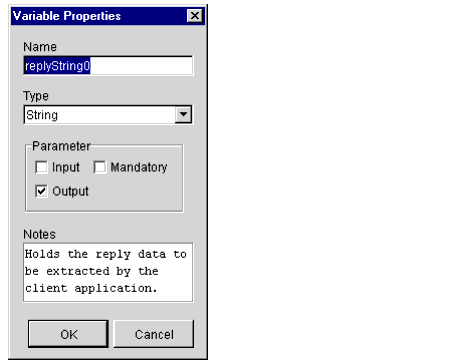
Defining Output Variables
Variables that must be retrieved after the workflow completes must be declared as output variables. Otherwise, their value will not be preserved.
To define an output variable:
Figure 2-14 Variable Properties Dialog Box for an Output Variable
Working with Business Messages
You use WebLogic Process Integrator in conjunction with WebLogic Collaborate to exchange business messages between trading partners. The following sections describe how to work with business messages exchanged by using workflows:
About Business Messages
A business message is the basic unit of communication exchanged between trading partners in a conversation. A business message is a multi-part MIME message that consists of:
You can access the contents of a business message programmatically using XOCP messaging objects, as described in Step 1: Create the Business Message and Receiving an XOCP Business Message.
Summary of Prerequisite Tasks for Exchanging Business Messages
You must perform the following tasks before you can send and receive business messages. Subsequent sections describe these tasks in detail.
This task involves writing the code associated with the Manipulate Business Message action.
For more information, see Writing Business Operations to Manipulate Business Messages.
Defining Variables and Manipulating Business Messages
The following sections describe procedures you perform in regard to both sent and received messages:
Defining WebLogic Process Integrator Variables for Business Messages
At run time, a business message is stored in a WebLogic Process Integrator variable (of type Java Object) when it is ready to be sent or when it has been received. When a business message is ready to be sent, the application code associated with the Manipulate Business Message action constructs the business message and returns it in this variable to the workflow instance. When a business message has been received, the application code associated with the Manipulate Business Message action obtains this variable from the workflow instance and uses it to process the incoming business message.
Note: In WebLogic Collaborate, XOCP business messages are not stored in WebLogic Process Integrator variables of type XML Document.
In WebLogic Process Integrator Studio, you must define the Java Object variables used to store business messages before you define any actions that refer to them, as described in Defining Manipulate Business Message Actions.
For each workflow template definition, you must define a separate variable for each business message that the workflow sends or receives. For example, if a workflow sends a request and receives a reply, you must define variables for both in its workflow template definition.
To define a variable for a business document in WebLogic Process Integrator Studio:
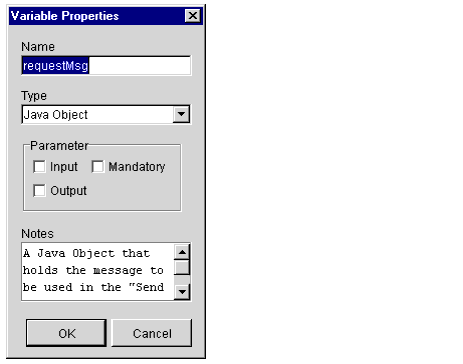
Figure 2-15 Variable Properties Dialog Box
Defining Manipulate Business Message Actions
At run time, the Manipulate Business Message action is invoked to manipulate a business message. If the workflow is sending a business message (such as request), the Manipulate Business Message action runs the associated application code to create the business message and save it in an output variable that is sent subsequently in a Send Business Message action. If the workflow is receiving a business message (such as a reply), the Manipulate Business Message action captures the incoming business message in an input variable and passes it onto the associated application code for processing.
The Manipulate Business Message action can be associated with any of the following nodes: task, decision, event, and start. You must explicitly add the Manipulate Business Message action to the workflow template definition.
Adding a Manipulate Business Message Action
To define the Manipulate Business Message action for a workflow in WebLogic Process Integrator Studio:
Figure 2-16 Add Action Dialog Box
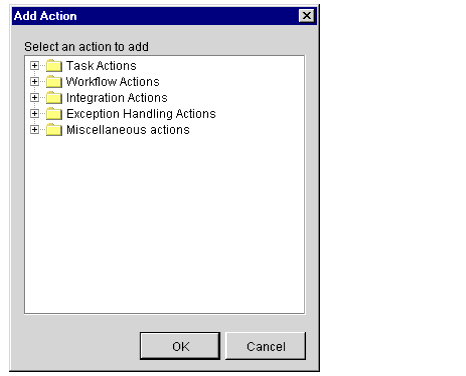
Figure 2-17 Add Action Dialog Box With Integration Actions
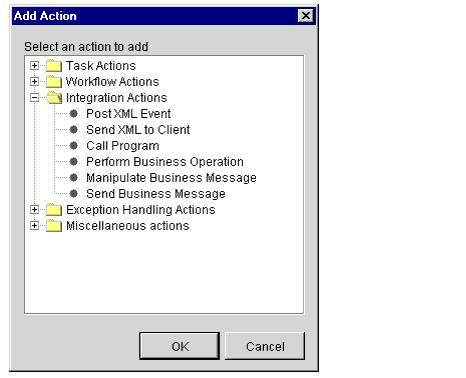
Figure 2-18 Manipulate Business Message Dialog Box
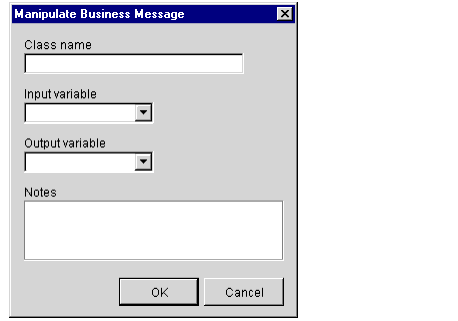
When specifying input or output variables, follow these guidelines:
Example of a Manipulate Business Message Action
For example, suppose you specify the following settings in the Manipulate Business Message dialog box.
|
Field |
Description |
|---|---|
|
Class name |
examples.wlpiverifier.ProcessRequest |
|
Input variable |
requestMsg |
|
Output variable |
replyMsg |
At run time, when the WebLogic Process Integrator Process Engine executes the action with the specified settings, the following events occur:
Writing Business Operations to Manipulate Business Messages
You write business operations that use WebLogic Process Integrator variables and Java code to manipulate business messages that are exchanged between trading partners. The Manipulate Business Message action invokes a special WebLogic Collaborate business operation, a message manipulator, to create a business message to send or to process a business message that has been received. A message manipulator is a Java class that implements the com.bea.b2b.wlpi.MessageManipulator interface.
For more information about defining the message manipulator class and input and output variables for the Manipulate Business Message action, see Defining Manipulate Business Message Actions. For more information about the com.bea.b2b.wlpi.MessageManipulator interface, see the WebLogic Collaborate Javadoc
.Supported Operations
Message manipulators support the following operations for processing business messages:
MessageManipulator Interface
To process business messages that are exchanged between roles in a conversation, workflow applications use Java classes that implement the com.bea.b2b.wlpi.MessageManipulator interface. This interface contains a single operation, manipulate, with the following signature:
XOCPMessage manipulate(WorkflowInstance instance, XOCPMessage in) throws WLPIException;
When calling the manipulate operation, a workflow specifies the following parameters.
The manipulate operation returns an XOCP message generated by the message manipulator. At run time, this XOCP message is stored in the output variable specified in the associated WebLogic Process Integrator Manipulate Business Message action. If this output variable was not specified, then the return value is ignored.
Note: Classes that implement the message manipulator interface must have a public default constructor (a constructor without arguments). The Process Engine uses Java reflection to create objects of that class and therefore invokes the default constructor.
Creating and Defining Messages to Send
The following sections describe how to prepare messages to be sent:
Steps for Creating Business Messages
The PrepareQuery class in the WebLogic Process Integrator Verifier program is an example of a message manipulator that constructs a business message before it is sent. It is called by the Manipulate Business Message action that occurs in the workflow. It returns a reply message (replyMsg variable) that is passed back to the workflow as the business message to send.
Step 1: Import the Necessary Packages
The following listing shows the packages that the PrepareQuery class imports, which includes the XOCP messaging objects that are used to create the XOCP message.
Listing 2-1 Importing the Necessary Packages
package examples.wlpiverifier;

import java.io.*;

import org.apache.xerces.dom.*;
import org.w3c.dom.*;

import com.bea.eci.logging.*;
import com.bea.b2b.wlpi.MessageManipulator;
import com.bea.b2b.wlpi.WorkflowInstance;
import com.bea.b2b.wlpi.WLPIException;

import com.bea.b2b.protocol.conversation.ConversationType;
import com.bea.b2b.enabler.*;
import com.bea.b2b.enabler.xocp.*;
import com.bea.b2b.protocol.messaging.*;
import com.bea.b2b.protocol.xocp.conversation.local.*;
import com.bea.b2b.protocol.xocp.messaging.*;
Step 2: Implement the MessageManipulator Interface
The following listing shows the PrepareQuery class declaration that implements the MessageManipulator interface.
Listing 2-2 Implementing the MessageManipulator Interface
public class PrepareQuery implements MessageManipulator{
...
}
Step 3: Call the Manipulate Method
The code in the following listing calls the manipulate method, which retrieves the current workflow instance object as well as the incoming business message.
Listing 2-3 Calling the manipulate Method
  public XOCPMessage manipulate(WorkflowInstance instance,
                                        XOCPMessage in)
    throws WLPIException{
Step 4: Get the Input Variables from the Current Workflow Instance
The code in the following listing gets the input variables associated with the current workflow instance by calling the getVariable method on the workflow instance.
Note: The WlpiVerifierConstants class contains constant values.
Listing 2-4 Getting the Input Variables
    int current = ((Integer)instance.getVariable(WlpiVerifierConstants.CURRENT)).intValue();

    String req = (String)instance.getVariable(WlpiVerifierConstants.REQUESTSTR + current);
    boolean last;
    if (current < 4){
      try{
        String v = (String)instance.getVariable(WlpiVerifierConstants.REQUESTSTR + (current + 1));
        if (v == null || v.length() == 0)
          last = true;
        else
          last = false;
      }catch (WLPIException e){
        last = true;
      }
    }else
      last = true;

    if (last)
      instance.setVariable("last", new Integer(1));
The code in the following listing creates the request message. For more information about creating XOCP business messages, see Step 1: Create the Business Message.
Listing 2-5 Creating the Request Message
    XOCPMessage xocpmsg = null;
    try{
      DOMImplementationImpl domi = new DOMImplementationImpl();

      // "request" - (param1) The qualified name of the document type to be created.
      // "request" - The document type public identifier.
      // "upper-request.dtd" - The document type system identifier
      DocumentType dType = domi.createDocumentType("request",
"request", "upper-request.dtd");

      org.w3c.dom.Document rq = new DocumentImpl(dType);
      Element root = rq.createElement("request");
      rq.appendChild(root);
      Text t = rq.createTextNode(req);
      root.appendChild(t);
      root.setAttribute("last", last ? "true" : "false");

      xocpmsg = new XOCPMessage("");
      xocpmsg.addPayloadPart(new BusinessDocument(rq));

    }catch(Exception e){
      e.printStackTrace();
      throw new WLPIException("PrepareQuery raised exception:" + e);
    }
Step 5: Return the Request Message
The code in the following listing returns the request message in the variable xocpmsg (of type XOCPMessage) The return value is then assigned to an output variable (of type Java Object) in the workflow in preparation for sending the business message.
Listing 2-6 Returning the Request Message
return xocpmsg;
Defining Send Business Message Actions
After you create a business message in WebLogic Process Integrator using a Manipulate Business Message action and a message manipulator, you send the business message using the Send Business Message action.
To define a Send Business Message action:
Figure 2-19 Add Action Dialog Box
Figure 2-20 Add Action Dialog Box With Integration Actions
Figure 2-21 Send Business Message Dialog Box
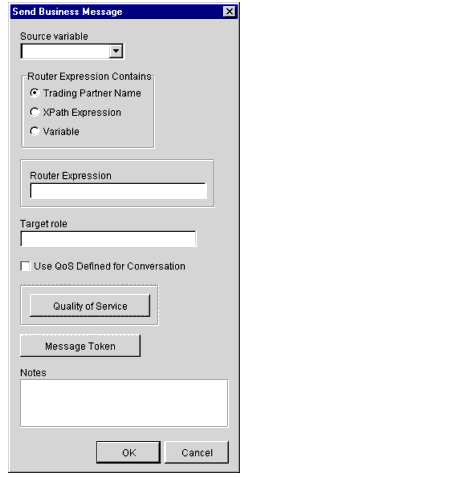
Defining the Quality of Service for Message Delivery for a Send Business Message Action
The Quality of Service (QoS) is a set of attributes that are defined for reliable business message publishing. In WebLogic Process Integrator, you can define the QoS at the following levels:
To define QoS at the Send Business Message level:
Note: The definitions specified here will apply to this Send Message action only, not to all send actions within this conversation.
Assigning Message Token Information to WebLogic Process Integrator Variables
When a business message is sent by the WebLogic Collaborate messaging service, a message token is returned as a Java object at the programming level. The message token provides the information about the message, such as the message ID, conversation ID, send success/failure, the delivery status, and the number of recipient destinations after final selection (router and filter evaluations) at the c-hub. Applications call the getVariable method to get access to this variable.
This variable could be defined as an output variable that gets processed after the workflow ends. A message token is represented by the com.bea.b2b.protocol.messaging.MessageToken class, which is described in the Javadoc and in Message Tokens.
You can configure WebLogic Process Integrator workflows to get access to the message token by assigning the token and its associated information to WebLogic Process Integrator variables. At run time, values are assigned to the workflow instance variables after the Send Business Message action has completed. For more information about message tokens, see Message Tokens.
To assign the message token and its associated information to WebLogic Process Integrator variables:
Figure 2-22 Message Token Assignments Dialog Box
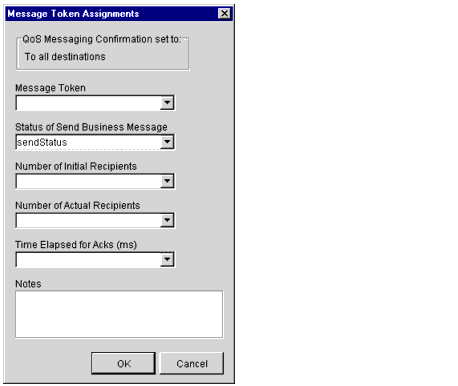
Note: The available options in this dialog box depend on the selected Quality of Service settings, as described in Defining the Quality of Service for Message Delivery at the Template Level.
Defining the Workflow to Receive Business Messages
A workflow can receive a business message in the following circumstances:
The following sections describe procedures for setting up your workflow to receive business messages:
Defining the Business Message Start for Conversation Participant Workflows
To define the Business Message start property for a conversation participant workflow:
Figure 2-23 Start Properties Dialog Box
When a workflow instance is started for the conversation participant workflow, the target variable contains the business message that triggered the conversation. If a router variable is specified, it contains an XPath expression that can be used to reply to the sender. For more information, see Defining Send Business Message Actions.
Defining Business Message Receive Events
If a workflow waits to receive a business message, such as reply to a request or a subsequent (not an initial) request), you must define a Business Message Receive event. This event is triggered at run time when the appropriate business message is received in the conversation.
To define a Business Message Receive event:
Figure 2-24 Event Properties Dialog Box
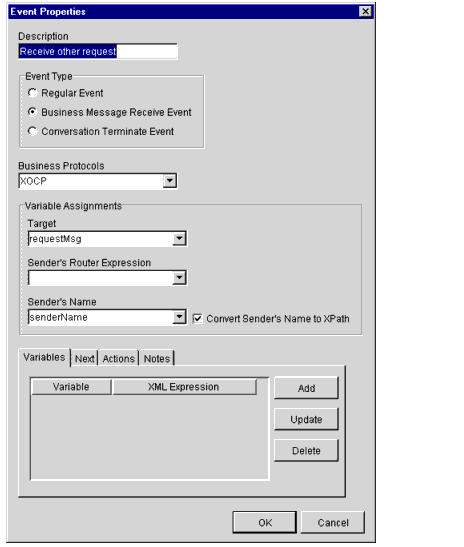
At run time, when the business message is received, the event is triggered and the target variable is set to the business message that was just received. If a router variable is specified, it contains an XPath expression that can be used to reply to the sender. For more information, see Defining Send Business Message Actions.
Steps for Receiving Business Messages
The PrepareReply class in the WebLogic Process Integrator Verifier program is an example of a message manipulator that receives and processes a business message. It is called by the Manipulate Business Message action associated with the Start event (defined as Business Message start event) that is triggered when the initial business message is received from the conversation initiator workflow. It returns a reply message (replyMsg variable) that is passed back to the workflow as the business message to send.
Step 1: Import the Necessary Packages
The code in the following listing shows the packages that the PrepareReply class imports, which includes the XOCP messaging objects that are used to create the XOCP business message.
Listing 2-7 Importing the Necessary Packages
import java.util.*;

import org.apache.xerces.dom.*;
import org.w3c.dom.*;

import com.bea.eci.logging.*;
import com.bea.b2b.wlpi.MessageManipulator;
import com.bea.b2b.wlpi.WorkflowInstance;
import com.bea.b2b.wlpi.WLPIException;
import com.bea.b2b.protocol.messaging.*;
import com.bea.b2b.protocol.xocp.conversation.local.*;
import com.bea.b2b.protocol.xocp.messaging.*;
Step 2: Implement the MessageManipulator Interface
The following listing shows the PrepareReply class declaration that implements the MessageManipulator interface.
Listing 2-8 Implementing the MessageManipulator Interface
public class PrepareReply implements MessageManipulator
Step 3: Call the Manipulate Method
The code in the following listing calls the manipulate method, which retrieves the current workflow instance object as well as the incoming business message (request).
Listing 2-9 Calling the manipulate Method
  public XOCPMessage manipulate(WorkflowInstance instance,
                                       XOCPMessage in)
    throws WLPIException{
Step 4: Process the Request Message
The code in the following listing processes the request message.
Listing 2-10 Processing the Request Message
      PayloadPart[] payload = in.getPayloadParts();

      Document rq = null;
      if (payload != null && payload.length > 0){
        BusinessDocument bd = (BusinessDocument)payload[0];
        rq = bd.getDocument();
      }

      if (rq == null){
        throw new WLPIException("Did not get a request document");
      }

      Element root = rq.getDocumentElement();
      String name = root.getNodeName();
      if (!name.equals("reply")){
        String msg = "Expected reply, found " + name;
        throw new WLPIException(msg);
      }
      if (!root.hasChildNodes()){
        String msg = "No data in reply";
        throw new WLPIException(msg);
      }
      Node value = root.getFirstChild();
      if (value == null){
        String msg = "No text inside request";
        throw new WLPIException(msg);
      }
      if (value.getNodeType() != Node.TEXT_NODE){
        String msg = "Note inside request is not text node";
        throw new WLPIException(msg);
      }
      Text t = (Text)value;
      String data = t.getData();
Step 5: Process the Input Variables Associated with the Current Workflow Instance
The code in the following listing processes the input variables associated with the current workflow instance.
Listing 2-11 Changing the Input Variables
      // get the 'current' variable from the workflow
      int current =
          ((Integer)instance.getVariable(WlpiVerifierConstants.CURRENT)).intValue();
      // assign it to a variable that we can extract later in the client servlet
      instance.setVariable(WlpiVerifierConstants.REPLYSTR + current, data);
      // get the no of recipients that got the message
      Integer noOfRecipients = (Integer)instance.getVariable(WlpiVerifierConstants.RECIPIENTSHOLDER);
      // assign it to a variable that we can extract later in the client servlet
      instance.setVariable(
          WlpiVerifierConstants.RECIPIENTS + current, (Integer)noOfRecipients);

      return null;
  }
Developing Applications That Start Conversation Initiator Workflows
For conversation initiator workflows, you can start the workflow at run time by using WebLogic Process Integrator Worklist or by starting it in a Java application. The following sections describe how to start a conversation initiator workflow programmatically:
To start a conversation initiator workflow programmatically, the start node for the workflow template must have a Manual start property, as described in Defining the Start for a Conversation Initiator Workflow.
WebLogic Process Integrator Integration API
WebLogic Collaborate applications use the com.bea.b2b.wlpi package to start WebLogic Process Integrator workflows. This package provides the following interface and classes.
For details about this package, see the WebLogic Collaborate Javadoc.
Creating Workflow C-Enabler Sessions
Before you start the workflow, the application must first create a workflow c-enabler session with the c-hub. A workflow c-enabler session is a logical session between one c-enabler node and a c-hub that connects the c-enabler node to a c-space.
You can create workflow c-enabler sessions in the following ways:
It is generally more convenient to create workflow c-enabler sessions as part of the bootstrap sequence of the WebLogic Server hosting the c-enabler. To create workflow c-enabler sessions upon WebLogic Server startup, you must specify the com.bea.b2b.wlpi.Start startup class and c-enabler session information while using the WebLogic Server Administration Console to configure the c-enabler node.
The following listing shows a fragment of a sample config.xml file that specifies the startup class and defines a workflow c-enabler session named caller-session.
Listing 2-12 Starting a Workflow C-Enabler Session in the config.xml File
<<StartupClass
Arguments="ConfigFile=xml/enablers.xml,SessionName=caller-session,User=bea,Password=12345678,OrgName=BEA"
      ClassName="com.bea.b2b.wlpi.Start"
      Name="WlpiVerifierCaller"
      Targets="myserver"
    />
For more information about using the WebLogic Server Administration Console, see see the BEA WebLogic Server Administration Guide.
Programming Steps for Accessing Conversation Initiator Workflows
To access a WebLogic Process Integrator conversation initiator workflow, a WebLogic Collaborate workflow application completes the following steps:
The WlpiVerifierServlet in the WebLogic Process Integrator Verifier application provides the sample code for this section. For more information about the WebLogic Process Integrator Verifier application, see Running the WebLogic Process Integrator Verifier Example in BEA WebLogic Collaborate Getting Started.
Step 1: Import the Necessary Packages
To access a WebLogic Process Integrator workflow, a WebLogic Collaborate application begins by importing the necessary package(s). At a minimum, the WebLogic Collaborate application must import the com.bea.b2b.wlpi package, as shown in the following listing.
Listing 2-13 Importing the com.bea.b2b.wlpi Package
import java.io.*;
import java.util.*;
import javax.servlet.*;
import javax.servlet.http.*;
import javax.naming.*;
import com.bea.wlpi.server.*;
import com.bea.wlpi.common.*;
import com.bea.wlpi.server.worklist.*;
import com.bea.wlpi.server.wlcollaborate.*;
import com.bea.b2b.wlpi.*;
import com.bea.eci.logging.*;
Step 2: Initialize Input Variables
If a conversation initiator workflow has input variables defined, you must initialize and assign variables to them in the WebLogic Collaborate application before starting the workflow instance. These input variables must first be declared in the template definition in WebLogic Process Integrator Studio, as described in Defining Input Variables.
Retrieving Values from a Submitted HTML Form
The WlpiVerifierServlet in the WebLogic Process Integrator Verifier application initializes the input variables and retrieves the values that a Web user has entered and submitted in an HTML form, as shown in the following listing from the WebLogic Process Integrator Verifier application.
Listing 2-14 Setting the Value of an Input Variable
// servlet parameters
  private static final String sendParam = "sendstring";
  private static final String idParam = "recipientId";

  // vars to hold parameter values
  private String[] sendStr = new String[5]; // strings to send
  // contains the replies for each sent string
  private String[] reply = new String[sendStr.length];
  // the no of actual recipients for each reply
  private Integer[] noOfRecipients = new Integer[sendStr.length];

  public void doPost(HttpServletRequest req, HttpServletResponse res)
      throws IOException, ServletException{
    try{
      // get the parameters for this servlet
      Enumeration  e = req.getParameterNames();
      String name = null;
      while (e.hasMoreElements()){
        name = (String)e.nextElement();
        String lowName = name.toLowerCase();
        if (lowName.startsWith(sendParam)){
          int index = Integer.parseInt(lowName.substring(sendParam.length()));
          sendStr[index] = req.getParameter(name);
        }
      }//while
Assigning Values by Using the setVariable Method
A WebLogic Collaborate application sets instance variables by calling the setVariable method on the workflow instance, passing the name of the variable and its value. The setVariable method requires the following parameters.
The WlpiVerifierServlet of the WebLogic Process Integrator Verifier application uses the setVariable method to specify values for the request string, as shown in the following listing.
Listing 2-15 Setting the Value of Input Variables
for (int i = 0 ; i < data.length ; i++){
      wi.setVariable(WlpiVerifierConstants.REQUESTSTR + i, data[i]);
Step 3: Establish a Workflow C-Enabler Session
You establish a workflow c-enabler session by accessing the Workflow C-Enabler Session Manager and then retrieving an existing workflow c-enabler session or creating a new one.
Accessing the Workflow C-Enabler Session Manager
WebLogic Collaborate provides a Workflow C-Enabler Session Manager that manages all workflow c-enabler sessions. One Workflow C-Enabler Session Manager exists per WebLogic Server instance. A WebLogic Collaborate application must get access to this Workflow C-Enabler Session Manager by calling the WorkflowEnablerSessionManager.get() method, as shown in the following listing:
Listing 2-16 Accessing the Workflow C-Enabler Session Manager
WorkflowEnablerSessionManager wesm = WorkflowEnablerSessionManager.get();
After accessing the Workflow C-Enabler Session Manager, a WebLogic Collaborate application either creates a new workflow c-enabler session or retrieves an existing one.
Retrieving an Existing C-Enabler Session
If the required workflow c-enabler session already exists (for example, the workflow c-enabler session was created upon WebLogic Server startup, as described in Creating Workflow C-Enabler Sessions), a WebLogic Collaborate application can obtain access to it by calling the getExistingEnablerSession method and passing its workflow c-enabler session name. The workflow c-enabler session name is specified in the c-enabler XML configuration file.
The code in the following listing retrieves an existing workflow c-enabler session in a WebLogic Collaborate application by specifying its name (caller-session):
Listing 2-17 Retrieving an Existing Workflow C-Enabler Session
WorkflowEnablerSession wes = wesm.getExistingEnablerSession(
                  "caller-session");
Creating a New Workflow C-Enabler Session Programmatically
If you do not create workflow c-enabler sessions upon WebLogic Server startup, as described in Creating Workflow C-Enabler Sessions, the WebLogic Collaborate application must do so programmatically. Creating a workflow c-enabler session includes registering a workflow conversation handler for all of the conversation types that are active for the workflow c-enabler session.
Note: A WLPIException will be thrown if the specified workflow c-enabler session was already created in a startup class or by a servlet initialized during the WebLogic server bootstrap.
The code in the following listing creates a workflow c-enabler session in a WebLogic Collaborate application.
Listing 2-18 Creating a Workflow C-Enabler Session
// Define the parameters for the workflow c-enabler session
String configFile = "xml/enablers.xml";
String sessionName = "caller-session";
String orgName = "WAC1";
String user = "bea";
String password = "12345678";

// Get the only WorkflowEnablerSessionManager
WorkflowEnablerSessionManager wesm = WorkflowEnablerSessionManager.get();

// Create a workflow c-enabler session with specified parameters
WorkflowEnablerSession wes = wesm.getEnablerSession(configFile, sessionName, orgName, user, password);
The WebLogic Collaborate application passes the following parameters to the getEnablerSession method.
Step 4: Create a Workflow Instance for a Specific Workflow Template
After establishing a workflow c-enabler session, a WebLogic Collaborate application creates a workflow instance by calling the createInstance method, passing the name of the WebLogic Process Integrator workflow template to use. Calling this method automatically creates a corresponding WebLogic Collaborate conversation associated with this workflow c-enabler session.
The specified workflow template must:
Note: A WebLogic Collaborate application can call the createInstance method to to create any valid workflow instance, regardless of whether the workflow template is linked to a role in a WebLogic Collaborate conversation definition.
The code in the following listing creates a workflow instance.
Listing 2-19 Create a Workflow Instance for the Specified Workflow Template
WorkflowInstance wi = wes.createInstance(WlpiVerifierConstants.INITIAL_TEMPLATEID);
Note: The WlpiVerifierConstants class contains constant values.
Step 5: Start a Workflow Instance
After creating a workflow instance and initializing input variables, a WebLogic Collaborate application starts the workflow instance by calling the start method on the instance, as shown in the following listing.
Listing 2-20 Start a Workflow Instance
wi.start();
Step 6: Wait for the Workflow Instance to Complete
Once a workflow instance has been started, a WebLogic Collaborate application can wait for its completion by calling the waitForCompletion method on the workflow instance. The operation blocks until the workflow instance has completed.
Listing 2-21 Waiting for Completion of the Workflow Instance
private void waitForWorkFlowToEnd(WorkflowInstance wi)
    throws Exception{

    wi.waitForCompletion();
...
}
While waiting for the workflow instance to complete, a WebLogic Collaborate application can determine the completion state of the workflow instance by calling the isCompleted method on the workflow instance. This method returns a Boolean true if the workflow execution completed, or false if not.
Step 7: Handle Results in Output Variables
After a workflow instance has completed, a WebLogic Collaborate application can handle the results of the workflow instance by retrieving the information stored in output variables. These output variables must first be declared in the template definition in WebLogic Process Integrator Studio, as described in Defining Output Variables.
A WebLogic Collaborate application retrieves the value of an instance variable by calling the getVariable method on the workflow instance, passing the name of the variable to retrieve, as shown in the following sample listing.
Listing 2-22 Retrieving the Results in Output Variables
for (int i = 0 ; i < reply.length ; i++){
      try{
        reply[i] = (String)wi.getVariable(WlpiVerifierConstants.REPLYSTR + i);
        noOfRecipients[i] = (Integer)wi.getVariable(WlpiVerifierConstants.RECIPIENTS + i);
The getVariable method returns a Java object that should be cast to the appropriate Java data type, as described in Associations Between WebLogic Process Integrator Variables and Java Data Types.
Step 8: Handling Exceptions
If an error occurs while running a workflow application, a com.bea.b2b.wlpi.WLPIException is thrown. Workflow applications can catch this exception and process it as appropriate, as shown in the following listing.
Listing 2-23 Handling WLPIExceptions in Workflow Applications
catch (WLPIException we){
      String msg = "Exception in Workflow: " + we;
      throw new Exception(msg);

|

|

|
|
|
|
Copyright © 2001 BEA Systems, Inc. All rights reserved.
|

