

|
|
|
|
|
|
Deploying Web Applications
You can use WebLogic Commerce Server and WebLogic Personalization Server services and resources to deploy your e-commerce Web site as a Web application.
Note: Before you read this section, we recommend that you read the BEA WebLogic Server document Writing a Web Application. It contains background information you need, even if you used the WebLogic Commerce Server sample JSP templates and the WebLogic Personalization Server example portal to develop your Web application.
This section describes the process of deploying Web applications that use WebLogic Commerce Server and WebLogic Personalization Server services and resources. It includes the following topics:
About Web Applications
A Web application, as defined by the Java Servlet Specification v2.2, is a set of server-side resources that make up an online application. These resources
include:
WebLogic Commerce Server and WebLogic Personalization Server provide EJBs, classes, and other infrastructure that you need to create Web applications. They also provide sample JSPs and other sample objects that you can use as a template for developing your own Web applications.
Sample Web Applications
The WebLogic Commerce Server and WebLogic Personalization Server software includes three Web applications that you can use as a template for your own Web applications:
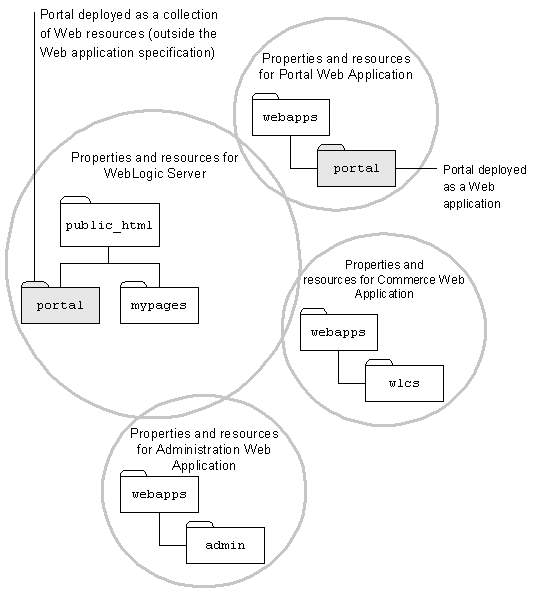
Note: A WebLogic Personalization Server example portal is also installed in $WL_COMMERCE_HOME/server/public_html/portals. This example portal is not a Web application; it does not include a deployment descriptor and it does not use other features that the J2EE specification makes available to Web applications. For more information, refer to the following section, Comparison of Deploying the Example Portals.
Comparison of Deploying the Example Portals
When you install WebLogic Personalization Server, it includes two example portals that differ only in the manner in which they are deployed:
In addition, because it is a Web application, it uses features such as declarative security that the J2EE specification defines for Web applications.
Figure 4-1 illustrates the relationships between Web application properties and resources and WebLogic Server properties and resources. Note that each Web application shares some common properties and resources but contains another set that are not shared. Files deployed under public_html (which is the document root that weblogic.properties establishes) use only the WebLogic Server properties and resources.
Figure 4-1 Web Application Properties and WebLogic Server Properties
Recommendation for Deploying Expanded Directory Hierarchies or WAR Files
Within the Web application specification, you can deploy a Web application as an expanded directory hierarchy or in an archived format such as a .war file.
We recommend that you deploy a Web application as an expanded directory hierarchy when any of the following conditions is true:
If you deploy your Web application as an expanded directory hierarchy, you can also hot deploy modifications to EJBs and some servlets. For more information about hot deployment, see "Using WebLogic Server Hot Deploy" on the WebLogic Server documentation site.
We recommend that you deploy your Web application as a .war file on production sites that do not frequently update files within the Web application. Deploying a single file is less error prone than deploying an expanded directory hierarchy, but you cannot hot deploy a modified .war file.
Registering a Web Application in weblogic.properties
To notify WebLogic Commerce Server and WebLogic Personalization Server that you have added a Web application, you must first shut down the server. Then add the following property to the $WL_COMMERCE_HOME/weblogic.properties file:
weblogic.httpd.webApp.myapp=location
Where:
For example, the administration Web application places the following lines in weblogic.properties file:
# Defines the admin tools Web Application.
weblogic.httpd.webApp.tools=/WLC3/server/webapps/admin/
When deploying in your production environment, consider removing or deactivating (by placing a # character at the beginning of the line) the properties for the example portal and sample JSP templates:
# Defines the example portal WAR deployment.
#weblogic.httpd.webApp.portal=/WLC3/server/webapps/examples/portal/portal.war
# Defines the wlcs Web Application.
#weblogic.httpd.webApp.wlcs=/WLC3/server/webapps/wlcs/
Defining a Default Web Application
You can specify a default Web application so that WebLogic Server interprets any requests for the document root (as defined in weblogic.properties) as a request for the default Web application.
If you are deploying only one Web application, consider making it the default. If you are deploying multiple Web applications, you can create a default Web application that acts as a portal for the other Web applications.
To define a default Web application, add the following property to $WL_COMMERCE_HOME/weblogic.properties:
weblogic.httpd.defaultWebApp=myapp
For more information about default Web applications, refer to "Default Web Application," under "Deploying on WebLogic Server" in the WebLogic Server document Writing a Web Application.
Setting Up a Deployment Descriptor
Each Web application uses a deployment descriptor, formatted in XML, to specify the following information:
If you are using the WebLogic Commerce Server and WebLogic Personalization Server deployment descriptors as a starting point for you own Web application, open $WL_COMMERCE_HOME/server/webapps/wlcs/WEB-INF/web.xml in a text editor and verify or modify the following parameters:
In most environments, you can deploy your Web application without changing the other parameters in the file. For information on modifying parameters to enhance performance in the production environment, refer to the Performance Tuning Guide.
For information on creating your own deployment descriptor, see "Creating the Deployment Descriptor" in the WebLogic Server document Writing a Web Application.
Port Numbers
When generating a URL for a Web application, the createWebflowURL() method refers to the HTTP_PORT and HTTPS_PORT parameters in the Web application's deployment descriptor to determine the port numbers to encode (Listing 4-1).
Listing 4-1 Parameters for Port Numbers
<context-param>
<param-name>HTTP_PORT</param-name>
<param-value>port-number</param-value>
</context-param>
<context-param>
<param-name>HTTPS_PORT</param-name>
<param-value>port-number</param-value>
</context-param>
The WebLogic Commerce Server web.xml already defines these parameters. If you are modifying this file for your own Web application, open $WL_COMMERCE_HOME/server/webapps/wlcs/web.xml and do one of the following:
<!-- -->, or change the values to match the values in $WL_COMMERCE_HOME/weblogic.properties.
To specify a main page for your Web application, use the <welcome-file> parameter (Listing 4-2). If you have named your main page something other than index.jsp, modify the value in your web.xml file.
By specifying a main page, you can access the Web application by specifying the context name in the URL: http://host:port/context-name. You determine the Web application context name when you register it in weblogic.properties. For more information about context names, see Registering a Web Application in weblogic.properties.
Listing 4-2 Parameter for the Main Page
<welcome-file-list>
<!-- This is the entry point to a WLCS site.
Change this appropriately -->
<welcome-file>/index.jsp</welcome-file>
</welcome-file-list>
Session Timeout
The <session-timeout> parameter determines how many minutes of inactivity the server will tolerate before ending the session (Listing 4-3). The $WL_COMMERCE_HOME/server/webapps/wlcs/web.xml file sets the parameter to 15 minutes. You can modify this setting depending on your security needs.
Listing 4-3 Parameter for Session Timeout
<!-- Commerce Server Session Configuration -->
<session-config>
<!-- The default session timeout interval is 15 minutes. This is measured based on session inactivity - that is, the session will be invalidated 15 minutes after a client last accesses WLCS.
Configure this to a suitable interval -->
<session-timeout>15</session-timeout>
</session-config>
Security Declarations
You set up security declarations for your Web application in the deployment descriptor. The security declarations do the following:
The WebLogic Commerce Server web.xml file includes the following parameters to establish one role, called CustomerRole (Listing 4-4).
Listing 4-4 Parameters for Establishing Roles
<security-role>
<description>Registered customers with role "CustomerRole"</description>
<role-name>CustomerRole</role-name>
</security-role>
When users create a user account through WebLogic Commerce Server, Pipeline components add the username to the CustomerRole.
If you set up Pipeline components to add users to other roles, you must declare each role in the Web application's deployment descriptor by adding parameters that are illustrated in Listing 4-4, substituting the <role-name> value with the name of the role you created.
Establish Security Constraints
After defining roles, you can specify a collection of resources (JSPs) that only specific roles can access.
The security constraint in Listing 4-5 is an excerpt from $WL_COMMERCE_HOME/server/webapps/wlcs/web.xml. If you are using this file as a template for your own deployment descriptor, make sure that the <url-pattern> parameters match any JSPs that you want to be accessible only to users in the CustomerRole. You can add <url-pattern> parameters to specify new directories or to specify specific files. Note that a pattern or filename must start with a / character (forward slash). For more information on specifying URL patterns, refer to the Java Servlet Specification v2.2.
If you add any URL patterns to the <security-constraint> element, you must also add those patterns to the patterns defined for <param-name>HTTPS_URL_PATTERNS</param-name>. For more information, see Determine Which Links Use HTTPS.
To give another role access to the resource collection, add <role-name> elements to the <auth-constraint> element.
Listing 4-5 Security Constraint for A Collection of Resources
<security-constraint>
<!-- Define a resource collection -->
<web-resource-collection>
<web-resource-name>Customer Profile - Self Administration Pages</web-resource-name>
<description>Customer Profile - Self Administration Pages</description>
<!-- URL pattern for the resource collection -->
<url-pattern>/commerce/user/*</url-pattern>
<url-pattern>/commerce/order/*</url-pattern>
<http-method>GET</http-method>
<http-method>POST</http-method>
</web-resource-collection>
<!-- This constraint applies to users with role "CustomerRole" -->
<auth-constraint>
<description>Users with role "CustomerRole"</description>
<role-name>CustomerRole</role-name>
</auth-constraint>
<!-- For enabling SSL, specify CONFIDENTIAL or INTEGRAL. -->
<user-data-constraint>
<transport-guarantee>CONFIDENTIAL</transport-guarantee>
</user-data-constraint>
</security-constraint>
Determine Which Links Use HTTPS
The security constraints described in the previous topic identify files that only specific roles can access. In addition to declaring a set of files secured by role, you also declare a set of files, pipelines, and input processors that need to be accessed via HTTPS. When the createWebflowURL() method encounters one of the resources you declare, it generates a URL that uses the HTTPS protocol.
Listing 4-6 is an excerpt from $WL_COMMERCE_HOME/server/webapps/wlcs/web.xml. If you are using this file as a template for your own deployment descriptor, make sure that the <param-value> values match any JSPs, pipelines, and input processors that you want to be accessed via HTTPS.
You can add <param-value> values to name specific resources or to name new patterns. Name specific resources by adding their name to the list. When naming specific pipelines and input processors, do not use the .inputprocessor or .pipeline extension.
Specify patterns for pipelines and input processors in the form of pattern_*. For example, to enable SSL for all requests to input processors whose names start with profileeditcc_, use the pattern profileeditcc_*.
If you add any target names or patterns to the <param-value> element, you must also add them to the <security-constraint> element, which is described in Establish Security Constraints.
Listing 4-6 Parameters for Generating Links to Secured Resources
<context-param>
<param-name>HTTPS_URL_PATTERNS</param-name>
<param-value>
/commerce/user/*,/commerce/order/*,/commerce/register/*,
newuser_*,profilenewcc_*,paymentnewcc_*,profileeditcc_*,
paymenteditcc_*,viewprofile_*,editprofile_*,profilenewaddress_*,
profileeditaddress_*,changepassword_*,EnterShippingInfo_*,
SelectShippingAddress_*,AddNewShippingAddress_*,orderhistory_*,
RefreshOrderHistory,AuthorizePayment,CommitOrder,
RefreshPaymentHistory,DeleteCreditCard,TaxVerifyShippingAddress_*,
shoppingcart_InitShippingMethodList
</param-value>
</context-param>
Restarting the Server
After modifying properties files for the Web application, you can start WebLogic Commerce Server and WebLogic Personalization Server. For information on starting the server, refer to Starting the Server.
For a description of the URLs you use to access Web applications, see the WebLogic Server topic "URLs and Web Applications" in Writing a Web Application.

|

|

|
|
|
|
Copyright © 2001 BEA Systems, Inc. All rights reserved.
|