

|
|
|
|
|
|
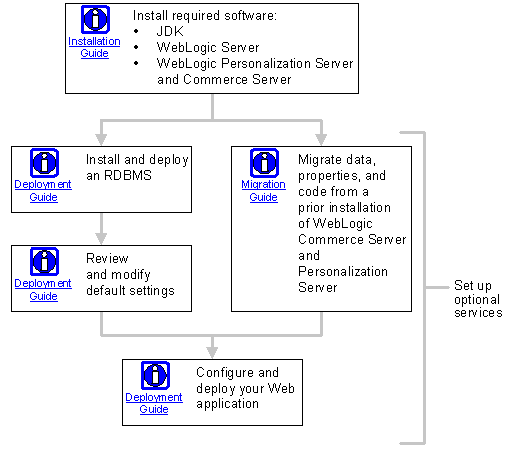
Installation and Deployment Roadmap
Installing and deploying your e-commerce Web site and portal consists of the following phases (see Figure 1-1):
At any time during the installation and deployment process, you can Set Up Optional Services.
Figure 1-1 Installation and Deployment Roadmap
Install Required Software
To install the required software, you must complete the following steps in order:
Note: At this point, we recommend that you test your WebLogic Commerce Server and Personalization Server installation by starting the server and reviewing the sample e-commerce Web site, example portal, and the Administration tool.
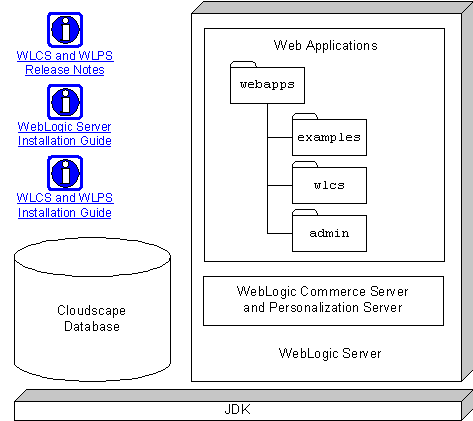
Figure 1-2 illustrates the results of this installation phase, and the documents you need to complete it.
Figure 1-2 Installation Phase
Install and Deploy an RDBMS
The Cloudscape database that WebLogic Commerce Server and Personalization Server includes with its installation is intended only to demonstrate basic Commerce Server and Personalization features. For your production Web site, install and deploy a database management system that WebLogic Commerce Server and Personalization Server supports for production environments.
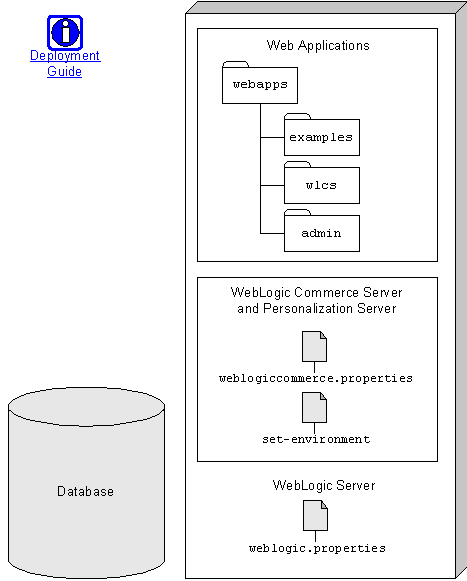
In addition to using the RDBMS installation media and setting properties in the RDBMS, you must modify settings in three WebLogic Commerce Server and Personalization Server configuration files: weblogic.properties, weblogicommerce.properties, and set-environment (see Figure 1-3).
For more information, refer to "Supported Platforms" in the Release Notes. For information on installing and deploying database schemas, refer to the Deployment Guide.
Figure 1-3 Database-Schema Deployment Phase
Review and Modify Default Settings
Although the default settings that the WebLogic Commerce Server and Personalization Server installation program configures are sufficient for most development environments, we recommend that you review and, if necessary, modify the following settings:
In addition, if you have created any EJBs that are not included with WebLogic Commerce Server and Personalization Server, see "Deploy Additional EJBs" under "Review Server Defaults" in the Deployment Guide.
For information on tuning these default settings for a production environment, refer to the Performance Tuning Guide.
Migrate from a Prior Release
If you are upgrading from a previous release of WebLogic Commerce Server and Personalization Server, upgrade your database to the current schema and migrate your data into the new data structures. For information on migrating to a new release, refer to the Migration Guide.
Configure and Deploy Your Web Application
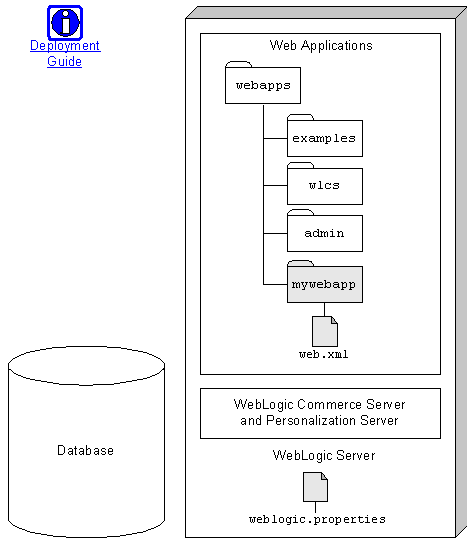
Towards the end of your Web site development cycle, we recommend that you package the Web site as a Web application by configuring the weblogic.properties file and by creating a deployment descriptor for your Web application (see Figure 1-4). For more information, see "Deploying Web Applications" in the Deployment Guide.
Note: While the Web application specification provides many desirable features for a production environment, these features may slow your progress during the initial phases of your development cycle. For more information, see "Recommendation for Deploying Inside or Outside the Web Application Specification" under "Deploying Web Applications" in the Deployment Guide.
Figure 1-4 Web Application Deployment Phase
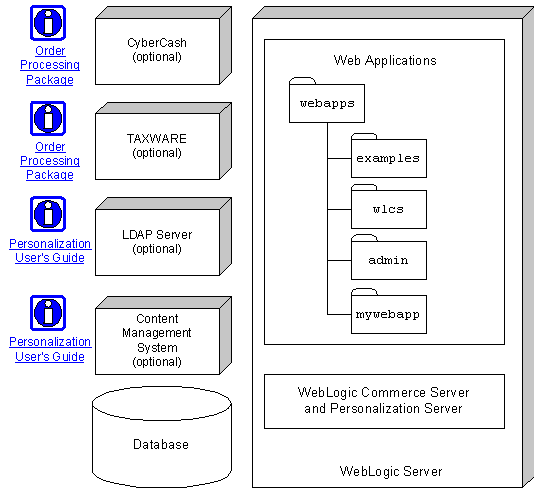
Set Up Optional Services
Any time after the installation phase, you can set up optional services for WebLogic Commerce Server and Personalization Server (see Figure 1-5):
Figure 1-5 Set Up Optional Services

|
|
|
|
Copyright © 2001 BEA Systems, Inc. All rights reserved.
|