
HOME | SITE MAP | SEARCH | CONTACT | GLOSSARY | PDF FILES | WHAT'S NEW
GETTING STARTED | TABLE OF CONTENTS | PREVIOUS TOPIC | NEXT TOPIC | INDEX
|
|
BEA WebLogic Enterprise 4.2 Developer Center | |
|
HOME | SITE MAP | SEARCH | CONTACT | GLOSSARY | PDF FILES | WHAT'S NEW |
||
|
GETTING STARTED | TABLE OF CONTENTS | PREVIOUS TOPIC | NEXT TOPIC | INDEX |
||
This chapter discusses the following topics:
Table 2-1 outlines the development process for WLE applications.
The steps in the development process are described in the following topics.
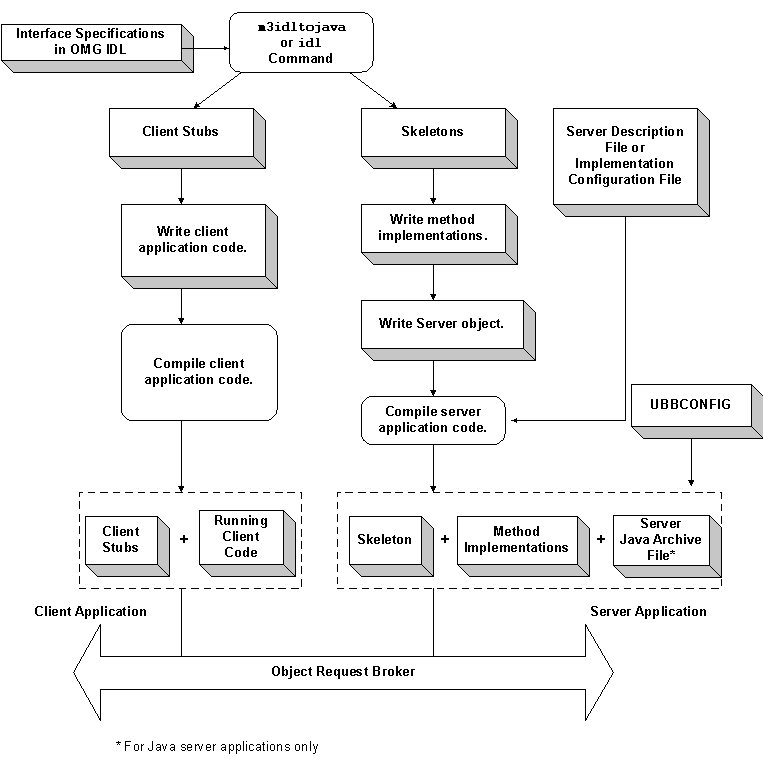
Figure 2-1 illustrates the process for developing WLE applications.
Throughout this topic, the Simpapp sample application is used to demonstrate the development steps. C++ and Java versions of the Simpapp sample application are available.
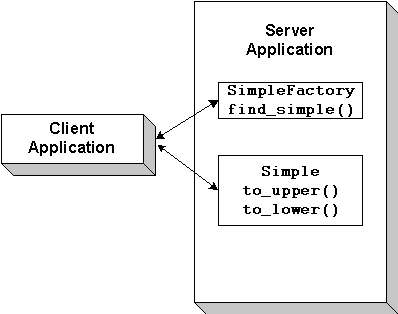
The server application in the Simpapp sample application provides an implementation of a CORBA object that has the following two methods:
Overview of the Development Process for WLE Applications
Figure 2-1 Development Process for WLE Applications
The Simpapp Sample Application
upper method accepts a string from the client application and converts the string to uppercase letters.
Figure 2-2 illustrates how the Simpapp sample application works.
Figure 2-2 Simpapp Sample Application
The source files for the C++ and Java versions of the Simpapp sample application are located in the \samples\corba\simpapp and \samples\corba\simpap_java directories of the WLE software. Instructions for building and running the Simpapp sample applications are in the readme files in the directories. For the instructions for building and running the Java Simpapp sample application, see Guide to the Java Sample Applications on the Online Documentation CD.
Note: The Simpapp sample applications demonstrate building C++ client and server applications and Java client and server applications. For information about building a simple ActiveX client application, see the description of the Basic sample application in the Guide to the University Sample Applications on the Online Documentation CD.
The WLE product offers a suite of sample applications that demonstrate and aid in the development of WLE applications. For an overview of the available sample applications, see the topic "Additional WLE Sample Applications."
The first step in writing a WLE application is to specify all of the CORBA interfaces and their methods using the Object Management Group (OMG) Interface Definition Language (IDL). An interface definition written in OMG IDL completely defines the CORBA interface and fully specifies each operation's arguments. OMG IDL is a purely declarative language. This means that it contains no implementation details. Operations specified in OMG IDL can be written in and invoked from any language that provides CORBA bindings.
The Simpapp sample application implements the CORBA interfaces listed in Table 2-2.
Listing 2-1 shows the simple.idl file that defines the CORBA interfaces in the Simpapp sample application. The same OMG IDL file is used by both the C++ and Java Simpapp sample applications.
Listing 2-1 OMG IDL Code for the Simpapp Sample Application
#pragma prefix "beasys.com"
interface Simple
{
     //Convert a string to lower case (return a new string)
     string to_lower(in string val);
     //Convert a string to upper case (in place)
     void to_upper(inout string val);
};
interface SimpleFactory
{
     Simple find_simple();
};
The interface specification defined in OMG IDL is used by the IDL compiler to generate client stubs for the client application, and skeletons for the server application. The client stubs are used by the client application for all operation invocations. You use the skeleton, along with the code you write to create the server application that implements the CORBA objects.
During the development process, use one of the following commands to compile the OMG IDL file and produce client stubs and skeletons for WLE client and server applications:
idl command. For a description of the idl command, see C++ Programming Reference on the Online Documentation CD.
Table 2-3 lists the files that are created by the
Table 2-4 lists the files that are created by the
The WLE software supports C++ and Java server applications. The steps for creating server applications are:
idl command.
Table 2-3 Files Created by the IDL Command
m3idltojava command.
Table 2-4 Files Created by the
m3idltojava CommandStep 3: Writing the Server Application
For a detailed description of how to create server applications, see the following on the Online Documentation CD:
After you compile the OMG IDL file, you need to write methods that implement the operations for each interface in the file. An implementation file contains the following:
Writing the Methods That Implement Each Interface's Operations
activate_object and deactivate_object methods (optional)
You can write the implementation file by hand. However, both the You also need to write an implementation for the factory that is used to create the objects in your application. You can include the implementation for the factory object in the same file with the other implemenations in your WLE application, or youu can include it in a seperate file.
Writing an implementation for a factory object is different than writing an implementation for other types of objects, because you need to define a specific set of information for the factory. For more information about writing implementations for factories, see Creating C++ Server Applications or Creating Java Server Applications on the Online Documentation CD.
Listing 2-2 includes the C++ implementations of the Simple and SimpleFactory interfaces in the Simpapp sample application.
Listing 2-3 includes the Java implementation of the Simple interface from the Simpapp sample application.
Listing 2-4 includes the Java implementation of the SimpleFactory interface from the Simpapp sample application.
The Server object performs the following tasks:
idl and m3idltojava commands have an option that generates a template for implementation files. For information about using this template, see Creating C++ Server Applications or Creating Java Server Applications on the Online Documentation CD.
Listing 2-2
C++ Implementation of the Simple and SimpleFactory Interfaces
// Implementation of the Simple_i::to_lower method which converts
// a string to lower case.

char* Simple_i::to_lower(const char* value)
{
     CORBA::String_var var_lower = CORBA::string_dup(value);
     for (char* ptr = v_lower; ptr && *ptr; ptr++) {
         *ptr = tolower(*ptr);
     }
     return var_lower._retn();
}
// Implementation of the Simple_i::to_upper method which converts
// a string to upper case.
void Simple_i::to_upper(char*& valuel)
{
CORBA::String_var var_upper = value;
var_upper = CORBA::string_dup(var_upper.in());
for (char* ptr = var_upper; ptr && *ptr; ptr++) {
*ptr = toupper(*ptr);
}
value = var_upper._retn();
}
// Implementation of the SimpleFactory_i::find_simple method which
// creates an object reference to a Simple object.
Simple_ptr SimpleFactory_i::find_simple()
{
CORBA::Object_var var_simple_oref =
TP::create_object_reference(
_tc_Simple->id(),
"simple",
CORBA::NVList::_nil()
);
}
Listing 2-3
Java Implmentation of the Simple Interface
import com.beasys.Tobj.TP;

/**The SimpleImpl class implements the to_upper and to_lower
/**methods.


public class SimpleImpl extends _SimpleImplBase
{
/*Converts a string to upper case.*/

	public void to_upper(org.omg.CORBA.StringHolder data)
	{
		if (data.value == null)
		     return;
		data.value = data.value.toUpperCase();
		return;
	}
/*Converts a string to lower case.*/

	public String to_lower(String data)
	{
		if (data == null)
		     return null;
		return data.toLowerCase();
	}
}
Listing 2-4
Java Implementation of the SimpleFactory Interface
import com.beasys.Tobj.TP;

/**The SimpleFactoryImpl class provides code to create the Simple /**object.


public class SimpleFactoryImpl extends _SimpleFactoryImplBase
{
/*Create an object reference to a Simple object*/
public Simple find_simple()
{
org.omg.CORBA.Object simple_oref =
TP.create_object_reference(
SimpleHelper.id(), //Repository ID
"simple", //object id
null //routing criteria
);
//Send back the narrowed reference
return SimpleHelper.narrow(simple_oref);
};
};
}; Creating the Server Object
In C++ server applications, the Server object is already instantiated and a header file for the Server object is available. You implement methods that initialize and release the server application, and, if desired, create servant objects.
Listing 2-5 includes the C++ code from the Simpapp sample application for the Server object.
In Java server applications, you implement the Server object by creating a new class that derives from the Listing 2-6 includes the Java code from the Simpapp sample application for the server object.
As part of server development, you determine what events cause an object to be activated and deactivated by assigning object activation policies, as follows:
Listing 2-5
C++ Server Object
static CORBA::Object_var static_var_factory_reference;
// Method to start up the server
CORBA::Boolean Server::initialize(int argc, char* argv[])
{
	// Create the Factory Object Reference

	static_var_factory_reference =
	    TP::create_object_reference(
		_tc_SimpleFactory->id(),
		"simple_factory",
		CORBA::NVList::_nil()
	    );
	// Register the factory reference with the FactoryFinder

	TP::register_factory(
	     static_var_factory_reference.in(),
	    _tc_SimpleFactory->id()
	);
	return CORBA_TRUE;
}
// Method to shutdown the server

void Server::release()
{
// Unregister the factory.

  try {
	TP::unregister_factory(
	    static_var_factory_reference.in(),
	    _tc_SimpleFactory->id()
	);
  }
  catch (...) {
	TP::userlog("Couldn't unregister the SimpleFactory");
  }
}
// Method to create servants

Tobj_Servant Server::create_servant(const char*
 interface_repository_id)
{
	if (!strcmp(interface_repository_id,
	_tc_SimpleFactory->id())) {
		return new SimpleFactory_i();
	}
	if (!strcmp(interface_repository_id,
	_tc_Simple->id())) {
		return new Simple_i();
	}
	return 0;
}com.beasys.Tobj.Server class and overrides the initialize and release methods. In the server application code, you can also write a public default constructor for the Server object.
Listing 2-6
Java Server Object
import com.beasys.Tobj.TP;
public class ServerImpl
	extends com.beasys.Tobj.Server
{
	static org.omg.CORBA.Object factory_reference;
/**Method to start up the server*/
public boolean initialize(String[] args)
{
try {
// Create the factory object reference.
factory_reference = TP.create_object_reference(
SimpleFactoryHelper.id(),
"simple_factory",
null
);// Register the factory reference with the FactoryFinder
TP.register_factory(
factory_reference,
SimpleFactoryHelper.id()
);return true;
	} catch (Exception e){
			TP.userlog("Couldn't initialize server: " +
			e.getMessage());
			e.printStackTrace();
			return false;
		}
	}
/** Method to shutdown the server*/

	public void release()
	{
		try {
			TP.unregister_factory(
			       factory_reference,
			SimpleFactoryHelper.id()
			        );
		} catch (Exception e){
			TP.userlog("Couldn't unregister the
			SimpleFactory: " + e.getMessage());
			e.printStackTrace();
		}
	}
}
Defining an Object's Activation Policies
genicf command.
Note:
You also define transaction policies in the ICF and Server Description Files. For information about using transactions in your WLE application, see the topic "Using Transactions."
The WLE software supports the following activation policies:
The Simple interface in the Simpapp sample application is assigned the default activation policy of method. For more information about managing object state and defining object activation policies, see Creating C++ Server Applications and Creating Java Server Applications on the Online Documentation CD.
The WLE software supports the following types of client applications:
Step 4: Writing the Client Application
The steps for creating client applications are as follows:
The client development steps are illustrated in Listing 2-7 and Listing 2-8, which include code from the Simpapp sample application. In the Simpapp sample application, the client application uses a factory to get an object reference to the Simple object and then invokes the to_upper and to_lower methods on the Simple object.
For a detailed description of the development steps with code examples from CORBA C++, CORBA Java, and ActiveX client applications as well as Java applets, see Creating Client Applications on the Online Documentation CD.
Listing 2-7 C++ Client Application from the Simpapp Sample Application
int main(int argc, char* argv[])
{
    try {
	// Initialize the ORB
	CORBA::ORB_var var_orb = CORBA::ORB_init(argc, argv, "");

	// Create the Bootstrap object
	Tobj_Bootstrap bootstrap(var_orb.in(), "");

	// Use the Bootstrap object to find the FactoryFinder
	CORBA::Object_var var_factory_finder_oref =
	  bootstrap.resolve_initial_references("FactoryFinder");

	// Narrow the FactoryFinder
	Tobj::FactoryFinder_var var_factory_finder_reference =
	 Tobj::FactoryFinder::_narrow
	 (var_factory_finder_oref.in());

	// Use the factory finder to find the Simple factory
	CORBA::Object_var var_simple_factory_oref =
	var_factory_finder_reference->find_one_factory_by_id(
	_tc_SimpleFactory->id()
	);

	// Narrow the Simple factory
	SimpleFactory_var var_simple_factory_reference =
	  SimpleFactory::_narrow(
	                         var_simple_factory_reference.in());

	// Find the Simple object
	Simple_var var_simple =
	  var_simple_factory_reference->find_simple();

	// Get a string from the user
	cout << "String?";
	char mixed[256];
	cin >> mixed;

	// Convert the string to upper case :
	CORBA::String_var var_upper = CORBA::string_dup(mixed);
	var_simple->to_upper(var_upper.inout());
	cout << var_upper.in() << endl;

	// Convert the string to lower case
	CORBA::String_var var_lower = var_simple->to_lower(mixed);
	cout << var_lower.in() << endl;

	return 0;
	}
}
Listing 2-8 Java Client Application from the Simpapp Sample Application
public class SimpleClient
{
	public static void main(String args[])

	// Initialize the ORB.
	ORB orb = ORB.init(args, null);

	// Create the Bootstrap object
	Tobj_Bootstrap bootstrap = new Tobj_Bootstrap(orb, "");

	// Use the Bootstrap object to locate the FactoryFinder
	org.omg.CORBA.Object factory_finder_reference =
	bootstrap.resolve_initial_references("FactoryFinder");

	// Narrow the FactoryFinder
	FactoryFinder factory_finder_reference =
	FactoryFinderHelper.narrow(factory_finder_reference);

	// Use the FactoryFinder to find the Simple factory.
	org.omg.CORBA.Object simple_factory_reference =
	factory_finder_reference.find_one_factory_by_id
	(SimpleFactoryHelper.id());

	// Narrow the Simple factory
	SimpleFactory simple_factory_reference =
	SimpleFactoryHelper.narrow(simple_factory_reference);

	// Find the Simple object.
	Simple simple = simple_factory_reference.find_simple();

	// Get a string from the user.
	System.out.println("String?");
	String mixed = in.readLine();

	// Convert the string to upper case.
	org.omg.CORBA.StringHolder buf = new
	org.omg.CORBA.StringHolder(mixed);
	simple.to_upper(buf);
	System.out.println(buf.value);

	// Convert the string to lower case.
	String lower = simple.to_lower(mixed);
	System.out.println(lower);
        }
}
Because the WLE software offers great flexibility and many options to application designers and programmers, no two applications are alike. An application, for example, may be small and simple (a single client and server running on one machine) or complex enough to handle transactions among thousands of client and server applications. For this reason, for every WLE application being managed, the system administrator must provide a configuration file that defines and manages the components (for example, domains, server applications, client applications, and interfaces) of that application.
When system administrators create a configuration file, they are describing the WLE application using a set of parameters that the WLE software interprets to create a runnable version of the application. During the setup phase of administration, the system administrator's job is to create a configuration file. The configuration file contains the sections listed in Table 2-5.
Table 2-5 Sections in the Configuration File for WLE Applications
There are two forms of the configuration file:
UBBCONFIG file. The configuration file may, in fact, be given any file name.
For information about the Configuration file and the Listing 2-9 shows the configuration file for the Simpapp sample application.
When creating Java server applications, include the If you are using an XA-compliant resource manager, use the You use the In the tmloadcf command, see Administration Guide on the Online Documentation CD.
Listing 2-9
Configuration File for Simpapp Sample Application
*RESOURCES
	IPCKEY    55432
	DOMAINID  simpapp
	MASTER    SITE1
	MODEL     SHM
	LDBAL     N
*MACHINES
"PCWIZ"
LMID = SITE1
APPDIR = "C:\WLEDIR\MY_SIM~1"
TUXCONFIG = "C:\WLEDIR\MY_SIM~1\results\tuxconfig"
TUXDIR = "C:\WLEDIR"
MAXWSCLIENTS = 10 *GROUPS
SYS_GRP
LMID = SITE1
GRPNO = 1
APP_GRP
LMID = SITE1
GRPNO = 2 *SERVERS
DEFAULT:
RESTART = Y
MAXGEN = 5
TMSYSEVT
SRVGRP = SYS_GRP
SRVID = 1
TMFFNAME
SRVGRP = SYS_GRP
SRVID = 2
CLOPT = "-A -- -N -M"
TMFFNAME
SRVGRP = SYS_GRP
SRVID = 3
CLOPT = "-A -- -N"
TMFFNAME
SRVGRP = SYS_GRP
SRVID = 4
CLOPT = "-A -- -F"
simple_server
SRVGRP = APP_GRP
SRVID = 1
RESTART = N
ISL
SRVGRP = SYS_GRP
SRVID = 5
CLOPT = "-A -- -n //PCWIZ:2468" *SERVICES
JavaServer parameter in the UBBCONFIG file to start the Java server application. For example:
*SERVERS
   .
   .
   .
	JavaServer
		SRVGRP = BANK_GROUP2
		SRVID = 8
		CLOPT = "-A -- -M 10 Bankapp.jar TellerFactory_1"
		SYSTEM_ACCESS = FASTPATH
RESTART = NJavaServerXA parameter in place of the JavaServer parameter to associate the XA resource manager with a specified server group.
Step 6: Compiling the Server Application
buildobjserver command to compile and link C++ server applications. The buildobjserver command has the following format:
buildobjserver [-o servername] [
options]buildobjserver command syntax:
options represents the command line options to the buildobjserver command.
When creating Java server applications, use the You use the In the javac compiler to create the bytecodes for all the class files that comprise your WLE application. This set of files includes the *.java source files generated by the m3idltojava compiler, plus the object implementation files and server class files you created.
buildjavaserver command to build a Java ARchive (JAR) file and link the Java server applications. The buildjavaserver command has the following format:
buildjavaserver [-s searchpath] input_file.xml
buildjavaserver command syntax:
CLASSPATH environment variable.
You then have to specify the location of the JAR file for your Java server application in the The final step in the development of the CORBA client application is to produce the executable client application. To do this, you need to compile the code and then link against the client stub.
When creating CORBA C++ client applications, use the When creating CORBA Java client applications, see your Java ORB's documentation for information about building client executables. You need to include the The Sample applications demonstrate the tasks involved in developing a WLE application, and provide sample code that can be used by client and server programmers to build their own WLE application. The following additional sample applications are provided:
APPDIR system environment variable. On Windows NT systems, this directory must be on a local drive (not a networked drive). On Solaris, the directory can be local or remote.
Step 7: Compiling the Client Application
buildobjclient command to construct a WLE client application executable. The command combines the client stubs for interfaces that use static invocation, and the associated header files, with the standard WLE libraries to form a client executable. For the syntax of the buildobjclient command, see C++ Programming Reference on the Online Documentation CD.
m3envobj.jar file in your CLASSPATH when you compile the CORBA Java client application. The m3envobj.jar file contains the Java classes for the WLE environmental objects.
m3envobj.jar file built against the Netscape Enterprise server is located in the following directory:
WLEdir/udataobj/java/netscape
Additional WLE Sample Applications
The University sample applications are based on client and server applications implemented at a university. Each University sample application demonstrates a new WLE feature while building on the experience obtained from the previous sample application. The University sample applications are intentionally simplified to demonstrate only the steps and processes associated with using a particular feature of the WLE product.
Table 2-6 describes the University sample applications.
The Java sample applications demonstrate the process of developing Java server applications with the WLE product. In addition, the Java sample applications focus on using database products, such as Oracle and Microsoft SQL Server, with a WLE application. The Java sample applications listed in Table 2-7 are provided.
Univeristy Sample Applications
Table 2-6 The University Sample Applications
Java Sample Applications
Table 2-7 Java Sample Applications
![]()