|
|
|
|
|
|
Starting, Stopping, and Customizing WebLogic Collaborate
This section provides the information you need to start, stop, and customize WebLogic Collaborate. It includes the following topics:
Understanding the Preconfigured Domains
A WebLogic Server domain is a collection of WebLogic Server resources and applications that occupy a single namespace. The configuration of a domain and the applications deployed are dependent on the domain start and configuration files. Components of WebLogic Integration (such as WebLogic Collaborate) are applications that are deployed in a WebLogic Server domain.
When you install WebLogic Collaborate, the following WebLogic Collaborate sample and custom domains are created and configured:
The sample domain is configured with a JDBC connection pool that provides the access information required to connect to a Cloudscape database. (Cloudscape is a pure-Java relational database management system that BEA ships with the WebLogic distribution to allow you to run code examples.) The installation program creates a Cloudscape database for this domain, and populates the database with the tables WebLogic Collaborate requires. No further configuration of this domain is required to run the sample applications included with the WebLogic Collaborate distribution or obtained from the WebLogic Developer Center.
The custom domain is configured with a JDBC connection pool that provides the access information required to connect to the database selected during installation. If you selected a database other than Cloudscape for the custom domain, you must execute the appropriate scripts as described in Installing BEA WebLogic Collaborate to create the database tables WebLogic Collaborate requires. This custom domain can then be used to run sample applications or to develop and deploy your own applications.
A copy of each of the following files is located in the sample and custom domain directories. These files control the WebLogic Server resource configuration and the initial deployment of the applications in each domain:
An example of each file is provided in WebLogic Collaborate Sample Configuration Files.
As part of the WebLogic Collaborate installation, each setEnv file is updated with the information required to start WebLogic Collaborate. For information about the required environment settings, see Updating the WebLogic Collaborate Environment.
When you start WebLogic Collaborate by executing the startWebLogic command for one of the preconfigured domains (as described in Starting WebLogic Collaborate), WebLogic Collaborate, WebLogic Process Integrator, and the associated WebLogic Collaborate plug-in, are deployed on WebLogic Server.
As you become more familiar with WebLogic Collaborate and the other WebLogic Integration components, you can use the custom or samples domain as the starting point for development and testing, or you can create your own domain by modeling it after one of the preconfigured domains.
Understanding WebLogic Collaborate Users and Passwords
The WebLogic Collaborate installation configures a default fileRealm security realm for each of the domains described in the previous section. The following default users and passwords are configured.
Table 1-1 Default User Names and Passwords
To ensure system security, you can change the default passwords as described in Updating the Default Passwords.
Starting WebLogic Collaborate
As described in Understanding the Preconfigured Domains, when you execute the startWeblogic.cmd (Windows) or startWeblogic.sh (UNIX) command for a domain, WebLogic Server is started and deploys WebLogic Collaborate, WebLogic Process Integrator, and the WebLogic Collaborate plug-in for WebLogic Process Integrator.
The following sections provide instructions for executing the start command on a Windows or UNIX system.
Note: If you have shut down the WebLogic Collaborate application from the WebLogic Collaborate Administration Console, this procedure does not apply. See Restarting from the WebLogic Collaborate Administration Console.
Starting WebLogic Collaborate on Windows
On a Windows system, you can start WebLogic Collaborate with the program icons or from the command line.
Note: If WebLogic Server is already running, you must stop it before executing the start command.
Starting WebLogic Collaborate with Program Icons
To start WebLogic Collaborate using program icons, do one of the following:
A command window is launched, and startup messages are displayed. When the following message is displayed, startup has completed successfully:
<Month DD, YYYY hh:mm:ss meridianAbbreviation Timezone> <Notice> <WebLogicServer> <ListenThread listening on port 7001>
Starting WebLogic Collaborate from the Command Line
To start WebLogic Collaborate from the command line:
For example, if you installed the product in the default location, and you want to start the WebLogic Collaborate custom domain, enter the following:
cd \bea\wlintegration2.0\collaborate\config\mydomain
For the default location for each preconfigured domain see Understanding the Preconfigured Domains.
startWeblogic
When the following message is displayed, startup has completed successfully:
<Month DD, YYYY hh:mm:ss meridianAbbreviation Timezone> <Notice> <WebLogicServer> <ListenThread listening on port 7001>
Starting WebLogic Collaborate on UNIX
Note: If WebLogic Server is already running, you must stop it before executing the start command.
To start WebLogic Collaborate on a UNIX system:
For example, if you installed the product in the default location, and you want to start the WebLogic Collaborate custom domain, enter the following:
cd <BEA_Home>/wlintegration2.0/collaborate/config/mydomain
For the default location for each preconfigured domain see Understanding the Preconfigured Domains.
. ./startWeblogic.sh
When the following message is displayed, startup has completed successfully:
<Month DD, YYYY hh:mm:ss meridianAbbreviation Timezone> <Notice> <WebLogicServer> <ListenThread listening on port 7001>
Starting the WebLogic Collaborate Administration Console
You can use the WebLogic Collaborate Administration Console to:
Note: The WebLogic Collaborate Administration Console requires Netscape Navigator 4.7 (or above) or Microsoft Internet Explorer 5.x (or above). The browser you use must be configured to accept cookies. In Netscape Navigator select File
To start the WebLogic Collaborate Administration Console:
http://host:7001/wlcconsole
In this URL, host is the computer name or IP address of the system that is running WebLogic Collaborate, and 7001 is the WebLogic Server listen port configured for the domain. Specify localhost or 127.0.0.1 if the server is running on the local computer.
Note: If you have not yet changed the password, see Understanding WebLogic Collaborate Users and Passwords for the default password.
Figure 1-1 WebLogic Collaborate Administration Console
Note: Bookmark the WebLogic Collaborate Administration Console for quick access.
Overviews of the tasks performed from the WebLogic Collaborate Administration Console are provided in Basic Configuration Tasks, Advanced Configuration Tasks, and Monitoring WebLogic Collaborate.
Detailed information about using the interface and setting the required attributes is provided in the WebLogic Collaborate Administration Console online help. For help at any time, click the question mark in the upper right-hand corner of the page.
Note: The information in the online help is also available as a document entitled BEA WebLogic Collaborate Administration Console Online Help.
Stopping WebLogic Collaborate
There are two options for stopping WebLogic Collaborate:
The required procedures are provided in the following sections:
Stopping WebLogic Server and All Deployed Applications
You can stop WebLogic Server and all applications deployed in a WebLogic Collaborate domain by executing the stopWeblogic.cmd (Windows) or stopWeblogic.sh (UNIX) command located in the domain directory. The following sections provide instructions for executing the stop command on a Windows or UNIX system.
Stopping WebLogic Server and All Deployed Applications on Windows
The following sections provide instructions for stopping WebLogic Server and all deployed applications by using the program icons or by executing the stopWeblogic.cmd from the command line.
Stopping WebLogic Server and All Deployed Applications with Program Icons
To stop WebLogic Server and all deployed applications using program icons, do one of the following:
Shutdown messages are displayed as shown in the following figure. When you are returned to the command prompt, shut down is complete.
Figure 1-2 Shut down Sequence Messages
Once WebLogic Server and all applications have been terminated, you can restart WebLogic Collaborate, as described in Starting WebLogic Collaborate on Windows. Stopping WebLogic Server and All Deployed Applications from the Command Line To start WebLogic Collaborate from the command line: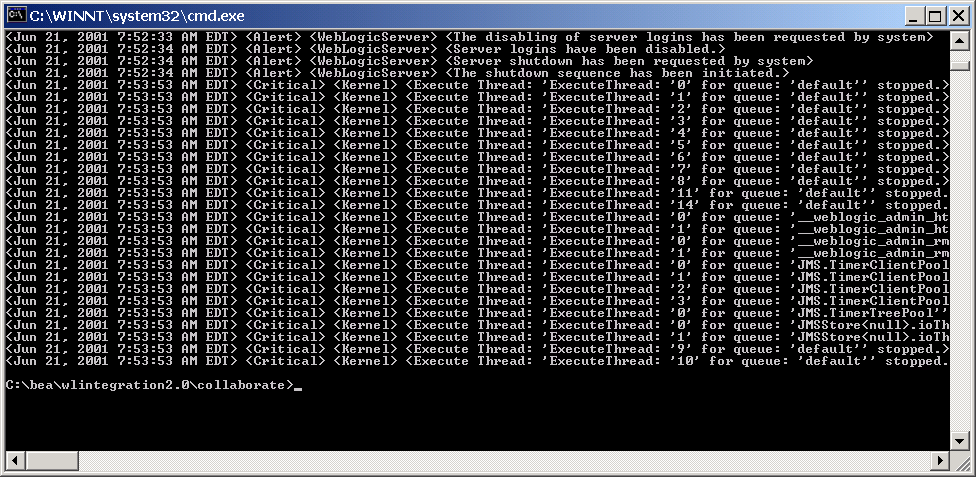
For example, if you installed the product in the default location, and you want to start the WebLogic Collaborate custom domain, enter the following:
cd \bea\wlintegration2.0\collaborate\config\mydomain
For the default location for each preconfigured domain see Understanding the Preconfigured Domains.
stopWeblogic
Shutdown messages are displayed as shown in Figure 1-2.
Once WebLogic Server and all applications have been terminated, you can restart WebLogic Collaborate, as described in Starting WebLogic Collaborate on Windows
Stopping WebLogic Server and All Deployed Applications on UNIX
To stop WebLogic Server and all deployed applications on a UNIX system:
For example, if you installed the product in the default location, and you want to stop the WebLogic Collaborate custom domain, enter the following:
cd <BEA_Home>/wlintegration2.0/collaborate/config/mydomain
For the default location for each preconfigured domain see Understanding the Preconfigured Domains.
. ./stopWeblogic.sh
Shutdown messages are displayed as shown in Figure 1-2.
Stopping from the WebLogic Collaborate Administration Console
You can shut down the WebLogic Collaborate application, but leave WebLogic Server and other deployed applications running, from the WebLogic Collaborate Administration Console.
To shut down the WebLogic Collaborate application:
Figure 1-3 WebLogic Collaborate Monitoring General Tab
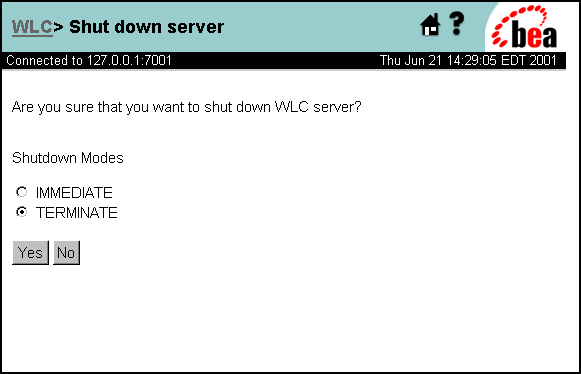
The shut down confirmation page is displayed. This page allows you to select shut down mode as shown in the following figure. Figure 1-4 Shut down Options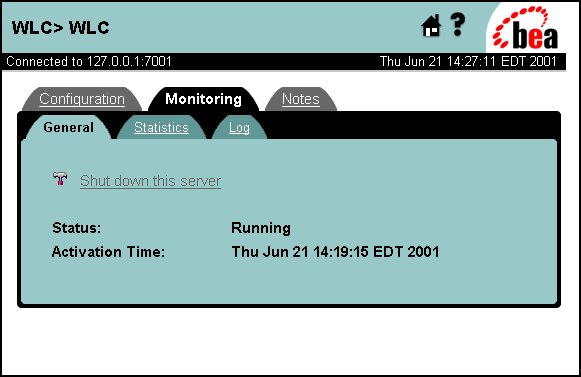
The WebLogic Collaborate application is shut down. WebLogic Server and any other applications remain active. When WebLogic Collaborate has shut down, you can restart it as described in the following procedure.
Restarting from the WebLogic Collaborate Administration Console
To restart WebLogic Collaborate after shutting down from the WebLogic Collaborate Administration Console:
Figure 1-5 WebLogic Collaborate Monitoring General Tab
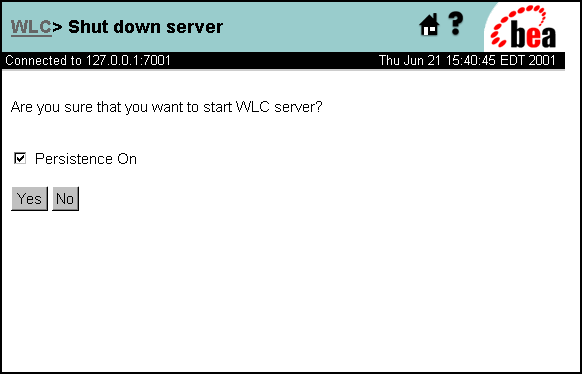
The start up confirmation page is displayed. This page allows you to turn persistence on or off as shown in the following figure. Figure 1-6 Start Up Confirmation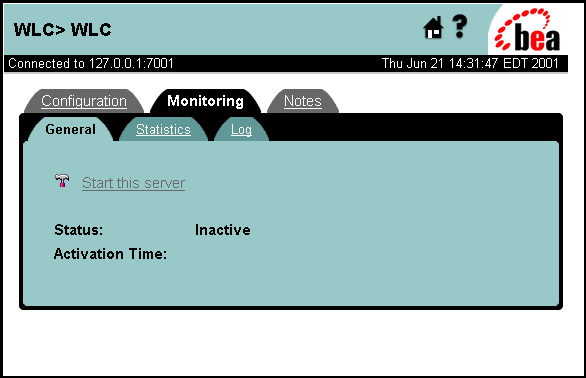
For information about WebLogic Collaborate persistence, see Configuring Persistence and Recovery.
The restart process may take a couple minutes. You will be returned to the Monitoring General tab when the process is complete.
Starting the WebLogic Server Administration Console
Some tasks require access to the WebLogic Server Administration Console for the active domain. The following procedure describes how to start the WebLogic Server Administration Console.
To start the WebLogic Server Administration Console:
http://host:7001/console
In this URL, host is the computer name or IP address of the system that is running WebLogic Collaborate and 7001 is the listen port configured. Specify localhost or 127.0.0.1 if WebLogic Collaborate is running on the local computer.
Note: The password you enter is the WebLogic Server system password specific to the active domain. It is usually not the same as the default password specified when you install WebLogic Server. If you have not yet changed the password, see Understanding WebLogic Collaborate Users and Passwords for the default password.
Figure 1-7 WebLogic Server Administration Console
Note: Bookmark the WebLogic Server Administration Console for quick access.
For instructions on using and navigating the WebLogic Server Administration Console, see the WebLogic Server 6.0 documentation set.
Starting WebLogic Process Integrator Studio
WebLogic Process Integrator Studio, with the WebLogic Collaborate plug-in, is used to create the collaborative workflows that implement the trading partner roles assigned in WebLogic Collaborate.
Both the custom and sample WebLogic Collaborate domains contain a studio.cmd (Windows) or studio.sh (UNIX) command file. This command can be used to start WebLogic Process Integrator Studio with the WebLogic Collaborate plug-in if you have installed the Studio client in the same BEA Home directory as the WebLogic Collaborate installation.
If you have installed the Studio client on another system, or will be deploying WebLogic Collaborate in another domain, you need to be aware of certain requirements.
The following sections provide the information you need to start the WebLogic Process Integrator Studio:
Starting Studio for the Custom or Samples Domain
The following sections provide instructions for starting a locally installed Studio client for the custom or sample domain on a Windows or UNIX system. If you have installed Studio on a system that is remote to the WebLogic Collaborate installation, see Starting Studio on a System Remote to WebLogic Collaborate.
Starting on Windows
To start the local installation of the WebLogic Process Integrator Studio on Windows:
The studio.cmd executes in a command window, then, within a few moments, the Studio application window is displayed.
Starting on UNIX
To start the local installation of the WebLogic Process Integrator Studio on UNIX:
cd <BEA_Home>/wlintegration2.0/collaborate/config/mydomain/shortcuts
. /studio.sh
cd <BEA_Home>/wlintegration2.0/collaborate/config/samples/shortcuts
. /studio.sh
The studio.sh file executes, then, within a few moments, the Studio application window is displayed.
Starting Studio on a System Remote to WebLogic Collaborate
Before starting Studio on a system remote to WebLogic Collaborate, make sure you have met the requirements described in Studio Configuration Requirements.
Starting on Windows
To start WebLogic Process Integrator Studio on Windows:
Note: The Studio installation, and the studio.cmd file that is invoked by the shortcut, must be modified as described in Studio Configuration Requirements.
The studio.cmd executes in a command window, then, within a few moments, the Studio application window is displayed.
Starting on UNIX
To start WebLogic Process Integrator Studio on UNIX:
cd <BEA_Home>/wlintegration2.0/processintegrator/bin
. /studio.sh
The studio.ch command executes in a command window, then, within a few moments, the Studio application window is displayed.
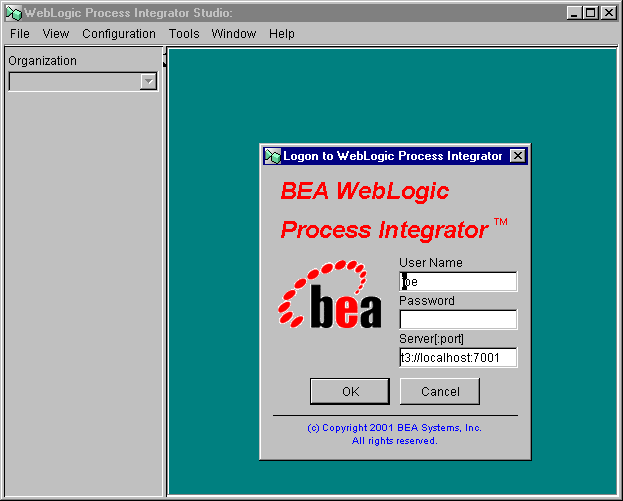
Logging In and Connecting to the WebLogic Process Integrator Server
After you have executed the Studio command as described in the previous section, the logon dialog box is displayed in front of the WebLogic Process Integrator Studio application window as shown in the following figure.
Figure 1-8 Logon to WebLogic Process Integrator Dialog Box
t3://host:7001
Here, host is the computer name or IP address of the system that is running the WebLogic Process Integrator Server. Specify localhost if the server is running on the same computer as the Studio application.
Studio Configuration Requirements
If you have installed the Studio client on another system, or will be deploying WebLogic Collaborate in another domain, you need to be aware of the following requirements.
Note: The collaborate/config/mydomain/fileRealm.properties and collaborate/config/samples/fileRealm.properties file include the required entries for the default users.
Note: The CLASSPATH in the collaborate/config/samples/studio.cmd (or .sh) and collaborate/config/mydomain/studio.cmd (or .sh) file include the wlc.jar file.
Adding the Required Users to the fileRealm.properties File
The fileRealm.properties file is located in the root of the domain. The required entries for each user are:
acl.access.weblogic.admin.mbean.MBeanHome=user
acl.lookup.weblogic.admin.mbean.MBeanHome=user
To edit the fileRealm.properties file:
cd <BEA_HOME>/bea/wlintegration2.0/collaborate/config/devdomain
Adding wlc.jar to the CLASSPATH in the Start Studio Command
To add the wlc.jar file to the CLASSPATH in the studio.cmd (Windows) or studio.sh (UNIX) file:
The wlc.jar file is located in the <BEA_Home>/wlintegration2.0/collaborate/lib directory and should be copied to the <BEA_Home>/wlintegration2.0/processintegrator/lib directory for the Studio installation.
cd <BEA_HOME>/bea/wlintegration2.0/processintegrator/bin
c:/bea/wlintegration2.0/processintegrator/lib/wlc.jar
Customizing WebLogic Collaborate
The following sections describe how to modify the default installation.
About Updating the JDBC Configuration
As discussed in Understanding the Preconfigured Domains, when you installed WebLogic Collaborate, the JDBC connection pool for the samples domain is configured to use the default Cloudscape database. Depending on the information provided during installation, the JDBC connection pool for the custom domain was configured to use either:
In a standard installation, each WebLogic Integration component follows this model, with a samples domain configured to use the default Cloudscape domain, and a custom domain configured to use either the Cloudscape or the alternate database. Therefore, the components share the database resources.
Although this arrangement typically provides an environment that meets your evaluation, development, and testing needs, there are circumstances that may require you to customize the JDBC configuration. For example, you may wish to:
The first case is fairly straightforward. As described in Using BEA WebLogic Collaborate Samples, commands have been provided to assist you in reconfiguring the the samples domain to use the alternate database you selected during installation.
The second case, where it becomes necessary to change the database used (for example, from Microsoft SQL to Oracle) you can do one of the following:
Installing the WebLogic Integration components in a new location is the recommended method. When this methods is used, the JDBC connection pool is automatically configured as part of the installation process. Because you are not overwriting the existing installation, the information remains available and can be exported as needed for import to the new installation.
If you choose the second method, keep the following in mind:
Updating the JDBC Connection Pool
To update the WebLogic Integration JDBC connection pool:
JDBC Connection Pool Parameters
The following table summarizes the information required to configure the JDBC connection pool.
Table 1-2 JDBC Connection Pool Parameters
JDBC Connection Pool URL Format
The JDBC connection pool URL includes the following:
The following list provides a sample URL for each supported database.
jdbc:oracle:thin:@host:port:database
For example: jdbc:oracle:thin:@rdbmshost:1521:wlidb
jdbc:cloudscape:database
For example: jdbc:cloudscape:wlidb
jdbc:weblogic:mssqlserver4:database@host:port?sql7=true
For example: jdbc:weblogic:mssqlserver4:wlidb@rdbmshost:1433?sql7=true
Updating the RDBMS Realm Properties
To update the WebLogic Process Integrator RDBMS realm properties:
Updating the WebLogic Collaborate Environment
The WebLogic Collaborate environment is set by the setEnv.cmd (Windows) or setEnv.sh (UNIX) file. This file is located in the config\domain_name subdirectory, as described in Understanding the Preconfigured Domains. An example of this file is provided in WebLogic Collaborate Sample Configuration Files.
The variables in this file are set when you install WebLogic Collaborate and normally do not require update. If you must update the environment, however, you can do so by completing the following procedure.
To update the WebLogic Collaborate environment:
Navigate to the appropriate domain directory and right click setEnv.cmd. Then select Edit from the shortcut menu to open the file in Notepad.
Go to the appropriate domain directory, and open setEnv.sh in your preferred text editor.
For information about the required values, see WebLogic Collaborate Sample Configuration Files.
The setEnv.cmd file will run to set these environment variables for WebLogic Collaborate when you execute the start command as described in Starting WebLogic Collaborate.
Updating the Default Passwords
After you have installed WebLogic Collaborate, you can update the default passwords to ensure system security.
Warning: The wlcsystem user name and password are used by the WebLogic Collaborate run-time environment and are stored in the WebLogic Collaborate repository. This password must be updated using the WebLogic Collaborate Administration Console. Do not use the WebLogic Server Administration Console to update this password.
Updating the system Password
The password for the system login can be changed through the WebLogic Server Administration Console as described in the following procedure.
To update the password for the system user for the active domain:
For example, to change the system password, enter system.
The startWeblogic.cmd (Windows) or startWeblogic.sh (UNIX) commands used to start WebLogic Collaborate are configured for automatic login. If you change the password for system, you will need to update these files. See WebLogic Collaborate Sample Configuration Files.
Updating the default WebLogic Process Integrator Passwords
The default passwords for admin, joe, and mary, which are used to log on to WebLogic Process Integrator Studio and Worklist, can also be changed through the WebLogic Server Administration Console as described in the previous section.
Updating the wlcsystem Password
The password for the wlcsystem user can only be changed through the WebLogic Collaborate Administration Console as described in the following procedure.
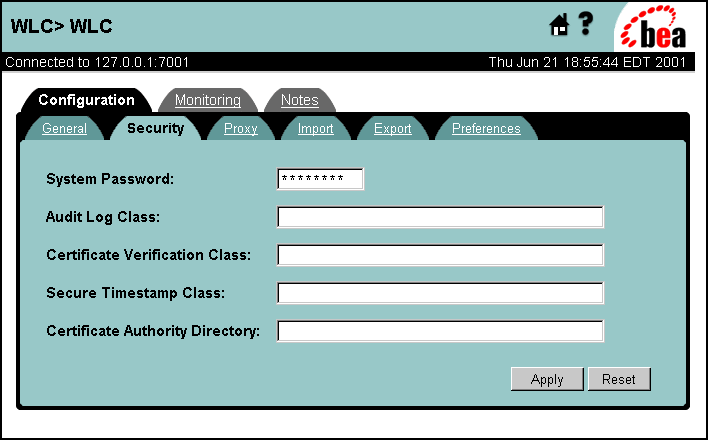
The Security tab is displayed as shown in the following figure. The content of the System Password field is the password for the wlcsystem user.
Figure 1-9 WebLogic Collaborate Configuration Security Tab
Verifying Configuration
If you make changes to the WebLogic Collaborate installation, or configure your own domain, you can verify the WebLogic Collaborate configuration by starting WebLogic Collaborate for the domain, then starting the WebLogic Collaborate Administration Console for the domain as described in this section.
We also recommend that you verify the configuration of the samples domain by running the Hello Partner sample as described in Using BEA WebLogic Collaborate Samples. In order to run the Hello Partner sample, you will need to load the sample data and workflows into the WebLogic Collaborate repository as described in Hello Partner Sample in Using BEA WebLogic Collaborate Samples.

|

|

|
|
|
|
Copyright © 2001 BEA Systems, Inc. All rights reserved.
|