BEA Logo BEA Collaborate Release 2.0

  BEA Home  |  Events  |  Solutions  |  Partners  |  Products  |  Services  |  Download  |  Developer Center  |  WebSUPPORT


   Collaborate Documentation   |   Security   |   Previous Topic   |   Next Topic   |   Contents   |   Index

Configuring Security


This topic includes the following sections:

For general information about configuring WebLogic Collaborate, see Configuration Tasks in Administering BEA WebLogic Collaborate.


Configuring the SSL Protocol and Mutual Authentication

To configure WebLogic Server to use the SSL protocol and mutual authentication, complete the following steps:

  1. Obtain a digital certificate for WebLogic Server as described in "Configuring the SSL Protocol" in Managing Security in the BEA WebLogic Server Administration Guide.

  2. Start the WebLogic Server Administration Console as described in "Starting the WebLogic Server Administration Console" in Starting, Stopping, and Customizing WebLogic Collaborate in Administering BEA WebLogic Collaborate.

  3. In the navigation tree (in the left pane) of the WebLogic Server Administration Console, choose Servers—>myserver for the domain you are configuring, as in the following figure.

    Figure 3-1 Choosing a Domain


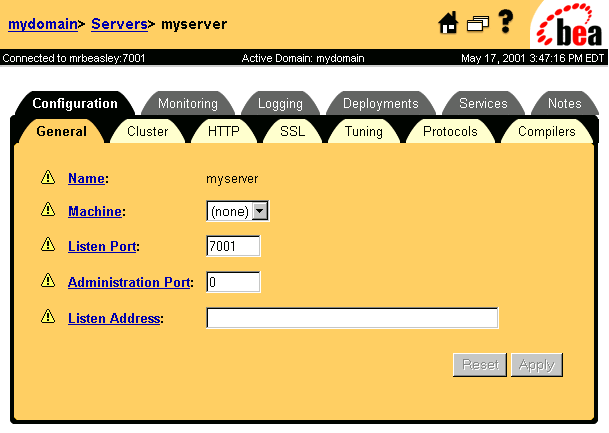
    The Configuration page for WebLogic Server is displayed, shown in the following figure.

    Figure 3-2 WebLogic Server Administration Console Configuration Page


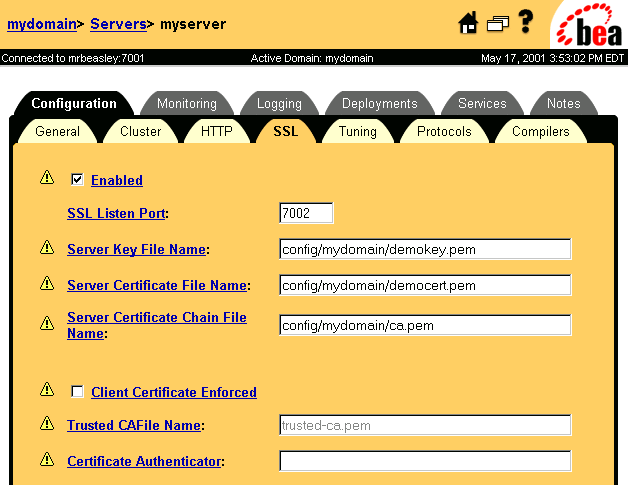
  4. Select the SSL tab to display the Secure Sockets Layer (SSL) configuration page, shown in the following figure.

    Figure 3-3 SSL Configuration Page


  5. The following table describes the information that you enter into the SSL configuration page.

    Table 3-1 SSL Configuration Page Fields

    Field

    Description

    Enabled check box

    If checked, SSL connections are enabled between WebLogic Collaborate and trading partners.

    SSL Listen Port

    Specifies the dedicated port on which WebLogic Collaborate listens for SSL connections.

    Server Key File Name

    Specifies the location of the private key file for WebLogic Server.

    Server Certificate File Name

    Specifies the location of the public key file for WebLogic Server. You obtain this file from a trusted security vendor, as described in step 1 in this section.

    Server Certificate Chain File Name

    Specifies the full directory location of the digital certificate for WebLogic Server. This location is also known as the root certificate authority.

    Client Certificate Enforced check box

    If checked, mutual authentication is enabled between WebLogic Collaborate and trading partners accessing WebLogic Collaborate resources.

    Trusted CAFile Name

    Specifies the name of the file that contains the digital certificate for the certificate authority trusted by WebLogic Server. Trading partners are required to present digital certificates issued by this certificate authority. You obtain this filename from each trading partner configured in your WebLogic Collaborate environment.

    Certificate Authenticator

    Specifies the certificate authenticator to be used to determine the validity of the trading partner digital certificate


Configuring Access Control Lists for WebLogic Collaborate

The access control list (ACL) for a resource determines whether a user or group can access a resource in WebLogic Collaborate. To define ACLs, you do the following:

  1. Create an ACL for a resource.

  2. Specify the permission for the resource.

  3. Grant the permission to a specified set of users and groups.

For a WebLogic Collaborate resource, one or more permissions can be granted.

The ACL on the JDBC connection pool that is preset in the sample configuration shipped with WebLogic Collaborate has the following permissions set for the user wlcsystem: reserve, reset, and shrink.

For complete information about defining ACLs, see "Defining ACLs" in Managing Security in the BEA WebLogic Server Administration Guide.

To set the ACLs on the JDBC connection pool:

  1. Start the WebLogic Server Administration Console, if it is not already running.

  2. In the navigation tree, choose Security—>ACLs.

    Figure 3-4 Choosing ACLs in the Navigation Tree


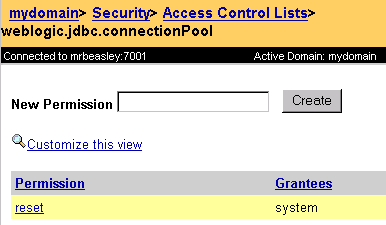
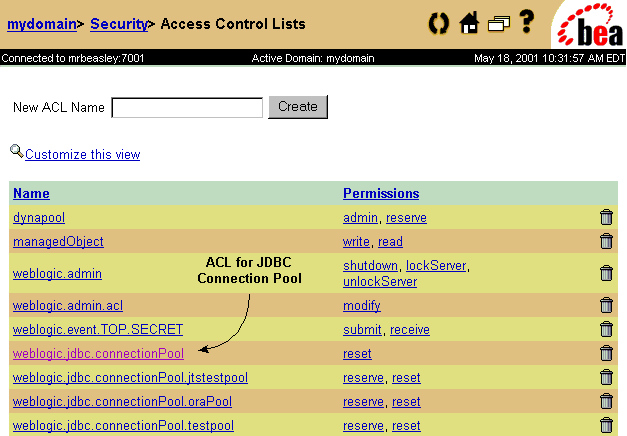
    The ACLs that are configured in WebLogic Server are listed in the Access Control Lists configuration page, as shown in the following figure. Note the entry for the ACL for the JDBC connection pool.

    Figure 3-5 ACL for the JDBC Connection Pool


  3. Click the name of the ACL for the JDBC connection pool. The WebLogic Server Administration Console displays the dialog box in which you can set the required permissions for the JDBC connection pool, as shown in the following figure.

    Figure 3-6 Setting Permissions for the JDBC Connection Pool


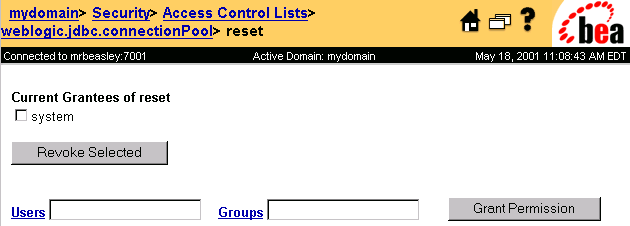
  4. Click reset. The dialog box in which you can reset the ACLs for the JDBC connection pool is displayed, as shown in the following figure.

    Figure 3-7 ACL Reset Dialog Box


  5. Enter wlcsystem in the Users field, if necessary.

  6. Click Grant Permission, if you have made any changes.

For more information about access control lists, see "Defining ACLs" in Managing Security in the BEA WebLogic Server Administration Guide.


Configuring Security for the WebLogic Collaborate System

The WebLogic Collaborate repository contains security information about the WebLogic Collaborate system and the trading partners that access WebLogic Collaborate resources. You can configure repository information either by using the WebLogic Collaborate Administration Console, or by specifying it in a repository data file that you then import into the repository using the Bulk Loader.

Note: If you use the Bulk Migrator utility to migrate the repository from a previous release of WebLogic Collaborate, make sure the user wlcsystem is created and the correct password is included in the Bulk Loader data file. For more information about using the Bulk Migrator utility, see Migrating the Repository in Migrating BEA WebLogic Collaborate to Release 2.0.

For the WebLogic Collaborate system, you need to configure the following as required:

To configure these entities in the WebLogic Collaborate system, complete the following steps:

  1. Start the WebLogic Collaborate Administration Console.

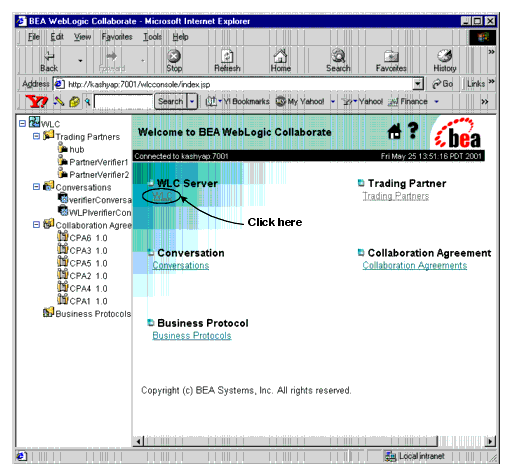
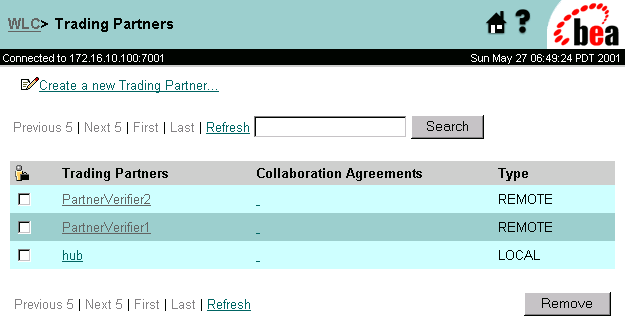
  2. In the main pane of the WebLogic Collaborate Administration Console, click the link under WLC Server, as shown in the following figure.

    Figure 3-8 WebLogic Collaborate Administration Console Main Window


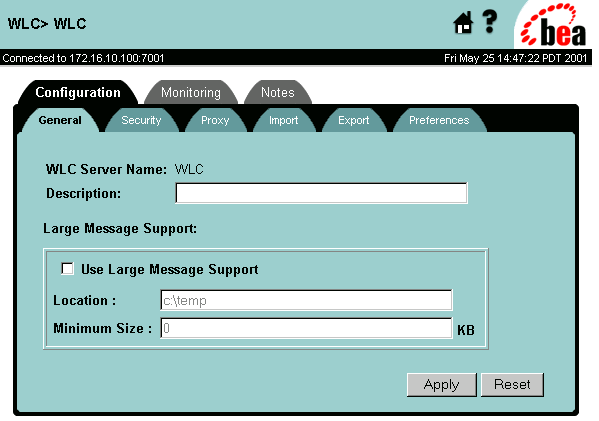
    The WLC configuration tabs are displayed, as shown in the following figure.

    Figure 3-9 WLC Server Configuration Tabs


  3. Select the Security tab. The Security configuration page for the WebLogic Collaborate system is displayed, as shown in the following figure.

    Figure 3-10 WebLogic Collaborate System Security Configuration Page


  4. The following table describes the fields in the Security tab of the Configuration panel that you may need to configure. Note that the new configuration takes effect after the WebLogic Collaborate system is restarted.

    Table 3-2 Configuring the WebLogic Collaborate System

    Field

    Description

    System Password

    Password for the WebLogic Collaborate system user. This is set when you install the WebLogic Collaborate software, and by default this password is wlcsystem. However, if you want to change it, you can enter a new password in this field.

    Audit Log Class

    Java class that implements audit logging, which is used for nonrepudiation. You can use the audit log to reconstruct the sequence of events that have occurred during a conversation, along with the data exchanged. Depending on how you configure the audit log, the audit log may store each business message exchanged among trading partners along with digital signatures, timestamps, and other data. For more information about auditing, see Secure Audit Log Service.

    Certificate Verification Class

    Java class that calls out to software that verifies that a digital certificate submitted by a remote trading partner is valid. This class can call out to either the Online Certificate Status Protocol (OCSP) application that WebLogic Collaborate provides, or certificate verification provider software that you obtain from a trusted security vendor. For more information about the certificate verification class, see Trading Partner Certificate Verification.

    Secure Timestamp Class

    Java class that provides secure timestamping of business messages exchanged among trading partners. Timestamping is used for nonrepudiation. For more information about secure timestamping, see Secure Timestamp Service.

    Certificate Authority Directory

    Location that contains the Certificate Authorities of all the trading partner certificates configured in the WebLogic Collaborate repository.


Configuring Trading Partner Security

Configuring trading partner security involves setting the following for each trading partner:

The following subsections describe how to configure trading partner security for each of these components.

Note: If you use the Bulk Loader to import data into the WebLogic Collaborate repository, the WebLogic Server users that represent each trading partner configured in the repository are not automatically created. You need to create these WebLogic Server users manually. For more information, see Working with the Bulk Loader in Administering BEA WebLogic Collaborate.
Configuring Trading Partner Certificates

WebLogic Collaborate provides a means to configure the following trading partner certificates.

Table 3-3 Trading Partner Certificates Configured in WebLogic Collaborate

Certificate

Description

Client certificate

Digital certificate of the remote or local trading partner. Configuring the client certificate is required when using the SSL protocol.

Certificate Details:

Private Key Details:

Server certificate

Digital certificate of the remote trading partner. Configuring the server certificate is required when using the SSL protocol.

Certificate Details:

Signature certificate

Certificate required of each trading partner if digital signature support, a requirement for nonrepudiation, is configured for the e-market. For a description of digital signature support, see Digital Signature Support.

Certificate Details:

Private Key Details:

Encryption certificate

Certificate required of each trading partner when business message encryption is configured for the e-market. Note that encryption support is available only with the RosettaNet protocols. For a description of message encryption, see Configuring Message Encryption.

Certificate Details:

Private Key Details:


Note the following general rules about configuring trading partner certificates:

To configure trading partner certificates, complete the following steps:

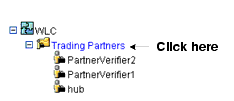
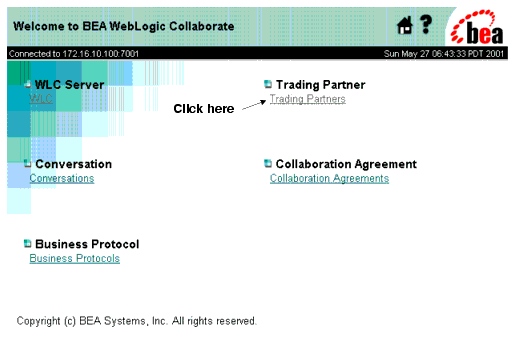
  1. Display the main trading partner configuration page, which you can do one of the following ways:

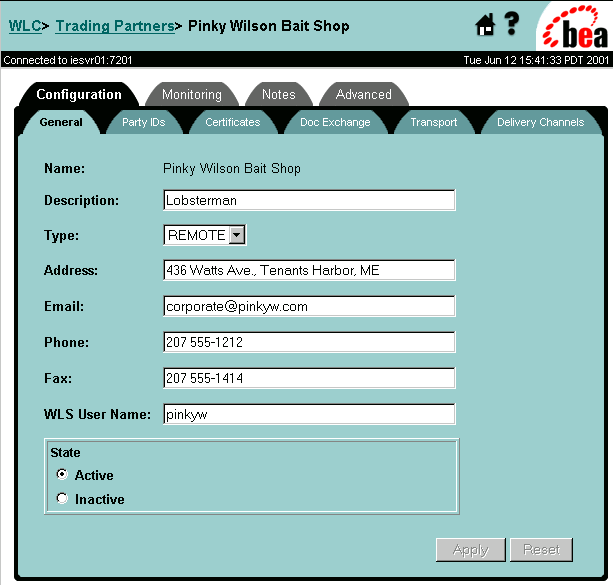
  2. Click the name of the trading partner whose security settings you want to configure. The General configuration page for the trading partner is shown in the following figure.

    Figure 3-14 General Configuration Page for Trading Partner


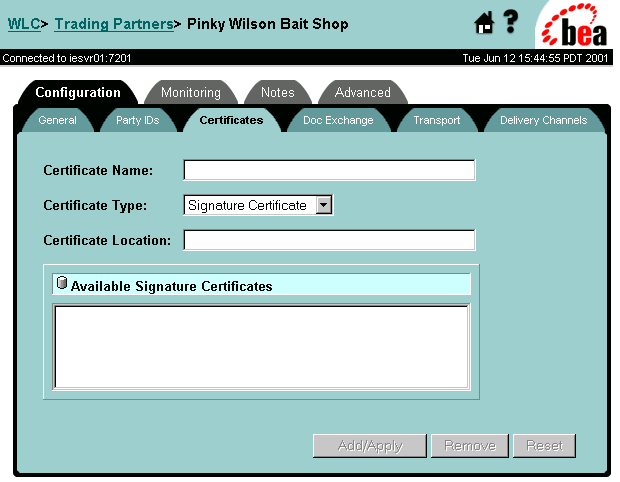
  3. Select the Certificates tab. The page on which you configure trading partner certificates is displayed, as shown in the following figure.

    Figure 3-15 Trading Partner Certificates Configuration Page


    Note: The preceding figure shows configuring a remote trading partner. If the trading partner were local, an additional field would be displayed showing the private key location for the certificate name.
  4. To configure each of the trading partner certificates, complete the steps listed in the following table.

    Table 3-4 Configuring Trading Partner Certificates

    To configure . . .

    Complete the following steps . . .

    Client certificate

    If you are configuring a local or remote trading partner:

    1. In the Certificate Type selection box, select Client Certificate.

    2. In the Certificate Name field, enter the client certificate name.

    3. In the Certificate Location field, enter the filename and location on your WebLogic Collaborate machine where the client certificate is stored.

    4. In the Private Key Location field, enter the filename and location on your WebLogic Collaborate machine where the private key of the local trading partner is stored. (This step applies only to local trading partners.)

    5. Click Add/Apply.

    Server certificate

    If you are configuring a remote trading partner:

    1. In the Certificate Type selection box, select Server Certificate.

    2. In the Certificate Name field, enter the name of the server certificate for the remote trading partner's WebLogic Collaborate system.

    3. In the Certificate Location field, enter the filename and location on your WebLogic Collaborate machine where the trading partner's server certificate is stored.

    4. Click Add/Apply.

    Signature certificate

    For trading partners using digital signature support:

    1. In the Certificate Type selection box, select Signature Certificate.

    2. In the Certificate Name field, enter the signature certificate name.

    3. In the Certificate Location field, enter the filename and location on your WebLogic Collaborate machine where the signature certificate is stored.

    4. In the Private Key Location field, enter the filename and location on your WebLogic Collaborate machine where the local trading partner private key is stored. (This step applies only to local trading partners.)

    5. Click Add/Apply.

    Encryption certificate

    For trading partners using RosettaNet-based business message encryption:

    1. In the Certificate Type selection box, select Encryption Certificate.

    2. In the Certificate Name field, enter the encryption certificate name.

    3. In the Certificate Location field, enter the location on your WebLogic Collaborate machine where the encryption certificate is stored.

    4. In the Private Key Location field, enter the location on your WebLogic Collaborate machine where the local trading partner private key is stored. (This step applies only to local trading partners.)

    5. Click Add/Apply.


Notes: When you create a trading partner in WebLogic Collaborate, a WebLogic Server user is created for that trading partner at run time using the WebLogic Server username that you specify. However, when you delete a trading partner from the WebLogic Collaborate repository, the corresponding WebLogic Server user is not automatically deleted. When you delete a trading partner, be sure also to manually delete the corresponding WebLogic Server user.

Visit the BEA Developer Center to obtain helpful resources, such as links to sites that provide useful tools for manipulating digital certificates and private keys, which you might find useful in managing WebLogic Collaborate security. You can reach the BEA Developer Center at the following URL:

http://developer.bea.com/index.jsp

Configuring a Secure Transport

When you configure a transport for a trading partner, you bind the trading partner's transport to a transport security protocol. For example, if a trading partner is configured to use SSL certificates, you must bind that trading partner's transport to a transport protocol that uses SSL. When a secure transport is configured, the client certificate is used for outbound SSL. Because WebLogic Collaborate allows only one client certificate, there is no need to select the client certificate while configuring a secure transport.

To configure a secure transport for a trading partner, complete the following steps:

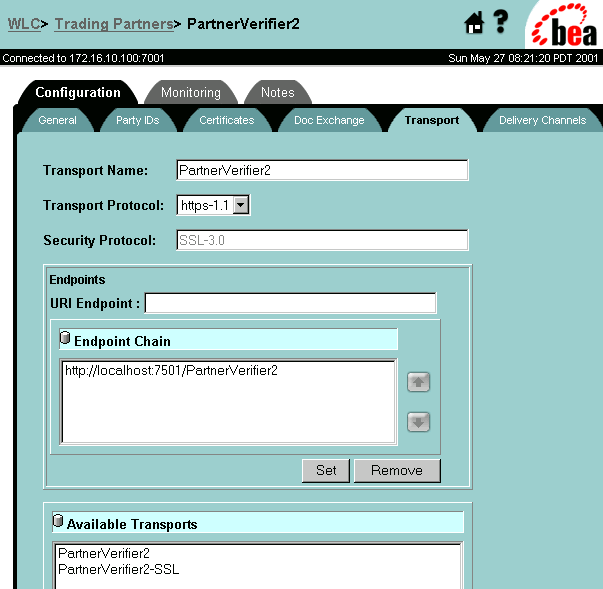
  1. Select the Transport tab. The Transport configuration page is displayed. The top of this page is shown in the following figure.

    Figure 3-16 Trading Partner Transport Configuration Page


  2. Enter the information described in the following table.

    Table 3-5 Configuring the Trading Partner Transport

    Field

    Description

    Transport Name

    The name of the trading partner transport. You can enter a name, or choose from the list of available transports displayed in the box labeled Available Transports. Note that each of the available transports has a security protocol bound to it, so if you choose from this list, the transport and security protocols are set automatically. For more information about specifying the transport name, see the online help for the Transport tab by clicking the question mark in the upper right.

    Transport Protocol

    The security protocol for the transport. You can choose between HTTP-1.1 and HTTPS-1.1. The HTTPS-1.1 protocol uses SSL. Note that if you choose HTTPS-1.1, the security protocol is displayed in the nonmodifiable field labeled Security Protocol.

    URI Endpoint

    The URI for the transport on the trading partner's WebLogic Collaborate system. To specify the URI endpoint, you can enter a URI in this field, or choose from one of the available URIs displayed in the box below this field. When you enter the URI endpoint, click Set, to establish the URI, or Remove, to clear an existing entry in the URI Endpoint field. For more information about specifying the URI endpoint, see the online help for the Transport tab by clicking the question mark in the upper right.


  3. Click Add/Apply.

Configuring a Secure Delivery Channel

When you configure a trading partner's delivery channel, you have the option of making the delivery channel secure by binding it to the secure transport configured in Configuring a Secure Transport.

To configure a secure channel, complete the following steps:

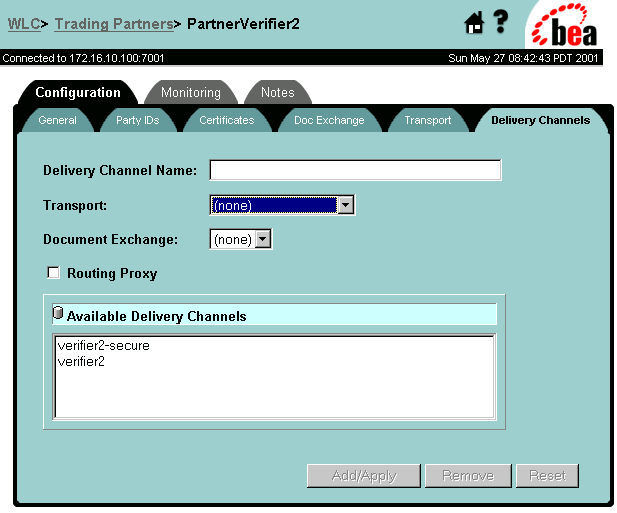
  1. Select the Delivery Channels tab. The Delivery Channels configuration page is displayed, as shown in the following figure.

    Figure 3-17 Trading Partner Delivery Channels Configuration Page


  2. Enter the information described in the following table.

    Table 3-6 Configuring a Trading Partner Delivery Channel

    Field

    Description

    Delivery Channel Name

    The delivery channel name. You can enter a name in this field, or choose from the delivery channels listed in the Available Delivery Channels box below. For more information about specifying a delivery channel name, see the online help for the Delivery Channels page by clicking the question mark in the upper right.

    Transport

    The name of the transport configured in the trading partner transport tab. This field gives you an opportunity to bind the delivery channel to a transport that you secured when configuring the transport properties, as described in Configuring a Secure Transport.

    Document Exchange

    The name of the document exchange to which you want to bind the delivery channel. For more information about binding a document exchange to a delivery channel, see the online help for the Delivery Channels page by clicking the question mark in the upper right.

    Routing Proxy

    Check this box if you want the trading partner delivery to act as a routing proxy (hub). For more information about proxy servers, see Configuring WebLogic Collaborate to Use an Outbound HTTP Proxy Server.


  3. Click Add/Apply.

Configuring a Secure Document Exchange

When you configure the trading partner document exchange, you can associate a document exchange with a business protocol binding that provides digital signature support or message encryption. Digital signature support is available with all the business protocols supported in WebLogic Collaborate; however, message encryption is available only with the RosettaNet protocol.

To enable digital signature or message encryption support, complete the following steps:

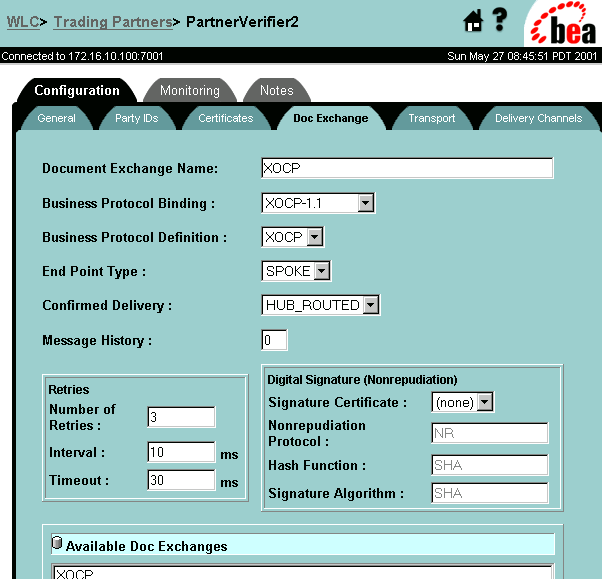
  1. Select the Document Exchange tab. The Document Exchange configuration page is displayed, as shown in the following figure.

    Figure 3-18 Trading Partner Document Exchange Configuration Page


  2. Enter the information described in the following table.

    Table 3-7 Configuring a Trading Partner Document Exchange

    In the field labeled . . .

    Choose the following information . . .

    Business Protocol Binding

    The business protocol and version that supports the digital signature or message encryption capabilities that you want. The protocol you choose becomes bound to the trading partner document exchange identified at the top of the page.

    Business Protocol Definition

    The business protocol associated with the business protocol binding chosen in the preceding selection box.


  3. For information about specifying data in the fields labeled Document Exchange Name, End Point Type, Confirmed Delivery, Message History, and Retries, see the online help for the Document Exchange page by clicking the question mark in the upper right.

  4. For information about configuring digital signature information, see Configuring Message Encryption.

  5. For information about configuring message encryption information, see Configuring Digital Signatures for Nonrepudiation.


Configuring Message Encryption

As mentioned in Introducing WebLogic Collaborate Security, the WebLogic Collaborate message encryption service encrypts business messages for the business protocols that require it. Currently, message encryption is supported only for the RosettaNet 2.0 protocol.

How WebLogic Collaborate Message Encryption Works

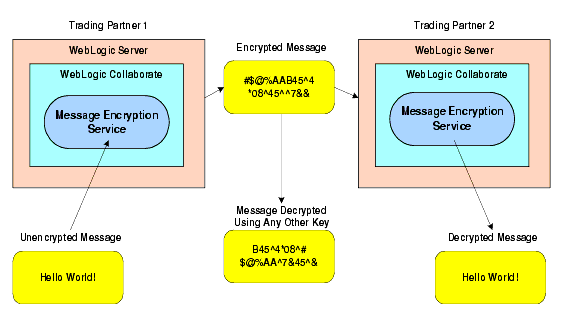
Data encryption works by using a combination of the sender's certificate, private key, and the recipient's certificate to encode a business message. The message can then be decrypted only by the recipient using the recipient's private key.

Note: The WebLogic Collaborate message encryption feature is controlled by licensing (Encryption/Domestic or Encryption/Export), but the decryption of a business message is not. If WebLogic Collaborate does not have a valid encryption license, WebLogic Collaborate disables the encryption service. However, WebLogic Collaborate can always decrypt business messages that are received.

The WebLogic Collaborate Release 2.0 message encryption service supports only the Rivest-Shamir-Adleman (RSA) encryption algorithm.

The following figure shows how data encryption is performed using the public and private keys.

Figure 3-19 WebLogic Collaborate Message Encryption Service


Note: To use message encryption, you must have a valid license for using the encryption service.

Configuring Message Encryption

To configure message encryption for business messages exchanged by trading partners in a RosettaNet 2.0-based conversation definition, complete the following steps:
  1. Configure the trading partner as described in Configuration Tasks in Administering BEA WebLogic Collaborate.

  2. Configure security for the trading partner delivery channel, as described in Configuring a Secure Delivery Channel. Be sure to configure the delivery channel using a transport that uses the appropriate RosettaNet 2.0 protocol binding.

  3. Configure the trading partner document exchange, as described in Configuring a Secure Document Exchange. Be sure to configure the document exchange to support the appropriate RosettaNet 2.0 business protocol binding.

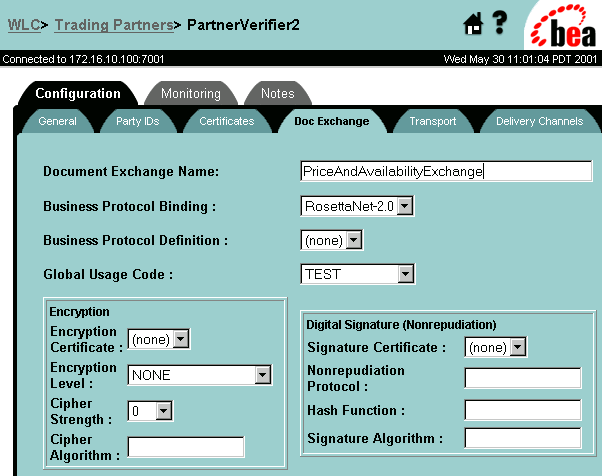
    Notice that when you select a RosettaNet business protocol binding on the Doc Exchange configuration page, the Encryption box is displayed in the lower left-hand corner of that configuration page. The following figure shows the Document Exchange configuration page with the Encryption box.

    Figure 3-20 Configuration Box for Message Encryption on Doc Exchange Configuration Page


  4. In the Encryption box, select the information described in the following table.

    Table 3-8 Message Encryption Configuration Settings

    In the field labeled . . .

    Select the following . . .

    Encryption Certificate

    The name of the encryption certificate configured in Configuring Trading Partner Certificates.

    Encryption Level

    The parts of the business message that you want to have encrypted. Choose PAYLOAD if you want to encrypt only the XML business document(s) part of the message. Choose ENTIRE_PAYLOAD if you want to encrypt the business documents and all attachments in the message.

    Cipher Strength

    Either 56- or 128-bit encryption. Note that 128-bit encryption is not available in some localities.


    Note that the field labeled Cipher Algorithm is a nonmodifiable information field containing the name of the algorithm. With Release 2.0 of WebLogic Collaborate, the only value displayed in this field is RSA.
  5. Click Add/Apply.


Configuring Digital Signatures for Nonrepudiation

Digital signature support (described in detail in Implementing Nonrepudiation) provides a means to prevent anyone or anything from tampering with the contents of a business message, especially when the business message is in transit between two trading partners. Digital signature support is a requirement for nonrepudiation.

If you are implementing nonrepudiation, you need to configure digital signature support in the WebLogic Collaborate Administration Console, which you can do by completing the following steps:

  1. Configure the trading partner, as described in Configuration Tasks in Administering BEA WebLogic Collaborate.

  2. Configure the trading partner signature certificate, as described in Configuring Trading Partner Certificates.

  3. Configure the trading partner delivery channel security, as described in Configuring a Secure Delivery Channel. Be sure to configure the delivery channel using a transport that uses the appropriate protocol binding.

  4. Configure the trading partner document exchange, as described in Configuring a Secure Document Exchange. Be sure to configure the document exchange to support the appropriate business protocol binding.

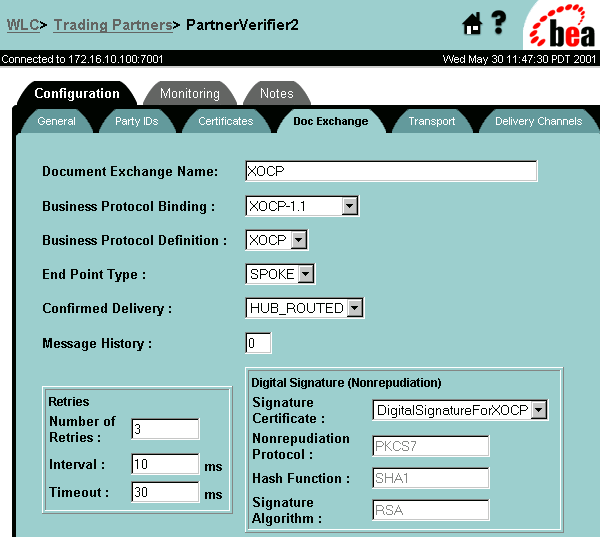
  5. In the Doc Exchange tab, notice the box labeled Digital Signature (Nonrepudiation) in the lower right. In this box, choose the trading partner signature certificate identified in Configuring Trading Partner Certificates.

    When you choose a signature certificate, notice the data displayed in the nonmodifiable fields that are associated with the signature certificate, as shown in the lower right in the following figure.

    Figure 3-21 Configuring Nonrepudiation


    These nonmodifiable fields are used for the following purposes.


Customizing the WLCCertAuthenticator Class

The WLCCertAuthenticator class is an implementation of the WebLogic Server CertAuthenticator class. The default implementation of the WLCCertAuthenticator class maps the digital certificate of the trading partner to the corresponding trading partner user defined in the WebLogic Collaborate repository. You may want to extend this functionality to use mutual authentication for users other than trading partners. For example, you may want to modify the class to map a Web browser or Java client to a WebLogic Server user.

The WLCCertAuthenticator class is invoked by WebLogic Server after an SSL connection between the trading partner and WebLogic Server has been established. The class can extract data from a digital certificate to determine the trading partner name that corresponds to the digital certificate.

The following code example, in which the WebLogic default realm for retrieving users is used, shows how the WLCCertAuthenticator class is customized:

public User authenticate(String userName, Certificate[] certs, boolean ssl)
{

String user = null;

// If not using SSL, return
if (ssl == false)
{
return null;
}

// Verify that the certificate is either a c-hub certificate or a trading partner
// certificate, then return the corresponding WLS user.

if ((user = Security.isValidWLCCertificate(certs))!= null)
{
return realm.getUser(user);
}
// Certificate is not a valid WLC certificate.
// Check here for non-WLC certificate and return the corresponding user.
}


Configuring a Certificate Verification Provider Interface

As explained in Trading Partner Certificate Verification, you use a certificate verification provider to validate a trading partner's digital certificate. If you are using a certificate verification provider (CVP), you need to configure it in the WebLogic Collaborate Administration Console, using the steps described in this section.

To configure a CVP:

  1. Start the WebLogic Collaborate Administration Console.

  2. In the main page of the WebLogic Collaborate Administration Console, click the link under WLC Server, as described in Configuring Security for the WebLogic Collaborate System.

  3. In the WLC Server Configuration panel, select the Security tab. This displays the page shown in the following figure.

    Figure 3-22 WebLogic Collaborate System Security Configuration Page


  4. In the field labeled Certificate Verification Class, enter the fully qualified name of the Java class that implements the CVP.

  5. Click Apply.

Note: You can load a certificate verification provider via the Bulk Loader. For more information, see Working with the Bulk Loader in Administering BEA WebLogic Collaborate.


Configuring WebLogic Collaborate to Use an Outbound HTTP Proxy Server

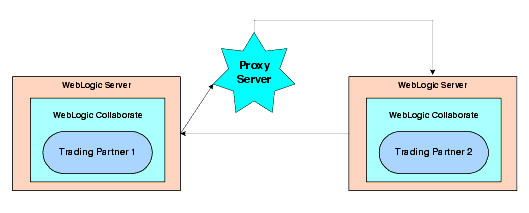
If you are using WebLogic Collaborate in a security-sensitive environment, you may want to use WebLogic Collaborate behind a proxy server. A proxy server allows trading partners to communicate across intranets or the Internet without compromising security. A proxy server is used to:

When proxy servers are configured on the local network, network traffic (SSL and HTTP) is tunneled through the proxy server to the external network. The following figure illustrates how a proxy server might be used in the WebLogic Collaborate environment.

Figure 3-23 Proxy Server


To configure a proxy server for WebLogic Collaborate, complete the following steps:
  1. Display the configuration tabs in the right pane of the WebLogic Collaborate Administration Console window, as shown in the following figure.

    Figure 3-24 Configuration Tabs in the WebLogic Collaborate Administration Console


  2. Select the Proxy tab. The Proxy configuration page is displayed, as shown in the following figure.

    Figure 3-25 WebLogic Collaborate Proxy Server Configuration Page
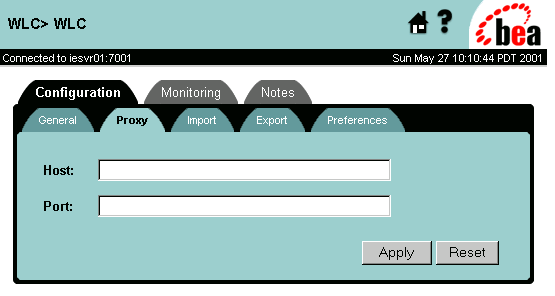


  3. In the field labeled Host, enter the address of the proxy server used for the WebLogic Collaborate server, if any. For example:
    myproxy.mycompany.com.

  4. In the field labeled Port, enter the port number for the proxy server.

  5. Click Apply.

  6. Add permissions to read and write the ssl.proxyHost and ssl.proxyPort system properties for the WebLogic Server. These system properties are stored in the weblogic.policy file, which is located in the directory where you installed WebLogic Server. Add the following lines to the grant section of the weblogic.policy file:
    permission java.util.PropertyPermission "ssl.proxyHost", "read, write";
    permission java.util.PropertyPermission "ssl.proxyPort", "read, write";


Configuring WebLogic Collaborate with a Webserver and a WebLogic Proxy Plug-In

You can configure WebLogic Collaborate with a webserver, such as Apache server, that is programmed to service business messages from a remote trading partner. The webserver can provide the following services:

The webserver uses the WebLogic proxy plug-in, which you can configure to provide the following services:

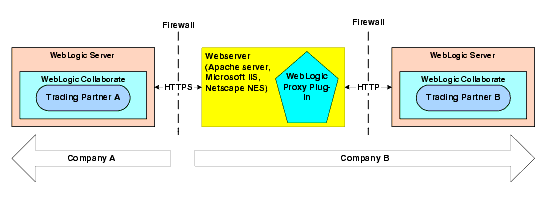
The following figure shows the topology of an environment that uses a webserver, the WebLogic proxy plug-in, and WebLogic Collaborate.

Figure 3-26 Using a Webserver and the WebLogic Proxy Plug-In


Configuring the Webserver

To configure the webserver, see Deploying and Configuring Web Applications in the BEA WebLogic Server Administration Guide.

The following code example provides the segment of httpd.conf (for Apache server) for configuring the proxy plug-in:

# LoadModule foo_module libexec/mod_foo.so
LoadModule weblogic_module libexec/mod_wl_ssl.<suffix>

<Location /weblogic>
SetHandler weblogic-handler
PathTrim /weblogic
WebLogicHost myhost
WebLogicPort 80
</Location>

Note that in WebLogic Server 6.0, the proxy plug-in supports only one-way SSL. Because WebLogic Server hosting WebLogic Collaborate is configured with mutual authentication, it is important that you do not configure the proxy plug-in with SSL.

WebLogic Server User Identity for the Trading Partner

The WebLogic Server user identity is optional when you configure the remote trading partner. If a particular WebLogic Collaborate deployment has stringent security requirements, we recommend the following:


Configuring WebLogic Process Integrator Access to the WebLogic Collaborate Repository

If you use WebLogic Collaborate with WebLogic Process Integrator, note the following configuration tasks for sharing access to the WebLogic Collaborate repository.

For information about configuring ACLs for WebLogic Collaborate resources, see Configuring Access Control Lists for WebLogic Collaborate.


back to top previous page next page