

|
|
|
|
|
|
Migrating WebLogic Integration 2.1 to WebLogic Integration 2.1 Service Pack 1
This section describes the procedure for migrating from BEA WebLogic Integration 2.1 to BEA WebLogic Integration 2.1 Service Pack 1.
It includes the following topics:
Before You Begin
Before you attempt to migrate to WebLogic Integration 2.1 Service Pack 1, we strongly recommend that you back up your entire database and export all your workflows. This preparation will enable you to fix your environment and start the migration again if your first migration attempt fails. You can run the migration script as many times as necessary without any adverse results.
Domain Migration
The procedures provided in Database Migration run only migration utilities that migrate the WebLogic Integration repository information stored in database tables. These utilities do not migrate WebLogic Server domain information for your application. For example, if you create a domain for your WebLogic Integration 2.1 application and then run the migration procedure on the database for that domain, you must also update the config.xml file for the application domain by adding the additional entries needed for WebLogic Integration 2.1 Service Pack 1 (SP1). The procedure for adding those additional entities is provided in this section.
If, however, you are using one of the preconfigured domains installed with WebLogic Integration 2.1 and you use the upgrade installer to upgrade to WebLogic Integration 2.1 SP1, you do not need to follow the procedure in this section because the upgrade installer automatically updates the config.xml files for the four preconfigured domains with the additional entities needed for WebLogic Integration 2.1 SP1.
To migrate the WebLogic Server domain information for your application, complete the following procedure:
Make the following changes:
a. Add a deployment entry for the ebXML plug-in jar file in two steps: (1) add the two lines highlighted (in bold) in Listing 5-1, and (2) increment the values of DeploymentOrder for all the remaining deployment entries, as shown in Listing 5-1.
b. Change the name of the data integration plug-in from XTPlugin to com.bea.wlxt.WLXTPlugin, as shown in the last deployment entry of Listing 5-1.
Listing 5-1 Deployment Entries in the config.xml File After Editing
<EJBComponent Name="wlaiplugin-ejb.jar" Targets="myserver"
	URI="wlaiplugin-ejb.jar" DeploymentOrder="9"/>
<EJBComponent Name="ebxml-bpm-plugin.jar" Targets="myserver"
	URI="ebxml-bpm-plugin.jar" DeploymentOrder="10"/>
<WebAppComponent Name="b2bconsole" ServletReloadCheckSecs="1"
	Targets="myserver" URI="b2bconsole.war" DeploymentOrder="11"/>
<WebAppComponent Name="wlai" ServletReloadCheckSecs="1"
	Targets="myserver" URI="wlai.war" DeploymentOrder="12"/>
<WebAppComponent Name="WLAIPlugin" Targets="myserver"
	URI="wlai-plugin.war" DeploymentOrder="13"/>
<WebAppComponent Name="com.bea.wlxt.WLXTPlugin" Targets="myserver"
	URI="wlxtpi.war" DeploymentOrder="14"/>
c. Add a new JMS queue by inserting the line that is highlighted (in bold) in Listing 5-2.
Listing 5-2 Addition of JMS Queue in the config.xml File
	<JMSTopic JNDIName="com.bea.wlpi.NotifyTopic" Name="wlpiNotify"/>
	<JMSQueue JNDIName="com.bea.b2b.OutboundQueue" Name="B2bOutboundQueue"/>
</JMSServer>
Database Migration
WebLogic Integration 2.1 Service Pack 1 (SP1) requires database entities not required for WebLogic Integration 2.1.
To convert your installation of WebLogic Integration 2.1 to WebLogic Integration 2.1 SP1, you must run one of the following procedures:
Caution: Both of these migration procedures update a single repository. The migration of repository data from an existing database instance to a new instance is not supported.
Figure 5-1 WebLogic Integration 2.1 to WebLogic Integration 2.1 Service Pack 1 Database Migration
Upgrade Install This section provides a procedure for using the service pack upgrade installer to convert your installation of WebLogic Integration 2.1 to WebLogic Integration 2.1 Service Pack 1 (SP1). The conversion includes the upgrade of the repository data so it becomes compatible with WebLogic Integration 2.1 SP1. To upgrade and migrate the repository data: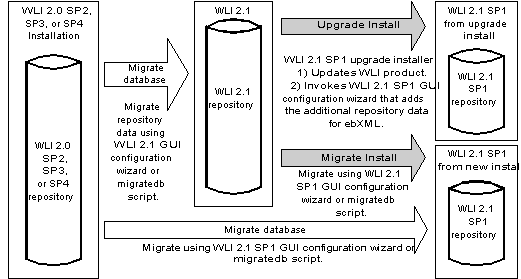
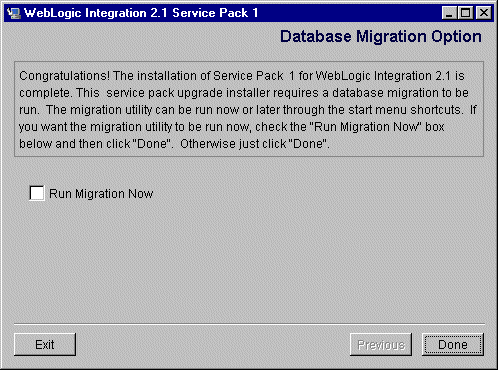
The service pack upgrade installer gives you the option of invoking the WebLogic Integration database configuration wizard directly from the service pack upgrade installer, as shown in Figure 5-2.
Figure 5-2 Invoking the Database Configuration Wizard to Migrate with the Service Pack Upgrade Installer
Migrate your repository data by following one of these procedures:
If you select the Run Migration Now check box, follow the procedure provided in Migrating with the Database Configuration Wizard, starting with step 2.
If you do not select the Run Migration Now check box, complete the service pack upgrade, and then run a migration utility. Run either the WebLogic Integration 2.1 database configuration wizard or the migration script to update the existing WebLogic Integration 2.1 repository database tables with the additional database entries needed for WebLogic Integration 2.1 SP1. Follow one of the migration procedures provided in Migration Utilities.
Caution: You must complete the database migration before you can start to use the upgraded WebLogic Integration 2.1 SP1 installation.
New Installation
This section provides a procedure for updating the repository data of an existing WebLogic Integration 2.1 installation to make it compatible with a new installation of WebLogic Integration 2.1 Service Pack 1 (SP1).
To update the repository data for a new installation of WebLogic Integration 2.1 SP1:
Migrating Two Repositories
This section provides a procedure for updating the repository data of an existing WebLogic Integration 2.1 installation with two repositories to be compatible with a new installation of WebLogic Integration 2.1 Service Pack 1 (SP1). For example, you may have two repositories, one for deploying your WebLogic Integration application in a production environment and one for developing your WebLogic Integration application. For your production environment, the repository resides in an Oracle database of the wlidomain domain and for the development environment, the repository resides in a Microsoft SQL Server database of the samples domain. Figure 5-3 illustrates this scenario.
Figure 5-3 Example Database Configuration
To migrate the two database instances for the example configuration shown in Figure 5-3, complete the following procedure: 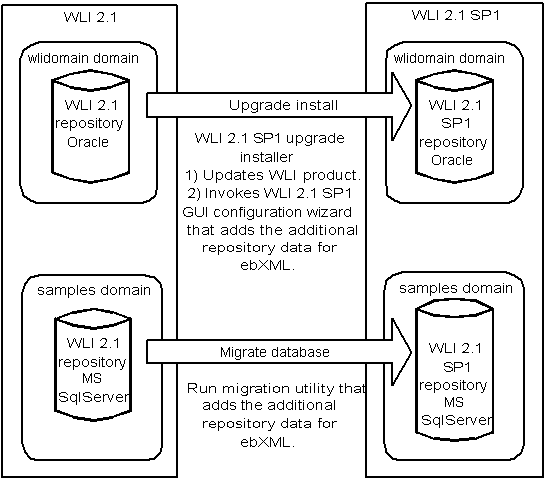
Warning: Make sure you switch the default domain before running a migration utility. In the example configuration shown in Figure 5-3, the default domain would change from the wlidomain to samples domain. The migration procedures in Migration Utilities, provide steps for switching the default domain.

|

|

|
|
|
|
Copyright © 2002 BEA Systems, Inc. All rights reserved.
|