

|
|
|
|
|
|
Configuring WebLogic Portal for Microsoft SQL Server Databases
WebLogic Portal includes a set of scripts that create Microsoft SQL Server tables and other data objects for use in any WebLogic Portal environment. The scripts run only in a Windows environment. If you use WebLogic Portal on a UNIX host with a Microsoft SQL Server database located on a Windows host, you must install the contents of the PORTAL_HOME\db\sql_server\2000 directory and the PORTAL_HOME\db\create_all.bat script on a Windows machine with SQL Server database connectivity.
Depending on the database environment that you are defining, you can choose to load sample data that supports the reference applications. Usually, a development environment loads the sample data and a staging or production environment does not. In some cases, you may need to modify the default scripts so that they load non-operational sample data (such as data for the product catalog).
To use a Microsoft SQL Server database with a WebLogic Portal installation, complete the following tasks:
Step 1: Install the Client Software
Step 2: Create a User Database and Database Owner
Step 3: Configure Properties and Environment Variables for SQL Server
Step 4: Create the Schema Objects for MS SQL Server
Step 5: Load Additional Sample Data
Before you continue, follow the procedures in "Installing and Using WebLogic jDriver for Microsoft SQL Server" on the BEA WebLogic Server documentation site.
Step 1: Install the Client Software
On the WebLogic Portal host, use the SQL Server installation program to install the SQL Server client software and configure it to access your SQL Server Database.
For information on the SQL Server release that WebLogic Portal supports, refer to Supported Platforms in the Installation Guide.
After you install the client software, complete the following tasks:
Configure Security Authentication
Verify that the security authentication settings for your SQL Server are set to "SQL Server and Windows." You cannot create the WebLogic Portal database if your SQL Server is configured for "Windows Only" authentication. To configure authentication settings, do the following:
Create and Test the ODBC Data Source
Before you can run create_database.sql, verify that an ODBC Data Source for Microsoft SQL Server is installed on the WebLogic Portal host.
Then use the osql utility to make sure that you can connect to the SQL Server database from the WebLogic Portal host.
Step 2: Create a User Database and Database Owner
You must create a user database and database owner exclusively for the WebLogic Portal schema. If you need to locate multiple WebLogic Portal databases on same database server, you must create a separate database and database owner combination for each database.
Note: We recommend that you locate the SQL Server database on a host other than the WebLogic Portal host.
WebLogic Portal includes a sample script, create_database.sql, for creating a user database named WLCS with an owner named WEBLOGIC.
To create a user database and database owner, complete the following tasks:
Modify create_database.sql
You must modify create_database.sql to substitute pathnames that match your environment. We recommend that you place the database data file and the log file on separate physical disks and away from any system database (i.e. master, msdb, tempdb) data or log files. The script provides initial sizes for these files, and you can adjust the values depending on your disk-space requirements and system usage.
To modify the script, do the following:
Note: If you use WebLogic Portal from a Unix host with a Microsoft SQL Server database located on a Windows host, edit the create_database.sql that you copied to the Windows machine.
Note: In this document, PORTAL_HOME refers to the directory into which you installed WebLogic Portal.
If you create more than one WebLogic Portal database on the same SQL Server host, each data file must have a unique name.
If you create more than one WebLogic Portal database on the same SQL Server host, each log file must have a unique name.
where my-database-owner is the user ID of your database owner.
go
create database my-database-name
ON
(NAME = my-database-name_DATA,
FILENAME = 'D:\DATAFILE\WLCS_DATA.mdf',
SIZE = 60)
LOG ON
(NAME = my-database-name_LOG,
FILENAME = 'E:\LOGFILE\WLCS_LOG.ldf',
SIZE = 20)
go
checkpoint
go
-- *** Create a WEBLOGIC login and user in the WLCS database
use master
go
exec sp_addlogin 'WEBLOGIC', 'PASSWORD', 'my-database-name', 'us_english'
go
use my-database-name
go
sp_changedbowner WEBLOGIC
go
where my-database-name is the new name of your database.
Note: If you change the names of the database owner (WEBLOGIC by default) or the database (WLCS by default), you must review each script for the default names and modify them to match your new names.
Run create_database.sql
To run the create_database.sql script, do the following:
PORTAL_HOME\db\sql_server\2000\admin
osql -U sa -S SERVER -e -icreate_database.sql -ocreate_database.log
where SERVER is the name of your SQL Server database server host.
The command logs on to the database server host as System Administrator, runs the create_database.sql script, and directs the output to a file named .\create_database.log.
Change the Password
The create_database.sql script creates a generic password named password.
We recommend that you change the database-owner password to a new password of your choice.
To change the password, do the following from a DOS prompt:
osql -U WEBLOGIC -P PASSWORD -S server-name
where WEBLOGIC is the user name for the database owner and
server-name is the name of your SQL Server database server host.
1> sp_password PASSWORD,newpassword
where newpassword is your new password.
2> go
osql sets the new password and returns the following message:
Password correctly set.
(return status = 0)
1>
Step 3: Configure Properties and Environment Variables for SQL Server
When you install WebLogic Portal, it is configured to support a Cloudscape demonstration database. This section describes how to modify the default Cloudscape properties to support a SQL Server database.
To configure properties and environment variables for SQL Server, complete the following tasks in the order indicated below:
Start the Administration Console
To configure a server to support SQL Server, start the server that you want to configure and access the Administration Console for the server's domain.
For example, you want to configure myServer (which listens on port 7501). Start myServer on your local host and then enter the following URL in a browser:
http://localhost:7501/console
Set Up JDBC Connection Pools and Data Sources
Connection pools provide ready-to-use pools of connections to your RDBMS. The application server creates the pools during server startup, thus eliminating the overhead of your enterprise application having to establish database connections for each transaction. For more information about connection pools, refer to "Overview of Connection Pools" in the WebLogic Server Programming WebLogic JDBC guide.
A DataSource is an interface between your enterprise application and a connection pool. For more information, refer to "Overview of DataSources" in the WebLogic Server Programming WebLogic JDBC guide.
Configure commercePool for SQL Server Databases
To configure commercePool for SQL Server, do the following:
Figure 10-1 The General Tab for JDBC Connection Pools
The WebLogic Server Administration Console keeps this password in an encrypted format.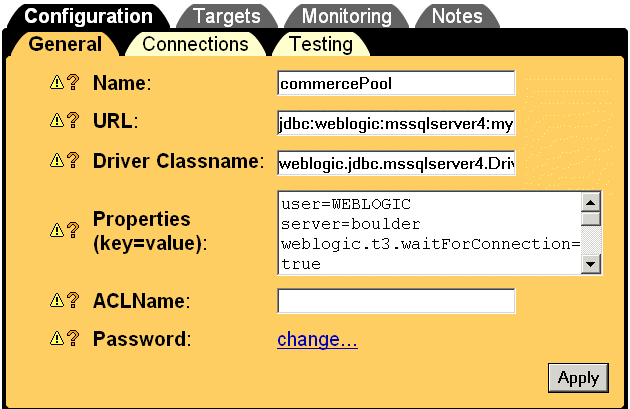
Configure dataSyncPool for SQL Server Databases
To configure dataSyncPool for SQL Server, do the following:
The WebLogic Server Administration Console keeps this password in an encrypted format.
Update Settings for the RDBMS Security Realm
If you are using the RDBMS security realm, you must change the RDBMSRealm settings to match the database type that stores the user information. If you are using LDAP or some other security realm, you can ignore these settings.
To change these settings, do the following:
Note: If you named your RDBMS realm something other than wlcsRealm, click the realm that you created.
The WebLogic Portal Administration Tools keeps this password in an encrypted format.
weblogic.allow.reserve.weblogic.jdbc.connectionPool.commercePool=wlcs
weblogic.allow.reset.weblogic.jdbc.connectionPool.commercePool=wlcs
weblogic.allow.shrink.weblogic.jdbc.connectionPool.commercePool=wlcs
server=@SQL_SERVER_NAME@
where @SQL_SERVER_NAME@ is the name of the SQL Server database server that hosts the WebLogic Portal database.
Configure the JDBC Helper Service
The JDBC Helper Service enables services to explicitly establish a database connection and to coordinate the processing of CLOB data. To configure the JDBC Helper service for SQL Server, do the following for each application that you have deployed:
Note: Since the data synchronization framework uses the Personalization enterprise application, you will need to use the following procedure for the Personalization application as well as all other deployed applications.
Stop the Server
Stop the server to complete the remainder of Step 3: Configure Properties and Environment Variables for SQL Server.
For information on stopping the server, refer to Shutting Down a Server.
Update Environment Variables for the Server
To update environment variables, do the following on your WebLogic Portal host:
Listing 10-1 Specify the Database (Example for a Windows Environment)
REM ----------- Specify which database to use -----------
REM SET DATABASE=CLOUDSCAPE
REM SET DATABASE=ORACLE
REM SET DATABASE=ORACLE_OCI_815
SET DATABASE=MSSQL
Step 4: Create the Schema Objects for MS SQL Server
WebLogic Portal includes a script, create_all.bat, that calls a series of other scripts to create the WebLogic Portal schema and loads sample data. You can modify the script to create the database without loading sample data.
This step includes the following tasks:
Set Variables in databaseload.properties
To set up databaseload.properties, do the following on your WebLogic Portal host:
Note: If you use WebLogic Portal from a Unix host, edit the databaseload.properties that is located on the UNIX host.
#------Cloudscape--------------------------------#
#jdbcdriver=COM.cloudscape.core.JDBCDriver
#connection=jdbc:cloudscape:Commerce
#dblogin=none
#dbpassword=none
#------MS SQL Server-----------------------------#
jdbcdriver=weblogic.jdbc.mssqlserver4.Driver
connection=jdbc:weblogic:mssqlserver4:@MSSQL_SERVER@:@MSSQL_PORT@
dblogin=@MSSQL_USER@
dbpassword=@MSSQL_PASSWORD@
Replace @MSSQL_USER@ with the name of the database owner and
@MSSQL_PASSWORD@ with the database owner's password.
The user name and password must match the user name and password you used in Set Up JDBC Connection Pools and Data Sources and Update Settings for the RDBMS Security Realm.
Set Variables in create_all.bat
To set variables in create_all.bat, do the following:
Note: If you use WebLogic Portal from a Unix host with a Microsoft SQL Server database located on a Windows host, edit the create_all.bat that you copied to the Windows machine.
REM To be set by user
set SAMPLEDATA=Y
set USER_ID=myUser
set PASSWORD=myPassord
set SERVER=myServer
REM End of set by user
echo ***************************************************************
echo    Please replace the reference of @WL_PORTAL_HOME@
echo    with the actual WebLogic Portal path
        ( e.g.,C:\BEA\WLPORTAL4.0 )
echo    Once changed, be sure and remove these echo statements
        and the
echo    EXIT command from the batch file.
echo ***************************************************************
EXIT
CALL @WL_PORTAL_HOME@\bin\win32\set-environment.bat
REM To be set by user for Microsoft SQL Server
REM set MSSQL_VERSION=7
set MSSQL_VERSION=2000
REM set MSSQL_UNIX=N
set MSSQL_UNIX=Y
Run create_all.bat
Caution: Before it creates tables, create_all.bat runs SQL statements that drop any existing WebLogic Portal tables. If you run create_all.bat for a database that already contains WebLogic Portal data, you will lose any WebLogic Portal data that is in the database.
To run this script, do the following:
PORTAL_HOME\db\
create_all.bat
The script creates log files under PORTAL_HOME\db.
The script logs its actions in several log files, which it locates in the PORTAL_HOME\db directory.
For a description of the tables, indexes, and constraints, see the following topics:
Step 5: Load Additional Sample Data
You can load additional sample data that demonstrates ad placeholders and other Campaign services. To load additional sample data, do the following from the WebLogic Portal host:
The loadSampleData script does the following:

|

|
|
|
|
Copyright © 2001 BEA Systems, Inc. All rights reserved.
|