

|
|
|
|
|
|
Additional Tuning Recommendations
This chapter recommends configurations for miscellaneous services and components:
For information on tuning the Behavior Tracking service, refer to "Persisting Behavioral Tracking Data" in the Guide to Events and Behavior Tracking.
All of the recommendations in this document are in addition to the recommendations in the BEA WebLogic Server Performance and Tuning guide.
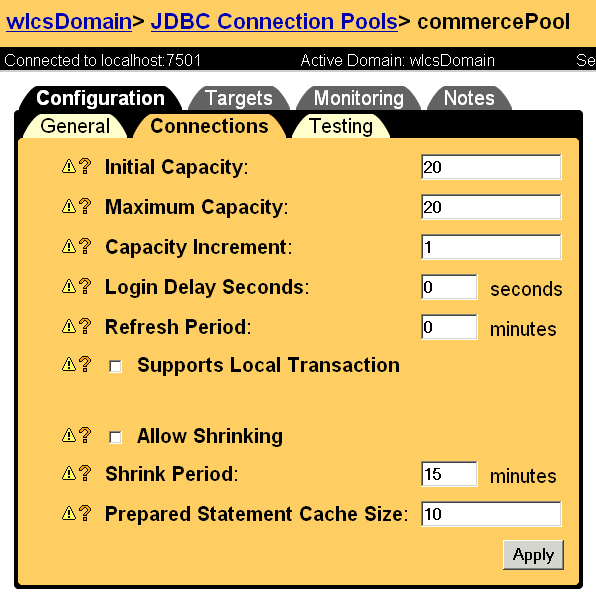
Adjust Database Connections Available at Startup
To optimize the database pool performance for your production Web site, do the following:
Figure 6-1 Change Values on the commercePool Tab
For More Information
For more information on database connection pools, refer to the WebLogic Server Administration Console online help.
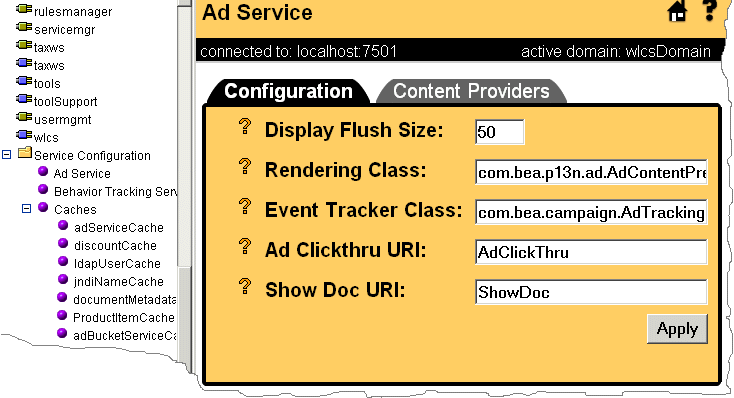
Increase the Size of the Display-Count Buffer
The Campaign service uses display counts to determine whether a campaign has met its end goals. Each time an ad placeholder finds an ad to display as a result of a scenario action, the Campaign service updates the display count.
By default, the Campaign service does not update the display count in the database until an ad placeholder has found 10 ads to display as a result of one or more scenario actions. If the server crashes before the Campaign service flushes this display-count buffer to the database, you can lose display-count updates, up to the number of display counts that are in the buffer.
You can use the WebLogic Server Administration Console to determine the number of display counts that are stored in memory before the Campaign service updates the database:
http://hostname:port-number/console
For example, you started a server on a host named bonnie and it uses port 7001 as a listen-on port. Enter the following URL:
http://bonnie:7001/console
Figure 6-2 Adjust the Ad Count
Display Metadata, Sort and Query Explicit Metadata
If you used the BulkLoader to load document metadata into the reference implementation document database, you can improve document management performance when retrieving documents by doing the following:
For more information about content management, see "Creating and Managing Content" in the Guide to Building Personalized Applications.
Use LDAP for Authentication Only
For improved performance, use LDAP for authentication only; do not use it to retrieve user and group properties. Instead of retrieving properties from LDAP servers, configure your system to use properties stored in the RDBMS by minimizing the number of properties registered for retrieval from LDAP in the user management tools.
For more information about changing LDAP settings, see "Using Other Realms" under "Creating and Managing Users" in the Guide to Building Personalized Applications.
Use the HotSpot Virtual Machine
Hot Spot enhances JDK 1.3 performance. It provides several implementations, which vary depending upon the operating system. HotSpot is an optimized VM with several variations.
For Windows:
WebLogic Portal supports the Client VM.
Note: If WebLogic Portal is configured to use the default Cloudscape database, the Classic VM is used. If WebLogic Portal is configured with any other database, the default is the Client VM using the -hotspot implementation.
To change this setting to the -client implementation of Client VM:
Change:
SET JAVA_VM=-hotspot
To:
SET JAVA_VM=-client
For Linux or Solaris:
WebLogic Portal is certified for both the Server VM and the Client VM, but the Server VM is the default setting.
To change the HotSpot VM:
For Linux change the following line under the LINUX|Linux heading of the VM Options section (the following is an example entry):
JAVA_VM_OPTIONS="-hotspot -Xms128m - Xmx128"
To:
JAVA_VM_OPTIONS="-ms160m -mx300m -XX:MaxNewSize=100m -XX:NewSize=100m -XX:MaxPermSize=128m"
For HP-UX or AIX:
WebLogic Portal does not specify this setting, so it defaults to the Client VM. Both Client and Server VMs are certified for WebLogic Portal.
The default startPortal startup script activates the HotSpot VM that is appropriate for each platform type. This script is located at PORTAL_HOME/config/portalDomain.
Deactivating HotSpot
To deactivate HotSpot, do the following:
For Windows:
For UNIX:
Note: For information on shutting down and starting the server, refer to "Starting and Shutting Down the Server" in the Deployment Guide.

|

|
|
|
|
Copyright © 2001 BEA Systems, Inc. All rights reserved.
|