
| Download Docs | Site Map | Glossary | |
|
|
|||
| bea.com | products | dev2dev | support | askBEA |
|
|
||||||||
| e-docs > WebLogic Platform > WebLogic Portal > Administration Guide > Introduction to BEA WebLogic Portal Administration |
|
Administration Guide
|
Introduction to BEA WebLogic Portal Administration
Welcome to the WebLogic Portal Administration Guide. Portal administration involves more than traditional system administration activities. It also involves tasks that control the behavior, content, and appearance of portals. While portal administrators do not develop the resources required for a portal Web site, they use those resources to maintain and modify portals.
This guide shows you how to administer portal Web sites built with BEA WebLogic Portal. Administration tasks include setting up and managing users, creating and managing group portals, modifying portal attributes, creating personalization behavior, developing campaigns, and changing a portal's look and feel.
Portal development tasks are described in the WebLogic Portal Development Guide.
This section includes information on the following subjects:
An Administrator's Portal Primer
A portal is a feature-rich Web site. It provides a single point of access to enterprise data and applications, presenting a unified and personalized view of that information to employees, customers, and business partners.
Portals allow you to have multiple Web applications within a single Web interface. In addition to regular Web content that appears in a portal, portals provide the ability to display portlets—self-contained applications or content—all in a single Web interface.
Portals support multiple pages with tab-based navigation, with each page containing its own content and portlets.
Portal Features
While a fully-functioning portal offers many features to portal users that enhance their experience when using WebLogic Portal, many administration features likewise enhance your experience when managing portals and portal resources. This section describes some of these features.
User Management
WebLogic Portal lets you create users (made up mostly of your site visitors) and optionally store information about them, giving you the details necessary to target Web content to your visitors with pinpoint accuracy. You can also create groups and add users to them. Groups let you define different views of your portal for different groups (Group Portals), making it seem as if visitors in each group are looking at completely different Web sites.
WebLogic Portal also provides tools for creating dynamic groups of visitors: Segments and Entitlement Segments. By creating groupings of characteristics, such as gender, browser type, or date, any site visitors who match those characteristics dynamically become members of the group. Segments are used to target visitors with campaigns and personalized content. Entitlement Segments are used to control the pages and portlets visitors can view.
Group Portals
Portals are designed either for single users or for groups. With Group Portals you can restrict portal access to specific visitors and set up delegated administration for portals. You can create multiple Group Portals within a portal. The Group Portals can share portal resources, such as layouts and portlets, but can be configured differently to satisfy the needs of each group separately. Because users are designated individually as members of a group, the Group Portal provides a static form of personalization.
Delegated Administration
The WebLogic Portal security service lets you create different levels of administrators, each with varying degrees of access. You can also create administrators that can in turn delegate administration tasks to other users.
Portal and Portlet Management
Using existing resources that are either provided by BEA or created by developers, administrators can modify a portal's look and feel, define and arrange the pages and portlets displayed in a portal, define the different views of the portal (Group Portals) that different visitors see, and control access to pages and portlets within a group portal (with Entitlement Segments).
Personalization
Administrators have a great deal of control over the personalized content that is displayed in a portal by defining rules for Content Selectors and Placeholders. Content Selectors are rules that target specific Web content stored in a content database to specific site visitors. Placeholders are rules that control which advertisements are displayed on a Web page, and can provide a mechanism for ad rotations that display different ads each time the same person visits the site.
Campaigns
Campaigns are powerful tools for targeting content to visitors. Administrators can create campaign scenarios that target specific visitors with three types of actions. For example: targeting a specific content piece to an employee, giving the visitor a discount in a purchasing session, or sending the visitor a predefined e-mail message.
Roadmap for Administering a Portal
This section describes the tools and processes involved in administering a portal and implementing the features in the previous section.
How Do I Administer a Portal?
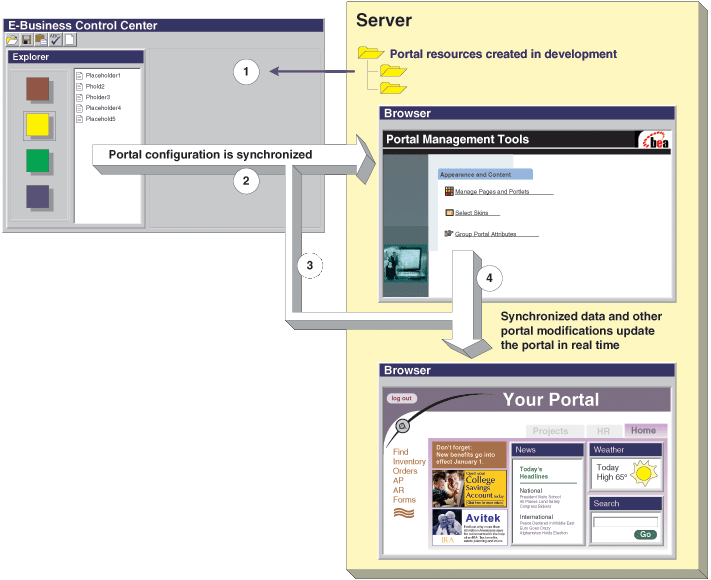
For most WebLogic Portal administration tasks, you will use two tools: the WebLogic Portal Administration Tools that run in a browser when your portal domain is running, and the locally installed E-Business Control Center for off-line changes to portal resources. Figure 1-1 shows how these tools fit into a portal administration workflow. See the numbered key following the roadmap for a full explanation of each stage of portal administration.
Figure 1-1 Portal Administration Workflow
Starting and Logging in to the Administration Tools
Procedures throughout this guide require you to use the WebLogic Portal Administration Tools or the E-Business Control Center. The following procedures show you how to start and log in to these tools.
Starting the WebLogic Portal Administration Tools
To launch the WebLogic Portal Administration Tools for your domain:
Open a browser and enter the following URL:
http://<hostname>:<port>/<enterprise_app_folder_name>Tools
where <enterprise_app_folder_name> is located beneath the beaApps folder in your domain.
For example, if you are launching the tools on the server itself, the default URL is:
http://localhost:7501/portalAppTools
Starting the E-Business Control Center
The E-Business Control Center must be installed on each machine that will run it. To launch the E-Business Control Center, choose Start
After you start the E-Business Control Center, you must open a project file that corresponds with your enterprise application (which can include multiple portals). The project file gives you access to all the metadata and rules defined in the E-Business Control Center for your enterprise application's portals. The default location of your project (.eaprj) file is:
<your_domain>/beaApps/portalApp-project/portalApp-project
the last item in the path being the project file. When you start the E-Business Control Center, the last project file that was open is loaded automatically.
For information on setting up proper connections from the E-Business Control Center to the server, see Setting up the E-Business Control Center.
Logging in to the Tools
After you install WebLogic Portal, initial login to the tools requires a WebLogic Server system administrator or a WebLogic Portal system administrator username and password. WebLogic Server system administrators have full security privileges for the entire domain and can log into and use the WebLogic Server Console tools. WebLogic Portal system administrators have full security privileges for an enterprise application, which can include multiple portals. Table 1-1 shows the default system administrator usernames and passwords.
For information on creating additional administrators, see Creating Administrative Users. Note: For E-Business Control Center server connections, such as synchronization, you must be either a WebLogic Server system administrator or a WebLogic Portal system administrator.
How Do I Get Started?
With the basic background on portals and portlets presented in this section, you can now begin administering portals. This guide is structured to let you view and perform the many tasks involved in portal administration.
While the procedures contained in this guide will show you what you need to know to administer portals and portlets, you should also do some advanced planning to enable your portal to fully support your enterprise.
The following list suggests some activities you need to consider before administering your portal. This list is not a comprehensive planning guide for a new portal. However, it should provide sufficient guidance for getting you started.
You are now ready to begin administering your portal. From here you can:

|

|

|


