bea.com | products | dev2dev | support | askBEA
 Download Docs   Site Map   Glossary 
Search

Administration Guide

 Previous Next Contents Index View as PDF  

Tutorial - Administering a Portal

In the previous tutorial, you created a portal administrator. In this tutorial, you use the new portal administrator to modify the content and look and feel of an existing portal. When you finish, you can view the portal to see the changes you made.

This tutorial is part of a larger tutorial that begins with "Creating a New Portal in a New Domain" in the WebLogic Portal Development Guide at http://download.oracle.com/docs/cd/E13218_01/wlp/docs70/dev/newdom.htm. That tutorial has you create the new domain, new portal, and new portlets that are used in this tutorial.

This tutorial includes the following steps:


Step 1: View the Existing Portal

View the portal you created as it is now so you can compare it to the modified version you will create.

In a browser, go to http://<hostname>:<port>/<portalwebappname>/index.jsp. If you are running the server on your local machine and using the example data in these procedures, the URL will probably be http://localhost:7501/NewPWApp/index.jsp.

Log in with username administrator and password password.

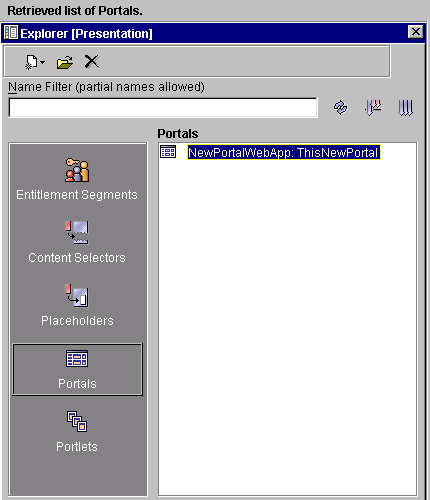
Figure  3-1 shows the existing portal's look and feel with a single "Home" page, indicated by the page tab.

Figure 3-1 The Portal and Portlet You Created in the First Tutorial


Step 2: Make Skins and Layouts Available in the Portal

Skins and layouts are existing resources that affect the appearance of portals and portlets. In this step you will make these resources available for use in your portal.

Note: If you are continuing from previous procedures and the E-Business Control Center is still running with your portal project file open, you can skip the first two steps.

  1. Launch the E-Business Control Center. (Choose Start > Programs > BEA WebLogic Platform 7.0 > WebLogic Portal 7.0 > E-Business Control Center. )

  2. Open the project file, which is portalApp-project in this example. (Choose File  > Open Project and navigate to <BEA_HOME>\user_projects\<your_new_domain>\beaApps\
    portalApp-project\portalApp-project
    ). This is shown in
    Figure  3-2.

    Figure 3-2 Opening a Project File


  3. Click the Presentation tab in the E-Business Control Center Explorer window.

  4. Click the Portals icon, and double-click the file for the Portal you created. In this example, it should be the NewPortalWebApp: ThisNewPortal file. See Figure  3-3.

    The editor window for ThisNewPortal appears.

    Figure 3-3 Opening the Portal File


  5. In the portal editor window, click the General bar and click the Skins tab, as shown in Figure  3-4.

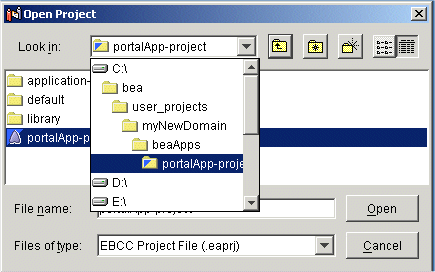
    Figure 3-4 Making Skins Available


  6. In the Available skins list, select the coologic skin, and click Add to move it into the Selected skins list.

  7. Click the Layouts tab, and move the fourcolumn layout into the Selected layouts list.

  8. Click the Portlets tab, and make sure all portlets are in the Selected portlets list as shown in Figure  3-5.

    Figure 3-5 Make Sure All Portlets Are In Selected Portlets List


  9. Click the General bar to close it.

Keep the portal file open.


Step 3: Create a Portal Page and Add a Portlet

A new portal page is like a blank slate that you add things to. In this step, you will create a new portal page, add layouts that you made available in the previous step, and select a portlet to use on the page.

  1. In the portal editor, click the Pages bar as shown in Figure  3-6.

    Figure 3-6 Click the Pages Bar


  2. Click Add. The Page Definition window appears, as shown in Figure  3-7.

    Figure 3-7 Setting the Page Definition


  3. In the Portal page name field, enter the name for the page, such as My Page in this example.

  4. In the Available layouts list, move the layouts you want to be able to use. In this example, move the threecolumn and fourcolumn layouts to the Selected layouts list. Selecting more than one layout lets you switch between these layouts later.

  5. In the Available portlets list, move the portlets you want to the Selected Portlets list. In this example, move BasicPortlet to the Selected portlets list.

  6. Verify that the window looks like Figure  3-8, then click OK. The name of the new page is listed in the Pages pane.

    Figure 3-8 Page Definition Page After Making Changes

  7. On the E-Business Control Center toolbar, click the Save icon as shown in Figure  3-9.

    Figure 3-9 Save Icon


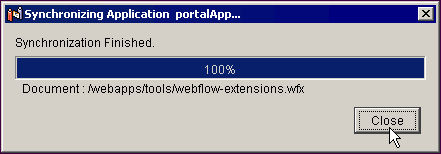
Step 4: Synchronize the Modified Portal

To use the new portal configuration, you must synchronize the E-Business Control Center data stored on your hard drive to the server.

  1. In the E-Business Control Center, make sure your synchronization settings are correct. Choose Tools > Project Settings. The Project Settings window appears, as shown in Figure  3-10.

    Figure 3-10 Verifying Project Settings


  2. Make sure the following project settings are correct:

    1. On the General tab, make sure your Application Root Directory path is set to the portalApp enterprise application directory, at <BEA_HOME>\user_projects\<your_new_domain>\beaApps\
      portalApp
      . In this example, the directory should be <BEA_HOME>\user_projects\myNewDomain\beaApps\portalApp.

    2. On the Connections tab, click Edit Connections, select the Default connection, click Edit, make sure the Application Name field contains portalApp, and make sure the Server field contains the correct http://<hostname>:<port> information. If you are running the server on your local machine, the setting should probably be http://localhost:7501, as shown in Figure  3-11.

      Click OK in the Connection Details and Edit Connections windows.

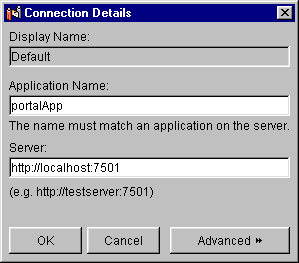
      Figure 3-11 Verifying Connection Details


    3. On the Synchronization tab, deselect Validate the project and Show reset options for active campaigns. Click OK.

  3. On the E-Business Control Center toolbar, click the Synchronize button. The E-Business Control Center runs the necessary processing tasks, as shown in Figure  3-12.

    Figure 3-12 Synchronization in Progress


  4. When the Synchronizing Application window shows that synchronization is complete, click Close, as shown in Figure  3-13.

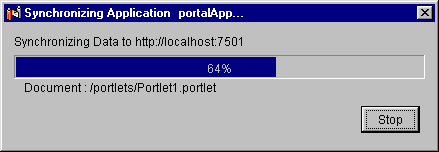
    Figure 3-13 Synchronization Complete


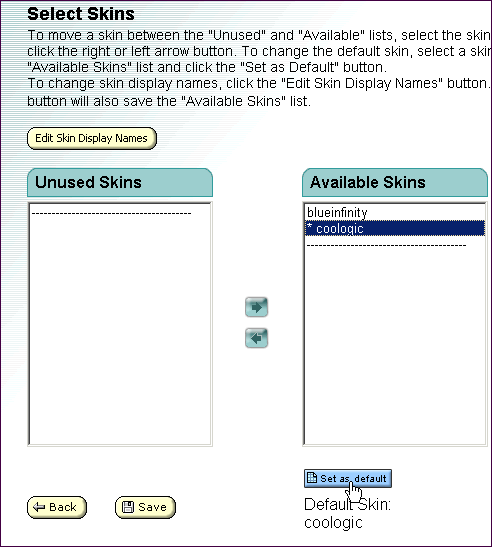
Step 5: Use the New Skins, Layouts, and Portlets

Now that you have modified the portal to include new skins, layouts, and a portal page with a portlet, you will use these resources to make live modifications to the portal with the WebLogic Portal Administration Tools. To make these modifications, you log in as the portal administrator you created in the previous procedure (portaladmin in this example).

  1. Close all open browsers, open a new browser, and launch the WebLogic Portal Administration Tools with the following URL: http://<hostname>:<port>/portalAppTools. If you are running the server on your local machine, the URL will probably be http://localhost:7501/portalAppTools.

  2. At the login prompt, enter the appropriate username and password information for the portal administrator you created; in this example, use the following, as shown in Figure  3-14.

    Username: portaladmin

    Password: password

    Figure 3-14 Log Into the Administration Tools as the Portal Administrator You Created


  3. On the Portal Management Home page, click the default (everyone) link, as shown in Figure  3-15.

    Figure 3-15 Portal Management Home Page


  4. On the Group Portal Management Home page, click Select Skins as shown in Figure  3-17.

    Figure 3-16 Clicking Select Skins


  5. On the Select Skins page, in the Unused Skins list, move the coologic skin into the Available Skins list.

  6. With coologic selected in the Available Skins list, click the Set as Default button below the list to make coologic the default skin, as shown in Figure  3-17.

    Figure 3-17 Setting the Default Skin


  7. Click Save. You are returned to the Group Portal Management Home page.

  8. Click the Manage Pages and Portlets link.

  9. On the Pages and Portlets page, select My Page in the Unused Pages list and click Attributes.

  10. In the Set Page Attributes window, select the following options, as shown in Figure  3-18.

  11. Click Save. You are returned to the Pages and Portlets page. Notice that My Page now appears in the Available Pages list.

  12. Next to My Page, click Layouts.

  13. On the Select Page Layouts page, move fourcolumn from the Unused Layouts list to the Available Layouts list and click Save.

  14. Next to My Page, click Edit Portlets. In the Portlets list, select BasicPortlet and click Set Attributes.

  15. On the Set My Page Portlet Attributes page, set the following options, as shown in Figure  3-19:

  16. Click Save, and in the page that appears, click Back at the bottom of the page. You are returned to the Pages and Portlets page.

Your portal modifications are complete. You have:

Now you can view the modified portal.


Step 6: View the Modified Portal

In a browser, go to http://<hostname>:<port>/<webappname>/index.jsp. If you are running the server on your local machine, the URL is probably http://localhost:7501/NewPWApp/index.jsp.

Figure  3-20 shows the modified portal. Notice the new look and feel, the new "My Page" tab, and the renamed portlet. Compare this to the original portal in Figure  3-1.

Figure 3-20 Viewing the Modified Portal


You have successfully completed this tutorial, which has shown you a few ways that administrators can manage portals. There are many more tasks administrators can perform, including creating Group Portals and Group Portal administrators, developing campaigns, targeting visitors with personalized content, and performing other traditional system administration tasks.

For procedures on these additional tasks, see Administering Portals.


Back to Top Previous Next