bea.com | products | dev2dev | support | askBEA
 Download Docs   Site Map   Glossary 
Search

Administration Guide

 Previous Next Contents Index View as PDF  

Personalization and Interaction Management

Targeting content to particular users allows you to market your products or web content to a desired audience. For example, you might have content in your portal about upcoming municipal elections that you only want visitors to access on or before the date of the election. Or you might wish to display an advertisement for new mystery novels to a visitor who has previously purchased mystery books online at your commerce portal.

The use of personalization greatly reduces the effort needed to maintain a personalized site. Users are grouped into user segments based on individual attributes (see Creating Customer Segments for more information). Because personalization is based on rules, these user segments automatically reflect changes in user attributes.

Note: For more information about rules and their role in personalization see the Developer's Guide at http://download.oracle.com/docs/cd/E13218_01/wlp/docs70/dev/index.htm.

As an administrator, you can use the Personalization tools to map content to users, enriching visitor experience while using your portal content to the best advantage possible. This chapter contains information on the following subjects:


Targeting Customers with Portal Content

A Content Selector is a mechanism that allows you to define the conditions under which specific content can be viewed by a visitor. Using the Content Selector Editor, you define the type of visitor you want to target and show them the content you want them to see.

You use the BEA E-Business Control Center to define the conditions that trigger a Content Selector. You then define a query that retrieves the content to show the visitor.

To use the E-Business Control Center to define a content selector do the following:

  1. Open the E-Business Control Center, for the procedure, see Starting the E-Business Control Center.

  2. Click the Presentation tab.

  3. Click the Content Selector icon in the Explorer pane. Any existing content selectors appear in the right pane of the Explorer.

    Figure 8-1 E-Business Control Center New Menu with Content Selector Selected


  4. Click New and select Content Selector. The Content Selector Editor appears.

    Figure 8-2 Content Selector Editor


  5. Click Edit to open the Selection Rules editor:

    Figure 8-3 Selection Rules Editor


  6. Click the checkbox next to each condition that you want to use to activate the content selector. For each condition selected, a related action is added to the Action pane.

  7. In the Action pane, do the following:

    1. Determine how the conditions will apply. The default value is "all," which means that all conditions must be true before the content selector is activated. Click the word all to toggle the value to any, which means that at least one of the conditions must be true to activate the content selector.

    2. Next, set the values for each condition by clicking the underlined text in the condition list; for example, if you selected the condition "The visitor is a member of a predefined customer segment", the action "The visitor is in customer segment [customer segment]" appears. Click [customer segment] to display the Select Customer Segments dialog box.

      Figure 8-4 Select Customer Segments Dialog Box
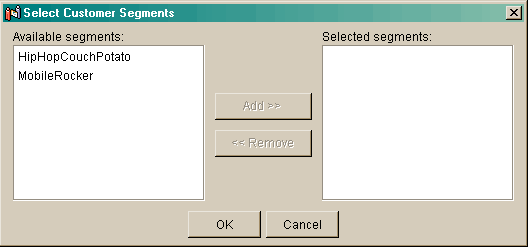


    3. Select the customer segments of which the visitor must be a member and click Add to move them to the Selected segments list. When you've added all of the segments necessary, click OK.

    4. Repeat step b for each condition selected.

    5. When the values for all selected conditions have been set, click OK. The Selection Rules dialog box closes.

  8. On the E-Business Control Center, open the File menu and select Save as. The Save as dialog box appears.

    Figure 8-5 Save As Dialog Box


  9. Enter a name for the content selector in the Name field and click Save. The new content selector will appear in the content selector list in the Explorer.

  10. When you are finished click the Synchronize icon in the toolbar to persist the new information to your production server. Make sure that your connection setting are correct. See Setting up the E-Business Control Center.

    Figure 8-6 Synchronize button


Targeting Customers with Advertisements

Ad Placeholders allow you to target content to the desired visitor. For example, in a Web site that sells tools and building materials online, you might want to create several advertisements for a sale on gardening tools and display it to visitors who access your Web site during the dates of the sale. You use the tools provided in the E-Business Control Center to create an ad placeholder as well as queries that determine the gardening tool advertisements that are displayed in a placeholder on a JSP page.

Note: Ad placeholders can be a very important aspect of creating campaign scenarios, for information about working with ads in relation to campaigns, see Defining Campaigns.

This procedure shows you how to create a placeholder file in the E-Business Control Center and how to set up default queries in that placeholder.

To create an ad placeholder file:

  1. Open the E-Business Control Center, for the procedure, see Starting the E-Business Control Center.

  2. Click the Presentation tab.

  3. Click the Placeholders icon in Explorer pane. Any existing placeholders appears in the right pane of the Explorer.

  4. Select New > Placeholder. The Placeholder Editor appears.

    Figure 8-7 The Placeholder Editor


  5. Enter a description for the placeholder.

  6. Click New to define a default ad query. A placeholder file is considered incomplete if it does not have at least one default query (though you can still save the placeholder file). The Connection Setup window appears.

  7. Select an existing connection in the Display Name field, and enter the username and password provided by your administrator. The Ad Search window appears.

    Figure 8-8 The Ad Search Window


  8. In the Ad Search window, do the following:

    1. Select the property set and corresponding properties that describe the query conditions.

    2. Click Add to define the descriptors for the selected parameters. The Ad Search Values window appears.

      Figure 8-9 The Ad Search Values Window
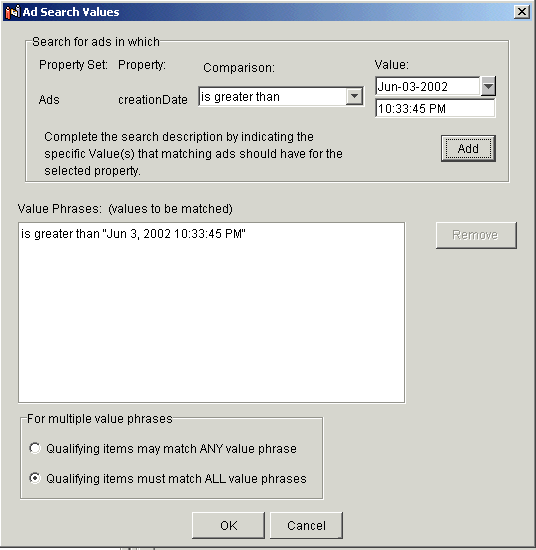


    3. Select a comparison you want to use and enter a corresponding value. A comparison defines whether a value will be "equal to," "greater than," etc. Depending on the property that you are comparing, the Value box might contain a list of values for you to select.

Note: If the property value requires text entry, you can use the "like" comparison with wild card characters (* and ?). If you set up a query based on filename and you are using the like comparison, begin the query with an asterisk (*), because path information always precedes the filename in the query results.

    1. Click Add to add the comparison and value. Repeat the preceding steps to add multiple values.

    2. When you are finished constructing the query, click OK in the Ad Search window. You return to the Ad Value window.

  1. In the Ad value window, click Add to add multiple descriptors. When you are finished, click OK to return to the Placeholder Editor.

  2. To change the priority of an existing default ad query, click the Display Priority column for the query and select a priority.

    The Display Priority determines the likelihood that the query runs relative to the priority of any other queries that are in the placeholder.

Note: If you do not define priorities for your query, the placeholder randomly selects and displays from the list of query results.

  1. To prevent an ad placeholder from using default ad queries if it also contains campaign ad queries, select the option, "Do not display default ads if ads placed by a campaign apply."

    If you want the placeholder to choose among default and campaign ad queries, select the option, "Keep default ads in rotation with ads placed by a campaign." This selection potentially reduces the chance that the placeholder displays a given ad that is part of a campaign.

    Figure 8-10 Setting Default Query Options in the Placeholder Editor


  2. Click the Save icon in the Main toolbar. The Save As window appears.

    Figure 8-11 Save As window


  3. In the Save As window, enter a name for the placeholder and click Save. Be sure to use the name of a placeholder that already exists or will exist on a JSP. You can get those names from your business engineer.

  4. When you are finished click the Synchronize icon in the toolbar to persist the new information to your production server. Make sure that your connection setting are correct, see Setting up the E-Business Control Center.

    Figure 8-12 Synchronize icon


Back to Top Previous Next