

| Download Docs | Site Map | Glossary | |
|
|
|||
| bea.com | products | dev2dev | support | askBEA |
 |
 |
|
|||||||
| e-docs > WebLogic Platform > WebLogic Portal > Development Guide > Extending Portlets |
|
Development Guide
|
Extending Portlets
To invoke advanced features in portlets, and make these portlets available to administrators, developers use several tools and many procedures. This section includes information on the following subjects:
Basic Portlet Customization
One of the most basic customizations is moving a portlet from one portal into another. Understanding this procedure will help you understand many of the other tasks in this section, since many procedures and tools are introduced here. This section covers the following basic portlet customizations:
Moving a Portlet Between Portal Web Applications
This section explains the process of moving a portlet from one portal Web application to another, and is based on the assumption that both portals have been deployed correctly. Figure 11-2 shows the two portals with their associated Web applications.
Figure 11-1 Portals and associated Web applications
This example illustrates moving a portlet called flowlet1, shown in Figure 11-2, from one portal Web application (NewPWApp) to another (NextPWApp). Figure 11-2 flowLet1 portlet in the NewWPApp
Take the following steps to add the flowLet1 portlet to NextPWApp portal:
Step 1: Copy J2EE Resources into New Web Application
If you open the flowLet1 portlet inside the E-Business Control Center, you can see it is visible among the available portlets.
Because the original portlet uses a custom Webflow, this file must be moved before the target portal Web application can use this portlet. Figure 11-3 shows the flowLet1 Webflow file in the \webapps directory for NewPWApp being copied into the \webapps directory for NextPWApp.
Figure 11-3 Copying the navigation Webflow
Figure 11-4 shows the portlet folder flowLet1 being copied from the NewPWApp application folder into the NextPWApp Web application folder. The JSPs and images that make up your portlet are stored inside this directory. Figure 11-4 Copying J2EE resources
Now that the J2EE resources have been copied into the new Web application, the metadata can be edited to point to these resources. Step 2: Edit the Target Web Application Metadata Use the E-Business Control Center to add the flowLet1 portlet to the ThatNewPortal portal: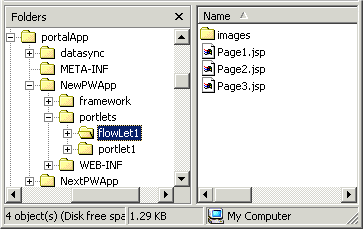
Figure 11-5 Adding flowLet1 to ThatNewPortal
Step 3: Synchronize the Project
Use the E-Business Control Center to sync the project.
Note: For more details on the E-Business Control Center, consult "Setting up the E-Business Control Center" in the Administration Guide at http://download.oracle.com/docs/cd/E13218_01/wlp/docs70/admin/sysadmin.htm.
Figure 11-6 Click Synchronization button
Step 4: Make the New Portlet Visible and Available
The new portlet called flowLet1 is now deployed, but must be made available using the WebLogic Portal Administration Tools.
Figure 11-7 Go to Portal Management
Figure 11-8 Select Default Group Portal
Figure 11-9 Manage Pages and Portlets
Figure 11-10 Click Edit Portlets
Figure 11-11 Select Set Attributes for flowLet1 portlet
Figure 11-12 Set Portlet Attributes
Figure 11-13 Viewing flowLet1 in NextPWApp
Moving a Portlet Between Domains
Assuming both domains are correctly installed and deployed instances of the latest release of WebLogic Portal, the procedure for moving a portlet from one domain to the other is almost identical to that used for Moving a Portlet Between Portal Web Applications.
Figure 11-14 The .portlet file
Finding Missing Resources Through Error Messages
If you are missing necessary portlet resources in a domain, you will receive error messages either at server startup or when you try to access portal pages that use those resources. (Missing portlet resources do not prevent the server from starting.)
For example, you may receive HTTP session errors in your browser such as 404, or render-time errors that say, for example, "Functionality temporarily unavailable." Missing metadata can also cause errors.
Look for error messages in your server's command window to determine which resources are missing. For example, Listing 11-1 shows that a portlet called WebFlowPortlet is missing a file called header.jsp. This message was generated in the command window when the portal page containing this portlet was accessed.
Listing 11-1 Error caused by missing portlet resources
<Jun 12, 2002 10:38:59 AM MDT> <Error> <HTTP> <101214> <Included resource or file "/NewWebApp/portlets/WebflowPortlet/header.jsp" not found from requested resource "/NewWebApp/framework/portal.jsp".>
The E-Business Control Center also catches some errors when you are editing portlets. For example, a warning dialog box alerts you if the portlet you are editing is missing an associated Webflow file.
Creating Categories for Portlets
The E-Business Control Center lets you group portlets into categories for easier management. This section illustrates how to create categories and manage portlets within them.
Preparing to Work With Categories
The steps in this section require that the following preparations be in place:
Warning: Trying to create a new category before a portal has been defined in the E-Business Control Center will generate an error.
Creating Portlets and Categories
Figure 11-15 Creating a new category
The resulting category list should resemble that shown in Figure 11-16.
Figure 11-16 New categories
Note: Selecting one of the portlets makes the three icons to the right available, as shown in Figure 11-17. Figure 11-17 Category icons in toolbar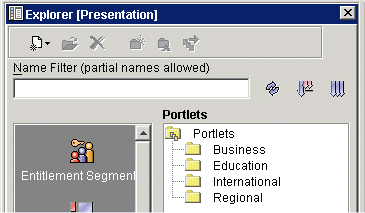
Moving Portlets and Categories This section explains how to move portlets and categories using the E-Business Control Center.![]()
Figure 11-18 Click Move category
Figure 11-19 Categories and portlets
Figure 11-20 Select a category and click rename
Figure 11-21 Renaming a category
Figure 11-22 Moving portlets into a Category
Figure 11-23 Selecting destination folder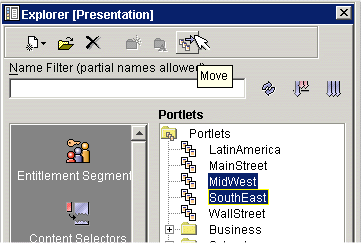
Figure 11-24 Portlets and categories arranged
Adding Portlets to Existing Categories
This section explains how to place new portlets into existing categories. In this example, the following portlets are created:
To add portlets to existing categories, take the following steps:
Note: When naming the portlets, click Select a Category, as shown in Figure 11-25.
Figure 11-25 Select a category for the portlet
Figure 11-26 Placing a new portlet inside an existing category
Figure 11-27 Portlets in their categories
Portlets and the Framework
The BEA WebLogic platform provides extensive support for customizing portlets, including JSP tag libraries designed to expose robust functionality while requiring minimal Java scripting within the actual JSPs that constitute a portlet. Use the information in this section to create the following portlet types:
The remainder of this section explains each portlet type, providing several examples of each and explaining some techniques for creating portlets that best make use of the BEA WebLogic platform.
Simple JSP Portlets
To illustrate some of the power, flexibility, and ease-of-use inherent in the WebLogic Portal platform, this subsection includes the following examples:
The scriptDemo Portlet
The scriptDemo portlet, shown in Figure 11-30, appears to the left on the Home page of an example portal created using the Portal Wizard.
Preparing
Make the following preparations to work through this example:
Before Continuing
Ensure your portal looks similar to that shown in Figure 11-28 before a user is logged in, or that shown in Figure 11-29 with a user logged in.
Figure 11-28 Starting point with anonymous user
Figure 11-29 Starting Point with user logged on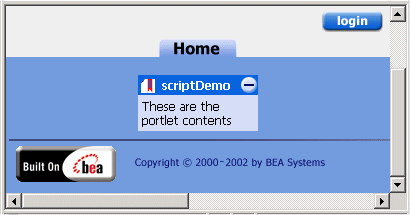
Installing the scriptDemo portlet With the raw materials are in place, you can now transform the portlet by replacing the content.jsp to change its behavior. Listing 11-2 shows a very simple scriptlet that illustrates how to use generic Java scriptlets to interact with the Portal framework in a portlet. Listing 11-2 scriptDemo portlet version 1 Steps Take the following steps to place this new code inside the scriptDemo portlet: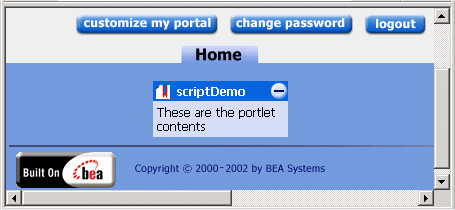
<center> Test Portlet </center>
<br><hr>
<%

A Simple Java Scriptlet
<br>
/*
Create a new String variable and set the value to an empty string.
*/
  String userName = "";
/*
To get the actual user name, first get the java.security.Principal object from the Javax.servlet.http.HttpServletRequest object using the getUserPrincipal() method. The request object is available to the JSP directly. For the Principal object, use the full package name.
*/

  java.security.Principal principal = request.getUserPrincipal();
/*
If the principal object is null then the user has not logged in. For this example, ignore the not-logged in case by using an if statement to only process the value if it is not null.
*/
  if (principal != null)
  {
/*
*/
    userName = principal.getName();
  }
%>
<%--
Display the value of the userName variable using a scriptlet. Note that the scriptlet is embedded in the HTML and is denoted by the <%= %> block.
--%>
The user name is : <%= userName %>
<br>
<BEA_HOME>\portalDomain\beaApps\portalApp\
<PortalWebApp>\portlets\scriptDemo\
Figure 11-30 scriptDemo portlet with anonymous user
Figure 11-31 shows what the code in the scriptDemo portlet displays when a user is logged on. Notice that the user name is filled in.
Figure 11-31 scriptDemo portlet with a user logged on
Note: For more information on using JSP tags in your custom portlets, consult the following resources:
Calling ActiveX Components from a Portlet
To call an ActiveX component from within your portlet, use the HTML <OBJECT> tag, as shown in Listing 11-3 and Listing 11-4.
These examples include a CODEBASE parameter so that if the local machine doesn't have the component installed in their registry, the component can be downloaded from Microsoft.
Note: In these examples, the portal is only communicating with the ActiveX components through HTML, which comes back from the portal to the browser, and tells the browser to load and run the ActiveX component.
Listing 11-3 Calling Outlook Using Active X - Calendar Example
<OBJECT CLASSID="clsid:0006F063-0000-0000-C000-000000000046"
CODEBASE="http://activex.microsoft.com/activex/controls/office/
outlctlx.CAB#ver=9,0,0,3203"
id=OVCtl1 width=100% height=200>
<param name="Folder" value="Calendar">
<param name="Namespace" value="MAPI">
<param name="Restriction" value="">
<param name="DeferUpdate" value="0">
</OBJECT>
Listing 11-4 Calling Outlook Using Active X - Inbox Example
<OBJECT CLASSID="clsid:0006F063-0000-0000-C000-000000000046"
CODEBASE="http://activex.microsoft.com/activex/controls/office/outlctlx.CAB#
ver=9,0,0,3203"
id=OVCtl1 width=100% height=200>
<param name="Folder" value="Inbox">
<param name="Namespace" value="MAPI">
<param name="Restriction" value="">
<param name="DeferUpdate" value="0">
</OBJECT>
Note: ActiveX components only work inside Microsoft Internet Explorer with appropriate security settings which allow them to run.
WebFlow Portlets
This section begins by showing the types of webflow portlets that can be created by the portlet wizard. Next, some fundamental aspects of WebFlow are illustrated using simple scripting examples. The following topics are handled in the section:
Three Webflow Portlets
The Portlet Wizard in the E-Business Control Center can now produce three different types of Webflow portlets:
Preparing
This section illustrates adding new Webflow portlets to the application NewPWApp, as shown throughout this chapter. To work through these examples, make sure the portal server is running, and that portal-project is open in the E-Business Control Center.
Creating a Navigation Bar Webflow Portlet
This procedure shows how to use the portlet wizard to create a Navigation Bar Webflow portlet.
Figure 11-32 Starting the Portlet Wizard
Figure 11-33 Elect to use the Portlet Wizard
Figure 11-34 Naming the Navigation Portlet
Figure 11-35 Associate the portlet with the Home page
Figure 11-36 Select components
Figure 11-37 Select Webflow content type
Figure 11-38 Select Navigation Bar Model
Figure 11-39 Select number of pages
Figure 11-40 Confirm Resource Files Location
Figure 11-41 Confirm Summary
Figure 11-42 Confirm Next Steps
Figure 11-43 Synchronize project
Figure 11-44 Viewing the Navigation Bar Portlet
Creating a Sequential Webflow Portlet
This procedure shows how to use the portlet wizard to create a Sequential Webflow portlet.
Figure 11-45 Starting the Portlet Wizard
Figure 11-46 Elect to use the Portlet Wizard
Figure 11-47 Naming the Sequential Webflow Portlet
Figure 11-48 Associate the portlet with the Home page
Figure 11-49 Select Portlet Components
Figure 11-50 Select Webflow content type
Figure 11-51 Select Sequential model
Figure 11-52 Select number of pages
Figure 11-53 Confirm Resource Files Location
Figure 11-54 Confirm Summary
Figure 11-55 Confirm Next Steps
Figure 11-56 Synchronize project
Figure 11-57 Viewing the Sequential Webflow Portlet
Creating a Hierarchical Webflow Portlet
This procedure shows how to use the portlet wizard to create a Hierarchical Webflow portlet.
Figure 11-58 Starting the Portlet Wizard
Figure 11-59 Elect to use the Portlet Wizard
Figure 11-60 Naming the Hierarchical Portlet
Figure 11-61 Associate the portlet with the Home page
Figure 11-62 Select components
Figure 11-63 Select Webflow content type
Figure 11-64 Select Hierarchical Model
Figure 11-65 Select number of pages
Figure 11-66 Confirm Resource Files Location
Figure 11-67 Confirm Summary
Figure 11-68 Confirm Next Steps
Figure 11-69 Synchronize project
Figure 11-70 Viewing the Hierarchical Portlet
How a Portlet Handles a Refresh Event
To illustrate how portlets can use Webflow, observe how portlets handle the refresh event, as demonstrated in the bold code in Listing 11-5.
Listing 11-5 Adding refresh notification to a portlet
<%@ taglib uri="portlet.tld" prefix="portlet" %>
<%
System.out.println("Calling refresh on flowLet1 portlet.");
%>
<center>
<font size="6" color="green">Portlet 1</font><BR>
<p>
Portlet content with Webflow
<p>
<a href="<portlet:createWebflowURL event="switch1"/>">Next Page</a>
<p>
</center>
Continuing from the previous example, edit the text in the scriptDemo portlet as shown in the following steps:
Figure 11-71 Open console window
<BEA_HOME>\portalDomain\beaApps\portalApp\<PortalWebApp>\
portlets\scriptDemo\
Figure 11-73 Refresh messages in Console
Understanding Webflow Refresh Events in a Portlet
In Webflow, the Refresh event amounts to calling an entity called lastContentUrl, which merely allows you to trigger a portlet to refresh itself without specifying its name. By navigating through the various buttons and controls in the portal in this example while observing the console window for refresh messages, you can see when refresh events are caused by certain actions. To look more closely at the Webflow associated with flowLet1, take the following steps:
Figure 11-74 Opening Webflows within Portal Web Application
Figure 11-75 Nodes linked to portal_lastContentUrl
By default, refresh is always invoked on an entire portal, and can be called on every portlet. Any portlet with its own Webflow can be made to respond to all refresh events. To make this default behavior for a portlet, use the Webflow editor to open the portlet's Webflow and set *.refresh proxynode to lastContentUrl.
For an in-depth look at using Webflow, consult Setting Up Portal Navigation.
Making a Portlet Respond to a Custom Event
To explain custom events, consider the navigation mapping in the Webflow for flowLet1 portlet, shown in Figure 11-76.
Figure 11-76 Navigation nodes in flowLet1 Webflow
The navigation between content1.jsp and content2.jsp is accomplished using pre-defined events called switch1 and switch2. By selecting one of the content nodes, you can examine the properties of the Webflow that links content1.jsp with content2.jsp in the flowLet1 portlet. The properties of the content2 presentation node are shown in detail in Figure 11-77. Figure 11-77 Mappings for content2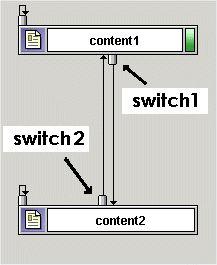
Defining a Custom Event Figure 11-78 shows how a custom event is assigned to a new presentation node. This event is named myCustomEvent, and the Event connector tool is used to link presentation node content2 with presentation node content3. Figure 11-78 Defining myCustomEvent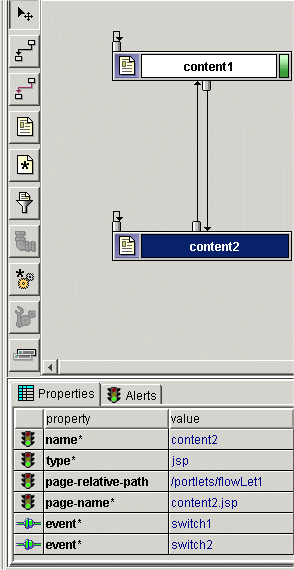
Invoking the Custom Event To call the custom event in the portlet, include the following code in your JSP: Figure 11-79 shows the third screen of flowLet1 after a new presentation node, called content3.jsp, has been added. Figure 11-79 The third page of flowLet1 portlet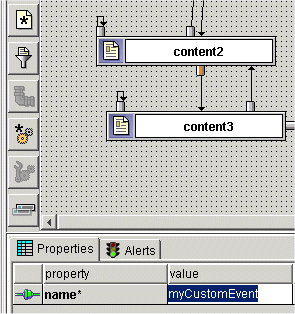
<a href="<portlet:createWebflowURL event="myCustomEvent"/>">Next Page</a>
Sharing State from One Portlet to Another Share state from one portlet to another by placing the arguments into the HttpSession object using an Input Processor. For instance, if portletA uses a form named "foo", use the IP to extract the "foo" form data, and portletB can get the form data from the Pipeline Session. Note: For more information on Input Processors, consult Setting Up Portal Navigation. Web Service Portlets Web Services are reusable software components that enable applications to interact efficiently and in a loosely-coupled manner; they are used internally for fast and low-cost application integration, or made available to customers, suppliers or partners over the Internet. Enabling portlets to consume Web Services, either internally or over the Internet, introduces a range of new benefits - and introduces some new developer issues as well. Note: For the sake of simplicity, the examples shown in this section show portlets connecting to Web Services that are locally hosted. This section contains information on the following topics: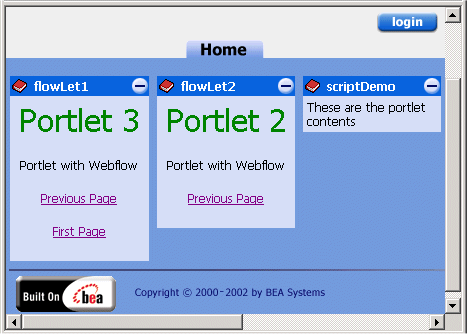
Using the Portlet Wizard to Create Web Services Portlets
The Portlet Wizard can create portlets that consume Web Services in three different ways:
This option can be used to create a portlet that calls a Web Service asynchronously through client polling. The section "Calling Web Services Asynchronously" includes instructions on creating this type of portlet.
This section shows how to use the Portlet Wizard to create a portlet of each type.
Preparation
Start the WebLogic Workshop Examples Server by navigating to Programs
Note: This example shows the scriptDemo, flowLet1 and flowLet2 portlets removed, but you complete these Web Service portlet examples without removing the old portlets from the portal.
Avoiding Namespace Collisions
Both the previous Call Generation and the Interface examples create instances of identical classes which run within the same portal namespace. To prevent namespace collision, the local instances of each class must be given unique names. In the second and third portlets, the implementation classes are re-named, as shown before the code samples.
Creating a Simple Form-Driven Web Service Portlet
The first portlet sends simple form input to the AccountEJBClient Web Service, creating a simple bank account object hosted at the WebLogic Workshop examples server.
Create the Portlet Called formLet Using the Portlet Wizard
Figure 11-80 Select Generated Code type
Figure 11-81 Select Server Location
Figure 11-82 Select Generated Code Types
Figure 11-83 Click Add Web Services
Figure 11-84 Enter the URL of the WSDL
Figure 11-85 Retrieving Operations
Figure 11-86 Select the createNewAccount operation
Figure 11-87 Code Preview
Note: The directory specified in this screen will act as the parent directory for the newly created portlet files. This directory should exist under the WLP web application directory. A sub-directory with the same name as the new portlet will be created where users can find the files generated by this wizard.
In addition, a WEB-INF/lib directory will be created in this location. This directory will contain a .jar file that the portlet references at runtime.
If the directory specified in this screen was not under a WLP web application, users will need to copy the created portlets sub-directory containing the generated files and the .jar file to the portlets directory and the WEB-INF/lib directory, respectively, of the intended Portal Web application.
Figure 11-88 Select/Confirm Resource Files location
Figure 11-89 Confirm Summary of Files
Figure 11-90 Choose Next Steps
Note: For this example, we'll create all three portlets first, then deploy them at once at the end.
Creating a Call-Generation Web Service Portlet
The Call Generation portlet enables the user to list big accounts by remotely invoking classes hosted within the Web Service hosted on the WebLogic Workshop examples server.
Create the Portlet Called callgenLet Using the Portlet Wizard
Figure 11-91 Select Generated Code type
Figure 11-92 Web Service(s) screen
http://localhost:7001/samples/ejbControl/
AccountEJBClient.jws?WSDL
Figure 11-93 Adding another Web Service WSDL
Note: Notice the parameter list below the operation.
Figure 11-94 Selecting the listBigAccounts operation
Figure 11-95 Code Preview
Note: Within Listing 11-6, the following entries, in boldface within the code, have been shortened:
callImpl was originally p_sdl_AccountEJBClient_AccountEJBClient_Impl
callSoap was originally p_sdl_AccountEJBClient_AccountEJBClientSoap
Listing 11-6 Call Generation Portlet code
<%@ include file="callgenlet1_include.inc" %>
<%@ taglib uri="portlet.tld" prefix="portlet" %>
<%@ taglib uri="i18n.tld" prefix="i18n" %>
<%@ page import="com.bea.portal.appflow.PortalAppflowConstants"%>
<%@ include file="/framework/resourceURL.inc"%>
<%
sdl_AccountEJBClient.AccountEJBClient_Impl callImpl = new sdl_AccountEJBClient.AccountEJBClient_Impl();
sdl_AccountEJBClient.AccountEJBClientSoap callSoap = callImpl.getAccountEJBClientSoap();
%>
<%
double threshold = 1000;
%>
<%=cnvrtSC(String.valueOf(callSoap.listBigAccounts(threshold)))%>
Figure 11-96 Select/Confirm Resource Files location
Figure 11-97 Confirm Summary of Files
Figure 11-98 Choose Next Steps
Creating a Web Services Interface Portlet
This portlet searches for accounts with a balance over a threshold set within the portlet, and lists them in the portlet. What is significant is the way in which this portlet communicates with the Web Service: the portlet uses classes implemented according to the self-describing WSDL called listBigAccounts.
Create the Portlet Called interFaceLet Using the Portlet Wizard
Figure 11-99 Select Generated Code Type
Note: In the Web Service(s) screen for Interface Generation portlets, notice that no operations are available. This is because you are being provided the interface description and must implement the required methods yourself.
Figure 11-100 Code Preview screen for interFaceLet
Listing 11-7 Code for interFaceLet
<%@ include file="interFaceLet_include.inc" %>
<%@ taglib uri="portlet.tld" prefix="portlet" %>
<%@ taglib uri="i18n.tld" prefix="i18n" %>
<%@ page import="com.bea.portal.appflow.PortalAppflowConstants"%>
<%@ include file="/framework/resourceURL.inc"%>
<%
sdl_AccountEJBClient.AccountEJBClient_Impl intImpl = new
    sdl_AccountEJBClient.AccountEJBClient_Impl();
sdl_AccountEJBClient.AccountEJBClientSoap intSoap =
    intImpl.getAccountEJBClientSoap();
...
*/%>
Figure 11-101 Select/Confirm Resource Files location
Figure 11-102 Confirm Summary of Files
Figure 11-103 Choose Next Steps
Figure 11-104 Synchronization Complete
Deploying the Web Services Portlets
Now that they are all created and installed, what remains is to make them available to the WebLogic Server instance. This is done by simply re-deploying the Portal Web Application in which these portlets are to run, according to the following procedures:
http://<host>:<port>/console
Figure 11-105 Left tab of console: Deployments
Figure 11-106 Go to Portal Management
Figure 11-107 Select Default Group Portal
Figure 11-108 Manage Pages and Portlets
Figure 11-109 Click Edit Portlets
Viewing the Web Services Portlets
Now that they are all deployed and placed within the same portal page, observe the functionality they provide by taking the following steps:
http://<host>:<port>/NewPWApp/
The result should resemble that shown in Figure 11-110.
Figure 11-110 Web Services portlets before accounts have been entered
Figure 11-111 Web services portlets with some account activity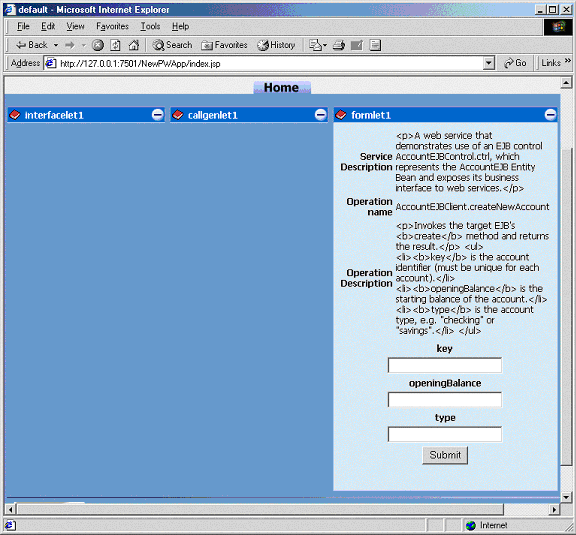
Note: For more information on Web Services, consult "Building Web Services on WebLogic Platform" at http://download.oracle.com/docs/cd/E13196_01/platform/docs70/interm/webserv.html and "Introduction to WebLogic Workshop" at http://download.oracle.com/docs/cd/E13226_01/workshop/docs70/index.html.
Calling Web Services Asynchronously
BEA WebLogic Portal 7.0 enables portlets to participate in asynchronous communication with Web Services such as conversations. This example shows how to create a simple conversation portlet that interacts with a Web Service hosted on the local server.
Figure 11-112 Conversation Web Services Portlet
About the Conversation Portlet The portlet created in this example contains three button-activated actions: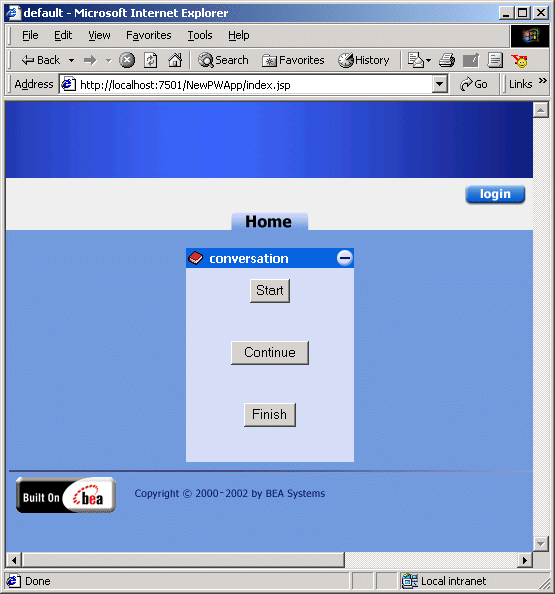
Preparation
Creating the Conversation Portlet
To create and deploy a sample Conversation portlet, follow these steps.
Figure 11-113 Creating the conversation portlet
Listing 11-8 content.jsp for Conversation Web Services Portlet
<%@ include file="Conversation_include.inc" %>
<%@ taglib uri="portlet.tld" prefix="portlet" %>
<%@ taglib uri="i18n.tld" prefix="i18n" %>
<%@ page import="org.openuri.www.StartRequest"%>
<%@ page import="org.openuri.www.GetRequestStatusResponse"%>
<%@ page import="org.openuri.www.x2002.x04.soap.conversation.StartHeader"%>
<%@ page import="org.openuri.www.x2002.x04.soap.conversation.ContinueHeader"%>
<%@ page import="weblogic.xml.schema.binding.internal.builtin.VoidType"%>
<%@ page import="com.bea.portal.appflow.PortalAppflowConstants"%>
<%@ page import="com.bea.portal.appflow.PortalAppflowConstants"%>
<%@ include file="/framework/resourceURL.inc"%>

<%
    DL_wsdl_Conversation.Conversation_Impl conversationImpl = new
DL_wsdl_Conversation.Conversation_Impl();
    DL_wsdl_Conversation.ConversationSoap soap =
conversationImpl.getConversationSoap();
%>

<%
    String target = request.getParameter("target");
    String conversationID = session.getId();
        if ( conversationID == null )
            conversationID = "";
%>

<portlet:form event="<%= PortalAppflowConstants.PORTLET_REFRESH %>">
    <table border="0" align="center">
        <tr>
            <td width="100%" align="center">
            <table border="0" align="left">
            <tr>
<%
                if ( target != null
                     && target.equals("start")
                     &&  true  )
                {
                    try
                    {
                     StartHeader startHeader = new StartHeader(conversationID,
"http://localhost:7001/samples/async/Conversation.jws");
            VoidType startResponse = new VoidType();

            StartRequest begin = new StartRequest(false);

            startResponse = soap.startRequest(begin, startHeader);
%>
            <td><%=cnvrtSC("Conversation started with ID: " +
String.valueOf(conversationID))%></td>
<%
              }
               catch (java.rmi.RemoteException e)
              {
%>
            <td><%=cnvrtSC("Duplicate conversation id for start: " +
String.valueOf(conversationID))%></td>
<%
            e.printStackTrace();
             }
                }
%>
            </tr>
            </table>
            </td>
        </tr>
        <tr>
            <td width="100%" align="center"><input type="submit" name="start"
value="Start"></td>
        </tr>
    </table>
    <br><br>
    <input type="hidden" name="target" value="start">
</portlet:form>

<portlet:form event="<%= PortalAppflowConstants.PORTLET_REFRESH %>">
    <table border="0" align="center">
        <tr>
            <td width="100%" align="center">
            <table border="0" align="left">
            <tr>
<%
                if ( target != null
                     && target.equals("continue")
                     &&  true  )
                {
                    try
                    {
            ContinueHeader continueHeader = new
ContinueHeader(conversationID);
            GetRequestStatusResponse status = soap.getRequestStatus(null,
continueHeader);
            String result = status.getGetRequestStatusResult();
%>
            <td><%=cnvrtSC("Response: " + String.valueOf(result))%></td>
<%
                }
                catch ( Exception e )
                {
                    e.printStackTrace();
                 }
             }
%>
            </tr>
            </table>
            </td>
        </tr>
        <tr>
            <td width="100%" align="center"><input type="submit" name="continue"
value="Continue"></td>
        </tr>
    </table>
    <br><br>
    <input type="hidden" name="target" value="continue">
</portlet:form>

<portlet:form event="<%= PortalAppflowConstants.PORTLET_REFRESH %>">
    <table border="0" align="center">
        <tr>
            <td width="100%" align="center">
            <table border="0" align="left">
            <tr>
<%
                if ( target != null
                     && target.equals("finish")
                     &&  true  )
                {
                    try
                    {
                     VoidType terminateResponse = new VoidType();
                     ContinueHeader finishHeader = new
ContinueHeader(conversationID);
                     terminateResponse = soap.terminateRequest(null, finishHeader);
%>
                <td><%=cnvrtSC("Conversation terminated.")%></td>
<%
                    }
                    catch ( java.rmi.RemoteException e )
                    {
%>
                <td><%=cnvrtSC("Conversation already terminated.")%></td>
<%
                        e.printStackTrace();
                    }
                }
%>
            </tr>
            </table>
            </td>
        </tr>
        <tr>
            <td width="100%" align="center"><input type="submit" name="finish"
value="Finish"></td>
        </tr>
    </table>
    <br><br>
    <input type="hidden" name="target" value="finish">
</portlet:form>
Figure 11-114 Starting the conversation
Error Handling within Web Services Portlets
In a production scenario, the Web Services to which your portlets connect are typically hosted elsewhere, and are out of your control. The portal framework enables portlets to generate two errors specifically designed to handle Web Services problems:
JAXRPCException: If a Web service is unavailable at run-time, the portlet will cause the throw a javax.xml.rpc.JAXRPCException. Add error handling to your .JSP by catching the exception in a generated portlet.
Note: The JAXRPCException applies to cases where the connection is refused, not when there is a delay in service.
SOAPFaultException: When a Web service cannot handle the SOAP request generated from the Web Service Portlet Wizard, a javax.xml.rpc.soap.SOAPFaultException is thrown. You should catch this exception within your .JSP to protect from compile failures.
Portalizing an Existing Web Application
To move an existing non-portal Web application into the portal framework, certain modifications are necessary. This section outlines the process using an example provided with the WebLogic Platform installation.
Getting Started
One strategy for adding functionality to a portlet is to graft JSP code from an existing (non-portal) Web application into the JSPs that constitute a portlet. This tutorial uses refactored sample code from the Internationalization portlet included with the product such that the functionality is replicated within a portlet. Figure 11-115 and Figure 11-116 show the Internationalization sample application displaying language-specific content based on user input.
Note: For detailed instructions on launching and exploring this application, consult the Personalization Examples section of the WebLogic Platform documentation.
Figure 11-115 Internationalization Input
Figure 11-116 Internationalization Results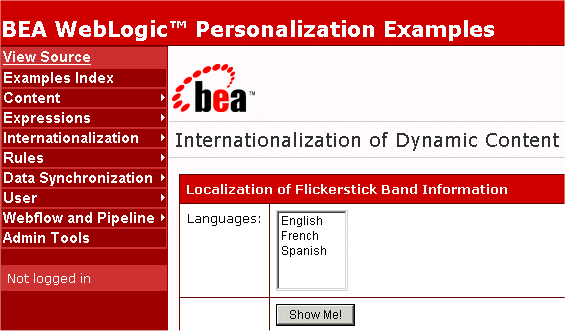
Requirements WebLogic Portal 7.0 with Service Pack 1 must be successfully installed. Process Overview This process includes the following steps: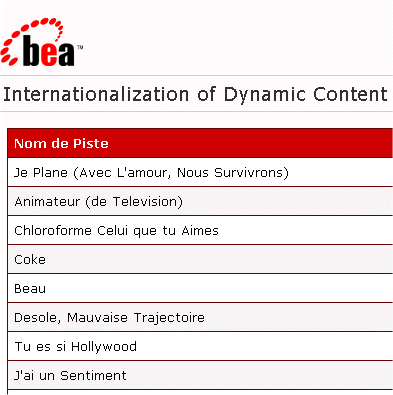
Step 1: Create a Portal Web Application
Step 2: Build a 2-page WebFlow Portlet
Step 4: Load Content Resources
Step 1: Create a Portal Web Application
For instructions on creating a new portal Web application to use as the basic structure for this new application, consult the tutorial called Creating the New Portal in the WebLogic Portal 7.0 Development Guide.
For this example, the portal Web application will be called NewPWApp.
Note: If your application makes use of portal services such as Personalization, Internationalization, etc., you must add support for this functionality to the portal created using the portal Wizard. For detailed instructions on adding these features to your portal, consult the section called Adding All Portal Services to Your Domain in the Building Custom Templates chapter of the WebLogic Portal 7.0 Development Guide.
Step 2: Build a 2-page WebFlow Portlet
While the portal server created in the new domain is running, use the E-Business Control Center to launch the Portlet Wizard. Create a 2-page Webflow portlet, naming it i18n. For detailed instructions on creating Webflow portlets this way, consult the section Creating a Sequential Webflow Portlet.
Note: Don't forget to make the portlet visible and available using the WebLogic Portal Administration Tools.
Step 3: Edit Portlet Code
In this step, JSPs and properties files are edited to use the portlet Webflow and to invoke personalization.
Replace Portlet JSPs
First, the JSPs generated by the Portlet Wizard need are replaced with JSPs that make calls to Personalization services and act upon content. Save the contents of Listing 11-9 and Listing 11-10 in the following directory:
<BEA_HOME>beaApps\portalApp\NewPWApp\portlets\i18n
Listing 11-9 Page1.jsp
<%---------------------------------------------------------
Copyright (c) 2000-2002 BEA Systems, Inc. All rights reserved.
--------------------------------------------------------%>
<%--------------------------------------------------------
File: Page1.jsp
Purpose: Gathers form input for I18N language of choice.
----------------------------------------------------------%>
<%@ taglib uri="webflow.tld" prefix="webflow"%>
<%@ taglib uri="portlet.tld" prefix="portlet"%>
<%----------------------------------------------------------
Declare html font styles for valid and invalid form entries, to be
used with webflow validated form.
---------------------------------------------------------%>
<% String validStyle = "background: white; color: black; font-family: Arial"; %>
<% String invalidStyle = "background: white; color: red; font-style: italic"; %>
<center>
<%-------------------------------------------------------
Using portlet validated form.
---------------------------------------------------------%>
<portlet:validatedForm event="switch2" applyStyle="message"
messageAlign="right" validStyle="<%= validStyle %>"
invalidStyle="<%= invalidStyle %>" unspecifiedStyle="<%= validStyle %>">
<table border="0" cellspacing="0" cellpadding="0" width="100%">
<tr>
<td>
<table border="0" cellpadding="6" cellspacing="1" width="100%">
<tr class="header">
<td colspan="2">
Localization of Flickerstick Band Information
</td>
</tr>
<tr class="tablerow1">
<td align="right" valign="top" width="1%">Languages:</td>
<td>
<%----------------------------------------------------------
Using <webflow:select> and <webflow:option> in place of standard html select and option to enable form validation.
----------------------------------------------------------%>
<webflow:select name="language" size="5">
<webflow:option value="en"/>English
<webflow:option value="fr"/>French
<webflow:option value="es"/>Spanish
</webflow:select>
</td>
</tr>
<tr class="tablerow1">
<td align="right" valign="top" width="1%"> </td>
<td>
<input type="submit" name="Submit" value="Show Me!">
</td>
</tr>
<tr class="tablerow2">
<td class="label" colspan="2">
Select the language in which you would like to view Flickerstick information.
</td>
</tr>
</table>
<input type="hidden" name="resultFile" value="Page2.jsp">
<input type="hidden" name="sample" value="<%= request.getParameter("sample") %>"></td>
</tr>
</table>
</portlet:validatedForm>
</center>
Listing 11-10 Page2.jsp
<%-----------------------------------------------------------
Copyright (c) 2000-2002 BEA Systems, Inc. All rights reserved.
------------------------------------------------------------%>
<%-----------------------------------------------------------
File: Page2.jsp
Purpose: Gathers form input for I18N language of choice.
----------------------------------------------------------%>
<%@ page import="com.bea.p13n.content.ContentHelper"%>
<%@ page import="com.bea.p13n.content.Content" %>
<%@ taglib uri="cm.tld" prefix="cm" %>
<%@ taglib uri="es.tld" prefix="es" %>
<%@ taglib uri="i18n.tld" prefix="i18n" %>
<%@ taglib uri="portlet.tld" prefix="portlet" %>
<%---------------------------------------------------------
Contruct the query string.
Example: isTrackIdentifier='true' && bandName='Flickerstick' && language='en'
----------------------------------------------------------%>
<%
StringBuffer queryStr = null;
String language = request.getParameter("language");if (language != null)
{// Build the query string
queryStr = new StringBuffer();
queryStr.append("isTrackIdentifier = 'true' && bandName = 'Flickerstick' && language = '");queryStr.append(language);
queryStr.append("'");}
//queryStr = new StringBuffer();
//queryStr.append("bandName = 'Flickerstick'");if (queryStr != null)
{%>
<% System.out.println("\n\nqueryStr=" + queryStr + "-------------------------------------------\n\n"); %><br>Language is: <%= language %><br>
<br>Query String is: <%= queryStr %><br>
<br>ContentHelper.DEF_CONTENT_MANAGER_HOME is : <%= ContentHelper.DEF_CONTENT_MANAGER_HOME %><br>
<%----------------------------------------------------------
Localize the page with the selected language. Future invocations of
i18n tags in this request will default to this language.
-----------------------------------------------------------%>
<i18n:localize language="<%= language %>"/>
<%-----------------------------------------------------------
Using the constructed query string retrieve the track names for
Flickerstick.
-------------------------------------------------------------%>
<cm:select contentHome="<%= ContentHelper.DEF_CONTENT_MANAGER_HOME %>"
sortBy="trackNum" query="<%= queryStr.toString() %>" id="contentArray" failOnError="true"/>
<table border="0" cellspacing="0" cellpadding="0" width="100%">
<tr>
<td>
<table border="0" cellspacing="1" cellpadding="6" width="100%">
<tr class="tableheader">
<%---------------------------------------------------------
Retrieved localized messages for track name and track number.
----------------------------------------------------------%>
<td><i18n:getMessage messageName="trackName" bundleName="Page2"/></td>
<td><i18n:getMessage messageName="trackNum" bundleName="Page2"/></td>
</tr>
<% int row = 0; %>
<br>contentArray length is : <%= contentArray.length %><br>
<es:forEachInArray id="nextDoc" array="<%= contentArray %>" type="Content">
<tr class="<%= (row % 2 == 0) ? "tablerow1" : "tablerow2" %>">
<%-------------------------------------------------------------
Get the bandName property using the cm:getProperty tag and use it to
construct the parameters to pass to the Webflow.
----------------------------------------------------------%>
<td>
<cm:printProperty id="nextDoc" name="trackName" encode="html"/>
</td>
<td>
<cm:printProperty id="nextDoc" name="trackNum" encode="html"/>
</td>
</tr>
<% row++; %>
</es:forEachInArray>
</table>
</td>
</tr>
</table>
<%
}
else
{%>
<b>Please specify one language in your request!</b>
<%
}
%>
<center>
<a href="<portlet:createWebflowURL event="switch1"/>">Previous Page</a>
</center>
Save Properties Fies for Internationalization
Save the contents of the following listings in this directory:
<BEA_HOME>beaApps\portalApp\NewPWApp\portlets\i18n
For example, Listing 11-11 would be saved as Page2_en.properties.
Listing 11-11 Page2_en.properties
trackName=Track Name
trackNum=Track Number
Listing 11-12 Page2_fr.properties
trackName=Nom de Piste
trackNum=Numero do Piste
Listing 11-13 Page2_sp.properties
trackName=Nombre de la canción
trackNum=Número de la canción
Step 4: Load Content Resources
In this step, content resources are imported from the Personalization domain.
<BEA_HOME>\user_projects\myNewDomain
<BEA_HOME>\user_projects\myNewDomain
Step 5: Test the application
Now that the JSPs are edited, observe the functionality of the new portlet by taking the following steps:
http://<host>:<port>/NewPWApp/
The result should resemble that shown in Figure 11-117.
Figure 11-117 Verifying the i18n Portlet
Figure 11-118 Results page of i18n Portlet
Performance Tuning
This section covers performance issues related specifically to WebLogic Portal, including JDBC and Thread settings and several cache settings. Many factors effecting the performance of your portal application are specific to WebLogic Server. For information on making those adjustments, consult the WebLogic Server Performance and Tuning guide at http://download.oracle.com/docs/cd/E13222_01/wls/docs70/perform/index.htmll.
Using Caches to Tune Performance
To adjust caching for production Web site, examine the following factors:
Adjust Caching for Content Management
To optimize content-management performance for your production Web site, the Content Manager uses the caching framework to configure and manage the following caches:
documentContentCache
documentMetadataCache
documentIdCache
The content management JSP tags provide an additional set of caches, which you can access by doing the following:
For the cm:select, cm:selectById, pz:contentQuery, and pz:contentSelector JSP tags, use the useCache attribute whenever possible. Doing so avoids a call to DocumentManager and, in the case of pz:ContentSelector, to the Rules Manager.
To clear cached content when user and/or document attributes change, use the remove method of com.bea.p13n.content.ContentCache. For more information, see the WebLogic Portal Javadoc. for com.bea.p13n.content.ContentCache.
For the cm:select, cm:selectById, pz:contentQuery, and pz:contentSelector JSP tags, set the cacheScope attribute to application whenever possible. This application scope applies to the Web application, not to the enterprise application, as shown in Listing 11-14.
Listing 11-14 Setting cacheScope to application
<cm:select id="myDocs" query="riskFactor = 'Low'"
useCache="true" cacheId="myDocs"
cacheScope="application"
max="10" cacheTimeout="300000" />
The application cache type is global instead of per-user and should speed up queries by avoiding a call to the DocumentManager EJB.
For pz:contentSelector, set the cacheScope attribute to application only when you want to select shared content. For example, you create an application that uses an application-scoped cache to select content for non-authenticated users. Because it uses the application scope, all non-authenticated users see the same content. For authenticated users, your application provides personalized content by switching to a session scoped cache.
Whenever you can predict the next document that users will view based on the document that they are currently viewing, load the next document into the cache before users request it. This "forward caching" will greatly improve the speed at which WebLogic Portal responds to user requests (assuming that your prediction is correct; forward caching a document that no one requests will only degrade performance and scalability).
Listing 11-15 contains a snippet of a JSP with an example of forward caching a document:
Listing 11-15 Forward caching a document
<%-- Get the first set of content --%>
<cm:select id="myDocs" query="riskFactor = 'Low'"
useCache="true" cacheId="myDocs"
cacheScope="application"
max="10" cacheTimeout="300000" />
<%-- Generate a query from each content's relatedDocId --%>
<% String query = null; %>
<es:forEachInArray array="<%=myDocs%>" id="myDoc" type="com.bea.p13n.content.Content">
<% String relId = (String)myDoc.getProperty("relatedDocId", null); %> <es:notNull item="<%=relId%>">
<%
if (query != null)
query += " || ";
else
query = "";
query += "identifier = '" +
ExpressionHelper.toStringLiteral(relId) + "'";
%>
</es:notNull>
</es:forEachInArray>
<%-- Load the related content into the cache via cm:select --%>
<es:notNull item="<%=query%>">
<cm:select query="<%=query%>" id="foo" useCache="true" cacheId="relatedDocs"
cacheScope="session" max="10" cacheTimeout="300000" />
</es:notNull>
For more information on content management JSP tags, see "Personalization JSP Tags" in the JavaServer Page Guide at http://download.oracle.com/docs/cd/E13218_01/wlp/docs70/jsp/p13njsp.htm.
Property Caching in a Clustered Environment
To decrease the amount of time needed to access user, group, and other properties data, the WebLogic Server Configurable Entity and Entity Property Manager use the cache framework to configure and manage the following caches:
ldapGroupCache
ldapUserCache
entityPropertyCache
entityIdCache
unifiedProfiletypeCache
propertyKeyIdCache
Note: By default, these property caches are enabled.
With property caching enabled in a clustered environment, each server in a cluster maintains its own cache; the cache is not replicated on other servers. In this environment, when properties that are stored in the caches change on one server, they may not change on another server in a timely fashion. In most cases, immediate or quick access to properties on another server is not necessary: user sessions are pinned to a single server, and even with caching enabled, users immediately see changes they make to their own settings on the server.
If a user and an administrator are pinned to different servers in the cluster and the administrator changes a user's properties, the user may not see the changes during the current session. You can mitigate this situation by specifying a small Time-To-Live (TTL) setting.
If you require multiple servers in a cluster to have immediate access to modified properties, disable property caching.
Adjust Caching for the Discount Service
To reduce the amount of time the Order and Shopping Cart services need to calculate order and price information that include discounts, the Discount Service uses the caching framework to create and manage the following caches:
When a customer adds an item to the shopping cart, removes an item from the shopping cart, checks out, or confirms an order, the Pricing Service is responsible for determining the price of the items in the cart. To calculate the effect of discounts on the shopping cart, the Pricing Service requests the Discount Service to retrieve information about all global discounts and about any campaign discounts that apply to the current customer.
The first request for information about discounts requires a separate call to the database for each discount that applies. For example, if you have defined one global discount and if a customer is eligible for two campaign-related discounts, the Discount Service makes three calls to the database. To decrease the response time for any subsequent requests, the Discount Service uses the caches.
Adjusting the discountCache
The discountCache contains data for campaign discounts. For maximum performance, set the capacity to the number of campaign discounts that are currently deployed. A larger capacity will potentially use more memory than a smaller capacity.
The Time-To-Live (TTL) property determines the number of milliseconds that the Discount Service keeps the information in the cache. After the cache value times out, the next request for the value requires the Discount Service to call the database to retrieve the information and then cache the value. A longer TTL decreases the number of database calls made over time when requesting cached objects. In a clustered environment, the TTL is the maximum time required to guarantee that any changes to global discounts are available on all servers.
Adjusting the globalDiscountCache
The Maximum Number of Entries property for global caches does not need to be modified.
The time-to-live property determines the number of milliseconds that the Discount Service keeps information in the global-discount cache. After the Time-To-Live (TTL) expires, the next request for global discount information requires the Discount Service to call the database to retrieve the information and then cache the value. A longer TTL decreases the number of database calls made over time when requesting cached objects. In a clustered environment, the TTL is the maximum time required to guarantee that any changes to campaign discounts are available on all servers.
Discount-Service Caches in Clustered and Non-Clustered Environments
In either environment (clustered or non-clustered), when you change a discount priority, end date, or its active/inactive state, WebLogic Portal flushes the discount from the appropriate cache. Changes to a campaign discount flush only the specific discount from the campaign-discount cache. Changes to a global discount flush all discounts from the global-discount cache.
For example, you log in to a WebLogic Portal host named bread and deactivate a campaign discount named CampaignDiscount1. WebLogic Portal flushes the CampaignDiscount1 from the campaign-discount cache on bread.
In a clustered environment, other machines in the cluster continue to use their cached copy of the discount until the TTL for that discount expires.
Adjust Group Membership TTL in the Caching Realm
The WebLogic Server Caching realm stores the results of both successful and unsuccessful realm lookups. It does not use the WebLogic Portal caching framework.
The Caching realm manages separate caches for Users, Groups, permissions, ACLs, and authentication requests. It improves the performance of WebLogic Server by caching lookups, thereby reducing the number of calls into other security realms.
WebLogic Portal enables the Caching realm by default. While all of the caches in the Caching realm can improve performance, the Time-To-Live (TTL) value for the Group Membership Cache in particular can affect the performance of WebLogic Portal.
In addition, note that if you delete a user from the system without first removing the user from a group, then the system continues to recognize the user until the TTL for the Group Membership Cache expires.
For information on adjusting the Group Membership TTL, refer to the WebLogic Server Administration Guide at http://download.oracle.com/docs/cd/E13222_01/wls/docs70/adminguide/index.html.
Tuning Thread / Connection Parameters in JDBC
Certain performance problems encountered in the portal may be corrected by changing config.xml entries to reduce to thread count for the default execute queue in WLS lower than the connection pool maximum capacity specified for the commercePool. The basic formula should make the number of connections in the connection pool equal to the number of threads + 1.
For information on adjusting threads and connection pools, consult "Tuning JDBC Connection Pool Maximum Capacity" at
http://download.oracle.com/docs/cd/E13222_01/wls/docs70/perform/WLSTuning.html#1117878.

|

|

|