 Prerequisites
This chapter discusses how to:
Maintain service setup.
Define service supplier setup.
Define sourcing setup.
Maintain users and team setup.
Maintain workflow setup.
Maintain settlement setup.
PrerequisitesYou must perform the following:
Register user profiles.
If you want to be able to replace service coordinators, you must define a URL for the email notification.
Modify the SP_REPLACESC_EM and SP_REPLACETEAM_EM URL identifiers on the URL Maintenance page (PeopleTools, Utilities, Administration, URLs) to indicate the location to which email notifications should be sent regarding the replacement service coordinators or teams.
See Also
Replacing Service Coordinators
Maintaining Service SetupTo define competency types, use the Competency Types (RS_CM_TYPE_TABLE) component. To define competencies, use the Competencies (RS_CM_COMPTNCY_TBL) component. Use the RS_CM_COMPTNCY_TBL component interface to load data into the tables for this component.
To set up competencies by setID, use the Competency by Set ID (SP_COMP_BY_SETID) component. To maintain role distribution, use the Role Distribution (SP_DSTRLST) component.
To set up rating models, use the Rating Models (RS_CM_REVW_RAT_TBL) component.
To capture years of experience, use the Maintain Experience (SP_EXPERIENCE) component. To maintain service requests, use the Service Request Type (SP_REQUEST_TYPE) component. To set up service types by service, use the Service Types by Service (SPB_PJROLE_SERVICE) component.
To maintain logistical tasks, use the Logistical Task (SPB_TASK_CMP) component. To define logistical task groups, use the Logistical Task Group (SPB_TASK_GROUP_CMP) component. To associate tasks by task groups, use the Assign Tasks to Task Group (SPB_TASKTOGROUP) component.
To set up service types, use the Service Types (SPB_ROLE_TYPE) component.
To maintain rate sheets, use the Services Rate Sheet (SPB_RATESHEET) component. To set up services/roles by service types, use the Services/Roles by Service Types (SPB_ROLESBYTYPE) component. To set up service and project role attributes, use the Service/Project Roles Attributes (SPB_ROLE_COMP) component. To assign task groups to service types, use the Assign Tasks Groups to Service Types (SPB_ROLE_TASKGP) component.
This section discusses how to:
Maintain role distribution lists.
Maintain competencies.
Maintain competencies by setID.
Maintain rating models.
Maintain service types.
Maintain services/roles by service type.
Maintain service/project role.
Maintain service/project role attributes.
Maintain rate sheets.
View rate sheet lists.
Maintain logistical tasks.
 Pages Used to Maintain Service Setup
|
Page Name |
Object Name |
Navigation |
Usage |
|
SP_REQUEST_TYPE |
|
Maintain service request types. |
|
|
SP_DSTRLST |
|
Specify the role distribution lists that receive work order surveys and alerts. |
|
|
RS_CM_TYPE_TBL |
|
Enter a long or short description for new competency types. |
|
|
RS_CM_COMPTNCY_TBL |
|
Define competencies. |
|
|
SP_COMPBYSETID_PG |
Services Procurement, Define Services Procurement, Service Setup, Competency Setup, Competencies by SetID |
Define competencies by setID. |
|
|
RS_CM_REVW_RAT_TBL |
|
Select the model used to rate a candidate's competency. |
|
|
SPB_ROLE_TYPE |
|
Set up service types. |
|
|
SPB_ROLESBYTYPE |
|
Define Service (project roles) by role type. |
|
|
SP_SURVEY_BY_SVTYP |
|
Associate service type with one or more surveys. |
|
|
SPB_VMS_BU_SRVC |
Services Procurement, Define Services Procurement, Service Setup, Service Type Setup, VMS by BU Service Type |
Associate the VMS supplier by business unit and service type. Note. This page is only available if you do not have the Managed Service Provider Installation option enabled on the Services Procurement Installation Options page. |
|
|
SPB_PROJ_ROLE |
|
Set up service (project role). |
|
|
SPB_ROLE_COMP_PG |
|
Maintain service (project role) attributes |
|
|
SPB_PJROLE_SERVICE |
|
View service types associated with services. |
|
|
SP_EXPERIENCE_PG |
|
Maintain Experience values. |
|
|
SPB_RATESHEET_NEW |
|
Maintain standard rates by region and service (project role). |
|
|
SPB_RS_LIST |
|
View rate sheet lists. |
|
|
SPB_TASK_PG |
|
Maintain work order logistical tasks. |
|
|
SPB_TASK_GROUP_PG |
|
Define logistical task groups. |
|
|
SPB_TASKTOGROUP_PG |
|
Associate one or more tasks to a task group. |
|
|
SPB_ROLE_TASKGP_PG |
|
Define task groups by service type. |
|
|
SP_SUR_RESTYP |
|
Define formats and answer choices for work order survey questions. |
|
|
SP_SUR_DEFN |
|
Define questions, role distribution lists and response types for work order surveys. |
|
|
SP_SUR_DEFN_SVTYP |
Select the Service Type tab on the Survey Setup page. |
View the service types related to the survey. |
Maintaining Role Distribution ListsAccess the Role Distribution List page.
Use role distribution lists to send survey and work order alert notifications.
|
Role Distribution List |
Indicates the name of the new distribution list. |
|
Role Action Description |
Select from the available work order role actions for the distribution list. |
See Also
Maintaining CompetenciesAccess Competency page.
Use competencies from requisitions to indicate the skills that you need on the project.
Competencies also exist in the PeopleSoft Human Resource Management (PeopleSoft HRMS) database. If you are integrating with a PeopleSoft HRMS database, access the Resource Management Installation options page and define which product “owns” the competency tables.
|
Rating Model |
Select the model used to rate a candidate's competency. |
Competency Type
|
Type and Description |
Enter values to create a logical grouping of competencies. |
Maintaining Competencies by SetIDAccess the Maintain Competencies by SetID page.
|
Competency |
Select to determine which competencies are available for selection when defining service attributes or creating requisitions and work orders. |
Maintaining Rate ModelsAccess the Rate Model page.
|
Rating |
Enter a rating number. Use this number to determine the range for the best and worst ratings. |
|
Review Pts (review points) |
Enter the review points associated with the rating code, if desired. Note. This value is not used within services procurement. |
Maintaining Service TypesAccess the Service Types page.
Service types are a way of grouping roles or services. For example, you can have a service type of DEV and roles of java developer, QA engineer, and so forth that are linked to that service type.
|
Service Method |
Select the service method for the service type. Available options are Resource and Deliverable. |
|
Track Resources |
Use this option to track resources for deliverable-based work orders. The system firsts looks to the service type to determine if resources should be tracked for deliverable-based work orders. If you do not select this option, the business unit setting is used. Note. This option is only available for deliverable-based engagements. |
|
Category |
Select the item category for the service type. |
|
Time Reporting Option |
Use this option to determine whether service types with a service method of Resource require the service provider to report time against specific ChartField combinations, or whether the total time is entered and distribution percentages automatically split time or progress according to the ChartField distribution defined for the work order. Values are:
Note. Service types defined with a service method of Deliverable are automatically set to a time reporting option of Percent Allocation. |
|
Allow Expenses |
Select to track and report expenses for deliverable-based assignments. Note. When you select this value, the expense rate and expense amount fields are available on requisitions and work orders. |
|
Require Survey by Default |
Select to indicate that surveys are mandatory for work orders that are associated with the specified service type. If you select this check box, surveys must be complete before the work order is finalized. Note. You can override the status of a mandatory survey on a work order. |
|
Automatically Send Survey |
Select to indicate that a survey will be automatically sent to a recipient at the time the work order is terminated, closed, or canceled. If a survey is not sent automatically, then you must click the Send Survey to Recipients button on the work order. Note. If a survey is automatic, it is sent to all recipients that are tied to the role as specified on the role distribution list. |
Rate Access
|
Minimum and Maximum |
Enter the minimum and maximum number of suppliers to be returned from the sourcing rules. |
|
Score |
Enter a score range between 0 and 100. Supplier scores must fall within the required score range to meet requisition source requirements. |
Notification Options
The field values in this group box are identical to the field values that are discussed on the Services Procurement - Work Order Settings page. For more information about the notification option settings on this page, refer to the Defining Work Order setting section within this PeopleBook.
See Defining Work Order Settings.
|
Using Work Order Alerts |
Select to define alerts for work orders. Alert values on the service type default onto the work order alerts if alert defaults are not previously taken from the Requester Defaults or Service Coordinator Defaults. |
See Also
Managing Time in PeopleSoft Services Procurement
Maintaining Service/Roles by Service TypeAccess the Service/Role by Service Type page.
Service types are a way of grouping roles or services. For example, you can have a service type of DEV and roles of java developer, QA engineer, and so forth that are linked to that service type. When a service type is selected on a requisition, the services and roles that you can select are only those which are linked to the service type using this page.
|
Service/Project Role |
Select the title for the services and project role. |
|
Description |
Displays the description for the services and project role. |
Maintaining Service/Project Role AttributesAccess the Service/Project Role Attributes page.
Service and project role attributes appear by default on the requisition. Define them here for simplified requisition entry.
|
Description |
Enter the description of the service (project role). Note. This value appears by default on the requisition as the job title. |
|
Comments |
Enter comments that describe the service (project role). Note. This value appears by default on the requisition as the scope of work. |
|
Experience |
Enter the years of experience that this service (project role) requires. Note. This value appears by default on the requisition as the experience. |
|
Education Level |
Enter the lowest level of education that this service (project role) requires. Note. This value appears by default on the requisition as the education level. |
|
Interview Required |
Select if this service (project role) requires an interview before hiring someone for the position. If an interview is required, the system does not allow a service provider to be hired until interviews have been conducted. Note. This value appears by default on the requisition as the interview required. |
|
Competencies |
Add or delete competencies to a service. Note. The competencies associated to the services default onto the requisition. |
Note. The experience, education level and interview required fields are available only for resource-based requisitions. Experience and education level are informational only and are not used to filter resource skills on a requisition or work order.
Maintaining Rate SheetsAccess the Rate Sheet page.
Use rate sheets to enforce that rates entered on a requisition are reasonable for a particular location. Rate sheets are defined for a region, project, role and currency. Rate sheets are only applicable to resource-based roles and services, because deliverables-based services are created for an entire amount, not a specific rate.
Rate
|
Allow Override |
Select to override the default rate defined on the rate sheet when you create requisition or work orders. |
|
Min Rate (minimum rate) |
Enter the minimum rate amount that requesters should use when creating a requisition for the rate sheet role, region, and currency. |
|
Max Rate (maximum rate) |
Enter the maximum rate amount that requesters should enter when creating a requisition for the rate sheet role, region, and currency. |
|
Target Rate |
Enter the rate that appears by default when creating a requisition for the rate sheet role, region, and currency. |
Note. If you select SP Pay Types Enabled on the Services Procurement Installation Options page, you can enter minimum, maximum, and target rates for pay rate, fixed cost, vendor markup, and third-party markup rates on the rate sheet.
Expenses
If you have expenses enabled for the business unit, you can associate expense rates to the rate sheet.
Viewing Rate Sheet ListsAccess the Rate Sheet List page.
|
Region |
Select to access the Maintain Rate Sheets page, where you can access the rate sheet for the selected region and service and also view the rate breakdown. |
Maintain Logistical TasksAccess the Logistical Tasks page.
You associate logistical tasks with a work order when the work order is created manually or generated from a requisition. The tasks related to the service type selected on the work order are automatically linked to the work order.
|
Work Order Type |
Select a work order type. Values are:
|
|
Approval Type |
Select work order approval type. Values are:
Terminate: Select if supplier must confirm a termination action before continuing with the work order. |
|
Execution Type |
Select work order execution type. Values are:
|
|
Assign To |
Select a default assigned to person. This field dynamically generates and assigns logistical tasks to the default assigned to person. Email notification is automatically sent to this person. Values are:
|
Defining Service Supplier SetupTo create suppliers, use the Vendor (VNDR_ID) component. Use the EM_VENDOR_CI component interface to load data into the tables for this component.
To view suppliers by service, use the Supplier By Service (SPB_SPLR_PROJROLE) component. To set up supplier sourcing, use the Supplier Sourcing (SPB_SUP_SRC_SETUP) component. To define services by supplier, use the Services by Supplier (SPB_PROJROLEBYSUPL) component.
To set up suppliers by service types, use the Suppliers by Service Types (SPB_SUPLBYROLETYPE) component. To define regions by supplier, use the Regions by Supplier (SPB_SPLR_REGION) component.
To define regions and service types by suppliers, use the Regions/Service Types by Supplier (SPB_SPLR_REGSER) component. To define suppliers by region, use the Suppliers by Region (SPB_REGION_SPLR) component. To set up suppliers by region and service type, use the Suppliers by Region/Service Type (SPB_REGSER_SPLR) component. To set up suppliers by region and service, use the Suppliers by Region/Service (SPB_REGROLE_SPLR) component. To set up services supplier information, use the Services Details (VENDOR_SPRO) component.
This section discusses how to:
Build the region hierarchy using PeopleSoft Tree Manager.
Enter supplier information.
Maintain services supplier information.
Maintain the supplier network.
Maintain sourcing supplier setup.
Set up suppliers by region.
Pages Used to Define Service Supplier Setup
|
Page Name |
Object Name |
Navigation |
Usage |
|
PSTREEDEFN |
|
Build the region tree hierarchy. |
|
|
REGION_CD |
|
Define procurement region codes. |
|
|
VNDR_ID1_SUM |
|
Maintain vendor information. |
|
|
VENDOR_SPRO_PG |
|
Maintain vendors as service suppliers. |
|
|
SPB_SUP_NETWORK |
|
Maintain a network of service suppliers for each business unit. |
|
|
SPB_SPLR_REGION_PG |
|
Maintain sourcing rules for suppliers by associating them with regions, service types and services. |
|
|
SPB_ROLETYPEBYSUPL |
Click the Service Type tab from the Supplier Sourcing Setup - Region page. |
Associate resource suppliers with service types. |
|
|
SPB_SPLR_REGSER_P |
Click the Service Type by Region tab from the Supplier Sourcing Setup - Region page. |
Associate active resource suppliers with regions and service types, and associate regions and service types with a resource supplier. |
|
|
SPB_PROJROLEBYSUPL |
Click the Service tab from the Supplier Sourcing Setup - Region page. |
Associate services with deliverables suppliers. |
|
|
SPB_SPLR_REGROL |
Click the Service by Region tab from the Supplier Sourcing Setup - Region page. |
Associate deliverables suppliers with regions and services. |
|
|
SPB_REGION_SPLR_PG |
|
Displays suppliers by region. |
|
|
SPB_SUPLBYROLETYPE |
|
Displays resource suppliers by service types. |
|
|
SPB_REGSER_SPLR_PG |
|
Displays suppliers by regions and service types. |
|
|
SPB_SPLR_PROJROLE |
|
Displays suppliers by service. |
|
|
SPB_REGROLE_SPLR |
|
Displays suppliers by region and service. |
Building the Region HierarchyUse the region hierarchy tree structure to build the Supplier by Region and Rate Sheets by Region components graphically. This visual structure associates suppliers with procurement regions and enables you to determine the best suppliers for a given region. Expand the region nodes to view specific ship to locations (leafs) within the region.
The region tree is only used within Services Procurement if the Use Region Tree Structure check box is selected on the Services Procurement Installation Options page. If the check box is clear, there is no parent child relationship defined between the different regions, only locations are assigned to the regions.
With the region hierarchy, you can also:
Determine the best supplier to fill a requisition requirement.
Create requisitions for specific regions (ship to locations) and source them to qualified suppliers in those regions.
Source requisitions to suppliers that match region and rate sheet requirements.
To build the region hierarchy:
Access the Region Codes page and set up PeopleSoft Services Procurement region codes.
Access the Tree Manager page and set up the tree definition and properties.
Select REGION_TREE as the structure ID, enter a description and SetID, and select Level Not Used for the Use of Levels field.
Add a root node by selecting one of the available values.
See Also
Entering Supplier InformationAccess the Identifying Information page.
Note. Administrators can create, approve, and deactivate vendors. To enable administrator access, select all options on the Vendor Processing Authority page.
See Also
Maintaining Vendor Information
Maintaining Services Supplier InformationAccess the Services Supplier Information page.
|
Supplier Type |
Select Resource, Deliverable, or Both. The supplier type determines what type of requisitions the supplier can fill. If a supplier only provides hourly employees, select Resource. If a supplier only provides services that are paid in one total amount, select Deliverable. If the supplier can provide both types of services, select Both. |
|
Internal Supplier |
Select if the supplier is internal to your organization. |
|
Include in Invoice Approval |
Select if invoices should be routed to the supplier for approval before being routed internally for approval. If this option is selected after work orders have already been opened for the supplier, then the Supplier Invoice Approver name on these work orders will be missing. Therefore, the system issues a warning whenever this option is selected to remind the user to review all open work orders for this supplier and to assign a supplier invoice approver. If the Supplier Invoice Approver is missing on any work orders, invoicing will bypass submitting the invoice to suppliers for approval even though this option is selected to Include in Invoice Approval. |
|
Ethnicity |
If the vendor is minority owned, select the ethnicity of the owner. |
|
Score |
Displays the supplier score as determined from data analysis. |
Maintaining the Supplier Network Setup
Access the Supplier Network Setup page.
|
|
Click to access the Supplier Sourcing Setup component, where you can organize service suppliers by business unit, region, service type, and service. |
Maintaining Supplier Sourcing Setup
Access the Supplier Sourcing Setup page.
Use the Supplier Sourcing Setup component to add suppliers to the supplier network in one central location. Use this component to organize service supplier information by business unit, region, service type, service type by region, service, and service by region.
Setting Up Suppliers by Region
Access the Suppliers by Region page.
Note. If the region tree structure is enabled, use the region hierarchy tree structure to build the supplier and region associations graphically.
Defining Sourcing SetupTo set up bid factors, use the Bid Factor Setup (BID_FACTOR_COMP) component. To create bid factor groups, use the Bid Factor Group Setup (BID_FCTR_GRP_COMP) component.
To set up services procurement pay types, use the Services Procurement Pay Types (SPB_PAY_TYPES) component. To set up bid factors mapping, use the Bid Factor Mapping (SPF_BIDFCTR_MAP) component. To set up bid factors by category, use the Bid Factor by Category (SP_BDFTR_CAT_COMP) component.
To define autosourcing parameters, use the Autosource (SPF_AUTOSOURCE) component. To define markups by service type, use the Markups by Service Types (SPB_SRVC_MRKUP) component. To maintain markups by region, use the Markup by Region (SPB_RGN_MRKUP) component.
This section provides an overview of the bid factor processes and discusses how to:
Create bid factors.
Map bid factors.
Define bid factors by item category.
Set up services procurement pay types.
Enter markups by service type.
Enter markups by region.
Understanding Bid FactorsWith PeopleSoft Services Procurement bid factors, you can:
Define bid factor rules that help select qualified bids.
Effectively manage a vast number of bid submittals for a requisition.
Speed up the submittal process by calculating the best and worst bid scores.
View bid factor scores across a bid pool.
Bid Factors and RequisitionsPeopleSoft Services Procurement makes it possible for bid factors to appear by default on the requisition. This ensures that bid factors relevant to the requisition automatically appear on the requisition. Bid factors can be added instantly while creating the requisition and can be edited before sourcing the requisition. Setting up the standard bid factors helps alleviate the work during requisition creation and sourcing.
Bid factors appear by default from several setup pages:
Bid Factor Mapping: Enables the user to define which bid factors should appear on deliverables-based requisitions and which should appear on resource-based requisitions.
A bid factor can appear on both resource and deliverable requisitions.
Bid Factors by Category: You can add bid factors to item categories. The item category links to the service type on the requisition.
When you select the service type on the requisition, the bid factors matching that service type appear by default onto the Bid Factors by Requisition page.
Bid Factor by Service: You can link bid factors to services and project roles.
When you select the services and project role on the requisitions, the bid factors linked to that services and project role appear by default on the Bid Factors by Requisition page.
Bid Factors by Activity: You can link bid factors to deliverable activities.
When a service is selected on a deliverables requisition, the bid factors linked to the activities by service appear by default on the Bid Factors by Requisition page.
Note. If the same bid factor is defined in multiple defaulting pages, the system deletes the duplicates so that a bid factor only appears once on the Bid Factors by Requisition page.
See Also
Creating and Managing Requisitions
Pages Used to Define Sourcing Setup
|
Page Name |
Object Name |
Navigation |
Usage |
|
SPF_AUTOSOURCE |
|
Define rules to automatically source upon requisition approval. |
|
|
BID_FACTOR_PNL |
|
Create bid factors. |
|
|
BID_FCTR_BUDEPT |
Click the Assign BUs and Departments link on the Bid Factor Setup page. |
Assign business units and departments to bid factors. |
|
|
BID_FACTOR_LINE |
Click the Assign Defaulting Rules link on the Bid Factor Setup page. |
Assign defaulting rules to bid factors. |
|
|
BID_FCTR_QRY |
Click the Assign Response Query link on the Bid Factor Setup page. |
Associate response query to bid factors. |
|
|
BID_FCTR_CLAUSE |
Click the Assign Clauses link on the Bid Factor Setup page. |
Assign contract clauses to bid factors. |
|
|
BID_FCTR_AGRMNT |
Click the Assign Agreements link on the Bid Factor Setup page. |
Assign contract agreements. |
|
|
BID_FACTOR_GRP |
|
Group bid factors. |
|
|
SPF_BIDFCTR_MAP_PG |
|
Map predefined attributes to bid factors in the strategic sourcing module. |
|
|
SP_BDFTR_BY_CAT_PG |
|
Associate bid factors by category. |
|
|
SPB_PAY_TYPES |
|
Maintain descriptive labels for each pay type. |
|
|
SPB_SRVC_MRKUP |
|
Maintain vendor markup information by service type. |
|
|
SPB_RGN_MRKUP |
|
Maintain vendor markup information by region. |
|
|
SPB_LVL_CD |
|
Maintain performance level codes for a supplier. |
|
|
SPB_SUP_SCORE_RULE |
|
Maintain supplier scoring rules. |
Creating Bid FactorsAccess the Bid Factor Setup page.
|
Default Weighting |
Assign an ideal default weighting for the bid factor question that you create. |
|
Type |
Select the bid factor type. The bid factor type determines the bid factor questions. Values are:
Additional fields appear, depending on the bid type selection. Note. The separator bid factor type is used to organize long lists of bid factors by creating headings. |
|
Question |
Enter the text of the bid factor question. |
|
Best and Worst |
Enter the best and worst possible scores that a supplier can bid for a particular question. For example, if you create a new bid factor with type Date, and the Question field contains What is the end date? the Best and Worst fields represent the best and worst dates on which the candidate can complete the job. |
|
Assign BUs and Departments |
Click to access the Assign Business Units and Departments to Bid Factor page, where you can assign business units and departments to bid factors. |
|
Assign Defaulting Rules |
Click to access the Assign Defaulting Rules to Bid Factor page, where you can assign default rules to bid factors. |
|
Assign Response Query |
Click to access the Assign Response Query to Bid Factor page, where you can assign a response query to bid factors. |
|
Assign Clauses |
Click to access the Assign Contract Clauses page, where you can assign contract clauses to bid factors. |
|
Assign Agreements |
Click to access the Assign Contract Agreements page, where you can assign contract agreement to bid factors. |
Cost Contributions
Use this section to define factor cost contributions based on bid price, bid quantity, cost range, and fixed cost. You can also define cost contributions based on user-defined parameters.
Mapping Bid FactorsAccess the Bid Factor Mapping page.
Predefined PeopleSoft Services Procurement bid factors appear when you create a service requisition. For example, if you have a bid factor of EXPERIENCE mapped to the PeopleSoft Services Procurement attribute Experience, the experience on the requisition is compared to that of the candidate.
Bid factor attributes appear by default on the Requisition - Bid Factor by Requisitions Lines page.
|
Bid Factor Code |
Enter the bid factor code that maps to the specified services procurement attribute. |
|
Status |
Displays the status of the bid factor mapping. |
|
Comment Text |
Displays the question related to the bid factor code. |
|
Resource Service type BF(resource service type bid factor) |
Select this check box if the bid factor is related to resource-based requisitions. Note. The RATE and CANDIDATE bid factor mappings only occur on resource-based requisitions, and therefore, only have the Resource Service type BF check box selected. |
|
Deliverable service type BF(deliverable service type bid factor) |
Select if the bid factor is related to deliverables-based requisitions. The AMOUNT bid factor mappings only occurs on deliverables-based requisitions, and therefore, only have the Deliverable service type BF check box selected. |
Note. Use ad hoc bid factors to create unique bid factor values that appear by default in requisitions.
Defining Bid Factors by Item CategoryAccess the Bid Factors by Category page.
Link bid factors to a specific item category. You can link bid factors to a category for both deliverable- and resource-based services. When a requisition is created for a service type, it looks for any bid factors linked to the item category for that service type. If it finds any bid factors, it lists them on the Bid Factors by Requisition Line page.
Setting Up Services Procurement Pay TypesAccess the Services Procurement Pay Types page.
You can enter labels for each pay type field. The system provides values as a default, which you can override. The pay types are linked to the time reporting codes. The system uses these pay types and multipliers to calculate the rate on the invoice. The total rate is calculated as the total sum of all individual pay types.
Note. This component is only accessible if SP Pay Types Enabled is selected on the Services Procurement Installation Options page.
Entering Markups by Service TypeAccess the Markup Details page.
When you define markups by service type, you can set limits on the vendor markups for particular service types. You can define the maximum markup as an amount or as a percentage. When the vendor bids on a requisition, the system verifies to whether the vendor markups exceed the maximum amounts defined. The system first checks for a markup on the service type and if it doesn't find one, it looks for a markup on the region. If it doesn't find one on the region, no validation is to be done on the vendor markups.
|
Max Vendor Markup (maximum vendor markup) |
Enter the maximum vendor markup rate as percentage or as total amount. |
|
Max Total Markup (maximum total markup) |
Enter the maximum vendor tolerance rate in percentage. |
Note. This component is only accessible if SP Pay Types Enabled is selected on the Services Procurement Installation Options page.
Entering Markups by RegionAccess the Maintain Markups by Region page.
When you define markups by region, you can set limits on the vendor markups for a particular region. You can define the maximum markup as an amount or as a percentage. When the vendor bids on a requisition, the system verifies whether the vendor markups exceed the maximum amounts defined. The system first checks for a markup on the service type and if it doesn't find one, it looks for a markup on the region. If it doesn't find one on the region, no validation is to be done on the vendor markups.
|
Max Vendor Markup(maximum vendor markup) |
Enter maximum vendor markup rate as percentage or as total amount. |
|
Max Total Markup (maximum total markup) |
Enter maximum vendor tolerance rate in percentage. |
Note. This component is only accessible if SP Pay Types Enabled is selected on the Services Procurement Installation Options page.
Maintaining Users and Team SetupTo set up requesters, use the Requester Setup (REQUESTOR_TBL) component. Use the REQUESTOR_TBL_CI to load data into tables for this component.
To set up user preferences, use the User Preferences (PV_OPR_DEFAULT) component.
This section providers an overview of users and team setup, and discusses how to:
Set up roles for role actions.
Set up users.
Set up user preferences.
Set up service requester defaults.
Set up service coordinator defaults.
Create and edit requesters.
Create and edit service coordinators.
Create and edit service provider contacts.
Create and edit service providers.
Create and edit service providers/coordinators.
Revoke the service provider/coordinator role.
Replace the services coordinator.
Replace the VMS service coordinator.
View the Coordinator Replacement log.
Create and edit service administrators.
Create and edit approvers.
Create service coordinator teams.
Understanding Users and Team Setup
This section provides overviews of the users and team setup, and discusses:
User roles.
Requesters.
Service coordinators.
Service provider/coordinators.
Provider contacts.
Service providers.
Independent providers.
Understanding User Roles
The user role information determines whether the user is an enterprise user or a supplier user.
Here are some examples of enterprise users:
Requester.
Service coordinator (employee).
Approver.
Services procurement analyst.
Administrator.
Invoice manager.
Here are some examples of supplier users:
Service provider.
Provider contact.
Service coordinator (non-employee).
Independent provider.
Register new requesters, service coordinators, provider contacts, administrators, approvers, independent providers, and service providers. Associate them with appropriate user roles to define which pages they use when entering the procurement environment. Users are only authorized to view pages that are associated with their specified user role type.
Note. An individual user may be associated with one or more of these roles.
The system uses autonumbering to generate unique person IDs while registering a service coordinator, service provider contact,
and service provider. The system uses the number type PeopleSoft Services Procurement person ID to generate the person ID
automatically.
Warning! The user default SetID is the SetID for the PeopleSoft Services Procurement person ID. If the default SetID is not obtained for the user creating the person ID, the SetID from the autonumbering table becomes the SetID for the PeopleSoft Services Procurement person ID.
Note. You can attach the number type for the PeopleSoft Services Procurement person ID to any person ID. Be sure to specify a different starting sequence for every SetID with a maximum length of three.
Requesters
The Department SetID, ShipTo SetID, Location SetID, and PO Origin SetID fields work together when you establish department, ship to, location, and origin default information for a requester. After you select a SetID for each of the defaults, you can select only the defaults associated with that SetID.
A requester can create and manage service projects and service activities, create and manage service requisitions, view service sourcing information, view bid and response information, view work orders, and approve time and expense sheets.
Service Coordinators
A service coordinator is an employee or non-employee who is responsible for sourcing and filling a requisition. The service coordinator can view service requisitions and lines, source requisitions, communicate with suppliers, view bid and response information and, depending on their defaults, create and manage work orders.
Provider Contacts
A service provider contact is a supplier who can manage a service provider roster, view service requisitions, submit bids, communicate with service coordinators, view bid and response information, enter progress logs, and view timesheets and expenses.
Note. You must register the service provider contact before you can set up a provider contact user profile or register a related service provider. However, when you register a service provider as an independent provider, you do not need to register the service provider contact first.
Service Providers
A service provider is a person who can record and view time and expense information.
Service Providers/Coordinators
A service provider/coordinator can source and bid for service providers and also perform the duties of a service coordinator (recruiter).
Important! Only existing service providers can be switched to this combined role.
Independent Providers
The Independent Provider check box on the Register Service Provider page determines whether the service provider is an independent provider. Select the check box to identify the service provider as an independent provider who is both the provider contact and a service provider.
Note. You must register the service provider user before you can set up a service provider user profile.
An independent provider is a person who acts as both the provider contact and the service provider. An independent provider can record and view time and expense information, manage a consultant roster, view service requisitions, submit bids, communicate with service coordinators, and view bid and response information.
An independent provider has only one person ID and one user profile. An independent provider is assigned both the SP_PROVIDER_CONTACT and the SP_PROVIDER roles, or roles that provide functionality for both service provider and provider contact. You can also attach a resume for a service provider.
Common Elements Used in this Section
|
Return to Define Services Procurement |
Click this page to return to the Define Services Procurement home page. |
|
Return to Services User Setup |
Click this page to return to the Services User Setup page. |
Pages Used to Maintain Users and Team Setup
Setting Up Roles for Role Actions
Access the eProcurement Role Actions page.
Role actions specify which roles can perform specific actions within the application. The services procurement role actions that PeopleSoft delivers begin with SP.
|
SP_ADD_SERV_PROVIDER |
Enables user to add service providers from the supplier portal. Note. If this role action has an active role associated to it, the Add Service Provider link is visible and editable. If no roles are associated to this role action, the link is hidden. |
|
SP_ALLOW_PASTDATE |
Enables you to add requisitions with a start date in the past. |
|
SP_APPROVER |
Enables you to approve invoices. |
|
SP_COORDINATOR_BUYER |
Enables you to edit a sourced requisition, cancel the requisition, and view the life cycle from the Sourcing and Review page. |
|
SP_ENFORCE_PROJ_ATTR |
Enforces the timesheet attributes (Overtime and expense options) associated with the project on the requisition. |
|
SP_ENTERPRISE_ADMIN |
Identifies enterprise administrators. |
|
SP_EXP_APPROVER |
Determines which user roles can approve expenses. |
|
SP_HIDE_SOURCING_PG |
Hides the sourcing preferences functionality from the requisition. It disables the sourcing preferences from the PeopleSoft Services Procurement requisition page, thus, preventing the requester from specifying preferred vendors. |
|
SP_INVOICE_APPROVER |
Enables you to approve invoices. |
|
SP_IGNORE_REAPPR |
Does not initiate the re-approval process for the roles assigned to this role action, when the requisition is filled with higher rate. |
|
SP_OVERRIDE_SUR_FLAG |
Enables you to override the survey required setting from the service type on the work order. |
|
SP_PROVCNTCT_ACTION |
Validates if the logged in user has the Provider Contact role. Determines valid actions on progress logs and work orders. |
|
SP_REQUESTER |
Determines which user roles can create service requisitions. |
|
SP_SERVICE_PROVIDER |
Identifies service providers. |
|
SP_SRVC_COORDINATOR |
Determines which user roles can source requisitions. |
|
SP_SUPPLIER_ADMIN |
Identified supplier administrators. |
|
SP_SUPPLIER_INV_APPROVER |
Enables service provider contact to approve invoices. |
|
SP_TIME_ADJUST |
Enables you to adjust timesheets. |
|
SP_TIME_APPROVER |
Determines which user roles can approve timesheets. |
|
SP_TIME_PROXY |
Enables service provider contact to enter timesheets on behalf of a service provider. |
|
WF_REAAPR_REQUIRED |
Enables you to edit a few fields (service coordinator, time approval, and competency description) on the requisition even after it's approved or sourced. |
|
SP_EXPENSE_PROXY |
Determines which user roles can enter expenses on behalf of the service provider. |
|
SP_PLOG_APPROVER |
Determines which user roles can approve progress logs. |
|
SP_HIDE_RT_BREAKDOWN |
Determine which user has access to view the Rate Break Down Details throughout the fulfillment transaction process. |
|
SP_TIME_ADJUST_TRC |
Enables which user can adjust time categories during the timesheet approval process. |
|
SP_VMS_MSP_BREAKDOWN |
Determine which user can view the VMS or MSP breakdown details throughout the fulfillment transaction process. |
|
SP_WRKORDER_APPROVER |
Enables you to approve work orders. |
Setting Up User Profiles
Access the User Profile page.
Create a user profile for all users in the PeopleSoft Services Procurement system.
Note. Before you can set up user profiles for the service provider, service coordinator, and provider contact users, register them on the User Setup page.
To set up user profiles:
Access the User Profiles page Services Procurement, Maintain Users, Services User Setup, and enter a user ID.
Enter the required values, particularly email and address information on the User Profiles - General page.
Note. To run either the Datamart Application Engine process, the Invoicing Application Engine process, or Crystal reports, select the permission list value of SP for the Navigator Home page, Primary, and Process Profile fields. Select this value only for users who run these processes.
Access the User Profiles - ID page and set user ID attributes.
This table lists user roles and ID types:
|
User Roles |
ID Types |
|
Requester |
If the requester is already set up as an employee, select Employee as the ID type. If the requester is not an employee, select None as the ID type. If you select Employee as the ID type, enter the correct employee ID in the Attribute Value field. |
|
Service Coordinator |
SelectService Procurement Person and Employee if the service coordinator is also an employee. |
|
Service Provider |
Select Service Procurement Person. |
|
Service Provider Contact |
Select Service Procurement Person. |
|
Approver |
Select Employee if the approver has an employee ID; otherwise, select None. |
|
Invoice Manager |
Select Employee if the invoice manager has an employee ID; otherwise, select None. |
|
Executive |
Select Employee if the user has an employee ID; otherwise, select None. |
|
Administrator |
Select Employee if the administrator has an employee ID; otherwise, select None. |
Access the User Profiles - Roles page and select one of these role names for the user:
Note. This process can happen automatically based on the values defined in the Role Actions for the User page.
Warning! The Person ID selected on the user profile Services Procurement Person field must be unique. The person ID is used to send worklist entries, and if two users share the same person ID, the worklist entry may go to the incorrect user.
Note. To run Crystal reports, assign the Invoice Manager role to the user. This role provides access to the tree QUERY_TREE_SP and the access group SP_ACCESS_GROUP, which are necessary to run Crystal reports.
Access the User Profiles - Workflow page and enter the name of the approver who approves requisitions entered by the requester.
Access the Process Group Permission page and attach a process group value.
Note. To run all PeopleSoft Services Procurement application engines or Crystal reports, select POALL, GLALL, FSALL, or TLSALL in the Process Group field.
Setting Up User PreferencesAccess the User Preferences page.
You must set up user preferences for all requesters. You must also enter user preferences for service coordinators to enable service coordinators to create and manage requisitions on behalf of a requester. User preferences are optional for all other users.
To set up user preferences:
Select a user ID from the list of available values.
(Optional) Click the Overall Preferences link to capture the default business unit and default SetID for the requester.
Click the Procurement link to enter requester preferences.
Enter the required values, particularly the requester name. The selected requester has full authorization for creating, updating, and canceling requisitions.
Click the Requisition Authorizations link to define a requester's access to requisitions or to add multiple requesters to authorizations.
The entry in the requisition authorization overrides the requester selected in the Requester field on the Procurement page.
Click the Vendor Processing Authority link to enable administrator access to enter, approve, and deactivate vendors.
Setting Up Service Requester DefaultsService requester defaults make service requisition entry easier. The defaults that you define on this page are used on the requisition, simplifying the requisition entry process.
Requisition/Work Order
|
Projects Business Unit |
Enter the default PeopleSoft Project Costing business unit. If the default project business unit is already defined for the project user preferences, the value is display only. |
|
Project |
Enter the default project for which the requester is to enter service requisitions. |
|
Service Type |
Select the default service type. |
|
Service (Project Role) |
Select the default service (project role). |
|
Time Approver |
Select the default time approver. The values include users who have at least one of the roles specified for the role action: SP_TIME_APPROVER. |
|
Invoice Approver |
Select the default invoice approver. The values include users who have at least one of the roles specified for the role action: SP_APPROVER. |
|
Allow Time/Expense Overage % |
Select the default tolerance for time and expense. |
|
Expense Approver |
Select the default expense approver. Values include users who have at least one of the roles specified for the role action: SP_EXP_APPROVER. |
Service Coordinator
|
Service Coordinator |
Click to add a default service coordinator who will source the requisition. |
|
Service Team |
Click to add a default service coordinator team for the service coordinator. The system uses this default if the service requester does not have a default team, and the requisition region/service type does not have a team defined. The service team is not required. Note. You can select a default Service Coordinator or Service Coordinator Team for the selected requester. If a default Service Coordinator team is specified, it will be the first selection for defaulting. If a default Service Coordinator is specified, it will only be used if no team is found on the Service Teams by Region/Service Type or Business Unit. |
Notification Options
|
Requisition Notification Method |
Select the notification method for requisitions. |
See Defining Work Order Settings.
Permissions
|
May Enter Work Order |
Select this option so that the user can add new work orders. |
|
May Extend Work Order |
Select this option so that the user can extend the duration of the work order contract. Note. Select this check box to enable users to extend work order agreements. |
|
Authorized to Source to Preferred Suppliers |
Select this option so that the user can source requisitions to preferred suppliers. Note. Select this check box to enable users to source requisitions to preferred suppliers in the sourcing details section of the requisition. |
Setting Up Service Coordinator DefaultsTo set up service coordinator defaults, access the Service Coordinator Defaults page.
Use this page to set up defaults for persons with the Service Provider/Coordinator role.
Requisition/Work Order
|
Projects Business Unit |
Enter the default PeopleSoft Project Costing business unit. If the default project business unit is already defined for the project user preferences, the value is display only. |
|
Project |
Enter the default project for which the requester is to enter service requisitions. |
|
Service Type |
Select the default service type. |
|
Service (Project Role) |
Select the default service (project role). |
|
Time Approver |
Select the default time approver. Values include users who have at least one of the roles defined in the role query: SP_TIME_APPROVER. |
|
Invoice Approver |
Select the default invoice approver. Values include users who have at least one of the roles defined in the role query: SP_INVOI CE_APPROVER. |
|
Allow Time/Expense Overage % |
Select the default tolerance for time and expense. |
|
Expense Approver |
Select the default expense approver. Values include users who have at least one of the roles defined in the role query: SP_EXP_APPROVER. |
Notification Options
|
Requisition Notification Method |
Select the notification method for requisitions. |
See Defining Work Order Settings.
Permissions
|
May Enter Work Order |
Select this option so that the user can add new work orders. |
|
May Extend Work Order |
Select this option so that the user can extend the duration of the work order contract. Note. Select this check box to enable users to extend work order agreements. |
|
Authorized to Delegate |
Select this option so that the user can delegate another service coordinator to source a requisition. |
|
Authorized to Change Sourcing Rules |
Select this option so that the user can update the sourcing rules defined on the requisition when sourcing. |
Creating and Editing Requesters
To create and edit requesters:
Access the Services User Setup page.
Select the Create a new Services User option from group #1, and then select the Requester option from group #2.
Click the Next button on the first Services User Setup page to continue to the second Services User Setup page.
Use this page to specify whether the requester has an existing user profile, or if the requester requires a new user profile.
Note. If you select the option Yes (I need to add an existing user as a Requester), the system adds an additional field so that you select the user that you want to add as a requester. When you select the requester option, the system automatically takes you to the Requester Setup page, where you can edit the requester setup (see step 6.).
If the user does not already exist, select the option No (I need to create a new user profile, then add the new user as a Requester) option on the Services User Setup page.
When you select this option, the system adds a step for you to create a user profile for the requester.
Note. If the HCM Person Integration is enabled, the Create User Profile link is not visible on the page when the user selects the option No. However, when the HCM Person integration is enabled, the requester user profiles must be created in the HCM system first.
See HCM Integrations.
Select the User Profile link on the Services User Setup page to access the User Profile Information page, where you can enter user ID and password information for the new user.
Note. You must fill out this page completely in order to successfully create a new user ID for the user. If you do not fill out all the fields on the User Profile Information page completely, the system will not save the page.
Click the OK button on the User Profile Information page to access the next Services User Setup page.
After you create the user profile, the system adds another step to the Services User Setup page that enables you to add the new user as a Requester.
Click the Add button on the Services User Setup page to access the Requester Setup page.
Select the Return to Services User Setup link on the Requester Setup page to access the next Services User Setup page.
When you return to the Services User Setup page, the system adds more steps for you to define security and user preferences for the requester.
Click the Finish button on the Services User Setup page once you complete the requester setup.
Creating and Editing Service Coordinators
To create and edit service coordinators:
Access the Services User Setup page.
Select the Create a new Services User option from step #1, and then select the Service Coordinator option from step #2.
|
Person ID |
Use this field to search for a Person ID to associate with the new service coordinator. Note. If you do not have a pre-existing person ID to associate with the new service coordinator, click the Add button to add a new person ID. |
|
Add |
Click to access the Maintain Service Coordinator page, where you can add a new person ID and define personal information for the service coordinator. |
Click Go on the Services User Setup page to access the Maintain Service Coordinator page.
|
Person Type |
Select to indicate whether the service coordinator is acting in the role of a Coordinator/Provider Contact or Service Coordinator. Note. If this person has a role of Service Provider/Coordinator, the field is display-only. Note. If you select the Coordinator/Provider Contact as the person type, the system automatically changes the Personnel Status field
to a display-only status of Non-Employee, and you are unable to change the status of the field. |
|
Person Status |
Select a value to indicate the status of the service coordinator. Values are Active, Inactive, and Pending Registration. When the value is Inactive, the Coordinator Status field on the Service Coordinator Information page is also set to Inactive. Note. If there are open transactions for this service coordinator, you cannot change the status to Inactive. Note. In addition, if the service coordinator with the person type of service provider/coordinator is the only active member of a team, you cannot change the status to Inactive. You will receive an error message indicating that another active member must be assigned to the team. |
|
Personnel Status |
Select to indicate if the service coordinator is an Employee or Non-Emple (non-employee). Note. If you select Employee, the system will enable you to search for a pre-existing user and employee ID on the Service Coordinator Information page. If you select Non-Emple, you can create a new user profile for the non-employee. |
Access the Service Coordinator Information page.
|
Supplier Administrator |
Selecting the Supplier Administrator check box enables the coordinator and provider contact users to register other provider contacts for the same supplier. Note. This check box appears if you select Coordinator/Provider Contact as the person type on the Maintain Service Coordinator page. Users that are defined with this person type can access to the Maintain Provider Contact and Manage Service Provider functionality from the Supplier portal for the related supplier organization. |
|
Create User Profile |
Click to access the User Profile Information page, where you can provider a user ID, password, and other information for creating a user profile for the non-employee service coordinator. |
|
Replace Service Coordinator |
Click this link to access the Replace Service Coordinator page. This link appears if there are any non-VMS transactions for the service coordinator. |
|
Replace VMS Coordinator |
Click this link to access the Replace VMS Service Coordinator page. This link appears if there are any VMS transactions for the service coordinator. |
After you save the page, select the Return to Services User Setup link on the Maintain Service Coordinator page to access the modified Services User Setup page.
When you return to the Services User Setup page from the Maintain Service Coordinator page, the system automatically adds additional links for you to add security and user preferences for your new service coordinator.
Click the Finish button on the Services User Setup page once you complete the service coordinator setup.
Viewing Service Coordinator Information
Access the Service Coordinator Information page.
|
Coordinator Status |
This field is display-only. If the service provider/coordinator role is revoked, the status is set to Inactive. Important! The coordinator status on this page should not be confused with the higher level person status of the person as a whole. The
higher level person status can also be set to Inactive. If this occurs, it would inactivate both the Service Provider and
the Service Coordinator roles for same person. Consequently, the status on the Service Coordinator Information page would
then reflect the inactive status of the higher level person status. |
Creating and Editing Service Provider Contacts
To create and edit service provider contacts:
Access the Services User Setup page.
Select the Create a new Services User option from group #1, and then select the Service Provider Contact button from group #2.
Click the Add button on the Services User Setup page to access the Maintain Provider Contact page.
Note. Since the service provider contact is a non-employee, the system creates a new person ID for the new service provider contact.
|
Person Type |
Select Service Provider or Service Provider/Coordinator. Note. On the Maintain Provider Contact page, the person type field is always display-only. |
|
Personnel Status |
This field always defaults to Non-Employ (non-employee) and cannot be changed. |
Select the Provider Contact Information link on the Maintain Provider Contact page to access the Provider Contact Information page
Select the Phone and Email Details link on the Provider Contact Information page to enter telephone and email details for the service provider contact.
After you save the page, select the Return to Services User Setup page link on the Maintain Provider Contact page to access the modified Services User Setup page.
When you return to the Services User Setup page from the Maintain Provider Contact page, the system automatically adds additional links for you to add security and user preferences for your new service coordinator.
Creating and Editing Service Providers
To create and edit service providers:
Access the Services User Setup page.
Select the Create a new Services User option from group #1, and then select the Service Provider button from group #2.
Click the Add button on the Services User Setup page to access the Maintain Service Provider page.
Note. Since the service provider is a non-employee, the system creates a new person ID for the new service provider.
|
Independent Provider |
Service provider or service provider/coordinator that does not have any provider contacts that represent them. |
Select the Service Provider Information link on the Maintain Service Provider Information page to access the Service Provider Information page.
Select the Phone and Email Details link, the Provider Skills link, and the Resume Attachment link, and enter the related information.
|
Function Type |
Indicates whether the service provider is independent. |
After you save the page, click the Return to Services User Setup page link on the Maintain Service Provider page to access the modified Services User Setup page.
When you return to the Services User Setup page from the Maintain Service Provider page, the system automatically adds additional links for you to add security and user preferences for your new service provider.
Creating and Editing the Combined Service Providers/Coordinator Roles
To create and edit service provider/coordinators:
Access the Services User Setup page.
Select the Edit an existing Services User option from step #1.
Select the Service Provider option from step #2.
Select the Person ID that you want to change to a service provider/coordinator user.
Note. Only existing service providers can be assigned to this role.
Click the Edit Service Provider link from step #4 to access the Maintain Service Provider page.
Select Service Provider/Coordinator in the Person Type field.
You will receive a confirmation message indicating your approval to change this person to the new service provider/coordinator role. Click the OK button to accept the changes, and to return to the Maintain Service Provider page.
Click Save button to assign this role.
Click the Return to Services Setup link.
(optional) Click the User Preferences link from step #5, and then click the Service Coordinator Defaults link to add any specific defaults such as the time approver and any permissions that you may want this person to have.
Save your changes, and then click the Return to Services Setup link.
(optional) Click the Update User Profile link to make changes to the existing user profile, and then click the OK button to return to the Services Setup page.
Click the Finish button or the Return to Define Services Procurement link.
Note. A service provider can be associated to multiple suppliers with the service provider becoming effective for the new supplier
on a designated effective date. For a user with the combined role of service provider/coordinator, the supplier information
for the service coordinator should be in sync. An email notification is sent to the service administrator making the change
when the service provider gets associated to a different supplier. The service administrator will have to manually change
the supplier information for the coordinator when the associated service provider becomes effective for the new supplier.
For the combined service provider/coordinator role, the vendor information from the Maintain Service Coordinator page cannot
be changed. An error message will be displayed if the vendor information is changed on the Maintain Service Coordinator page
for a Service Provider/Coordinator role user. For this user, the vendor information can be changed only on the Service Provider
Information page.
The service administrator will receive a warning message if there are no active approved work orders assigned to the service provider, and can click the OK button to proceed with changing the role to a service provider/coordinator.
Revoking the Service Provider/Coordinator Role
The following describes the steps involved when the service provider/coordinator role is revoked:
Service administrator accesses the Maintain Service Provider page.
Service administrator changes the person type from Service Provider/Coordinator to Service Provider.
The system validates that the service provider/coordinator is not associated to any active work orders. If the service provider/coordinator is associated to any active work orders, an error message displays, and the service administrator will not be able to change the person type to being just a Service Provider
If the service provider/coordinator is associated to any active work orders, an error message displays and the system will direct the service administrator to identify a replacement service coordinator for all active work orders for this Service Coordinator before re-attempting to revoke the coordinator role.
If the service provider/coordinator is the only active team member, an error message displays and the system and will direct the service administrator to assign another active member to the team before attempting to revoke the coordinator role.
Upon confirmation, the system revokes all the service coordinator roles that were granted to the service provider.
The system sets the Person Status field to Inactive on the Maintain Service Provider page.
The person continues in the system as a service provider, and can continue entering time or can be submitted as a candidate for other sourced requisitions.
The system sets the service coordinator status to Inactive.
If there are any open requisitions or work orders for the service coordinator, an error message displays and the person type will not be changed. In addition, if the service coordinator is the only active member of a team, an error message displays stating that another active member must be assigned to the team before revoking the service provider/coordinator role.
In addition, the system also display an error message if the service provider/coordinator (user) is defined as a service coordinator for a VMS business unit or for a VMS by business unit and Service Type.
Replacing Service Coordinators
Access the Replace Service Coordinator page.
The fields on this page differ from this page shot if the search criteria is for work orders only. Differences are noted.
You may want to use this functionality to distribute workload more evenly between service coordinators.
Search Transactions
|
Service Coordinator |
Select the service coordinator that you want to replace. This is a required field. |
|
Business Unit |
Select the business unit for the service coordinator. This is a required field. |
|
Service Type |
Select a value for the service coordinator. If you want to retrieve all service types, leave this field blank. Note. If the Use HCM Terminology? option is selected on the Services Procurement Installation Options page, the label for this field is Job Family. |
|
Service |
Select a project role for the service coordinator. If you want to retrieve all project roles, leave this field blank. Note. If the Use HCM Terminology? option is selected on the Services Procurement Installation Options page, the label for this field is Job Code. |
|
Transaction Type |
Select a value to determine the types of transactions to be retrieved. Values are:
|
|
View Coordinator Statistics |
Click this link to display the number of transactions associated to the selected service coordinator. |
|
Hide Coordinator Statistics |
Click this link if you do not want the system to display the coordinator statistics. Note. This link is available only after you have clicked the View Coordinator Statistics link. |
|
Search |
Click this button to retrieve transactions based on the search criteria. |
Service Coordinator Statistics
This grid displays the total number of transactions for the service coordinator. The information is summarized for the specific business unit entered in the Search Criteria section, and the information is also summarized for all business units to which the service coordinator is associated.
You can view information such as the:
Number of open and closed requisitions.
Number of VMS and non-VMS requisitions.
Number of open and closed work orders.
Number of VMS and non-VMS work orders.
Requisition Details
This section displays requisition and work order details such as requisition ID, service type, service, vendor, provider contacts, work order type and status, and start and end dates.
If the search criteria was for Work Order Only, the name of this step box would be Services Work Orders. Any differences in information displayed are noted.
|
Expand All and Collapse All |
These options appear when the transaction type of Requisition Through Work Orders is selected. Click to expand or collapse the grid to view any work orders associated with requisitions. |
|
|
Click the arrow toggle switch button to display associated work orders for a single requisition line. If there are no associated work orders for the requisition line, this button is hidden. |
|
|
Click the Selection check box next to the requisitions or work orders where you want to replace the services coordinator. |
|
Select/Deselect All |
Click this check box to automatically select or clear all the check boxes in the search results grid. |
|
Assign To |
Select to whom the requisitions or work orders should be reassigned. Values are:
|
|
Generate email notifications using batch process |
Select this option to run the email notifications as a batch process rather than including them as part of the online processing. The service coordinator or team receives an email that includes a link to the Coordinator Replacement Log for the transactions that have been reassigned. Note. A URL must be defined for the replacement email notification. Define this URL using the URL Maintenance page (PeopleTools, Utilities, Administration, URLs) for the SP_REPLACESC_EM and SP_REPLACETEAM_EM URL identifiers. |
|
Comments |
Enter any applicable freeform text related to the reassignment. |
|
Replace Service Coordinator |
Click this button to replace the service coordinator on all selected transactions. A confirmation page displays, and you must click the OK button to confirm the replacement process. In addition, upon clicking the OK button, email notifications will be generated either online or in batch if the Generate email notifications using batch process option has been selected. |
|
Coordinator Service Log |
Click this link to access the Coordinator Service Log to view transactions associated with the reassignment. |
Replacing VMS Service Coordinators
Access the Replace VMS Coordinator page.
This page behaves in a similar manner as the Replace Coordinator page which is used for non-VMS transactions. The VMS-related differences are described here.
Note. When replacing the VMS Service Coordinator on Work Orders, if the replacement process detects that the work order's supplier invoice approver is the same person as the VMS service coordinator that is being replaced, the system will also updates the supplier invoice approver with the replacement service coordinator.
|
VMS Supplier |
Select the VMS supplier for which transactions are to be reassigned. If there is only one VMS supplier, then it appears as a default value in this field. This is a required field. |
|
Replacement Method |
Select a value to indicate the method to use for replacement. Values are:
|
Requisition Details
This section displays requisition and work order details such as requisition ID, service type, service, vendor, provider contacts, work order type and status, start and end dates, and the service coordinator or service team defined for the VMS supplier.
If the search criteria was for Work Order Only, the name of this step box would be Services Work Orders.
|
Service Coordinator from VMS Definition |
This column displays the VMS service coordinator that is defined for this VMS supplier. |
|
Service Team from VMS Definition |
This column displays the VMS service team that is defined for this VMS supplier. |
Confirmation Message for VMS Coordinator Replacement
The following discusses the confirmation messages received when you click the Replace Service Coordinator button on the Replace VMS Coordinator page:
If the replacement method is Use Transaction's Current VMS Relationship Definition:
The system will reassign the service coordinator for the selected transactions, using the current effective-dated VMS service team/service coordinator established on the selected transactions' VMS relationship definition, as shown in the Service Team/Service Coordinator from VMS Definition columns of the Requisition (Work Order) transaction grid.
Please either confirm or cancel the reassignment. This operation may take several minutes to complete. Please be patient.
If the replacement method is Specify Replacement Coordinator/Team:
The confirmation message displays the quantity of requisitions or work orders selected, as well as the Service Coordinator or Team that will receive the reassignment of the selected transactions.
Viewing Service Coordinator Replacement Logs
Access the Coordinator Replacement Log page.
The service coordinator will receive an email which contains a link to the Coordinator Replacement Log page. The email includes a list of all requisitions and work orders that have been reassigned to the service coordinator.
Search Service Coordinator
|
From Service Coordinator |
Select the service coordinator that was replaced. |
|
To |
Select a value to indicate the role that was replaced: Values are Service Coordinator and Service Coordinator Team.Select the service coordinator or service coordinator team in the adjacent field that is available. |
|
Business Unit |
Select the specific business unit associated with the service coordinator. If you want to see all business units to which the service coordinator is associated, leave this field blank. |
|
Requisition ID |
(Optional) Select a specific requisition or leave this field blank if you'd like to retrieve all requisitions associated with the service coordinator. |
|
Work Order ID |
(Optional) Select a specific work order or leave this field blank if you'd like to retrieve all work orders associated with the service coordinator. |
|
Date From and Date To |
(Optional) Enter the beginning and ending dates to narrow the results that are retrieved. |
Service Coordinator Logs
|
Requisition ID and Work Order ID |
Click a link to access information related to the requisition or work order. |
|
Return to Replace Coordinator |
Click this link to access the Replace Coordinator page. Note. If you are reviewing VMS service coordinators, the link will read Return to Replace VMS Coordinator. |
Creating and Editing Service Administrators
To create and edit service administrators:
Access the Services User Setup page.
Select the Create a new Services User option from step #1, and then select the Service Administrator option from step #2.
Once you select the Create a new Services User and Service Administrator options, the system adds step #3 for you to enter a user ID for the new service administrator user.
Note. If you choose to edit an existing service user, the system adds step #3, where you must chose the user ID that you want to edit.
Click the Add button on the Services User Setup page to access the User Profile Information page, where you can enter passwords, general attributes, permission lists, and workflow attributes.
Once you finish entering information on the User Profile Information page, click the OK button to return to the Services User Setup page.
When you return to the Services User Setup page, the system adds more steps for you to edit and define security and user preferences for the service administrator.
Click the Finish button on the Services User Setup page once you complete the service administrator setup.
Creating and Editing Approvers
To create and edit approvers:
Access the Services User Setup page.
Select the Create a new Services User option from step #1, and then select the Approver option from step #2.
Once you select the Create a new Services User and Approver options, the system adds step #3 for you to enter a user ID for the new approver user.
Note. If you choose to edit an existing approver user, the system adds step #3, where you must choose the user ID that you want to edit.
Click the Add button on the Services User Setup page to access the User Profile Information page, where you can enter passwords, general attributes, permission lists, workflow attributes, and approver authorizations.
Once you finish entering information on the User Profile Information page, click the OK button to return to the Services User Setup page.
When you return to the Services User Setup page, the system adds more steps for you to edit and define security and user preferences for the service administrator.
Click the Finish button on the Services User Setup page once you complete the service administrator setup.
Creating Service Coordinator Teams
Access the Service Team page.
Use this page to select the services coordinators that belong to each team and specify their notification preferences.
The system stores the service team or service coordinator from the requisition on the work order. If the work order is not created from a requisition, and the user creating the work order is a requester, the system uses the default service coordinator team or default service coordinator from the requester defaults. If the work order is not created from a requisition, and the user creating the work order is a service coordinator that belongs to a team, you can select from all the service coordinator’s teams or you can assign it to an individual service coordinator. If the user doesn’t belong to any teams, the system makes the user the service coordinator on the work order.
|
Notify team members of other team member’s worklist items |
Select to notify all team members with a notification type of Email and Worklist or Worklist Only when any service coordinator on the team receives a worklist notification. The initial sourcing notification will be sent to all team members regardless of this setting |
Maintaining Workflow Setup
This section discusses how to set up workflow.
See Implementing PeopleSoft Services Procurement Workflow.
Maintaining Settlement SetupTo define Services Procurement business unit options, use the Services Procurement Options (BUS_UNIT_SPRO) component.
To define shifts, use the Shifts (SPB_SHIFT) component. To define shift and service combinations, use the Shift by Service (SPB_SHFT_BY_SRV) component. To define assignments, use the Assignments (SPB_ASSIGNMENT) component. To define assignment and service combinations, use the Assignment by Service (SPB_ASGN_BY_SRV) component. To define time category overrides, use the Review/Override Time Categories (SPA_TM_EDIT_TRC) component.
To define rules for reporting time, use the Time Reporting Rule (SPA_TRULE_DEFN) component. To set up the AP interface, use the AP interface (SPA_AP_INTRFACE) component. To set up payment types, use the Payment Types (SPA_EXPEND_MTHD) component. To set up expense types, use the Expense Types (SPA_EXPENSE_TYPE) component. To define your service time/progress template, use the Service Time/Progress Template (SPA_TIME_TMPL) component. To set up time reporting codes, use the Time Reporting Code (SPA_TRC_CODE) component.
To define business purposes, use the Business Purpose (EX_PURPOSE) component.
To set up preferred merchants, use the Preferred Merchant (EX_MERCHANT) component. Use the EX_MERCHANT_SETUP component interface to load data into the tables for this component.
To define expense locations, use the Expense Location (EX_LOCATION) component. Use the EX_LOCATION_SETUP component interface to load data into the tables for this component. To define expense payment type, use the Expense Payment Type (SPA_EXPEND_MTHD) component. To define expense types, use the Expense Type (SPA_EXPENSE_TYPE) component.
To define expense distance rates, use the Distance Rates (EX_AUTO_RT_TBL) component. Use the EX_AUTO_RATE_SETUP component interface to load data into the tables for this component.
This section discusses how to:
Maintain time reporting codes.
Create time reporting rules.
Maintain the service time/progress template.
Define expense distance rates.
Define expense types.
Defining additional expense types.
Define payment terms timing codes.
Define single payment terms.
View where payment terms are used.
Calculate example data for single payment terms.
Define multiple payment terms.
Calculate example data for multiple payment terms.
Define the accounts payable interface.
Common Elements Used in this Section
|
Return to Time and Expense Setup |
Click this link to return to the Time and Expense home page. |
Pages Used to Maintain Settlement Setup
|
Page Name |
Object Name |
Navigation |
Usage |
|
SPB_SHIFT |
Services Procurement, Define Services Procurement, Settlement Setup, Time and Expense Setup, Shifts |
Define shifts to be used on timesheets. Note. This page appears only if the Enable Shifts check box is selected on the Services Procurement Business Unit Definition page. |
|
|
SPB_ASSIGNMENT |
Services Procurement, Define Services Procurement, Settlement Setup, Time and Expense Setup, Assignments |
Define assignments to be used on timesheets. Note. This page appears only if the Enable Assignments check box is selected on the Services Procurement Business Unit Definition page. |
|
|
BUS_UNIT_TBL_SP |
|
Select the check boxes to enable the business units to use shifts, assignments, and time category overrides. |
|
|
SPB_SHFT_BY_SRV |
Services Procurement, Define Services Procurement, Settlement Setup, Time and Expense Setup, Shifts by Service |
View and modify valid shifts that are associated with a specific service. |
|
|
SPB_ASGN_BY_SRV |
Services Procurement, Define Services Procurement, Settlement Setup, Time and Expense Setup, Assignments by Service |
View or modify assignments that are associated with a specific service. |
|
|
QRY_QUERY |
Reporting Tools, Query, Query Manager |
Use this page to select the query name for which you want to run these PSQUERY reports:
|
|
|
SPA_TIME_TMPL_PG |
|
Create services templates. Enter or modify options used in a timesheet to enter time and expense information and progress information. |
|
|
SPA_TIME_TMPL_DIST |
Click the Select ChartField link on the Service Time/Progress Template page. |
Select the ChartFields to display on the Timesheet. The values from the selected ChartFields will be used to allocate time on Distribution lines. Note. This option is only available when you select Actual Allocation as your time reporting option. |
|
|
SPA_TRC_CODE |
|
Define time reporting codes. |
|
|
SPA_TRC_PAYTYPE |
Click the Pay Types link on the Services Time Reporting Codes page. |
Enter and view pay types that are associated with time reporting codes. Use this page to indicate the pay rate and mark up rates that are used on the work order. Note. This option is only available when pay types are used. |
|
|
SPA_TIMERPT_RUL |
|
Define rules for reporting time. |
|
|
EX_PURPOSE |
|
Use business purposes to justify a business expense as a corporate tax deduction. |
|
|
EX_AUTO_RT_TBL |
|
Define expense distance rates. |
|
|
SPA_EXPENSE_TYPES1 |
|
Define expense types. |
|
|
SPA_EXPENSE_TYPES3 |
Click the Expense Types2 tab from the Expense Types1 page. |
Define expense types. |
|
|
SPA_EXPEND_MTHD |
|
Create payment types that show (on an expense sheet) how an expense item was paid. |
|
|
EX_LOCATION |
|
Create an expense location that can be required on an expense sheet. When you define an expense type, you can require a service provider to enter the location for the transaction to ensure that the cost accurately reflects prevailing prices for that region. |
|
|
EX_MERCHANT |
|
Define a preferred merchant that you can include in an expense type. When you define an expense type, you can require a service provider to enter the preferred merchant for that transaction to ensure that the cost accurately reflects prevailing prices for that region. |
|
|
PYMT_TERMS_TIMING |
|
Define payment terms timing for each period that you reference in your payments. |
|
|
PYMT_TERMS_SINGLE |
|
Define valid payment terms for single payments. |
|
|
SNGL_TRMS_WHR_USED |
Click the Search Where Used link on the Payment Terms - Single Payments page. |
View where payment terms are used. |
|
|
SNG_TR_CLC_PAY_DTA |
Click the Calculate Example Payment Data link on the Payment Terms - Single Payments page. |
Calculate example data for single payment terms. |
|
|
PYMT_TERMS_MULTI |
|
Define valid payment terms for multiple payments. |
|
|
MLT_TR_CLC_PAY_DTA |
Click the Calculate Example Payment Data link on the Payment Terms - Multi Payment page. |
Calculate example data for multiple payment terms. |
|
|
SPA_AP_INTRFACE |
|
Define accounts payable application interface information. |
Maintaining Time Reporting Codes
Access the Services Time Reporting Codes page.
|
Multiplication Factor |
Define the multiplication factor for the TRC. The system uses the value that you enter when calculating time and expense amounts. Note. This factor is applied in addition to any applicable shift or assignment pay rate. In addition, for assignment pay, the assignment pay rate must be Based on Time. |
|
Pay Types |
Associate pay types with time reporting codes. Available only if pay types are enabled on the Services Procurement Installation Options page. |
Pay Types by TRC
To access the pay types by TRC, click the Pay Types link on the Services TRC component.
Use pay types by TRC to determine how you pay the supplier. For example, you can have an agreement that you pay all pay types (pay rate, fixed cost, third-party markup, vendor markup) for hours 0 - 8. After 8 hours you might only pay the pay rate and fixed cost but no markups. In this case, you would create two TRCs, one with all 4 pay types and one with only pay rate and fixed cost. You would then create a services time template with overtime enabled. On the overtime rules, you would use the two new TRCs that you created.
You can select up to 4 pay types on this page, but each pay type can only be defined once.
|
Pay Type |
Select the pay type you are to pay to the supplier |
|
Multiplication Factor |
Select the multiplication factor for the pay type. The value appears by default from the Services TRC multiplication factor, but you can override the value. |
Creating Time Reporting Rules
Access the Time Reporting Rule page.
Rule Details
|
Description |
Enter a long description to identify the time reporting rule. |
|
Default TRC (default time reporting code) |
Select a default TRC to use when the time reporting rule does not meet the rule criteria. |
Rule Sequence
|
Rule Sequence |
Enter a rule sequence number. This value is used to determine the order the system validates and applies the rule criteria to a timesheet. Since the rule sequence numbers are incremental, be sure to prioritize the rule in the order in which you want the system to evaluate and validate the TRC codes to use for time reporting. Note. Always identify the most important rules at the lowest rule sequence to ensure that the system picks up those rules first. If you define a priority rule at higher sequence number and the system validates another rule that qualifies at a lower sequence number, the system uses the lowest rule sequence to populate the timesheet. For example, if you create a rule with specific capture dates (as in the case of holidays), always be sure to define those dates first. The system starts at the most current rule sequence and works its way down the list. Also, if you want to be sure that there is always a valid rule in place, identify the “catch-all” rule as the last rule in the sequence. That way, you are always sure that there is a valid rule in the sequence. |
|
Rule Scope |
Select the time scope that this rule sequence covers. Values include Date, Day of the Week, and Time Period. |
|
Rule Type |
Select the type for this rule sequence. Values include Time Quantity and TRC List. |
Rules by Date
|
Date |
Enter the date for which this rule applies. |
|
Min Threshold (minimum threshold) |
Enter minimum quantity of hours for this rule. |
|
Max Threshold (maximum threshold) |
Enter the maximum quantity of hours fro this rule. |
|
TRC (time reporting code) |
Select a value to use with this time reporting rule. |
|
Override UOM (override unit of measure) |
Select an alternative UOM to use as an override on the work order. Use this UOM to calculate a different rate on the work order. |
|
Blackout |
Select to prevent time from being entered for the specified day. Note. This option is only available for the rule type of TRC List. |
Rules by Day of the Week
|
Day of Week |
Enter a day of the week to create a time reporting rule. Values include:
|
Rules by Time Period
|
Time Period |
Enter a time period to create a time reporting rule. Values include Bi-Monthly, Daily, Monthly, Semi-Monthly, and Weekly. |
Using Shifts on Timesheets
The following diagram illustrates the steps involved in defining shifts that can be used on timesheets:
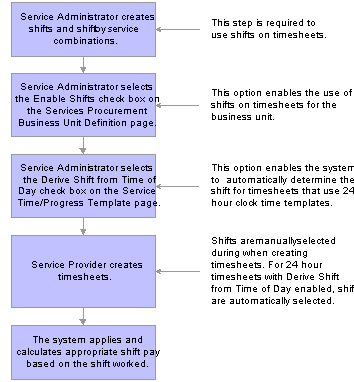
Shifts Definition
Defining Shifts for Use on Timesheets
Access the Shift page.
Note. These settings are defined at the setID level.
Note. The fields that appear on this page depend upon the value selected for the Shift Pay field.
Note. The Document Service and Service Type labels will differ if Enterprise Human Capital Management is installed.
|
SetID |
Select the SetID that will be able to use this shift. |
|
Shift ID |
Enter a name for the shift. |
|
Description |
Enter a description for the shift. This is a required field. |
|
Effective Date |
Enter the date that the shift will become effective. The current date is the default value. This is a required field. Add effective-dated rows for each Shift Pay type as required. |
|
Effective Status |
Select Active (default) or Inactive. This determines if this shift will be available for use on timesheets. Only shifts with a status of Active will be available for use. This is a required field. Note. If you change an Active shift to Inactive, the system will issue a warning message if there are any existing shift and service combinations for the effective dated shift. |
|
Shift Start Time and Shift End Time |
(Optional) Enter the start and end times for the shift. Shift pay is paid for work performed during this time period. You can leave this blank and the system will automatically select the shift based on the start and end times entered on the timesheet. Note. Start and stop times are for informational purposes only. If the 24-hour clock time template is used and the Derive Shift Based From Time of Day option is selected, then the system automatically populates the default time values in this fields. However, these start and stop times can still be modified at the template definition level. |
|
Shift Pay |
Select a value to indicate the basis for the shift pay calculation:
This is a required field. |
|
Shift Pay Rate Percentage |
Enter a negative or positive percent value for the shift pay rate. This is a required field and is used with the Percent of Work Order Rate value. |
|
Shift Pay Rate Amount |
Enter a negative or positive amount. If pay types are not selected, then this is a single rate. If pay types are selected, this rate must be broken out into the Pay Rate, Fixed Cost, Vendor Markup, and Third-Party Markup fields that appear. This is a required field and is used with the Add to Work Order Rate or Substitute Work Order Rate values. |
|
Shift Pay Rate Currency |
Enter the currency code for this shift pay rate. This field works with the Add to Work Order Rate or Substitute Work Order Rate values. |
|
Shift Pay Rate UOM (unit of measure) |
Enter the unit of measure for this shift pay rate. This field works with the Add to Work Order Rate or Substitute Work Order Rate values. |
Defining Shifts by Service
Access the Shifts by Service page.
Note. These settings are defined at the setID level.
This page identifies the shifts that are valid for a particular service. Only shifts associated to the service can be associated to time reported against a work order for that service. In addition, for 24-hour clock time entry, only shifts that are associated to the time template can be associated to the time reported.
Shift by Service Details
|
Project Role |
Select a value for this service (job) code. |
|
Shift ID |
Select the shift to be associated with this service. |
|
Effective Date |
Enter the effective date for this service. This is a required field. |
|
Detail Definition |
Select a method to use for defining details of the shift. Values are:
|
Description
|
Start of Shift and End of Shift |
(Optional) Enter the beginning and ending times for the shift. Note. Start and stop times are for informational purposes only. If the 24-hour clock time plate is used and the Derive Shift Based From Time of Day option is selected, then the system automatically places default time values on this fields. However, these start and stop times can still be modified at the template definition level. |
|
Shift Pay |
The default values come from the Shift definition page but you can modify it here. Values are:
|
|
Pay Rate |
This required field is available if you select Add to Work Order Rate or Substitute Work Order Rate.If you selected the Add to Work Order Rate, you must enter a positive or a negative amount in this field, If you selected the Substitute Work Order Rate value, you must enter a positive amount. If pay types are not selected, then this is a single rate. If pay types are selected, this rate must be broken out into the Pay Rate, Fixed Cost, Vendor Markup, and Third-Party Markup fields that appear. |
|
Shift Percent |
You must enter a positive or a negative percent in this field if you selected the Percent of Work Order Rate value. This is a required field. |
|
Currency |
You must enter a value in this field if you selected the Add to Work Order Rate or Substitute Work Order Rate option. |
|
UOM (unit of measure) |
This field is available if you select the Add to Work Order Rate or Substitute Work Order Rate value. This is a required field. |
|
Shift |
Click this link to access the Shift definition page for this specific shift. |
See Also
PeopleSoft Services Procurement Reports: General Description
Using Assignments on Timesheets
The following diagram illustrates the steps involved to define assignments that can be used on timesheets:
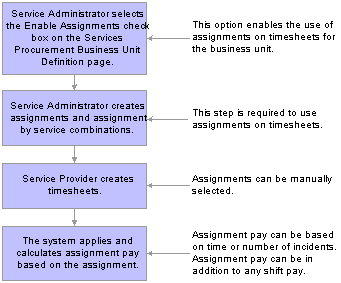
Assignments Definition
Defining Assignments for Use on Timesheets
Access the Assignment page.
Note. These settings are defined at the setID level.
Note. The fields that appear on this page depend upon the value selected for the Assignment Pay field.
|
SetID |
Select the SetID that will be able to use this assignment. |
|
Assignment ID |
Enter a name for the assignment. |
|
Description |
Enter a description for the assignment. |
Assignment Definition
|
Effective Date |
Enter the date that the assignment will become effective. The current date is the default value. This is a required field. Add effective-dated rows for each Assignment Pay type as required. |
|
Status |
Select Active (default) or Inactive. This determines if this assignment will be available for use on timesheets. Only assignments with a status of Active will be available to associate with services or on timesheets. This is a required field. Note. If you change an Active assignment to Inactive, the system will issue a warning message if there are any existing assignment and service combinations for the effective-dated assignment. |
|
Assignment Pay |
Select the value on which the assignment pay calculation should be based. Values are Based on Time or Based on Incident.
If you select Based on Time, select a value as the basis for time associated with the assignment:
|
|
Rate |
This display-only field shows the total of the Pay Rate, Fixed Cost, Vendor Markup, and 3rd Party Markup fields. |
|
Currency |
Enter the currency associated with the assignment pay rate. This field is available if you select the Add to Work Order Rate or Substitute Work Order Rate option. |
|
UOM (unit of measure) |
Enter the unit of measure associated with the assignment pay rate. This field is available if you select the Add to Work Order Rate or Substitute Work Order Rate option. |
If you select Based on Incident, you must break down the assignment pay amount into these fields.
Note. The total of these fields should add up to the total assignment pay amount.
Pay Rate
Fixed Cost
Vendor Markup
3rd Party Markup
|
Rate |
This display-only field shows the total of the Pay Rate, Fixed Cost, Vendor Markup, and 3rd Party Markup fields. |
|
Currency |
The value in this display-only field comes from the assignment currency. |
Defining Assignments by Service
Access the Assignments by Service page.
Note. These settings are defined at the setID level.
|
Assignment ID |
Enter a description for this assignment by service. |
|
Service |
Enter the service code. |
Assignment by Service
|
Effective Date |
Enter the effective date for this service. This is a required field. |
|
Detail Definition |
Select a method to use for defining details of the assignment by service combination. Values are:
|
Description
|
Assignment Pay |
Select the method on which to base the assignment pay. Values are:
|
|
Pay Rate |
This required field is available if you select Add to Work Order Rate or Substitute Work Order Rate. If you selected the Add to Work Order Rate, you must enter a positive or a negative amount in this field, If you selected Substitute Work Order Rate, you must enter a positive amount. If pay types are not selected, then this is a single rate. If pay types are selected, this rate must be broken out into the Pay Rate, Fixed Cost, Vendor Markup, and Third-Party Markup fields that appear. |
|
Percent |
You must enter a positive or a negative percent in this field if you selected the Percent of Work Order Rate value. This is a required field. |
|
Currency |
You must enter a value in this field if you selected the Add to Work Order Rate or Substitute Work Order Rate option. |
|
UOM (unit of measure) |
This field is available if you select the Add to Work Order Rate or Substitute Work Order Rate value. This is a required field. |
|
Assignment |
Click this link to access the Assignment definition page for this specific assignment. |
Enabling the Use of Shifts and Assignments
Access the Services Procurement Bus Def (business unit definition) page.
Time and Expense Settings
|
Enable Shifts |
Select this check box if you want to use shifts on timesheets. |
|
Enable Assignments |
Select this check box if you want to use assignments on timesheets. |
|
Enable Time Category Override |
Select this check box if you want to enable time category overrides. |
See Also
Defining Shifts for Use on Timesheets
Defining Assignments for Use on Timesheets
Editing Time Categories on Timesheets
Maintaining the Service Time/Progress Template
Access the Service Time/Progress Template page.
Time Reporting
|
Time Reporting Option |
Use this option to determine whether a resource based work order requires the service provider to report time against specific ChartFields, or whether the total time is entered and distribution percentages automatically split time or progress according to the ChartField distribution defined for the work order. Values are:
|
|
Time Reporting Period |
Select a period that indicates how often service providers enter their work hours. The default value is Weekly. Other values are Daily, Bi-Weekly, Semi-Monthly, and Monthly. Note. When you select a the monthly time reporting option, the Display Calendar field is editable. You must select a display calendar to chunk monthly reporting properly. |
|
Select ChartFields |
Select the ChartFields to display on the timesheet. The values from the selected ChartFields will be used to allocate time on distribution lines. Note. This option is only available when you select Actual Allocation as the time reporting option. |
|
Service Calendar |
Select a service calendar for the time reporting period. Use this calendar as a detail for how the organization reports time during the calendar year. Values are:
|
|
Display Calendar |
Select an appropriate calendar display option. Use this option to determine how the calendar is displayed for the time reporting period. For example, if you select Monthly as the time reporting option, you may want to display the calendar on a weekly basis. |
|
Allow for more than 24 hours |
Select if a service provider is enabled to enter more than 24 hours for a single project, work order, activity, and day. You can use this option for team reporting instead of individual reporting. Note. When you select this option, the Rounding, Default Start Time, Default Stop Time, Break Duration, Precision, and Break is Editable fields are available. |
|
Use 24-Hour Clock |
Select this option if you want time logged using the 24-hour clock. You will select this check box if you want to pay providers shift differential using shifts. |
|
Rounding |
Select whether you want to round up or down to the hour. Select None if you do not want to round the minutes. |
|
Precision |
Select the number of precise minutes for rounding. Values are Six, Twelve, Fifteen, Twenty, and Thirty. |
|
Default Start Time and Default Stop Time |
Enter the default start and stop times to appear by default on the timesheet. The user can override these values. |
|
Break Duration (Mins) (break duration - minutes) |
Enter the break duration in number of minutes. The break duration is subtracted from the total time difference between the start and end dates. For example, if you have a start time of 8:00 a.m. and end time of 5:00 p.m. with a 30-minute break duration, 8.5 hours are recorded for the day. |
|
Break is Editable |
Select to indicate that the break is not mandatory. |
|
Derive Shift From Time of Day |
Select this option if you want the system to automatically derive the shift depending upon the time of day. This option is used with 24-hour clocks only. |
|
Shifts |
This group box appears when you select Derive Shift From Time of Day. Use this group box to associate specific shifts with this time service template. Note. Start and stop times are for informational purposes only. If the 24-hour clock time plate is used and the Derive Shift Based From Time of Day option is selected, then the system automatically places default time values on this fields. However, these start and stop times can still be modified at the template definition level. |
|
Start of Shift and End of Shift |
These default values come from the Shift definition page, but you can override the values here. These are required fields. Note. Start and end times cannot fall within the ranges for another shift for the sample template. |
|
Time Reporting Rule ID |
Select a time reporting rule to use for calculating different payouts. Note. To use this feature, you must first define the time reporting rules on the Time Reporting Rules page. |
|
View Time Reporting Rules |
Click to view the time reporting rule associated with this service template. |
|
Overtime Permitted |
Select to indicate if a requisition allows overtime. This option controls which service time templates appears in the Time Template lookup prompt on work order. If Overtime Permitted option equals N, the work order prompt list only displays Service Time Templates that are defined with the overtime permitted option equal to N. If the Overtime Permitted option is equal to Y, the prompt list displays all service templates. Note. Setting this option is the responsibility of the administrator who defines time templates. It is also the responsibility of the Administrator to configure and define Time Reporting Rules that prevent overtime and associate the right Time Reporting Rule ID to the Time Template that does not permit overtime. |
|
Use Ratings |
Select if the performance of a service provider during the time period is to be rated. Note. This check box is only accessible if the Use Ratings check box on the Services Procurement Business Unit Definition page is selected. |
|
Use Comments |
Select to enable service providers and provider contacts to enter comments or concerns on the timesheet and progress log. |
Defining Expense Distance Rates
Access the Distance Rate page.
You can set up standard and varied distance rates in different base currencies with each combination tied to an expense type. When service providers use their automobiles for business purposes, you can reimburse them based on how far they must drive.
|
Distance Rate Type |
Select Standard Rate to indicate a uniform reimbursement rate regardless of transportation type. Select Varied Rate to indicate reimbursement rates that depend on the transportation type. |
|
Standard Distance Rate |
Enter the monetary amount that is to be reimbursed per unit driven, if you selected Standard Rate. |
Varied Distance Rates
|
Transportation Type and Distance Rate |
If you selected Varied Rate, enter a distance rate to define the monetary amount that is reimbursed for the transportation type per unit driven. |
|
Rate Adjustment Factor |
Enter an adjustment factor that the system applies for the transportation type. |
Defining Expense Types
Access the Expense Types1 page.
Required Fields
|
Description, Merchant, Preferred Merchant, and Location |
Select each option to appear as a required field on the expense sheet that a service provider completes for the expense type. To define an expense location amount for this expense type, select the Location check box to make it a required field on the expense sheet. |
Defining Additional Expense Types
Access the Expense Types2 page.
|
Per Diem Amount |
Enter the amount that is authorized for this expense type. In the column that appears to the right of this field, select the per diem's currency. |
|
Deduct For Breakfast, Deduct For Lunch, and Deduct For Dinner |
Enter deduction amounts. The currencies for these amounts appear by default from the currency that you selected for the per diem. |
|
Preferred Merchant |
You can add more rows to create a list of merchants that service providers must use. If the expense type appears in an expense sheet and the service provider did not use a preferred merchant, the line item requires an explanation. |
Defining Payment Terms TimingAccess the Payment Terms Timing Codes page.
Payment terms are stored in separate tables and form the basis of net due date, discount due date, and discount amount calculations. You define the payment terms and timing methods that the system uses for vendor payments. The system supports percentage and fixed amount discount calculations. PeopleSoft Payables uses these payment terms and timing methods to schedule payments for invoices and to calculate amounts remitted to vendors.
Defining Single Payment TermsAccess the Single Pay Terms page.
|
|
Click the Refresh Display button if you modified an existing term definition and want to display the original, saved terms definition. |
|
Search Where Used |
Click to access the Search Where Used page to view where this payment term ID is used. |
|
Calculate Example Payment Data |
Click to calculate example payment data for the payment terms ID, based on currency, gross amount, and basis date values provided as input variables. This enables you to perform a what if analysis regarding the effect of various parameter settings on the calculated result, before choosing to save a particular term's definition. |
Payment Terms Control
|
Terms Applicability |
Displays Vendor-Only Terms. |
|
Split Net Terms |
Select to enable a definition of payment terms that contain multiple net terms and any associated discounts. For example, select this option to use one timing ID if the basis date is between the 1st and 15th, and another timing ID if the basis date is between the 16th and end of the month. Split terms definitions enable you to set up variable net due date terms. There are terms that, depending on the basis date, result in more than one possible set of net or discount due dates. |
Net Due Terms
|
Basis From Day |
Enter the beginning day of the basis day range. The basis date's day value must be equal to or greater than this day or else the terms definition does not apply. This field is available for entry when the Split Net Terms check box is selected. |
|
Basis To Day |
Enter the ending day of the basis day range. The basis date's day value must be equal to or less than this day or else the terms definition does not apply. This field is available for entry when the Split Net Terms check box is selected. |
|
Timing ID |
Select to calculate the net payment due date for this day range within the single payment term. |
|
Discount Terms Available |
Select if the terms that you are defining include discount terms. |
Note. All available days, 1 to 31, must be accounted for in the basis from day and basis to day ranges.
Discount Terms
|
Timing ID |
Select to specify the discount portion of this single payment term. |
|
Adjustment Days |
Enter the number of days used to adjust the discount due date for this single payment term. Define flexible discount terms by entering either basis date relative or due date relative discount due dates. This is useful if the discount terms are often calculated as, for example, 2 percent for the first 10 days following the start-of-terms (basis) date, or 2 percent up to 10 days before the payment due date. |
|
Discount Terms Percent |
Enter the discount percent that is applied to the invoice gross amount to calculate the discount amount. |
|
Discount Terms Amount |
Enter the flat amount discount that is applied to the invoice regardless of the invoice amount. Note. This value is applied using the transaction currency units defined for the voucher. The particular currency to use is not defined here but is determined by context. |
Viewing Where Payment Terms Are UsedAccess the Search Where Used page.
|
Multi-Payment Terms ID |
Displays the multipayment terms ID that uses this single payment terms ID. |
|
Number of Terms |
Indicates the number of installments contained within the displayed multipayment terms ID that appears. |
|
Number of Occurrences |
Indicates the number of times that this payment terms ID is used within the multipayment terms. |
Calculating Example Data for Single Payment TermsAccess the Calculate Example Payment Data (single payment terms) page.
|
Gross Invoice Amount, Terms Basis Amount, and Use Basis Amount |
Enter a value to use as the terms basis amount for the example discount calculation. To use a different amount, select the Use Basis Amount check box, which enables the Terms Basis Amount field, and enter a different value. Note. The terms basis amount value must be less than the gross invoice amount value. |
|
Basis Date |
The system populates this field with the current date by default. |
|
Calculate Example Payment Data |
Click the Calculate Example Payment Data button to calculate the payment data based on the values entered on the page. |
Defining Multiple Payment TermsAccess the Multiple Pay Terms page.
Group single payment terms for payments split into multiple payments or installments.
Calculating Example Data for Multiple Payment TermsAccess the Calculate Example Payment Data (multiple payment terms) page.
Use this page in the same way that you use the Calculate Example Payment Data (single payment terms) page.
Defining the Accounts Payable InterfaceAccess the Accounts Payable Interface page.
|
Interface |
Select Other to indicate a third-party application. Select PeopleSoft AP to indicate that you use PeopleSoft Payables. |
|
File Format |
PeopleSoft Services Procurement uses comma-separated values as its only file format. If you select Other as the interface, the system exports invoice data to a flat file using this format, which you can use to export to your accounts payable system for invoice voucher generation. If you select PeopleSoft AP as the interface, this field is disabled, because it is not applicable. |