 Understanding Context Manager Pagelets
This chapter provides an overview of Context Manager pagelets and discusses how to:
Work with the Context Manager frame.
Work with the Related Contacts pagelet.
Work with the Related Discussion pagelet.
Work with the Related Information pagelet.
Work with the Related Resources pagelet.
Work with the Related Workspaces pagelet.
Work with the Content Ratings pagelet.
Understanding Context Manager Pagelets
Context Manager provides the user with immediate, relevant information for any business transaction without requiring a manual search. To the users, Context Manager appears as a frame on the right side of the page displaying pagelets that are loaded with appropriate information based on the target page or transaction. Therefore, Context Manager can be considered to be the framework within which features—such as, related information, related contacts, related resources, related discussions, related workspaces, related links, and content ratings—operate.
Note. Defined security rules are maintained such that items to which a user does not have access will not appear.
Context Manager is just one method that PeopleSoft Enterprise Portal delivers for providing contextually relevant information to your users. PeopleSoft Enterprise Portal also provides a general purpose solution that can be deployed to any of your PeopleSoft application pages. PeopleSoft Enterprise Portal related content services provide PeopleSoft Enterprise Portal features on PeopleSoft application pages.
See Understanding PeopleSoft Enterprise Portal-Delivered Related Content Services.
Once pagelets have been assigned to menu items, these pagelets can be used by:
Topic experts to manage content.
Users to view the added content.
 Managing Content in the Context Manager Pagelets
Context Manager pagelets provide features for topic experts to manage the content items displayed within each pagelet. Topic experts are responsible for adding, editing, expiring, or deleting content items for each combination of menu item and template pagelet publication.
The following example shows a page (the sample Context Manager Item page) with a number of Context Manager pagelets, including the Related Information pagelet. In this example, the topic expert has clicked the Add button in the Related Information pagelet, which opens the Related Information page in a separate window, allowing the expert to add a new content item.
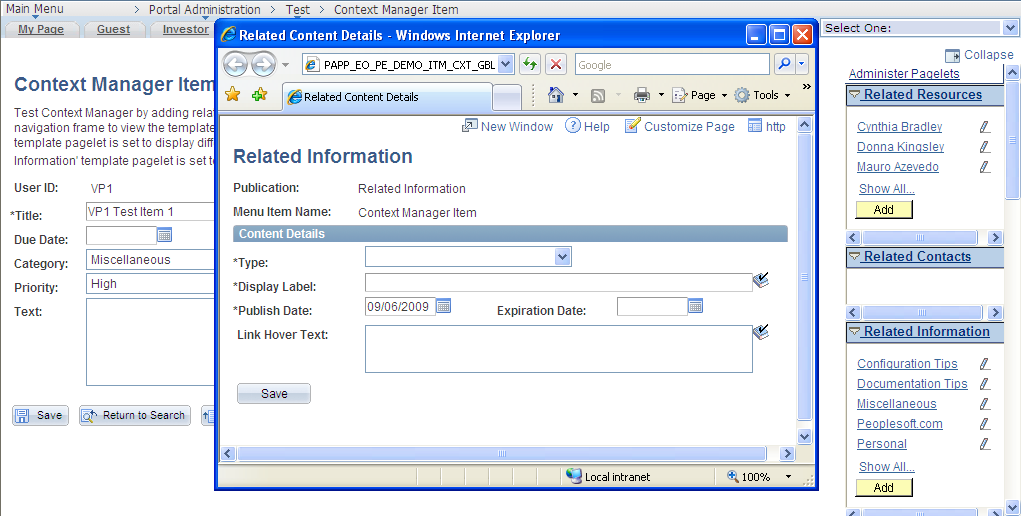
Topic expert adding content to the Related Information pagelet
Viewing Content in the Context Manager PageletsUnlike homepage pagelets, Context Manager pagelets display in the Context Manager frame on the right side of the page. The Context Manager frame displays when you accesses a transaction or page to which one or more of the pagelets has been assigned. The Context Manager pagelets are designed to provide convenient access to data that is contextually relevant to the transaction or page being displayed.
Working With the Context Manager Frame
Access a page that has the dynamic content template and pagelets assigned.
The following example displays the Context Manager frame showing the pagelets configured for this page:
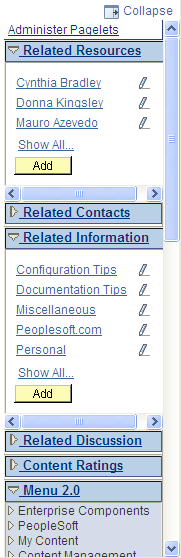
Context Manager frame
|
|
Click the Click to Expand Contextual Pagelets button to expand the Context Manager frame to display the configured pagelets. |
|
|
Click the Click to Collapse Contextual Pagelets button to collapse the Context Manager frame to hide the configured pagelets. |
|
Administer Pagelets |
Click the Administer Pagelets link to access the Assign Template Pagelets page to manage template pagelets assigned to this menu item. Note. The Administer Pagelets link displays for portal administrators with privileges to manage template pagelet assignments. |
|
|
Click the Maximize button or Minimize button to display or hide the contents of a specific pagelet. |
|
<link title> |
Click the title of a link to open that content item in a separate browser window. Note. A maximum of five links can appear on each pagelet. If more than five links are available, the pagelet displays the five most recently added links along with a Show All link. You can click this link to access a page listing all available links. Note. The system checks the publication and expiration dates and displays only currently active content. |
|
|
Click the Edit this link button to edit the attributes of this content item. Note. The Edit this link button displays for topic experts who have been assigned to manage content for this pagelet–menu item combination. |
|
Add |
Click the Add button to add a new content item to this pagelet. Note. The Add button displays for topic experts who have been assigned to manage content for this pagelet–menu item combination. |
Working With the Related Contacts
PageletThis section discusses how to:
Use the Related Contacts pagelet.
Contact a related contact.
View a list of related contacts.
Add or edit related contacts.
Pages Used to Work With the Related Contacts Pagelet|
Page Name |
Definition Name |
Navigation |
Usage |
|
Contact User |
EPPRC_SEND_EMAIL |
Click the name of a contact in the Related Contacts pagelet. |
Open a new browser window to send an email to a related contact. |
|
Related Contacts List |
EPPRC_EMAIL_EDIT |
Click the Show All… link in the Related Contacts pagelet. |
Open a new browser window to view the entire list of related contacts. Note. From this page, topic experts can also maintain related contacts. |
|
Related Contact |
EPPRC_EMAIL_DTL |
|
Open a new browser window to add a new related contact or edit an existing related contact. Note. Only topic experts can add or edit related contacts. |
Using the Related Contacts Pagelet
Access the Related Contacts pagelet in the Context Manager frame.
Use these elements in the Related Contacts pagelet:
|
<Contact description> |
Click a contact link to open a new browser window showing the Contact User page on which you can send an email to the selected contact. |
|
|
Click the Edit this link button to open a new browser window showing the Related Contact page on which you can update information for the contact. Note. The Edit this link button displays for topic experts only. |
|
Show All... |
Click the Show All... link to open a new browser window showing the Related Contacts List page on which you can view the complete list of contacts. |
|
Add |
Click the Add button to open a new browser window showing the Related Contact page on which you can add a new contact for the current menu item. Note. The Add button displays for topic experts only. |
Contacting a Related Contact
Access the Contact User page (click the name of a contact in the Related Contacts pagelet or click the Email button on the Related Contacts List page).
|
User ID and Description |
Displays the user ID and description of the selected contact. |
|
Email Subject |
Enter a subject for your email. Note. The topic expert can define a default email subject, which you can override, on the Related Contact page. |
|
Message Text |
Enter the email message. |
|
Send |
Click to send your email. A confirmation page appears to inform you that your email was transmitted. |
Viewing a List of Related Contacts
Access the Related Contacts List page (click the Show All… link in the Related Contacts pagelet).
Use the Related Contacts List page to send an email to any of the related contacts.
Note. From this page, topic experts can also maintain related contacts.
|
|
Click the Email button to access the Contact User page to send an email to that contact. |
|
Edit |
Click the Edit button to access the Related Contact page to edit the contact information for this related contact. Note. The Edit button appears only for topic experts assigned to this pagelet–menu item combination. |
|
Delete |
Click the Delete button to delete this related contact. Note. The Delete button appears only for topic experts assigned to this pagelet–menu item combination. |
|
Add |
Click the Add button to access the Related Contact page to add a new related contact. Note. The Add button appears only for topic experts assigned to this pagelet–menu item combination. |
|
Save |
Click the Save button to save your changes. Note. The Save button appears only for topic experts assigned to this pagelet–menu item combination. |
Adding or Editing Related Contacts
Access the Related Contact page (click the Edit this link button or the Add button in the Related Contacts pagelet).
|
Publication |
Displays the name of the template pagelet publication. |
|
Menu Item Name |
Displays the name of the current menu item. |
|
Contact |
Select the user ID of the related contact. |
|
Display Label |
Enter a description for the contact, which appears in the Related Contacts pagelet and on the Related Contacts List page. |
|
Publish Dt (publish date) |
Select the date on which the contact should be published and available for viewing in the pagelet for this menu item. |
|
Expiration Date |
Select the date on which you want this contact to become inactive for this menu item. Leave this field blank if there is no expiration date. Note. Enter a date in the past to immediately remove a related contact link from the pagelet. |
|
Link Hover Text |
Enter tool tip text that you want to display when the user's cursor hovers over the link for this related contact. |
|
Email Address |
Displays the contact's default email address from his or her system profile. |
|
Email Subject |
Enter a default subject to appear when a user sends an email to this contact. |
|
Email Address Override |
Select if you want to override the default email address for the contact. |
|
Override Email |
If you selected the Email Address Override, option, enter the overriding email address for this contact. |
Working With the Related Discussion PageletThis section provides an overview of forums started from the Related Discussion pagelet and discusses how to:
Use the Related Discussion pagelet.
Participate in and manage forums started from the Related Discussion pagelet.
Understanding Forums Started from the Related Discussion Pagelet
Discussions started from the Related Discussion pagelet are similar to stand alone discussions created in the portal. However, these discussions have several distinctions from stand alone discussions including:
You cannot define the name of the discussion. While the discussion for each menu item is distinct and separate, all such discussions have the same title, Menu Item Discussion Details, on the discussion forum's homepage.
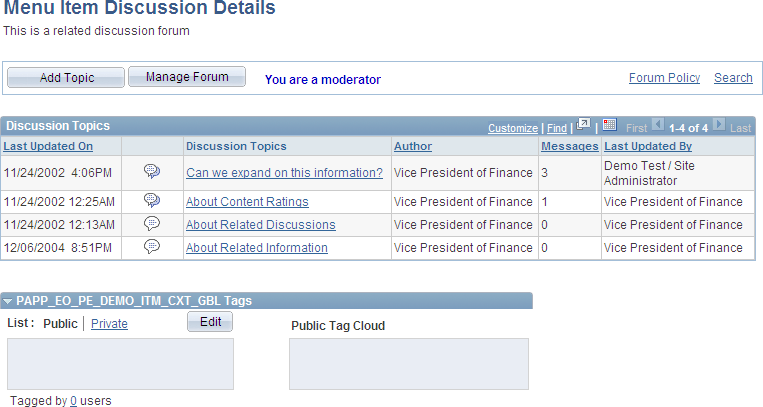
Discussion forum homepage (discussion started from the Related Discussion pagelet)
Note. The menu item ID appears as the title for the Tags expandable section.
The first user to access the transaction or page after the Related Discussion pagelet has been assigned to the menu item becomes the forum moderator by default. This user (or other users with portal administrator or discussion administrator privileges) is then responsible for managing the forum including maintaining forum participants.
Discussion topics and replies can be defined as key sensitive.
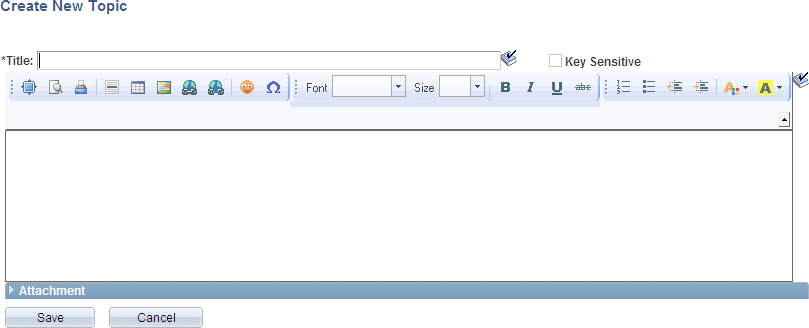
Create New Topic page with the Key Sensitive field
Select the Key Sensitive option to make this post key sensitive—that is, the post is available for the specific page key (or keys) only.
Note. To make a post available across all instances, clear this option.
Using the Related Discussion Pagelet
Access the Related Discussion pagelet in the Context Manager frame.
|
<Topic title> |
Click the link for a discussion topic to view the Post Details page. |
|
View / Add Topic |
Click the View / Add Topic link access discussion forum homepage. |
|
Manage |
Click the Manage link to open the Forum Privileges page in a new window. Note. The Manage link appears for the first user to access the page after the Related Discussion pagelet has been assigned. This user becomes the default forum moderator. The Manage link also appears for users who have discussion administrator privileges. |
Participating in and Managing Forums Started from the Related Discussion
Pagelet
Discussions started from the Related Discussion pagelet are similar to stand alone discussions created in the portal.
To participate in a discussion started from the Related Discussion pagelet, see the chapter on discussion forums in this PeopleBook.
See Participating in Discussion Forums.
To manage in a discussion forum started from the Related Discussion pagelet, see the chapter on discussion forums in this PeopleBook.
See Creating Discussion Forums.
Working With the Related Information PageletThis section discusses how to:
Use the Related Information pagelet.
View a related information item
View a list of related information items.
Add or edit related information.
Pages Used to Work With the Related Information Pagelet|
Page Name |
Definition Name |
Navigation |
Usage |
|
Related Information - <Content Title> |
EPPCM_PUB_VIEWHTML EPPCM_PUB_VIEWFILE |
Click the link for a related information item in the Related Information pagelet. |
Open a new browser window to view the selected related information item. |
|
Related Information List |
EPPRC_CONT_EDIT |
Click the Show All... link in the Related Information pagelet. |
Open a new browser window to view the entire list of related information items. Note. From this page, topic experts can also maintain related information items. |
|
Related Information |
EPPRC_CONT_DTL |
|
Open a new browser window to add a new related information item or edit an existing related information item. Note. Only topic experts can add or edit related information items. |
Using the Related Information Pagelet
Access the Related Information pagelet in the Context Manager frame.
Use these elements in the Related Information pagelet:
|
<Content description> |
Click a content link to open a new browser window displaying the related information item. The links listed in the Related Information pagelet can connect to any of the following:
|
|
|
Click the Edit this link button to open a new browser window showing the Related Information page on which you can update information for the related information item. Note. The Edit this link button displays for topic experts only. |
|
Show All... |
Click the Show All... link to open a new browser window showing the Related Information List page on which you can view the complete list of items. |
|
Add |
Click the Add button to open a new browser window showing the Related Information page on which you can add a new related information item for the current menu item. Note. The Add button displays for topic experts only. |
Viewing a Related Information Item
Access the item of related information (click the link for an item in the Related Information pagelet or click the link for an item on the Related Information List page).
Depending on the type of related information, a new browser window is opened displaying the following:
The web site when the information type is External Website.
The file attachment when the information type is File Attachment.
The Related Information - <Content Title> page when the information type is Managed Content.
Note. A second browser window is opened displaying the content itself if it is a managed content attachment.
The PeopleSoft transaction page when the information type is Menu Item.
Viewing a List of Related Information Items
Access the Related Information List page (click the Show All... link in the Related Information pagelet).
|
Related Content |
Click a link to open a new browser window displaying the content item or the Related Information - <Content Title> page for an item of managed content. |
|
Edit |
Click the Edit button to access the Related Information page to edit the information for this related information item. Note. The Edit button appears only for topic experts assigned to this pagelet–menu item combination. |
|
Delete |
Click the Delete button to delete this related information item. Note. The Delete button appears only for topic experts assigned to this pagelet–menu item combination. |
|
Add |
Click the Add button to access the Related Information page to add a new related information item. Note. The Add button appears only for topic experts assigned to this pagelet–menu item combination. |
|
Save |
Click the Save button to save your changes. Note. The Save button appears only for topic experts assigned to this pagelet–menu item combination. |
Adding or Editing Related Information
Access the Related Information page (click the Edit this link button or the Add button on the Related Information pagelet).
|
Publication |
Displays the name of the template pagelet publication. |
|
Menu Item Name |
Displays the name of the menu item for this pagelet–menu item combination. |
|
Content Type |
If the administrator specified All Types on the Related Information Publication page, use the drop-down list to select a type for this related information item:
Important! If the portal administrator specified a content type for the publication on the Related Information Publication page, then that value is displayed in this field and should not be changed. Note. After you select a type, the page presents only the fields necessary to further define the selected related information type. |
|
Display Label |
Enter a value in this required field before attempting to select or define an item. |
|
URL |
If the type is set to External Website, enter the URL for the website. |
|
File Name |
If the type is set to File Attachment, click the Add Attachment button to upload the file. Once uploaded, the name of the file appears as a link. Click the link to display the contents of the file in a new browser window. Click the Delete Attachment button to remove an uploaded file. |
|
Content Title |
If the type is set to Managed Content, click the Select Content button to select the item of managed content. Once selected, the content title appears as a link. Click the link to display the item in a new browser window. Click the Re-Select Content button to select a different item of managed content. |
|
Menu Item Name |
If the type is set to Menu Item, select the menu item. |
|
Publish Dt (publish date) |
Select the date on which the information should be published and available for viewing in the pagelet for this menu item. |
|
Expiration Date |
Select the date on which you want this related information link to become inactive for this menu item. Leave this field blank if there is no expiration date. Note. Enter a date in the past to immediately remove a related information link from the pagelet. |
|
Link Hover Text |
Enter tool tip text that you want to display when the user's cursor hovers over the link for this related information item. |
Working With the Related Resources PageletThis section discusses how to:
Use the Related Resources pagelet.
View a related resource profile
View a list of related resources.
Add or edit related resources.
Search for a related resource.
Note. You must set up Resource Finder and its search indices before you can use Related Resources pagelet. In addition, the Resource Finder installationoption must be enabled.
See Also
Enterprise Portal Resource Finder Overview
Performing Resource Finder Searches
Pages Used to Work With the Related Resources Pagelet|
Page Name |
Definition Name |
Navigation |
Usage |
|
Resource Finder profile |
EPX_PRF_MAIN |
Click the link for a related resource in the Related Resources pagelet. |
Open a new browser window to view the Resource Finder profile for the selected resource. |
|
Related Resources List |
EPX_DIRCNTC_EDIT |
Click the Show All... link in the Related Resources pagelet. |
Open a new browser window to view the entire list of related resources. Note. From this page, topic experts can also maintain related resources. |
|
Related Resources |
EPX_DIRCNTC_DTL |
|
Open a new browser window to add a new related resource or edit an existing related resource. Note. Only topic experts can add or edit related resources. |
|
Related Resources - Advanced Search |
EPX_DIRCNTC_SRCH |
Click the Search button on the Related Resources page. |
Search for and select a Resource Finder resource as a related resource. |
Using the Related Resources Pagelet
Access the Related Resources pagelet in the Context Manager frame.
The Related Resources pagelet derives its resources from the Resource Finder feature. Resource Finder is a highly flexible repository that can receive data loads containing information about any entity, along with links that relate these entities to each other. These entities are typically things like customers, suppliers, employees, departments, locations, companies, and business units.
Use these elements in the Related Resources pagelet:
|
<Resource Name> |
Click a resource name to open a new browser window displaying the Resource Finder profile for that resource. |
|
|
Click the Edit this link button to open a new browser window showing the Related Resources page on which you can update information for the related resource. Note. The Edit this link button displays for topic experts only. |
|
Show All... |
Click the Show All... link to open a new browser window showing the Related Resources List page on which you can view the complete list of resources. |
|
Add |
Click the Add button to open a new browser window showing the Related Resources page on which you can add a new related resource for the current menu item. Note. The Add button displays for topic experts only. |
Viewing a Related Resource Profile
Access the Resource Finder profile page (click the link for an item in the Related Resources pagelet or click the link for an item on the Related Resources List page).
A Resource Finder profile displays contact information about a resource along with relationships amongst the resource and other resources in the system. Resource Finder and Resource Finder profiles are discussed in the Resource Finder PeopleBook.
See Using Participant Profiles and Organization Charts.
Viewing a List of Related Resources
Access the Related Resources List page (click the Show All... link in the Related Resources pagelet).
|
Related Resources |
Click a link to open a new browser window displaying the Resource Finder profile for the related resource. |
|
Edit |
Click the Edit button to access the Related Resources page to edit the information for this related resource. Note. The Edit button appears only for topic experts assigned to this pagelet–menu item combination. |
|
Delete |
Click the Delete button to delete this related resource. Note. The Delete button appears only for topic experts assigned to this pagelet–menu item combination. |
|
Add |
Click the Add button to access the Related Resources page to add a new related resource. Note. The Add button appears only for topic experts assigned to this pagelet–menu item combination. |
|
Save |
Click the Save button to save your changes. Note. The Save button appears only for topic experts assigned to this pagelet–menu item combination. |
Adding or Editing Related Resources
Access the Related Resources page (click the Edit this link button or the Add button in the Related Resources pagelet).
|
Publication |
Displays the name of the template pagelet publication. |
|
Menu Item Name |
Displays the name of the menu item for this pagelet–menu item combination. |
|
Display Label |
Enter the link name that is displayed in the Related Resources pagelet for this resource. Note. The default is the name of the resource, which is populated after a resource is selected. |
|
Text to Search For |
Enter search criteria to select a resource from Resource Finder. |
|
Search |
Click the Search button to access the Related Resources - Advanced Search page. |
|
Contact Description |
Displays the name of the selected resource. |
|
Publish Dt (publish date) |
Select the date on which the resource should be published and available for viewing on the pagelet for this menu item. |
|
Expiration Date |
Select the date on which you want this resource to become inactive for this menu item. Leave this field blank if there is no expiration date. Note. Enter a date in the past to immediately remove a related resource link from the pagelet. |
Searching for a Related Resource
Access the Related Resources - Advanced Search page (enter search criteria and click the Search button on the Related Resources page).
|
Find |
Select the resource type: Customer Contact, Employee, and Product Expert. Note. The resource type determines the available search fields. |
|
Name |
Enter text to search for in the the resource's name. |
|
Contains Words |
Enter any text (word, phrase, or word fragment) to search for in all fields of the resource's profile. |
|
Look Up |
Click the Look Up button to execute the search. |
|
Name |
Click a Name link in the search results to select that profile as the related resource. |
Working With the Related Workspaces PageletThis section discusses how to use the Related Workspaces pagelet.
Pages Used to Work With the Related Workspaces Pagelet|
Page Name |
Definition Name |
Navigation |
Usage |
|
Select A Workspace Template |
EPPCW_WIZ_TMPL |
Click the Create Workspace link in the My Workspaces pagelet. |
Select the template on which you want to base the new workspace. |
|
Workspaces - Search |
EPPCW_MYWS |
Click the View All Workspaces link in the My Workspaces pagelet. |
Specify criteria to search for workspaces of which you are already a member. |
Using the Related Workspaces Pagelet
Access the Related Workspaces pagelet in the Context Manager frame.
|
View All Workspaces |
Click to access the Browse Workspaces search page. |
|
Create Workspace |
Click to display step 1 of the workspace creation wizard. Note. When you access this wizard through the Related Workspaces pagelet from the transaction for which you are building this workspace and the transaction has been associated with a workspace template, that recommended template is selected by default, but can be overridden. |
Working With the Content Ratings PageletThis section discusses how to:
Use the Content Ratings pagelet.
Participate in content ratings surveys.
Page Used with the Content Ratings Pagelet|
Page Name |
Definition Name |
Navigation |
Usage |
|
Content ratings survey |
EO_PE_SR_SURVEY |
|
Participate in a content ratings survey associated with the current menu item. |
Using the Content Ratings Pagelet
Access the Content Ratings pagelet in the Context Manager frame.
Click a link to access a survey that has been assigned to the menu item.
See Also
Managing Content Ratings and iTracker
Participating in Content Ratings Surveys
Access a content ratings survey page (click the link for a survey in the Content Ratings pagelet).
Note. The actual page name and question depend on the survey.
Each content ratings survey consists of a single question. The question can be in the form of multiple choice, ranking list, or a yes/no question.
|
Comments |
Enter free-form text in this field to add any comments that you have regarding the survey. |
|
Submit |
Click to submit your response. A confirmation page is displayed. Note. From the confirmation page, click theView Results button to view the current results of the survey. |
Working With the Menu 2.0 Pagelet
The Menu 2.0 pagelet replicates the menu items of the drop-down Main Menu and the Enterprise Menu pagelet. The Menu 2.0 pagelet provides you with access to all of your menu items in the Context Manager frame.
Note. The current menu item is highlighted in the Menu 2.0 pagelet.