16 Processing Accounts Receivable Drafts
This chapter contains the following topics:
-
Section 16.2, "Understanding the Types of Accounts Receivable Drafts"
-
Section 16.3, "Understanding the Steps for Processing Accounts Receivable Drafts"
-
Section 16.4, "Understanding Draft Processing and the General Ledger"
-
Section 16.7, "Approving and Posting Accounts Receivable Drafts"
-
Section 16.10, "Designating a Draft as Insufficient Funds (NSF)"
Note:
Country-specific functionality for processing accounts receivable drafts exists for Spain.See Also:
16.1 Understanding Accounts Receivable Drafts
Drafts are payment instruments that enable direct communication between the bank of the payor and the bank of the payee. In most countries, a draft is a promise to pay a debt. The use of a draft for payment of obligations affects the legal nature of the underlying liabilities. Therefore, you must classify, track, and report drafts separately from other types of payments and obligations. Many areas of the world use draft processing, although the payment instrument might be referred to as something other than a draft. For example, in Asia Pacific, the draft process is commonly used for post-dated checks. In the United States, it is used for credit card payments.
You, as the supplier, or the customer can originate a draft. Regardless of who originates it, you must enter the draft into the system (a process which is also known as draft acceptance), remit it for collection, and then record the collection. Drafts can also be discounted and might have a contingent liability.
See Also:
16.2 Understanding the Types of Accounts Receivable Drafts
Each type of draft corresponds to a particular payment instrument. The different types of draft are divided into two categories, as follows:
16.2.1 Manual Drafts
Manual drafts are also called customer acceptance drafts because a customer must accept them before they can be remitted to the bank. These types of manual drafts are available:
-
The supplier prints the draft with bank account information.
-
The supplier prints the draft with the bank name only.
-
The customer prints the draft with bank account information.
-
The customer prints the draft with the bank name only.
The system can distinguish drafts with only a bank name from those with complete bank account information. This is helpful because banks generally assess an additional fee to collect drafts if you do not provide account information.
16.2.2 Automatic Drafts
Automatic drafts are also called pre-authorized drafts because they do not require customer acceptance. You and the customer agree in advance that the customer will pay with a draft.
16.3 Understanding the Steps for Processing Accounts Receivable Drafts
A draft is a payment that passes through various steps of processing. During each step, the system creates either electronic or paper records and accounting entries.
16.3.1 Draft Origination
The draft process begins when either you or the customer originates (prints) a draft. The draft shows the amount to be paid, the due date, banking information and, possibly, information about the underlying liabilities (invoices).
You can generate a draft by printing an invoice with a draft, or a statement with a draft. Some customers expect one draft per invoice. Other customers expect one draft for a statement of invoices. You can either send invoices with drafts attached or send statements with drafts attached.
The draft origination step updates the customer ledger with the draft number (statement number), but has no effect on the general ledger.
This table shows the result of draft origination. In this case, the result is the invoice record as it appears in the Customer Ledger table (F03B11) after a statement has been generated. If the customer generates the draft, you bypass this step.
| Customer Number | Document Type | Document Number | Document Amount | Statement Number |
|---|---|---|---|---|
| 7001 | RI | 1234 | 10,000 | 10005 |
16.3.2 Draft Acceptance
You enter a draft after the customer accepts it. The draft has no legal force until the customer accepts it. When a draft is accepted, the status of the invoice changes. In some countries this has legal ramifications.
For manual drafts, the customer can accept the draft using any of these methods:
-
Signing the draft that you originated and returning it to you.
-
Changing the draft that you originated (date, amount, bank, and so on), and then signing it and returning it to you.
-
Originating, signing, and sending the customer's own draft to you.
For automatic drafts, the draft is accepted by prior agreement, so each draft does not require customer acceptance.
Draft acceptance also includes entering the draft into the system. If you process drafts manually, you enter the draft to create the appropriate records. If you process drafts automatically, the system creates the appropriate draft records for you.
Regardless of whether you enter the draft manually or create the draft automatically, the system performs these steps:
-
Creates a record in the Receipts Header (F03B13) and Receipts Detail (F03B14) tables.
-
Marks the invoice as paid by changing its pay status to P.
-
Creates an invoice record (document type R1) in the F03B11 table.
This table shows the result of draft acceptance in the F03B11 table:
| Customer Number | Document Type | Document Number | Document Amount | Pay Status | Pay Instr |
|---|---|---|---|---|---|
| 7001 | RI | 1234 | 10,000 | P | 2 |
| 7001 | R1 | 10005 | 10,000 | D | 2 |
After you enter the draft, you must post it to the general ledger. When you post the draft, the system creates a journal entry to debit drafts receivable and credit an A/R trade account.
16.3.3 Draft Remittance (Optional)
Draft remittance consists of these steps:
-
You remit (deposit) the draft to the bank so that it can collect the funds from the customer's bank. You can remit the draft either electronically or on paper in the form of a bank register. When you remit the draft for payment, the system updates the pay status of the R1 draft invoice record to G.
This table shows the result of draft remittance on the draft invoice record in the F03B11 table:
Customer Number Document Type Document Number Document Amount Pay Status Pay Instr 7001 R1 10005 10,000 G 2 -
The system creates these journal entries, which you must post:
-
The system debits the drafts remitted account and credits the drafts receivable account.
-
If the draft is remitted with a discount, the system debits the drafts remitted with discount account and credits the drafts receivable account.
-
If the draft is remitted with contingent liability, the system debits the drafts remitted with discount account and credits the drafts receivable account. The system also debits the bank account and credits the contingent liability account.
-
-
You arrange to collect funds from the draft in one of these ways:
-
Wait until the funds become available on the due date specified by the draft.
-
Request an advance from the bank before the due date of the draft. Typically, banks charge a fee when they advance funds for a draft before its due date.
Note:
Draft remittance is optional in certain countries.
-
16.3.4 Draft Collection
Draft collection consists of these steps:
-
Your bank collects the funds for the draft from the customer's bank on the due date of the draft, or the bank informs you that it cannot collect the funds.
-
On or after the due date, both you and the customer recognize the transfer of cash. When you run the program that processes draft collection, the system updates the pay status of the draft invoice record to show that it has been collected.
This table shows the result of the collection process on the draft invoice record in the F03B11 table:
Customer Number Doc Type Document Number Document Amount Pay Status Pay Instr 7001 R1 10005 10,000 P 2 -
The system creates these journal entries, which you must post:
-
The system creates a journal entry to debit the bank account and credit drafts remitted.
-
If the draft is remitted with a discount, the system debits the bank account and credits the drafts remitted with discount account.
-
If the draft is remitted with contingent liability, the system debits the contingent liability account and credits the drafts remitted with discount account.
-
16.4 Understanding Draft Processing and the General Ledger
This graphic illustrates the effect of each stage of the draft process on the general ledger:
Figure 16-1 Draft processing effect on the General Ledger
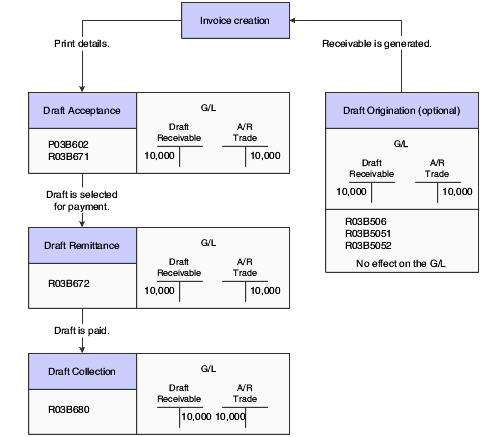
Description of ''Figure 16-1 Draft processing effect on the General Ledger''
16.5 Originating Drafts
This section provides an overview of invoices with draft attachments, statements with draft attachments, and draft statements by due date, lists prerequisites and discusses how to:
-
Print invoices with draft attachments.
-
Set data selection and data sequencing for Invoice Print with Draft (R03B5051).
-
Set processing options for Invoice Print with Draft (R03B5051).
-
Print statements with draft attachments.
-
Set data selection and data sequencing for Statement Notification Refresh (R03B500X).
-
Set processing options for Statement Notification Refresh (R03B500X).
-
Set processing options for Statement Print with Draft (R03B506).
-
Print draft statements by due date.
Note:
The default draft format conforms to the French Bank Association format. Users in other countries might need to modify the format for their specifications.16.5.1 Understanding Invoices with Draft Attachments
To print an invoice or credit memo with an attached draft, use the Invoice Print with Draft program (R03B5051). You can select different versions of this report to print delinquency fees or chargebacks only.
When you print invoices with draft attachments, the system assigns a draft number to the invoice and uses it to update the Statement Number field (CTL) on the invoice record. The system also prints the customer's bank account number and the draft number on the draft attachment.
This program prints and updates records in the F03B11 table.
16.5.2 Understanding Statements with Draft Attachments
To print a statement with one or more invoices combined into one draft, use a version of the Statement Notification Refresh program (R03B500X) that is set up for draft processing.
When you print invoices with draft attachments, the system assigns a draft number to the statement and uses it to update the Statement Number field (CTL) on the invoice record. The system also prints the customer's bank account number and the draft number on the draft attachment.
This program prints and updates records in the F03B11 table.
16.5.3 Understanding Draft Statements by Due Date
To print a statement with one or more invoices combined into one draft, use a version of the Statement Notification Refresh program that is set up for draft processing. When you print statements with draft attachments, the system assigns a draft number to the statement and uses it to update the Statement Number field (CTL) on the invoice record.
Processing options enable you to select invoices by due date to print on the statement; the system generates a new statement for each group of invoices by invoice due date and currency code. The system prints the customer's bank account number and the draft number on the draft statement and the draft bank code, if desired.
The system updates records in the F03B11 table.
16.5.4 Prerequisites
Before you complete the tasks in this section:
-
To print invoices with draft attachments, review the Invoices tab on the Customer Master Revision form and verify that the Send Invoice to field (SITO) has the correct value for printing the billing name and address on invoices with draft attachments
-
To print statements with draft attachments, complete these tasks:
-
On the Collection tab on the Customer Master Revision form, select the Print Statement option for each customer for whom you print statements with draft attachments
-
In the processing options for the Statement Notification Refresh program (R03B500X), enable the Draft Flag processing option and specify the Statement Print with a Draft program (R03B506) in the Print Program processing option.
-
16.5.5 Printing Invoices with Draft Attachments
From the Draft Daily Operations menu (G03B161), select Invoice Print with Draft.
16.5.6 Setting Data Selection and Data Sequencing for Invoice Print with Draft (R03B5051)
If you assign payment instruments to customer records, you can use data selection to select only those invoice records with a specific payment instrument. For example, you can set Payment Instrument EQ (equal) to D (draft by invoice) so that the program selects only invoices for customers who typically pay by a draft.
This data sequence is required:
-
Company
-
Address Number
-
Document (Voucher, Invoice, and so on)
-
Document Type
-
Document Company
-
Document Pay Item
If you change this sequence, the totals will be inaccurate.
16.5.7 Setting Processing Options for Invoice Print with Draft (R03B5051)
Processing options enable you to specify the default processing for programs and reports.
16.5.7.1 Print
Use these processing options to specify which dates to use and whether to include tax amounts on the printed invoice.
- 1. Invoice Print Date
-
Specify the date to print on the invoice. If you leave this processing option blank, the system date is used.
- 2. Print Tax Amounts
-
Specify whether to print tax amounts on the invoices. Values are:
Blank: Do not print tax amounts.
1: Print tax amounts.
16.5.7.2 Currency
This processing option specifies whether to print currency information on the invoice.
- 1. Print Currency
-
Specify whether to print the domestic or foreign currency amount on the invoice. Values are:
Blank: Print the domestic amount without the currency code.
1: Print the foreign amount with the currency code.
16.5.7.3 Attachments
This processing option specifies whether to print associated generic text on the invoice.
- 1. Print Attachments
-
Specify whether to print generic text (attachments) from the invoice record on the invoice. Values are:
Blank: Do not print generic text.
1: Print associated generic text.
16.5.7.4 Draft - City
This processing option specifies the city of origin of the invoice.
- 1. Enter city of origin to print on draft
-
Specify the city of origin to print on the draft. If you leave this processing option blank, the system does not print a city of origin on the draft.
16.5.8 Printing Statements with Draft Attachments
From the Draft Daily Operations menu (G03B161), select Statement Print with Draft.
16.5.9 Setting Data Selection and Data Sequencing for Statement Notification Refresh (R03B500X)
If you assign payment instruments to customer records, you can use data selection to select only those invoice records with a specific payment instrument. For example, you can set Payment Instrument EQ (equal) to F (draft by statement) so that the program selects only invoices for customers who typically pay by a draft.
This data sequence is required in the order listed:
-
Address Number - Alternate Payee
-
Company
-
Currency Code - From
-
Address Number
-
Document (Voucher, Invoice, and so on)
-
Document Type
-
Document Company
-
Pay Item
If you change this sequence, the totals on the statement will not be accurate.
16.5.10 Setting Processing Options for Statement Notification Refresh (R03B500X)
Processing options enable you to specify the default processing for programs and reports.
16.5.10.1 Consolidation
This processing option specifies whether one statement that includes records for all companies is generated for the customer or a separate statement for the customer is generated for each company.
- 1. Company
-
Enter the company to use to locate the remit to address. The system generates one statement for each customer for the company that you specify, regardless of whether the company is specified on the invoice. If you select to retrieve aging specifications from the company constants, the system uses the company number that you specify to locate the remit to address, based on the value in the Remit To processing option, and the aging specifications.
If you leave this processing option blank, the system produces one statement for each customer by company. For example, if you enter invoices for the customer for companies 00001, 00020, and 00050, the system produces three statements, one for each company.
16.5.10.2 Aging
These processing options are used to specify the aging criteria for statements.
- 1. Company Constants
-
Specify whether to retrieve the aging specifications and statement date from the Accounts Receivable constants. If you leave this field blank, the system uses the processing options for aging specifications (Statement Date, Date Types, and Aging Categories). Values are:
Blank: Use processing options 2 through 10.
1: Use the Accounts Receivable constants.
- 2. Statement Date
-
Specify the date to use to determine the aging category to which the system assigns open invoices. The system compares the date that you enter with the date on the invoice, as specified by the Date Types processing option, to determine the number of days that the invoice is past due. The system uses this date to print the statement date on the statement.
If you leave this processing option blank, the system uses today's date to age open invoices.
- 3. Date Type
-
Specify the date on the invoice to use to determine the aging category. The system compares the date that you specify to the value in the Statement Date processing option to determine the number of days the invoice is past due. Values are:
D: Use the invoice due date.
I: Use the invoice date.
G: Use the G/L date.
S: Use the statement date.
- 4. Aging Categories
-
Specify which aging categories the system uses to assign invoices. The system uses the date specified in the Statement Date processing option and the value specified in the Date Type processing option to calculate the aging for each invoice, and then assigns them to the aging category specified by this code. Values are:
1: Aging days. The system assigns invoices to the aging categories specified in the Aging Category 1 through Aging Category 6 processing options. The aging categories are user defined.
2:Fiscal periods. The system uses the fiscal periods defined by the date pattern assigned to the company record as the aging categories.
3:Calendar. The system uses each calendar month as an aging category.
If you leave this processing option blank, the system uses the default value 1 (aging days).
- 5. Aging Category 1
-
Use this processing option and the value in the Aging Category 2 processing option to specify the interval that the system uses for the future and current aging categories that print on the statement.
- 6. Aging Category 2
-
Use this processing option and the values in the Aging Category 1 and Aging Category 3 processing options to determine the interval that the system uses for the current and first aging categories that print on the statement.
- 7. Aging Category 3
-
Use this processing option and the values in the Aging Category 2 and Aging Category 4 processing options to determine the interval that the system uses for the first and second aging categories that print on the statement.
- 8. Aging Category 4
-
Use this processing option and the values in the Aging Category 3 and Aging Category 5 processing options to determine the interval that the system uses for the second and third aging categories that print on the statement.
- 9. Aging Category 5
-
Use this processing option and the values in the Aging Category 4 and Aging Category 6 processing options to determine the interval that the system uses for the third and fourth aging categories that print on the statement.
- 10. Aging Category 6
-
Use this processing option and the value in the Aging Category 5 processing option to determine the interval that the system uses for the fourth and fifth aging categories on the statement.
- 11. Credits
-
Specify whether to age credit memos according to the aging specifications, or to apply credits to the Current aging column that prints on the statement. Values are:
Blank: Age credits.
1: Apply credits to Current aging balance.
- 12. Exclude Future Amounts
-
Specify whether to prevent future invoice amounts from printing on the statement. The system uses the aging specifications from the Accounts Receivable constants or the processing options to determine whether the invoice has a future amount. For example, if you age invoices based on the due date, and the statement date is June 30, 2008, the system prevents all invoices with a due date after June 30, 2008 from printing the statement.
- 13. Multi-Currency
-
Specify whether to generate and print amounts on the statement in the domestic or foreign currency. Values are:
Blank: Domestic currency. Prints all domestic and foreign currency invoices and receipts in the domestic currency of the remit to company.
1: Foreign currency. Prints all invoices and receipts in the transaction currency of the invoice.
- 14. Draft Flag
-
Use this processing option to produce statements with a draft. If you use this option, the system assigns a draft number to the statement, not a statement number.
16.5.10.3 Print
These processing options are used to specify the Remit To address, print program and version, and letter to print.
- 1. Remit To Address
-
Specify the remit to address that prints on the statement. The remit to address indicates where the customer should send their payments. The system retrieves this address based on the address book record that is set up for the company that is designated on the invoice in the Address Book Master table (F0101). Values are:
Blank: Use the address of the company designated in the F03B11 table, unless you specify a company in the Consolidation processing option. The system retrieves the company's address book number from the Company Constants table (F0010).
A: Use the value in the 1st Address Number field (AN81) of the company record.
B: Use the value in the 2nd Address Number field (AN82) of the company record.
C: Use the value in the 3rd Address Number field (AN83) of the company record.
D: Use the value in the 4th Address Number field (AN84) of the company record.
E: Use the value in the Factor/Special Payee field (AN85) of the company record.
F: Use the value in the 5th Address Number field (AN86) of the company record.
Address: Specify an address book number that you want the system to use instead of the company's address book number.
For example, if you generate statements for company 00001, and you want the receipts to be remitted to a lockbox address, you set up the lockbox address as a record in the Address Book system and assign the lockbox address book number to one of the address book number fields on the address book record for company 00001. In this processing option, you specify which of these address book numbers to use.
- 2. Print Statement by Due Date
-
Specify whether to print statements by the invoice due-date. The system displays invoices by due date and currency code if you select this option. Values are:
Blank: Do not print statements by due date.
1: Print statements by due date. The system prints a new statement each time that the due date changes.
- 3. Print Program
-
Specify the statement print program to use to produce statements. Click the Search button for a list of valid statement print programs. If you leave this processing option blank, the system uses R03B5001. Each print statement program has processing options that control the type of information that the system prints on the statement. The data selection and data sequence of the print program controls the amount of detail that prints on the statement and the order in which it prints.
- 4. Version of Print Program
-
Specify the version of the statement print program to use. If you leave this processing option blank, the system uses ZJDE0001.
- 5. Letter Name
-
Specify a predefined letter for text that you want to print on the statement. If the letter was set up with a letter type, you must also specify the letter type.
- 6. Letter Type
-
Specify a predefined letter for text that you want to print on the statement. If the letter was set up with a letter type, you must also specify the letter type.
16.5.10.4 Update
These processing options are used to specify whether the system uses an "as of" date to calculate invoice open amounts, whether it updates the statement number on invoice records, and whether the system creates one A/R Notification History Detail (F03B21) record for each invoice or for each invoice pay item.
- 1. Date - As Of
-
Specify the date that you want to use to produce statements for a prior period. This date is useful if a customer requests a statement for a specific date or for a date that is different from the original date that you used to produce the statement.
For example, to produce a statement from several months ago, enter the date that you want to use for the statement date in this processing option, and the system compares it to the closed date on the invoice to determine whether the invoice was open as of that date. If the invoice was open, the system recalculates the open amount and includes it on the statement. The system recalculates the open amount by adding to the current open amount the receipts that were applied to the invoice and have a G/L date that is on or after the as of date.
If you want to reprint a statement that was previously generated for a prior period, use the Review Statements program (P03B202).
Caution:
The system requires additional processing time to determine whether the invoice was open on the date that you specify; therefore, do not complete this field unless you want to use this feature. For the system to perform As Of processing, you must include paid invoices in the data selection of the Statement Notification Refresh program (R03B500X). You might also want to limit data selection to the specific customer for whom you are generating the statement. - 2. Statement Number Update
-
Use this processing option to overwrite the statement number on invoices that are included on multiple statements. For example, if an open invoice is included on statement 123 and the invoice is still open when you run statements again, the system assigns the new statement number to the invoice and overwrites the previous value. Values are:
Blank: Update the statement number on all invoice records.
1: Update the statement number on only those invoice records that do not have a value in the Statement Number field (CTL).
- 3. Summarize Invoices
-
Specify whether to include a summarized invoice record in addition to each invoice pay item record in the A/R Notification History Detail (F03B21) table. You use the Review Statement program (P03B202) to review the information in this table. Values are:
Blank: Include invoice pay item records only.
1: Include a summarized invoice record in addition to the invoice pay item records.
Note:
If you want to print summarized invoice information on the statement, use the corresponding processing option in the statement print program that you are using (R03B5001, for example).
16.5.11 Setting Processing Options for Statement Print with Draft (R03B506)
Processing options enable you to specify the default processing for programs and reports.
16.5.11.1 Print
- 1. City
-
Specify the city in which the draft originated to print on the statement.
- 2. Bank Draft Code
-
Specify the bank draft code that the system prints on the statement. The value that you enter must exist in UDC 03B/BD. The system prints only the code on the statement, not the description of the code. If you leave this processing option blank, the system does not print a bank draft code.
16.5.12 Printing Draft Statements by Due Date
From the Draft Daily Operations menu (G03B161), select Statement Print with Draft.
16.6 Accepting Drafts
This section provides an overview of manual drafts, unapplied drafts, pre-authorized drafts, and draft revisions, lists prerequisites discusses how to:
-
Set processing options for Draft Entry (P03B602).
-
Enter an unapplied draft.
-
Locate open invoices to apply to drafts.
-
Apply a draft to invoices.
-
Apply unapplied payments to invoices.
-
Apply credit memos to invoices.
-
Enter stand-alone records.
-
Process pre-authorized drafts.
-
Set data sequence for Pre-Authorized Drafts (R03B671).
-
Set processing options for Pre-Authorized Drafts (R03B671).
16.6.1 Understanding Manual Drafts
Manual drafts are also called customer acceptance drafts because the customer must accept them before they can be remitted to the bank. These types of manual drafts are available:
-
The supplier prints the draft with bank account information.
-
The supplier prints the draft with the bank name only.
-
The customer prints the draft with bank account information.
-
The customer prints the draft with the bank name only.
You use one of these programs to enter a draft manually, depending on whether you or the customer originate the draft:
| Program | Usage |
|---|---|
| Enter Our Drafts (P03B602) | Use this program when the company originates a draft for the customer to sign and return. |
| Enter Customer Drafts (P03B602) | Use this program when the customer originates and accepts a draft, and then sends it to the company to be entered. |
The fields that you complete on the Enter Our Drafts and Enter Customer Drafts programs are the same. You can enter drafts in a foreign currency (the transaction currency of the invoice), but not in an alternate currency.
You apply the draft to open invoices using the same type input codes that you use to enter receipts. These type invoice codes include:
-
10: Invoice match
-
11: Invoice match with chargeback discount
-
15: Invoice match with write-off
-
16: Invoice match with chargeback
-
17: Invoice match with deduction
-
25: Standalone write-off
-
26: Standalone chargeback
-
27: Standalone deduction
See Understanding Type Input Codes for Standard Receipts Entry or Draft Entry.
When you enter a draft, the system:
-
Creates a batch header record in the Batch Control Records table (F0011) and assigns it a batch type DB (draft receipts).
-
Creates a draft record in the Receipts Header table (F03B13) and assigns it a draft status of 4 (Accepted).
-
If you use the Enter Our Drafts program, verifies that the draft number that you enter matches the draft number that is assigned to the invoices when you originated the draft using the Invoice Print with Draft (R03B5051) or Statement Print with Draft program (R03B506).
-
Creates a draft record in the Receipts Detail table (F03B14) for each invoice pay item that the draft closes. The system updates the Receipt Type Code (TYIN) field to A (Applied) on these records.
-
Creates a draft record in the F03B14 table for the total of the invoices paid and assigns it the draft status 4 (Accepted). The system updates the Receipt Type Code (TYIN) field to D (Draft) to differentiate this record from the applied records.
-
Creates an invoice record with a document type of R1 in the F03B11 table with a pay status of D (draft accepted).
-
If the draft is unapplied, creates an invoice record with a document type of RU in the F03B11 table with a pay status of A (draft approved for payment).
After you enter drafts, you can approve them and post them to the general ledger. If you post the draft at a Draft-Acceptance status, the system creates a journal entry to debit drafts receivable and credit an A/R trade account.
This program updates and creates records in the F03B11, F03B13, and F03B14 tables.
16.6.1.1 Fields Updated During Receipt or Draft Entry
When you enter a receipt, the system updates specific fields with the account ID. The system locates the AAI based on the how the receipt is applied to invoices. The system uses this account ID when you post the receipt to create automatic entries. This table lists the fields that the system updates based on the type of receipt, and the AAI that the system uses to locate the account.
| Account | Type of Payment Application | Type Input Code | Field Updated | Table Updated | AAI Used |
|---|---|---|---|---|---|
| Bank Account
Note: The system updates this field when you enter a receipt; however, it does not update the bank account field on the draft until you either remit or collect the draft. |
All | N/A | GLBA | F03B13 | The system uses the bank account number entered on the receipt.
If the Bank Account field is blank, the system locates the account based on this hierarchy:
|
| A/R Trade | Applied payment | 10 | AID | F03B14 | The system does not use an AAI.
The system uses the account entered in the AID field of the invoice record in the F03B11 table. |
| A/R Trade | Unapplied payment | N/A | AID | F03B13 | The system locates the account using this hierarchy, where xxxx is the value of the Unapplied G/L Offset field:
|
| A/R Trade | Payment that generates a chargeback | 11 and 16 | AIDC and AID | F03B11 and F03B14 | The system locates the account using this hierarchy, where xxxx is the value of the Chargeback G/L Offset field:
|
| A/R Trade | Stand-alone chargeback | 26 | AIDC | F03B14 | The system locates the account using this hierarchy, where xxxx is the value of the Chargeback G/L Offset field:
|
| Discount Taken | Payment with a discount | 10 | AIDD | F03B14 | The system uses this hierarchy, where xx is the discount reason code:
|
| Write-off | Payment with a write-off | 10 and 15 | AIDW | F03B14 | The system uses this hierarchy, where xx is the write-off reason code:
|
| Write-off | Stand-alone write-off | 25 | AIDW | F03B14 | The system uses this hierarchy, where xx is the write-off reason code:
|
| Deduction Suspense | Payment with a deduction | 17 | DAID | F03B14 | The system uses this hierarchy:
|
| Deduction Suspense | Stand-alone deduction | 27 | DAID | F03B14 | The system uses this hierarchy:
|
This table shows how the system updates the AID2 field on the records in the F03B14 table when you accept, remit, or collect a draft. The system creates the records during each draft stage based on the AAI listed, where x is the payment instrument.
| Draft Stage | AAI |
|---|---|
| Acceptance | RD1x |
| Remittance | RD2x |
| Remittance for Discount | RD3x |
| Remittance with Contingent Liability | RD4x |
16.6.2 Understanding Unapplied Drafts
You enter unapplied drafts when you do not know which invoice or group of invoices the draft pays. Until you collect the draft, an unapplied draft does not reduce a customer's balance. When you enter an unapplied draft, the system creates records in these tables:
| Table | Records Created |
|---|---|
| F03B11 | The system creates these two records:
|
| F03B13 | The system creates a draft payment record. |
| F03B14 | The system creates these two records:
These invoice records generated by the draft application also have a corresponding detail record (F03B14) that is used for posting purposes:
The system uses a posting status of D when it creates the invoice records in the F03B11 table. To update the general ledger, you must post the receipt records in the F03B14 table. |
The unapplied draft remains open until you apply it to the appropriate invoices.
After you enter unapplied drafts, you must post them. When you post unapplied drafts, the system debits the draft receivables account and credits the A/R trade account that is associated with the AAI item RCUC, unless you override the Unapplied G/L Offset field on the draft or specify to use the G/L offset that is set up in the customer master record.
The process for applying unapplied drafts to invoices are very similar to the process for applying unapplied receipts to invoices.
16.6.3 Understanding Pre-authorized Drafts
Automatic drafts are also called pre-authorized drafts because they do not require customer acceptance for each draft. You and the customer agree in advance that the customer will pay with a draft. You do not print and send a draft to the customer, but instead remit (deposit) the draft to the bank for collection.
You create automatic drafts by running the Pre-Authorized Drafts program (R03B671). You select the invoices to pay with each draft by using data selection. You can run this batch process in either proof or final mode:
Using proof mode, you can select to generate a detail or summary report of transactions:
-
Detail - lists each invoice to be paid by draft.
-
Summary - prints a summary of all invoices by customer or payor, due date, and payment instrument to be paid by draft.
Using final mode, you can make the same selections as in proof mode. In final mode, the system:
-
Creates drafts.
-
Updates the pay status of drafts to D (draft accepted).
-
Generates a report.
Whichever mode you select, you can review the information and make necessary changes. You can use either Standard Invoice Entry or Speed Status Change to change the pay status.
The system processes drafts in the same way as receipts except that the system:
-
Uses batch type DB (draft receipts).
-
Applies draft receipts to open customer invoices.
-
Creates an invoice record with a document type of R1 in the F03B11 table for the total draft amount.
-
Updates the payment status of the draft invoice to D (draft accepted).
After you generate drafts, you must approve and post them to the general ledger to create the appropriate journal entries.
This program updates and creates records in the F03B11, F03B13, and F03B14 tables.
Note:
The report prints the abbreviated column heading PI, which indicates payment instrument.16.6.4 Understanding Draft Revisions
After you enter drafts, you can review and revise them before you post them to the general ledger. You typically review drafts to:
-
Verify information for a particular customer.
-
Revise draft information, such as the due date, payment instrument, or customer bank account.
These guidelines apply when you revise draft information:
-
You cannot add invoices to a draft unless an unapplied amount exists.
-
You can change these fields when the draft has been accepted:
-
Draft Due Date
You can also change this field after the draft has been remitted.
-
Draft Amount
You cannot change this field if the draft is posted or if it is in a status other than Draft- Acceptance.
-
Payment Instrument
-
Bank Name
-
Customer Bank Account Number
-
Bank Transit
-
-
You can never change the G/L date on a draft; however, you can assign a new G/L date to a posted draft when you perform additional tasks (such as applying the draft to invoices or voiding the draft). The system updates the records in the F03B14 table with the G/L date that you enter. The system does not change the G/L date on the record in the F03B13 table.
16.6.5 Prerequisites
Before you complete the tasks in this section:
-
Verify that the appropriate accounts are specified for these AAI items:
-
RKD for discounts taken.
-
RCxxxx, where xxxx is the chargeback G/L offset code for the chargeback A/R trade account.
-
RAxx, where xx is the write-off reason code.
-
RN, for the deduction suspense account.
-
Verify that the appropriate offset account is set up for the AAI RCxxxx, where xxxx is the unapplied G/L offset (for unapplied drafts) or the chargeback G/L offset (for drafts that generate a chargeback). If you enter unapplied drafts, the system uses the default RCUC unless you specify a different unapplied G/L offset value or set a processing option to use the value from the customer record.
-
Verify these UDC tables are set up to specify the reason codes:
-
00/DE for discount reason codes.
-
03B/CB for chargeback reason codes.
-
03B/RC for write-off reason codes.
-
03B/CR for deduction reason codes.
-
Verify the processing options are set up appropriately for discounts, chargebacks, write-offs, and deductions, or for the type input codes that you allow.
16.6.6 Forms Used to Accept Drafts
| Form Name | FormID | Navigation | Usage |
|---|---|---|---|
| Work With Drafts | W03B602A | Draft Daily Operations menu (G03B161), Enter Our Drafts.
Draft Daily Operations (G03B161), Enter Customer Drafts. |
Locate and delete drafts. |
| Draft Entry | W03B602B | Enter UC in the Unapplied G/L Offset field of the QBE (query by example) row on the Work With Drafts form. Click Find and then select the unapplied draft and click Select or Add. | Enter an unapplied draft.
Apply a draft to invoices using type input codes, or apply a credit memo to an invoice. Locate an unapplied draft to which you want to apply invoices. |
| Work With Bank Accounts By Address | W0030AD | Select Bank Information from the Form menu on the Draft Entry form. | Locate and select a bank account for the draft. |
| Additional Information | W03B602J | Select Additional Info from the Form menu on the Draft Entry form. | Assign a G/L offset other than UC, enter reference information, or override the business unit for a draft. |
16.6.7 Setting Processing Options for Draft Entry (P03B602)
Processing options enable you to specify the default processing for programs and reports.
16.6.7.1 Display
These processing options specify whether to retain values that were previously entered on the Draft Entry form. If you are entering similar types of drafts, completing these processing options can reduce entry time.
- 1. Payor Number
-
Specify whether to retain the payor number entered on the Draft Entry form after you enter the draft. Values are:
Blank: Do not retain the payor number.
1: Retain the payor number.
- 2. Draft Date
-
Specify whether to retain the draft date entered on the Draft Entry form after you enter the draft. Values are:
Blank: Do not retain the draft date.
1: Retain the draft date.
- 3. Company
-
Specify whether to retain the company number entered on the Draft Entry form after you enter the draft. Values are:
Blank: Do not retain the company number.
1: Retain the company number.
- 4. G/L Date
-
Specify whether to retain the G/L date entered on the Draft Entry form after you enter the draft. Values are:
Blank: Do not retain the G/L date.
1: Retain the G/L date.
- 5. Draft Due Date
-
Specify whether to retain the draft due date entered on the Draft Entry form after you enter the draft. Values are:
Blank: Do not retain the draft due date.
1: Retain the draft due date.
- 6. Bank Name
-
Specify whether to retain the customer bank name entered on the Draft Entry form after you enter the draft. Values are:
Blank: Do not retain the customer bank name.
1: Retain the customer bank name.
- 7. Customer Bank Account
-
Specify whether to retain the customer bank account number entered on the Draft Entry form after you enter the draft. Values are:
Blank: Do not retain the customer bank account.
1: Retain the customer bank account.
- 8. Payment Instrument
-
Specify whether to retain the payment instrument on the Draft Entry form after you enter the draft. Values are:
Blank: Do not retain the payment instrument.
1: Retain the payment instrument.
- 9. Bank Transit Number
-
Specify whether to retain the bank transit number entered on the Draft Entry form after you enter the draft. Values are:
Blank: Do not retain the bank transit number.
1: Retain the bank transit number.
- 10. Currency
-
Specify whether the system retains the currency code entered on the Draft Entry form after you enter the draft. Values are:
Blank: Do not the retain the currency code.
1: Retain the currency code.
- 11. Exchange Rate
-
Specify whether the system retains the exchange rate that is entered on the draft entry after you enter the draft. Values are:
Blank: Do not retain the exchange rate.
1: Retain the exchange rate.
16.6.7.2 Defaults
These processing options specify default values to use on the Draft Entry and Additional Information forms. When you enter a draft, you can override any of the values entered in these processing options.
- 1. Type Input Code
-
Specify the default type input code for applying drafts to invoices. Values are:
Blank: The system does not default a value.
10: Simple invoice match
11: Match auto chargeback discount
15: Match with write-off
16: Match with chargeback
17: Match with deduction
If you enter 10, the system applies the draft to the oldest open invoice or group of invoices in a customer's account, similar to the Balance Forward type input code (1) for the Speed Receipts application.
- 2. Deduction Reason Code
-
Specify the default deduction reason code for entering a deduction amount. If you leave this field blank, the deduction reason code must be entered manually in the detail area on the Receipt Entry form. Valid deduction reason codes are defined in UDC 03B/CR.
- 3. Payment Instrument With Bank Account
-
Specify the default payment instrument for processing drafts that have a bank account number.
- 4. Payment Instrument Without Bank Account
-
Specify the default payment instrument for processing drafts without a bank account number.
- 5. Drafts Receivable Account
-
Specify the drafts receivable account number to use when you post drafts to the general ledger. You enter the account number in the standard format (bu.obj.sub). If you leave this processing option blank, the system uses the account number associated with the AAI item RD1x, where x is the payment instrument on the customer record (F03012).
- 6. Default G/L Offset for Unapplied Draft
-
Specify whether to use the value in the G/L Class Code field of the customer record as the default value for the Unapplied G/L Offset field when you enter unapplied drafts. The system locates the A/R trade account based on the G/L offset that you use. Values are:
Blank: Do not use default values.
1: Use values from the G/L Class Code.
If the customer record does not have a G/L class code defined, the system uses the default G/L offset (UC) for unapplied drafts.
- 7. Draft Numbering
-
Specify whether to have Next Numbers assign the draft number. Values are:
Blank: Do not use Next Numbers
1: Use Next Numbers
16.6.7.3 Edits
These processing options specify whether to enable:
-
Write-offs.
-
The deletion of unposted drafts.
-
Charges to the draft status.
They also specify whether the system notifies you of certain conditions, such as the entry of an overpayment.
- 1. Write-offs
-
Specify whether to allow write-offs on drafts. Values are:
Blank: Allow write-offs.
1: Do not allow write-offs.
- 2. Delete/NSF Unposted Receipts
-
Specify whether to allow the delete and NSF operations on unposted drafts. Values are:
Blank: Allow delete and NSF.
1: Do not allow delete and NSF.
- 3. Overpayment Edit
-
Specify the severity of the error message issued when an invoice has been overpaid. Values are:
0: No Edit
1: Warning
2: Error
When you overpay an invoice, the system displays it as a negative open amount.
- 4. Bank Name
-
Specify whether to enable the Bank Name field on the Draft Entry form. Values are:
Blank: Do not enable the Bank Name field. The system uses the bank name that is set up in the F0030 table for the customer or payor.
1: Enable the Bank Name field. The system allows you to override the value in the Bank Name field.
Note:
If you do not specify the customer's bank name, you must specify the customer's bank account number and bank transit number. - 5. Return To Prior Draft Status
-
Specify whether to allow the status of drafts to be reset to the previous draft status. Values are:
Blank: Allow drafts to be reset to the previous draft status.
1: Do not allow drafts to be reset to the previous draft status.
- 6. Draft Number
-
Specify the severity of the message that the system issues when a draft number is not assigned. This processing option is valid only when the corresponding processing option for Draft Types (on the Process tab) is 1 (Customer generated drafts). Values are:
Blank: No Edit
1: Warning
2: Error
16.6.7.4 Process
These processing options specify how the system applies drafts to invoices when you use a default type input code, and whether the system creates a summarized record in the Account Ledger table (F0911) for each batch of drafts that you enter or a detail record for each draft.
- 1. Drafts Type
-
Specify the type of drafts to process. Values are:
Blank: Process drafts that you generate.
1: Process customer generated drafts.
- 2. Open Amount
-
Specify whether to create draft invoice records (document type R1) with an open amount in the F03B11 table. This processing option controls whether you can select the draft for aging. When you create a draft without an open amount, you use that record as a placeholder only and you cannot select it for payment or aging. Values are:
Blank: Create draft invoice records with an open amount.
1: Create draft invoice records without an open amount.
- 3. Journal Entry Creation Method
-
Specify whether the post program creates one summarized journal entry for the batch of drafts entered, or one journal entry for each draft. The system assigns the value that you enter in this processing option to the A/R Post field (ISTR) in the F03B13 table. The post program uses this value to create the journal entry records. Values are:
Blank: Create summarized journal entries. The system creates one journal entry with the document type RK for each batch of drafts that you post. The system assigns the draft batch number as the document number of the journal entry. To use this method, you must also ensure that the:
-
Offset method in the A/R Constants is equal to B (batch mode).
-
Batch does not contain any foreign transactions.
Otherwise, the system creates journal entries in detail.
1: Create detailed journal entries. The system creates one journal entry with the document type RC for each draft in the batch. The system uses Next Numbers for journal entry documents (system 09) to assign the document number to the receipt journal entry. To provide an audit trail, the system updates these fields in the F03B14 table with the journal entry information:
-
JE document type (RZDCTG)
-
JE document number (RZDOCG)
-
JE document company (RZKCOG)
-
- 4. Display Invoices
-
Specify whether to display only invoices with an approved pay status. Values are:
Blank: Display all invoices.
1: Display only approved invoices.
16.6.7.5 Currency
If you use multicurrency, this processing option specifies whether the system validates that the effective date that it uses to retrieve the exchange rate matches the G/L date entered on the draft.
- 1. Edit Effective Date
-
Specify whether the system validates the effective date that it uses to retrieve the exchange rate against the G/L date that you enter on the draft. Values are:
Blank: Do not validate the effective date.
1: Validate the effective date. The system issues a warning when the effective date of the exchange rate retrieved from the Currency Exchange Rates table (F0015) is not in the same period as the G/L Date of the draft.
16.6.7.6 Chargeback
These processing options specify values that you want the system to assign to chargeback records that it creates.
- 1. Pay Status
-
Specify the default pay status that you want the system to assign to chargebacks. If you leave this processing option blank, the system uses the value that is set up in the Data Dictionary for item PST. Valid values are defined in UDC 00/PS (Pay Status).
- 2. Date Option
-
Specify the invoice date and net due date that you want the system to assign to chargebacks. Values are:
Blank: Use the draft G/L date.
1: Use the corresponding dates from the invoice.
- 3. Reason Code
-
Specify the default reason code that you want the system to assign when you enter a chargeback amount. If you leave this processing option blank, you must enter the chargeback reason code manually. Valid chargeback reason codes are defined in UDC 03B/CB.
16.6.7.7 Auto Write-off
These processing options activate the automatic write-off feature and establish write-off limits for both under- and overpayments. When you activate the automatic write-off feature, you must specify the write-off reason code for the system to use.
- 1. Maximum Underpayment Amount
-
Specify the limit for the system to use to write off underpayments. If the difference between the payment amount and open amount of the invoice is equal to or less than the amount specified, the system automatically writes off the remaining amount when you enter the draft.
- 2. Underpayment Reason Code
-
Specify the default reason code that you want the system to assign when it automatically writes off an underpayment. If you specify a value in this processing option, this activates the automatic write-off process. Valid write-off reason codes are defined in UDC 03B/RC. You must also set up a corresponding AAI item (RAxx, where xx is the reason code) for the write-off reason code that you specify.
- 3. Maximum Overpayment Amount
-
Specify the maximum amount for which the system writes off overpayments. If the difference between the payment amount and the open amount of the invoice is equal to or less than the amount specified, the system automatically writes off the remaining amount when you enter the draft.
Enter the value as a negative amount.
- 4. Overpayment Reason Code
-
Specify the default reason code for the system to assign when it automatically writes off an overpayment. If you specify a value in this processing option, this activates the automatic write-off process. Valid write-off reason codes are defined in UDC 03B/RC. You must also set up a corresponding AAI item (RAxx, where xx is the reason code) for the write-off reason code that you specify.
16.6.7.8 Mnl Write-off
These processing options specify write-off limits for both under- and overpayments, and specify a default value for the system to use for the write-off reason code.
- 1. Maximum Underpayment Amount
-
Specify the maximum amount for which you can write off an underpayments. If the difference between the payment amount and the open amount of the invoice is equal to or less than the amount specified, the system allows you to write off the remaining amount when you enter the draft.
- 2. Maximum Overpayment Amount
-
Specify the maximum amount for which you can write off an overpayment. If the difference between the payment amount and the open amount of the invoice is equal to or less than the amount specified, the system allows you to write off the remaining amount when you enter the draft. Enter the value as a negative amount.
- 3. Write-Off Reason Code
-
Specify the default reason code that you want the system to assign when you enter a write-off amount. Valid write-off reason codes are defined in UDC 03B/RC. You must also set up a corresponding AAI item (RAxx, where xx is the reason code) for each write-off reason code that you specify.
16.6.7.9 Discount
These processing options define rules for processing discounts.
- 1. Discount Available
-
Specify whether to allow the discount taken to be greater than the discount available. Values are:
Blank: Do not allow discounts taken to be greater than the discount available.
1: Allow discounts taken to be greater than the available discount.
- 2. Discount Applied
-
Specify whether to allow the discount taken to be greater than the payment amount. Values are:
Blank: Do not allow the discount taken to be greater than the payment amount.
1: Allow the discount taken to be greater than the payment amount.
- 3. Grace Period Days
-
Specify the number of days to be added to the discount due date during which the discount can be taken. This processing option is used only when the system calculates the discount taken. You can also enter the discount amount manually.
- 4. Discount Reason Code
-
Specify the default discount reason code that you want the system to use when discounts are taken. You can override this code, if necessary, when you enter the draft. The discount reason code that you enter must exist in UDC 00/DE. You must also set up a corresponding AAI item (RKDxx where xx is the reason code) for each discount reason code that you specify.
16.6.7.10 Match Priority
These processing options specify the order that you want the system to use to locate invoices on the Remittance Entry form. Valid search methods for these processing options are:
-
Invoice Number
-
Sales Order Number
-
Customer Reference
-
Statement Number
-
Shipment Number
- 1. Invoice Match, Sales Order Match, Customer Reference Match, Statement Match, and Shipment Number Match, and Receipt Matching Reference1 Match
-
For each of these processing options, specify the sequence of search methods that the system uses to select invoices on the Remittance Entry form.
Values are blank, 1, 2, 3, 4, 5 and 6. If you leave a search method field blank, the system excludes that search method and uses only the other methods that you specify. If you leave all five fields blank, the system searches using all methods in the order listed.
16.6.7.11 Void/NSF
These processing options specify the values for the system to use when drafts are voided or designated as insufficient funds.
- 1. Update Payment Instrument
-
Specify whether to update the payment instrument on the R1 draft invoice record in the F03B11 table if the draft is voided or designated as NSF. Values are:
Blank: Do not update the payment instrument.
1: Update the payment instrument.
Note:
You must enter a value for the Payment Instrument for Draft processing option if you enter 1 for this processing option. - 2. Payment Instrument for Draft
-
Specify the payment instrument to assign to R1 draft records in the F03B11 table when a draft is voided or designated as NSF. Values are set up in UDC 00/PY.
Note:
If the Update Payment Instrument processing option is blank, the system ignores this processing option. - 3. Payment Instrument for Renewal Draft
-
Specify the payment instrument to assign to the new draft invoice record that the system creates in the F03B11 table when you void or designate the draft as NSF with the option to renew the draft. Values are set up in UDC 00/PY.
- 4. Draft Account
-
Specify the draft receivable account number to use when you post drafts that have been voided or designated as NSF using the renewal option. You enter the account number in the standard format (bu.obj.sub). If you leave this processing option blank, the system uses the account number associated with the AAI item RD5.
16.6.8 Entering an Unapplied Draft
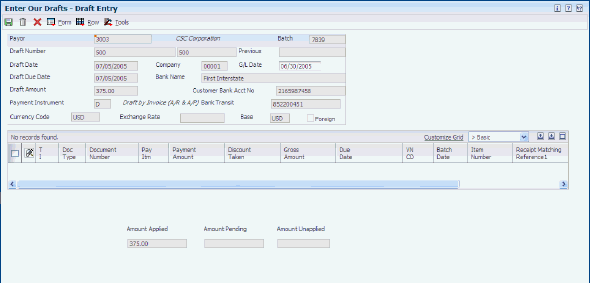
Access the Draft Entry form.
To enter an unapplied draft:
-
Complete the fields on the Draft Entry form.
The system updates the Bank Name, Customer Bank Acct No (customer bank account number), and Bank Transit fields if bank account information for A/R drafts (record type D) is set up for the customer.
If bank account information for the customer is not set up for record type D, you can activate the bank account for draft processing by completing steps 3 through 6.
If you do not have bank account information set up for the customer, proceed to step 7.
-
Select Bank Information from the Form menu.
-
On Work With Bank Accounts By Address, select a bank account record that is set up, and then select Activate as Draft from the Row menu.
-
Click Close.
-
Complete the Bank Name field, if it has not been updated by the system.
Note:
If the Bank Name field is not available for input, you must change the corresponding processing option to allow overrides to the bank name. -
To specify more information, select Additional Info from the Form menu.
-
On Additional Information, complete the Unapplied G/L Offset, Reference, and Business Unit fields, if applicable, and click OK.
-
On Draft Entry, click OK to create an unapplied draft or follow the steps to apply the draft to invoices or to enter remittance information.
-
Payor
Enter the address book number to locate and enter information.
-
Draft Number
For Our Drafts, enter the number generated by Invoice Print with Draft Attachments or Statement Print with Draft Attachments. The system validates this number in the invoice table.
For Customer Drafts, enter the customer's draft number.
-
Draft Date
Enter the date on the check or the date that you enter the receipt into the system. The receipt date is used for information and reporting purposes only.
-
Draft Due Date
Enter the date that the payment amount was debited or credited to the bank account. The value date is not the date the bank reconciled the payment. Automatic payments populate this field automatically. If you are making manual payments and have set a processing option to display the value date field, you can manually enter the value date here.
-
Draft Amount
Enter the actual amount of the receipt or payment.
-
Payment Instrument
Displays the payment instrument that is set up in the processing option. If the processing option is blank, the system uses the payment instrument from the customer master record.
-
Company
Enter the number for which the transaction is entered.
-
G/L Date
Enter the date to which the transaction is posted.
-
Customer Bank Acct No (customer bank account number)
Displays the number assigned by a bank to identify the account for a company, customer, or supplier.
Note:
Nordic users: Enter the bank, Bankgiro, or Postgiro account number. -
Bank Transit
Displays the number assigned to a bank by the Federal Reserve as defined in the bank account information for the customer.
-
Bank Name
Displays the name of the bank as defined in the bank account information for the customer.
-
Unapplied G/L Offset
Displays the code that determines the trade account that the system uses as the offset when you post.
The system uses UC as the offset and the associated AAI item RCUC to locate the A/R trade account if you do not override this value.
You can also set a processing option for the system to use the default value of the G/L offset code from the customer master record.
-
Reference
Enter an alphanumeric value to use as a secondary reference on the receipt or draft.
-
16.6.9 Locating Open Invoices to Apply to Drafts
You locate open invoices to apply them to unapplied drafts. The process for locating open invoices for draft processing is very similar to the process for locating open invoices for manual receipt processing.
16.6.10 Applying a Draft to Invoices
The process for applying a draft to invoices is very similar to the process for applying a receipt to invoices.
See Applying a Receipt or Draft to Invoices Using Type Input Codes.
16.6.11 Applying Unapplied Payments to Invoices
Access the Draft Entry form.
To apply an unapplied draft to invoices:
-
Display the open items for the customer by selecting either Load or Select from the Form menu.
-
In the header area, complete the G/L Date field.
Note:
The G/L date that you assign does not change the G/L date of the unapplied draft record in the F03B13 table. The system uses the G/L date for the draft detail record that it creates in the F03B14 table to pay the invoice. -
In the detail area, complete the T I field with the appropriate code.
-
If necessary, override the values in the Payment Amount, Discount Taken, Remark, Write-Off Amount, Chargeback Amount, or Deduction Amount fields.
-
Verify that the Amount Pending and Amount Unapplied fields contain the correct information.
The amount pending should equal the draft amount specified in the header if you have fully applied the draft to invoices.
The system creates an unapplied draft record for the amount that appears in the Amount Unapplied field.
-
Click OK.
-
Discount Taken
Enter the amount by which an invoice or voucher is reduced if paid by a specific date. The discount taken does not have to be the same as the discount available.
-
Write-Off Amount
Enter the amount by which you want to reduce the customer's account balance. The system updates the account specified in the AAI item RAxx, where xx is the write-off reason code with the amount specified.
If you enter a write-off amount, you must enter a write-off reason code.
-
WO CD (write-off reason code)
Enter the code that identifies the reason that the write-off occurred. Typical reason codes are:
BD: Bad debt
DC: Damaged goods
MW: Minor amount write-off
TF: Tax or freight dispute
-
Chargeback Amount
Enter the unpaid invoice amount for which you want to create a new invoice record so that you can charge the customer.
If you enter a chargeback amount, you must enter a chargeback reason code.
-
CB CD (chargeback reason code)
Enter the code that identifies the reason that a chargeback was generated for an invoice during receipt entry. Typical chargeback reason codes are:
DA: Disputed amounts
DD: Unearned (disallowed) discount amount
Note:
The system does not accept blank as a value, even if it is defined in the user defined code table. -
Deduction Amount
Enter the domestic amount of the deduction. The currency associated with this amount appears in the Base Currency Code field (BCRC).
If you enter a deduction amount, you must enter a deduction reason code.
-
DD CD (deduction reason code)
Enter the code that identifies the reason a customer did not fully pay an invoice. Typical deduction reason codes include:
DG: Damaged Goods
SS: Short Shipment
UD: Undefined Deduction
-
Chargeback G/L Offset
Displays a code that indicates the A/R trade account that you want the system to use when you post the chargeback. To locate the account, the system concatenates this code to the AAI item RC. The system uses this hierarchy to locate the A/R trade account to use for the chargeback record:
-
If you use multicurrency, the system searches for RCxxx, where xxx is the currency code for the receipt.
-
If the system does not locate the AAI, it uses RCxxx,x where xxxx is the value in the Chargeback G/L Offset field.
-
If the system does not locate the AAI, it uses RC for company 00000.
-
-
Unapplied G/L Offset
Displays the code that indicates the trade account that the system uses as the offset when you post invoices or vouchers. The system concatenates the value that you enter to the AAI item RC to locate the trade account. For example, if you enter TRAD, the system searches for the AAI item RCTRAD.
You can assign up to four alphanumeric characters to represent the G/L offset or you can assign the three-character currency code (if you enter transactions in a multicurrency environment). You must, however, set up the corresponding AAI item for the system to use; otherwise, the system ignores the G/L offset and uses the account that is set up for PC or RC for the company specified.
If you set up a default value in the G/L Offset field of the customer record, the system uses the value during transaction entry unless you override it.
Note:
Do not use code 9999. It is reserved for the post program and indicates that offsets should not be created.
-
16.6.12 Applying Credit Memos to Invoices
The process for applying a credit memo to invoices is very similar for drafts and manual receipts.
See Applying a Receipt or Draft to Invoices Using Type Input Codes.
16.6.13 Entering Stand-Alone Records
The process for entering stand-alone records is very similar for drafts and manual receipts.
16.6.14 Processing Pre-authorized Drafts
From the Draft Daily Operations menu (G03B161), select Pre-Authorized Drafts.
16.6.15 Setting Data Sequence for Pre-Authorized Drafts (R03B671)
To ensure proper processing, do not modify the data sequence that is set up in the JD Edwards EnterpriseOne demo versions:
-
Company (CO)
-
Base Currency (BCRC)
-
Currency Code (CRCD)
-
Due Date (DDJ)
-
Statement Number (CTL)
-
Payor Address Number (PYR)
-
Address Number (AN8)
-
Document Number (DOC)
-
Document Type (DCT)
-
Document Company (KCO)
-
Pay Item (SFX)
16.6.16 Setting Processing Options for Pre-Authorized Drafts (R03B671)
Processing options enable you to specify the default processing for programs and reports.
16.6.16.1 Defaults
These processing options specify the default values for the system to use when it generates drafts.
- 1. Draft Date
-
Specify the draft date to assign to the records in the F03B13 and F03B14 tables. If you leave this processing option blank, the system uses the system date.
- 2. Draft G/L Date
-
Specify the draft G/L date to assign to records in the F03B13 and F03B14 records. If you leave this processing option blank, the system uses the system date.
- 3. Draft Due Date
-
Specify the draft due date to assign to invoice records (R1) in the F03B11 table. If you leave this processing option blank, the system uses the invoice due date.
- 4. Draft Receivable Account Number
-
Specify the drafts receivable account number to use when you post drafts to the general ledger. You enter the account number in the standard format (bu.obj.sub). If you leave this processing option blank, the system uses the account number associated with the AAI item RD1x, where x is the payment instrument on the customer record (F03012).
- 5. Journal Entry
-
Specify whether the post program creates one summarized journal entry for the batch of drafts entered or one journal entry for each draft. The system assigns the value that you specify to the A/R Post field in the F03B13 table. The post program uses this value to create the journal entry records. Values are:
Blank: Summarized journal entries. The system creates one journal entry with the document type RK for each batch of drafts that you post. The system assigns the draft batch number as the document number of the journal entry. To use this method, you must also ensure that:
-
The offset method in the A/R Constants is equal to B (batch mode)
-
The batch does not contain any foreign transactions
Otherwise, the system creates journal entries in detail.
1: Detail journal entries. The system creates one journal entry with the document type RC for each draft in the batch. The system uses Next Numbers for journal entry documents (system 09) to assign the document number to the receipt journal entry.
To provide an audit trail, the system updates these fields in the F03B14 table with the journal entry information:
-
JE document type (RZDCTG)
-
JE document number (RZDOCG)
-
JE document company (RZKCOG)
-
- 6. Discount Reason Code
-
Specify the discount reason code that you want the system to use when discounts are taken. The discount reason code that you enter must exist in UDC 00/DE. You must also set up a corresponding AAI item (RKDxxx, where xxx is the reason code) for each discount reason code that you specify.
16.6.16.2 Select
These processing options provide information for selecting invoices to pay.
- 1. Pay Thru Date
-
Select invoices from the F03B11 table that have a due date less than or equal to the pay thru date that you specify.
- 2. Minimum Draft Amount
-
Specify the minimum amount required for the system to generate a draft. If you leave this processing option blank, the system generates drafts for all invoice amounts.
16.6.16.3 Process
These processing options specify guidelines for processing drafts, such as whether you want to process them in proof or final mode, whether you want the system to create journal entries in detail or in summary, how you want the system to assign the draft number, and so forth.
- 1. Process Mode
-
Specify whether to run the program in proof or final mode. In proof mode, the system generates a draft report. In final mode, the system generates a report and updates the F03B13, F03B14, and F03B11 tables with draft records. Values are:
Blank: Proof mode
1: Final mode
- 2. Summary/Detail
-
Specify whether the system generates one draft per invoice (detail) or one draft per customer or payor for each invoice due date (summary). Values are:
Blank: Detail drafts. The system creates one draft for each invoice.
1: Customer summary draft. The system creates one draft per customer for each group of invoices that have the same due date.
2: Payor summary draft. The system creates one draft per payor for each group of invoices that have the same due date.
- 3. Negative Draft
-
Specify whether the system generates drafts for a negative (credit) amount. Values are:
Blank: Do not generate negative drafts.
1: Generate negative drafts.
- 4. Draft Number
-
Specify whether the system assigns the draft number from the Next Numbers system or uses the statement number. Values are:
Blank: Use Next Numbers. The system uses the internal document number of the draft (R1) to populate Receipt Draft Number field in the F03B13 and F03B14 tables.
1: Use the statement number. The system uses the statement number from the Control/ Statement field of Customer Ledger table (F03B11) to populate Receipt Draft Number field in the F03B13 and F03B14 tables.
.Note:
The internal document number of draft (R1) in the F03B11 table is always a Next Number. - 5. Open Amount
-
Specify whether to create invoice draft documents (R1) with an open amount in the F03B11 table. The setting of this processing option controls whether you can select the draft for aging. When you create a draft without an open amount, you use that record as a placeholder only, and you cannot select it for payment or aging. Values are:
Blank: Create draft invoices (R1) with an open amount.
1: Create draft invoices (R1) without an open amount.
16.6.16.4 Credit Card
These processing options specify whether you want to update the draft records in the Receipts Header table (F03B13) with credit card information from the sales order.
- 1. Credit Card Processing
-
Specify whether to update the records in the F03B13 with the credit card and authorization numbers from the Prepayment Transaction Table (F004201) when you process sales orders with drafts and set up prepayments in the sales order cycle. Values are:
Blank: Prepayment processing was not used on the sales order.
01: Prepayment processing was used on the sales order.
- 2. Prepayment Origination Flag
-
Specify the system from which the prepayment originated, such as 01 for Sales Order Entry. Valid values are in UDC 00/PO.
16.7 Approving and Posting Accounts Receivable Drafts
This section provides an overview of draft approval and posting and an overview of the journal entries created by the draft post, and discusses how to:
-
Run the post program to post Accounts Receivable drafts.
-
Post drafts from Draft Journal Review.
See Also:
16.7.1 Understanding Draft Approval and Posting
After you enter drafts, you must approve them and post them to the general ledger to update the appropriate account information. Depending on the organization's policy, batches might require management approval before you can post them. The process to review and approve batches is the same regardless of the batch type. The batch type for draft batches is DB.
Note:
The status of the draft batch header remains In Use until you completely exit the draft entry program.Because the system creates all the entries to the Account Ledger table (F0911) when you post drafts, balancing errors occur only when the post program is interrupted. If the post program is aborted before it completes, run the post program again to delete the entries that the system created, and then run the post program a third time to create new entries.
During the post, the system:
-
Selects unposted receipt transactions from these tables:
-
F03B13
-
F03B14
-
-
Edits and verifies each transaction
If no errors occur, the system:
-
Debits and credits the appropriate accounts in the Account Ledger table (F0911).
The account that the system debits depends on the draft status.
-
Creates automatic offsets to the A/R trade account in the F0911 table.
-
Creates automatic entries to the discount, write-off, chargeback, or deduction account, if applicable.
-
Updates balances in the Account Balances table (F0902).
-
Marks the transactions as posted (P) in the F0911 table.
-
Updates the F03B14 table with a D in the Posted Code field
Note:
The system does not update the record in the F03B13 table until the draft is collected and posted. If the draft is posted after acceptance and remittance, the system does not update the Posted Code field. -
Updates the status of the Batch Control Records table (F0011) to D.
You can also post drafts using the Draft Journal Review program (P0011).
Note:
The system creates unapplied draft (RU), draft (R1), chargeback (RB), and deduction (R5) invoices with a posted status of D in the F03B11 table. To determine whether these records are posted, you must locate and verify the posted status of the draft document from which they originated.16.7.2 Understanding Journal Entries Created by the Draft Post
When you post drafts to the general ledger, the system creates the record in the F0911 table based on the journal entry creation method and the status of the draft when you post it.
These tables list the journal entries that the system creates for standard drafts, drafts that are discounted, and drafts that are discounted with contingent liability. The system retrieves the account from the field listed in the table for the appropriate record. The field is updated based on an AAI when draft is entered, remitted, or collected.
16.7.2.1 Standard Drafts
This table lists the journal entries that the system creates for standard drafts:
| Draft Status | JE Doc Type | Field | Based on AAI | Account Debited | Account Credited |
|---|---|---|---|---|---|
| Acceptance (4) | R1 | AID2 | RD1x | Draft Receivable | |
| Acceptance (4) | AE | AID | N/A
The system updates the field from the invoice paid |
A/R Trade | |
| Remittance (3) | R2 | AID2 | RD2x | Draft Remitted | |
| Remittance (3) | R1 | AID2 from Acceptance record | RD1x | Draft Receivable | |
| Collection (1) | RC
Note: The document type might be RK depending on the journal entry creation method. |
GLBA | RB or processing option for R03B672 | G/L Bank | |
| Collection (1) | R2 | AID2 from Remittance record | RD2x | Draft Remitted |
16.7.2.2 Discounted Drafts
This table lists the journal entries that the system creates for discounted drafts:
| Draft Status | JE Doc Type | Field | Based on AAI | Account Debited | Account Credited |
|---|---|---|---|---|---|
| Acceptance (4) | R1 | AID2 | RD1x | Draft Receivable | |
| Acceptance (4) | AE | AID | N/A
The system updates the field from the invoice paid. |
A/R Trade | |
| Remittance (3) | R2 | AID2 | RD3x | Draft Remitted for Discount | |
| Remittance (3) | R1 | AID2 from Acceptance record | RD1x | Draft Receivable | |
| Collection (1) | RC
Note: The document type might be RK depending on the journal entry creation method. |
GLBA | RB or processing option for R03B672 | G/L Bank | |
| Collection (1) | R2 | AID2 from Remittance record | RD3x | Draft Remitted for Discount |
16.7.2.3 Discounted Drafts with Contingent Liability
This table lists the journal entries that the system creates for discounted drafts with contingent liability:
| Draft Status | JE Doc Type | Field | AAI Used | Account Debited | Account Credited |
|---|---|---|---|---|---|
| Acceptance (4) | R1 | AID2 | RD1x | Drafts Receivable | |
| Acceptance (4) | AE | AID | N/A
The system updates the field from the invoice paid |
A/R Trade | |
| Remittance (2) | R2 | AID2 | RD3x | Drafts Remitted for Discount | |
| Remittance (2) | R1 | AID2 from Acceptance record | RD1x | Drafts Receivable | |
| Remittance (2) | RC
Note: The document type might be RK depending on the journal entry creation method. |
GLBA | RB or processing option for R03B672 | G/L Bank | |
| Remittance (2) | R2 | AID2 | RD4x | Drafts Contingent Liability | |
| Collection (1) | R2 | AID2 | RD4x | Drafts Contingent Liability | |
| Collection (1) | R2 | AID2 from Remittance record | RD3x | Drafts Remitted for Discount |
16.7.2.4 Journal Entry Creation Method
The difference between creating journal entries in detail or creating summarized journal entries is the number of entries that the system creates, and the document type and document number that the system assigns.
Regardless of the method you use to create journal entries, the system updates these fields in the draft detail record (F03B14) from the journal entry that the system creates:
-
RZDCTG (Document Type - JE)
-
RZDOCG (Document Number - JE)
-
RZKCOG (Document Company - JE)
Note:
The system follows the same methodology for assigning document numbers for all stages in the draft process.
16.7.2.5 Detail Method
If you set the processing option to create detailed journal entries, when you enter the draft, the system updates the A/R Post Status (ISTR) field in the F03B13 table to 1. When you post drafts, the system:
-
Creates one document in the F0911 table for each draft in the batch.
-
Assigns the document type RC to the entry for the bank account (either at collection or at remittance, if you remit discounted drafts with contingent liability).
-
Assigns the document number from Next Numbers for system 03B, line 6 (Draft Number).
-
Updates the record in the F03B14 table with the document number that is assigned to the journal entry for audit purposes.
16.7.2.6 Summary Method
If you set the processing option to create summarized journal entries, when you enter the draft, the system does not update the A/R Post Status field (ISTR field in the Receipts Header table (F03B13). When you post drafts, the system:
-
Creates one record in the F0911 table for each batch of drafts posted.
-
Assigns the document type of RK to the entry for the bank account (either at collection or at remittance, if you remit discounted drafts with contingent liability).
-
Assigns the batch number as the document number.
To create summarized journal entries, you must also verify:
-
The offset method in the Accounts Receivable Constants is set to a value of B (batch mode).
-
The intercompany settlement option in the general accounting constants is set to a value other than 2 or 3.
Otherwise, the system generates detailed journal entries.
16.7.2.7 Key to Method Used
This table shows the type of journal entry that the system creates according to the settings in the general accounting and accounts receivable constants:
| Intercompany (G/A Constants) | Offset Method (A/R Constants) | Journal Entry Creation Method (Summary or Detail) | Journal Entry Created (F0911) |
|---|---|---|---|
| 1 (Hub) | B | D | Detail |
| 1 | Y | D | Detail |
| 1 | S | D | Detail |
| 2 (Detail) | B | D | Detail |
| 2 | Y | D | Detail |
| 2 | S | D | Detail |
| 3 (Configured Hub) | B | D | Error (not allowed) |
| 3 | Y | D | Detail |
| 3 | S | D | Detail |
| 1 | B | S | Summary |
| 1 | Y | S | Detail |
| 1 | S | S | Detail |
| 2 | B | S | Summary |
| 2 | Y | S | Detail |
| 2 | S | S | Detail |
| 3 | B | S | Error (not allowed) |
| 3 | Y | S | Detail |
| 3 | S | S | Detail |
Note:
The offset methods are:Y: One automatic entry offset per document, regardless of the number line item.
S: One automatic entry per pay item.
B: One automatic entry per batch.
The system creates additional records depending on whether a discount was taken, or the draft was applied with a write-off, chargeback, or deduction.
16.7.2.8 Posting Voided and NSF Drafts
The system also creates journal entries when you post a draft that has been voided or designated as insufficient funds (NSF). Regardless of the processing option setting for the journal entry creation method, this occurs:
-
When you post a voided draft, the system creates a journal entry with the document type RO.
-
When you post a draft that is designated as NSF, the system creates a journal entry with the document type RV.
The system updates the DOCQ and DCTQ fields on the F03B13 record with the document number and document type that the system assigns to the journal entry.
16.7.2.9 Posting Zero Amount Drafts
When you apply unapplied drafts to invoices, the system does not generate any journal entries because the amount of the draft is zero.
Additionally, the system creates an automatic entry (document type AE) only when the A/R trade account to which the unapplied draft was posted is different from the A/R trade account to which the invoice was posted. If the trade accounts are the same for the unapplied draft and the invoice, the system does not generate any AE entries, nor does it produce a posting edit report.
16.7.2.10 Automatic Entries Created by the Draft Post
When you post drafts, the system creates automatic entries (document type AE) in the Account Ledger table (F0911). The system uses the account IDs from fields that the system updated when you entered the draft. This table shows the field that the post uses to locate the account for the AE entry based on the type of draft that you entered.
| Account | Type of Draft | Field | Table |
|---|---|---|---|
| A/R Trade | Applied Draft (TI Code 10) | AID | F03B14 |
| Unapplied Drafts | AID | F03B13 | |
| Chargebacks (TI Codes 11, 16, and 26) | AIDC | F03B14 | |
| Discount Taken | Discounts (TI Code 10) | AIDD | F03B14 |
| Write-off | Write-offs (TI Codes 10, 15, and 25) | AIDW | F03B14 |
| Deduction Suspense | Deduction (TI Codes 17 and 27) | DAID | F03B14 |
16.7.3 Forms Used to Approve and Post Drafts
| Form Name | FormID | Navigation | Usage |
|---|---|---|---|
| Work With Batches | W0011A | Draft Daily Operations (G03B161), Draft Journal Review | Locate draft batches. |
| Batch Approval | W0011C | Select a batch and select Batch Approval from the Row menu on the Work With Batches form. | Approve a batch for posting. |
16.7.4 Running the Post Program to Post Accounts Receivable Drafts
From the Draft Daily Operations menu (G03B161), select Post Drafts to G/L.
16.7.5 Posting Drafts from Draft Journal Review
Access the Work With Batches form.
Select the batch that you want to post and select Post by Batch from the Row menu.
16.8 Revising, Deleting, and Voiding Drafts
This section provides an overview of draft statuses and an overview of draft voids and deletions, lists prerequisites and discusses how to:
-
Return a draft to prior status
-
Delete or void a draft.
16.8.1 Understanding Draft Statuses
If you remit or collect a draft in error, you can return the draft to its prior status rather than completely processing the draft and then voiding it. You can select multiple drafts for this purpose. The system reverses any changes that were made to the drafts when each was moved to its current status.
Note:
You cannot return a draft from the acceptance status to a prior status, or return a draft that is voided or designated as having insufficient funds (NSF) to a prior status.In the processing options for the draft entry programs (P03B602), you can specify whether to prohibit users from using this feature.
When you return a draft to a previous status, the system:
-
Issues a warning that the remittance paper or tape batch might have already been sent to the bank for processing.
-
Removes the draft from the remittance register if the draft is included in the remittance register.
-
Updates the draft invoice record (R1) in the F03B11 table to the prior pay status.
-
Updates the F03B13 table with the prior draft status and batch.
-
Removes unposted records from the F03B14 table for the current status.
-
Reverses posted records from the F03B14 table for the current status.
-
Deletes the draft record from the Draft Remittance Work File table (F03B672) if it exists (remitted using a tape format), and marks the Text Processor Header record (F007101) with a status of 3 (Suspended/Outbound).
Note:
The system retrieves the status for the Text Processor Header record from the user defined code 00/TL.
16.8.2 Understanding Draft Voids and Deletions
If you enter a draft in error, you can delete or void it. When you delete or void a draft, the system reopens any invoices that the draft paid.
You can delete a draft only when:
-
The draft is not posted.
-
The draft is at a draft-acceptance status (4).
Note:
If the draft is at a remittance or collection status, you cannot delete it; you must post the draft and then void it.
When you delete a draft, the system removes the draft records from these tables:
-
Receipt Header (F03B13)
-
Receipt Detail (F03B14)
-
Customer Ledger (F03B11)
If the draft is posted, you must void the draft. When you void a draft, the system updates these fields on the draft record in the F03B13 table:
-
Receipt NSF/Void Code field (NFVD)
The system updates this field to V.
-
Void Date (VDGJ)
The system uses the GL date that you enter when you void the draft.
-
Void Reason Code (VRE)
The system uses the reason code that you enter when you void the draft.
The system also creates a new batch, which you must post to create the reversing journal entries. You can void the draft at any stage of draft processing.
16.8.3 Prerequisite
Verify that the AAI item RD5x is set up. The system uses this AAI when you void or designate drafts as NSF.
16.8.4 Forms Used to Delete and Void Drafts
| Form Name | FormID | Navigation | Usage |
|---|---|---|---|
| Work With Drafts | W03B602A | Draft Daily Operations (G03B161), Enter Our Drafts or Enter Customer Drafts | Locate drafts. |
| Return to Prior Draft Status | W03B602L | Select a draft and then select Prior Status from the Row menu on the Work With Drafts form. | Return a draft to a prior status. |
| Confirm Delete | W03B602D | Select a draft and then select Void/Delete from the Row menu on the Work With Drafts form. | Confirm the deletion/void of a draft. |
| Void/NSF Draft | W03B602C | Click OK on the Confirm Delete form. | Specify the GL date and reason for voiding the draft. |
16.8.5 Returning a Draft to Prior Status
Access the Return to Prior Draft Status form.
Figure 16-3 Return To Prior Draft Status form
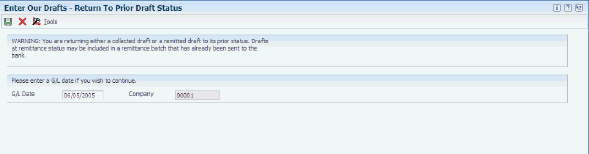
Description of ''Figure 16-3 Return To Prior Draft Status form''
16.8.6 Deleting or Voiding a Draft
Access the Work With Drafts form.
This example shows the Void/NSF Draft form.
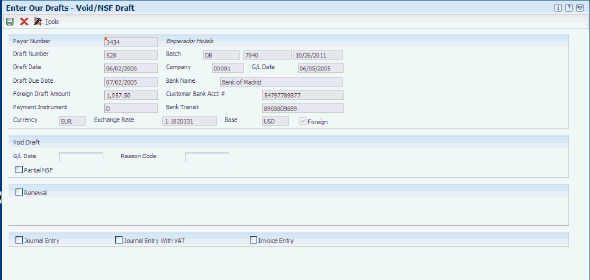
To delete or void a draft:
-
On Work With Drafts, select the draft that you want to delete or void, and then select Void/Delete from the Row menu.
-
On Confirm Delete, click OK.
-
On Void/NSF Draft, complete the G/L Date and Reason Code fields and then click OK.
You must complete both fields regardless of whether the draft is posted.
16.9 Remitting Drafts
This section provides an overview of draft remittance, discounted drafts and contingent liability, and online draft registers, and discusses how to:
-
Create a register for Accounts Receivable drafts.
-
Run the Draft Remittance program.
-
Set data selection for Draft Remittance (R03B672).
-
Set processing options for Draft Remittance (R03B672).
Country-specific functionality for draft remittance exists for France, Italy, and Spain.
See Also:
16.9.1 Understanding Draft Remittance
You remit (deposit) the draft to the bank so that it can collect the funds from the customer's bank. In certain countries, draft remittance is an optional step in the draft process. You can remit drafts to the bank for collection on either a tape or by printing a paper register. Generally, you must have complete bank account information for the customer to use an electronic format.
Before you remit the drafts to the bank, you can create a register to group drafts by bank account. The system updates the draft records with bank account information and assigns them a register number, which you can use as data selection when you run the Draft Remittance program (R03B672).
If you do not create a register, the system updates the draft records with the bank account information when you run the Draft Remittance program.
You can run the draft remittance batch process proof or final modes.
In proof mode, the system:
-
Selects accepted drafts (Draft Status 4) from the F03B13 table.
-
Verifies that the GL date is within the company's GL fiscal period.
-
Prints a report of the drafts to be remitted.
If you run the A/R Draft Remittance Paper Format program (R03B672P) in final mode, the system performs the same actions that it does in proof mode, and it also:
-
Creates a new batch header record in the Batch Control Records table (F0011) for the remittance batch.
-
Changes the payment status of the draft invoice records in the F03B11 table from D (or #, if the register was created previously) to G (draft deposited, not due).
-
Changes the draft status of the records in the F03B13 table and draft invoice records in the F03B11 table from 4 (Accepted) to 3 (Remitted - Cash or Discount) or 2 (Remitted - Contingent).
-
Creates these records in the F03B14 table, if the draft is remitted for cash or discount:
-
A record that reverses the acceptance status of the draft.
-
A record that enters a remittance status of 3 (Remitted - Cash or Discount) for the draft.
-
-
Creates these records in the F03B14 table, if the draft was remitted with contingent liability:
-
A record that reverses the acceptance status (draft status 4) of the draft.
-
A record that enters a remittance status or 2 (Remitted - Contingent) for the draft.
-
A record that accounts for the contingent liability.
-
-
Creates one record for each draft in the Draft Remittance table (F03B672).
-
Automatically removes records from the F03B672 table when it creates the pdf file that you print.
When you run the A/R Draft Remittance Magnetic Tape Format program (R03B672T) in final, the system performs the same actions that it does in final mode for paper, and it also:
-
Updates the Text Processor Header table (F007101).
-
Updates the Text Processor Detail table (F007111).
-
Assigns the batch number from Next Numbers 00/07.
Note:
You must use the Text File Processor program (P007101) to purge batches from the text processor tables (F007101 and F007111). When you purge draft remittance batches, the system also removes the records from the F03B672 table.
It is recommended that you run the draft remittance process in proof mode before you run it in final mode. This allows you to review and correct errors prior to updating records. If the system finds errors when you run the report in final mode, it prints an error message on the report.
After you remit drafts, you approve and post the remittance batch to the general ledger. The system creates the appropriate journal entries.
16.9.1.1 Error Processing
If you encounter errors when running the Draft Remittance program (R03B672):
-
Verify that you selected the correct version.
-
Verify that the GL date that you entered in the processing option is correct.
-
Verify that the as of date that you entered in the processing option is the same as or subsequent to the latest draft due date.
-
Verify that you have entered a paper or tape remittance program and version in the processing options.
16.9.2 Understanding Discounted Drafts and Contingent Liability
You can request an advance from the bank before the due date of the draft. This is called discounting a draft. When a draft is discounted, you can collect part or all of the money in advance. Some countries require businesses to recognize a contingent liability until the maturity date of the draft, as follows:
-
Before the due date of the draft, recognize the draft as cash and offset the amount as a contingent liability.
-
On the due date of the draft, close the contingent liability by processing the collection.
When you remit a draft with contingent liability, you can collect 100 percent of the draft before the due date.
You must complete the appropriate processing options for the Draft Remittance program (R03B672) to remit drafts with discounts and contingent liability.
When you post the draft remittance, the system creates journal entries for both discounted drafts and drafts that are discounted with contingent liability, as follows:
-
If the draft is remitted for discount without contingent liability, the system debits the Draft Remitted for Discount account, based on the AAI item RD3x(wherexis the payment instrument) and credits the drafts receivable account that you used.
-
When you collect the draft, the system debits a bank account (RB) and credits the Draft Remitted for Discount account (RD3x).
If the draft is remitted for discount with contingent liability, the system creates journal entries to do this:
-
Debit the Draft Remitted For Discount account, based on the AAI item RD3x (where x is the payment instrument) and credit the drafts receivable account that you used.
-
Debit the bank account and credit the Contingency Liability account, based on the AAI item RD4x (where x is the payment instrument).
When you collect the draft, the system debits the Contingency Liability account and credits the Draft Remitted for Discount account.
Note:
Do not confuse discounted drafts, which enable you to receive a cash advance from the bank, with discounted invoices.You apply drafts to invoices with discounts and without discounts.
You remit drafts for the invoice amount and wait until the bank collects it from the customer, or you remit a discounted draft, which allows you to receive part of the payment in advance of the draft due date, or you remit a discounted draft and account for the contingent liability in the general ledger.
16.9.3 Understanding Online Draft Registers
You can manually create an online register to use when remitting drafts to the bank. This is an optional step in the draft remittance process. When you create a register, you select the drafts that you want to remit to the bank for collection. You must remit those drafts to the bank by running the Draft Remittance program (R03B672) before you can create another register for the same bank account; however, you can add and remove drafts from an existing register before you remit them.
The advantages of creating a register before remitting drafts are:
-
Drafts are organized for collection by payment instrument and due date.
-
An online record of the drafts to be remitted is provided for you to review.
-
An easy method of selecting drafts when you run the Draft Remittance program is provided (you can select by draft register number).
-
The draft status is updated so that the same drafts are not remitted accidentally to the wrong bank for collection.
You can include either regular drafts or discounted drafts on the register, but all drafts must be in the same transaction currency.
When you create a register, the system:
-
Creates a batch header record in the Batches table (F0011) with a batch type &B.
-
Changes the pay status of the selected draft invoice records (F03B11) from D (draft accepted) to # (selected for payment).
-
Updates the GL bank account on the selected draft receipt records (F03B13).
-
Assigns a register number (DREG field) to the selected draft receipt records (F03B13) by concatenating a 5-digit number (starting with 00001) to the batch number.
16.9.4 Forms Used to Remit Drafts
| Form Name | FormID | Navigation | Usage |
|---|---|---|---|
| Work With Draft Registers for Payment | W03B675C | Draft Remittance and Collection (G03B162), Draft Register Creation & Review | Determine whether a register already exists for a draft. |
| Draft Register Details | W03B675D | Click Add on the Work With Draft Registers for Payment form.
Select a draft register and then click Select on the Work With Draft Register for Payment form. Enter an amount in the Total Expected field on the Batch Control form and click OK. |
Create an online register to use when remitting drafts to the bank.
Review and revise a draft register. |
| Select All Drafts | W03B675E | Select Drafts from the Form menu on the Draft Register Details form. | Locate and select the individual drafts that you want the bank to collect.
Add drafts to an existing register. |
16.9.5 Creating a Register for Accounts Receivable Drafts
Access the Draft Register Details form.
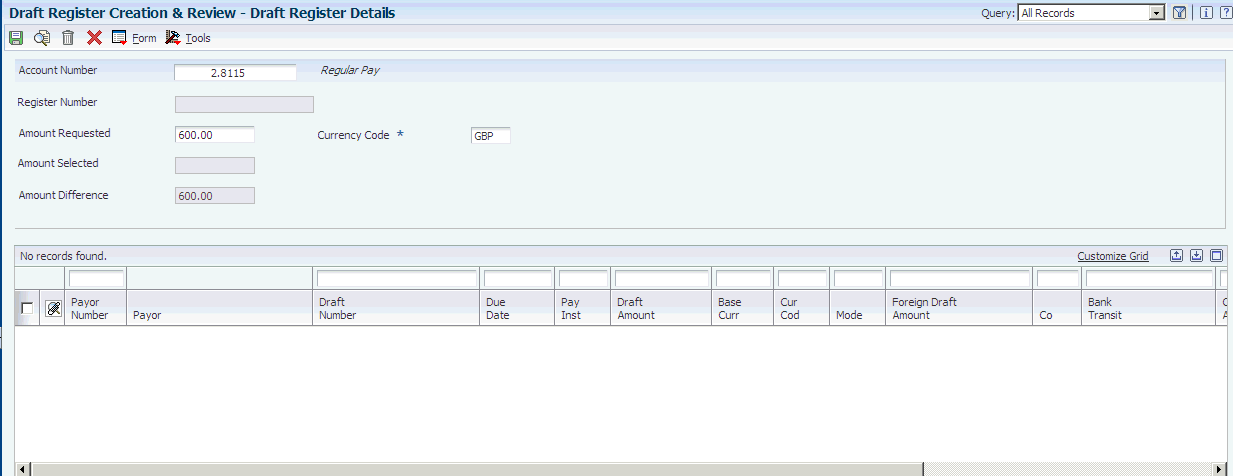
To create a register for Accounts Receivable drafts:
-
Enter the account number of the GL bank in the Account Number field.
-
Complete the Currency Code field.
-
(Optional) Complete the Amount Requested field.
-
From the Form menu, select Drafts.
-
On Select All Drafts, select the individual drafts that you want the bank to collect, and click Select.
-
On Draft Register Details, click OK.
-
Account Number
Enter the general ledger account for the bank account.
-
Amount Requested
Enter the total amount of drafts selected for remittance so that you can verify the amount of the drafts you select equals the amount that you expected.
-
16.9.6 Running the Draft Remittance Program
From the Draft Remittance and Collection menu (G03B162), select Draft Remittance.
16.9.7 Setting Data Selection for Draft Remittance (R03B672)
Multiple demonstration versions of this program are available to select drafts according to whether:
-
The draft has a bank account.
If you do not register the draft, the draft records do not have a GL bank account. Select a version that is without register (w/o Reg.).
-
You are submitting the version in proof or final mode.
-
You are remitting drafts on paper or using a tape format.
You can add other selection criteria. For example, you can select drafts on the basis of the payment instrument.
16.9.8 Setting Processing Options for Draft Remittance (R03B672)
Processing options enable you to specify the default processing for programs and reports.
16.9.8.1 Proof/Final
This processing option specifies whether to process draft remittances in proof or final mode.
- 1. Final Mode
-
Specify whether to remit drafts in proof or final mode. In proof mode, the system generates a report only of the drafts that are remitted when you run the program in final mode. In final mode, the system prints a report, changes the payment status of the draft to G (draft deposited not due), and creates journal entries in the F0911 table. Values are:
Blank: Proof mode
1: Final mode
16.9.8.2 As of Date
This processing option specifies the date to use to select draft records for remittance.
- 1. As Of Date
-
Specify the date on which to select draft records for remittance. The system selects all drafts with a due date on or before the date specified. If you leave this processing option blank, the system uses the system date.
16.9.8.3 Bank
These processing options specify which draft records to select, based on whether they were previously printed on a draft register.
- 1. Register
-
Specify whether to select draft records (F03B13) that were processed with a draft register. Draft records processed with a register have a value in the G/L Bank Account field. Draft records that were not processed with a draft register do not have a value in the G/L Bank Account field. Values are:
Blank: Select records that were not processed with a draft register.
1: Select records that were processed with a draft register.
- 2. Draft Remittance G/L Bank Account
-
Specify the G/L bank account to use for draft records processed without a register. Enter the account number in the standard format (bu.obj.sub).
Note:
Leave this processing option blank if drafts have been processed with a register.
16.9.8.4 G/L Remittance
These processing options specify account information and the exchange rate.
- 1. AAI for Draft G/L Account
-
Specify the AAI to use when you post remitted drafts. Values are:
Blank: AAI item RD2x (cash), where x is the payment instrument.
1: AAI item RD3x (discount), where x is the payment instrument.
2: AAI item RD4x (contingent liability), where x is the payment instrument.
- 2. Override Account Number for RD2/RD3 AAI
-
Specify the G/L account to use when you post remitted drafts. The system uses this account instead of the account associated with the AAI item specified in the previous processing option. The system uses the G/L account that you specify only for cash and discounted drafts (AAI items RD2x and RD3x). Use this processing option to override the G/L account for contingent liability drafts (AAI item RD4x). Enter the account number in the standard format (bu.obj.sub).
- 3. Override Account Number for RD4 AAI
-
Specify the G/L account to use when you post remitted drafts. The system uses this account instead of the account associated with the AAI item specified in the previous processing option. The system uses the G/L account that you specify only for the contingent liability account (AAI items RD4x). Enter the account number in the standard format (bu.obj.sub).
- 4. Exchange Rate Override
-
Specify the exchange rate to use for drafts that pay foreign invoices. The system applies the exchange rate that you specify to all drafts regardless of the invoice currency. If you leave this processing option blank, the system locates the exchange rate from the Currency Exchange Rates table (F0015).
Note:
This processing option is applicable only to drafts remitted with contingent liability.
16.9.8.5 G/L Date
This processing option specifies the G/L date to use for the journal entries that the system creates for draft remittance.
- 1. Journal Entry G/L Date
-
Specify the G/L date to assign to the journal entry that the system generates for remitted drafts. If you leave this processing option blank, the system assigns the system date.
16.9.8.6 Maximum
This processing option specifies the maximum amount for the sum of drafts that you remit.
- 1. Maximum Accumulated Drafts Amount
-
Specify the maximum amount allowed for the sum of the drafts that you remit. If the total amount of the drafts selected for processing exceeds the amount specified, the system does remit the draft records, and you must use data selection to limit the amount of drafts to be processed.
16.9.8.7 Minimum
This processing option specifies the minimum amount for the sum of drafts that you remit.
- 1. Minimum Remittance Process Amount
-
Specify the minimum amount required to process drafts for remittance. If the total amount of the drafts selected for processing is less than or equal to the amount specified, the system does not remit the draft records.
16.9.8.8 Paper/Tape
These processing options specify the draft remittance programs to use for the bank format.
- 1. Paper/Tape Remittance Program
-
Specify the remittance program for the system to use for the bank format. If you do not specify a program, the system does not process the remittance. These remittance programs are available:
-
R03B672AR: Remittance Date PO Template AGR
-
R03B672IP: AR Magnetic RIBA Draft Remittance Paper Format
-
R03B672IR: A/R Magnetic RID Draft Remittance Tape Format
-
R03B672IT: A/R Magnetic RIBA Draft Remittance Tape Format
-
R03B672P: A/R Draft Remittance Paper Format
-
R03B672T: A/R Draft Remittance Magnetic Tape Format
-
- 2. Paper/Tape Remittance Version
-
Specify the version of the remittance program for the system to use. If you leave this processing option blank, the system uses version ZJDE0001.
16.9.8.9 Custom Report
These processing options specify a custom draft remittance report program.
- 1. Custom Remittance Report - Program ID
-
Specify the program to use to generate a custom report for the remittance. If you leave this processing option blank, the system does not generate a report.
- 2. Custom Remittance Report - Version ID
-
Specify the version of the custom remittance report program for the system to use. If you leave this processing option blank, the system does not generate a report.
16.10 Designating a Draft as Insufficient Funds (NSF)
This section provides an overview of NSF drafts and the NSF Drafts Notification report, and discusses how to:
-
Designate a draft as NSF (full or partial).
-
Print the NSF Drafts Notification report.
-
Set processing options for NSF Drafts Notification (R03B574).
See Also:
16.10.1 Understanding NSF Drafts
If the customer does not have sufficient funds to pay the draft, you can designate the draft as NSF (insufficient funds). You can designate the entire draft amount or a portion of the draft amount as NSF.
16.10.1.1 Full NSF Drafts
A full NSF draft is a draft for which you did not collect any money. You can use the NSF feature at any stage of draft processing to reopen the existing invoices and process the draft. When you designate a draft as NSF, the system:
-
Removes the open amount from the draft record (R1) in the F03B11 table.
-
Assigns a pay status of P to the draft record (R1).
-
Assigns the G/L date that you entered as the date closed on draft record (R1).
-
Creates a new batch for the NSF record.
You must post this batch to create the appropriate journal entries and update the F0911 and F0902 tables.
You can also renew the draft using the draft renewal feature.
When you designate a draft as NSF, you can also create a new invoice or create a journal entry directly from the Void/NSF Draft form by selecting the appropriate option. This enables you to charge the customer for any fees that the bank might have charged you, or to create a journal entry for the fees. If the fees are taxable, you can designate the tax on the invoice or select the Journal Entry with VAT option.
16.10.1.2 Partial NSF Draft
Rather than designate the entire draft amount as NSF, you can specify the amount of the draft that cannot be collected by selecting the Partial NSF option. Because the system cannot determine which invoices to reopen, the system keeps the original invoices closed (paid) and creates a standalone chargeback invoice (document type NP) for the amount of the NSF when you designate a partial NSF.
You can enter a partial NSF draft between remittance and collection stages or after the collection stage of draft processing, but not during the acceptance stage. For example, you might learn that the customer has insufficient funds for a payment after you have remitted the draft to the bank or after you have moved the draft to collection status.
You can create a renewal draft when you anticipate a future payment for the amount of the NSF draft. The gross amount of the renewal draft equals the amount of the NSF draft.
When you create a partial NSF, the system:
-
Creates a record in the F03B14 table with a type input code of 30 to designate a partial NSF. The system generates this record to adjust the amount to be collected from the customer's bank.
-
Creates a record in the F03B14 table with a type input code of 36 to designate a standalone chargeback record that the system created as a result of the partial NSF.
-
Creates an invoice chargeback record in the F03B11 table with a document type of NP for the amount of the NSF.
Note:
The system includes partial NSF drafts in the NSF calculation when you run the Statistics History Update program (R03B16A). The system does not include standalone chargeback records for partial NSF drafts (document type NP) in the NSF calculation.
16.10.1.3 Renewal Drafts
When you designate a draft as having insufficient funds (NSF drafts), you can specify that the draft should be renewed. When renewing drafts, the system creates a new draft for the insufficient amount. The system applies this new draft to the reopened invoices or to the chargeback, depending on how the Partial NSF option is set on the Void/NSF Draft form for the record.
If you renew the draft, the system:
-
Creates a new draft in the F03B13, F03B14, and F03B11 tables.
-
Matches the newly created draft to the original invoices that were open, or to the chargeback invoice that the system created if the Partial NSF option was selected. You can revise, remove, or add invoice records as desired.
-
Updates the G/L date of the original draft in the F03B13 table.
16.10.2 Understanding the NSF Drafts Notification Report
To monitor the total amount of drafts that have been returned for insufficient funds, print the NSF Drafts Notification report. The system prints a separate report for each customer that has NSF drafts and allows you to set up and print a message on the report to provide them with additional information. You might want to set up different messages for different levels of severity. For example, "The following drafts have been returned by the bank for insufficient funds. Please remit the funds to the bank immediately."
The system prints records from the F03B14 table, but uses the invoice date from the R1 draft record in the F03B11 table.
16.10.3 Forms Used to Designate a Draft as Insufficient Funds (NSF)
| Form Name | FormID | Navigation | Usage |
|---|---|---|---|
| Work With Drafts | W03B602A | Draft Daily Operations (G03B161), Enter Our Drafts or Enter Customer Drafts. | Locate drafts. |
| Confirm Delete | W03B602D | Select a draft and then select NSF from the Row menu on the Work With Drafts form. | Confirm the designation of a draft as NSF. |
| Void/NSF Draft | W03B602C | Click OK on the Confirm Delete form. | Designate a draft as NSF (full or partial). |
| Create Standalone Payment | W03B602H | Enter the information to create a partial NSF and click OK on the Void/NSF Draft form. | Create a stand-alone transaction to write off the part of the payment that was not received. |
16.10.4 Designating a Draft as NSF (Full or Partial)
Access the Void/NSF Draft form.
To designate a draft as NSF (full or partial):
-
Complete the G/L Date and Reason Code fields.
-
To specify a partial NSF, select the Partial NSF option and complete the NSF Amount field. If you are specifying a full NSF, skip this step.
-
To specify renewal information, complete the Renewal, Draft Number, Draft Date, Draft Due Date, Payment Instrument, and Exchange Rate fields.
The system creates a new draft and applies it to the open invoices or to the newly created chargeback record, depending on whether you specified a partial NSF.
-
To create a journal entry for bank fees, select the Journal Entry option.
-
To create a journal entry with VAT (value added tax), select the Journal Entry With VAT option.
-
To create an invoice to charge the customer for bank fees, select the Invoice Entry option.
-
Click OK.
-
If you specified a partial NSF, the system displays the Create Standalone Payment form. Complete the Customer, Customer Reference, Chargeback Reason Code, and Chargeback G/L Offset fields and click OK.
-
If you specified draft renewal, the Draft Entry form displays the new draft that was created and the open invoice or chargeback. On Draft Entry, you can change invoice information as necessary.
-
NSF Amount (insufficient funds amount)
Enter the amount of insufficient funds. This field is displayed if you select the Partial NSF option When you complete this field, the system creates a partial NSF document type NP for the insufficient amount in the F03B11 table. If do not select the Partial NSF option, the system re-opens the invoices paid by this draft for the full amount applied to the draft.
The system creates a chargeback invoice for the amount specified in this field.
You can enter an amount up to (but not including) the total amount of the draft. When you use a foreign currency, this field is displayed as Foreign NSF Amount.
-
Customer Reference
Enter an alphanumeric value to be used as a cross-reference or secondary reference number. Typically, this is the customer number, supplier number, or job number.
-
Chargeback Reason Code
Enter the code that identifies the reason that a chargeback was generated for an invoice during receipt entry. Typical chargeback reason codes are:
DA: Disputed amounts.
DD: Unearned (disallowed) discount amount.
Note:
The system does not accept blank as a value, even if it is defined in the user defined code table. -
Chargeback G/L Offset
Enter the code that indicates the A/R trade account that you want the system to use when you post the chargeback. To locate the account, the system concatenates this code to the AAI item RC. The system uses this hierarchy to locate the A/R trade account to use for the chargeback record:
-
If you use multicurrency, the system searches for RCxxx, where xxx is the currency code for the receipt.
-
If the system does not locate the AAI, it uses RCxxx,x where xxxx is the value in the Chargeback G/L Offset field.
-
If the system does not locate the AAI, it uses RC for company 00000.
-
-
16.10.5 Printing the NSF Drafts Notification Report
From the Draft Remittance and Collection menu (G03B162), select NSF Drafts Notification.
16.10.6 Setting Processing Options for NSF Drafts Notification (R03B574)
Processing options enable you to specify the default processing for programs and reports.
16.10.6.1 Print
These processing options specify the information that prints on the report.
- 1. Print Date
-
Specify the date to print on the report. If you leave this processing option blank, the system prints today's date.
- 2. Summary
-
Specify whether to summarize draft detail lines by document number. Values are:
Blank: Do not summarize draft detail lines. The system prints each draft line.
1: Summarize draft detail lines. The system prints one detail line for each draft document number.
16.10.6.2 Date Range
These processing options specify the records to print on the report.
- 1. From Date and 2. Through Date
-
Specify the range of dates to use to select records to print on the report. The system prints all drafts with a due date on or after the date specified in the From Date processing option as well as all drafts with a due date on or before the date specified in the Through Date processing option. If you leave this processing option blank, the system uses today's date.
16.10.6.3 System
These processing options specify the text to print on the report.
To print a message on the report, you must first set up the product code, user code, letter code, and message using the Generic Message/Rates Records program (P00191)
You can select any combination of codes to use for P00191, but you must specify the same codes in the processing options on the System tab.
- 1. System Code, 2. User Defined Code, and 3. NSF Letter Code
-
Specify the system, user defined code, and NSF letter code (product code) that corresponds to the text that you want the system to retrieve from the General Message Detail table (F00192) to print on the report.
16.11 Collecting Drafts
This section provides an overview of draft collection and discusses how to:
-
Run the Draft Collection with Status Update program.
-
Set processing options for Draft Collection with Status Update (R03B680).
16.11.1 Understanding Draft Collection
You can arrange to collect funds for a draft in one of these ways:
-
Wait until the funds become available on the due date specified by the draft.
-
Request an advance from the bank before the due date of the draft. This is called discounting the draft. Typically, banks charge a fee when they advance funds for a draft before its due date. You must account for this fee separately during draft collection.
Your bank collects the funds for the draft from the customer's bank on the due date of the draft. Your bank informs you if it cannot collect the funds. On or after the due date, both you and the customer recognize the transfer of funds. You update the status of the draft in the records to show that it has been collected.
Some companies prefer to close the draft on the draft due date, while others wait until the payment appears on their bank statement. Processing options control the pay status code that the system assigns to paid draft records (R1) and whether to close the draft. The system removes the open amount from the draft record and creates records in the F03B14 table when you close the draft. If you select to leave the draft records open, you must run the Draft Collection with Status Update program (R03B680) again to select and update the draft records and to create matching records in the F03B14 table. After you collect the draft and close it, you must post the draft batch to create the appropriate journal entries.
Additionally, the bank might assess fees for draft collection. Typical fees include charges for incomplete bank information, discounted drafts, and commissions. In addition, the tax regulations in certain countries might require that VAT be assessed on these fees. You account for all fees by creating a separate journal entry using the Journal Entries with VAT program (P09106).
You can run the Draft Collection with Status Update program in either proof or final mode. This table illustrates the differences between these two modes:
In proof mode, the system:
-
Selects drafts that are either accepted or remitted.
-
Prints a report that shows the drafts to be updated. It shows all drafts that have a payment status of G (draft deposited, not due) with a due date that you specify in a processing option.
In final mode, the system:
-
Creates a batch header record in the Batch Control Records table (F0011) for collected drafts. You must post this batch to create the appropriate journal entries.
-
Changes the pay status of draft invoice records (R1) to P (paid) or to another value that you select.
-
Changes the draft status on the records in the F03B13 table from either 2 (Remitted - Cash or Discount) or 3 (Remitted - Contingent) to 0 (Collected).
-
Creates one or more records in the F03B14 table, depending on whether you remit drafts. If you remit drafts, the system creates a reversing draft remittance record in addition to the record the system creates for the collected draft.
16.11.2 Running the Draft Collection with Status Update Program
From the Draft Remittance and Collection menu (G03B162), select Draft Collection with Status Update.
16.11.3 Processing Options for Draft Collection with Status Update (R03B680)
Processing options enable you to specify the default processing for programs and reports.
16.11.3.1 Proof/Final
These processing options specify whether to process draft collections in proof or final mode.
- 1. Final Mode
-
Specify whether to process drafts for collection in proof or final mode. In proof mode, the system generates a report of the drafts that are eligible for collection. In final mode, the system generates a report, changes the payment status of the draft from G (draft deposited not due) to P (paid in full), and creates journal entries. Values are:
Blank: Proof mode
1: Final mode
16.11.3.2 As Of Date
This processing option specifies the date to use to select draft records for collection.
- 1. As Of Date
-
Specify the date for the system to use to process drafts for collection. The system selects all drafts with a due date on or before the date specified that are eligible for collection. If you leave this processing option blank, the system uses the system date.
16.11.3.3 G/L Date
These processing options specify the date to assign as the G/L date on the journal entries that the system creates.
- 1. Journal Entry G/L Date
-
Specify the G/L date for the system to assign to the journal entry it generates for collected drafts. If you leave this processing option blank, the system assigns the system date.
- 2. G/L Date From Bank Account Float Day
-
Specify whether to add the float days specified for the G/L bank account in the Bank Transit Master table (F0030) to the draft due date used as the G/L date on the journal entry that the system generates for draft collection. Values are:
Blank: Use the date from the previous processing option.
1: Add the number of float days specified for the G/L bank account to the due date.
Note:
The system generates a separate journal entry for each G/L date that the system calculates. - 3. G/L Date from Float Day Entered
-
Specify whether to use a different number of float days to add to the due date used as the G/L date, instead of the days specified for the bank account in the Bank Transit Master table (F0030). Values are:
Blank: Do not specify float days. Use one of the previous processing options to determine the G/L date.
1: Use the float days specified in the next processing option to determine the G/L date and to select draft records. If you do not specify the float days in the next processing option, the system uses one of the previous processing options or the system date.
- 5. Payment Instrument
-
Specify the payment instrument for the system to use to select draft records. Use this processing option only if you specified 1 in processing option 3 (G/L Date from Float Day Entered). Otherwise, the system does not select draft records by payment instrument. You are not required to complete this processing option.
16.11.3.4 Pay Status
These processing options specify the pay status for collected draft invoice records and whether to remove the open amount, if one exists.
- 1. Pay Status Code
-
Specify the payment status code for the system to assign to collected drafts. The code that you specify must be set up in the Payment Status Codes UDC (00/PS). If you leave this processing option blank, the system assigns the payment status code P (Paid in Full).
Note:
This processing option works with the Close Draft processing option. If you select to update the pay status to P, but do not close the draft, the system considers the draft open and:-
Does not create records in the F03B14 table for the R1 draft invoice records.
-
Does not update the pay status of the R1 draft records to P; it updates the pay status to A.
-
Creates an empty batch header record for batch type DB. You can either post the empty batch header record or run the Batch to Detail integrity report (R007031) to delete it.
-
- 2. Close Draft
-
Specify whether to remove the open amount from the R1 draft invoice record (F03B11) if one exists. Values are:
Blank: Remove the open amount from the R1 invoice draft records.
1: Do not remove the open amount.
Note:
This processing option works with the Pay Status Code processing option. If you select to update the pay status to P, but do not close the draft, the system considers the draft open and:-
Does not create records in the F03B14 table for the R1 draft records.
-
Does not update the pay status of the R1 draft records to P; it updates the pay status to A.
-
Creates an empty batch header record for batch type RB. You can either post the empty batch header record or run the Batch to Detail integrity report (R007031) to delete it.
-
16.11.3.5 Exchange Rate
This processing option specifies the exchange rate to use to calculate gain or loss records for the collected draft records.
- 1. Exchange Rate Override
-
Specify the exchange rate to use for drafts that pay foreign invoices. The system applies the exchange rate that you specify to all drafts regardless of the invoice currency. If you leave this processing option blank, the system locates the exchange rate from the Currency Exchange Rates table (F0015).
Note:
This processing option is applicable only to drafts remitted without contingent liability.