Planner Workbench
This chapter covers the following topics:
- Overview of Planner Workbench
- Tailoring the User Interface
- Using the Context Windows
- Implementing Planning Recommendations
- Interactive Scheduling Using the Gantt Chart
- Accessing Planner Workbench From Oracle Collaborative Planning
- Displaying Suppliers Modeled as Organizations
Overview of Planner Workbench
The Planner Workbench is a powerful graphical tool that lets you perform advanced simulation, review plan performance, and take actions based on system recommendations.
You can use:
-
Planner Workbench to view the output of a plan run. Navigate to Supply Chain Plan > Workbench
-
Collections Workbench to view collected data from the source instance. Navigate to Collections > View Collected Data
Both have the same structures and navigation styles.
Planning Detail Report
The Planning Detail Report provides a simple and consolidated report that shows the output of the advanced supply chain planning process. The report gives detailed information to help you understand and analyze the supply chain planning results by presenting the data selectively and coherently. For a given Supply Chain Plan, the report includes the relevant details about items, resources, gross requirements, scheduled receipts, planned orders, plan constraints, and exceptions in separate worksheets.
General Navigation
The Planner Workbench consists of two main tabs, Plan and Queries. The Plan tabbed pane appears by default. However, you can change the default pane settings in the Preferences window. You can specify Queries as the default tab in the Others tabbed pane of the Preferences window.
The Plan tabbed pane displays a list of plans in a tree structure. You can drill down to the elements in the tree and view corresponding information such as exception messages, supply and demand. The detailed information related to the selected item appears in separate context windows. You can use the following to navigate to various context windows for the selected item:
-
Icons
-
Tools menu
-
Right-click pop-up menu
The Plan tabbed pane displays all available plans for your organization whereas the Queries tabbed pane displays filtered information. You can create specific queries to filter items, resources, supply, demand, exception messages, and suppliers according to your criteria in the Queries tabbed pane. For more information on the Queries tabbed pane, refer to Queries Tabbed Pane.
Plan Tabbed Pane
The Plan tabbed pane displays a list of plans for an organization. These plans are arranged in a hierarchical tree format. You can expand a plan to view its elements or nodes.
View By
You can view a plan by:
-
Actions
-
Items
-
Organizations
-
Projects
-
Resources
-
Suppliers
You can select your view by preference from the View By drop-down menu that is available at the top in the Navigator. The following sections show the drill down information for each view.
Actions
Plans > Versions >Exception Groups ...
For exception sets other than Recommendations,
... > Exceptions > Organizations > Items
For Recommendations exception set,
... > Scheduled Receipt Type > Organizations > Items
Items
Plans > Product Families/Models/Option Classes or Categories > Items ...
... > Organizations > Components/Departments/Lines/Transportation Resources
... > Approved Suppliers
Organizations
Plans > Organizations ...
... > Product Families/Models/Option Classes or Categories > Items > Components/Approved Suppliers
... > Departments > Resources (owned) > Items > Components/Approved Suppliers
... > Transportation Resources
Projects
Plans > Organizations ...
... > Planning Groups > Common > Items
... > Items > Planning Groups > Common
Resources
Plans > Organizations > Department Classes, Resource Groups, Lines, or Transportation Resources > Departments > Resources > Items
Suppliers
Plans > Approved Suppliers > Categories > Items Organizations
Drill Down
In any window with summary information like actions summary or horizontal plan, you can drill down to more detailed information by double-clicking on an element. This feature lets you do the following:
-
Drill down on action messages to view details of a particular action.
-
Drill down to different levels in the Items, Organizations, and Resources categories to view details.
-
Drill either down or up from a supply or demand order in the Pegging tree.
-
When working in the Items or Organizations category, drill down from the Horizontal Plan to view supply/demand details. When working in the Resources category, drill down from the Horizontal Plan to view resource availability.
-
When working in the Items or Organizations category, drill down from the Vertical Plan to view supply/demand details.
Multi-selecting in the Navigator
You can multi-select items or nodes in the Navigator:
-
Expand the tree and select a node.
-
Hold the Shift key down and select another node.
You can right-click and select an option to view information about the multiple nodes you selected.
Note: You cannot use multi-select to select two nodes that do not belong to the same folder, nor can you multi-select an item and a product family.
Navigating Using Icons
You can use the icons in the Navigator to view detailed information about the element you select.
-
Create, save and execute queries for filtering items, exception messages, resources, suppliers, supply and demand based on specific criteria. The first icon is for creating a query while the second and third are for saving and executing queries, respectively.
-
View the horizontal plan.
-
View the supply and demand details.
-
View the exception messages related to the plan or the element.
-
View the items related to the plan or the element.
-
View the Gantt chart.
-
View additional details such as key indicators, process effectivity, and resources.
Based on your selection of plans or elements, icons that are not relevant may get disabled. You can select multiple items using Control-Click.
Pull-Down Menus
Pull-down menus take context from the Planner Workbench tree. For example, if an item node is selected, the pull-down menus will be related to that item. If a resource is selected, the pull-down menu will be related to that resource.
Right-click Menu Options
Right-click menu take context from the Planner Workbench tree. For example, if you select an item node, the right-click menu options related to that item appear. The right-click menu options available for various node types (elements) when you view by Actions, Items, Organizations, Projects, Resources, and Suppliers are listed.
Refer the following table for right-click menu options for various node types in view by Actions:
| Node Type | Right-click Menu Options |
|---|---|
| Plan | Exceptions > submenu: |
| Summary | |
| Details | |
| Supply/Demand > submenu: | |
| Supply | |
| Demand | |
| Supply/Demand | |
| Onhand | |
| Items > submenu: | |
| Items | |
| Resources > submenu: | |
| Resources | |
| Key Indicators | |
| Options | |
| Refresh > submenu: | |
| All | |
| Only Selected | |
| Properties | |
| Delete | |
| Help | |
| Versions / Exceptions Group / Exceptions | Exceptions > submenu: |
| Summary | |
| Details | |
| Supply/Demand > submenu: | |
| Supply | |
| Demand | |
| Supply/Demand | |
| Onhand | |
| Items > submenu: | |
| Items | |
| Resources > submenu: | |
| Resources | |
| Refresh > submenu: | |
| All | |
| Only Selected | |
| Properties | |
| Delete | |
| Help | |
| Organization | Exceptions > submenu: |
| Summary | |
| Details | |
| Supply/Demand > submenu: | |
| Supply | |
| Demand | |
| Supply/Demand | |
| Onhand | |
| Items > submenu: | |
| Items | |
| Resources > submenu: | |
| Resources | |
| Key Indicators | |
| Refresh > submenu: | |
| All | |
| Only Selected | |
| Properties | |
| Delete | |
| Help | |
| Items | Exceptions > submenu: |
| Summary | |
| Details | |
| Horizontal Plan > submenu: | |
| Default | |
| Vertical Plan | |
| Supply/Demand > submenu: | |
| Supply | |
| - Demand | |
| Supply/Demand | |
| Onhand | |
| Items > submenu: | |
| Items | |
| Substitutes | |
| Resources > submenu: | |
| Resources | |
| Supply Chain > submenu: | |
| Sources | |
| Supply Chain Bill | |
| Destinations | |
| BOM/Routings > submenu: | |
| Components | |
| Routing Operations | |
| Where Used | |
| Process Effectivity | |
| Co-Products | |
| Key Indicators | |
| Refresh >submenu includes All and Only Selected | |
| Properties | |
| Delete | |
| Help |
Refer the following table for right-click menu options for various node types in view by Items.
| Node Type | Right-click Menu Options |
|---|---|
| Plan | Exceptions > submenu: |
| Summary | |
| Details | |
| Supply/Demand > submenu: | |
| Supply | |
| Demand | |
| Supply/Demand | |
| Onhand | |
| Items > submenu: | |
| Items | |
| Resources > submenu: | |
| Resources | |
| Key Indicators | |
| Options | |
| Refresh > submenu: | |
| All | |
| Only Selected | |
| Properties | |
| Delete | |
| Help | |
| Categories | Exceptions > submenu: |
| Summary | |
| Details | |
| Supply/Demand > submenu: | |
| Supply | |
| Demand | |
| Supply/Demand | |
| Onhand | |
| Items > submenu: | |
| Items | |
| Resources > submenu: | |
| Resources | |
| Key Indicators | |
| Expand Partial | |
| Refresh > submenu: | |
| All | |
| Only Selected | |
| Properties | |
| Delete | |
| Help | |
| Items / Organizations / Components / Where Used | Exceptions > submenu: |
| Summary | |
| Details | |
| Horizontal Plan > submenu: | |
| Default | |
| Supply/Demand > submenu: | |
| Supply | |
| Demand | |
| Supply/Demand | |
| Onhand | |
| Items > submenu: | |
| Items | |
| Resources > submenu: | |
| Resources | |
| Supply Chain > submenu: | |
| Sources | |
| Supply Chain Bill | |
| Destinations | |
| BOM/Routings > submenu: | |
| Components | |
| Routing Operations | |
| Where Used | |
| Process Effectivity | |
| Co-Products | |
| Key Indicators | |
| Refresh > submenu: | |
| All | |
| Only Selected | |
| Properties | |
| Delete | |
| Help |
Refer the following table for right-click menu options for various node types in view by Organizations.
| Node Type | Right-click Menu Options |
|---|---|
| Plans | Exceptions > submenu: |
| Summary | |
| Details | |
| Supply/Demand > submenu: | |
| Supply | |
| Demand | |
| Supply/Demand | |
| Onhand | |
| Items > submenu: | |
| Items | |
| Resources > submenu: | |
| Resources | |
| Key Indicators | |
| Options | |
| Refresh > submenu: | |
| All | |
| Only Selected | |
| Properties | |
| Delete | |
| Help | |
| Organizations | Exceptions > submenu: |
| Summary | |
| Details | |
| Supply/Demand > submenu: | |
| Supply | |
| Demand | |
| Supply/Demand | |
| Onhand | |
| Items > submenu: | |
| Items | |
| Resources > submenu: | |
| Resources | |
| Key Indicators | |
| Refresh > submenu: | |
| All | |
| Only Selected | |
| Properties | |
| Delete | |
| Help | |
| Categories | Exceptions > submenu: |
| Summary | |
| Details | |
| Supply/Demand > submenu: | |
| Supply | |
| Demand | |
| Supply/Demand | |
| Onhand | |
| Items > submenu: | |
| Items | |
| Resources > submenu: | |
| Resources | |
| Key Indicators | |
| Expand Partial | |
| Refresh > submenu: | |
| All | |
| Only Selected | |
| Properties | |
| Delete | |
| Help | |
| Items | Exceptions > submenu: |
| Summary | |
| Details | |
| Horizontal Plan > submenu: | |
| Default | |
| Vertical Plan | |
| Supply/Demand > submenu: | |
| Supply | |
| Demand | |
| Supply/Demand | |
| Onhand | |
| Items > submenu: | |
| Items | |
| Substitutes | |
| Resources > submenu includes Resources | |
| Supply Chain > submenu: | |
| Sources | |
| Supply Chain Bill | |
| Destinations | |
| BOM/Routings > submenu: | |
| Components | |
| Routing Operations | |
| Where Used | |
| Process Effectivity | |
| Co-Products | |
| Key Indicators | |
| Refresh > submenu includes All and Only Selected | |
| Properties | |
| Delete | |
| Help | |
| Departments / Resources / Transportation Resources | Exceptions > submenu: |
| Summary | |
| Details | |
| Supply/Demand > submenu: | |
| Supply | |
| Demand | |
| Supply/Demand | |
| Onhand | |
| Items > submenu: | |
| Items | |
| Resources > submenu: | |
| Resources | |
| Resource Availability | |
| Resource Requirements | |
| Gantt Chart | |
| Key Indicators | |
| Refresh > submenu: | |
| All | |
| Only Selected | |
| Properties | |
| Delete | |
| Help |
Refer the following table for right-click menu options for various node types in view by Projects.
| Node Type | Right-click Menu Options |
|---|---|
| Plans | Exceptions > submenu: |
| Summary | |
| Details | |
| Supply/Demand > submenu: | |
| Supply | |
| Demand | |
| Supply/Demand | |
| Onhand | |
| Items > submenu: | |
| Items | |
| Resources > submenu: | |
| Resources | |
| Key Indicators | |
| Options | |
| Refresh > submenu: | |
| All | |
| Only Selected | |
| Properties | |
| Delete | |
| Help | |
| Organizations | Exceptions > submenu: |
| Summary | |
| Details | |
| Supply/Demand > submenu: | |
| Supply | |
| Demand | |
| Supply/Demand | |
| Onhand | |
| Items > submenu: | |
| Items | |
| Resources > submenu: | |
| Resources | |
| Key Indicators | |
| Refresh > submenu: | |
| All | |
| Only Selected | |
| Properties | |
| Delete | |
| Help | |
| Planning Groups / Projects / Tasks | Exceptions > submenu: |
| Summary | |
| Details | |
| Supply/Demand > submenu: | |
| Supply | |
| Demand | |
| Supply/Demand | |
| Onhand | |
| Items > submenu: | |
| Items | |
| Key Indicators | |
| Refresh > submenu: | |
| All | |
| Only Selected | |
| Properties | |
| Delete | |
| Help | |
| Items | Exceptions > submenu: |
| Summary | |
| Details | |
| Horizontal Plan > submenu: | |
| Default | |
| Vertical Plan | |
| Supply/Demand > submenu: | |
| Supply | |
| Demand | |
| Supply/Demand | |
| Onhand | |
| Items > submenu: | |
| Items | |
| Substitutes | |
| Supply Chain > submenu: | |
| Sources | |
| Supply Chain Bill | |
| Destinations | |
| BOM/Routings > submenu: | |
| Components | |
| Routing Operations | |
| Where Used | |
| Process Effectivity | |
| Co-Products | |
| Key Indicators | |
| Refresh > submenu: | |
| All | |
| Only Selected | |
| Properties | |
| Delete | |
| Help |
Refer the following table for right-click menu options for various node types in view by Resources.
| Node Type | Right-click Menu Options |
|---|---|
| Plans | Exceptions > submenu: |
| Summary | |
| Details | |
| Supply/Demand > submenu: | |
| Supply | |
| Demand | |
| Supply/Demand | |
| Onhand | |
| Items > submenu: | |
| Items | |
| Resources > submenu: | |
| Resources | |
| Key Indicators | |
| Options | |
| Refresh > submenu: | |
| All | |
| Only Selected | |
| Properties | |
| Delete | |
| Help | |
| Organizations | Exceptions > submenu: |
| Summary | |
| Details | |
| Supply/Demand > submenu: | |
| Supply | |
| Demand | |
| Supply/Demand | |
| Onhand | |
| Items > submenu: | |
| Items | |
| Resources > submenu: | |
| Resources | |
| Key Indicators | |
| Refresh > submenu: | |
| All | |
| Only Selected | |
| Properties | |
| Delete | |
| Help | |
| Department Classes / Departments | Exceptions > submenu: |
| Summary | |
| Details | |
| Supply/Demand > submenu: | |
| Supply | |
| Demand | |
| Supply/Demand | |
| Onhand | |
| Items > submenu: | |
| Items | |
| Resources > submenu: | |
| Resources | |
| Resource Availability | |
| Resource Requirements | |
| Gantt Chart | |
| Key Indicators | |
| Refresh > submenu: | |
| All | |
| Only Selected | |
| Properties | |
| Delete | |
| Help | |
| Resources / Resource Groups / Transportation Groups | Exceptions > submenu: |
| Summary | |
| Details | |
| Supply/Demand > submenu: | |
| Supply | |
| Demand | |
| Supply/Demand | |
| Onhand | |
| Items > submenu: | |
| Items | |
| Resources > submenu: | |
| Resources | |
| Resource Availability | |
| Resource Requirements | |
| Gantt Chart | |
| Key Indicators | |
| Refresh > submenu: | |
| All | |
| Only Selected | |
| Properties | |
| Delete | |
| Help | |
| Items | Exceptions > submenu: |
| Summary | |
| Details | |
| Horizontal Plan > submenu: | |
| Default | |
| Vertical Plan | |
| Supply/Demand > submenu: | |
| Supply | |
| Demand | |
| Supply/Demand | |
| Onhand | |
| Items > submenu: | |
| Items | |
| Substitutes | |
| Supply Chain > submenu: | |
| Sources | |
| Supply Chain Bill | |
| Destinations | |
| BOM/Routings > submenu: | |
| Components | |
| Routing Operations | |
| Where Used | |
| Process Effectivity | |
| Co-Products | |
| Key Indicators | |
| Refresh > submenu: | |
| All | |
| Only Selected | |
| Properties | |
| Delete | |
| Help |
Refer the following table for right-click menu options for various node types in view by Suppliers.
| Node Type | Right-click Menu Options |
|---|---|
| Plans / Organizations | Exceptions > submenu: |
| Summary | |
| Details | |
| Supply/Demand > submenu: | |
| Supply | |
| Demand | |
| Supply/Demand | |
| Onhand | |
| Items > submenu: | |
| Items | |
| Resources > submenu: | |
| Resources | |
| Key Indicators | |
| Options | |
| Refresh > submenu: | |
| All | |
| Only Selected | |
| Properties | |
| Delete | |
| Help | |
| Approved Suppliers | Exceptions > submenu: |
| Summary | |
| Details | |
| Supply/Demand > submenu: | |
| Supply | |
| Demand | |
| Supply/Demand | |
| Onhand | |
| Items > submenu: | |
| Items | |
| Key Indicators | |
| Refresh > submenu: | |
| Only Selected | |
| Properties | |
| Delete | |
| Help | |
| Categories | Exceptions > submenu: |
| Summary | |
| Details | |
| Supply/Demand > submenu: | |
| Supply | |
| Demand | |
| Supply/Demand | |
| Onhand | |
| Items > submenu: | |
| Items | |
| Resources > submenu: | |
| Resources | |
| Key Indicators | |
| Expand Partial | |
| Refresh > submenu: | |
| All | |
| Only Selected | |
| Properties | |
| Delete | |
| Help | |
| Items | Exceptions > submenu: |
| Summary | |
| Details | |
| Horizontal Plan > submenu: | |
| Default | |
| Supply/Demand > submenu: | |
| Supply | |
| Demand | |
| Supply/Demand | |
| Onhand | |
| Items > submenu: | |
| Items | |
| Resources > submenu: | |
| Resources | |
| Key Indicators | |
| Supplier Information | |
| Refresh > submenu: | |
| All | |
| Only Selected | |
| Properties | |
| Delete | |
| Help |
Properties Window
You can view properties for any node in the Navigator or pegging tree by selecting the node, then choosing [right-click] > Properties.
For an MRP plan with an MPS plan as a demand schedule, the MRP item may peg to a demand in the MPS plan. In this case, the Properties window displays pegging information about the end demand from the MPS.
The Properties window displays different views depending on whether you navigate from a demand or a supply. The following displays the properties for a supply in the pegging tree.
Navigating Through a Find Window
The Find windows enables you to control the volume of data displayed. You can set find criteria for all trees and detail windows.
The Find window enables you to display basic information for the items in the current plan, plus pegging and supply/demand information.
To display the Find window
-
Select a plan in the Planner Workbench.
-
Choose Tools > [Exception Details, Supply/Demand, Supply, Demand, On Hand, Items, or Resources].
The Find window appears. You can search for the following item details:
-
ABC Class (Items only)
-
BOM Item Type
-
Buyer
-
Category
-
Effectivity Control
-
Exception Set
-
Forecast Control
-
Item
-
MRP Planning Method
-
Make or Buy
-
Nettable Quantity
-
Non Nettable quantity
-
Organization
-
Planner
-
Primary Supplier
-
Repetitive
-
Standard Cost
-
WIP Supply Type
-
-
-
To retrieve all records, leave all fields blank and choose Find.
-
To retrieve a subset of records, enter a search string. You can use just one string in your search (containing a criterion, an operator, and a value), or you can enter several strings to refine your search.
-
Once you have entered at least one string containing a field name, a condition, and (optionally) a value, choose Find to start your search.
-
Optionally, choose a folder to import a previously defined search strings and start the search.
If you want to perform a wildcard search, set the condition as Starts With. For example, if you want to retrieve all items that start with X, set the condition as Starts With and specify X in the From field.
Rolling Dates Search Condition
If you want to filter based on rolling dates, select Days From Today as the condition. For example, if you want to retrieve all late replenishments for sales order exception messages where the due date is less than five days from today, select Days From Today condition and specify 5 in the From field.
Expand Partial
Use Expand Partial to search for item(s) in the tree in the Planner Workbench and Collection Workbench. You can enter either the complete item name or a partial name with a wildcard.
To use Expand Partial
-
From Planner Workbench, select a plan name from the Navigator.
-
Select a category node, such as Organizations or Items.
-
Right-click on an item in the Navigator.
A menu appears.
-
Select Expand Partial.
The Enter Reduction Criteria for Long List form appears.
-
Enter either a complete item name or a partial item name with a wildcard and select OK. This search is not case sensitive.
Matching results (up to 500 in number at a time) are displayed in the left pane. If there are no matching items, a message appears in the status bar.
-
Select Cancel to close the window.
Queries Tabbed Pane
The Planner Workbench enables you to filter specific information in a plan. You can create queries to filter items, suppliers, resources, and exception messages based on specific criteria. You can also save the query and execute it whenever you require.
Navigating the Queries Tabbed Pane
Icons
You can click the icons provided in the bottom of the Navigator to create, save and execute queries.
| Icon | Description |
|---|---|
| Create Query | First icon in the Navigator. |
| Save Query | Second icon in the Navigator. |
| Execute Query | Third icon in the Navigator. |
Right-click Menu Options
You can right-click in the Queries tabbed pane and select the following options pertaining to queries:
-
Create Query
-
Save Query
-
View Query
-
Execute Query
-
Delete Query
-
Rename Query
Navigating Nodes in the Queries Tabbed Pane
The Queries tabbed pane consists of the following nodes:
-
Query Result: You can expand the Query Result node to view the results of your unsaved queries.
-
Personal Queries: You can save your query either as a Personal query or a Public query. In case you want to share the query with others planners, save the query as Public query. You can create and save various types of queries such as items, resources, exception messages, and suppliers within the Personal Queries node. For example, if you want to create a personal query to filter items in a plan, navigate to the Item type in the Personal Queries node, right-click and select Create Query.
-
Public Queries: If you want to have exclusive ownership rights to view, execute, and modify a query, save it as a Personal query. The Public Queries node comprises of Item, Resource, Exception, and Supplier. You can create and save various types of queries such as items, resources, exception messages, and suppliers within the Public Queries node. For example, if you want to create a public query to filter exception messages associated with a plan, navigate to the Exception type in the Public Queries node, right-click and select Create Query.
Create a Query
To create a query
You can create queries for filtering items, resources, suppliers, and exception messages associated with a plan in the Planner Workbench.
-
Click the Queries tab in the Planner Workbench. The Queries tabbed pane appears.
-
Specify the name of the plan on which you want you run the query.
-
Right-click in the Queries tabbed pane to display the pop-up menu.
-
In the pop-up menu, select Create Query.
Alternatively, you can click the Create Query icon at the bottom of the Queries tabbed pane to create queries.
The Create Query window appears.
-
Specify a name for the query in the Query Name field.
-
Select a type of query from the Query Type drop-down menu to specify the information you want to filter.
The various types of queries are Item, Resources, Exceptions, and Suppliers. You can select Item to create queries that filter information related to items. Similarly, you can select Resources and Suppliers to create queries that filter information related to resources and suppliers, respectively. For information about how to filter exception messages, see Exception Messages.
-
Click Yes in the Public drop-down menu in case you want the query to be visible to other planners as a public query.
-
Specify the criteria in the Criteria box. For example, you may want to filter those items that need to be purchased. In this case, specify Make or Buy, Equals, and Buy in the Criteria, Condition, and From fields, respectively.
The following table lists the criteria for querying items, resources, and suppliers.
Query Type Criteria Item ABC Class
BOM Item Type Buyer
Category
Effectivity Control
Exception Set
Forecast Control
Item
MRP Planning Method
Make or Buy
Nettable Quantity
Non Nettable Quantity
Organization
Planner
Repetitive
Standard Cost
WIP Supply Type
Carrying Cost
ATP Flag
ATP Components Flag
Create Supply Flag
PIP FlagResources Department Class
Department Line
Maximum Rate
Minimum Rate
Organization
Owning Department
Resource
Resource Group
Resource TypeSuppliers Approved Supplier
Supplier Site
Buyer
Category
Item
Organization
Planner
Standard Cost -
To retrieve all the records that meet any one of the criteria that you specify, select Match Any. However, if you want to retrieve only those records that meet all criteria, select Match All.
-
Select the check box preceding the criteria specifications for those criteria specifications that you want to include as active. When you execute a query, the planning engine considers only the active criteria as the basis for the search.
-
Click Save to save the query. Based on your selection, the planning engine saves the query either as a Personal Query or a Public Query.
-
Click Execute to run the query. The planning engine filters and displays the result based on the criteria you specified in the query.
View Results of a Query
When you execute a query, the planning engine displays the result to the right of the Queries tabbed pane.
If you want to view the details of a specific filtered row, click the row. When you right-click the selected row, the available options appear. You can select the required option from the drop-down menu to navigate to context windows such as Exceptions window and Horizontal Plan window.
If you want to the view the Results window without the Navigator, you can click the Collapse window sliding bar, which is the vertical slider between the Navigator and the Results window.
Note: To execute a query for a particular plan, you can specify the name of the plan in the Plan field.
Multi-select Items in Query Results Window
You can multi-select specific records or items in the Query Results window.
For example, you may want to view the demand information for two specific records in the Query Results window. Use Ctrl-click to highlight the specific records. Select [right-click] > Supply > Demand to view the demand information for the items you selected.
Tailoring the User Interface
The following table shows the menu options for the Planner Workbench and what happens when a particular menu option is selected.
| Menu | Menu Option | Description |
|---|---|---|
| File | Export | Export the plan information to Microsoft Excel. |
| Edit | Duplicate | Duplicate a record. |
| Edit | Clear | Edit the current field. |
| Edit | Delete | Delete the current field. |
| Edit | Preferences | Set a user profile. |
| View | Show Navigator | Display Navigator window. |
| View | Find | Find a record. |
| View | Find All | Find all records. |
| View | Query by Example | Run queries for certain information. |
| View | Record | View a record. |
| View | Requests | Review requests. |
| Tools | Exception Details | View exception details for your plan. |
| Tools | Supply/Demand | View supply and demand information. |
| Tools | Supply | View supply information. |
| Tools | Demand | View demand information. |
| Tools | On-Hand | View on-hand quantities. |
| Tools | Items | View items information. |
| Tools | Resources | View resources information. |
| Tools | Notifications | View notifications. |
| Tools | Launch Notifications | Launch notifications. |
| Tools | Work Dates | View work dates for your plan. |
| Tools | Preferences | Set preferences. For more information, see Defining Display Preferences. |
| Tools | Close All Detail Windows | Close all context windows that are open in the Planner Workbench. |
| Plan | Start Online Planner | Start online planner. |
| Plan | Online Replan | Run replan. |
| Plan | Stop Online Planner | Stop online planner |
| Plan | Online Planner Status | View online plan status. |
| Plan | Batch Replan | Run replan in batch mode. |
| Plan | Save Actions | Save actions related to your plan. |
| Plan | Launch New Plan | Launch new plan |
| Plan | Copy Plan | Copy your baseline plan before running a new plan. |
| Plan | Purge Plan | Delete the plan. |
| Plan | Plan Options | View plan options. |
| Plan | Select All for Release | Release all planned orders for items with your planner code. |
| Plan | Release | Release selected orders only. |
| Plan | Undo Summary | View summary of changes in the Planner's Workbench for online planning purposes. |
| Plan | Add Undo Bookmark | Add bookmark to the Undo Summary. |
| Plan | Compare Plans | Compare plan exceptions and options |
| Plan | Firm All | Firm all orders that meet the requirements you specify in a search criteria within the planning time fence. |
You can tailor the user interface in the following ways:
Resize Windows
You can resize windows as with any windows-based application. In the Planner Workbench you can adjust slide bars to change the relative widths of the Navigator and the context windows, such as Exception Summary, that you open.
Customize Columns
You can add, hide columns, resize, and move columns on the horizontal plan and folder windows.
Adjustable Item Field
If you have large item numbers, you can add the Item field to the scrollable region of these Planner Workbench windows and adjust its size using folder technology:
-
Supply/Demand
-
Supply
-
Demand
-
On Hand
-
Items
-
Process effectivity
The Item field in the fixed region remains whether or not you also add the field to the scrollable region.
Defining Display Preferences
Display preferences control what horizontal material planning data, horizontal capacity planning data, supplier planning information, transportation planning information, and supply/demand detail are displayed for each item.
To define your display preferences
-
Navigate to the Planner Workbench.
-
Choose Tools > Preferences.
The Material Plan tab appears as the default tab.
-
Type the name for your preference set.
A preference set is applicable to all types of horizontal plans. You can create and save up to three personal preference sets for viewing a horizontal plan based on your requirements. You may want to create multiple preference sets to view different levels of information for a horizontal plan. For example, you may want to view summary-level information with rows displaying gross requirements, total supply, safety stock, and on-hand quantity to validate whether or not supply matches demand at a period level. You may also want to view detailed information for each supply type on a daily-level.
Preference sets are unique to the individuals creating it. If you create and apply a specific preference set, it is available only to you.
-
Enter Display Buckets, Display Factor, Decimal Places, Show Graph and check each type of plan information you want to display in your material plan.
Display Factor is a multiplier.
-
Choose the Capacity Plan tab.
-
Check each type of plan information you want displayed in your resource capacity plan.
-
Choose the Supplier Plan tab.
-
Check each type of plan information you want displayed in your supplier capacity plan.
-
Choose the Transportation tab.
-
Check each type of plan information you want displayed in your capacity plan.
-
Choose the Allocated ATP tab.
Oracle Global Order Promising supports two allocation methods for different business needs:
-
Allocated ATP based on User-Defined Allocation Percentage
-
Allocated ATP based on Demand Priority
For more details on Allocated ATP, see Oracle Global Order Promising.
-
-
-
Check each type of information you want displayed in your allocated ATP.
-
Choose the Other tab.
Supply/Demand details appear. You can select the following based on your requirements:
-
Release Phantoms: Enables the release of planned orders for the phantoms.
-
Release Configurations: Enables the release of planned orders for ATO items.
-
Firm Jobs: Enables the release of the Firm status when you release the work in process jobs.
-
Include Sales Orders: Enables the release of sales orders (loopback) from the Planner Workbench.
-
Release VMI Items: Enables the release of those items from the Planner Workbench that have the item attribute set to VMI items. This check box is selected by default.
-
Job Status: When Planner Workbench creates discrete jobs from planned orders, it assigns this status to the discrete jobs.
-
-
-
Enter a Job Status.
When the Planner Workbench creates discrete jobs from implemented planned orders, it assigns the job status you enter in the Preferences window.
-
Select a Job Class.
When the Planner Workbench creates discrete jobs from implemented planned orders, it assigns the job class you enter in the Preferences window.
-
Select a Req Group By default.
When the Planner Workbench creates purchase requisitions from implemented planned orders, it assigns the requisition load group you enter in the Preferences window.
If you do not have a value for this preference, Planner Workbench uses the value of profile option MRP: Requisition Load Group Option.
Valid values are:
-
All on One: Creates one purchase requisition for all recommended orders
-
Buyer: Creates one purchase requisition for each buyer; within each requisition, creates one line for each planned order
-
Planner: Creates one purchase requisition for each planner; within each requisition, creates one line for each planned order
-
Vendor: Creates one purchase requisition for each vendor; within each requisition, creates one line for each planned order
-
Category: Creates one purchase requisition for each item category; within each requisition, creates one line for each planned order
-
Item: Creates one purchase requisition for each item; within each requisition, creates one line for each planned order
-
One each: Creates a purchase requisition for each planned order
-
-
Enter a category set.
This category set is used throughout Planner Workbench. Items that you have not assigned to a category in this category set do not appear in Planner Workbench.
Oracle recommends that you typically select the default planning category set specified in Oracle Inventory. Do not select a category set with flag Allow multiple item category assignments selected. Planner Workbench does not support item assignment to multiple categories and you may experience unexpected results.
-
Under General, select either Plans or Queries in the Default Tab.
You may consider having the Queries tabbed pane as default if you want a query to be executed automatically each time you open the Planner Workbench. You can specify the query name in the Auto Execute Query field. In addition, you can specify a default plan that needs to open when you access the Planner Workbench.
View Recommendations for (Days from Today) specifies how many days of recommendations you want to see. Planner Workbench calculates Days from Today using the supply Suggested Order Date.
If you want to view all actions in the expanded form, select Expand All Actions.
-
Choose Save to use your preference selections.
-
Choose Reset to use your previously saved selections.
Note: The parameter Cutoff Date is not supported in Oracle Advanced Planning and Scheduling.
Using the Context Windows
You can invoke context windows for a selected plan or element in the Navigator to view summary information in tables and graphs, including:
-
Exceptions
-
Horizontal Plan
-
Vertical Plan
-
Supply/Demand
-
Items
-
Resources
-
Supply Chain
-
BOM/Routing
-
Key Indicators
You can highlight one or more nodes on the Navigator to include the result in a single context window. You can also use the Find window to further limit the context.
Context Synchronization Between the Context Windows and the Navigator
The planning engine refreshes the context window to synchronize with the node that you select in the Navigator. The planning engine refreshes the context in an open context window when you:
-
Select a context window from the right-click pop-up menu
-
Click the available short cut icons
-
Drill down in an open context window
Exception Summary Window
The Exception context window segregates all of the exception messages that require immediate attention.
To view exceptions
-
Choose a plan for which to view exception messages. You can view exception messages at the item level by selecting an item.
-
Drill-down to the item level and right-click the item.
-
To view the Exceptions Summary window, click Exceptions > Summary.
The Exceptions Summary window appears.
The Exception Summary window lists exception groups and exception messages for the selected plan in order of their usefulness in troubleshooting. For instance, exceptions due to late sales orders appear before exceptions due to resource constraints.
Using the Find window, you can sort, group, or sub-total exceptions according to various criteria including item, supplier, or buyer, for example.
To expand all actions
If you want to expand all actions in the Exceptions Summary window, perform the following steps within the Exception Summary window:
-
In the Exceptions Summary window, click in any row that has data.
-
Select [right-click] > Expand All.
The expanded actions appear.
If you want to specify your preference of viewing the expanded actions each time you access the Exception Summary window, perform the following steps:
-
Click Tools > Preferences to open the Preferences window.
-
Click the Other tab.
-
In the General box, select Expand All Actions.
-
To save your preference, click Save.
-
Close the Preferences window. When you view the Exception Summary window, the expanded actions appear.
To sort exceptions
-
From the Exception Summary window, select View > Find.
The Find Actions window displays.
-
Select criteria by which to sort exceptions.
-
Check Display Message Count check box.
-
Select Find button.
Exception messages appear in the Exception Summary window sorted accordingly.
Exception Details Window
To view exception details
Choose [right-click] > Exceptions > Details on an item. The Exception Details window appears.
Exception details display pre-seeded default folders (combination of various key columns) based on exception type. For example, Late Replenishment for Forecast exception detail has a different exception default folder than Material Constraint exception.
Note: If you select several different exceptions, the generic default folder appears. You can customize exception folders based on your preferences and save it as the default. This is explained in the next section.
Please note that the Days Late column is available and filled in for the following exceptions: Late Replenishment for Forecast and Late Replenishment for Sales Order.
The column named Quantity Satisfied By Due Date in the Exception Details form is used to present the portion of a demand that can be satisfied by the due date.
Drill Down to Related Exceptions
If you are working in a constrained or optimized plan, you can drill down from an exception to Related Exceptions (Right Mouse Options) to analyze questions like:
-
Why is the order late? Is it because of a resource, material, or transportation resource constraint?
-
A material/resource/transportation resource issue is detected. Will it cause any late orders?
The objective is to explain the cause and effect of the problems. The related exceptions that each exception drills down to are indicated by an arrow.
On the other hand, from the constraint exception (resource, material, or transportation resource), you can also drill down to Late replenishment for sales order/forecast if the constraint causes the late replenishment.
This feature only applies to the following:
-
Late replenishment for sales orders
-
Late replenishment for forecast
-
Material constraint
-
Resource constraint
-
Transportation resource constraints
To view related exceptions for the Late Replenishment for Sales Order
-
Select a row in the Late Replenishment for Sales Order Exception Details window.
-
Choose [right-click] > Related Exceptions.
Related exceptions appear in the Exception Details window.
Relevant Information Buttons
On the Exception Details window, additional information about the exception can be obtained through clicking the buttons on the bottom of the window. The type of exception determines what buttons are available. For example, the Items and Supply/Demand buttons are available for the Late replenishment for sales order exception.
The following buttons are available:
-
Suppliers: For details on the Suppliers window, see Supplier Capacity Window.
-
Resources: For details on the Resources window, see Resources Window.
-
Items: For details on the Items window, see Items Window.
-
More Details
-
Supply/Demand: For details on the Supply/Demand window, see Supply/Demand .
Right-click Menu Options
From the Exception Details window, planners can obtain more information through a right mouse click on the exception. The type of right mouse options users have is determined by the exception that is selected. Options included are:
-
Supply
-
Demand
-
Resource Availability
-
Resource Requirements
-
Sources
-
Destinations
-
Related Exceptions
-
Gantt Chart
-
Horizontal Plan
-
Vertical Plan
-
End Pegged Supplies
-
Critical Supplies
-
Calendar
Horizontal Plan
You can display your plan information horizontally or vertically.
The horizontal plan information is displayed in a pivot table enabling you to drill down from years, to periods, to weeks, to days. The following table shows the default display for the horizontal plan for each plan type:
| Plan Type | Default Display |
|---|---|
| Material Plan | Projected Available Balance |
| Capacity Plan | Required Hours vs. Hours Available |
| Supplier Plan | Required Capacity vs. Available Capacity |
| Transportation Plan | Weight Capacity Available vs. Weight Capacity Required |
The horizontal plan does not show fictitious demand created at the planned inventory point level.
For long-running processes, you can segment the material completions from a supply over the time of the process (supply segments). However, the horizontal plan displays its supply information, including information relating to available-to-promise, as if all of the supply is only available as of the supply due date.
Viewing the Horizontal Plan
To display your horizontal plan
-
Select one or more items, resources, lines, transportation resources, or suppliers from the Navigator.
-
Select [right-click] > Horizontal Plan > Default. If you create multiple preference sets for the horizontal plan, the preference set names appear in the Horizontal Plan right-click pop-up menu. You can select the preference set based on your requirement. For more information on preference sets, see Setting Preferences for Viewing Horizontal Plan.
Viewing Item Demand/Supply Across All Organizations
The horizontal plan in the Planner's workbench supports an aggregate view of supply-demand for items across all organizations in the supply chain plan.
To view an item's horizontal plan across all organizations
-
Navigate to the Planner Workbench.
-
There are two ways of viewing the horizontal material plan across all organizations:
-
View by items and highlight an item. This option provides you with an aggregate view across all organizations. The planning engine displays the numbers in the horizontal plan as an aggregate of all organizations.
-
Alternatively, you can expand the item node and multi-select all organizations that the item is planned for. This option provides you the horizontal plan for each organization that you select.
-
-
Select [right-click] > Horizontal Plan > Default (or any preference set you may have created).
The horizontal plan information is displayed in a pivot table that enables you to drill down from aggregate to periods to weeks to days.
Information in the Horizontal Plan View
This table describes the fields displayed in the Horizontal Plan window, Material Plan:
| Field | Description |
|---|---|
| Sales orders | Sales orders, including internal sales orders. |
| Forecast | Forecasts from Oracle Inventory and Oracle Demand Planning. |
| Production forecast | Demand generated by the forecast explosion process based on product families, models, and option classes. This helps differentiate between dependent demands and derived dependent demands. |
| Dependant demand | The planning engine calculates the dependent demand. |
| Expected scrap | Demand resulting from the application of the Shrinkage Rate item attribute to existing supplies and planned orders. |
| Payback demand | Demand resulting from a borrow or a payback transaction in Oracle Project Manufacturing. |
| Other independent demand | This includes the following: - Hard reservation (against sales order in Oracle Order Management) - Copied Schedule Demand - Demand Class Consumption (used by allocated ATP) - Expired Lots - Non-standard Demand |
| Gross requirements | The planning engine calculates the total demand in the following way: Sales Orders + Forecasts + Production Forecast + Dependent Demand + Expected Scrap + Payback Demand + Independent Demand The total demand from sales orders, forecasts, dependent demands, payback demand, scrap demands, expired lots, and other demands. |
| Work Orders | Existing make orders from Oracle Discrete Manufacturing, Oracle Process Manufacturing, Oracle Flow Manufacturing, and Oracle Project Manufacturing. |
| Purchase orders | Existing purchase orders. |
| Requisitions | Existing requisitions without corresponding purchase orders, including internal requisitions. |
| In Transit | Interorganization transfer quantities or quantities shipped from suppliers (after the customer receives the advanced ship notice). |
| In Receiving | Quantities that are received at the receiving dock but are not yet received into the inventory. |
| Planned orders | Make and buy planned orders |
| Payback supply | Supply resulting from a borrow or a payback transaction in Oracle Project Manufacturing. |
| Total supply | The planning engine calculates total supply as an aggregate of work in process, purchase orders, purchase requisitions, in transit, in receiving, planned orders, and payback supply. |
| Beginning on hand | The amount of stock in inventory at the beginning of a plan on hand. The value is 0 for all subsequent periods. |
| Projected available balance | The planning engine calculates this as: Beginning On hand + Total Supply - Total Demand |
| Current scheduled receipts | The planning engine calculates this as the sum of work in process, purchase orders, purchase requisitions, in transit, in receiving, and payback supply. |
| Projected on hand | The planning engine calculates this as: On hand + Beginning Total Supply - Total Demand The planning engine does not include planned orders to calculate the projected on hand. |
| Safety Stock | Safety stock level at the end of the bucket. |
| Net ATP | This indicates the difference between the net supply and demand after ATP performs all forward and backward consumption. |
| Expired lots | This indicates the quantity of expired lots. |
| ATP+ | The available to promise quantity available based on the plan without considering capable to promise or capable to deliver, The quantity available is as of the plan run and does not account for any supply/demand changes since the plan run. |
This table describes the fields displayed in the Horizontal Plan window, Capacity Plan:
Before you collect resource availability, attend to source system profile option MRP: Cutoff Date Offset Months. It tells the planning engine how many months of resource availability to calculate for resources and simulation sets. The planning engine does not calculate this information beyond this horizon. For constrained plans beyond this horizon, resource capacity is infinite. Set this value to your plan horizon. A large setting, for example, 12 months, could impact your planning engine performance.
| Field | Description |
|---|---|
| Hours available | Calculated based on setups of resources. Collect this information during the collections process using Resource Availability set to either: - Collect Existing Data - Regenerate and Collect Data In the operational data store load parameters, set Recalculate Resource Availability to Yes. |
| Setup hours | Required hours of setup time, including changeover setups |
| Setup hour ratio | Ratio of Setup Hours to Total Hours Available |
| Run hours | Required hours of run time (does not include setup time) |
| Run hour ratio | Ratio of Run Hours to Hours Available |
| Required hours | Total Required hours |
| Net hours available | Hours Available - Required Hours |
| Cum hours available | Net available across the plan horizon |
| Capacity load ratio | Load ratio of Required Hours to Hours Available for the bucket |
| Cum capacity load ratio | Load ratio of Cum Required Hours to Cum Hours Available across the plan horizon |
| Hours required per day | Daily hours required |
| Hours available per day | Daily hours available |
| Net ATP | Available to promise availability |
Custom Rows
If information that you want to see that is not available on the Horizontal Plan, you can:
-
Make your own custom row
-
Choose a label for it
-
Select the information to display in it
-
Enable it selectively, for example, by user or by preference
For example, you want to see projected available balance shown in value instead of in quantity.
If the Horizontal Plan contains information that you want to see in a different way, you can modify it. For example, you might want so see information a Horizontal Plan row in an alternate unit of measure.
To use a custom row:
-
Specify the information to display: Provide a PL/SQL program unit with no parameters that. Enter the name of the program unit in profile option MSC: Horizontal Plan Extension Program. You can choose the level—site, responsibility, or user.
-
Set its title: Navigate to the Manufacturing Lookups form and select lookup type MRP_HORIZONTAL_PLAN_TYPE_SC. Find the row for Code 500, Meaning User Defined, move to the Description field, and enter the title.
-
Enable it: Navigate to the Preferences form, Material Plan tab. Select Demands and select User Defined.
To modify the data in other rows:
-
Specify the modified information: Provide a PL/SQL program unit with no parameters that. Enter the name of the program unit in profile option MSC: Horizontal Plan Extension Program. You can choose the level—site, responsibility, or user. If you are also using a custom row, specify the information in the same PL/SQL program unit as you did for the custom row.
-
Enable them: Navigate to the Preferences form, Material Plan tab. Select Demands and select User Defined.
Exporting the Horizontal Plan
To export a horizontal plan to Microsoft Excel
You can copy or export an entire expanded horizontal plan to various other document formats such as Microsoft Word, Microsoft Excel, and Microsoft Notepad. If your operating system does not support clipboards, you cannot copy the plan.
-
In the horizontal plan tabbed region, right-click in the Items or Organization area in the right pane.
-
Click Copy horizontal plan to copy the horizontal plan to the clipboard.
-
Open an application such as Microsoft Word, Excel, or Notepad to paste the copied content.
-
Paste the horizontal plan using the Paste feature of the opened application.
Dynamically Define Graphs
Define graphs by selecting which pieces of information to graph.
To define information to be graphed
-
Navigate to the Horizontal Plan window.
-
Select the plan parameters you want to graph.
To graph two or more parameters together, hold the shift key as you select additional parameters. For example, you can graph either planned orders, gross requirements, or both. You can also choose to graph multiple items.
-
[Right-click] to show and hide graph or save preference in the Tools > Preferences menu.
-
[Right-click] on the Items or Organization area to display more options. Left click on Hide/Show Graph to hide the graph.
-
To change the number of periods being displayed in the horizontal graph, [right-click] anywhere in the graph and select Viewable Groups. Your choices are 5, 7, or 10. Five is the default.
Dynamically Choose Types of Graphs
After you have graphed parameters or items, you can change the chart type using the [right-click] menu. For example, if you have displayed a bar chart and you wish to display a line graph, select [right-click] > Line Chart.
To change the number of periods being displayed in the graph
Right-click on the graph and select Viewable Groups. The choices are 5, 7, and 10, with 5 as the default.
Save Settings for a Horizontal Plan
You can specify and save your preferences for various option settings while viewing a horizontal plan. When you login again, your preference settings would be in effect for the plan. You can save settings for Item, Resource, Transportation, and Supplier types of horizontal plan. The following table lists the option settings that you can specify and save:
To save your preferences for a horizontal plan
After specifying your preferences for a horizontal plan, perform the following steps to save your preferences.
-
[Right-click] on the Items or Organization area to display more options.
The menu appears.
-
Click Save Settings.
When you login again and return to the Planner Workbench, the settings that you saved are retained.
Setting Preferences for Viewing Horizontal Plan
For information on defining display preferences, see Defining Display Preferences.
Change Preferences
You may have multiple preference sets for a horizontal plan. If you want to switch between the preference sets, select [right-click] > Change Preferences. In the right-click pop-up menu, click the title of the preference set that you want to view.
Set Number Formatting for Horizontal Plan
As the number of order quantity increases, you may want to specify your preference for a number format to ease viewing numbers that run into millions. You can format and view numbers based on your preference for a horizontal plan.
To set the format preference for horizontal plans
-
To set the format preference for horizontal plans, navigate to the General Preferences window in the Oracle Self-service Web Applications.
-
Select your preference from the Number Format drop-down menu.
-
Click Apply.
Product Family and Member Item Drill Down
Aggregate Production Plan
You can view aggregate production plans in the Planner Workbench. The supply and release of planned orders related to member items are reflected in the aggregate planned order at the product family level. The summation of the actual quantities for member items provides the quantity and type of supply for the product family item. You can use this for demand leveling and plan analysis.
You can specify whether or not you want to view details of member items that belong to a plan in a horizontal plan. If you want to view the product family details in the horizontal plan, select the Display Product Family Details check box in the Material Plan tabbed pane of the Preferences window.
The planning engine displays two sections in the horizontal plan view. The first section includes the following information about the product family items:
-
Forecast
-
Gross requirements
-
Planned orders
-
Total supply
-
Projected available balance
The order types associated with the product family appear against the product family node in the first section.
The second section includes member total (all items belonging to the product family) for the plan. The member total includes all order types. You can use the Show and Hide right-click menu options to view specific order types. Calculations related to member item totals are based on only those member items that are part of the same plan.
You can double-click a row related to firm supplies such as work in process and on-hand, the planning engine displays details of the individual items. However, for detailed information, you can use the Planning Detail report.
Comparing Multiple Items
You can view and compare items that belong to two different categories in the horizontal plan. To select more than one items in different categories, highlight an item in the Navigator, hold the Shift key down and select another item.
Global Forecasting
There is a possibility that you may not know the exact demand fulfilling facility at the time of preparing and analyzing forecasts in case you have you have multiple shipping, distribution, and manufacturing facilities. You can use global forecasting for consuming forecast without any reference to a shipping organization. You can distribute a forecast to multiple shipping locations.
You need to choose a demand planning scenario published without a context of an organization. In addition you need to choose a Ship to consumption level. Following are the consumption levels supported:
-
Configure a forecast and define the Ship To entity. Specify any one of the following values for the Ship To:
-
Item
-
Zone
-
Customer
-
Customer Zone
-
Customer Site
-
Demand Class
-
-
Select the Global Forecasting check box in the Preferences window (Material tabbed pane).
-
In the View by Items mode, select an item and navigate to the Horizontal Plan window.
The global forecast section appears in the Horizontal Plan window. If this section does not appear, use the Show option from the right-click menu to display it. The following information appears in the global forecast section:
-
Item name
-
Original: This refers to the time phased global forecasts that Oracle Demand Planning publishes.
-
Cumulative Original: This indicates the cumulative value of the original time phased global forecasts.
-
Consumed: This indicates the number of sales orders that are consuming the forecasts. You can drill down from here to view the set of sales order in the Supply/Demand window.
-
Cumulative Consumed: This indicates the total number of sales orders based on the Consumed field.
-
Current: This refers to the original sales order. A negative value indicates over consumption. You can drill down from this field to the individual distributed forecasts. When you double-click in this field, the Supply/Demand window appears. You can view details regarding the distribution of the consumed amount across organizations.
-
Cumulative Current: This refers to the total number of original sales order based on the values from the Current field.
-
Expired Forecast: This refers to the amount of unmet forecasts. You can specify the number of days a forecast can remain unmet. If a forecast cannot be met until the specified number of days, the planning engine displays the forecast as an unmet forecast.
Drill-down from Forecast Row in Horizontal Plan
You can double-click the forecast row in the Horizontal Plan window to drill-down to the Supply/Demand window. However, in the case of global forecasting, you can drill down only from the consumed numbers field.
If you want to view consumption details, you can select [right-click] > Consumption Details option.
Information in the Consumption Details window is detailed in the following table:
| Field | Description |
|---|---|
| Sales Order | This indicates the sales order number. |
| Sales Order Sched Date | This indicates the scheduled ship date for the sales order. |
| Consumed Qty | This refers to the quantity consumed. |
| Consumption Date | This refers to the quantity consumption date. |
| Promise Date | For more information, see Lead Time and the Planning Time fence. |
| Request Date | For more information, see Lead Time and the Planning Time Fence. |
| End Item | This refers to the end item that consumed the forecast. An end item is applicable for option class and optional items. |
| Original Item | This indicates the original item for which you received the demand. This information is applicable only if the original item is substituted. |
Drill-down from Global Forecasting Section in Horizontal Plan
The following drill-downs are supported from the global forecasting section in the horizontal plan:
-
You can drill-down from the current quantity field to the Supply/Demand window to view distributed forecasts.
-
You can drill-down from the consumed quantity field to the Supply/Demand window to view the sales orders that consumed the forecasts.
Safety Stock Level
To see if your plan satisfies safety stock levels, verify that the projected available balance is the safety stock level. If it is not so exactly, it may be because of:
-
The planning engine could not schedule all supplies on time because of resource, material, and transportation constraints
-
The reasons in Other Safety Stock Planning Principles in Safety Stock.
Vertical Plan
The Vertical Plan view is enabled for an Item-Org context and it displays the activity by item over time in a vertical format (non-bucketized).
View Vertical Plan
To display your plan vertically
-
Select one or more items from the tree in the Navigator.
-
Select [right-click] > Vertical Plan.
Right-click Menu Options in a Vertical Plan
Based on the context of the selected field, the planning engine displays right-click menu options. If you right-click in an information field (non-fixed field) within a vertical plan, you can:
-
Choose to view additional fields associated with the vertical plan.
-
Hide fields that you do not want.
-
Move selected fields either to the right or the left.
-
Increase or decrease the field size.
-
Change the prompt or the heading of the field.
-
Drill down to the Supply/Demand and Item windows.
When you right-click the graph shown for a vertical plan, the planning engine displays three options: Days, Weeks, and Periods. You can choose the time frame for which you want to view the graph.
Supply Demand Window
The Supply/Demand window displays information about supplies and demands and shows pegging information.
View the Supply/Demand Window
You can navigate to the Supply/Demand window from various node types such as items, organizations, plans, departments, and planning groups in the Navigator. In addition to the Navigator, you can also drill down to the Supply/Demand window from other windows such as the Vertical Plan window.
If you request this window from the Exception Details window, it displays supply information, demand information, or both types of information based on the exception type. For example, if the exception message is Demand satisfied using end item substitution, the Supply/Demand window displays demand information only.
To display the Supply/Demand window
-
Select one or more nodes (using Ctrl-click) in the Navigator.
-
Select [right-click] > Supply/Demand.
The Supply/Demand pop-up menu displays the following options:
-
Supply
-
Demand
-
Supply/Demand
-
Onhand
-
-
-
To display the Supply/Demand window, click Supply/Demand.
Supply/Demand window has five tabbed regions:
-
Order
-
Release Properties
-
Sourcing
-
Line
-
Project
Each tabbed region displays fixed fields:
-
Org
-
Item
-
For Release
-
Firm
While each tabbed region shows different variable fields, you can access all of the Supply/Demand window variable fields using the Orders tab folder function.
-
Supply/Demand Window Notes
Internal Requisitions and Sales Orders
If you cancel an internal requisition and do not cancel the corresponding internal sales order, Planner Workbench:
-
Displays the internal requisition with a cancel reschedule recommendation since the planning engine can only issue a cancel recommendation for a supply
-
Does not display the internal sales order. The planning engine does not plan to satisfy the demand.
Safety Stock
To analyze how the planning engine has planned to meet safety stock levels, select the supply and analyze the pegging details. The pegs between a transient safety stock level and supplies peg with supply quantity zero. This is because the supply pegs to a demand after the safety stock level expires; the peg to the demand has the quantity. The pegs between a non-transient safety stock level and supplies peg with quantities that meet the safety stock level. To understand safety stock pegging, see Safety Stock Pegging in Pegging.
Order Tabbed Pane
The following table provides a description of the fields displayed in the Order tabbed pane:
| Fields | Description |
|---|---|
| Order Type | This refers to the supply or the demand type. For example, purchase order, sales order, planned order. |
| Sugg Due Date | The planning engine populates this for demands and supplies. For more information, seeLead Time and the Planning Time Fence. |
| Qty/Rate | Supply, demand quantity, or rate. |
| Order Number | Identifies the supply or the demand record. For purchase orders, displays purchase order number, line number, release number, shipment number. |
| Action | This refers to the action recommended by the planning engine. The possible values are: - None - Release - Cancel |
| New Date | After you firm a supply, you can specify a new date to change an existing planned order, a forecast, an MDS demand, a manual MDS demand, or a sales order. |
| New Qty | After you firm a supply, you can specify the quantity to change an existing planned order, a forecast, an MDS demand, a manual MDS demand, or a sales order. |
| Order Priority | Indicates the priority of a demand. The planning engine generates this number based on the priority rule used in the plan. |
| ABC Class | Inventory ABC classification of the item. |
| Alternate BOM | BOM Alternate bill of material name |
| Alternate Routing | BOM Alternate routing name |
| Arrival Set Name | On the sales order, the arrival set name designates lines that should arrive together at the customer site. Oracle Advanced Supply Chain Planning does not consider arrival sets but displays the field for information. |
| Bucket Type | This refers to the bucket type that a demand falls under, such as Forecasts. The valid values includes day, week, and period. |
| Build Sequence | This number indicates the order in which the work orders are sequenced. |
| Category | Category of an item |
| Company Name | Name of the company |
| Company Site | Name of the company site |
| Component Yield | Bills of material component yield for a component |
| Compression Days | The planning engine calculates the number of days that the order needs to be scheduled in the past (earlier than the planning horizon start date). For more information on Orders with Compression Days, see Exception Messages. |
| Consumed Forecast | For a forecast demand, this field indicates the quantity of the forecast that is consumed by sales orders. |
| Consumption Backward Days | This indicates the number of days (backward) when a forecast can be consumed by sales orders. |
| Consumption Forward Days | This indicates the number of days (forward) when a forecast can be consumed by sales orders. |
| Cube | Total cube of the supply row |
| Cumulative Probability | Not used in Oracle Advanced Supply Chain Planning. |
| Customer | Customer name as it appears on the sales order or forecast. |
| Customer Site | Customer ship to location |
| Days From Today | The planning engine calculates the difference between the suggested due date and the plan launch date to populate this field. |
| Days Late | For more information, seeLead Time and the Planning Time Fence. |
| Demand Class | An attribute of a demand that is used to categorize demand. |
| Demand Lateness Cost | Penalty cost for a demand |
| Description | Item description |
| Destination Org | The destination organization for an internal sales order. |
| Earliest Allowable Completion Time | The planning engine calculates this to indicate the end of the scheduling window for the supply that allows sufficient time for the upstream activities to be scheduled. |
| Earliest Possible Completion Time | The planning engine calculates this based on the constrained schedule for upstream supplies. It is the earliest time in which the supply can be completed. |
| Earliest Possible Start Time | The planning engine calculates the difference between the earliest possible completion time and supply duration to populate this field. |
| End Date | The end date of a bucketed forecast. This is used only in the Collections workbench. The planning engine does not populate the end date for Oracle Advanced Supply Chain Planning plans. |
| Expiration Date | This indicates the expiration date for an existing lot. |
| Expired Demand | The planning engine marks the demand quantity as expired if the demand is not met within specific number of days. |
| First Unit Completion Date | Indicates the first unit completion date of the repetitive job. |
| First Unit Start Date | Indicates the first unit start date of the repetitive job. |
| Fixed Leadtime | For buy items, the processing lead time |
| Imp Qty/Rate | Corresponds to the new quantity that you specify for an order when you release the order. |
| Implement Alternate BOM | Alternate BOM is an alternate list of component items that you can use to produce an assembly. |
| Implement Alternate Routing | An alternate manufacturing process that you can use to produce an assembly. |
| Implement As | If you select an organization in the Order tabbed pane, you can release the order as a discrete job. If you select a supplier, you can release the order as a purchase order. |
| Implement Date | Corresponds to the new date that you specify for an order when you release the order. |
| Implement Demand Class | Demand Class of released order |
| Implement FUCD | Implement first unit completion date for a repetitive job (editable) |
| Implement Firm | Implement firm flag status (editable) |
| Implement Job | Implement job number (not editable) |
| Implement Line | Implement line for a repetitive job (not editable) |
| Implement Project | Implement project name (editable) |
| Implement Source Org | Implement source organization (editable) |
| Implement Status | Implement work in process status (editable) |
| Implement Supplier | Implement supplier (editable) |
| Implement Supplier Site | Implement supplier site (editable) |
| Implement Task | Implement task identifier (editable) |
| Implement Unit Number | Implement starting unit number for unit effectivity (not editable) |
| Implement WIP Class | Implement work in process class (not editable) |
| Implemented Quantity | Previously implemented order quantities (not editable) |
| Internal Sales Order | Internal sales order number |
| Intransit Lead Time | This indicates the transit lead-time associated with a transfer order. |
| Item | Item name |
| Item From Source Plan | A flag that indicates whether the item is planned in some other plan. For example, when you feed an MPS supply plan to another plan such as MRP, the planning engine sets the flag for the item in the MRP plan. |
| Last Unit Completion Date | Indicates the last unit completion date of the repetitive job. |
| Last Unit Start Date | Indicates the last unit start date of the repetitive job. |
| Latest Acceptable Date | Indicates the latest acceptable date for a sales order. |
| Line | Line refers to the flow line. |
| Location | Location refers to the supplier site or organization location. |
| Lot | Lot refers to the lot number. |
| MRP Planning Method | Planning method defined for the item |
| Material Available Date | For more information, seeLead Time and the Planning Time Fence. |
| Min Possible Days Late | This planning engine calculates the minimum number of days that the end demand is late because of a particular supply. Other supplies may also cause additional delay. |
| Min Possible Start Time | This field is obsolete. |
| Model/Option Class | This refers to the model or the option class to which the item belongs. |
| Need By Date | For more information, seeLead Time and the Planning Time Fence. |
| Old Dock Date | For more information, seeLead Time and the Planning Time Fence. |
| Old Due Date | For more information, seeLead Time and the Planning Time Fence. |
| Order Date Type | For more information, seeLead Time and the Planning Time Fence. |
| Order Margin | Profit margin of an order |
| Original Item | If the planning engine recommends end item substitution for a demand, the item field refers to the substituted item. This field stores the original demanded item. |
| Original Item Qty | This indicates the demand quantity of the original item. |
| Original Need By Date | Original need by date of the purchase order or the requisition. For more information, see Lead Time and the Planning Time Fence. |
| Original Order Quantity | For forecasts, this is the original order quantity of the forecast before consumption or before the forecast expiration. For all other order types, this is the same as the demand quantity. |
| Original Quantity | Original forecast quantity for a global forecast. |
| Origination | This field indicates the source where the planned supply is created. The origin is either the planning engine or ATP. |
| Override Transit Times | Not used in Oracle Advanced Supply Chain Planning. This is reserved for future use. |
| PO Line No | Purchase order line number |
| Planned Arrival Date | For more information, see Lead Time and the Planning Time Fence. |
| Planner | Planner code |
| Planning Group | The name of the planning group for which the material is being planned. |
| Planning Level | The identifier assigned to a project in the planning group. |
| Probability | This is not used in Oracle Advanced Supply Chain Planning. |
| Process Days | This field indicates the number of days a planned order is scheduled for a repetitive schedule. |
| Product Family | The product family to which the item belongs. |
| Project Number | Project number. For more information, see Planning in Mixed Mode Environments. |
| Promise Arrival Date | The date when you promise that the customer can receive the products. |
| Promised Ship Date | The date when you promise to ship the products to the customer. For more information, see Lead Time and the Planning Time Fence. |
| Qty by Due Date | This indicates the supply quantity that is available by the demand due date. |
| Quantity in Process | This field indicates the quantity of a supply that is released. |
| Recommended | Oracle Shop Flow Manufacturing job information on collection workbench. |
| Release Errors | This field displays the release validation errors. |
| Repetitive | Repetitive schedule |
| Requested Arrival Date | The date when the customer wants to receive the products. For more information, see Lead Time and the Planning Time Fence. |
| Requested Ship Date | The date when the customer wants the products to be shipped. For more information, see Lead Time and the Planning Time Fence. |
| Reschedule Days | This indicates the number of days in or out that a supply order is rescheduled. A negative value indicates that the order is rescheduled to an earlier date. |
| Rescheduled | This flag indicates that the order is rescheduled. |
| Schedule Designator | This is the supply schedule name for those supplies that you feed to a plan by using a supply schedule. |
| Schedule Group | This refers to work in process schedule group. |
| Schedule Arrival Date | The date on which the customer can receive the product. For more information, see Lead Time and the Planning Time Fence. |
| Schedule Ship Date | The date when the product needs to be shipped to the customer. For more information, see Lead Time and the Planning Time Fence. |
| Service Level | Not used in Oracle Advanced Supply Chain Planning. |
| Shared Supply | A flag to indicate that this supply is shared among multiple demands. |
| Ship Method | Ship method used for transfers and buy orders. |
| Ship Set Name | On the sales order, the ship set name designates lines that should ship together. Oracle Advanced Supply Chain Planning does not consider ship sets. However, the field is provided for information. |
| Ship To | Customer ship to location |
| Shipment | Not used in Oracle Advanced Supply Chain Planning. |
| Source Order Priority | This indicates the priority number on the actual demand record. This is different from the priority number calculated by the planning engine. |
| Source Org | Name of the source organization |
| Source Supplier | Name of the source supplier |
| Source Supplier Site | Name of the source supplier site |
| Start Quantity | This indicates the start quantity of a supply that can be different from the finished quantity owing to yield. |
| Subinventory | Subinventory identifier on the supply document, demand document, or location of an on-hand. |
| Substitute Component Rank | BOM substitute component rank |
| Sugg Dock Date | For more information, see Lead Time and the Planning Time Fence. |
| Suggested Due Date | The timestamp for the suggested due date in case of:
|
| Suggested Due Date Before Bucketing | The due date for Planned Order Demand and Model, Option Class or, Product Family Demand order types. |
| Sugg Order Date | For more information, see Lead Time and the Planning Time Fence. |
| Sugg Ship Date | For more information, see Lead Time and the Planning Time Fence. |
| Sugg Start Date | For more information, see Lead Time and the Planning Time Fence. |
| Source Supplier | The supplier company name. |
| Source Supplier Site | The supplier company site name. |
| Task Number | The identifier assigned to the task in a project. |
| UOM | This is an item attribute (unit of measurement) |
| Unconstrained Earliest Possible Completion Time | The planning engine calculates this based on the unconstrained schedule for those upstream supplies that allow minimum durations. |
| Unconstrained Earliest Possible Start Time | The planning engine calculates the difference between the unconstrained earliest possible completion time and supply duration. |
| Unconstrained Latest Possible Completion Time | The planning engine calculates this based on the unconstrained schedule for those downstream supplies that allow minimum durations. |
| Unconstrained Latest Possible Start Time | The planning engine calculates the difference between the unconstrained latest possible completion time and the supply duration. |
| Unit Number | This refers to the starting unit effectivity number. |
| Update Need By Date | For more information, see Lead Time and the Planning Time Fence. |
| Using Assembly | For planned order associated with demands, this field refers to the assembly with this item as a component. |
| VMI | Yes indicates that the supply is for a VMI-enabled item. |
| WIP Status | Status of the work in process. Some of the values are: - Onhold - Released - Unreleased |
| Weight | Weight of the order |
| WIP Start Qty | Start quantity used for planning |
Release Properties Tabbed Pane
The following table provides a description of the fields displayed in the Release Properties tabbed pane:
| Fields | Description |
|---|---|
| Implement Date | Implement date (editable) |
| Imp Qty/Rate | Implement quantity or rate (editable). The planning engine initially derives this value by dividing quantity by rate. |
| Implement As | Implement as a work order or a purchase requisition (editable). |
| Implement Alternate BOM | Implement alternate bills of material name (editable) |
| Implement Alternate Routing | Implement alternate routing name (editable) |
| Implement Arrival Date | Implement arrival date (not editable) |
| Implement Demand Class | Implement demand class (not editable) |
| Implement Dock Date | Implement dock date (not editable) |
| Implement FUCD | Implement first unit completion date for a repetitive job (editable) |
| Implement Firm | Implement firm flag status (editable) |
| Implement Job | Implement job number (not editable) |
| Implement Line | Implement line for a repetitive job (not editable) |
| Implement Project | Implement project name (editable) |
| Implement Ship Date | Implement ship date (non editable) |
| Implement Source Org | Implement source organization (editable) |
| Implement Status | Implement work in process status (editable) |
| Implement Supplier | Implement supplier (editable) |
| Implement Supplier Site | Implement supplier site (editable) |
| Implement Task | Implement task identifier (editable) |
| Implement Unit Number | Implement starting unit number for unit effectivity (not editable) |
| Implement WIP Class | Implement work in process class (not editable) |
| Implemented Quantity | Previously implemented order quantities (not editable) |
| Location | Implement location for the source organization or the supplier site (not editable) |
| Order Type | Type of order such as planned order, sales order, manual master demand schedule (not editable). |
| Quantity in Process | Implement Quantity or Rate (editable for planned orders only) |
| Quantity/Rate | Original order quantity (not editable) |
| Release Errors | Alerts you to any problem that might have occurred during the process of release. |
| Suggested Due Date | For more information, see Lead Time and the Planning Time Fence. |
Sourcing Tabbed Pane
The following table provides a description of the fields displayed in the Source tabbed pane:
| Fields | Description |
|---|---|
| Source Org | Name of the source organization |
| Source Supplier | Name of the supplier |
| Source Supplier Site | Name of the supplier's site |
| Company Name | Name of the company |
| Company Site | Name of the company site |
| Order Type | Type of order |
| Quantity/Rate | Quantity supplied by the source org |
| Suggested Due Date | For more information, see Lead Time and the Planning Time Fence. |
Line Tabbed Pane
The following table provides a description of the fields displayed in the Line tabbed pane:
| Fields | Description |
|---|---|
| Line | A group of resources |
| Schedule Group | This refers to work in process schedule group. |
| Build Sequence | The sequence number indicating the order in which work orders are sequenced |
| First Unit Start Date | The date on which the first unit belonging to a line is scheduled. |
| Last Unit Completion Date | The date on which the last unit belonging to a line is completed |
| Last Unit Start Date | The date on which the last unit belonging to a line is started |
| Order Type | Type of order. For example, planned order, sales order. |
| Process Days | This field indicates the number of days a planned order is scheduled for a repetitive schedule. |
| Quantity/Rate | This indicates the rate per day for a repetitive schedule. |
| Repetitive | Repetitive schedule |
| Suggested Due Date | For more information, see Lead Time and the Planning Time Fence. |
| Using Assembly | Name of the assembly. An assembly is an item that has a bill of material. |
Project Tabbed Pane
The following table provides a description of the fields displayed in the Project tabbed pane:
| Fields | Description |
|---|---|
| Planning Group | The name of the planning group for which the material is being planned. |
| Project Number | The identifier assigned to a project in the planning group. |
| Task Number | The identifier assigned to the task in a project belonging to a planning group. |
| Order Type | Type of order. For example, planned order, sales order. |
| Quantity/Rate | The quantity of the order. |
| Suggested Due Date | For more information, see Lead Time and the Planning Time Fence. |
| Unit Number | Unit number |
Right-click Menu Options in the Supply/Demand Window
In addition to the folder options, the right-click pop-up menu displays the following options to navigate to other windows:
-
Exception Details
-
Onhand
-
Items
-
Resource Requirements
-
Order Exceptions
-
Release
-
Gantt Chart
-
Horizontal Plan
-
Co Product Supplies
-
Calendar (based on the context, the following options may be available)
-
Calendar > Organization Manufacturing Calendar
-
Calendar > Supplier Capacity Calendar
-
Calendar > Organization Shipping Calendar
-
Calendar > Supplier Shipping Calendar
-
Calendar > Organization Receiving Calendar
-
Calendar > Customer Receiving Calendar
-
Calendar > Carrier Transit Calendar
-
-
More
-
More > Vertical Plan
-
Pegging
Pegging is a process that the planning engine uses to link:
-
Supplies to demands: All the way up to the top-level independent demand.
-
Demands to supplies: All the way down to the bottom-level purchased component supply.
Use pegging to:
-
Trace a purchased component or subassembly shortage to the sales orders and forecasts that are affected.
-
Prioritize critical material and capacity resources.
-
Analyze the impact of changing a supply or demand
Pegging plays a major role in determining the sequence in which demands are satisfied. For some pegging modes, the planning engine:
-
Groups supplies and demands into time windows
-
Sorts supplies by type
-
Pegs by demand priority or randomly within time windows
This section discusses:
-
Standard pegging: Standard pegging groups demands into windows and supplies by type, then pegs by priority within window. It provides a limited amount of prioritization at the day level (the window size is always one day).
-
Priority pegging: Priority pegging pegs high priority demands first to on-hand and firm supplies then continues with other existing and non-firm supplies. It controls the trade-off between holding inventory or satisfying lower priority demands.
-
FIFO pegging: FIFO pegging pegs demands to supplies on a day-by-day basis. It is the pegging process with the least load on the system.
-
Priority/FIFO pegging: The planning engine uses a combination of priority pegging and FIFO pegging methods where it does not prioritize beyond the firm supplies. The load on the system is less than the load from priority pegging.
-
Enabling pegging checklist
-
Viewing pegging information
The actual date that a demand is satisfied is a function of the detailed scheduling process. There is no guarantee that high priority orders are satisfied on time.
In performing the pegging process, the planning engine selects demands and locates supplies to peg those demands to. Therefore, we say that the pegging process pegs demands to supplies.
When some people think of pegging, they think of supplies pegged to demands. For example, if you are using hard pegging with Oracle Project Manufacturing, it reserves the supply for the demand.
When discussing the results of the pegging process, you can correctly say either that demands peg to supplies or that supplies peg to demands. The diagrams in this section use arrows which indicate the supplies that peg to particular demands.
To use pegging you must enable it for the items and for the plan. The planning engine pegs in several ways (pegging modes). For certain modes, you specify information to instruct the planning engine.
The planning engine pegs each item after the netting process. It begins with all of the items in the highest bill of material level and proceeds level by level to the lowest bill of material level.
The planning engine attempts to minimize substitution at the expense of crossing organizations and uses substituted on-hand or scheduled receipts before creating planned orders. For example:
-
Item A is a saleable item
-
Item B is a substitute for item A
-
In organization M1, there is:
-
Demand for item A, due on day 10, quantity 100, priority 1
-
Demand for item A, due on day 20, quantity 70, priority 2
-
On-hand supply for item A, quantity 40
-
On-hand supply for item B, quantity 70
-
-
In organization M2, there is:
-
On-hand supply for item A, quantity 60
-
On-hand supply for item B, quantity 40
-
-
The planning engine pegs the demand in organization M1, for item A, due on day 10, quantity 100, priority 1 to:
-
Organization M1, on-hand supply for item A, quantity 40
-
Organization M2, on-hand supply for item A, quantity 60
-
Demand satisfied date is day 10
-
It crosses organizations to avoid substituting
-
-
The planning engine pegs the demand in organization M1 for item A, due on day 20, quantity 70, priority 2 to:
-
Organization M1, on-hand supply for item B, quantity 70
-
Demand satisfied date is today
-
There is no supply for the requested item in any organization; it substitutes to use on-hand before creating planned orders
-
The planning engine passes independent demand priorities to discrete job and planned order dependent demands to which they peg. Planned order dependent demands have lower priority than discrete job dependent demands at the same bill of material level.
The planning engine performs pegging for product family items regardless of the setting of their item attribute Pegging
Pegging Modes
This table shows the pegging modes and the settings that you use to enable them.
| Pegging Mode | Plan Option - Priority Pegging | Profile Option - MSC: Use FIFO Pegging |
|---|---|---|
| Standard | Cleared | No |
| Priority | Selected | No |
| FIFO | Cleared | Yes |
| Priority/FIFO | Selected | Yes |
When the pegging process is processing an end-item product substitution, it does not attend to the following profile options, regardless of the pegging mode. The process performs the pegging for these demands immediately following the item substitution:
-
MSC: Demand Window Size
-
MSC: Peg by Product Supplies
-
MSC: Supply Window Size
-
MSO: Firm Supply Allocation Window (Forwards Days)
-
MSO: Firm Supply Allocation Window (Backwards Days)
-
MSO: Use Firm Supplies Before Creating Planned Orders
Standard Pegging
The standard pegging process makes two passes through the demands and supplies.
First Pass
The planning engine groups demands into daily windows. It does not use profile option MSO: Demand Window Size. The first window starts at the first demand date and the last window ends at the end of the planning horizon.
For example, the demand window size is 1 day, the first demand is due on day 5. The first demand window is from day 5 to day 5, the second demand window is from day 6 to day 6, and the third demand window is from day 7 to day 7.
Demands in each window are sorted by demand priority in ascending order.
The planning engine groups supplies into daily windows. It does not use profile option MSO: Supply Window Size. The first window starts at the first supply availability date and the last window ends at the end of the planning horizon.
For example, the supply window size is 1 day, the first supply is available on day 7. The first supply window is from day 7 to day 7, the second supply window is from day 8 to day 8, and the third supply window is from day 9 to day 9.
Supplies in each window are sorted by type using the following order:
-
Firm supplies
-
On-hand
-
Receipt shipment, intransit shipment, payback supply (Oracle Project Scheduling)
-
Work order (firm), job by-product supply (firm), purchase order (firm), non-standard jobs, non-standard job by-product supply (always considered firm)
-
Purchase requisition (firm)
-
-
2. Existing supplies
-
Work order (non-firm), job by-product Supply (non-firm), repetitive schedule, repetitive schedule by-product supply, flow schedule, flow schedule by-product supply, purchase order (non-firm)
-
Purchase requisition (non-firm)
-
-
Planned supplies
-
Planned order (firm), planned order by-product supply (firm). You can raise the pegging priority of firm planned orders by releasing them.
-
Planned order (non-firm), planned order by-product supply (non-firm)
-
The supplies in each type are sorted as follows:
-
On-hand: Lot expiration date and then quantity in ascending order to use expiring lots first. A demand pegging to an expiring lot must have its demand date earlier than the lot expiration date; therefore, some expiring lots may not peg.
-
Firm: By date in ascending order within each type.
-
Non-firm: By quantity in ascending order within each type.
Second Pass
The planning engine begins from the first demand window and pegs demands by demand priority to supplies of the first supply window. If necessary, it continues the pegging process with the next supply window.
As all demands in the each demand window are pegged, it moves to the next demand window and pegs as it did in the first demand window
Unpegged supplies are posted to excess.
In this example, demands D1 and D2 are sorted by priority in ascending order and supplies S5 and S6 are sorted by type. Pegged entities are connected by arrows.
Pegged Entities
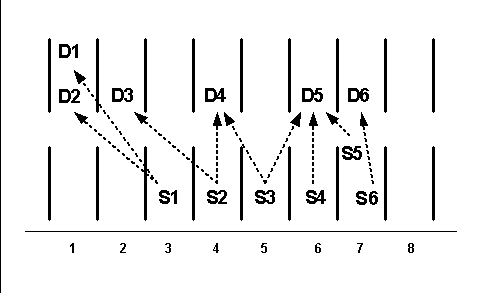
Standard Pegging Example
This example shows standard pegging for two items. It begins with various settings and then shows the pegging for each item.
Profile option MSC: Use FIFO Pegging is No.
Plan option Peg Supplies by Demand Priority: Cleared.
In standard pegging, the planning engine uses 1 as the value for MSO: Demand Window Size and MSO: Supply Window Size and ignores the entered values.
Item A101 Pegging
This diagram shows the demands, supplies, and pegging information for item A101. Demand priorities are in parentheses, pegged entities are connected by arrows, and split supply quantities are in brackets.
The first demand window starts on day 3 at the first demand date.
Supplies in the first supply window [day 1] are pegged in the following order:
-
On-hand of quantity 25 on day 1 and demand quantity of 100 on day 3
-
Firm planned order of quantity 10 on day 1 and demand of quantity 100 on day 3
-
Non-firm planned order of quantity 50 on day 1 and demand of quantity 100 on day 3
Supplies in the second supply window [day 2] are pegged in the following order:
-
Firm planned order of quantity 5 on day 2 and demand of quantity 100 on day 3
-
Non-firm planned order of quantity 35 on day 2 (for partial quantity 10) and demand of quantity 100 on day 3
-
Non-firm planned order of quantity 35 on day 2 (for partial quantity 25) and demand of quantity 100 on day 4
Supply in the third supply window [day 3] is pegged as non-firm planned order of quantity 75 on day 3 and demand of quantity 100 on day 4
Pegged Entities
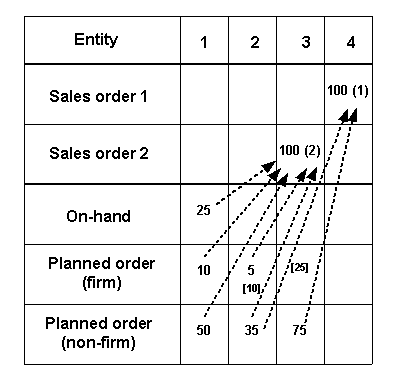
Item A102 Pegging
This table shows the demands, supplies, and pegging information for item A102. Demand priorities are in parentheses and pegged entities are connected by arrows.
Supplies in the first supply window [day 1] are pegged in the following order:
-
On-hand of quantity 10 on day 1 and demand of quantity 200 on day 1
-
Non-firm planned order of quantity 40 on day 1 and demand of quantity 200 on day 1
Supplies in the second supply window [day 2] are pegged in the following order:
-
Firm work order of quantity 20 on day 2 and demand of quantity 200 on day 1
-
Non-firm planned order of quantity 100 on day 2 and demand of quantity 200 on day 1
Supply in the third supply window [day 3] is pegged as firm purchase requisition of quantity 30 on day 3 and demand of quantity 200 on day 1
Supply in the forth supply window [day 4] is pegged as non-firm work order of quantity 40 on day 4 and demand of quantity 100 on day 6
Supply in the sixth supply window [day 6] is pegged as non-firm planned order of quantity 60 on day 6 and demand of quantity 100 on day 6
Pegged Entities

Priority Pegging
The priority pegging process makes three passes through the demands and supplies.
First Pass
The planning engine starts with the demand of highest priority as specified by the plan's demand priority rule. It scans backwards the number of days in the site or item-specific firm supply allocation window (profile option MSO: Firm Supply Allocation Window (Backward days) and finds the first firm supply quantity to peg the demand to.
The planning engine scans backward and finds supplies. It organizes and pegs them as follows:
-
Sorts on-hand by the lot expiration date and then quantity in ascending order. Pegs demand to on-hand before other firm supplies of day 1 when the firm supply allocation window includes day 1.
-
Firm supplies are not sorted on any given date.
-
If you want firm planned orders included in the firm supply allocation window, set profile option MSC: Include Firm Planned Orders In Firm Allocation Window to Yes.
If it cannot find enough firm supply quantity to satisfy the entire demand quantity, it scans forwards the number of days in the site or item-specific firm supply allocation window (profile option MSO: Firm Supply Allocation Window (Forward days)) to find supplies to peg the demand to.
The pass ends when the demand is completely pegged to firm supplies or all firm supplies in the firm supply allocation windows are exhausted.
This diagram shows an example of the first pass:
-
Demand D1 on day 4 is the highest priority demand
-
Supplies S2 and S3 on day 3 are not sorted
-
OH (on-hand) is sorted before supply S4 on day 1
-
The order of supplies for pegging to demand D1 is:
-
Backward: S1, S2 and S3 randomly; OH; and S4
-
Forward: S5; D1 cannot peg to S6
Priority Pegging First Pass Example
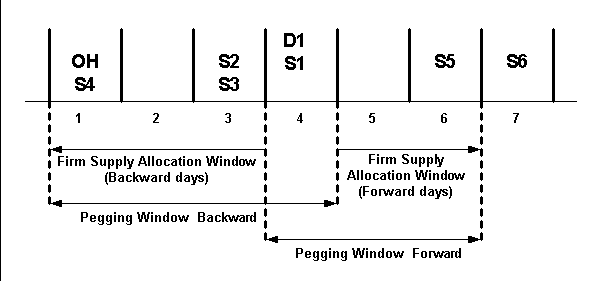
-
Second Pass
For the remaining demands and supplies, the planning engine groups all demands into windows by using profile option MSO: Demand Window Size. The first window starts at the first demand date and ends after the number of days in the window size. The second window starts at the end of the first window and ends after the number of days in the window size. The last window ends at the end of the planning horizon.
For example, the demand window size is 50 days and the first demand date is due on day 1. The first demand window is from day 1 to day 49 and the second demand window is from day 50 to day 99.
Demands in each window are sorted by demand priority in ascending order.
The planning engine groups all supplies into windows by using profile option MSO: Supply Window Size. The first window starts at the first available supply date and ends after the number of days in the window size. The second window starts at the end of the first window and ends after the number of days in the window size. The last window ends at the end of the planning horizon.
For example, the supply window size is 50 days and the first supply is available on day 1. The first supply window is from day 1 to day 49 and the second supply window is from day 50 to day 99.
It sorts supplies in each window by type in the same manner as the standard pegging first pass.
Third Pass
The planning engine uses the standard pegging second pass.
Third Pass Example
This diagram shows an example of the third pass:
-
Demands are sorted by priority in each demand window and supplies are sorted by type and date or quantity in each supply window
Note that:
-
Demand D1 is pegged to multiple supplies S1 and S2
-
Demands D3 and D4 both peg to supply S3
-
Pegged entities are connected by arrows
Priority Pegging Third Pass Example

Firm Supply Allocation Window
Setting
You can set the firm supply allocation window in these ways:
-
Site level: Use profile options MSO: Firm Supply Allocation Window (Backward days) and MSO: Firm Supply Allocation Window (Forward days) for all items.
-
Item level: Use Cumulative Manufacturing Lead Time (make items) or Processing Lead Time (buy items) and the profile option MSO: Multiplier to Derive Supply Allocation Window to calculate an item specific value for backward calculations only.
If you specify a positive number for the value of profile option MSO: Multiplier to Derive Supply Allocation Window, then the planning engine ignores the profile option MSO: Firm Supply Allocation Window (Backward days). If you specify a zero, negative, or null number for the value of profile option MSO: Multiplier to Derive Supply Allocation Window, then the planning engine uses the profile option MSO: Firm Supply Allocation Window (Backward days).
Calculating
Oracle Advanced Supply Chain Planning derives a firm supply allocation window for each item based on its item attributes as follows:
-
Make: Cumulative manufacturing lead-time. Either automatically calculate it or enter it. To automatically calculate it use either the Oracle Bills of Material Compute Lead Time calculation or the Lead Time Rollup concurrent processes.
-
Buy: Processing lead-time
These are the formulas for the item-specific firm supply allocation window:
-
Make item: Cumulative manufacturing lead-time * MSO: Multiplier to derive supply allocation window
-
Buy item: Processing lead-time * MSO: Multiplier to derive supply allocation window
The value is rounded up to the integer. If the cumulative manufacturing lead-time or the processing lead-time is null or 0 and the multiplier is positive, the planning engine uses the item-specific firm supply allocation window which is 0.
For example:
-
Cumulative manufacturing lead-times for item A101: 12 days
-
Cumulative manufacturing lead-times for item A102: 20 days
-
Firm supply allocation window for item A101: 15 days (12 * 1.2 = 14.4)
-
Firm supply allocation window for item A102: 24 days (20 * 1.2)
Sizing Demand and Supply Windows
Very small or very large window sizes bring advantages and disadvantages to the results of the pegging process.
Some benefits of small demand window size are:
-
Lower inventory and inventory carrying cost: Earlier demands are pegged to on-hand instead of higher priority later demands pegging to on-hand.
-
Decrease in total demand lateness: It is more likely that early demands are satisfied before later demands.
A disadvantage of small demand window size is more late higher priority demands. Lower priority demands are satisfied before higher priority demands and low priority demands for safety stock peg to on-hand.
A benefit of large demand window size is higher priority demands having a higher probability of being satisfied earlier.
Some disadvantages of large demand window size are:
-
Increased overall demand lateness.
-
Increased inventory carrying cost as more inventory is held.
When you are sizing the supply window, note that selecting a large window size can result in the planning engine's pegging early demands to firm supplies or non-firm supplies at the end of the window (firm supplies sort by type and date, non-firm supplies sort by type and quantity). This results in increased lateness for the early demands.
Priority Pegging Examples
This example shows priority pegging for two items. It begins with various settings and then shows the pegging for each item.
Profile option settings:
Plan option Peg Supplies by Demand Priority: Selected.
Item cumulative lead-times:
-
A101: 2
-
A102: 1
Item specific firm supply allocation window:
A101: 4 (2 * 2)
A102: 2 (2 * 1)
Item A101 Pegging:
First Pass
This diagram shows the demands, supplies, and pegging information for item A101 on the first pass. Demand priorities are in parentheses and pegged entities are connected by arrows. The order of the schedule entities is:
-
Demand
-
Pegging to on-hand and firm supplies within the firm supply allocation window. The planning engine starts with the highest priority demand on day 4 going backward and then forward.
Pegging to On-hand and firmed supplies
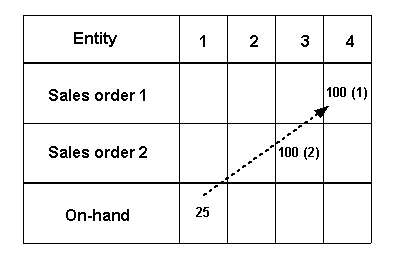
Second Pass
This diagram shows the demands, supplies, and pegging information for item A101 on the second pass. Demand priorities are in parentheses, pegged entities are connected by arrows, and split supply quantities are in brackets. The order of the schedule entities is:
-
Demand position after of on-hand and firm supplies within the firm supply allocation window
-
Pegging to supply outside the firm supply allocation window, firm supplies first
Note that non-firm planned orders are sorted by quantity in ascending order and firm planned orders are sorted by date in ascending order. Therefore, the planning engine:
-
Pegs the non-firm planned order in bucket 2 for quantity 35 and the higher priority demand in bucket 4. Pegs the non-firm planned order for quantity 35 on day 2 and the higher priority demand on day 4. Pegs the non-firm planned order for quantity 50 on day 1 and both the demand on day 4 (for quantity 25) and the demand on day 3 (for quantity 25).
-
Pegs the firm planned order for quantity 10 on day 1 and the higher priority demand of day 4.
Pegging of firmed planned order

Item A102 Pegging
First Pass
This table shows the demands, supplies, and pegging information for item A102 on the first pass. Demand priorities are in parentheses and pegged entities are connected by arrows. The order of the schedule entities is:
-
Demand
-
Pegging to on-hand and firm supplies within the firm supply allocation window. The planning engine starts with the highest priority demand on day 6 going backward and then forward.
Note that the planning engine pegs to firm jobs and on-hand balances with respect to the firm supply allocation windows. No demand in the first pass pegs to the firm job on day 3 but the demand in bucket 1 for quantity 170 in the second pass does peg to it.
Pegging Entities
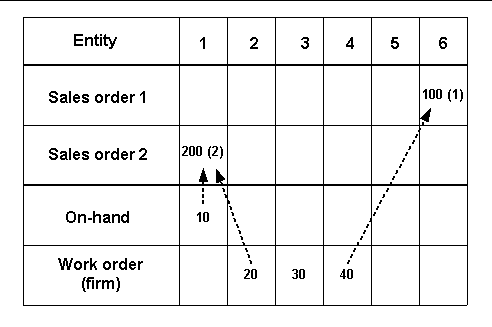
Second Pass
This table shows the demands, supplies, and pegging information for item A102 on the second pass. Demand priorities are in parentheses and pegged entities are connected by arrows. The order of the schedule entities is:
-
Demand position after of on-hand and firm supplies within the firm supply allocation window
-
Pegging to supply outside the firm supply allocation window, firm supplies first
Pegging to supply outside firm supply
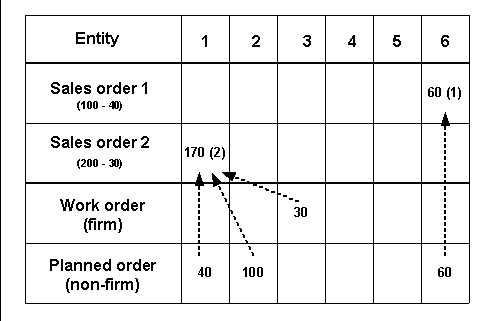
FIFO Pegging
For all demands and supplies, the planning engine:
-
Pegs demands to supplies day by day. It does not sort each day's supplies and demands.
-
When there are no more supplies or demands on one day, uses supplies or demands from the next day
-
At the end of the planning horizon, posts unpegged supplies to excess.
FIFO Pegging Example
This example shows FIFO pegging. It begins with various settings and then shows the pegging for each item. Daily supplies and demands are not sorted. Pegged entities are connected by arrows and split supply quantities are in brackets.
Profile option MSC: Use FIFO Pegging: Yes
Plan option Peg Supplies by Demand Priority: Cleared
The pegging includes:
-
The supply of quantity 500 on day 1 and the demand on day 3 for quantity 300 and the demand on day 7 for quantity 200.
-
The supply of quantity 100 on day 7 and the demand on day 7 for quantity 100.
-
The supply of quantity 400 on day 10 and the demand on day 10 for quantity 400.
-
The supply of quantity 200 on day 20 and the demand on day 10 for quantity 100 and the demand on day 20 for quantity 100.
-
The supply of quantity 300 on day 30 and the demand on day 30 for quantity 300.
Pegging
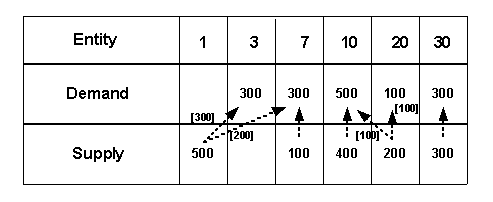
Priority/FIFO Pegging
The priority/FIFO pegging process makes two passes through the demands and supplies.
First Pass
The planning engine uses the priority pegging first pass.
Second Pass
The planning engine uses the FIFO pegging pass.
Priority/FIFO Pegging Example
This example shows priority/FIFO pegging. It begins with various settings and then shows the pegging for each item. Pegged entities are connected by arrows and split supply and combined demand quantities are in brackets.
Profile options:
Plan option Peg Supplies by Demand Priority: Selected.
Item cumulative lead-time: 1
Item specific firm supply allocation window: 2 (2 * 1)
First Pass
The planning engine pegs firm jobs and on-hand with respect to the firm supply allocation windows. It does not peg the firm work order for quantity 30 on day 3 to any demand in the first pass but to the demand on day 1 for 100 in the second pass.
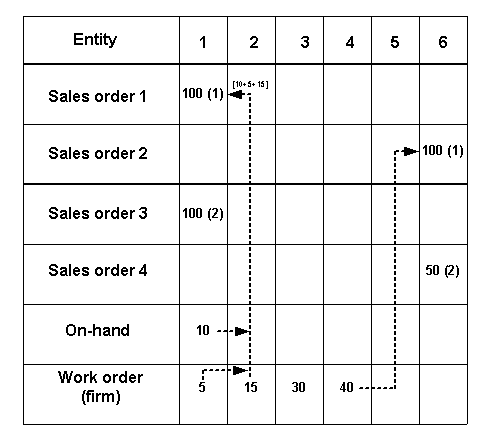
Second Pass
The planning engine pegs:
-
The demand for quantity 70 on day 1 to the planned order for quantity 70 on day 1.
-
The demand for quantity 100 on day 1 to the purchase requisition for quantity 20 on day 2, then to the planned order for quantity 50 on day 2, and then to the work order for quantity 30 on day 3.
Second Pass
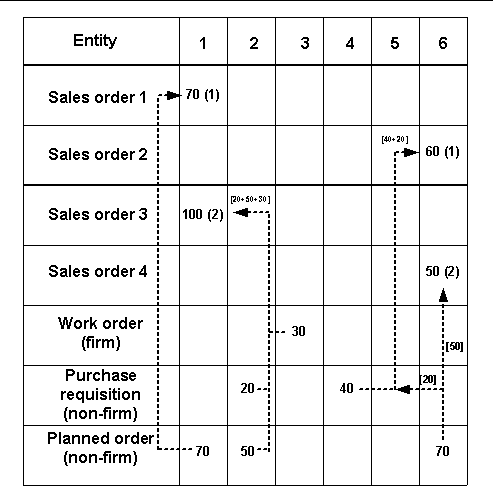
Priority and FIFO/Priority Comparison
This diagram shows the second pass as priority pegging schedules it. The planning engine pegs:
-
The demand for quantity 70 on day 1 to the purchase requisition for quantity 20 on day 2 and then to the planned order for quantity 50 on day 2.
-
The demand for quantity 100 on day 1 to the planned order for quantity 70 on day 1 and then to the work order for quantity 30 on day 3.
Third Pass
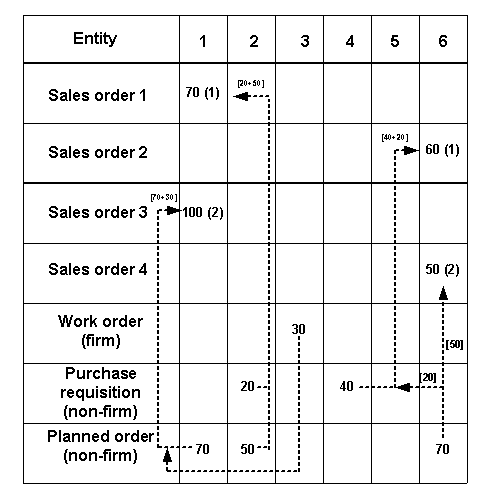
Enabling Pegging Checklist
-
Enable pegged items: In the Items form, MPS/MRP Planning tabbed region, Pegging field, select any value other than None. For more information, see Oracle Inventory User's Guide.
-
Enable plan pegging: In the Profile Options form, Main tabbed region, set Enable Pegging. This action enables standard pegging.
Perform this checklist item if you want to use FIFO pegging or priority/FIFO pegging.
-
Enable plan FIFO pegging: In the Profile Options form, set MSC: Use FIFO Pegging to Yes.
Perform the next three checklist items if you want to use priority pegging or priority/FIFO pegging.
-
Enable priority pegging: In the Plan Options form, Main tabbed region, select Peg Supplies by Demand Priorities.
-
Set firm supply allocation windows: In the Profile Options form, attend to the following:
-
Set multiplier To Derive Supply Allocation Window: In the Profile Options form, set MSO: Multiplier To Derive Supply Allocation Window. You can use a decimal quantity.
This profile option defaults to not entered, which instructs the planning engine to ignore it and base the backward search of pegging is on profile option MSO: Firm Supply Allocation Window (Backward days). If you enter a negative value or zero, the planning engine also ignores this profile option.
Perform this checklist item if you want to use priority pegging.
-
Set demand and supply window sizes. In the Profile Options form, attend to the following:
-
Set the profile MSC: Minimize Workorder crossovers during reschedules to Yes to avoid pushing any supply forward to complete a work order even if there is some excess. This ensures that the supply is not pegged to a safety stock and therefore, the safety stock date will be closer to the real demand date.
For more details on the profile option, see MSC Profile Options
Safety Stock Pegging
To set up safety stock planning and to understand the safety stock planning process, see Safety Stock.
Overview of Safety Stock Pegging
The planning engine plans to meet safety stock levels through a process of sequential phases:
-
Safety stock smoothing: Smooths out fluctuations in safety stock. This phase is optional. The planning engine only performs safety stock pegging if profile option MSC: Use FIFO Pegging is No.
Oracle recommends that you use priority pegging if your business uses safety stock.
-
Inventory netting: Creates planned orders and recommendations to meet safety stock levels
-
Pegging: Associates supplies and demands
-
Scheduling: Detailed schedules safety stock supplies
This topic explains the Pegging phase. To understand the other planning phases, see Safety Stock.
To view the results of safety stock pegging, use theSupply/Demand Window.
Safety Stock Pegging Phases
The planning engine plans to peg safety stock through a process of sequential phases:
-
Peg to non-transient safety stock levels.
-
Peg to demands
-
Peg to transient safety stock levels
Non-transient safety stock levels are levels that you must hold throughout the planning horizon. They are safety stock levels without ending effectivity dates.
Transient safety stock levels are levels that you must hold for only a certain time during the planning horizon. They are safety stock levels with ending effectivity dates
The safety stock level for a day can be a combination of non-transient and transient safety stock levels for that day.
The planning engine pegs non-transient and transient safety stocks differently. For:
-
Transient safety stock levels: It may dual-peg them to both satisfy a safety stock level and also to satisfy a future demand after the safety stock level has expired and safety stock level goes down
-
Non-transient safety stock levels: It only pegs them to safety stock level, never to demand
In all examples, please assume:
-
Profile option MSO: Demand Window Size is 1
-
Profile option MSO: Supply Window Size is 1
-
Demand dates are unconstrained demand dates. Unconstrained demand dates are demand dates calculated before scheduling. Scheduling of supplies occurs after pegging.
Safety Stock Pegging Phase 1: Peg to Non-transient Safety Stock Levels
You can choose to exclude non-transient safety stock demands from the pegging logic; set profile option MSC: Include Safety Stocks in Priority based Pegging to No. The pegging process:
-
First pegs all non-transient safety stock levels to non-firm planned orders
-
Then pegs other demands to supplies
If you set profile option MSC: Include Safety Stocks in Priority based Pegging to Yes, the pegging process does not give preferential treatment to the non-transient safety stock levels and pegs them at the same time as the demands.
Safety Stock Pegging Phase 2: Peg to Demands
The planning engine performs priority pegging logic using demands and supplies within each supply and demand window. It does not consider transient safety stocks. It does consider non-transient safety stocks if it has not pegged them in the previous optional phase.
Safety Stock Pegging Phase 3: Peg to Transient Safety Stock Levels
The planning engine performs priority pegging logic using transient safety stock levels and supplies. It pegs the supplies at quantity 0 because these supplies will eventually satisfy demands. It pegs the transient safety stock levels to the lowest priority supplies in the supply window.
This table shows pegging to a transient safety stock level. It details:
-
D: Demand
-
SSL(T): Transient safety stock level
-
S1: Supply 1
The transient safety stock level pegs to Supply 1 from D1 to D9 at quantity 0. The demand on D10 for quantity 10 pegs to Supply 1 on D10 at quantity 10.
| 1 | 2 | 3 | 4 | 5 | 6 | 7 | 8 | 9 | 10 | 11 | 12 | 13 | 14 | 15 | |
|---|---|---|---|---|---|---|---|---|---|---|---|---|---|---|---|
| D | - | - | - | - | - | - | - | - | - | 10 | - | - | - | - | - |
| SSL(T) | 10 | 10 | 10 | 10 | 10 | 10 | 10 | 10 | 10 | 10 | - | - | - | - | - |
| S1 | 10 | ||||||||||||||
| S1 pegs to | SSL(T) | SSL(T) | SSL(T) | SSL(T) | SSL(T) | SSL(T) | SSL(T) | SSL(T) | SSL(T) | D | - | - | - | - | - |
| S1 peg qty | 0 | 0 | 0 | 0 | 0 | 0 | 0 | 0 | 0 | 10 | - | - | - | - | - |
Other Safety Stock Pegging Principles
Other safety stock pegging principles are:
-
The planning engine can peg a safety stock level to more than one supply
-
The planning engine can split planned orders to peg to different transient safety stock levels. To enable this, set profile option MSC: Split Planned Order to perform safety stock pegging to Yes or Yes But Do Not Violate Order Modifiers.
-
The peg to a transient safety stock level expires either when the transient safety stock level expires or when the supply is consumed by demands.
-
A supply that pegs to a transient safety stock level and also to multiple demands may contribute less to its pegged safety stock level over time. As time progresses, the demands consume a part of its quantity at different times; the remaining quantity remains pegged to the transient safety stock level.
-
The planning engine can push out dependent demands of supplies that peg to safety stock levels: Use this method when your constraints tend to cause the scheduling phase of planning to push resource requirements out and result in unneeded safety stock at lower bill of material levels. To enable this, set a value for profile option MSO: Supply Reschedule Window Size for Safety Stock Pegging. The value is the number of reschedule that the pegging process estimates when it makes decisions against transient safety stocks.
This diagram shows an inventory netting scenario with pegging indicated. It chiefly shows the pegging of safety stock levels. The planning engine does peg other demands and supplies that do not appear pegged here or do not appear completely pegged here.
It details:
-
D: Demands
-
OH: On-hand balance
-
SR: Scheduled receipts
-
PO: Planned orders
-
SS(NT): Non transient safety stock levels
-
SS(T): Transient safety stock level
-
SSL: Safety stock level
-
PAB: Projected Available Balance
In this diagram, the non-transient safety stock levels (quantity 10 beginning on day 1 and an additional quantity 5 beginning on day 7) peg to supplies due on day 3.
For transient safety stock:
-
The quantity 10 on day 7 pegs to the planned order quantity 10 consumed on day 8.
-
The quantity 10 on days 8 and 9 and the quantity 3 on days 10 and 11 peg to the planned order quantity 10 consumed on day 12
-
The quantity 3 on day 12 pegs to the planned order quantity 3 consumed on day 14.
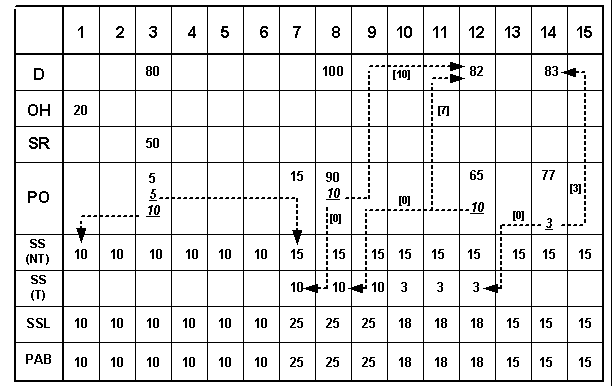
Forecast and Production Forecast Pegging
When you create a production plan during constrained master scheduling or, an unconstrained plan with pegging enabled, Oracle Advanced Supply Chain Planning allows you to see product family planned orders that are pegged to existing sources of supply including, On-hand, Work In Process jobs and firm planned orders if any. You can do this if:
-
The planning method for product family item and the member items are the same
-
You are performing constrained master scheduling in which the member items or some of their components are critical items. This ensures that both the product family and the member items reside in the same plan.
The planning engine does not generate pegging:
-
Across different plans
For example, if product family PF-1 is in production plan and you use that to drive manufacturing plan for member items M-A and M-B, the planning engine does not derive pegging in this scenario.
-
For sales orders
Note: Only demand that is pushed down from the aggregate demand statement is pegged.
Product family push down demand = Total supply (Planned orders) - Sales order demand (Rolled up sales orders at the product family level)
You can view the Pegging region of the Supply/Demand window to analyze the impact of changing a supply or demand order at any level of your bill of material.
To generate pegging information
-
Navigate to Plan Options > Main tab.
-
Select the Enable Pegging check box for an unconstrained plan.
Alternatively, you can choose to generate a constrained/optimized plan. In this case, the planning engine always generates pegging.
Viewing Pegging Information
Using the pegging tree, you can trace demand and supply up or down from any bill of material level.
To display the pegging tree
-
Select the desired item in the Navigator.
-
Navigate Tools > Supply/Demand.
-
In the Supply/Demand window, the pegging tree appears in the bottom half of the window.
The default display for viewing pegging from demand to supply is supply order details and end item demand order information. The default display for viewing pegging from supply to demand is supply order details, immediate parent demand information, and end item demand information.
-
To expand the entire pegging tree, select (highlight) the top pegging node (root), right-click, and select Expand All.
You can explode each node to higher level or lower level nodes by clicking on the plus and minus signs. You can also jump to other detail windows by right-clicking the pegging node.
To see a node's properties, highlight it, right-click it, and select Properties.
Right-click Menu Options in the Pegging Region of the Supply/Demand Window
The following right-click menu options are available from the pegging region:
| Right-click Menu Option | Available For Demand Line or Supply Line | Description |
|---|---|---|
| Exception Details | Both | Use to navigate to the Exception Details window. |
| Horizontal Plan | Both | Use this to navigate to the Horizontal Plan window. |
| Vertical Plan | Both | Use this to navigate to the Vertical Plan window. |
| Items | Both | Use this to navigate to the Items window. |
| Resource Requirements | Supply Line | Use this to navigate to the Resource Requirements window. |
| Expand | Both | Use this to expand all the pegging lines below the line you highlight in the pegging tree. |
| Refresh Supply/Demand | Both | Use this option to refresh the information in the Supply/Demand region. The planning engine does not change the information in the pegging region. |
| Calendar | Both | Various Calendar options (such as Organization Shipping and receiving) are available. |
| Refresh | Demand Line | The planning engine refreshes the information in the pegging region. |
Pegging Icons in the Supply/Demand Window
Pegging information is available in the pegging region of the Supply/Demand window. You can use the icons provided in this window to perform the following:
-
Supply Pegging icon and Demand Pegging icon: View upstream (demand pegging) and downstream pegging (supply pegging) for a particular supply or demand record in the same window. By default, a supply line has upstream pegging while a demand line has downstream pegging. You can change the pegging direction by clicking on these icons.
-
Backward Navigation icon and Forward Navigation icon: Navigate forward or backward to multiple Supply/Demand windows to view pegging information for different items.
-
For example, while navigating a pegging tree, you may want to view the demand pegging for a different item in the pegging tree. To do this, highlight the pegging line of the item and click the Demand Pegging icon. The planning engine refreshes only the pegging region and creates the highlighted line in the pegging region as the root pegging line. You can use the Backward Navigation to return to the previous context in the pegging region. The state of the pegging region is maintained so that you return to the pegging region as you left it.
-
The history of your forward and backward navigation is cleared when you select a different node from the Navigator or the Query result window. In addition, the history of the navigation is cleared when you select a different supply or demand line from the supply and demand region of the Supply/Demand window.
-
After you select an item from a plan or from a query result window and open the Supply/Demand window, you may have subsequent different context in the Supply/Demand window as you drill through pegging and view supply/demand for a different item.
-
The planning engine saves a copy of the contents in the entire Supply Demand window when a different root node (different item) appears in the pegging region. However, the planning engine does not save a copy of the Supply Demand window if you change the context in the supply/demand region of the window by firming a supply, querying a subset of records, or refreshing supply/demand.
-
-
Hide Dependant Demands and Show Dependant Demands toggle icon: This is a toggle icon and can be used to switch between hide and show of dependent demand pegging lines.
-
Hide Operation/Resource and Show Operation/Resource toggle icon: This is a toggle icon and can be used to switch between hide and show operation and resource pegging lines. By default, the planning engine displays the operation and resource lines in the pegging tree.
Vendor Managed Inventory (VMI) Supplies
You can perform the following tasks to manage VMI supplies using the Planner Workbench:
-
Search for VMI supplies using the VMI Flag criterion in the Find Supply/Demand window. After you specify the condition for the VMI flag, the records that meet your criteria appear in the Supply/Demand window. You can view all supplies (planned orders, requisitions, purchase orders, in transit shipments) that are managed by a VMI-enabled supplier.
-
Prevent the release of those planned orders that are sourced from VMI-enabled suppliers. You need not create a requisition for items managed by suppliers. To prevent the release of VMI items, clear the Release VMI Items check box in the Other tabbed pane of the Preferences window.
-
Create forecasts for VMI items and publish them to your suppliers.
Items Window
View the Items Window
You can navigate to the Items window from various node types such as items an plans in the Navigator. In addition to the Navigator, you can also drill down to the Items window from other windows such as Vertical Plan.
To display the Items window
-
Select one or more nodes (using Ctrl- click) in the Navigator.
-
Select [right-click] > Items > Items.
Information Displayed in the Items Window
The Items window provides detailed information pertaining to items such as:
| Fields | Description |
|---|---|
| BOM Item Type | BOM item attribute |
| Pegging | MPS/MRP planning item attribute |
| Preprocessing LT | Lead times item attribute |
| Processing LT | Lead times item attribute |
| Postprocessing LT | Lead times item attribute |
| Fixed LT | Lead times item attribute. For buy items, this field displays item attribute Processing LT. |
| Fixed Order Qty | General planning item attribute |
| Fixed Lot Mult | General planning item attribute |
| Min Order Qty | General planning item attribute |
| Max Ord Qty | General planning item attribute |
| ABC Class | ABC class code assigned to the item |
| ATP Components Flag | Oracle Order Management item attribute |
| ATP Flag | Oracle Order Management item attribute |
| Base Model | Bills of material item attribute |
| Buyer | Purchasing item attribute |
| Carrying Cost | General planning item attribute |
| Category | Planning category assigned to the item |
| Category Desc | Planning category description |
| Continuous Inter-Org Transfers | MPS/MRP planning item attribute |
| Convergent Supply Consumption | MPS/MRP planning item attribute |
| Create Supply Flag | MPS/MRP planning item attribute |
| Critical Component | MPS/MRP planning item attribute The planning engine can infer from the bottleneck resource group whether or not an item is a critical component. The Critical Component fields displays one of the following values: - Null - Item attribute - Inferred For example, sub-assembly B is created using an item A. You may not specify the item A as a critical component. However, if the resource for creating the sub-assembly B is a bottleneck, the planning engine considers the sub-assembly as a critical component at the time of planning for Item A in a production plan. |
| Demand Time Fence Date | The planning engine calculates this based on the sum of plan run date and demand time fence days. |
| Demand Time Fence Days | MPS/MRP planning item attribute |
| Description | Main item attribute |
| Discount | MRP: Plan Revenue Discount Percent profile option value |
| Divergent Supply Feed | MPS/MRP planning item attribute |
| Effectivity Control | Bills of material item attribute |
| Exception Set | MPS/MRP planning item attribute |
| Fixed Days Supp | MPS/MRP planning item attribute |
| Forecast Control | MPS/MRP planning item attribute |
| Inventory Use Up Date | The planning engine calculates this based on the engineering change order for the item. |
| Make/Buy | General planning item attribute |
| Margin | The planning engine uses the following formula to calculate this: (1 - Standard Cost/ Net Selling Price) * 100 |
| Net Selling Price | The planning engine uses the following formula to calculate this: Selling Price * (1 - Discount) |
| Nettable Qty | Nettable inventory quantity |
| Non Nettable Qty | Non-nettable inventory quantity |
| PIP Flag | MPS/MRP planning item attribute |
| Planner | General Planning item attribute |
| Planning Method | MPS/MRP planning item attribute |
| Planning Time Fence Date | The planning engine compares the sum of the plan run date and planning time fence days with the natural time fence. The greater value of the two is used for calculating the planning time fence date. If plan option Planning Time Fence is clear and the item has no firm discrete jobs, this field is blank. For more information, see Lead Time and the Planning Time Fence . |
| Planning Time Fence Days | MPS/MRP planning item attribute |
| Product Family Item | Product family item name (applicable to member items only) |
| Product Family Item Desc | Product family item description (applicable to member items only) |
| Repetitive | MPS/MRP planning item attribute |
| Round | MPS/MRP planning item attribute |
| Safety Stock Days | General planning item attribute |
| Safety Stock Method | General planning item attribute |
| Safety Stock Percent | General planning item attribute |
| Selling Price | The planning engine considers the selling price based on the default price list associated with the profile option MRP: Plan Revenue Price List. |
| Service Level | Target service level for an item |
| Shrinkage Rate | MPS/MRP planning item attribute |
| Standard Cost | Item cost |
| Substitution Window | MPS/MRP planning item attribute |
| UOM | Main item attribute |
| Unit Volume | Physical attributes item attribute |
| Unit Weight | Physical attributes item attribute |
| Volume UOM | Unit of measure for quantity (volume) |
| WIP Supply Type | Work in process item attribute |
| Weight UOM | Item weight (unit of measurement) |
Buttons in the Items Window
Various buttons are provided in the Items window. You can use these buttons to navigate to various other windows:
-
Destinations
-
Sources
-
Where Used
-
Components
-
Co-Product
-
Routing Operations
-
Safety Stock
-
Substitutes
Right-click Menu Options in the Items Window
In addition to the folder options, the right-click pop-up menu displays the following options to navigate to other windows:
-
Supply/Demand
-
Supply
-
Supplier Information
-
Process Effectivity
-
Exception Details
-
Gantt Chart
-
Horizontal Plan
-
Vertical Plan
Destinations Window
The Destinations window details information such as destination organization, sourcing, and assignment associated with items. You can access the Destinations window from the Items window and Supply Chain Bill.
The Destinations window consists of three tabs: Sourcing, Effectivity Dates, Assignment Information.
Sourcing Tabbed Pane
The following table provides a description of the fields displayed in the Sourcing tabbed pane:
| Field | Description |
|---|---|
| Item | Item |
| Source Type | Sourcing rule, bill of distribution or item attribute |
| Destination Org | The receiving organization. |
| Supplier | Supplier name (not used in the Destinations window) |
| Supplier Site | Supplier site name (not used in the Destinations window) |
| Allocation % | Allocation % from the sourcing rule or bill of distribution |
| Rank | Rank from the sourcing rule or bill of distribution |
| Shipping Method | Shipping method from the sourcing rule or bill of distribution |
| Intransit Time | Indicates the intransit time from the sourcing rule or the bill of distribution. |
Effectivity Dates Tabbed Pane
The following table provides a description of the fields displayed in the Effectivity Dates tabbed pane:
| Field | Description |
|---|---|
| From Date | Effectivity dates from the sourcing rule or bill of distribution |
| To Date | Effectivity dates from the sourcing rule or bill of distribution |
| Quantity | Indicates the conversion factor used during sourcing |
Assignment Information Tabbed Pane
The following table provides a description of the fields displayed in the Assignment Information tabbed pane:
| Field | Description |
|---|---|
| Sourcing Rule Type | Sourcing rule or bill of distribution or item attribute |
| Sourcing Rule Name | Sourcing rule or bill of distribution name |
| Assignment Name | Buy from, make at or transfer from |
Sources Window
The Sources window details information about sourcing and assignment associated with items. You can access the Sources window in one of the following ways:
-
Click the Sources button in the Items window
-
Right-click an item in the Navigator, select Supply Chain > Sources.
The Sources window consists of three tabs: Sourcing, Effectivity Dates, Assignment Information.
Sourcing Tabbed Pane
The following table provides a description of the fields displayed in the Source tabbed pane:
| Field | Description |
|---|---|
| Assignment Use | Type of assignment set that uses this rule. For example, Sourcing Assignment or Global Forecast Distribution. |
| Source Type | Sourcing rule or bill of distribution |
| Source Org | Source organization from the sourcing rule |
| Supplier | Supplier from the sourcing rule or bill of distribution |
| Supplier Site | Supplier site from the sourcing rule or bill of distribution |
| Allocation % | Allocation % from the sourcing rule or bill of distribution |
| Rank | Rank from the Sourcing Rule or bill of distribution |
| Shipping Method | Ship Method from the sourcing rule or bill of distribution |
| Intransit Time | Indicates the intransit time from the sourcing rule or the bill of distribution. |
| Allocated Qty | The planning engine calculates the allocated quantity in the following manner For each rank, the planning engine aggregates all historical allocations for the sources in that rank to calculate the total historical allocation. The planning engine uses the rank quantity and the allocated quantity to calculate the quantity that is to be allocated to the source. The rank quantity is the planned order quantity that needs to be planned for each rank. The allocated quantity is the quantity that is allocated to any source (allocated quantity). The planning engine also considers the allocation percent for the source at this rank. The quantity that is to be allocated to the source = ((allocation percent /100) * (total historical allocation + rank quantity)) - quantity allocated from this source. If the calculated quantity exceed the quantity required for this rank, the planning engine sets this value to the ceiling. |
Effectivity Dates Tabbed Pane
The Effectivity Dates tabbed pane displays the following information:
-
From Date
-
To Date
-
Quantity
For more information about these fields, see Destinations Window.
Assignment Information Tabbed Pane
The Assignment Information tabbed pane displays the following information:
-
Sourcing Rule Type
-
Sourcing Rule Name
-
Assignment Type
For more information about these fields, see Destinations Window.
Buttons in the Sources Window
You can use the buttons provided in the Sources window to navigate to the following windows:
-
Supplier Flexfences window
-
Supplier Capacity window
-
Supplier Variability window
-
Items window
-
Supply/Demand window
Supplier Capacity Window
You can view the capacity details associated with a supplier in the Supplier Capacity window.
View Supplier Capacity Window
To display your supplier capacity
-
In the Navigator, view by supplier.
-
Drill down to highlight an item associated with a supplier or a supplier site.
-
Select [right-click] > Supplier Information.
Alternatively, you can view by any other category and perform the following steps to navigate to the Supplier Capacity window.
Highlight a supplier or a supplier site.
-
Navigate to the Items window.
-
In the Items window, click Sources.
-
In the Sources window, click Supplier Capacity.
Information Displayed in the Supplier Capacity Window
The Supplier Capacity window displays the following information:
| Fields | Description |
|---|---|
| Supplier | Supplier name |
| Supplier Site | Supplier site name |
| Item | Item name |
| Org | Organization |
| Processing Lead Time | Approved Supplier List processing lead-time |
| Minimum Order Quantity | Approved Supplier List minimum order quantity |
| Fixed Lot Multiplier | Approved Supplier List fixed lot multiplier |
| Penalty Cost Factor | Supplier capacity penalty cost factor |
| Supplier Price | Purchasing item attribute |
| Supplier Capacity Calendar | Approved Supplier List supplier capacity calendar |
| Capacity Accumulation Date | The planning engine calculates the capacity accumulation date based on the Supplier Capacity profile option. For more information, see Supply Chain Modeling . |
| Category | Planning item category |
| Buyer | Purchasing item category |
| Planner | General planning item attribute |
| Standard Cost | Item cost from the Oracle Cost module |
The Supplier Capacity window has two tabs:
-
Supplier Capacity
-
Supplier Flexfences
Supplier Capacity Tabbed Pane
A supplier may have different capacity on different dates. You can specify the supplier's capacity for specific time periods in this tabbed pane The planning engine assumes infinite capacity on:
-
All days from the plan start date to the first day of defined capacity
-
All days after the last day of defined capacity to the planing horizon
The following table provides a description of the fields displayed in the Supplier Capacity tabbed pane:
| Fields | Description |
|---|---|
| From | Specify the start date. |
| To | Specify the end date. |
| Capacity | Specify the capacity of the supplier (units per day) for the duration. A blank value indicates no capacity for all dates before any date with defined capacity. A blank value means infinite capacity for all dates that there is no future dates with defined capacity. |
For more information on setting supplier capacity, see Supply Chain Modeling.
Supplier Flexfences Tabbed Pane
On certain days, the supplier may have additional capacity. You can specify the tolerance (in percent) to an increase in capacity that the supplier may indicate. The fields in the Supplier Flexfences Tabbed pane include:
-
Days: Approved Supplier List days in advance
-
Tolerance (%): Approved Supplier List tolerance (in %) for days in advance
For more information on setting supplier flexfences, see Supply Chain Modeling.
Supplier Variability Window
For information on setting supplier lead-time variability, see Oracle Inventory Optimization Implementation and User's Guide.
Safety Stock Window
The Safety Stock window shows time phased safety stock levels that the planning engine used to plan. To access the Safety Stock window for an item, navigate to the Items window, select items, and click Safety Stocks.
The information displays by item, then by effective date. You can also update safety stock levels. To see safety stock levels calculated but Oracle Advanced Supply Chain Planning or Oracle Inventory Optimizaion, see Horizontal Plan
To see more detailed results of safety stock planning, see Supply/Demand Window, and Pegging.
The following table lists the information displayed in the Safety Stock window.
| Field | Description |
|---|---|
| Item | Item |
| Org | Organization |
| Effective Date | Effective dates of the safety stock quantity |
| UOM | Unit of measure |
| Description | Item description |
| Quantity | Safety stock quantity |
| User Defined Quantity | The planning engine populates this field with the value from the Inventory Safety Stock definition form. |
| User Defined Days of Supply | This is a user-defined quantity that indicates days of supply. |
| Days of Supply | The planning engine populates this field with the value from the General Planning Item attribute. |
| Safety Stock Methods | The planning engine populates this field with the value from the General Planning Item attribute. |
| Project | The planning engine populates this field with the value from the Inventory Safety Stock definition form. |
| Task | The planning engine populates this field with the value from the Inventory Safety Stock definition form. |
Substitution Chain Window
You can navigate to the Substitution Chain window from:
-
Items window > Substitutes.
-
From the Navigator, right-click an item and select Items > Substitutes.
You can specify a customer and site to view the substitution chain for the item.
Substitition information is only available in Collections Workbench if the substitution set name is DEFAULT.
If you have more than one substitution set, you must running the plan with your substitution set specified in the plan options before you can see the substitution relationships here.
Right-click Menu Options
When you right-click an item in the Substitution Chain window, the following options appear:
-
Properties
-
Horizontal Plan
The Properties window does not display the following information for the default substitution chain:
-
Highest revision item
-
Implied predecessor
For more information about the Substitution Chain window, see Business Topics.
Resources Window
The Resources window displays resource-related information such as ship method, location, and resource cost.
Viewing the Resources Window
To navigate to the Resources window
-
Select a resource in the Navigator.
-
Choose [right-click] > Resources.
-
The Resources right-click menu displays four options: Resources, Resource Availability, Resource Requirements, Gantt Chart.
-
Select Resources to view the Resources window.
The Resources window appears.
The Resources window provides detailed information such as:
| Fields | Description |
|---|---|
| Dept/Line | Department or line designation |
| Resource | Resource name |
| Org | Organization |
| Owning Dept | Owning department of the resource |
| Dept Class | Department class to which the resource is assigned |
| Resource Type | Person, machine or miscellaneous |
| Resource Group | Bottleneck resource group assignment |
| Min Rate | Line rate |
| Max Rate | Line rate |
| Resource Cost | Resource cost per resource UOM |
| 24 Hours Resource | Yes or No |
| Aggregate Resource | Yes or No |
| Base UOM | Resource UOM |
| Batchable | Resource batchable flag |
| Batchable UOM | Resource batchable UOM |
| Batching Window | Resource batching window |
| Bottleneck Flag | The planning engine calculates this based on the plan options for bottleneck resource groups. |
| Dept/Line Desc | Description |
| Efficiency % | Resource efficiency % |
| Exception Set | Resource exception set |
| Group Number | Activity group number |
| Inactive Date | Resource inactive date |
| Max Capacity | Resource batching maximum capacity |
| Min Capacity | Resource batching minimum capacity |
| Offset (%) | Resource offset percent |
| Resource Desc | Resource description |
| Schedule | The valid values for this schedule flag are: - Yes - No - Prior - Next |
| Sequence | Resource sequence number |
| Utilization | Resource utilization % |
Right-click Menu Options
If you select a resource in the Resources window and right-click, the following options appear:
-
Folder options (such as Show Field or Hide Field)
-
Horizontal Plan
Buttons in the Resources Window
Based on the context, specific buttons are available in the Routing Operations window. You can use these buttons to navigate to other windows such as:
-
Gantt Chart
-
Items window
-
Resource Availability Summary window
-
Resource Requirements window
Resource Availability Summary Window
You can navigate to the Resource Availability Summary window either from the Resources window or by using the Resources right-click popup menu in the Navigator.
To view the Resource Availability window
To view the available capacity, choose Resources > Resource Availability.
The Resource Availability Summary window appears.
Information in the Resource Availability Summary Window
The following table lists the information displayed in the Resource Availability Summary window.
| Field | Description |
|---|---|
| Org | Organization |
| Dept/Line | Resource Owning Department or Line |
| Resource | Resource Name |
| From Date | Start Date for the Total Available |
| To Date | End Date for the Total Available |
| Total Available | Quantity based on the Resource UOM |
| UOM | Resource UOM |
Buttons in the Resource Availability Summary Window
The following buttons are available in the Resources Availability Summary window:
-
Requirements: You can navigate to the Resource Requirements window by clicking the Requirements button.
-
Details: You can navigate to the Resource Availability window to view the details.
Resource Availability (Details) Window
When you click the Details button in the Resource Availability Summary window, the Resource Availability window appears. You can view the details of the available capacity in the Resource Availability window.
Information in the Resource Availability (Details) Window
The following table lists the information displayed in the Resource Availability window:
| Field | Description |
|---|---|
| Org | Organization |
| Dept/Line | Owning department or line |
| Resource | Resource name |
| Shift date | Shift date |
| Shift Num | Shift id |
| From Time | Shift start time |
| To Time | Shift end time |
| Capacity Units | Number of resources for this shift |
| Max Rate | Repetitive line max rate |
Update Resource Availability
To update resource availability
You can make changes to the resource availability in the Update Resource section.
-
Click the Update Mode drop-down menu to specify the mode in which you want to update the resource availability.
The following options appear:
-
Add Capacity: Specify the number of units by which the current capacity needs to be increased with effect from a specific date.
-
Reduce Capacity: Specify the units by which the current capacity needs to be reduced with effect from a specific date.
-
Set Capacity: Specify the exact capacity units and the date from which the capacity change is effective.
-
Add Day: Add resource capacity for a non-working day.
-
Delete Day: Delete resource capacity for a workday.
-
Based on your choice, the planning engine prompts you to specify the information.
-
-
After making changes, click Apply.
Resource Requirements Window
You can navigate to the Resource Requirements window in one of the following ways:
-
From the Resources window, click the Requirements button.
-
From the Navigator, select a resource and choose Resource Requirements from the Resources right-click popup menu.
Oracle Advanced Supply Chain Planning does not:
-
Plan and schedule repetitive items
-
Detect duplicate resource requirements and decide to drop one. If you change a released discrete job bill of material, there may be requirements in two places. Change released discrete jobs to reflect bill of material and routing changes; Oracle recommends implementing engineering change orders to reflect changes on released jobs.
Information in the Resource Requirements Window
The following table lists the information displayed in the Resource Requirements window.
| Field | Description |
|---|---|
| Dept/Line | Owning department or line |
| Resource | Resource name |
| Org | Organization |
| Firm Type | Firm status of the resource requirement. If the resource is from a job from Oracle Shop Floor Management if profile option WSM: Create Job Level BOM and Routing Copies is Yes, it is the Firm Type collected from that job. |
| Start Date | Requirement start date |
| End Date | Requirement end date |
| Resource Hours | Required resource hours based on the routing requirement |
| Schedule Quantity | Assembly quantity of the actual or planned make order |
| Using Assembly | Assembly with the resource requirement |
| Op Seq | Actual or planned operation sequence number for the requirement |
| Res Seq | Actual or planned operation resource sequence number for the requirement |
| Daily Rate | Daily rate for repetitive schedule. |
| Daily Hours | The planning engine divides the adjusted resource requirement by the number of days that the job is scheduled on the resource to derive an approximate average. |
| Touch Time | The planning engine calculates this as follows: Resource Hours / Resource Efficiency % |
| Adjustable Resource Hours | The planning engine calculates this as follows: Resource Hours / (Resource Efficient % * Resource Utilization %) |
| Assigned Units | Number of assigned resource units |
| Batch Number | Batch number |
| Earliest Allowable Completion Time | The planning engine calculates this to indicate the end of the scheduling window for those resource requirements that allow sufficient time for the upstream activities to be scheduled. |
| Earliest Possible Completion Time | The planning engine calculates this based on the constrained schedule for upstream activities. It is the earliest time in which the resource requirement can be completed. |
| Earliest Possible Start Time | The planning engine calculates this based on the difference between the earliest possible completion time and supply duration. |
| Hours Expended | This indicates the resource hours already expended for existing make orders. |
| Load Rate | This is used for lines only to indicate the load rate of the line. |
| Order Number | Order number |
| Order Type | Order type |
| Overloaded Capacity | This indicates the number of overloaded resource units. |
| Quantity Completed | This indicates the quantity of the make order that is completed. |
| Quantity in Queue | This refers to the quantity of the make order that is in queue for resource requirement. |
| Quantity Running | This indicates the quantity of the make order that is running on this resource. |
| Quantity Waiting To Move | This refers to the quantity of the make order that is complete and is ready to be moved. |
| Rate End Date | Line rate end date |
| Recalculated Reverse Cumulative Yield | For more information, see Network Routing Window. |
| Recommended | Yes or No |
| Required Capacity | The planning engine calculates this as follows: Resource hours * Order quantity in weight/volume) |
| Schedule | The valid values for this schedule flag are: - Yes - No - Prior - Next |
| Schedule Date | This indicates the suggested due date for the supply. |
| Scheduling Sequence Number | This refers to the sequence dependent setup number. |
| Source Item | This is used for bills of resources to identity the source item for the resource requirement. |
| Unconstrained Earliest Possible Completion Time | The planning engine calculates this based on the unconstrained schedule for the upstream activities that allow minimum durations. |
| Unconstrained Earliest Possible Start Time | The planning engine calculates this based on the difference between the unconstrained earliest possible completion time and supply duration (Unconstrained Earliest Possible Completion Time - Supply Duration). |
| Unconstrained Latest Possible Completion Time | The planning engine calculates this based on the unconstrained schedule for the downstream activities that allow minimum durations. |
| Unconstrained Latest Possible Start Time | The planning engine calculates this based on the difference between the unconstrained latest possible completion time and supply duration. |
| Usage Rate | Indicates the usage rate for discrete and lot-based jobs. |
| Yield | This indicates the operation yield. |
Buttons in the Resource Requirements Window
The following button is available in this window:
-
Supply: Click this if you want to view the pegging information for supplies (Supply window).
Supply Chain
The tree structure makes it easy to go down levels on a bill of material. When viewing by Organization, you can drill down to go down a level from a department, resource, or item level to the next level down.
The supply chain map also offers the Item/Location View. This view is available only at the item nodes and is the default for these nodes. This view displays a diagrammed flow view of all the sourcing rules and bills of distribution associated with the selected item. This view also serves as the indented bill of materials.
When you right-click an item in the Navigator, the pop-up menu displays the following options:
-
Sources: Navigate to the Sources window. For more information, see Sources Window.
-
Supply Chain Bill: View the Supply Chain Bill for an item. For more information, see Supply Chain Bill.
-
Destinations: Navigate to the Destinations window. For more information, see Destinations Window.
Supply Chain Bill
You can view contextual supply chain and where used information for an item graphically.
To view Supply Chain Bill
-
Drill down to an end item in the Navigator.
-
Right-click the end item and select Supply Chain > Supply Chain Bill.
A graphical representation of the item's supply chain bill appears.
-
To expand the entire Supply Chain Bill tree, select [right-click] > Expand.
You can use the Expand menu option at all nodes of the Supply Chain Bill tree. When you click this menu option after selecting a particular node, the nodes in the selected node expand.
BOM/Routing
The planning engine provides detailed BOM and routing information associated with an item. Right-click an item in the Navigator, select BOM/Routing. The right-click pop-up menu displays the following options to navigate to windows that display specific information:
-
Components
-
Routing Operations
-
Where Used
-
Process Effectivity
-
Co-Products
Components Window
You can navigate to the Components window from the Items window. It consists of three tabs: Effectivity and Quantity, Use Up Information, and Item Details.
Effectivity and Quantity Tabbed Pane
The following table provides a description of the fields displayed in the Effectivity and Quantity tabbed pane:
| Field | Description |
|---|---|
| Org | Organization |
| Item | Parent item name |
| Component | Component name |
| Effectivity Date | BOM effectivity date |
| Usage | BOM component usage |
| Alternate BOM | Alternate BOM name |
| Change Notice | Engineering change order name |
| Revision | Engineering change order revision number |
Use Up Information Tabbed Pane
The following table provides a description of the fields displayed in the Use Up Information tabbed pane:
| Field | Description |
|---|---|
| Org | Organization |
| Item | Item name |
| Component | Component name |
| Use Up Item | Engineering change order use up item |
| Use Up | This indicates that it is a use up Engineering change order item. |
| Suggested Effectivity Date | This is the suggested effectivity date for a use up item. |
Item Details Tabbed Pane
The following table provides a description of the fields displayed in the Item Details tabbed pane:
| Field | Description |
|---|---|
| Org | Organization |
| Item | Item name |
| Component | Component name |
| Op Sq | BOM Operation Sequence number |
| Supply Type | BOM supply type |
| Offset Percent | BOM offset percent |
| Planning Factor | BOM planning factor |
| Item Desc | Parent item description |
| Component Desc | Component item description |
| UOM | BOM UOM for the component |
| Enforce Int Req | BOM enforce Integer Requirements Parameter |
| Optional | BOM optional flag |
Buttons in the Components Window
Based on the context, specific buttons may be available in the Components window. You can use these to navigate to other windows such as:
-
Routing Operations window
-
Substitution Chain window
-
Items window
-
Supply/Demand window
Routing Operations Window
In addition to using the BOM/Routing right-click pop-up menu in the Navigator, you can navigate to the Routing Operations window from the Items window. The Routing window displays the following information, but it does not display information for flow routings:
| Field | Description |
|---|---|
| Org | Organization |
| Item | Components required at the operation sequence |
| Assembly | Routing assembly item |
| Line | Routing line name |
| Alternate Routing | Alternate routing name |
| Alternate BOM | Alternate BOM name |
| Operation Seq | Routing operation sequence number |
| Operation Description | Routing operation description |
| Effectivity Date | Routing operation effectivity date |
| Disable Date | Routing effectivity disable date |
| From Unit Number | BOM unit effectivity start number |
| To Unit Number | BOM unit effectivity end number |
| Option Dependent | Routing operation dependent flag |
| Operation Type | Routing operation type |
| Minimum Transfer Qty | Routing minimum transfer quantity |
| Yield | Routing operation yield |
| Department | Routing department |
| Operation Lead Time | Routing operation lead-time |
| Cumulative Yield | Routing cumulative yield |
| Reverse Cumulative Yield | Routing reverse cumulative yield |
| Net Planning (%) | Routing net planning (%) |
| Setup Duration | Setup duration |
| Tear Down Duration | Tear down duration |
| UOM | Routing resource requirement UOM |
| Operation Code | Routing standard operation code |
| Effective | Routing effective date |
Buttons in Routing Operations Window
Based on the context, specific buttons may be available in the Routing Operations window. You can use these buttons to navigate to other windows such as:
-
Network Routing window
-
Resources window
Network Routing Window
You can navigate to the Network Routing window from the Routing Operations window. The Network Routing window displays the following information:
| Field | Description |
|---|---|
| From Seq + | Network routing from sequence number |
| Code | Network routing standard operation code |
| To Seq + | Network routing to sequence number |
| Code | Network routing standard operation code |
| Link Type | Network routing primary or alternate path |
| Planning % | Network routing planning (%) |
Where Used Window
The Where Used window provides information about the items usage. In addition to using the BOM/Routing right-click pop-up menu in the Navigator, you can also navigate to the Where Used window from the Items window to find out where the item is used.
The Where Used window has three tabs: Effectivity and Quantity, Use Up Information, and Item Details.
Effectivity and Quantity Tabbed Pane
The following table provides a description of the fields displayed in the Effectivity and Quantity tabbed pane:
| Field | Description |
|---|---|
| Org | Organization |
| Item | Component item name |
| Assembly | Parent item name |
| Effectivity Date | BOM effectivity date |
| From Unit Number | BOM unit effectivity start number |
| To Unit Number | BOM unit number end number |
| Usage | BOM usage |
| Alternate BOM | Alternate BOM name |
| Change Notice | ECO Name |
| Revision | ECO revision number |
| Disable Date | BOM component disable date |
Use Up Information Tabbed Pane
For more information, see Use Up Information Tabbed Pane (for Components window).
Item Details Tabbed Pane
For more information, see Item Details Tabbed Pane (for Components window).
You can navigate to the Items window and the Supply/Demand window from the Where Used window.
Co-Product Window
In addition to using the BOM/Routing right-click pop-up menu in the Navigator, you can navigate to the Co-Product window from the Items window. The Co-Product window displays the following information:
| Field | Description |
|---|---|
| Co-Product | Network routing co-product name |
| Split (%) | Network routing split (%) |
Process Effectivity
The Process Effectivity window provides information about the bills of material and routing header. It also provides easy access to detailed information associated with bills of material and routing.
View the Process Effectivity Window
You can right-click an item in the Navigator, select BOM/Routing > Process Effectivity to navigate to the Process Effectivity window.
Information Displayed in the Process Effectivity Window
The Process Effectivity window displays the following information:
| Field | Description |
|---|---|
| Org | Organization |
| Item | Item name |
| Effectivity Date | Routing effectivity date |
| Disable Date | Routing disable date |
| Minimum Quantity | Process manufacturing batch minimum quantity |
| Maximum Quantity | Process manufacturing batch maximum quantity |
| Priority | Process batch priority |
| Alternate Routing | Alternate routing name |
| Alternate BOM | Alternate BOM name |
| Total Product Cycle Time | Process Manufacturing product cycle time |
| Item Processing Cost | Process Manufacturing item processing cost |
| Line | Process Manufacturing line name |
| Primary Line | Process Manufacturing primary line flag |
| Line Rate | Process Manufacturing line rate |
Buttons in the Process Effectivity Window
The following buttons in the Process Effectivity window enables you to navigate to other context windows:
-
Routing Operations
-
Components
Key Indicators
The Key Indicators window is a summary chart that provides a graphical display of a plan's Key Performance Indicators (KPIs). At a glance, you can see how the plan performs relative to the following measures:
-
Inventory Turns
-
On-time Delivery
-
Margin Percentage
-
Planned Utilization
-
Margin
-
Cost Breakdown
-
Service Level
-
Inventory value
-
Utilization by Weight/Volume
You can choose to see any four of these measures together. The availability of the KPIs depends on the type of plan chosen. For information on how these measures are calculated, please refer to, Key Performance Indicators.
Viewing KPIs
To view key performance indicators, select plan option, Main tab, Display Key Performance Indicators.
To view KPIs
-
Select a Plan, an Item, an Org, or a Product Family from the Navigator.
-
Select Key Indicators in the pop-up menu.
The Key Indicators window displays the KPIs for the selected Plan, Item, Org, or Product Family.
To view an enlarged version of a KPI graph
Double-click on a sub-window to see an enlarged version of a KPI graph. Double-click again to return to the normal view.
Additional display options for each sub-window in the summary chart are available using the [right-click] menu. For instance, you can display KPI information in a trend chart.
Inventory Turns
This graph compares the actual inventory turn values to the target values collected from the source. You can view overall inventory turns for a plan or select a node on the tree to see the node's inventory turns. You can view the inventory turns value over time to evaluate the plan throughout the planning period.
The Inventory Turns graph is displayed at the following nodes:
-
Plans
-
Organizations
-
Product families
-
Categories
-
Individual items
-
Components
-
Planning groups
-
Projects
-
Tasks
On-time Delivery
The On-time Delivery Percentage graph is displayed at the following nodes:
-
Plans
-
Organizations
-
Product families
-
Categories
-
Individual items
-
Components
-
Planning groups
-
Projects
-
Tasks
Planned Utilization
The Planned Utilization percentage is available at the following nodes:
-
Plans
-
Organizations
-
Departments
-
Resource groups
-
Resources
-
Production lines
-
Transportation resources
-
Approved suppliers
Margin Percentage
This graph compares the actual margin to the target values collected from the source. You can evaluate alternate plans based on the net difference between plan revenues and costs. Plan revenues are derived from forecasts and booked sales orders while costs account for planned production schedule expenses.
Margin percentage is available at the following nodes:
-
Plan
-
Organization
-
Product family
Reviewing Item Planning Information
In the View by drop-down menu, select either Item or Organization, then drill down to an Item to view KPIs at the Item level.
Comparing KPIs for Multiple Plans
KPIs of multiple plans can be compared in the summary chart by selecting two or more plans in the Navigator (using Ctrl-Click).
Implementing Planning Recommendations
The Actions Summary view displays both recommendations and exceptions. The recommendations are divided into orders that must be released and future orders. In the Preferences window (Tools > Preferences), you can specify the time frame in days for which to show recommendations.
To implement planning recommendations, choose Tools > Preferences.
Creating and Implementing Firm Planned Orders
Accessing Planned Orders
You can access a subset of planned orders for a specified time period or other user defined sort criteria using the Supply/Demand window. You can release all planned orders using a Release All feature or you can individually select planned orders for release.
To access planned orders
-
In the View By Actions mode, drill down to the Recommendations node.
-
Drill down to items in Purchase Requisitions or Discrete Jobs.
-
Right-click an item, select Supply/Demand > Supply/Demand.
-
To firm a planned order, drill down to detail, then select the Firm check box.
For detailed information about the fields in the Supply/Demand window, see Supply/Demand Window.
Receiving Firm Planned Orders from Production Schedules
Production schedule planners can publish Oracle Production Scheduling work orders and planned orders to Oracle Advanced Supply Chain Planning. The orders in Oracle Advanced Supply Chain Planning are firm planned orders.
See Feeding a Production Schedule Back into ASCP.
Releasing Recommendations
You use the Supply/Demand context window to release recommendations to the execution systems.
To release recommendations
-
In the View By Actions mode (on the left pane), select the Recommendations node.
-
Drill down to the node that you want, for example, a plan, a planner, or an item.
-
Right-click an item, select Supply/Demand > Supply/Demand.
-
If you want to make changes to recommendations, navigate to the Release Properties tab, make them, and save your work. See Release for Buy and Make Orders and Release for Transfer Orders.
-
If you want to release a recommendation, select For Release. If you want to release all recommendations, select Edit > Select All.
If you select For Release in the Orders tab before you make changes in the Release Properties tab, clear For Release, make your changes, and select For Release again.
-
From either the Orders tab or the Release Properties tab, press [right-click] > and select Release.
Release for Buy and Make Orders
To change the supply Suggested Due Date, select a new date in Implement Date. You can select a non-workday. If you select a date in the past, the scheduled receipt or transfer order will have today's date.
To change the supply Qty/Rate, enter a new quantity or rate in Imp Qty/Rate.
If you want to firm a recommendation, select Firm. It becomes a firm planned order. See Creating and Implementing Firm Planned Orders.
When you release a planned order as buy from and do not change the recommended dates, the release process sets Need-by Date to the planned order Suggested Dock Date.
When you release a planned order as buy from and change the recommended dates, the release process calculates Need-by Date as follows:
-
If Implement Date is a non-workday in the manufacturing calendar, moves it to the previous working day.
-
Calculates Dock Date = Implement Date - Postprocessing lead time
-
If Dock Date is a non-workday in the manufacturing calendar, moves it to the previous working day.
-
If the organization has a receiving calendar and Dock Date is a non-workday in the receiving calendar, moves it to the previous working day on this calendar.
-
Sets Need-by Date to Dock Date
When you release recommendations for make items using substitute components, the substitute components only appear on the discrete jobs if the discrete jobs are in daily buckets.
Release for Transfer Orders
You transfer material by using internal sales orders and internal requisitions in pairs.
For release for transfer orders, your source instance must be at least release 12.1.1.
If your plan includes both the source and destination organizations, you can:
-
Change the date and quantity on the internal requisition
-
Change the date and quantity on the internal sales order
-
Cancel the internal requisition
-
Cancel the internal sales order
If your plan includes only the destination organization and not the source organization, you can:
-
Cancel the internal requisition
-
Cancel the internal sales order
Changes to the:
-
Internal requisition pass automatically to the internal sales order
-
Internal sales order pass automatically to the internal requisition
To change the internal requisition Suggested Due Date and the internal sales order Suggested Ship Date, select a new date in New Date. You can select a non-workday. If you select a date in the past, the scheduled receipt or transfer order will have today's date
To change the supply Qty/Rate, enter a new quantity in New Quantity. To cancel an internal requisition and internal sales order, set New Quantity to zero.
The information in fields Implement Date and Imp Qty/Rate come from:
-
If you have not firmed the recommendation, Suggested Due Date and Suggested Quantity
-
If you have firmed the recommendation, New Date and New Quantity
If you mark a recommendation For Release and want to make further changes to New Date and New Quantity, clear For Release before you make the changes. Otherwise, make the changes directly.
When you execute the release, the fields that change the internal requisition and internal sales order are Implement Date and Imp Qty/Rate. Also, the process:
-
Updates Ship Method on the internal sales order if the internal sales order is in the plan
-
Performs an available to promise check on the internal sales order, if profile option MSC: Perform ATP check for Internal Sales Orders is Yes
This table shows the other Planner Workbench fields that pas to the transfer orders.
| Planner Workbench Field (from) | Transfer Order (to) | Transfer Order Field (to) |
|---|---|---|
| Implement Dock Date > | Internal requisition | Need-By Date |
| Implement Ship Date > | Internal sales order | - Schedule Ship Date - Request Date - Promise Date |
| Implement Dock Date > | Internal sales order | Schedule Arrive Date |
| Material Available Date > | Internal sales order | Earliest Ship Date |
Once you have released either the internal requisition or internal sales order, you cannot release the other one
If the passing of changes to the other order of the transfer pair fails, you receive a message in a concurrent process log file from:
-
If your plan includes both the source and destination organizations, Oracle Order Management concurrent process Update Scheduling Results
-
If your plan includes only the destination organization and not the source organization, Oracle Purchasing concurrent processes Reschedule Requisitions or Check ATP
Publishing Plan Results to Oracle Order Management
One of the many decisions Oracle Advanced Supply Chain Planning can make is the selection of a facility to source the materials based on current conditions of supply and demand. The planning engine selects the sources based on global supply availability, constraints that you may have in the supply chain, costs involved in producing and procuring items etc. This information can be communicated to Order Management for effective execution.
As sales orders are accepted into the system, users may put in a fulfillment facility based on order promising or a preferred facility by default, but the facility chosen by the users may not be the correct facility given the ever evolving supply and demand picture through out the supply chain. As a result of plan run, you can determine the correct sources, and along with changed source you might have to change ship dates, ship methods etc. These change recommendations are published to Order Management
Oracle Advanced Supply Chain Planning checks for several conditions before releasing the updated sales orders to Oracle Order Management:
-
A single sales order line cannot have multiple source organizations. Global forecasting can result in split recommendations for a sales order.
-
Sales order lines in a ship set must have the same source organization. The implement date for all the lines in a ship set or an arrival set is the maximum date across all the lines in a ship set or an arrival set respectively.
-
Sales order lines set to Ship Model Complete do not receive any release recommendations.
-
Sales order lines for components of PTO models and kits do not receive any release recommendations.
The planning engine displays a release error for each incorrect selection of an order.
Note: You cannot auto-release these recommendations to Oracle Order Management.
To setup plan results publishing to Oracle Order Management
-
Select the Advanced Supply Chain Planner responsibility.
-
Navigate to Supply Chain Plan > Names.
-
Select the Notifications check box for the plan that you want to publish result for.
-
Navigate to Supply Chain Plan > Plan Options > Organizations tab:
-
Verify that global forecasts are defined as Demand Schedules in the Global Demand Schedules region.
To firm sales orders in Oracle Order Management
Oracle Order Management provides a Firm option at the order line level. You can set the Firm option on a sales order line in three ways:
-
Firm based on the event
Oracle Order Management provides different event values, which are set at organization level, to firm the demand lines:
-
Schedule: The sales order line is firmed the moment it is scheduled
-
Shipping Interfaced: The sales order line is firmed after it is interfaced to shipping.
-
None or Null: The sales order line is not firmed
-
-
Firm using a workflow
Oracle Order Management provides a sub process to hold and firm sales order lines. You can customize their line flow and place this sub process anywhere in the flow based on your need. Shipped, closed, fulfilled, and cancelled sales order lines are firmed irrespective of the sub process position. Lines that reach the sub process wait until they are progressed further.
You can manually progress the lines to continue their progress. Oracle Order Management provides a concurrent program to progress the sales order lines that are waiting at the sub process. You can schedule to run this concurrent program periodically to progress lines that are waiting at the sub process.
Oracle Order Management firms the sales order lines and progresses the lines to the next activity.
-
Firm by manually setting the Firm option on the sales order.
You can manually firm the sales order lines based on your need. However, you cannot update the firm option on closed, shipped, cancelled and fulfilled sales order lines.
To publish plan results to Oracle Order Management
-
Navigate to Supply Chain Plan > Workbench > Tools > Preferences > Other tab.
-
Select the Include Sales Orders check box.
-
Run a supply chain plan with global forecasts defined as demand schedules.
-
Review exception messages. The planning engine can generate the following exception message:
-
Changes recommended for sales order exception
-
-
Optionally, firm the sales order line:
-
Navigate to Supply/Demand window > order tab.
-
Select the Firm check box for the order line that you wish to firm.
-
-
Select the Release check box for each order or the Select all for release menu option to release the recommendations to update the sales orders.
This initiates the Release sales order recommendations concurrent process to save the release selection and release the updated sales order information to Oracle Order Management.
Note: You can manually change the Implement Date in the Release Properties window to override the plan recommendations. When the sales order is released, the Implement Date is populated to the Schedule Ship Date on the sales order line in Oracle Order Management.
When you release recommendations, the Release window appears as a confirmation with the following information:
-
Concurrent request number
-
Number of sales orders released
-
Number of sales orders affected
-
-
Click OK to complete the release process
The planning engine publishes the following information to the sales order line in Oracle Order Management:
| Fields from the Supply/Demand window in Oracle Advanced Supply Chain Planning | Fields that are updated on the Sales Order Line in Oracle Order Management |
|---|---|
| Source Organization | Warehouse |
| Suggested Ship Date | Scheduled Ship Date |
| Planned Arrival Date | Scheduled Arrival Date |
| Ship method | Shipping Method |
| Intransit lead-time | Deliver lead-time |
| Firm flag | Firm flag |
| Material availability date | Earliest ship date (Shipping) |
If the sales orders update in Oracle Order Management fails after the release by the planning engine, Oracle Advanced Supply Chain Planning initiates the following workflow notification:
-
Sales order changes from Oracle ASCP not committed
Oracle Advanced Supply Chain Planning derives the CSR or sales representative details from the Created By field on the sales order header and sends the following details:
-
Item - The item on the sales order line
-
Order number: Sales order number
-
Line Number: Sales order line number
-
Customer: Customer on the sales order
-
Override flag (from Oracle Order Management)
-
Old ship method and deliver lead-time
-
New ship method and deliver lead-time
-
Old schedule arrival date
-
New schedule arrival date
-
New schedule ship date
-
Old schedule ship date
-
Old source organization
-
New source organization
-
Request ID
Note: You need to define the person named in the Created By field as a valid user in Oracle ERP to receive the workflow notifications.
You can use the request ID displayed on the workflow notification to bring up the reason codes for failure to update the sales order in Oracle Order Management.
For more details, see Oracle Order Management User Guide.
-
Example
This section provides an example of sales order update by Oracle Advanced Supply Chain Planning to Oracle Order Management.
Assume that a sales order line has:
-
Request Date = D10
-
Schedule Ship Date = D20
If the planning engine determines that the material availability date is:
-
D22, then both the earliest ship date and schedule ship date are updated to D22.
-
D8, the schedule ship date is updated to the request date, which is D10. The planning engine uses the earliest ship date to update the schedule ship date.
The updated schedule ship date can be vied in Oracle Order Management after the sales order is released by the Planning engine.
If you have firmed a sales order in Oracle Order Management, the planning engine does not provide any recommendation for source change. Oracle Advanced Supply Chain Planning sources the supplies only from the source provided on the sales order. If the sourcing causes resource overload at the source organization, the resources are still overloaded to honor the source mentioned on the sales order.
Interactive Scheduling Using the Gantt Chart
Interactive scheduling provides a time-phased graphical interface to your plan's scheduled activities and resources to help resolve inevitable shop floor problems. It lets you troubleshoot exceptions arising from resource or material constraints; overloaded or underloaded resources; absenteeism, or machine downtime. Use interactive scheduling to pinpoint affected jobs and operations and simulate changes towards effective, timely resolution.
You can use the Gantt Chart for plan type Constrained.
To access the Gantt Chart
Follow the appropriate navigation path as shown in the table:
| Current Window | Navigation |
|---|---|
| Exception Details window | [Select any field] > [right-click] > Gantt Chart |
| Supply window | [Select any field] > [right-click] > Gantt Chart |
| Resources window | Click the Gantt Chart button |
| Navigator | Select a resource>[right-click]>Gantt Chart Select a resource and click the Gantt chart button and the bottom of the navigator window. |
The title in the Gantt Chart window reflects the view selection that you make-- Orders View, Resource Activities View, or Supplier Capacity View.
When the Gantt Chart opens, there are two group boxes.
-
The first group box displays "Gantt Chart" and the instance and organization selected.
The icons provide options for various Gantt chart views.
The Preference set determines the user preferences for Gantt chart display options.
The Go To option enables you to go to a specific date when the Gantt chart is displayed, and the Today option enables you to view the current date.
-
The next group box displays the view that is selected, with a left and a right pane.
The folder icon enables you to save selected settings.
The View field enables you to select a view.
The left pane displays a tree structure with multiple columns. The columns are dependant on the view that is selected.
Depending on the view selected, the left pane displays a list of resources, orders, or item suppliers.
To select a view, use the drop down menu in the left pane.
The right pane panels begin at the plan start date. To go to another date, you can:
-
Scroll horizontally
-
Enter a date and time in Go to: and press Enter. To go to today, click Today.
The right panel header also shows the planning granularity that was used for a certain portion of the planning horizon. This is different from the display granularity. For example, you may be viewing the Gantt chart in weekly buckets, but the portion of the planning horizon you are viewing may have been scheduled at the day level of granularity.
The Order-Centric View
The order centric view displays the selected supplies. This view can be invoked from the Supply or Supply/Demand block of the Planner Workbench. For the selected supply (or supplies), if pegging actions are invoked, the Gantt Chart displays all the supplies that peg to the selected supply. This includes supplies at various levels in the bill of material. This is provided as a tool to view the impact on supplies across supply chain levels on a planner's scheduling changes.
From the end assembly, the Gantt chart first displays the operations and the requirements on the resources selected to perform the operations. Because material availability is just as important as resource availability, it is shown within the Gantt to make rescheduling more accurate. The dates when materials become available are displayed as milestones. Material is shown at the beginning of the operation where it is needed.
When accessed from the Resource Centric View, the Order-Centric view shows the orders that were originally in the Resource Centric View.
The Orders view also functions as the view where late demand diagnosis can be performed in the Gantt chart. When you enter the Orders view from a late demand, the Gantt chart displays the late demand and all the supplies that peg up to that late demand. You can choose display options to highlight the critical path or show just the critical path. You can view the unconstrained earliest and latest start and completion times to identify the effects of resource and supplier capacity constraints on demand lateness. Comparison of the constrained earliest and planned start and completions times along the various activities on the critical path, which enables you to identify the key bottlenecks on the critical path.
The Resource-Centric View
This view can be accessed from the resource block of the Planner Workbench or by right clicking on a selected resource(s) in the left pane of Planner Workbench.
This view displays all the activities that are being worked on by the selected resource(s). The right pane shows resource availability as a backdrop. Resource activities that are scheduled on the resource are shown in the foreground. A color scheme can be applied to distinguish activities with characteristics such as: late order, early orders, firm orders, or orders causing overloads.
Changeover times between activities are displayed in a separate color. Activities on batchable resources can be shown either as individual activities or as consolidated batches. Users can select activities and view the alternate or simultaneous resources used in those activities. Activities can be moved to those alternate resources. Within the same resource, users can drag and drop activities to earlier or later points in time. The Resource Activities view only displays the portion of the planning horizon that is scheduled to the minute level of granularity.
The Resource Hours view displays hours that are available compared with hours that are used. The detail displays hours spent on late orders, hours spent on early orders, hours spent on firm orders, and hours that overloaded and exceed available capacity. The most granular display possible in this view is daily buckets. When viewing in daily buckets you can only view the portion of the planning horizon that was planned in days. When viewing in weekly buckets you can see both the portion that was planned in days and weeks. When viewing in period buckets you can see the entire planning horizon.
The Resource Units view displays continuous time varying profile of the resource units that are available compared with units that are used. This view is useful if there are a large number of available units per resource and if the units available vary with time.
Note: In both the order-centric and the resource-centric views, an activity that appears on the right pane and is not seen on the left pane can be brought in to the right pane by right clicking on that activity in the left pane and selecting Jump from the right-click option. This makes it easy to navigate to an activity.
Rescheduling is not available within the Resource Hours and the Resource Units views.
The Supplier Capacity View
This view displays the supplier capacity that is available and the supplier capacity that is used. It also tracks the cumulative capacity that is available. You can select a bucket and drill down into the supply details by selecting Supply from the right-click option. If the supplier capacity is infinite, or undefined, a dark background color is displayed.
A slider Scale option is available in the upper right portion of the chart, which controls the maximum value of the vertical dimension. This is useful when wanting to use different scales to identify the buld up of cumulative capacity versus the capacity available or used in any one bucket.
Defining User Preferences - Gantt
The Preferences - Gantt page enables you to define display options for these view types:
-
Orders
-
Resource Activities
-
Resource Hours
-
Resource Units
-
Supplier Capacity
To access the Preferences - Gantt page
To access the Preference - Gantt page:
-
Navigate to the Planner Workbench.
-
Choose Tools > Preferences.
-
Select the Gantt tab.
-
Select a View Type.
The Orders View Type
These fields are available on the Preferences - Gantt - Orders view type page:
-
Row Height: Select the desired height for each row in the view. One is the smallest and five is the largest.
-
Show Pegging with Material Flow Details: Select to display pegging arrows to and from each supply segment.
Important: Select this option only if you have enables segment level pegging for the plan. To see regular pegging between supplies and demands, you should not select this option.
-
Timescale Display: Select the timescale that will appear by default when the Gantt Chart is displayed.
-
Text Format: Select the text that displays within each type of bar.
-
Color Settings: Select the color that displays for each type of bar.
The Resource Activities View Type
The fields on the Resource Activities view type are similar to the Orders view type with the exception of the Display Tolerances field. In the Display Tolerances field, enter the tolerance for the number of days late that an order needs to be for it to be color coded as late when displayed in the Gantt chart. Also enter the tolerance of the number of days early that an order needs to be for it to be color coded as early. An order displays with the late color setting if it is late by more than this tolerance. The same applies to early orders.
Find Window
The Find window can be used to view subsets of data by selected criteria, such as by time, by items, by organizations within the Gantt chart. The Find window can be used with all views, but the fields that are available are dependant on the specific view. A Find condition can be saved as part of a folder.
Tip: The only way to save the find condition as a folder in the Gantt chart view is when the find window is open. Once you close the find window, you are not allowed to save as a folder.
To display the Find window, select View>Find.
Right-Click Menu Options
The Gantt Chart provides easy access to important information and tasks related to operations. The following options are available if you right-click with your cursor over an operation:
| [Right-Click] Menu Options | Description |
|---|---|
| View Alternate/Primary Resource | View Alternate/Primary Resource for this operation |
| Load Alternate/Primary Resource | Load Alternate/Primary Resource for this operation |
| View Simultaneous Resources | View Simultaneous Resources for this operation. If in the Resource Activities view, the selected simultaneous resource, and all of its associated instances is added to the list of displayed resources. |
| Firm/Unfirm Operation | Firm/Unfirm Operation for this operation |
| Reschedule | Reschedule |
| Supply/Demand | Open the Supply/Demand window |
| Exception Details | Open the Exception Details window |
| Items | Open the Items window |
| Resource Capacity | Open the Resource Capacity window |
| Resource Requirements | Open the Resource Requirements window |
| Resources | Open the Resources window |
| Batches | Open the Batches window |
| Charges | Open the Charge Details window |
| Material Flow Details | Open the Material Flow Details window |
| Horizontal Plan | Open the Horizontal Plan window |
| Hide/Show Resource | Temporarily hide or display a resource. |
| End Pegged Demands | Open the End Pegged Demands window |
| Save Layout | Save the list of displayed columns and their relative order to the current folder. |
Viewing Information on an Operation
You can view information on orders and operations via the Properties window or resource Tool Tips.
To display the Properties window
-
Select an order or operation from either pane.
-
Right-click and select Properties. If the Properties window is already open and you select another order or operation, you do not need to perform this step; the properties of your new selection replace the properties of your previous selection in the existing Properties window.
The Properties window appears.
Note: Most of the relevant properties are already available as folder columns in the Orders view. This enables you to view these properties for all the orders at the same time instead of opening the properties window one order at a time.
The Property window displays a host of information about the selected operation. Choose tabs to access different types of information.
When you double click on the Gantt chart bar on the right panel (or the labels on the left panel), a Property window appears with three tabs: resource, supply order, and end demand.
The properties for the Resource tab (only for the activity node) are: department/line, resource name, org/instance, operation sequence, resource sequence, alternate number, firm type, start time, end time, assigned units, and total hours required.
The properties for the supply order tab (only for the supply node) are: job number, job type, item, quantity, firm flag, suggest due date, ship date, need by date, unit number, project, task, alternate BOM, alternate routing, and time fence.
The properties for the end demand tab (only for the supply node) are: demand date, demand satisfied date, pegged quantity, demand name, demand qty, demand type, demand priority, customer, customer site, and item
The resource tool tip for an operation is a subset of the Properties window; to see it, rest your cursor over the operation in the right panel.
Specify Resources to Plot in the Lower Pane
To select resources to plot
-
From the Resource view, select resources using the Find window.
-
From the Orders view, select and order and then select Show Resources.
Specifying Time Buckets
To display a different time bucket for the right pane
-
Right-click on any day.
-
Choose from the following intervals:
-
Periods
-
Weeks
-
Days
-
Hours
-
Thirty Minutes
-
Fifteen Minutes
If the planning mode of the plan is Constrained (Without Detailed Scheduling):
-
Gantt chart views are available only in the planning buckets (Day, Week, Period). The system does not allow the zoom level to be less than a day (minutes and hours are disabled). You can to zoom from Week to Day and from Period to Week and Day. The entire planning horizon is displayed.
-
In the Orders View the start of an order is set to the beginning of the planning bucket and the end of the order is set to the end of the planning bucket in which the order is completed.
-
In the Resources View the start of an activity is set to the beginning of the planning bucket and the end of the activity is set to the end of the planning bucket in which the activity is completed.
-
-
-
Rescheduling Operations
You can reschedule a job from the Resource Activities view by using the Reschedule window, or by dragging and dropping the bar in the right pane. You can also reschedule a job in the Orders view by editing the left pane.
To reschedule an operation using the Reschedule window
-
In the left pane of the Gantt chart, right click on one of the nodes.
The related activity appears in the right pane.
-
[Right-click] on the bar in the right pane.
A list of tasks or options appears.
-
Select Reschedule.
-
Select a new start or end date for the activity.
-
Click OK.
The activity's new start or end date is reflected in the Gantt Chart. After moving an activity, you can firm it by the new start or end date, or by resource.
To change the duration of an activity
-
Specify a new start or end date using the instructions above.
-
Select the Resize check box.
-
Click OK.
The activity's new duration is reflected in the Gantt Chart. After changing an activity's duration, you can firm it by the new start or end date, or by resource.
To reschedule an activity graphically
-
Select the activity you wish to reschedule.
-
Drag the activity to a new date or time.
The activity's new start or end date is reflected in the Gantt Chart.
After moving an activity, you can firm it by the new start or end date, or by resource.
To resize an activity graphically
-
Select the activity.
-
Drag the right end of the activity bar to a desired end date. After resizing, the activity can be firmed.
Firming an Operation
To firm an operation
-
Place your cursor over the operation you wish to firm.
-
Choose [right-click] > Firm/Unfirm Operation > [Firm option].
Resolving Overload of an Operation
There are three ways to resolve overload of an operation. You can:
-
Reschedule the operation to a time when sufficient resources are available.
-
Select alternate resources for the operation.
-
Add extra capacity to complete the operation with your current resources.
To reschedule an operation
-
Use the Reschedule window
-
Drag and drop the operation in the Gantt Chart
To load an alternate resources
-
Place your cursor over the operation you wish to offload.
-
Choose [right-click] > Offload to Alternate Resource.
-
Choose an Alternate resource.
A new resource is listed for the operation in the left pane. In the right pane, the operation's shading changes to reflect that it is updated.
To add capacity
-
From the Resource or the Orders view, select an operation for which you wish add capacity.
-
Choose [right-click] > Resource Capacity.
The Resource Capacity window appears.
-
Select a date for which you'd like to add capacity.
-
Add capacity for a set duration for a particular shift.
-
Click Apply.
You can then run the online planner to see the results of adding capacity for this date. Your changes are also dynamically reflected in the Gantt Chart.
When any changes are made in the Gantt chart, including offloading, adding capacity, rescheduling, or increasing time duration for an activity, these changes do not take effect until the Online Planner is run.
Gantt Chart Icon Options
The following table shows the icon options for the Gantt chart and what happens when a particular option is selected.
| Icon Option | Gantt Chart Display |
|---|---|
| Peg Up and Down | Displays upstream supplies and downstream supplies relative to the selected supply or demand. |
| Peg Up | Displays all downstream supplies relative to the selected supply going all the way up to the end demand. |
| Peg Down | Displays all upstream supplies that relate to the selected supply or demand. |
| Back or Forward | Select to navigate back and forth between prior results from pegging actions taken within the Orders view. |
| Show Pegging for Selected | Displays pegging for the selected supply. Inbound and outbound material flow is displayed. |
| Show Pegging for All | Displays all pegging relationships for displayed supply and demand. |
| Hide Pegging | Turns off all pegging arrows that are displayed. |
| Show or Hide Intra Routing | Displays the flow of material between operations within a routing. |
| Select All | Selects all rows in the Orders view.
Note: This can be done only when the Orders view is displaying all supplies. For example, if the Orders view is displaying a full list of supplies only, the Select All option selects all of the supplies. However, if the Orders view is showing a demand and the supplies pegged to that demand, the Select All option does not select anything. |
| Collapse All | Collapses all of the expanded options to the highest level. |
| Expand Selected Supplies to Operations | All selected supplies are expanded to the operation level. |
| Expand Selected Supplies/Operations to Activities | All selected supplies are expanded to the resource activity level. |
| Show Critical Path Only | Displays only critical activities. |
| Highlight Critical Path | Displays all activities with critical activities highlighted. |
| Constrained Earliest Times | Displays constrained earliest possible start and end times. |
| Unconstrained Earliest Times | Displays unconstrained earliest possible start and end times. |
| Unconstrained Latest Times | Displays unconstrained latest possible start and end times. |
| View Batches/Hide Batches | Displays consolidated activities that are part of the same batch for a batchable resource, which is a resource with multiple activities that can be scheduled together as batches. |
| Show Charges | Displays an activity split based on the number of charges planned within the activity duration. For activities scheduled on chargeable resources, this option displays constituent charges of a single resource requirement. The start and end dates of each charge is shown as a thin white line within the bar that represents the resource activity. |
| Hide Charges | Removes the charges display from the bar graph. |
Gantt Chart Pegging
Gantt Chart pegging is specific to the Orders view. For supplies that you specify, the Gantt chart pegging view links related end assembly orders, subassembly orders and purchased material orders together in a hierarchical display. For the entire hierarchy, the timing of all production operations and purchased material arrivals are displayed. Material arrivals are shown as milestones. The hierarchy may be flexibly collapsed (with collapsed operations and material arrivals appearing as rolled up bars, as is commonly seen in project plans) and expanded. This view provides a consolidated view of all operation and material arrival dependencies for a particular end assembly order. You can drill down to any desired level and view further details.
To display Gantt Chart pegging
-
From the Planner's Workbench, select a plan.
-
Right click on the plan and select Supply and Demand, Supply and Demand.
The Supply/Demand window appears.
-
Select a demand.
-
Right click and select Gantt Chart.
The Gantt chart appears with the pegging information in the left pane. It displays the demand and all of the supplies pegged to that demand.
Alternatively, you can select a supply or a set of supplies and enter the Gantt chart. The Gantt chart only displays these supplies. Then you can select one of the supplies and perform a pegging action, which results in the related supplies being displayed.
Gantt Chart Two Views
It is possible to pass information between two open views of the Gantt chart. For example, when viewing the Resource Activities view, you can add the Orders view along the horizontal plain.
To display two views
-
Navigate to the Gantt chart, Resource Activities view as an example.
-
Select a resource activity along the timeline for one of the resources displayed in the view.
-
Click the Show Orders icon.
The Orders view is displayed below the Resource Activities view and is displays the order that you selected in the Resource Activities view..
Accessing Planner Workbench From Oracle Collaborative Planning
Suppliers can view specific information in the Planner Workbench by using the Planner Workbench tabbed region in Oracle Collaborative Planning. Based on whether you model the supplier as an organization or as a supplier for planning purposes, the information displayed to the supplier varies.
If you model the supplier as an organization, the following information appears in their Planner Workbench:
-
Plans for which the supplier is modeled as an organization
-
Supplier organization name
-
Product families, categories, departments, lines, and transportation resources in the supplier organization
-
Items and details such as components, where used, and approved suppliers within each product family
-
Organization-specific supply and demand information
Your suppliers can use the Planner Workbench - Supplier Administrator responsibility to view the following left-pane nodes and related right-pane tabbed regions in the Planner Workbench:
| Left Pane Nodes | Right Pane Tabs |
|---|---|
| Organization | Key Indicators, Actions |
| Category | Key Indicators, Actions |
| Item | Key Indicators, Horizontal Plan, Vertical Plan, Actions, |
| Component | Key Indicators, Horizontal Plan, Vertical Plan, Actions, |
The following table lists the right-click menu options available in Planner Workbench that your suppliers can use:
| Function Name | Menu Options |
|---|---|
| Exceptions | Actions, Exception Details, Related Exceptions, Save Actions |
| Resources | Resources, Resource Requirements, Resource Availability |
| Supplier | Supplier Capacity, Supplier Flex Fences, Supplier Variability |
| Routings | Routing Operations, Operation Networks |
| Key Indicators | Key Indicators |
| Pegging | Pegging, Critical Activities, End Pegged Supplies |
| Horizontal Plan | Horizontal Plan |
| Vertical Plan | Vertical Plan |
| Gantt Chart | Gantt Chart |
| Supply Chain Bill | Supply Chain Bill |
| Items | Items |
| Components | Components |
| Where Used | Where Used |
| Sourcing | Sourcing |
| Destination | Destination |
| Process Effectivity | Process Effectivity |
| Co-products | Co-products |
| Safety Stocks | Safety Stocks |
| Substitutes | Substitutes |
| Online Replan | Start Online Planner, Stop Online Planner, Online Replan, Online Planner Status, Batch Replan, Launch New Plan, Copy Plan, Purge Plan |
| View Notifications | Notifications |
| Launch Notifications | Launch Notifications |
| Plan Options | Plan Options |
| Release | Select All for Release, Release |
| Collaborate | Publish Order Forecast, Publish Supply Commits |
| Preferences | Preferences |
| Undo | Undo Summary, Add Bookmark |
| Plan Comparison Report | Compare Plans |
| Supply/Demand | Supply, Demand, Supply/Demand, On-hand |
If you model the supplier as a supplier in the Planner Workbench, this information appears in their Planner Workbench:
-
Plans for which the supplier is modeled as a supplier
-
Supplier name and supplier sites
-
Categories and items associated with the supplier
-
Supply and demand information specific to the supplier
Suppliers can use the Planner Workbench - Supplier User responsibility to view the following left-pane nodes and related right-pane tabbed regions in the Planner Workbench:
| Nodes | Tabs |
|---|---|
| Supplier | Key Indicators, Actions |
| Category | Key Indicators, Actions |
| Item | Key Indicators, Horizontal Plan, Actions |
The following table lists the right-click menu options available in Planner Workbench that your suppliers can use:
| Function Name | Menu Options |
|---|---|
| Items | Items |
| Substitutes | Substitutes |
| Resources | Resources, Resource Requirements, Resource Availability |
| Supply Chain Bill | Supply Chain Bill |
| Sourcing | Sourcing |
| Destination | Destination |
| Exceptions | Actions, Exception Details, Related Exceptions, Save Actions |
| Horizontal Plan | Horizontal Plan |
| Vertical Plan | Vertical Plan |
| Supply/Demand | Supply, Demand, Supply/Demand, On-hand |
| Plan Comparison Report | Compare Plans |
| Safety Stocks | Safety Stocks |
| View Notifications | Notifications |
-
Colors Description Dark Blue Required Cyan Available Magenta Overload Pink Updated Green Firmed Pink with Green Border Updated/Firmed Blue with Green Border Required/Firmed
Displaying Suppliers Modeled as Organizations
Oracle Advanced Supply Chain Planning provides you with the flexibility of modeling a supplier and its sites as an inventory organization. You can use this option if you want to:
-
Net through the supplier's supply chain bill in order to provide the supplier's supplier with advance visibility to their order forecast.
-
Constrain your supply chain plan on the basis of a lower level material or resource constraint within the supplier.
In such cases, Oracle Advanced Supply Chain Planning plans the supplier's site like any other internal inventory organization. When a planner views such an external organization in the Planner Workbench, it is distinguished as a supplier site as opposed to an internal organization through supplemental information.
Display of supplier site information provides you with advanced visibility to suppliers beyond your immediate suppliers by creating a multi-company supply chain plan. For example, if you source assemblies from a contract manufacturer with critical components being furnished by a tier 2 supplier, then you may want to create a multi-company plan. In such a plan, you can model your immediate suppliers as inventory organizations, and have the supply chain plan net through this organization in order to create demand for the tier 2 supplier. You can then publish the output of this plan as forecasts for both your immediate and tier 2 suppliers.
You can create an external organization and associate it to the supplier site representing the contract manufacturer in Oracle Inventory. Once the organization has been defined, you can create the reference setup information for planning purposes in this organization like items, bills of material, routings, resources, and operations.
For more details on setting up a supplier site as an inventory organization, see Oracle Inventory User's Guide.
To review plan information with suppliers modeled an organizations
-
Run a supply chain plan.
-
Navigate to Supply Chain Plan > Workbench to view plans by supplier organizations.
-
You can view the supplier icon and the supplier's company and site names in the Navigator window of Planner Workbench. The supplier sites that are modeled as organizations are graphically distinguished as external organizations in the Navigator window.
-
Highlight an organization, right-click, and select Supply/Demand.
-
The Supply/Demand window displays the Source Supplier and Source Supplier Sites in addition to the organization code for the modeled organization.