How to Remove the Main Logic Board
This procedure must be performed by a qualified service-trained maintenance provider. Persons who remove any of the outer panels to access this equipment must observe all safety precautions and comply with skill level requirements, certification, and all applicable local and national laws.
Before You Begin
Before you remove the main logic board, you must remove all removable components from it, so that you can transfer them to the new main logic board after you install it. Complete these tasks to remove the necessary components:
Video Demonstration
Figure 6-1

Click on the icon above for a video demonstration.
Click here for Appendix E, Video Player Help.
What to Do
-
Disconnect any external cables attached to the rear panel of the system.
Be sure to note where each cable attaches to the rear panel. See "Locating Rear Panel Features".
-
Disconnect the internal cables from the main logic board.
Press the tab on the cable connector to detach each cable.
-
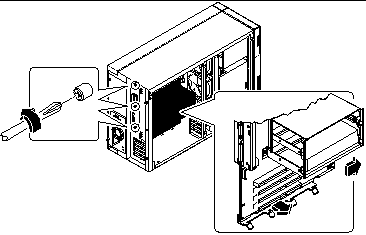
Loosen the three captive screws securing the main logic board to the rear panel.
Figure 6-2

Note -Be sure to remove the SSP paddle card and all PCI cards prior to removing the main logic board. See "Before You Begin".
-
Slide the main logic board away from the rear panel until it is free.
-
Pull the bottom edge of the main logic board away from the machine, and lift the board out of the system.
Place the main logic board on an antistatic mat.
What Next
To replace the main logic board, complete this task:
- © 2010, Oracle Corporation and/or its affiliates
