| Netra CT Server Service Manual |
| Netra CT Server Service Manual |
| C H A P T E R 9 |
|
Removing and Replacing the Servers |
This chapter specifies procedures for the installation, removal, and replacement of the Netra CT 810 server and Netra CT 410 server. The server and the midplane are considered a single FRU.
Consult the Netra CT Server Safety and Compliance Manual for safety information prior to performing the procedures in this chapter.
|
Note - Read Chapter 3 before performing the procedures in this chapter. |
You can power down and remove one server without affecting the other servers in the chassis.
The instructions in this section cover both of these situations:
1. Completely power off the Netra CT server.
Refer to Section 2.2, Powering Off the Server for those instructions. You must push the purple power supply unit locking mechanism into the unlocked position before you can remove the server.
2. Disconnect the power cable(s) from the appropriate connectors.
For rear-access models, disconnect the power cable(s) from the connectors at the rear of the chassis; for front-access models, disconnect the power cable(s) from the connectors at the front of the chassis. Keep the following in mind when disconnecting power cables:
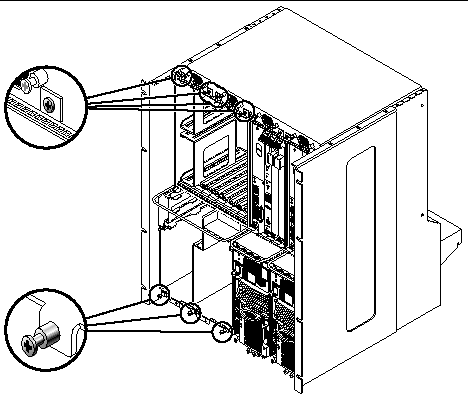
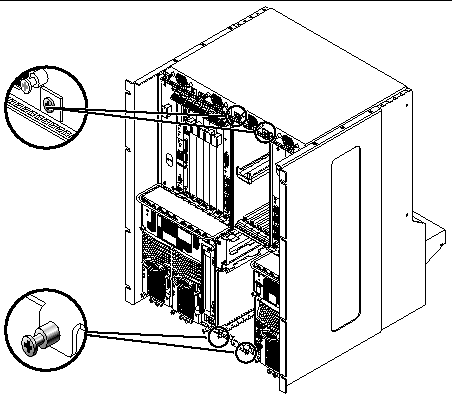
FIGURE 9-1 shows sample server configurations. You do not have to disconnect the power cables from any connectors other than the ones supplying power to the server that you want to remove; doing so will power off other servers in the chassis.


|
Caution - Do not attempt to remove the server from the chassis without first performing the next step or you might damage certain major system components. |
3. If you have a rear-access model, unseat all the rear transition cards from the server that you are going to replace.
You do not have to completely remove the rear transition cards from the chassis; you only need to pull them out an inch or two so that they are disengaged from the rear of the server that you are going to replace.
4. Determine if you need to unplug the cables connected to the server and remove all the components from the server.
5. Label all the cables connected to the front of the server.
You will be disconnecting the cables from the front of the server in the next step, and you will want to plug the cables back into the same ports after you've replaced the server. Note that you do not have to unplug any cables connected to cards installed in the rear of the chassis.
6. Unplug all cables from the cards installed in the front of the server.
7. Remove all the components from the server.
You will reinstall them in the replacement server later on.
Remove the components using the instructions in the following sections, whether you have a front-access or a rear-access model:
Remove the following additional components if you have a front-access model:
8. Using a No. 2 Phillips screwdriver, loosen the captive screws that secure the server to the chassis.
9. Grasp the server handle and slowly pull the server out of the chassis until the purple server bar at the top of the server is visible.
10. With your right hand, grasp the purple bar at the top of the server and completely pull the server out of the chassis using the server handle and the bar.
FIGURE 9-4 shows how to remove a Netra CT 810 server from the chassis and FIGURE 9-5 shows how to remove a Netra CT 410 server from the chassis.


11. Set the server aside on a flat surface.
12. Secure a blank filler panel over the empty server slot, if necessary.
If you are not going to replace the server right away, you must install a blank filler panel over the opening to ensure proper airflow in the system. The filler panel is secured to the chassis using four screws, two at the top of the filler panel and two at the bottom.
See the Netra CT Server Product Overview for combinations of Netra CT 410 server and Netra CT 810 server supported within a chassis.
1. Remove the blank filler panel, if necessary.
The filler panel is secured to the chassis using four screws, two at the top of the filler panel and two at the bottom. Store the slot filler panel in a safe place; you may have to use it again if you have to remove a server for an extended period of time.
2. With your left hand, grasp the server handle.
3. With your right hand, grasp the purple server bar at the top of the server and insert the server into the chassis using the flat server handle and the server bar.
FIGURE 9-4 shows how to insert a Netra CT 810 server into the chassis and FIGURE 9-5 shows how to insert a Netra CT 410 server into the chassis.
4. Push the purple server bar at the top of the server down and gently push the server the remaining distance into the chassis.
5. Using a No. 2 Phillips screwdriver, tighten the captive screws that secure the server to the chassis.
Tighten the screws on the server to a torque of 0.45 - 0.68 N.m (4 - 6 in.-lb).
6. If you have a rear-access model, reseat all the rear transition cards into the server that you just replaced.
7. Determine if you need to connect the cables to the cards in the server and reinstall all the components from the server.
8. Reinstall all the components that you removed from the faulty server.
Replace the following components, whether you have a front-access or a rear-access model:
Replace the following components if you have a front-access model:
9. Plug all the cables into the server.
10. Connect the DC input power cable(s) to the DC connector(s) for the server you just replaced.
Refer to Section 2.1, Powering On the Server for those instructions.
| Netra CT Server Service Manual | 816-2482-11 |
Copyright © 2003, Sun Microsystems, Inc. All rights reserved.
