Chapter 5 Roles and Resources
This chapter discusses Identity Manager roles and resources.
The information in this chapter is organized into the following topics:
Understanding and Managing Roles
Read this section for information about setting up roles in Identity Manager. In large organizations, role-based resource assignments greatly simplify resource management.
Note –
Do not confuse roles and admin-roles. Roles are used to manage end-user access to external resources. Admin-roles, on the other hand, are primarily used to manage administrator access to internal Identity Manager objects such as users, organizations, and capabilities.
The information in this section discusses roles. For information about admin-roles, see Understanding and Managing Admin Roles.
What are Roles?
A role is an Identity Manager object that allows resource access rights to be grouped and efficiently assigned to users.
Roles are organized into four role types:
-
Business Roles
-
IT Roles
-
Applications
-
Assets
Business Roles organize into groups the access rights that people who do similar tasks in an organization need to do their job duties. Typically, Business Roles represent user job functions. In a financial institution, for example, Business Roles might correspond to job functions like bank teller, loan officer, branch manager, clerk, accountant, or administrative assistant.
IT Roles, Applications, and Assets organize resource entitlements into groups. In order to provide end-users with access to resources, IT Roles, Applications, and Assets are assigned to Business Roles so that users can access the resources they need to do their jobs. IT Roles contain a specific set of Applications, Assets, and/or Resources, including specific entitlements on those assigned Resources. IT Roles can also contain other IT Roles.
Note –
The concept of role types is new in Identity Manager version 8.0. If your organization upgraded to version 8.0 from an earlier version of Identity Manager, your legacy roles were imported as IT Roles. For more information, see Managing Roles Created In Versions Prior to Version 8.0.
IT Roles, Applications, and Assets can be required, conditional, or optional.
-
A required role will always be assigned to the end-user.
-
A conditional role has conditions that must evaluate to true in order for the role to be assigned.
-
An optional role can be requested separately, and, upon approval, assigned to the end-user.
Required, conditional, and optional roles allow a Business Role designer to define coarse-grained access to contained roles in order to achieve regulatory compliance, while still allowing flexibility for an end-user’s manager to fine-tune the end-user’s access rights. Users assigned conditional or optional roles can still share the same assigned Business Role, but have different assigned access rights. With this approach, there is no need to define a new Business Role for each permutation of access requirements within an organization (a problem known as role explosion).
Putting Role Types to Work
The following discussion describes how to use role types effectively. For role type descriptions, see the previous section.
Managing Roles Created In Versions Prior to Version 8.0
Organizations that upgraded from an earlier version of Identity Manager to version 8.0 will automatically have their legacy roles converted to IT Roles. These IT Roles will remain directly assigned to users. Legacy roles will not be assigned a role owner as part of the upgrade process. A role owner can be assigned later, however. (For information on role owners, see Designating Role Owners and Role Approvers.)
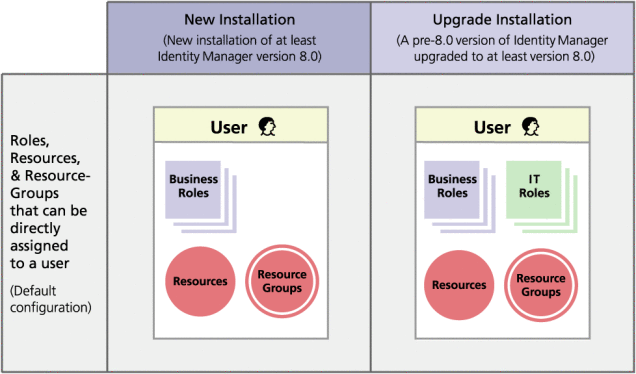
By default, organizations that upgrade to version 8.0 can directly assign both IT Roles and Business Roles to users (see Figure 5–2).
Organizations with legacy roles should consider creating new roles based on the guidelines outlined in the next section.
Using Role Types to Design Flexible Roles
IT Roles, Applications, and Assets are the role designer’s building blocks. These three role types are used in combination to build up user entitlements (or, access rights). IT Roles, Applications, and Assets are then assigned to Business Roles.
Designing Business Roles
In Identity Manager, a user can be assigned one or more roles, or no role. With the introduction of role types in Identity Manager 8.0, it is recommended that you only directly assign Business Roles to users. In fact, by default, you cannot directly assign any of the other role types to users unless your organization had a pre-8.0 version of Identity Manager installed and upgraded to at least version 8.0. This default restriction can be changed by modifying the role configuration object (Configuring Role Types).
To reduce complexity, Business Roles cannot be nested. In other words, one Business Role cannot contain another Business Role. In addition, Business Roles cannot directly contain resources and resource groups. Instead, resources and resource groups should be assigned to either an IT Role or an Application, which can then be assigned to one or more Business Roles.
Designing IT Roles
IT Roles can contain Applications, and Assets, as well as other IT Roles. IT Roles can also contain resources and resource groups.
IT Roles are intended to be created and managed either by your organization’s IT staff, or by the resource owners who understand the entitlements that are required to enable specific privileges within the resource.
Designing Applications and Assets
Applications and Assets are role types that are intended to represent commonly used business terms to describe things that end-users need in order to do their jobs. For example, an Application role could be named “Customer Support Tools” or “Intranet HR-Tool Admin.“
-
Applications cannot contain roles, but they can contain resources and resource groups. Applications can also define specific entitlements that restrict access to only specific applications on contained resources.
-
Assets are (typically) non-connected or non-digital resources, such as mobile phones and portable computers, that require manual provisioning. Consequently, assets cannot contain roles, resources, or resource groups.
Applications and Assets are intended to be assigned to Business Roles and IT Roles.
Note –
Role administrators should be assigned one or more of the following capabilities:
-
Asset Administrator
-
Application Administrator
-
Business Role Administrator
-
IT Role Administrator
See Assigning Capabilities to Users for more information.
Role Types in Summary
The following figure shows which role-types, resources, and resource-groups can be assigned to each of the four role-types. The figure also shows that role-type exclusions can be assigned to all four role-types. (For a description of Role exclusions, see To Assign Resources and Resource Groups.)
Figure 5–1 The Business Role, IT Role, Application, and Asset Role-Types
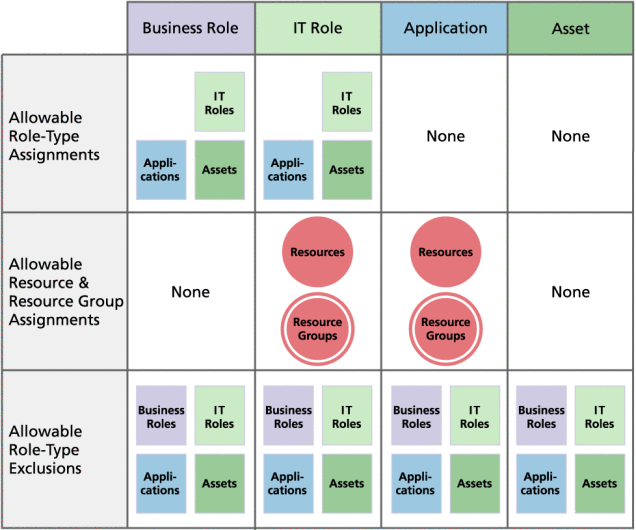
Optional, conditional, and required contained-roles (What are Roles?) provide added flexibility. Flexible role definitions can reduce the total number of roles your organization needs to manage.
Figure 5–2 shows that Business Roles and IT Roles are directly assignable to users if a pre-8.0 version of Identity Manager is upgraded to at least version 8.0. On upgrade, legacy roles are converted to IT Roles, and, to ensure backwards compatibility, IT Roles are directly assigned to users. If Identity Manager was not upgraded from a pre-8.0 version, then only Business Roles are directly assignable to users.
Figure 5–2 Roles and resources that can be directly assigned to users.
Creating Roles
This section describes how to create roles and the information is organized as follows:
Note –
For tips on designing roles, see Using Role Types to Design Flexible Roles
When you create or edit a role, Identity Manager launches the ManageRole workflow. This workflow saves the new or updated role in the repository, and allows you to insert approvals or other actions before the role is created or saved.
 To Create Roles Using the Create Role Form
-
In the Administrator interface, click Roles in the main menu.
The Roles page (List Roles tab) opens.
-
Click New at the bottom of the page.
The Create IT Role page opens. To create another type of role, use the Type drop-down menu.
-
Complete the form fields on the Identity tab.
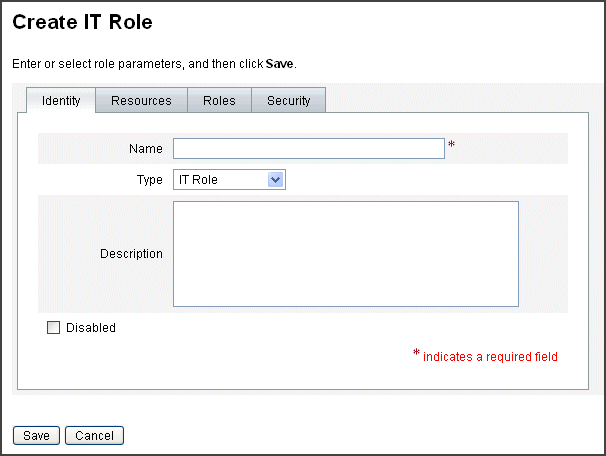
The following figure shows the Identity tab.
Figure 5–3 Identity Tab on the Create IT Role Page
-
Complete the form fields on the Resources tab (if applicable). For help filling out the fields on this tab, refer to online help, and also see To Assign Resources and Resource Groups.
For help setting extended attributes values on roles, see To View or Edit Resource Account Attributes.
The following figure shows the Resources tab.
Figure 5–4 Resources Tab on the Create IT Role Page

-
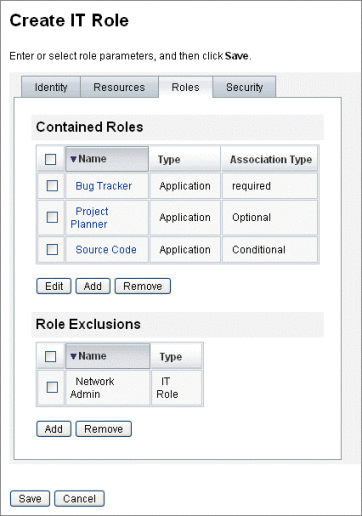
Complete the form fields on the Roles tab (if applicable). For help filling out the fields on this tab, refer to online help, and also see To Assign Roles and Role Exclusions.
Figure 5–6 shows the Roles tab.
-
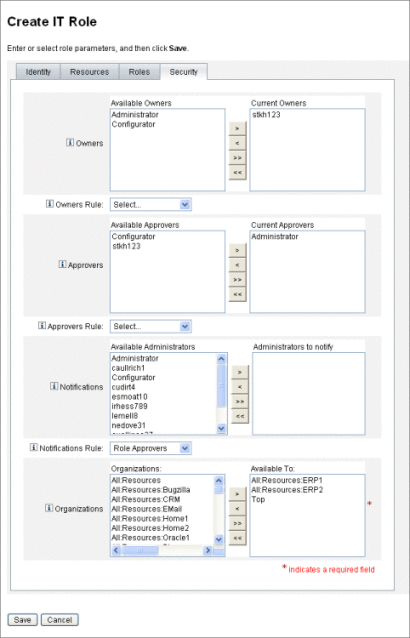
Complete the form fields on the Security tab. For help filling out the fields on this tab, refer to online help, and also see Designating Role Owners and Role Approvers and Designating Notifications.
Designating Role Owners and Role Approvers shows the Security tab.
-
Click Save at the bottom of the page.
-
Enter a role name and description on the Identity tab of the Create Role form. If you are creating a new role, use the Type drop-down menu to select the role-type you are creating.
Figure 5–4 shows the Identity portion of the Create Role form’s Identity tab. For help using this form, see online help.
 To Assign Resources and Resource Groups
Resources and Resource Groups can be directly assigned to IT Roles and Application roles using the Resources tab of the Create Role form. Resources are described later, in the Understanding and Managing Identity Manager Resources section. Resource Groups are described in the Resource Groupssection.
-
Resources and Resource Groups cannot be directly assigned to Business Roles because only roles can be assigned to Business Roles.
-
Resources and Resource Groups cannot be assigned to Asset roles because Asset roles are reserved for non-connected or non-digital resources that require manual provisioning.
This procedure describes how to assign resources and resource groups to a role when completing the Create Role form. See To Create Roles Using the Create Role Form to get started.
-
Click the Resources tab in the Create Role page.
-
To assign a resource, select it in the Available Resources column and move it to the Current Resources column by clicking the arrow buttons.
-
If you are assigning multiple resources, you can specify the order in which the resources are updated: Select the Update resources in order checkbox and use the + and - buttons to change the order of the resources in the Current Resources column.
-
To assign a resource group to this role, select it in the Available Resource Groups column and move it to the Current Resource Groups column by clicking the arrow buttons. A resource group is a collection of resources that provides another way to specify the order in which resource accounts are created and updated.
-
To specify account attributes for this role on a per resource basis, click Set Attribute Values in the Assigned Resources section. See To View or Edit Resource Account Attributes for more information.
-
Click Save to save the role, or click the Identity, Roles, or Security tabs to continue with the role creation process.
The following figure shows the Create Role form’s Resources tab.
Figure 5–5 The Resources section of the Create Role Tabbed Form

 To Edit Assigned Resource Attribute Values
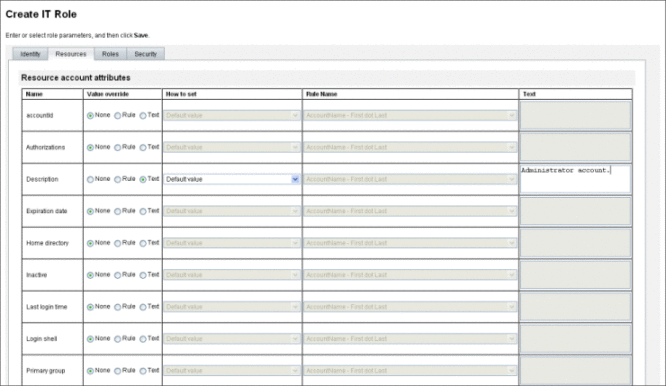
Use the Assigned Resources table to set or modify resource attribute values on resources assigned to a role. A resource can have different attribute values defined on a role-by-role basis. Clicking the Set Attribute Values button opens the Resource Account Attributes page.
The following figure shows the Resource Account Attributes page, which is used to set extended attribute values on resources assigned to a role.
-
From the page Resource Account Attributes page, specify new values for each attribute and determine how attribute values are set.
Identity Manager enables you to directly set values or use a rule to set values and provides a range of options for overriding existing values or merging values with existing values. For general information about resource attribute values, see To View or Edit Resource Account Attributes.
Use the following options to establish values for each resource account attribute:
-
Value override. Choose one of the following options:
-
None (Default). No value is established.
-
Rule. Uses a rule to set the value.
If you select this option, you must select a rule name from the list.
-
Text. Uses specified text to set the value.
If you select this option, you must enter the text in the adjacent Text field.
-
-
How to set. Choose one of the following options:
-
Default value. Makes the rule or text the default attribute value.
The user can change or override this value.
-
Set to value. Sets the attribute value as specified by the rule or text.
The value will be set and override any user changes.
-
Merge with value. Merges the current attribute value with the values specified by the rule or text.
-
Merge with value, clear existing. Removes the current attribute values and sets the value to a merger of values specified by this and other assigned roles.
-
Remove from value. Removes the value specified by the rule or text from the attribute value.
-
Authoritative set to value. Sets the attribute value as specified by the rule or text.
The value will be set and override any user changes. If you remove the role, the new value is null, even if it previously existed on the attribute.
-
Authoritative merge with value. Merges the current attribute value with the values specified by the rule or text.
Removing the role removes the value that was assigned when the role was assigned and leaves the original attribute value intact.
-
Authoritative merge with value, clear existing. Removes the current attribute values and sets the value to a merger of values specified by this and other assigned roles.
Clears the attribute value specified by this role if the role is removed, even if it previously existed on the attribute.
-
-
Rule Name. If you select Rule in the Value override area, select a rule from the list.
-
Text. If you select Text in the Value override area, enter text to be added to, deleted from, or used as the attribute value.
-
-
Click OK to save your changes and return to the Create or Edit Role page.
 To Assign Roles and Role Exclusions
Roles can be assigned to Business Roles and IT Roles using the Roles tab of the Create Role form. Assigned roles should be added to the Contained Roles table.
-
Roles cannot be assigned to Application roles and Asset roles.
-
Business roles cannot be assigned to any role type.
Role exclusions can be assigned to all four role types using the Roles tab of the Create Role form. If a role with a role exclusion is assigned to a user, the excluded role cannot also be assigned to the user. Role exclusions should be added to the Role Exclusions table.
This procedure describes how to assign one or more roles to a role when completing the Create Role form. See To Create Roles Using the Create Role Form to get started.
To complete the Roles tab
-
Click the Roles tab in the Create Role page.
-
Click Add in the Contained Roles section.
The tab refreshes and displays the Find Roles to Contain form.
-
Search for the role (or roles) that you will be assigning to this role. Start first with any required roles. (You will add conditional and optional roles later.)
See To Search for Roles for help using the search form. Business Roles cannot be nested or assigned to other role-types.
-
Use the checkboxes to select one or more roles to be assigned, then click Add.
The tab refreshes and displays the Add Contained Role form.
-
Select Required (or Conditional or Optional, as appropriate) from the Association Type drop-down menu.
Click OK.
-
Repeat the previous four steps to add conditional roles (if required). Repeat the previous four steps again to add optional roles (if required).
-
Click Save to save the role, or click the Identity, Resources, or Security tabs to continue with the role creation process.
Figure 5–6 shows the Create Role form’s Roles tab. For help using this form, see online help.
Figure 5–6 The Roles Portion of the Create Role Tabbed Form
Designating Role Owners and Role Approvers
Roles have designated owners and approvers. Only role owners can authorize changes to the parameters that define the role, and only role approvers can authorize the assignment of the role to end-users.
Note –
If you have Identity Manager integrated with SunTM Role Manager, you should allow Role Manager to handle all role change approvals and notifications by manually disabling Identity Manager's ability to perform these actions.
You must edit the RoleConfiguration configuration object in Identity Manager as follows:
-
Find all instances of changeApproval and set the value to false.
-
Find all instances of changeNotificaiton and set the value to false.
To be a role owner is to be the business owner responsible for the underlying resource account rights that are assigned through the role. If an administrator makes changes to a role, a role owner must approve of the changes before they can be carried out. This feature guards against an administrator changing a role without a business owner’s knowledge and approval. If change approvals have been disabled in the Role configuration object, however, a role owner’s approval is not required in order for changes to be carried out.
In addition to approving role changes, roles cannot be enabled, disabled, or deleted without a role owners’ approval.
Owners and approvers can either be directly added to a role, or dynamically added using a role-assignment rule. In Identity Manager it is possible (but not recommended) to create roles without owners and approvers.
Note –
Role-assignment rules have a RoleUserRule authType.
If you need to create a custom role-assignment rule, refer to the three default role-assignment rule objects and use them as an example:
-
Role Approvers
-
Role Notifications
-
Role Owners
Owners and approvers are notified by email if a work item requires their approval. Change-approval work items and approval work items are discussed in the Initiating Change-Approval and Approval Work Items section.
Owners and approvers are added to roles on the Security tab in the Create Role form.
Designating Role Owners and Role Approvers shows the Create Role form’s Security tab. For help using this form, see the online help.
Designating Notifications
One or more administrators can be sent notifications when a role is assigned to a user.
Specifying a notification recipient is optional. You could choose to notify an administrator if you decide not to require an approval when a role is assigned to a user. Or you could designate one administrator to serve as an approver, and, another administrator to serve as a notification recipient when the approval is made.
As with owners and approvers, notifications can either be directly added to a role, or dynamically added using a role-assignment rule. Notification recipients are notified by email when a role is assigned to a user. A work item is not created, however, because an approval is not required.
Notifications are assigned to roles on the Security tab on the Create Role form. Designating Role Owners and Role Approvers shows the Create Role form’s Security tab.
Initiating Change-Approval and Approval Work Items
When changes are made to a role, the role owners can receive a change-approval email, a change-notification email, or no email. When a role is assigned to a user, role approvers receive role approval emails.
By default, role owners are sent change-approval emails whenever the roles they own are changed. This behavior is configurable, however, on a role-type by role-type basis. For example, you could choose to enable change-approvals for Business Roles and IT Roles, and enable change-notifications for Application and Asset roles.
For instructions on enabling and disabling change-approval and change-notification email, see Configuring Role Types.
This is how change-approvals and change-notifications work:
-
If change-approvals are enabled, when an administrator changes a role, a work item is generated and an approval email is sent to the role owner. A role owner must approve the work item in order for the change to be made. Change-approval work items can be delegated. See Approving User Accounts for more information.
If change-approvals are disabled, no work item is generated and no change approval email is sent to the role owner.
-
If change-notifications are enabled, when an administrator changes a role, the change is made immediately, and a notification email is sent to the role owner.
If change-notifications are disabled, no notifications are sent to the role owner.
When a role is assigned to a user, role approvers receive role approval emails. Role approval emails cannot be disabled in Identity Manager.
For role approvals, when a user is assigned a role, a work item is generated and an approval email is sent to the role approver. A role approver must approve the work item in order for the role to be assigned to the user.
Change-approval and approval work items can be delegated. For more information on delegating work items, see Delegating Work Items.
Editing and Managing Roles
Most role editing and role management tasks can be performed using the Find Roles and List Roles tabs, which are located under the Roles tab in the main menu.
This section contains the following topics:
 To Search for Roles
Use the Find Roles tab to search for roles that meet the search criteria you specify.
Using the Find Roles tab, you can search for roles based on a wide variety of criteria such as role owners and approvers, assigned account types, contained roles, and so on.
For information on finding users assigned to a role, see To Find Users Assigned to a Specific Role.
-
In the Administrator interface, click the Roles tab.
The List Roles tab opens.
-
Click the Find Roles secondary tab.
Figure 5–7 shows the Find Role tab. For help using this form, see online help.
Figure 5–7 The Find Role Tab
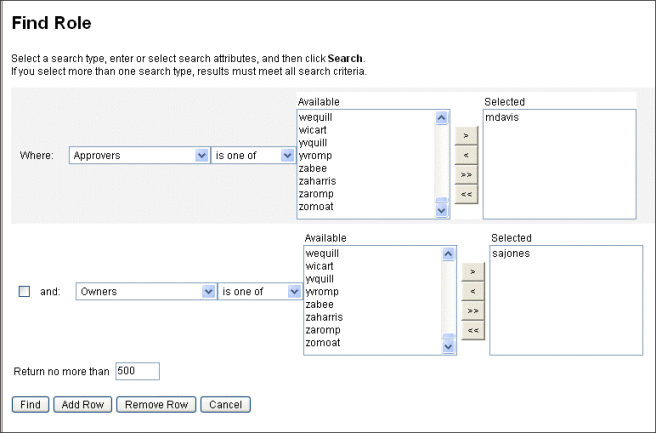
Use the drop-down menus to define the parameters of your search. Click the Add Row button to add additional parameters.
 To View Roles
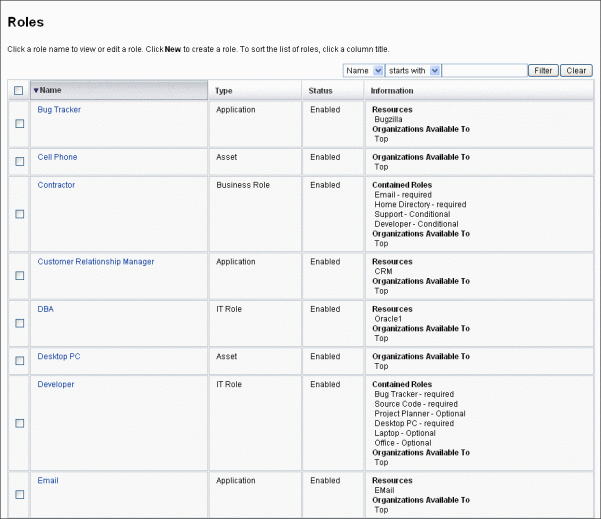
Use the List Roles tab to view roles. Use the filter fields at the top of the List Roles page to find roles by name or role type. Filtering is not case-sensitive.
-
In the Administrator interface, click the Roles tab.
The List Roles tab opens.
Figure 5–8 shows the List Roles tab. For help using this form, see online help.
Figure 5–8 The List Roles Tab
 To Edit a Role
Search for the role you want to edit using the List Roles or Find Roles tabs. If you make changes to a role, and change approvals are set to true, a role owner must approve your changes before they can be carried out.
For information on updating users with role changes, see To Update Roles Assigned to Users.
-
Search for the role you want to edit by following the instructions on To Search for Roles or To View Roles.
-
Click the name of the role you want to edit.
The Edit Role page opens.
-
Edit the role as needed. Refer to the steps in the To Create Roles Using the Create Role Form section for help completing the Identity, Resources, Roles, and Security tabs.
Click Save. The Confirm Role Changes page opens.
-
If this role is assigned to users, you can select when to update the users with role changes. See To Update Roles Assigned to Users for more information.
-
Click Save to save your changes.
 To Clone a Role
-
Search for the role you want to edit by following the instructions on To Search for Roles or To View Roles.
-
Click the name of the role you want to clone.
The Edit Role page opens.
-
Enter a new name in the Name field, and then click Save.
The Role: Create or Rename? page opens.
-
Click Create to make a copy of the role.
 To Assign a Role to Another Role
Identity Manager’s requirements around role assignments are described in What are Roles? and Putting Role Types to Work. You should understand this information before assigning roles.
Identity Manager will change a role’s role assignments if the role-owner of the parent role approves.
-
Search for the Business Role or IT Role to which you will be assigning one or more contained roles. (Roles can only be assigned to Business Roles and IT Roles.) Use the instructions on To Search for Roles or To View Roles to search for roles.
-
Click the Business Role or IT Role to open it.
The Edit Role page opens.
-
Click the Roles tab in the Edit Role page.
-
Click Add in the Contained Roles section.
The tab refreshes and displays the Find Roles to Contain form.
-
Search for the role (or roles) that you will be assigning to this role. Start first with any required roles. (You will add conditional and optional roles later.)
See To Search for Roles for help using the search form. Business Roles cannot be nested or assigned to other role-types.
-
Use the checkboxes to select one or more roles to be assigned, then click Add.
The tab refreshes and displays the Add Contained Role form.
-
Select Required (or Conditional or Optional, as appropriate) from the Association Type drop-down menu.
Click OK.
-
Repeat the previous four steps to add conditional roles (if required). Repeat the previous four steps again to add optional roles (if required).
-
Click Save to open the Confirm Role Changes page.
The Confirm Role Changes page opens.
-
In the Update Assigned Users section select an Update Assigned Users menu option and then click Save to save your role assignments.
See To Update Roles Assigned to Users for more information.
 To Remove a Role Assigned to Another Role
Identity Manager will remove a contained role from another role if the role-owner of the parent role approves. The removed role will be removed from users when users receive role updates. (See To Update Roles Assigned to Users for more information.) When the role is removed, users lose the entitlements that were bestowed by the role.
-
For information about removing a role assigned to one or more users, see To Remove One or More Roles From a User.
-
For information about disabling a role, see To Enable or Disable Roles.
-
For information about deleting a role from Identity Manager, see To Delete a Role.
-
Search for the Business Role or IT Role from which you want to remove a role. Use the instructions on To Search for Roles or To View Roles to search for roles.
-
Click the role to open it.
The Edit Role page opens.
-
Click the Roles tab in the Edit Role page.
-
In the Contained Roles section, select the checkbox next to the role that you want to remove, then click Remove. Select multiple checkboxes to remove multiple roles.
The table updates to show the remaining contained roles.
-
Click Save.
The Confirm Role Changes page opens.
-
In the Update Assigned Users section select an Update Assigned Users menu option. See To Update Roles Assigned to Users for more information.
-
Click Save to finalize your changes.
 To Enable or Disable Roles
Roles can be enabled and disabled on the List Roles tab. Role status is displayed in the Status column. Click the Status column header to sort the table by role status.
Disabled roles do not appear on the Roles tab in the Create/Edit user form and cannot be directly assigned to users. Roles that contain disabled roles can be assigned to users, but the disabled roles cannot be assigned.
Users who are assigned roles that are later disabled do not lose their entitlements. Role disablement only blocks future role assignments from occurring.
Disabling and re-enabling a role requires the permission of the role owner.
Upon enabling or disabling a role with assigned users, Identity Manager will prompt you to update these users. For more information, see To Update Roles Assigned to Users.
-
Search for the role you want to delete by following the instructions on To Search for Roles or To View Roles.
-
Click the checkboxes next to the roles that need to be enabled or disabled.
-
Click Enable or Disable at the bottom of the Roles table.
The Enable Role or Disable Role confirmation page opens.
-
Click OK to enable or disable the role.
 To Delete a Role
This section describes the procedure for deleting a role from Identity Manager.
-
For information on removing a role assigned to another role, see To Remove a Role Assigned to Another Role.
-
For information on removing a role assigned to one or more users, see To Remove One or More Roles From a User.
If you delete a role that is currently assigned to a user, Identity Manager blocks the deletion when you try to save the role. You must unassign (or reassign) all users assigned to a role before Identity Manager can delete it. You also must remove the role from any other roles.
Identity Manager requires a role owner’s approval before it will delete a role.
-
Search for the role you want to delete by following the instructions on To Search for Roles or To View Roles.
-
Select the checkbox next to each role that you want to delete.
-
Click Delete.
The Delete Role confirmation page displays.
-
Click OK to delete one or more of the roles.
 To Assign a Resource or a Resource Group to a Role
Identity Manager’s requirements around resource and resource group assignments are described in What are Roles? and Putting Role Types to Work. You should understand this information before assigning resources to roles.
Identity Manager will change a role’s resource and resource group assignments if the role-owner approves.
-
Search for the IT Role or Application to which you want to add a resource or resource group. For instructions on how to search for a role, see To Search for Roles or To View Roles.
-
Click the role to open it.
-
Click the Resources tab in the Edit Role page.
-
To assign a resource, select it in the Available Resources column and move it to the Current Resources column by clicking the arrow buttons.
-
If you are assigning multiple resources, you can specify the order in which the resources are updated: Select the Update resources in order checkbox and use the + and - buttons to change the order of the resources in the Current Resources column.
-
To assign a resource group to this role, select it in the Available Resource Groups column and move it to the Current Resource Groups column by clicking the arrow buttons. A resource group is a collection of resources that provides another way to specify the order in which resource accounts are created and updated.
-
To specify account attributes for this role on a per resource basis, click Set Attribute Values in the Assigned Resources section. See To View or Edit Resource Account Attributes for more information.
-
Click Save to open the Confirm Role Changes page.
The Confirm Role Changes page opens.
-
In the Update Assigned Users section select an Update Assigned Users menu option. See To Update Roles Assigned to Users for more information.
-
Click Save to save your resource assignments.
 To Remove a Resource or Resource Group Assigned to
a Role
Identity Manager will remove a resource or resource group from a role if the role-owner approves. The removed resource will be removed from users when users receive role updates. (See To Update Roles Assigned to Users for more information.) When the resource is removed, users lose their entitlements on that resource unless the resource is also directly assigned to the user.
-
Search for the IT Role or Application from which you want to remove a resource or resource group. Use the instructions on To Search for Roles or To View Roles to search for roles.
-
Click the role to open it.
The Edit Role page opens.
-
Click the Resources tab in the Edit Role page.
-
To remove a resource, select it in the Current Resources column and move it to the Available Resources column by clicking the arrow buttons.
To remove a resource group, select it in the Current Resource Groups column and move it to the Available Resource Groups column by clicking the arrow buttons.
-
Click Save.
The Confirm Role Changes page opens.
-
In the Update Assigned Users section select an Update Assigned Users menu option. See To Update Roles Assigned to Users for more information.
-
Click Save to finalize your changes.
Managing User Role Assignments
Roles are assigned to users in the Accounts area of Identity Manager.
 To Assign Roles to a User
Use the following procedure to assign one or more roles to a user (or users).
End-users can also make role assignment requests for themselves. (Only optional roles where the parent role is already assigned to the user can be requested.) See Requests Tab in the Identity Manager End-User Interface section for information on how end-users can request available roles.
-
In the Administrator interface, click the Accounts tab.
The List Accounts subtab opens.
-
To assign a role to an existing user, follow these steps:
-
Click the user’s name in the User List.
-
Click the Roles tab.
-
Click Add to add one or more roles to the user account.
By default, only Business Roles can be directly assigned to users. (If your installation of Identity Manager was upgraded from a pre-8.0 version, both Business Roles and IT Roles can be directly assigned to users.)
-
In the table of roles, select the roles you want to assign to the user and then click OK.
To sort the table alphabetically by Name, Type, or Description, click the column headers. Click a second time to reverse sort. To filter the list by role type, make a selection from the Current drop-down menu.
The table updates to show the selected role assignments, plus any required role assignments that are connected to the parent role assignments.
-
Click Add to view optional role assignments that can also be assigned to the user.
Select the optional roles to be assigned to the user and click OK.
-
(Optional) In the Activate On column, select the date that the role should become active. If you do not specify a date, the role assignment will become active as soon as a designated role approver approves the role assignment.
To make the role assignment temporary, select the date that the role should become inactive in the Deactivate On column. Role deactivation takes effect at the beginning of the selected day.
See To Activate and Deactivate Roles on Specific Dates for more information.
-
Click Save.
-
To Activate and Deactivate Roles on Specific Dates
When assigning a role to a user, you can specify an activate date and a deactivate date. Role-assignment work-item requests are created when the assignment is made. If a role assignment is not approved by the scheduled activation date, however, the role is not assigned. Role activations and deactivations take place a little after midnight (12:01 AM) on the date scheduled.
By default, only Business Roles can have activate dates and deactivate dates. All other role-types inherit the activate date and deactivate date of the Business Role that is directly assigned to the user. Identity Manager can be configured to allow other role types to have directly assignable activate and deactivate dates. For instructions, see Configuring Role Types.
 To Edit the Schedule for the Deferred Task Scanner
The Deferred Task Scanner scans user role assignments and activates and deactivates roles as needed. By default, the Deferred Task Scanner task runs every hour.
-
In the Administrator interface, click Server Tasks.
-
Click Manage Schedule in the secondary menu.
-
In the Tasks Available For Scheduling section, click on the Deferred Task Scanner TaskDefinition.
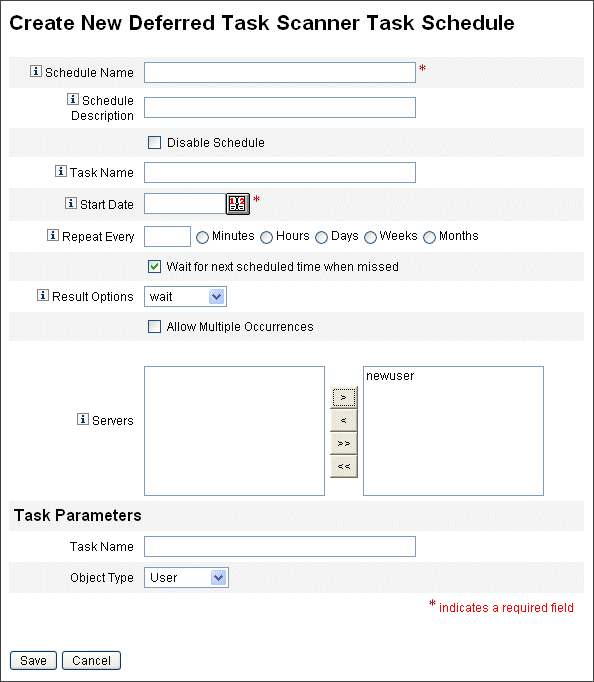
The “Create New Deferred Task Scanner Task Schedule” page opens.
-
Complete the form. For help, refer to the i-Helps and online help.
To specify a date and time when the task should run, in Start Date use the format mm/dd/yyyy hh:mm:ss. For example, to schedule a task to start running at 7:00 P.M. on September 29, 2008, type 09/29/2008 19:00:00.
In the Result Options drop-down menu, select rename. If you select wait, future instances of this task will not run until you remove the previous results. See online help for more information on the various Result Options settings.
-
Click Save to save the task.
Figure 5–9 shows the scheduled task form for the Deferred Task Scanner task.
Figure 5–9 The Deferred Task Scanner Scheduled Task Form
To Update Roles Assigned to Users
When editing roles assigned to users you can choose to update users with the new role changes immediately, or defer the update to run during a scheduled maintenance window.
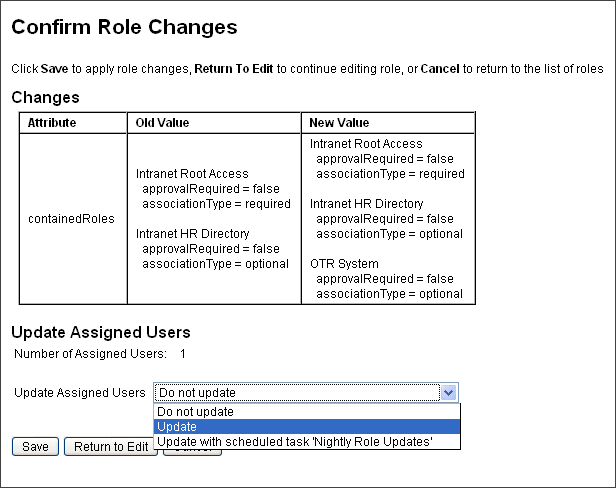
Upon making changes to a role, the Confirm Role Changes page opens. The Confirm Roles Changes page is shown in To Update Roles Assigned to Users.
-
The Update Assigned Users section of this page displays the number of users who currently have the role assigned.
-
Use the Update Assigned Users menu to select whether to immediately update users with the new role changes (Update), to defer updating users until a later time (Do not update), or to select a custom scheduled update task.
-
Because Update updates users immediately, you should avoid choosing this option if a large number of users will be affected. Updating users can be time and resource-intensive. If many users need to be updated, it is preferable to schedule the update for off-peak hours.
-
When Do not update is selected for a role, users assigned to the role will not receive role updates until an administrator views the user’s user profile or until the user is updated by the Update Role Users task. For information on scheduling the Update Role Users task, see the next section.
-
If you have created an Update Role Users task schedule, you can select it from the menu. The selected Update Role Users task will update users assigned to the role according to the schedule defined for the task. See the next section for more information.
To Update Roles Assigned to Users shows the Confirm Role Changes page. The Update Assigned Users section displays the number of users who currently have this role assigned. The Update Assigned Users drop-down menu has two default options: Do not update and Update. You can also select from a list of scheduled Update Role Users tasks. For instructions on creating scheduled Update Role Users tasks, see To Schedule an Update Role Users Task.
-
 To Manually Update Assigned Users
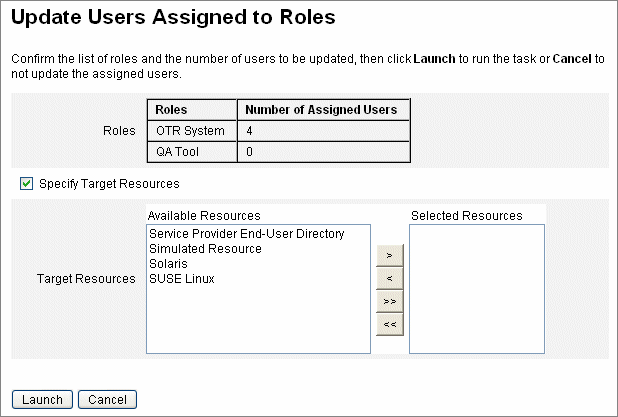
You can update users assigned to roles by selecting one or more roles and clicking the Update Assigned Users button. This procedure runs an instance of the Update Role Users Task for the roles specified.
-
Search for the role (or roles) whose assigned users should be updated by following the instructions on To Search for Roles or To View Roles.
-
Select the role (or roles) using the checkboxes.
-
Click Update Assigned Users.
The Update Users Assigned to Roles page (Figure 5–10) displays.
-
Click Launch to start the update.
-
Check the status of the Update Role Users task by clicking Server Tasks in the main menu, then click All Tasks in the secondary menu.
Figure 5–10 The Update Users Assigned to Roles Page
 To Schedule an Update Role Users Task
Note –
You should schedule an Update Role Users task to run on a regular basis.
Schedule the update Role Users task to update users with outstanding role changes as follows:
-
In the Administrator interface, click Server Tasks.
-
Click Manage Schedule in the secondary menu.
-
In the Tasks Available For Scheduling section, click on the Update Role Users TaskDefinition.
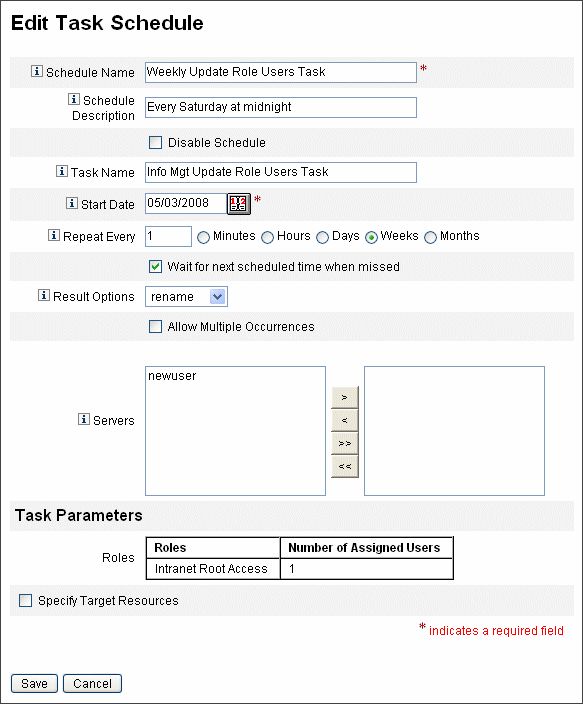
The “Create New Update Role Users Task Schedule” page opens, or, if you are editing an existing task, the “Edit Task Schedule” page opens (Figure 5–11).
-
Complete the form. For help, refer to the i-Helps and online help.
To specify a date and time when the task should run, in Start Date use the format mm/dd/yyyy hh:mm:ss. For example, to schedule a task to start running at 7:00 P.M. on September 29, 2008, type 09/29/2008 19:00:00.
In the Result Options drop-down menu, select rename. If you select wait, future instances of this task will not run until you remove the previous results. See online help for more information on the various Result Options settings.
-
Click Save to save the task.
Figure 5–11 shows the scheduled task form for the Update Role Users task. Specific roles can be assigned to specific Update Role Users tasks (as shown in the Task Parameters section.) See To Update Roles Assigned to Users for more information.
Figure 5–11 The Update Role Users Scheduled Task Form
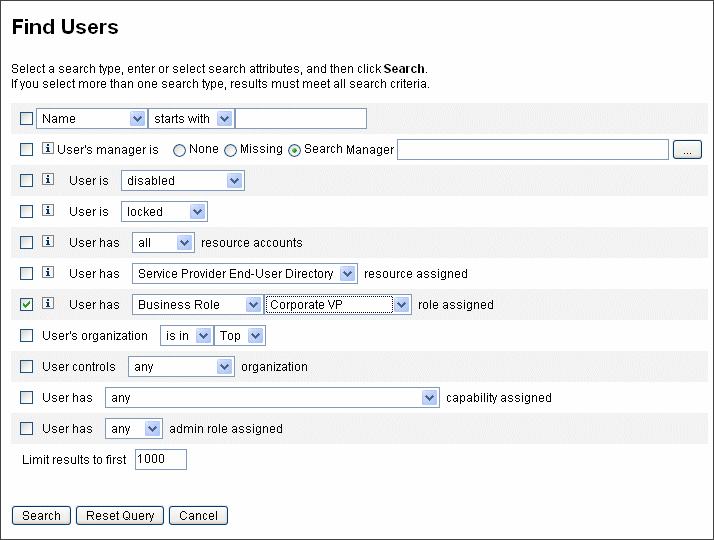
 To Find Users Assigned to a Specific Role
You can search for users who have a specific role assigned.
-
In the Administrator interface, click Accounts.
-
Click Find Users in the secondary menu. The Find Users page opens.
-
Locate the search type User has [Select Role Type] role assigned.
-
Select the option box and use the Select Role Type drop-down menu to filter the list of available roles.
A second role menu opens.
-
Select a role.
-
Clear the other search-type checkboxes, unless you want to narrow your search further.
-
Click Search.
Figure 5–12 Searching for users assigned a role using the Find Users page
 To Remove One or More Roles From a User
Using the Edit User page, one or more roles can be removed from a user account. Only a directly assigned role can be removed. Indirectly assigned roles (that is, conditional and/or required contained roles) are removed when the parent role is removed. Another way for an indirectly assigned role to be removed from a user is if the role is removed from the parent role (see To Remove a Role Assigned to Another Role).
End-users can also request that assigned roles be removed from their user accounts. See Requests Tab in the Identity Manager End-User Interface section.
For information on removing a role using a scheduled deactivation date, see To Activate and Deactivate Roles on Specific Dates.
-
In the Administrator interface, click the Accounts tab.
The List Accounts subtab opens.
-
Click the user from which you want to remove a rule (or rules).
The Edit User page opens.
-
Click the Roles tab.
-
In the table of roles, select the roles you want to remove from the user and then click OK.
To sort the table alphabetically by Name, Type, Activate On, Deactivate On, Assigned By, or Status, click the column headers. Click a second time to reverse sort. To filter the list by role type, make a selection from the Current drop-down menu.
The table shows the parent role assignments (those roles that can be selected), plus any role assignments that are connected to the parent role assignments (those roles that cannot be selected).
-
Click Remove.
The table of assigned roles updates to show the remaining assigned roles.
-
Click Save.
The Update Resource Accounts page opens. Deselect any resource accounts that you do not want removed.
-
Click Save to save your changes.
Configuring Role Types
Role Type functionality can be modified by editing the Role configuration object.
 To Configure Role Types to be Directly Assignable
to Users
By default, only certain role types can be directly assigned to users. To change these settings, use the following steps.
Note –
It is a recommended best practice that you only directly assign Business Roles to users. See Using Role Types to Design Flexible Roles for more information.
To change which role types can be directly assigned to users, follow these steps:
-
Open the Role configuration object for editing using the steps in Editing Identity Manager Configuration Objects.
-
Locate the role object that corresponds to the role type that you want to edit.
-
To edit the IT Role, locate Object name=’ITRole’
-
To edit the Application Role, locate Object name=’ApplicationRole’
-
To edit the Asset Role, locate Object name=’AssetRole’
-
-
Specify a set of instructions to update your configuration.
Depending on how you want to update your configuration, choose one of the following:
-
To modify a role type so that it can be directly assigned to a user, locate the following userAssignment attribute inside the role object:
<Attribute name=’userAssignment’>
        <Object/>
    </Attribute>
And replace it with the following:
<Attribute name=’userAssignment’> <Object> <Attribute name=’manual’ value=’true’/> </Object> </Attribute> -
To modify a role type so that it cannot be directly assigned to a user, locate the userAssignment attribute inside the role object and delete the manual attribute as follows:
<Attribute name=’userAssignment’>
        <Object>
        </Object>
    </Attribute>
-
-
Save the Role configuration object. You do not need to restart your application servers in order for the changes to take effect.
 To Enable Role Types for Assignable Activation Dates
and Deactivation Dates
By default, only Business Roles can have activate dates and deactivate dates that can be specified when roles are assigned. All other roles will inherit the activate date or deactivate date of the Business Role that is directly assigned to the user.
Note –
It is a recommended best practice that you only directly assign Business Roles to users. See Using Role Types to Design Flexible Roles for more information.
If you opt to allow another role type to be directly assignable to users (for example, the IT Role type), you may also want to be able to assign activate and deactivate dates for that role type.
Use the following steps to change which role types can have assignable activate dates and deactivate dates:
-
Open the Role configuration object for editing using the steps in Editing Identity Manager Configuration Objects.
-
Locate the role object that corresponds to the role type that you want to edit.
-
To edit the Business Role, locate Object name=’BusinessRole’
-
To edit the IT Role, locate Object name=’ITRole’
-
To edit the Application Role, locate Object name=’ApplicationRole’
-
To edit the Asset Role, locate Object name=’AssetRole’
-
-
Specify a set of instructions to update your configuration.
Depending on how you want to update your configuration, choose one of the following:
-
To modify a role type so that it can have directly assignable activate dates and deactivate dates, locate the following userAssignment attribute inside the role object:
<Attribute name=’userAssignment’>
        <Attribute name=’manual’ value=’true’/>
     </Attribute>
And replace it with the following:
<Attribute name=’userAssignment’> <Object> <Attribute name=’activateDate’ value=’true’/> <Attribute name=’deactivateDate’ value=’true’/> <Attribute name=’manual’ value=’true’/> </Object> </Attribute> -
To modify a role type so that it cannot have directly assignable activate dates and deactivate dates, locate the userAssignment attribute inside the role object and delete the activateDate and deactivateDate attributes as follows:
<Attribute name=’userAssignment’>
        <Object>
        </Object>
    </Attribute>
-
-
Save the Role configuration object. You do not need to restart your application servers in order for the changes to take effect.
 To Enable or Disable Change-Approval and Change-Notification
Work Items
By default, change-approval work items are enabled for all role types. This means that every time a role is changed (whether it is a Business Role, an IT Role, an Application, or an Asset), if the role has an owner, the owner must approve the change in order for the change to be made.
For more information on change-approval and change-notification work items, see Initiating Change-Approval and Approval Work Items.
Use the following steps to enable or disable change-approval and change-notification work items for role types, follow these steps:
-
Open the Role configuration object for editing using the steps in Editing Identity Manager Configuration Objects.
-
Locate the role object that corresponds to the role type that you want to edit.
-
To edit the Business Role, locate Object name=’BusinessRole’
-
To edit the IT Role, locate Object name=’ITRole’
-
To edit the Application Role, locate Object name=’ApplicationRole’
-
To edit the Asset Role, locate Object name=’AssetRole’
-
-
Locate the following attributes located in the <Object> element, which is located in the <Attribute name=’features’> element:
<Attribute name=’changeApproval’ value=’true’/>
 <Attribute name=’changeNotification’ value=’true’/>
-
Set the attribute values to true or false as needed.
-
If necessary, repeat steps 2 - 4 to configure another role type.
-
Save the Role configuration object. You do not need to restart your application servers in order for the changes to take effect.
 To Configure the Maximum Number of Rows that the Role
List Page Can Load
The List Roles page in the Administrator interface can display a configurable maximum number of rows. The default number is 500. Use the steps in the section to change the number.
Use the following steps to change the maximum number of rows that the List Roles page can display.
-
Open the Role configuration object for editing using the steps in Editing Identity Manager Configuration Objects.
-
Locate the following attribute and change the value:
<Attribute name=’roleListMaxRows’ value=’500’/>
-
Save the Role configuration object. You do not need to restart your application servers in order for the changes to take effect.
Synchronizing Identity Manager Roles and Resource Roles
You can synchronize Identity Manager roles with roles created natively on a resource. When synchronized, the resource is assigned, by default, to the role. This applies to roles that are created with the synchronization task, as well as existing Identity Manager roles that match one of the resource role names.
 To Synchronize an Identity Manager Role with a Resource
Role
-
In the Administrator interface, click Server Tasks in the main menu.
-
Click Run Tasks. The Available Tasks page opens.
-
Click the Synchronize Identity System Roles with Resource Roles task.
-
Complete the form. Click Help for more information.
-
Click Launch.
Understanding and Managing Identity Manager Resources
Read this section for information and procedures to help you set up Identity Manager resources.
What are Resources?
Identity Manager resources store information about how to connect to a resource or system on which accounts are created. Identity Manager resources define the relevant attributes about a resource and help specify how resource information is displayed in Identity Manager.
Identity Manager provides resources for a wide range of resource types, including:
-
Mainframe security managers
-
Databases
-
Directory services
-
Operating systems
-
Enterprise Resource Planning (ERP) systems
-
Messaging platforms
The Resources Area in the Interface
Identity Manager displays information about existing resources on the Resources page.
To access resources, select Resources on the menu bar.
Resources in the resource list are grouped by type. Each resource type is represented by a folder icon. To see currently defined resources, click the indicator next to the folder. Collapse the view by clicking the indicator again.
When you expand a resource type folder, it dynamically updates and displays the number of resource objects it contains (if it is a resource type that supports groups).
Some resources have additional objects you can manage, including the following:
-
Organizations
-
Organizational units
-
Groups
-
Roles
Select an object from the resources list, and then make selections from one of these options lists to initiate a management task:
-
Resource Actions. Perform a range of actions on resources, including edit, active synchronization, rename, and delete; as well as work with resource objects and manage resource connection.
-
Resource Object Actions. Edit, create, delete, rename, save as, and find resource objects.
-
Resource Type Actions. Edit resource policies, work with the account index, and configure managed resources.
When you create or edit a resource, Identity Manager launches the ManageResource workflow. This workflow saves the new or updated resource in the repository, and allows you to insert approvals or other actions before the resource is created or saved.
Managing the Resources List
Before you can create a new resource, you have to tell Identity Manager which resource types you want to be able to manage. To enable resources and create custom resources, use the Configure Managed Resources page.
 To Open the Configure Managed Resources Page
Use the following steps to open the Configure Managed Resources page.
-
Log in to the Administrator interface.
-
Click the Resources tab.
Use one of the following methods to open the Configure Managed Resources page:
-
Locate the Resource Type Actions drop-down list and choose Configure Managed Resources.
-
Click the Configure Types tab.
The Configure Managed Resources page opens.
This page has three sections:
-
Resource Connectors. This section lists resource connector types, the connector version, and connector server.
-
Resource Adapters. This section lists resource types that are commonly found in large enterprise environments. The version of the Identity Manager adapter that connects to the resource is listed in the Version column.
-
Custom Resource Adapters. This section is used to add custom resources to the Resources list.
-
 To Enable Resource Types
You can enable a resource type from the Configure Managed Resources page by using the following steps.
-
Open the Configure Managed Resources page if it is not already open (Managing the Resources List).
-
In the Resources section, select the box in the Managed? column for the resource type that you want to enable.
To enable all of the listed resource types, select Manage all resources.
-
Click Save at the bottom of the page.
The resource is added to the Resources list.
 To Add a Custom Resource
You can add a custom resource from the Configure Managed Resources page by using the following steps.
-
Open the Configure Managed Resources page if it is not already open (Managing the Resources List).
-
In the Custom Resources section, click Add Custom Resource to add a row to the table.
-
Enter the resource class path for the resource, or enter your custom-developed resource. For adapters provided with Identity Manager, see theSun Identity Manager 8.1 Resources Reference for the full class path.
-
Click Save to add the resource to the Resources list.
 To Create a Resource
Once a resource type is enabled, you can then create an instance of that resource in Identity Manager. To create a resource, use the Resource Wizard.
The Resource Wizard will guide you in setting up the following items:
-
Resource-specific parameters. You can modify these values from the Identity Manager interface when creating a specific instance of this resource type.
-
Account attributes. Defined in the schema map for the resource. These determine how Identity Manager user attributes map to attributes on the resource.
-
Account DN or identity template. Includes account name syntax for users, which is especially important for hierarchical namespaces.
-
Identity Manager parameters for the resource. Sets up policies, establishes resource approvers, and sets up organization access to the resource.
-
Log in to the Administrator interface.
-
Click the Resources tab. Verify that the List Resources subtab is selected.
-
Locate the Resource Type Actions drop-down list and select New Resource.
The “New Resource” page opens.
-
Select a resource type from the drop-down list. (If the resource type you are looking for is not listed, you need to enable it. See Managing the Resources List.)
-
Click New to display the Resource Wizard Welcome page.
-
Click Next to begin defining the resource.
The Resource Wizard steps and pages display in the following order:
-
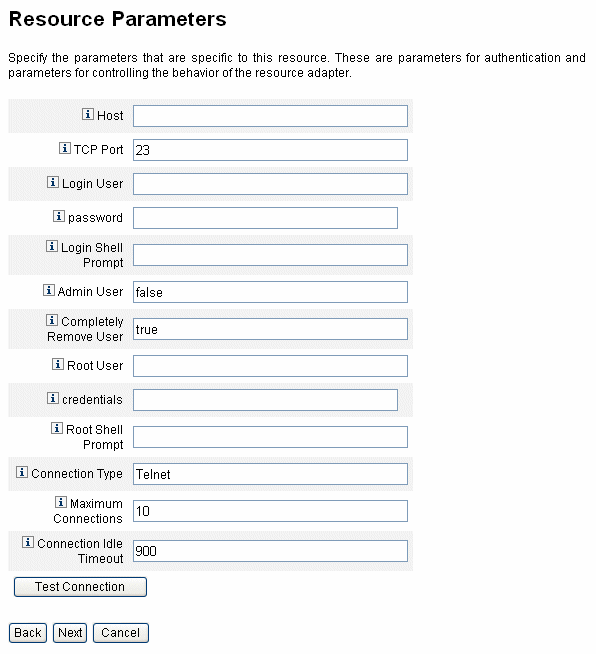
Resource Parameters. Set up resource-specific parameters that control authentication and resource adapter behavior. Enter parameters, and then click Test Connection to ensure the connection is valid. On confirmation, click Next to set up account attributes.
The following figure shows the Resource Parameters page for Solaris resources. The form fields on this page are different for different resources.
-
Account Attributes (schema map). Maps Identity Manager account attributes to resource account attributes. For more information about resource account attributes, see To View or Edit Resource Account Attributes.
-
To add an attribute, click Add Attribute.
-
To remove one or more attributes, select the boxes next to the attribute and click Remove Selected Attributes.
The next figure shows the Account Attributes page in the Resource Wizard.
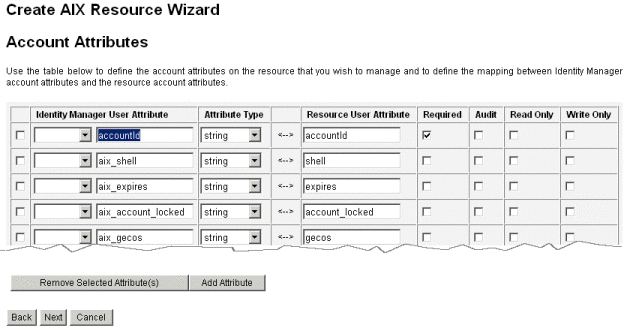
Note –If you want to export attributes to the EXT_RESOURCEACCOUNT_ACCTATTR table, you must check the Audit box for each attribute to be exported.
When you are finished, click Next to set up the Identity Template.
-
-
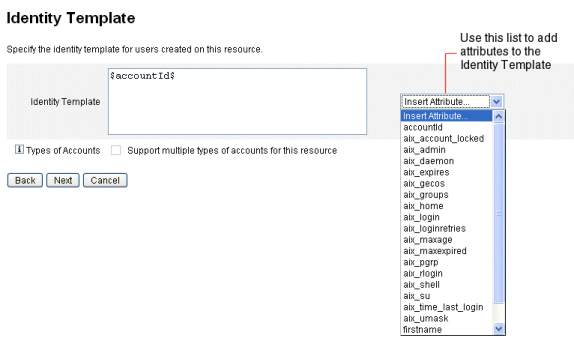
Identity Template. Defines account name syntax for users. This feature is particularly important for hierarchical namespaces.
-
To add an attribute to the template, select it from the Insert Attribute list.
-
To delete an attribute, highlight it in the string and use the delete key on your keyboard. Delete the attribute name, as well as the preceding and following $ (dollar sign) characters.
-
Type of accounts. Identity Manager provides the ability to assign multiple resource accounts to a single user. For example, a user may require an administrator-level account as well as a regular user account on a particular resource. To support multiple account types on this resource, select the Type of accounts check box.
Note –You cannot select the Type of accounts check box if you have not created one or more Identity Generation rules identified by the subtype IdentityRule. Because accountIds must be distinct, different types of accounts must generate different accountIds for a given user. Identity Generation rules specify how these unique accountIds should be created.
Sample identity rules are provided in sample/identityRules.xml.
You cannot remove an account type until it is no longer referenced by other objects within Identity Manager. Also, you cannot rename an account type.
For more information about completing the Type of accounts form, see the Identity Manageronline Help. For more information about creating multiple resource accounts for a user, see Creating Multiple Resource Accounts for a User.
-
-
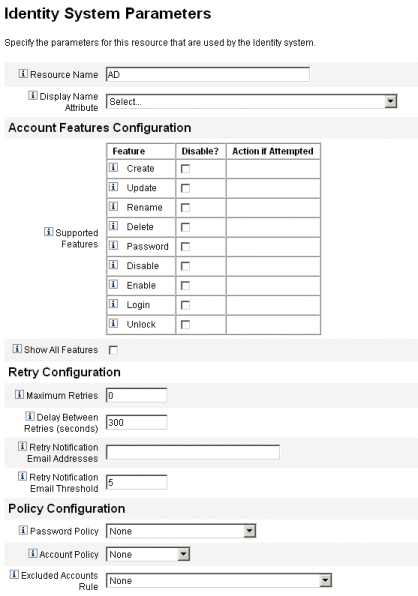
Identity System Parameters. Sets Identity Manager parameters for the resource, including retry and policy configuration, as shown in To Create a Resource.
-
-
Use Next and Back to move among the pages. When you complete all selections, click Save to save the resource and return to the list page.
Managing Resources
This section describes how to manage existing resources.
The topics are organized as follows:
 To View the Resource List
You can view existing resources from the Resource List.
-
Log into the Administrator Interface.
-
Click Resources in the main menu.
The Resource List is displayed on the List Resources subtab.
 To Edit a Resource Using the Resource Wizard
Use the Resource Wizard to edit resource parameters, account attributes, and identity system parameters. You can also specify the identity template that should be used for users created on the resource.
-
In the Identity Manager Administrator Interface, click Resources in the main menu.
The Resource List is displayed on the List Resources subtab.
-
Select the resource you want to edit.
-
In the Resource Actions drop-down menu, select Resource Wizard (under Edit).
The Resource Wizard opens in Edit mode for the selected resource.
 To Edit a Resource Using Resource List Commands
In addition to the Edit Resource Wizard, you can use the Resource List commands to perform a range of edit actions on a resource.
-
Choose one or more options from the Resource List.
These options include:
-
Delete resources. Select one or more resources, and then select Delete from the Resource Actions list. You can select resources of several types at the same time. You cannot delete a resource if any roles or resource groups are associated with it.
-
Search for resource objects. Select a resource, and then select Find Resource Object from the Resource Object Actions list to find a resource object (such as an organization, organizational unit, group, or person) by object characteristics.
-
Manage resource objects. For some resource types, you can create new objects. Select the resource, and then select Create Resource Object from the Resource Object Actions list.
-
Rename resources. Select a resource, and then select Rename from the Resource Actions list. Enter a new name in the entry box that appears, and then click Rename.
-
Clone resources. Select a resource, and then select Save As from the Resource Actions list. Enter a new name in the entry box that appears. The cloned resource appears in the resource list with the name you select.
-
Perform bulk operations on resources. Specify a list of resources and actions to apply (from CSV-formatted input) to all resources in the list. Then launch bulk operations to initiate the bulk-operation background task.
-
-
Save your changes.
 To View or Edit Resource Account Attributes
Resource account attributes (or schema maps) provide an abstract method for referring to attributes on managed resources. The schema map allows you to specify how attributes will be referred to within Identity Manager (the left side of the schema map) and how that name is mapped to the attribute name on the actual resource (the right side of the schema map). You can then refer to the Identity Manager attribute name within forms or workflow definitions and effectively reference the attribute on the resource, itself.
An example of a mapping between attributes in Identity Manager and those for an LDAP resource is as follows:
|
Identity Manager Attribute |
LDAP Resource Attribute |
|
|
firstname |
<--> |
givenName |
|
lastname |
<--> |
sn |
Any reference to the Identity Manager attribute, firstname, is actually a reference to the LDAP attribute, givenName when an action is taken upon that resource.
When managing multiple resources from Identity Manager, mapping a common Identity Manager account attribute to many resource attributes can greatly simplify resource management. For example, the Identity Manager fullname attribute can be mapped to the Active Directory resource attribute displayName. Meanwhile, on an LDAP resource, the same Identity Manager fullname attribute can be mapped to the LDAP attribute cn. As a result, an administrator only needs to provide a fullname value once. When the user is saved, the fullname value is then passed to the resources that have different attribute names.
By setting up a schema map on the Account Attributes page of the Resource Wizard, you can do the following:
-
Define attribute names and data types for attributes coming from managed resources
-
Limit resource attributes to only those that are essential for your company or organization
-
Create common Identity Manager attribute names to use with multiple resources
-
Identify required user attributes and attribute types
To view or edit resource account attributes, follow these steps:
-
In the Administrator interface, click Resources.
-
Select the resource for which you want to view or edit the account attributes.
-
In the Resource Actions list, click Edit Resource Schema.
The Edit Resource Account Attributes page opens.
The left column of the schema map (titled Identity System User Attribute) contains the names of Identity Manager account attributes that are referenced by the forms used in the Identity Manager Administrator and User interfaces. The right column of the schema map (titled Resource User Attribute) contains the names of attributes from the external source.
Resource Groups
Use the resources area to manage resource groups, which let you group resources to be updated in a specific order. By including and ordering resources in a group, and assigning the group to a user, you determine the order in which that user’s resources are created, updated, and deleted.
Activities are performed on each resource in turn. If an action fails on a resource, the remaining resources are not updated. This type of relationship is important for related resources.
For example, an Exchange Server 2007 resource relies on an existing Windows Active Directory account. This account must exist before the Exchange account can be successfully created. By creating a resource group with (in order) a Windows Active Directory resource and an Exchange Server 2007 resource, you ensure the correct sequence when creating users. Conversely, this order ensures that resources are deleted in the correct sequence when you delete users.
Select Resources, and then select List Resource Groups to display a list of currently defined resource groups. From that page, click New to define a resource group. When defining a resource group, a selection area lets you choose and then order chosen resources, as well as select the organizations to which the resource group will be available.
Global Resource Policy
This section describes how to edit the Global Resource Policy and set timeout values for a resource.
 To Edit Policy Attributes
You can edit resource policy attributes from the Edit Global Resource Policy Attributes page.
-
Open the Edit Global Resource Policy Attributes page and edit the attributes as needed.
These attributes include:
-
Default Capture Timeout. Enter a value, in milliseconds, that specifies the maximum time that the adapter should wait from the command line prompt before the adapter times out. This value applies to GenericScriptResourceAdapter or ShellScriptSourceBase adapters only. Use this setting when the results of a command or script are important and will be parsed by the adapter.
The default value for this setting is 30000 (30 seconds).
-
Default Wait for Timeout. Enter a value, in milliseconds, to specify the maximum time that a scripted adapter should wait between polls before checking to see if a command has characters (or results) ready. This value applies to GenericScriptResourceAdapter or ShellScriptSourceBase adapters only. Use this setting when the results of a command or script are not examined by the adapter.
-
Wait for Ignore Case. Enter a value, in milliseconds, to specify the maximum time the adapter should wait for the command line prompt before timing out. This value applies to GenericScriptResourceAdapter or ShellScriptSourceBase adapters only. Use this setting when the case (uppercase or lowercase) is irrelevant.
-
Resource Account Password Policy. If applicable, select a resource account password policy to apply to the selected resource. None is the default selection.
-
Excluded Resource Accounts Rule. If applicable, select a rule that governs excluded resource accounts. None is the default selection.
-
-
You must click Save to save your changes to the policy.
 To Set Additional Timeout Values
You can modify the maxWaitMilliseconds property by editing the Waveset.properties file. The maxWaitMilliseconds property controls the frequency in which an operation’s timeout will be monitored. If you do not specify this value, the system uses a default value of 50.
-
Add the following line to the Waveset.properties file:
com.waveset.adapter.ScriptedConnection.ScriptedConnection.maxwaitMilliseconds.
-
Save the file.
Bulk Resource Actions
You can perform bulk operations on resources by using a CSV-formatted file or by creating or specifying the data to apply for the operation.
Figure 5–13 shows the launch page for bulk operations using a create action.
Figure 5–13 Launch Bulk Resource Actions Page
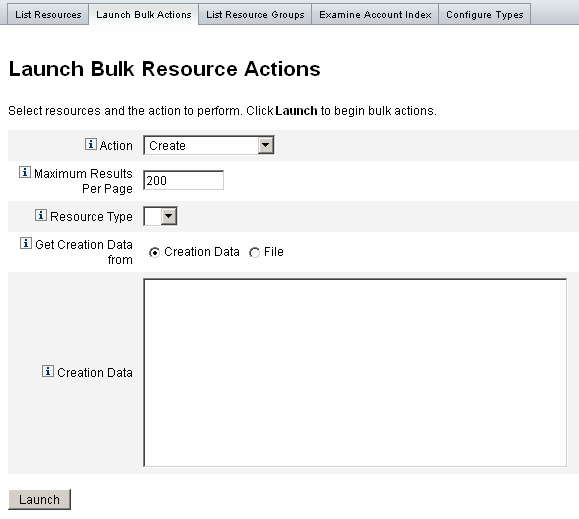
The options available for the bulk resource operation depend on the Action you select for the operation. You can specify a single action to apply to the operation or select From Action List to specify multiple actions.
-
Actions. To specify a single action, select one of the following options: create, clone, update, delete, change password, reset password.
For a single action selection, you will be presented with options to specify the resource involved with the action. For a Create action, you will specify the resource type.
If you specify From Action List, use the Get action list from area to specify either the file to use that contains the actions or the actions you specify in the Input area.
Note –The actions you enter in the input area list or in the file must be in comma-separated value (CSV) format.
-
Maximum Results Per Page. Use this option to specify the maximum number of bulk action results to display on each task results page. The default value is 200.
Click Launch to start the operation, which runs as a background task.
Understanding and Managing External Resources
You can also use Identity Manager to create, provision, and centrally manage external resources for your enterprise.
This section describes how to work with external resources, and the information is organized into the following topics:
What Are External Resources?
An external resource is a unique resource type that does not directly store user account information. Rather, it is a resource that is external to the workings of Identity Manager. These resources can be desktop computers, laptop computers, cell phones, security badges, and so forth.
Provisioning external resources almost always requires one or more manual processes. For example, after making the initial request and getting the required approvals to provision a laptop for a new employee, you might have to submit a purchase requisition request to the company's order request system. After the order is filled, someone else might have to pre-configure the laptop with corporate applications before personally delivering that laptop to the new employee to complete the provisioning request.
Why Use External Resources?
Using Identity Manager to provision external resources enables you to notify one or more provisioners about pending requests, including detailed information about what is being provisioned.
For example, an external resource provisioner might be an IT manager who needs to manually order and pre-configure a laptop for a user.
Identity Manager also maintains information about the external resources provisioned for a given user and updates that information upon completion of the provisioning request. Identity Manager then makes this information available for viewing, reporting, audit compliance validation, and exporting.
Note –
To configure external resources, you must have the External Resource Administrator capability. To create new external resources, you must have the Resource Administrator capability.
Configuring External Resources
This section describes the process for configuring the external resource data store and the external resources provisioner notification.
Configuring the External Resources Data Store
Identity Manager's external resource data store is a single data store that holds information about external resources and assignments to external resources. This data store can be a database or a directory.
-
If the external resource data store is a database, that data store is managed by the ScriptedJdbcResourceAdapter.
-
If the external resource data store is a directory, that data store is managed the LDAPResourceAdapter.
Note –
You must have the External Resource Administrator capability to configure the external resource data store.
The external resource data store allows you to store data in whatever attribute values you want and you can store those values in one or more tables.
For example, if you are using a MySQL database, Identity Manager stores external resource information in the following tables:
-
The extres.accounts table contains accountIDs and resourceIDs. Because external resource data store is a single data store, Identity Manager provides a unique ID key, <accountId>@<resourceId>, that uniquely identifies an account by its resourceID.
-
The extres.attributes table contains a collection of name/value pair attributes. You define these attributes in the schema mapping when creating an external resource.
Sample scripts used to create the database tables are co-packaged with Identity Manager in the following location:
wshome/sample/ScriptedJdbc/External |
Identity Manager supports multiple database types, and provides sample scripts for each type. You can modify these scripts as needed for your specific environment.
The external resource data store also supports LDAP using the LDAPResourceAdapter, which enables you to store data in existing or custom classes. A sample LDIF script is also co-packaged with Identity Manager in the following location:
wshome/sample/other/externalResourcePerson.ldif |
You can modify this script as part of configuring an external resources directory data store.
 To Configure a Database-Type Data Store
Although you can easily make changes, the external resource data store is typically configured only once. If you modify the configuration, Identity Manager automatically updates all existing external resources to use the newly configured data store.
Use the following steps to configure a database-type data store:
-
Select Configure -> External Resources from the menu bar in the Identity Manager Administrator interface.
-
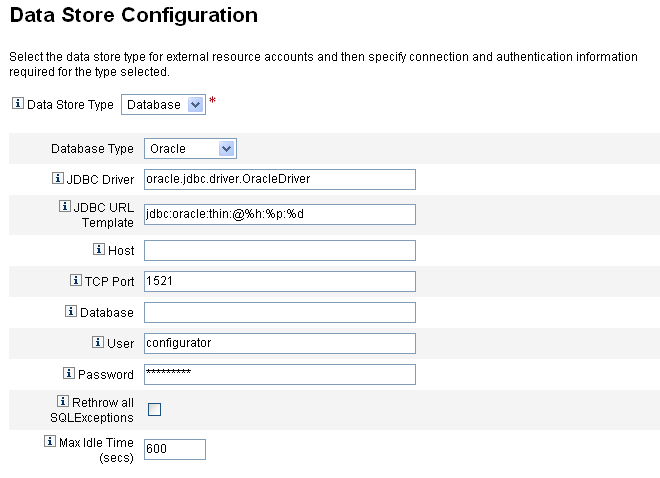
When the Data Store Configuration page displays, choose Database from the Data Store Type menu. Additional options display.
Figure 5–14 Data Store Configuration Page: Database
-
Specify the following connection and authentication information:
Note –Identity Manager automatically populates the JDBC Driver, JDBC URL template, port, and Max Idle Time (secs) fields with default values. You can change these default values if necessary.
-
JDBC Driver. Specify the JDBC Driver class name.
-
JDBC URL Template. Specify the JDBC Driver URL template.
-
Host. Enter the name of the host where you are running the database.
-
TCP Port. Enter the port number where the database is listening.
-
Database. Enter the name of the database on the database server that contains the data store table.
-
User. Enter the ID of a database user with permissions sufficient to read, update, and delete rows from the data store table. For example, root.
-
Password. Enter the database user's password.
-
Rethrow all SQLExceptions. Check this box to rethrow SQL exceptions to SQL statements if the exception error codes are 0.
If you do not enable this option, Identity Manager catches and suppresses these exceptions.
-
Max Idle Time. Specify the maximum time, in seconds, that you want JDBC connections to remain unused in a pool.
If the connection is not used before the specified time elapses, Identity Manager closes the connection and removes the connection from the pool.
-
Default value is 600 seconds
-
A -1 value prevents the connection from ever expiring
-
-
-
After successfully connecting to the data store, you must specify one or more scripts to be executed for each supported resource action. See To Configure the Action Scripts for instructions.
 To Configure the Action Scripts
You must specify a set of BeanShell (bsh) scripts that Identity Manager can use to track and execute the Get, Create, Update, Delete, Enable, Disable, and Test states of a given request.
Sample action scripts are available in
wshome/sample/ScriptedJdbc/External/beanshell |
Note –
You can modify these samples to create your own custom action scripts. Custom scripts are added to the Action Scripts selection tool, and they are displayed below the line in the Available and Selected lists.
Identity Manager provides sample scripts for the resource actions of any database types that are supported for external resources. To access these scripts, use the ResourceAction scripts provided in the following location:
wshome/sample/ScriptedJdbc/External/beanshell |
The default database name, username, and password are all extres.
-
If you choose any of the other database options or prefer using a different user name or database name, you must modify the sample database creation scripts and the ResourceAction scripts with different values.
For example, if you choose a MySQL database, but want to change the existing database name, username, and password, you must perform the following changes: You must update the create_external_tables.mysql script by changing the default database name, username, and password from extres to externalresources, externaladmin, and externalpassword respectively.
-
Next, you must change the ResourceAction scripts from the default extres.accounts and extres.attributes values to externalresources.accounts and externalresources.attributes respectively.
Use the following steps to configure the Action scripts:
-
Use the Action Scripts selection tools on the Data Store Configuration page to specify one or more action scripts for each resource action. You must select at least one script per resource action.
Figure 5–15 Action Scripts Area
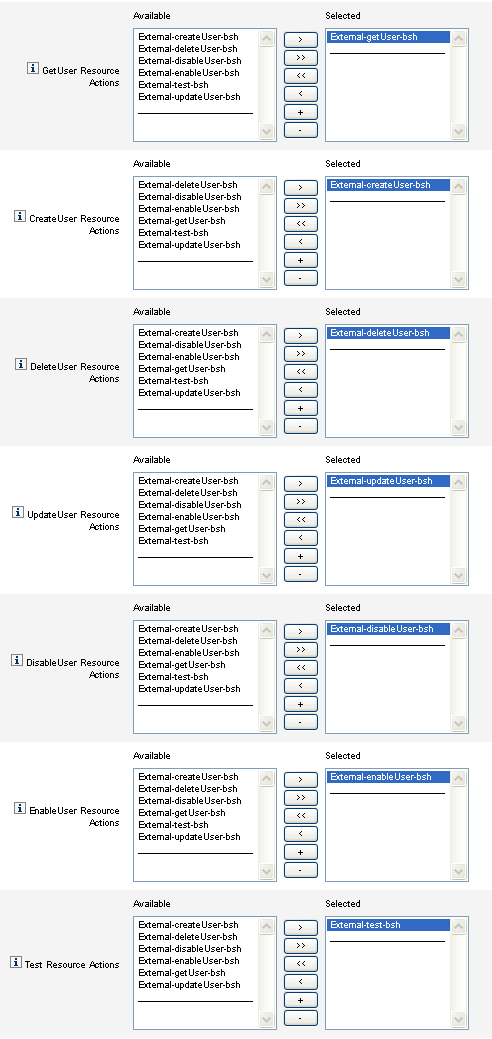
You must select the default action script that matches the resource action. For example, you must use
-
External-getUser-bsh for GetUser Resource Actions
Note –GetUser Resource Actions are used for Search operations.
-
External-createUser-bsh for CreateUser Resource Actions
-
External-deleteUser-bsh for DeleteUser Resource Actions
-
External-updateUser-bsh for UpdateUser Resource Actions
-
External-disableUser-bsh for DisableUser Resource Actions
-
External-enableUser-bsh for EnableUser Resource Actions
-
External-test-bsh for Test Resource Actions
Note –Test Resource Actions are used to enable full functionality for the Test Connection button.
Selecting any of the other bsh scripts from the sample scripts in the list will not work.
-
-
Choose an Action Context Mode from the menu to specify how attribute values will be passed to the action scripts.
-
Strings. Passes attribute values as string values.
-
Direct. Passes attribute values as a com.waveset.object.AttributeValues object.
-
-
Now is a good time to test your data store connection configuration. Click the Test Connection button, located at the bottom of the page.
A message displays to confirm that the connection is successful or to report an error with the configuration.
-
When you are finished, click Next to continue to the Provisioner Notification Configuration page.
 To Configure a Directory-Type Data Store
Use the following steps to configure a Directory-type data store.
-
Choose Directory from the Data Store Type menu. Additional options display.
Figure 5–16 Data Store Configuration Page: Directory
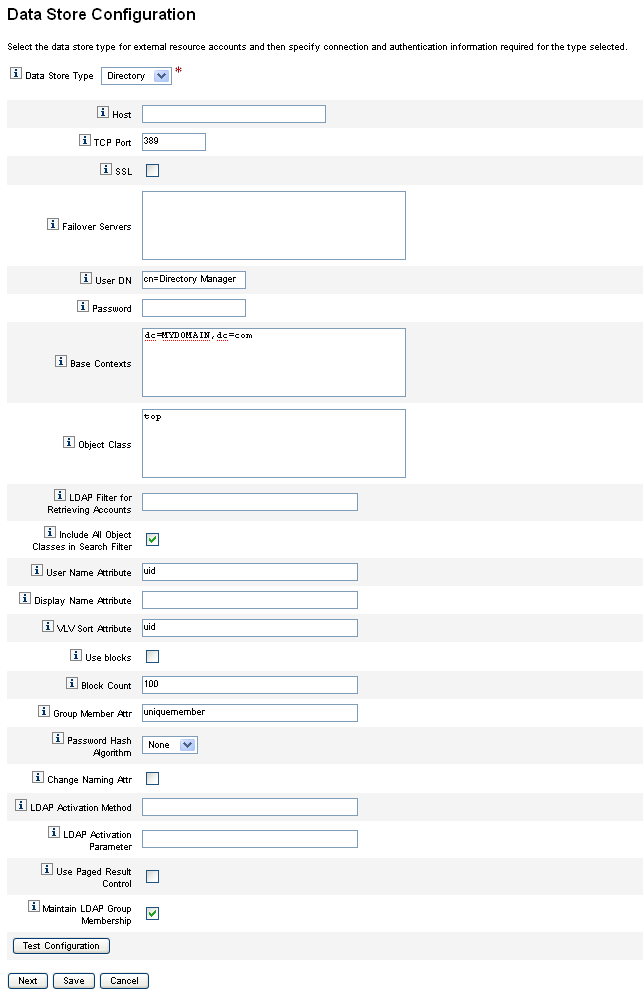
-
You must specify connection and authentication information for a Directory-type data store.
Configure the following options:
-
Host. Enter the IP address or the name of the host where the LDAP server is running.
-
TCP Port. Enter the TCP/IP port being used to communicate with the LDAP server.
-
If you are using SSL, this port is typically 636.
-
If you are using non-SSL, this port is typically 389.
-
-
SSL. Check this option to connect to the LDAP server using SSL.
-
Failover Servers. List all of the servers being used for failover if the preferred server fails. Enter this information in the following format, which follows the standard LDAP version 3 URLs described in RFC 2255:
ldap://ldap.example.com:389/o=LdapFailover
Only the host, port, and distinguished name (dn) portion of the URL are relevant in this setting.
If the preferred server fails, JNDI will automatically connect to the next server in this list.
-
User DN. Enter the dn used to authenticate to the LDAP server when making updates. (Defaults to cn=Directory Manager)
-
Password. Enter the principal's password.
-
Base Contexts. Specify one or more starting points that Identity Manager can use when searching the LDAP tree for users. (Defaults to dc=MYDOMAIN,dc=com)
Identity Manager performs searches when trying to discover users from the LDAP server or when looking for groups in which users are members.
-
Object Class. Enter one or more object classes to use when creating new user objects in the LDAP tree. (Defaults to top)
Each entry must be on a separate line. Do not use commas or spaces to separate entries.
Some LDAP servers require you to specify all of the object classes in a class hierarchy. For example, you might be required to specify top, person, organizationalperson, and inetorgperson instead of just using inetorgperson.
-
LDAP Filter for Retrieving Accounts. Enter an LDAP filter to control which accounts are returned from the LDAP resource. If you do not specify a filter, Identity Manager returns all accounts that include all of the specified object classes.
-
Include All Object Classes in Search Filter. Check this box to require all accounts to include every specified object class and to match the filter specified in the LDAP Filter for Retrieving Accounts field.
Note –You must enable this option when no search filter is specified. If you disable this option, accounts that do not include all of the specified object classes can be loaded into Identity Manager by using the reconciliation or load from resource features.
After loading, the account's objectclass attribute is not automatically updated. If an attribute on a missing object class is exposed through the Administrator interface, then providing a value for this attribute without modifying the objectclass attribute will fail. To avoid this problem, override the objectclass value in the Reconciliation or Load from Resource form.
-
User Name Attribute. Enter the name of the LDAP attribute that maps to the name of the Identity Manager user when discovering users from the directory. This name is frequently uid or cn.
-
Display Name Attribute. Enter the resource account attribute name whose value is used when displaying this account name.
-
VLV Sort Attribute. Enter the name of a sort attribute to use for VLV indexes on the resource.
-
Use blocks. Check this box to retrieve and process users in blocks.
When you are performing operations on a large number of users, processing users in blocks reduces the amount of memory used by the operation.
-
Block Count. Enter the maximum number of users to be grouped in blocks for processing.
-
Group Member Attr. Enter the name of the group member attribute to be updated with the user distinguished name (DN) when a user is added to the group.
The attribute name depends on the group's object class. For example, the Sun JavaTM System Enterprise Edition Directory Server and other LDAP servers use groups with the groupOfUniqueNames object class, and the uniqueMember attribute. Other LDAP servers use groups with the groupOfUniqueNames object class and the member attribute.
-
Password Hash Algorithm. Enter an algorithm that Identity Manager can use to hash the password. Supported values include:
-
SSHA
-
SHA
-
SMD5
-
MD5
If you specify 0 or leave this field blank, Identity Manager will not hash passwords and will store cleartext passwords in LDAP unless the LDAP server performs the hash. For example, the Sun Java System Enterprise Edition Directory Server hashes passwords.
-
-
Change Naming Attr. Check this box to allow modifications to change the user attribute representing the left-most relative distinguished name (DN). Modifications frequently change naming attributes to uid or cn.
-
LDAP Activation Method.
-
Leave this field blank if you want the resource to use password assignment for enable or disable actions.
-
Enter the nsmanageddisabledrole keyword, the nsaccountlock keyword, or the class name to use when performing an activation action for users of this resource.
-
-
LDAP Activation Parameter. Enter a value, based on how you completed the LDAP Activation Method field:
-
If you specified the nsmanageddisabledrole keyword, you must enter a value in the following format:
IDMAttribute=CN=nsmanageddisabledrole,baseContext
-
If you specified the nsaccountlock keyword, you must enter a value in the following format:
IDMAttribute=true
-
If you specified a class name, you must enter a value in the following format:
IDMAttribute
Note –For more information about the LDAP Activation Method and the LDAP Activation Parameter, see the Sun Identity Manager 8.1 Resources Reference.
-
-
Use Paged Result Control. Check this box to use LDAP Paged Results Control instead of VLV Control to iterate accounts during reconciliation.
Note –The resource must support simple paging control.
-
Maintain LDAP Group Membership. Check this box to have the adapter maintain LDAP group memberships when renaming or deleting users.
If you do not enable this option, the LDAP resource maintains the group memberships.
-
-
Test your data store connection configuration by clicking the Test Connection button.
A message displays to confirm that the connection is successful or to report an error with the configuration.
-
When you are finished, click Save and then click Next to continue to the Provisioner Notification Configuration page.
Note –You must set up valid account attributes and an identity template before you can create users on an LDAP resource.
Configuring Provisioner Notification
After configuring the data store for external resources, you must configure provisioner notifications. You can also configure requester notifications. This section describes the process for configuring notifications using email or Remedy.
 To Configure Email Notification
Note –
For more information about Email templates, see Configuring Task Templates.
Use the following instructions to configure and send email notifications to one or more provisioners:
-
From the Provisioner Notification Configuration page, select Email from the Provisioner Notification Type menu. Additional options display, as shown in the following figure.
Figure 5–17 Provisioner Notification Configuration Page: Email Notification Type
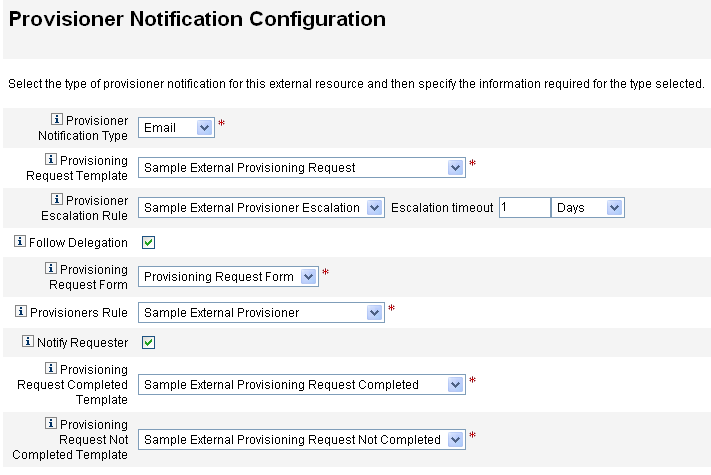
-
Configure the following options.
-
Provisioning Request Template. Choose Sample External Provisioning Request from the menu. You use this email template to configure the email used to notify provisioners of external resource requests.
-
Follow Delegation. Check this box if you want Identity Manager to follow delegations defined for the provisioner.
-
Provisioner Escalation Rule (optional). Choose a rule to determine to which provisioner a request is escalated if the current provisioner does not respond to the request before the specified timeout period.
Note –Although there are several sample rules available on this menu, you must choose the Sample External Provisioner Escalation rule or use your own custom rule. The Sample External Provisioner Escalation rule uses an External Provisioner Escalation rule to determine a provisioner for escalations.
-
Escalation timeout. Specify the maximum time to wait before escalating a provisioning request to the next provisioner.
Note –-
If you leave this field blank or enter a zero, the request never escalates.
-
If you specify a timeout, but do not select a Provisioner Escalation Rule, Identity Manager escalates the request to the Configurator when the request exceeds the specified timeout. If a Configurator does not exist, the request is classified as “not complete” once the timeout expires.
-
-
Provisioning Request Form. Choose a form that external resource provisioners can use to mark a provisioning request as completed or not completed.
-
Provisioners Rule. You must choose a rule to define the provisioner to whom provisioning requests are sent when external resources are assigned to users.
Note –-
You can write your own rules for this purpose. You can also define multiple provisioners. As any provisioner completes the task, that task is removed from all provisioner's queues. For more information about writing custom rules, see Chapter 5, Working with Rules, in Sun Identity Manager Deployment Reference.
-
Although there are several sample rules available on this menu, you must choose the Sample External Provisioner rule or use your own custom rule. The Sample External Provisioner rule makes Configurator the provisioner.
-
-
Notify Requester. Check this box to send email back to the original requester with information about what happened with the request. For example, whether the provisioning request completed or not completed, is additional information needed, and so forth.
When you enable this option, the following additional fields are displayed:
Note –-
Provisioning Request Completed Template. Choose the Sample External Provisioning Request Completed template to notify requestors when their requests are completed.
-
Provisioning Request Not Completed Template. Choose the Sample External Provisioning Request Not Completed template to notify requestors when their requests are not completed.
-
-
-
Click Save.
The Configure page displays indicating that you can go on to perform another configuration task.
-
Go to the Resources -> List Resources tab. You are now ready to create individual external resources based on this configuration. See To Create a Resource for instructions.
 To Configure Remedy Notification
Use the following instructions to create and send a Remedy ticket to provisioners:
-
Select Remedy from the Provisioner Notification Type menu. Additional options display, as shown in the following figure.
Figure 5–18 Provisioner Notification Configuration Page: Remedy Notification Type
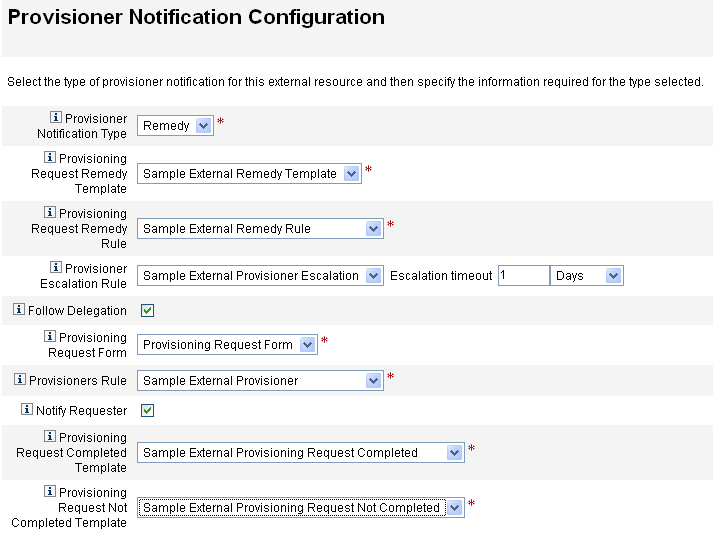
-
Configure the following options.
-
Provisioning Request Remedy Template. Choose Sample External Remedy template from the menu.
Note –Identity Manager provides a Sample Remedy Template that you can use or modify as needed.
A Remedy template contains a set of fields that are used to create a Remedy ticket. Identity Manager also uses this template to query Remedy for ticket status, to see if a task has been completed or not completed.
-
Provisioning Request Remedy Rule. You must choose a rule from this menu to define configuration settings for Remedy.
Note –Although there are several sample rules available on this menu, you must choose the Sample External Remedy Rule rule or use your own custom rule. The Sample External Remedy Rule uses a Remedy rule to determine whether the current status of a Remedy tick is completed or not completed.
A Remedy template contains a set of fields that are used to create a Remedy ticket. Identity Manager also uses this template to query Remedy for ticket status, to see if a task has been completed or not completed.
Identity Manager uses this rule to query a Remedy ticket for status information. If the ticket status is completed or not completed, Identity Manager marks the work item completed or not completed, respectively.
Note –You can write your own rules for this purpose. A sample rule, called Sample External Remedy Rule is provided for you to use or modify as needed. For more information about writing custom rules, see Chapter 5, Working with Rules, in Sun Identity Manager Deployment Reference.
-
Follow Delegation. Check this box if you want Identity Manager to follow delegations defined for the provisioner.
-
Provisioner Escalation Rule (optional). Choose a rule to determine to which provisioner a request is escalated if the current provisioner does not respond to the request before the specified timeout period.
Note –Although there are several sample rules available on this menu, you must choose the Sample External Provisioner Escalation rule or use your own custom rule. The Sample External Provisioner Escalation rule uses an External Provisioner Escalation rule to determine a provisioner for escalations.
-
Escalation timeout. Specify the maximum time to wait before escalating a provisioning request to the next provisioner.
Note –-
If you leave this field blank or enter a zero, the request never escalates.
-
If you specify a timeout, but do not select a Provisioner Escalation Rule, Identity Manager escalates the request to the Configurator when the request exceeds the specified timeout. If a Configurator does not exist, the request is classified as “not complete” once the timeout expires.
-
-
Provisioning Request Form. Choose a form that external resource provisioners can use to mark a provisioning request as completed or not completed.
-
Provisioners Rule. Choose a rule that determines one or more provisioners for this external resource request.
Note –You can write your own rules for this purpose. You can also define multiple provisioners. As any provisioner completes the task, that task is removed from all provisioner's queues. For more information about writing custom rules, see Chapter 5, Working with Rules, in Sun Identity Manager Deployment Reference.
-
Sample External Provisioner. Makes Configurator the provisioner.
-
Sample External Provisioner Escalation. Uses an External Provisioner Escalation rule to determine a provisioner for escalations.
-
Sample External Remedy Rule. Defines configurator settings for Remedy.
-
-
Notify Requester. Check this box if you want to send email to the requester when their request is completed or not completed. When you enable this option, the following additional fields are displayed:
-
Provisioning Request Completed Template. Choose the email template to use when requests are completed.
-
Provisioning Request Not Completed Template. Choose the email template to use when requests are not completed.
Note –For more information about Email templates, see Configuring the Task Templates.
-
-
-
Click Save.
The Configure page displays indicating that you can go on to perform another configuration task.
-
Go to the Resources -> List Resources tab. You are now ready to create individual external resources based on this configuration. See Creating External Resources for instructions.
Creating External Resources
After configuring the external resource data store and provisioner notifications, you can create a new external resource.
Note –
You must have the Resource Administrator capability to create new external resources.
-
From the main menu bar, select the Resources tab. The List Resources tab is displayed by default.
-
Click the Configure Types tab to open the Configure Managed Resources page.
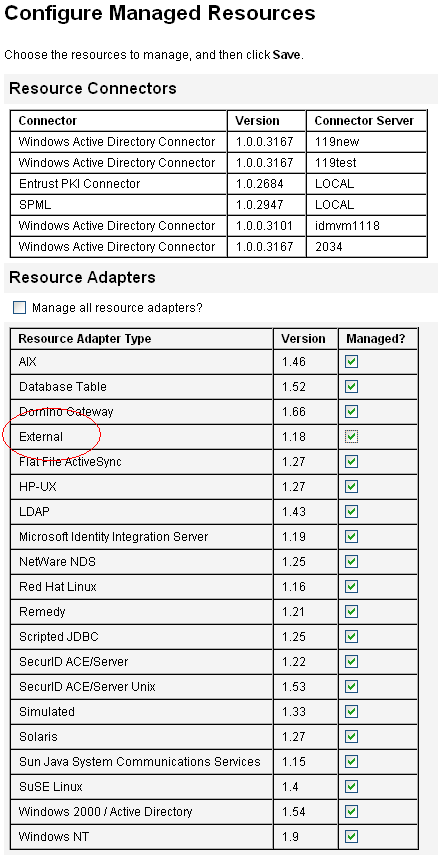
-
Review the Resource Adapters table to verify that the External resource type is available.
-
Return to the List Resources tab and choose New Resource from the Resource Type Actions menu.
-
When the New Resource page displays, choose External from the Resource Type menu, and click New.
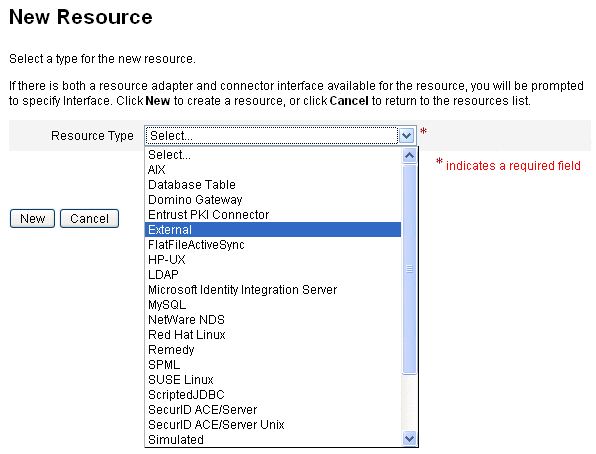
-
The Create External Resource Wizard Welcome page displays. Click Next.
A read-only view of the Data Store Configuration page displays and shows the connection and authentication information you defined earlier.
As mentioned previously, you generally configure this data store only once because the configuration applies to all external resources. If you want to change any of this information, you must go back to the Configure -> External Resources tab.
Note –You can click Test Configuration, located at the bottom of the page, if you want to retest the current data store configuration before you proceed.
-
Click Next to open the Provisioner Notification Configuration page, which is identical to the one you configured on the Configure -> External Resources tab.
-
Review the current Provisioner Notification settings and make any necessary changes for the new resource.
Note –If necessary, refer back to the configuration instructions in Configuring Provisioner Notification. Any changes made to this page will only affect this resource.
-
Click Next.
From this point, the process for creating an external resource is the same as that used to create any other resource. The Wizard takes you through several more pages:
-
Account Attributes page. Use this page to define optional account attributes for the resource and map Identity system attributes to the new resource account attributes. For example, if you are creating an external resource called “laptop,” you might want to add attributes for model and size.
Note –No defaults are specified for this page.
-
Identity Template page. Use this page to define account name syntax for users created on this external resource. You can use the default identity template, $accountId$, or specify a different template.
-
Identity System Parameters page. Use this page to configure identity system parameters for external resources. For example, you can disable policies, configure retries, or specify approvers.
See To Create a Resource for more information about these pages and for the instructions you need to finish configuring this resource.
-
-
When you finish configuring the Identity System Parameters page, click Save. Now you can assign this resource to a user, just as you would any other resource.
To create a new external resource, use the following steps:
Provisioning External Resources
This section describes the actual provisioning process, including:
 To Assign an External Resource to a User
Use these steps to assign an external resource to a user:
Note –
To assign external resources, you must have the Resource Administrator capability.
-
Click Accounts -> List Accounts and then click the user's name from the page.
-
When the Edit User page displays, click the Resources tab.
-
Locate the External resource in the Individual Resource Assignment's Available Resources list, move it to the Current Resources list, and then click Save.
Figure 5–19 Edit User Page
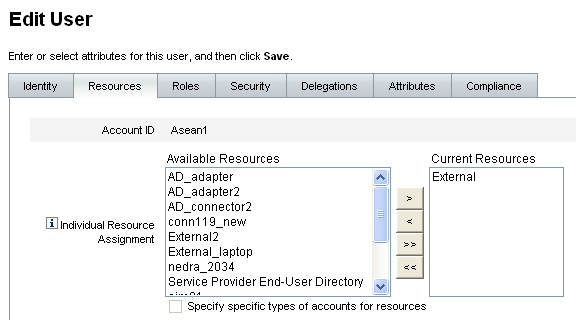
Identity Manager creates a provisioning task and sends you a message indicating who owns that provisioning task. Remember that one or more provisioners were defined, using the Provisioners Rule, when the Provisioner Notification page was configured for this resource.
Identity Manager also notifies the provisioners by using email or a Remedy ticket that they have a request pending.
Note –As with other resources, you can define approvers and they can approve or reject a request. You must define provisioners, but they do not approve or reject requests. Instead, provisioners either complete or do not complete tasks.
-
Click OK to return to the Accounts -> List Accounts page. Notice that an hourglass is displayed next to the user's name, in the work item icon, to indicate the request is pending.
 To Respond to An External Resource Provisioning Request
When a provisioning request is generated, the request suspends the provisioning process until one of the defined provisioners completes the manual provisioning or marks the request not complete, or the request times out. Identity Manager audits these provisioning responses.
As with any other work item, you can review all of your pending external resource provisioning requests from the Work Items -> Provisioning Requests tab.
You respond to provisioning requests as follows:
-
Click the Work Items > Provisioning Requests tabs to open the Awaiting Provisioning page.
Figure 5–20 Awaiting Provisioning Page
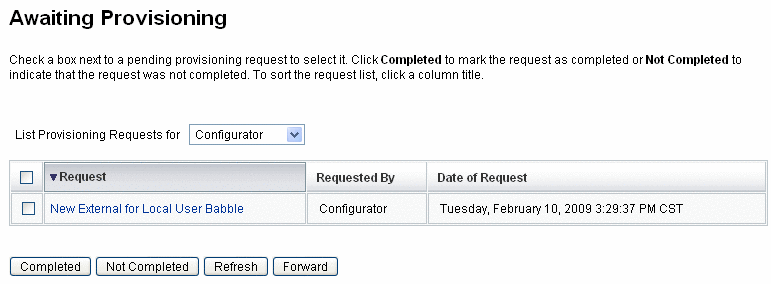
-
Locate and select the pending provisioning request.
-
Optionally, you can open your provisioning request email, click a link that is defined in the Provisioning Request Template, and log in to view a page containing details about the provisioning request.
From this page, you can update any of the requested attributes to accurately reflect what was provisioned for the user. For example, if the user requested a Sony laptop, but that model was not available, you could update the page with the model you actually provisioned.
Figure 5–21 Provisioning Request for a New Laptop
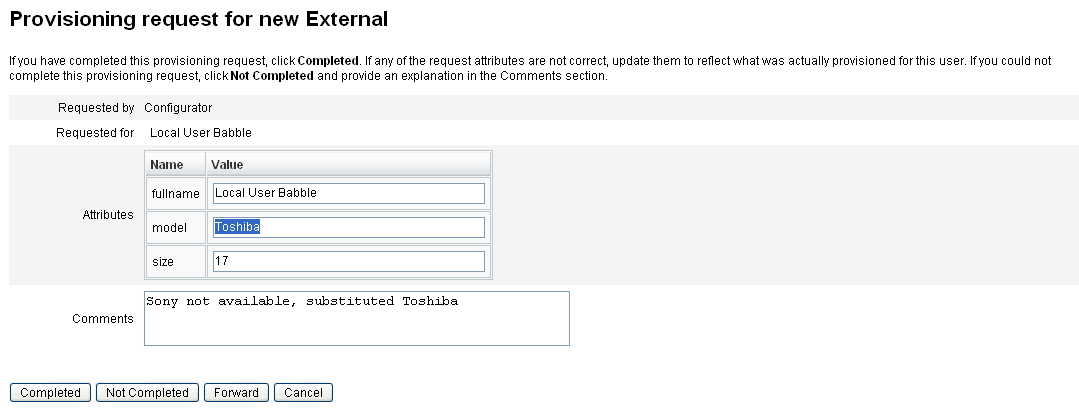
-
Click one of the following buttons to process the request:
-
If you can provision the resource, click Completed.
Identity Manager updates the user's external resource account attributes to show what was actually provisioned, removes the pending provisioning state flag, and completes the provisioning request work item being updated.
If configured, Identity Manager also notifies the requester that the provisioning request is complete by using the email template configured for that purpose.
-
If you cannot provision the resource, specify a reason why, and click Not Completed.
When you mark a request Not Completed,
-
The user is not provisioned to the external resource.
-
The external resource remains assigned to the user.
-
A yellow icon, indicating that an update is needed for the user, displays next to the user's name.
If this user is edited, an error message displays, stating that the user cannot be found in the external resource.
-
If configured, Identity Manager also notifies the requester by using the email template configured for that purpose.
-
-
If you cannot provision the resource you can also click Forward to forward the request to someone else.
When the provisioning request work item is completed or not completed, Identity Manager clears the user's assigned external resource pending state and no updates occur to the external resource data store.
The resource displays in the user's list of assigned resources and in the list of current resource accounts, including the user's accountId on that resource.
Note –If the assigned provisioner does not respond to a provisioning request before the specified timeout period, Identity Manager will cancel the associated provisioning request work item.
-
Escalating Provisioning Requests
-
If you specified a timeout period when you configured the Provisioner Notification page, and a provisioning request exceeds the timeout period, Identity Manager performs one of the following actions:
-
If you specified a Provisioner Escalation Rule, Identity Manager uses that rule to determine the next provisioner, and then escalates the request to that provisioner.
-
If you did not select a Provisioner Escalation Rule, Identity Manager escalates the request to the Configurator. If a Configurator does not exist, the request is classified as ”not complete” once the timeout expires.
-
-
If you left the Escalation timeout field blank, or entered a zero, Identity Manager never escalates the request.
Delegating Provisioning Requests
You can delegate external resource provisioning work items just like any other provisioning request. See Delegating Work Items for more information and instructions.
Unassigning and Unlinking External Resources
You can unassign or unlink external resources from a user, from the General tab as with any other resource. See Creating Users and Working with User Accounts for instructions.
Note –
Unassigning or unlinking an external resource from a user does not create a provisioning request or a work item. When you unassign or unlink an external resource, Identity Manager does not deprovision or delete the resource account, so there is nothing for you to do.
Troubleshooting External Resources
You cannot delete users who still have assigned external resources. You must first deprovision or delete those external resources before you can delete the users.
Identity Manager enables you to use the following methods for debugging and tracing external resources:
-
You can trace the External Resource adapter.
-
If you are using a data store that is a database, trace the com.waveset.adapter.ScriptedJdbcResourceAdapter and com.waveset.adapter.JdbcResourceAdapter trace class names.
-
If you are using a data store that is a directory, trace the com.waveset.adapter.LDAPResourceAdapter trace class name.
-
-
You can use workflow tracing to trace additional data flow and work flow, and use the NetBeans or Eclipse Identity Manager IDE plug-in to for debugging.
-
Because you configure and control the data store, you can use data store inspection to ensure the correct information is in that data store.
-
Identity Manager writes audit records for all activities that occur.
For more information about tracing and troubleshooting, see the Sun Identity Manager 8.1 System Administrator’s Guide.
- © 2010, Oracle Corporation and/or its affiliates
