Importing and Configuring Components in ePM
This section explains how import, create, and configure TPs, Action Groups, Transaction Profiles, and security in the AS2 PM sample scenario, using the eXchange ePM. Additionally, the section describes how to use ePM to set the configuration parameter values for the Transaction Profiles and their related components.
Note –
For detailed procedures on how to use TPs, Action Groups, Transaction Profiles, and Schedules, see the eXchange Integrator User’s Guide.
Before Using ePM
Before you begin, it is recommended that you do all the procedures given in the previous sections of this chapter. Also, your Integration Server, Repository, and Logical Host must be running. Also, your LDAP system and eXchange database (Oracle) must be running and accessible. However, Enterprise Designer does not need to be running.
Note –
For a general description of the outbound and inbound messaging ToPartner and FromPartner model used by ePM, see ToPartner and FromPartner Messaging Model .
You must do the procedures given under Running ePM to run ePM. In addition, after you run ePM, it is recommended that you do the procedures given under Importing B2B Hosts and Importing TPs.
Note –
For more detailed information on configuring ePM, see Chapter 4, Configuring AS2 PM.
Exporting the Necessary ePM Files
The ePM export files for security, B2B Hosts, and TPs are located in Project Explorer under eXchange, as follows:
-
ePMImport > AS2 > Hosts > envA_AS2.exp and envB_AS2.exp
-
epMImport > AS2 > SecurityKeys > CompanyA-Cert.der and CompanyA-Key.p12
-
ePMImport > AS2 > TP_Profiles > envA_AS2_TP_Berlin.exp and envB_AS2_TP_Atlanta.exp
For more information, see Exporting ePM Files. It is recommended that you set up a folder structure to contain these files, which reflects this organization, for example:
C:\temp\eXchange\Sample\AS2\TP_Profiles |
Note –
For more information on how to use ePM, including the ePM window and its features, see the eXchange Integrator User’s Guide.
Running ePM
This section explains how to run ePM and its user interface.
 To Run ePM
-
Start a browser session.
-
Enter the ePM URL.
This URL contains the Logical Host name and port number with epm appended, using the following syntax:
http://logical host:port + 1/epm
Where:
-
logical host: The host name or IP address of the Logical Host running your Project, that is, the current Logical Host.
-
port: The web server connector port configured in your Integration Server. To find this information, use Environment Explorer to open the current Logical Host. Right-click the Integration Server and select Properties. Open IS Configuration > Sections > Web Container > Web Server > Default Web Server. The port number is the value set for connector port. If you have several web server configurations, view them also.
For the sample scenario, use 18001 for Atlanta (envA) and 28001 for Berlin (envB).
For example, to access ePM for Atlanta in the sample scenario, use the following URL:
http://localhost:18001/epm
As stated previously, the sample must be running before you access ePM.
Note –You can only use the same port number for different ePM instances if they reside on different machines.
-
-
When the sign-in window appears, enter your Enterprise Manager user name (or the new user described under Adding a New User to ePM and Message Tracking), as well as the appropriate password, and click Sign In.
The initial ePM window appears.
The ePM Window
The ePM window allows you to access eXchange ePM features. This user interface has the following primary sections:
-
ePM Explorer
-
ePM Canvas
-
B2B Host Configuration tab
-
Trading Partner Configuration tab
For an example of this window as it first appears, see Figure 4–2.
Importing B2B Hosts
Your next step is importing the Atlanta and Berlin B2B Host files, as explained under this section.
This sample scenario has the following B2B Hosts:
-
envA_AS2: For Atlanta.
-
envB_AS2: For Berlin.
 To Import the envA B2B Host
-
Log in to ePM for envA (dmnA).
-
Click the B2B Host Configuration tab, if Host Explorer is not already displayed.
-
In Host Explorer, click and expand B2B Repository.
-
Select the B2B Host envA_AS2.
-
At the bottom of ePM Canvas, click Import.
-
When you are finished, click Save.
 To Import the envB B2B Host
-
Log in to ePM for envB (dmnB).
-
Click the B2B Host Configuration tab, if Host Explorer is not already displayed.
-
In Host Explorer, click and expand B2B Repository.
-
Select the B2B Host envB_AS2.
-
At the bottom of ePM Canvas, click Import.
-
When you are finished, click Save.
Importing TPs
Your next step is importing or creating the Atlanta and Berlin TP files, as explained under this section. Keeping track of the TPs, which company sends and receives data in a given instance, depends on which company you consider to be your current company. See ToPartner and FromPartner Messaging Model.
This sample scenario has the following TPs:
-
Berlin: For Atlanta (envA)
-
Atlanta: For Berlin (envB)
Note –Also, you can create and construct these TPs yourself, using the sample TPs as models.
This sample scenario has the following TP files (under TP_Profiles):
-
envA_AS2_TP_Berlin.exp: For Atlanta.
-
envA_AS2_TP_Atlanta.exp: For Berlin.
 To Import the Berlin TP to envA
-
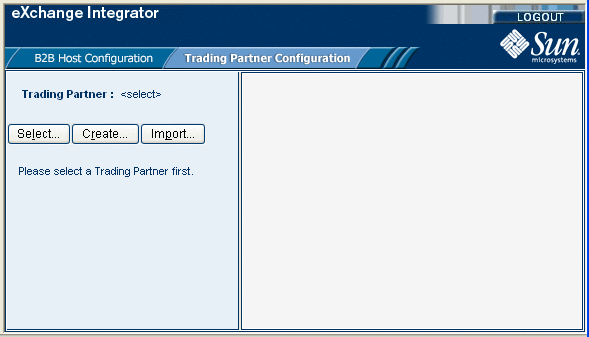
Click the Trading Partner Configuration tab.
The ePM window with this tab selected appears. See Figure 6–8.
Figure 6–8 ePM Window With Trading Partner Configuration Tab Selected
-
From this window, click Import.
The Import a Trading Partner - Step 1 of 2 window appears in ePM Canvas.
-
Name the TP Berlin.
-
Browse to the folder where you have stored your TP files and select envA_AS2_TP_Berlin.exp, then click Next.
The Import a Trading Partner - Step 2 of 2 window appears.
Note –See Exporting Sample Files for a list of the sample scenario’s data files.
-
Choose envA_AS2, from the pull-down menu.
-
Click Finish.
 To Locate the Berlin TP in the ePM Window
-
In the upper left side of the ePM window, click Select.
The Select the Trading Partner to Configure window appears in ePM Canvas.
-
Click Search on the canvas.
Any available TPs appear directly below.
-
In this case, you are looking for Berlin, which appears.
-
Click the TP name, in this case Berlin, to configure the TP.
 To Import the Atlanta TP to envB
-
Click the Trading Partner Configuration tab.
The ePM window with this tab selected appears.
-
From this window, click Import.
The Import a Trading Partner - Step 1 of 2 window appears in ePM Canvas.
-
Name the TP Atlanta.
-
Browse to the folder where you have stored your TP files and select envB_AS2_TP_Atlanta.exp, then click Next.
The Import a Trading Partner - Step 2 of 2 window appears.
-
Choose envB_AS2, from the pull-down menu.
-
Click Finish.
 To Locate the Atlanta TP in the ePM Window
Importing Keys and Certificates
Your next step is importing the Atlanta key and Berlin certificate security files, as explained under this section.
This sample scenario has the following security files:
-
CompanyA-Key.p12
-
CompanyA-Cert.der
 To Import the Key and Certificate Files
-
Log in to ePM for envA (dmnA).
-
In the Host Explorer tab, click and expand the Atlanta B2B Repository.
-
Select Private Keys in Host Explorer to import the private key file CompanyA-Key.p12 (private key for B2B Host).
Use the following parameters:
-
Alias: companya
-
Password: companya
-
-
At the bottom of ePM Canvas, click Import.
-
When you are finished, click Save.
-
In the Trading Partner Configuration tab, click and expand the Berlin TP.
-
Select Certificates in the TP Explorer to import the certificate file CompanyA-Cert.der.
Use the following parameter:
-
Alias: companya_cert
-
-
At the bottom of ePM Canvas, click Import.
-
When you are finished, click Save.
Using Action Groups and Transaction Profiles
You do the actual configuration of Action Groups and Transaction Profiles using parameters available under the following levels of the ePM Explorer tree:
-
Business protocols
-
Delivery protocols
-
Transports
AS2 PM is a delivery protocol. For more information on Action Groups and Transaction Profiles, see Using ePM: Overview. More information on delivery protocols in eXchange, as well as how to configure Transport parameters, is available in the eXchange Integrator User’s Guide.
Using Configuration Parameters in ePM
Parameters in ePM contain default values that you can accept or change. To change a default value to reflect a setting you want, enter an override value in the appropriate ePM text box.
 To Enter an Override Value for a Parameter
-
Click the check box next to the parameter you want to override, under the Override column (see Figure 6–13 for an example).
-
Enter the appropriate override in the text box for the parameter.
-
Click Save.
ePM Configuration General Operation
In the sample scenario, you import preconfigured B2B Hosts and TPs. When you are configuring your own instead of importing them (for example, if you are creating B2B Hosts and TPs from scratch), it is recommended that you use the following general order of configuration operations when setting values in ePM:
-
On the B2B Host Configuration tab, create a new B2B Host Transaction Profile.
-
Create a new Action Group (ePM here calls this a Business Action Group) for the B2B Host. Be sure to choose the correct Delivery Action and External Transport for the Action Group’s Business Actions.
-
On the Trading Partner Configuration tab, create a new TP.
-
For the new TP, select one or more Transaction Profiles from the B2B Host.
-
Choose the necessary settings (Settings tab) for each TP Transaction Profile.
-
Open any applicable Business Actions and enter appropriate overrides, as necessary.
Note –You can use the ePM for the Projects in the sample scenario as a model to complete the configuration of ePM. Enter information in ePM as shown in the sample. For more information, see After You Install and the eXchange Integrator User’s Guide.
For more information on these parameters, see Configuring AS2 PM ePM Parameters.
ePM Parameter Types
The ePM interface for AS2 PM contains the following general parameter types:
-
MADs: For details on operation, see Message Attribute Definition Parameters. These parameters are specific to AS2 PM.
-
TADs: For details on operation, see Transport Attribute Definition Parameters. These parameters are specific to AS2 PM
-
Cryptography: For details on operation, see Cryptography Settings.
-
Handler Type: For details on operation, see Handler Type Settings.
Many of the parameters under business and delivery protocol categories are the same, regardless of the PM and communication protocol you are using. However, some of these parameters are used specifically by AS2 PM and are only present for AS2 PM. For more information on parameters not described in this book, see the eXchange Integrator User’s Guide.
Screen examples of the AS2 PM-specific parameters, as they appear in ePM Canvas, are shown under the following procedures:
Note –
For this tutorial, no configuration is needed in the B2B Host Configuration tab. All further configuration occurs in the Trading Partner Configuration tab.
Configuring the TPs in the Sample Scenario
This section explains how to configure the ePM parameter settings for the Atlanta and Berlin TPs in the sample scenario.
Configuring the Atlanta TP
This section explains how to configure the ePM parameters for the Atlanta TP, ePM port No. 18001. Keep in mind that the Atlanta TP is Berlin, that is, Atlanta (envA) trades data with its partner, Berlin (envB).
 To Configure the Atlanta TP Parameters
-
In ePM Explorer, select Transaction Profiles > AS2AGProfile > Pass Through Inbound FromPartner.
-
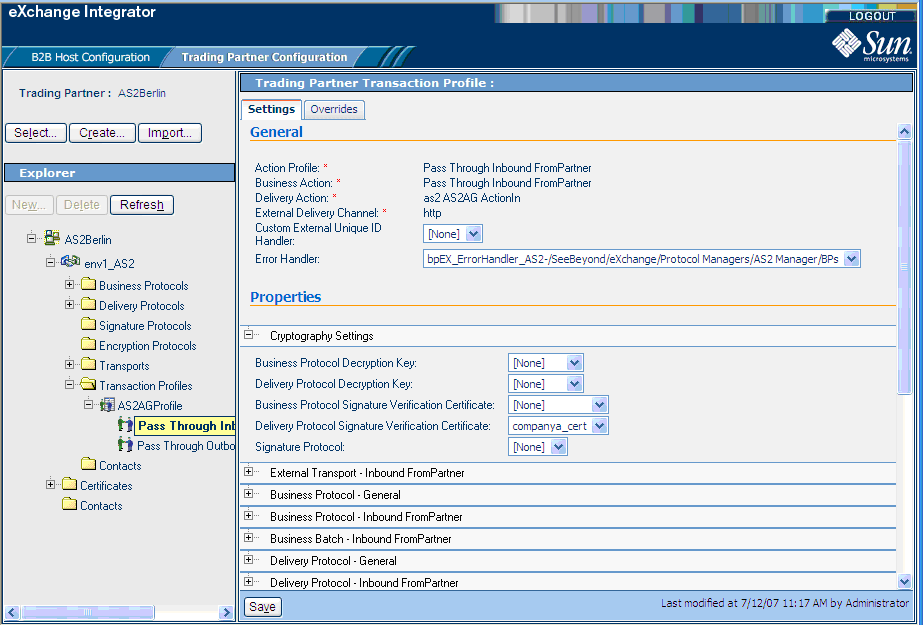
In the Settings tab under Pass Through Inbound FromPartner, configure Cryptography Settings as shown in Figure 6–9 and as follows:
-
Business Protocol Decryption Key: [None]
-
Delivery Protocol Decryption Key: [None]
-
Business Protocol Signature Verification Certificate: [None]
-
Delivery Protocol Signing Verification Certificate: companya_cert
-
Signature Protocol: [None]
For details, see Figure 6–9.
Figure 6–9 Atlanta TP Inbound Cryptography Settings
-
-
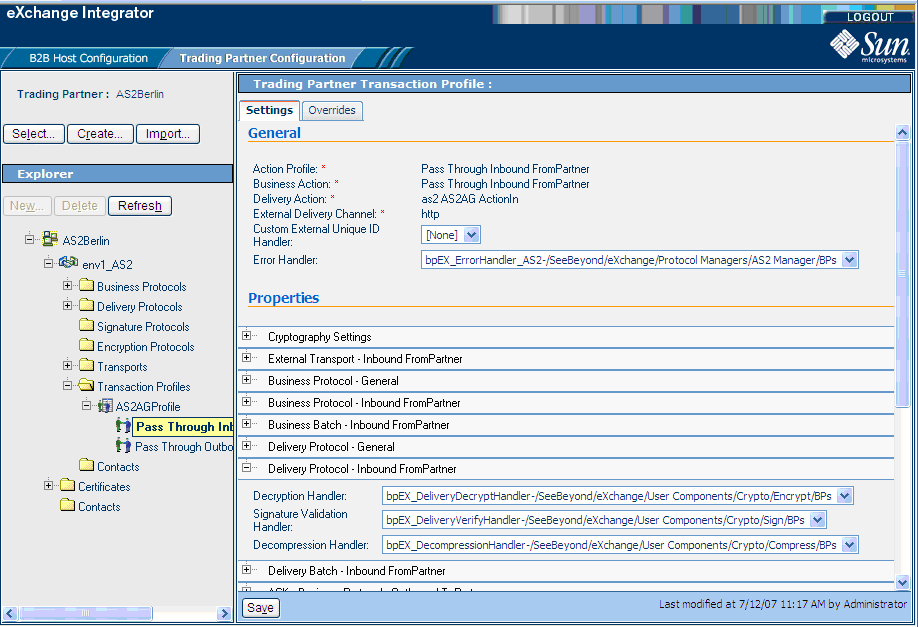
In the Settings tab, configure settings for Delivery Protocol — Inbound FromPartner settings as shown in Figure 6–10 and as follows:
-
Decryption Handler: Decryption handler BPs
-
Signature Validation Handler: Signature validation handler BPs
-
Decompression Handler: Decompression handler BPs
For details, see Figure 6–10.
Figure 6–10 Atlanta TP Delivery Protocol — Inbound FromPartner Settings
-
-
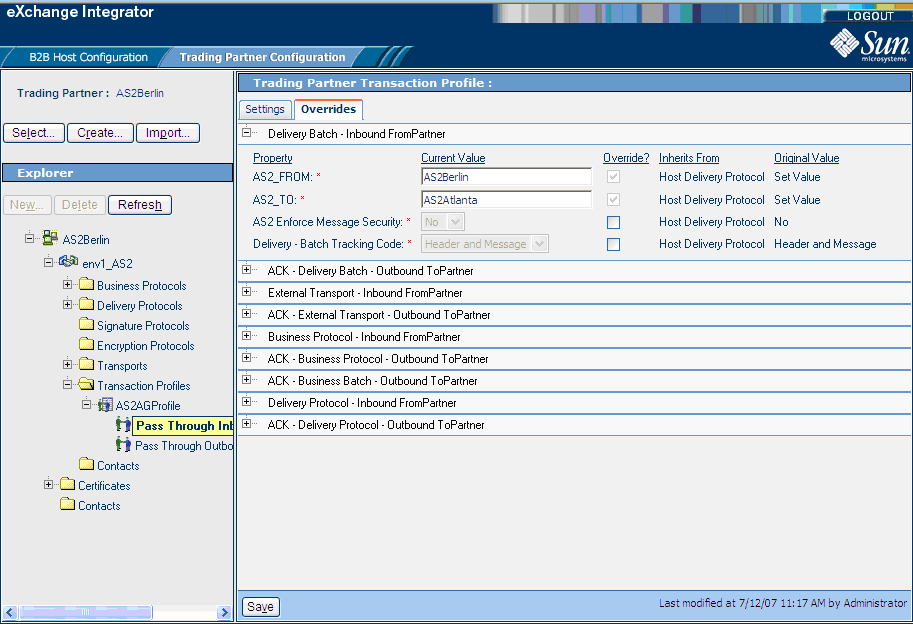
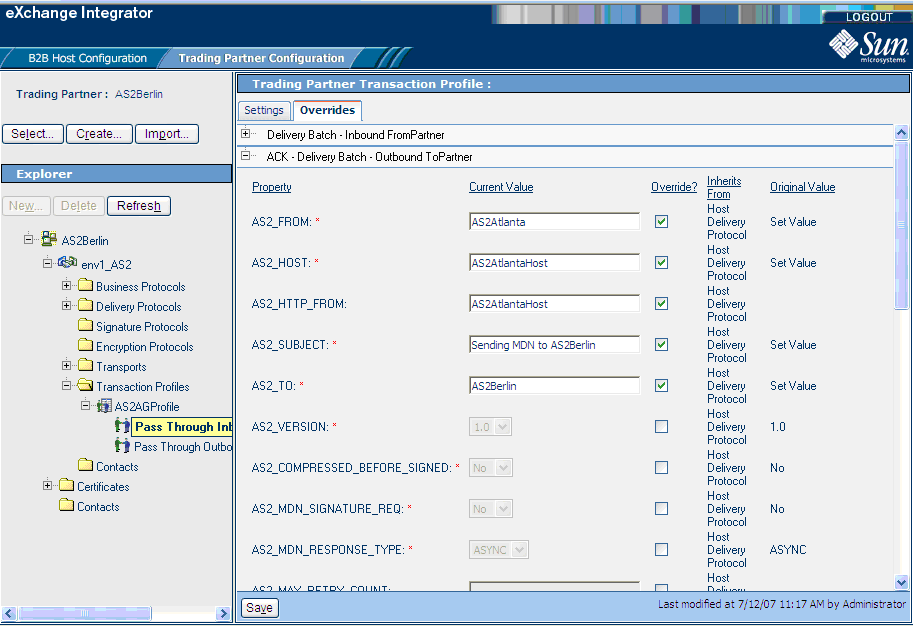
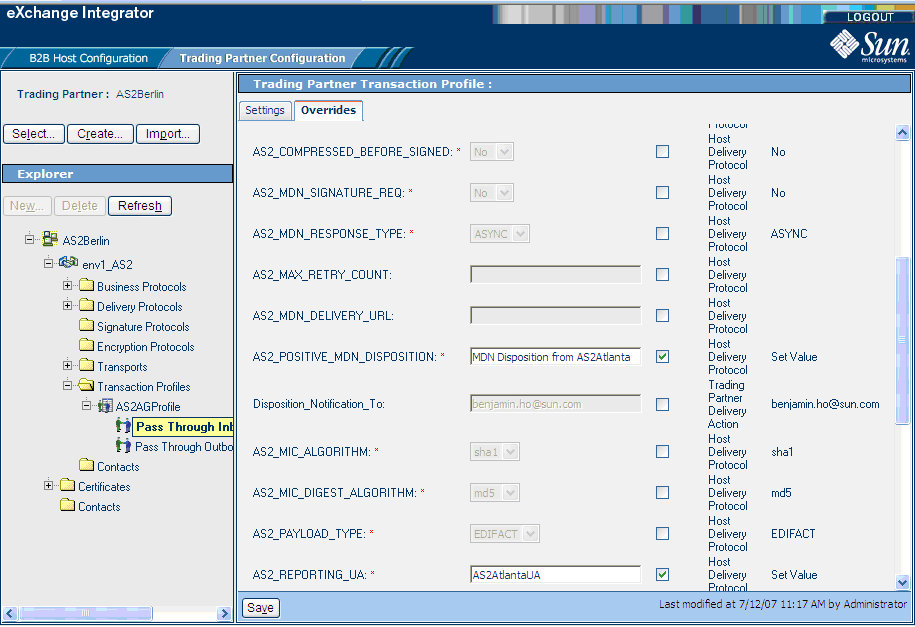
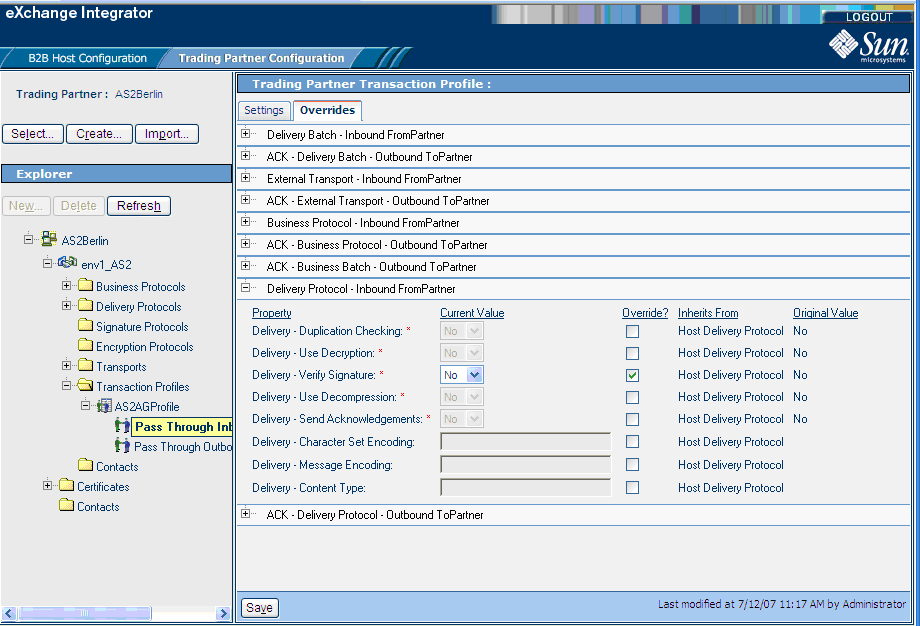
In the Overrides tab, configure inbound overrides as shown in the following figures:
-
In ePM Explorer, select Transaction Profiles > AS2AGProfile > Pass Through Outbound ToPartner.
-
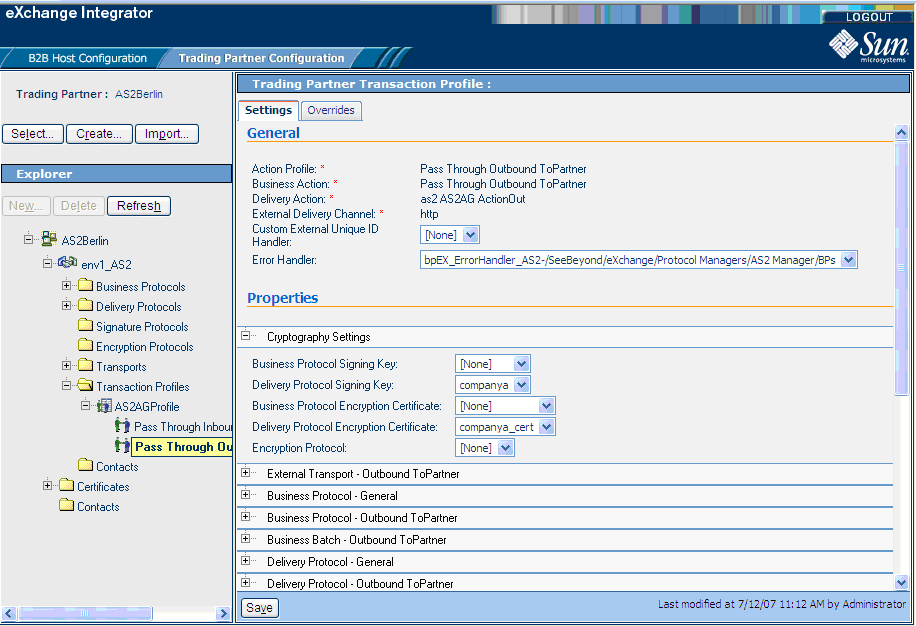
In the Settings tab under Pass Through Outbound ToPartner, configure Cryptography Settings as shown in Figure 6–11 and as follows:
-
Business Protocol Signing Key: [None]
-
Delivery Protocol Signing Key: companya
-
Business Protocol Encryption Certificate: [None]
-
Delivery Protocol Encryption Certificate: companya_cert
-
Encryption Protocol: [None]
For details, see Figure 6–11.
Figure 6–11 Outbound Atlanta TP Cryptography Settings
-
-
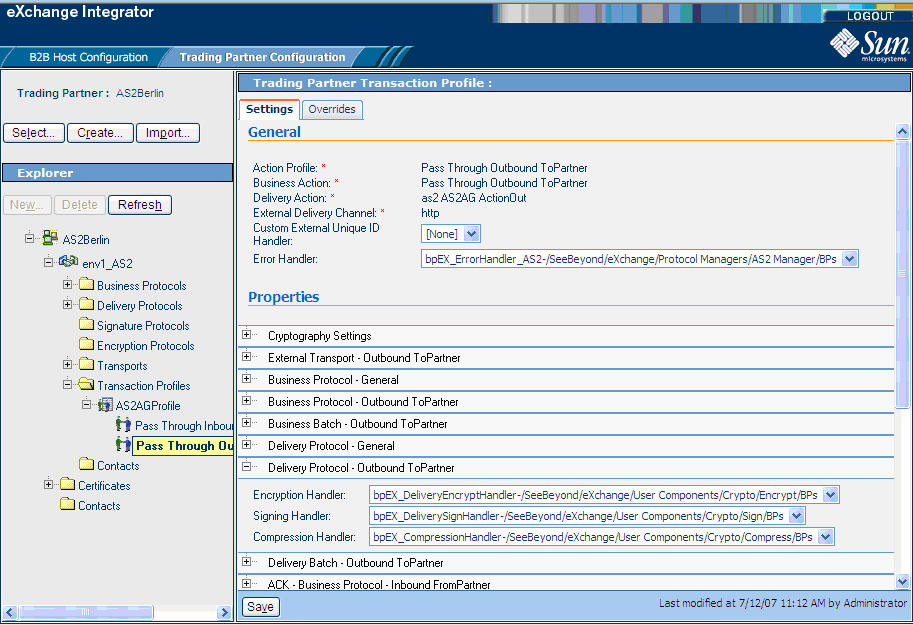
In ePM Canvas, configure Delivery Protocol — Outbound ToPartner settings as shown in Figure 6–12 and as follows:
-
Encryption Handler: Encryption handler BPs
-
Signing Handler: Signing handler BPs
-
Compression Handler: Compression handler BPs
For details, see Figure 6–12.
Figure 6–12 Atlanta TP Delivery Protocol — Outbound ToPartner Settings
-
-
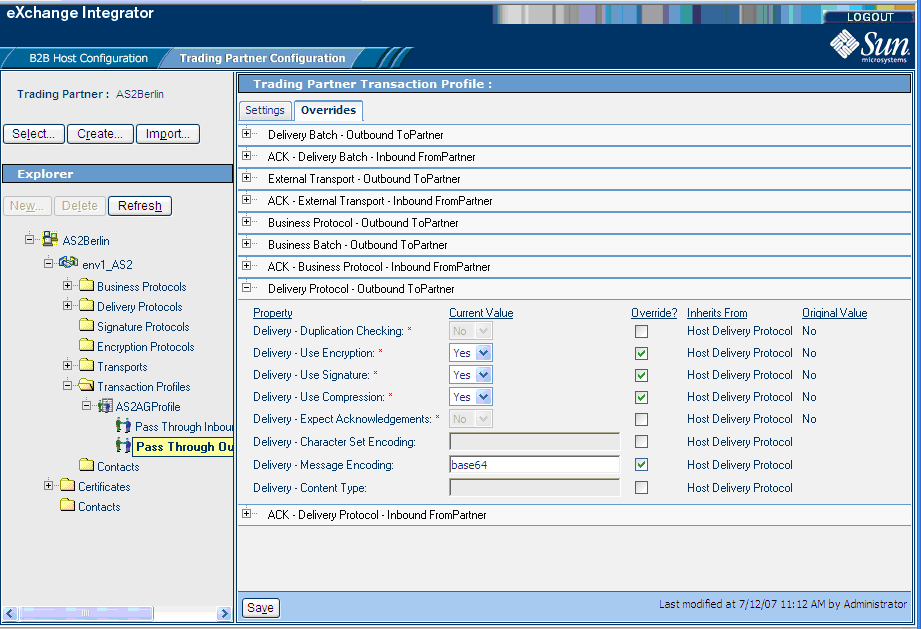
In the Overrides tab, configure TP overrides under Delivery Protocol — Outbound ToPartner as shown in Figure 6–13 and as follows:
-
Use Encryption: Yes
-
Use Signature: Yes
-
Use Compression: Yes
For details, see Figure 6–13.
Figure 6–13 Atlanta TP Delivery Protocol — Outbound ToPartner Override Settings
-
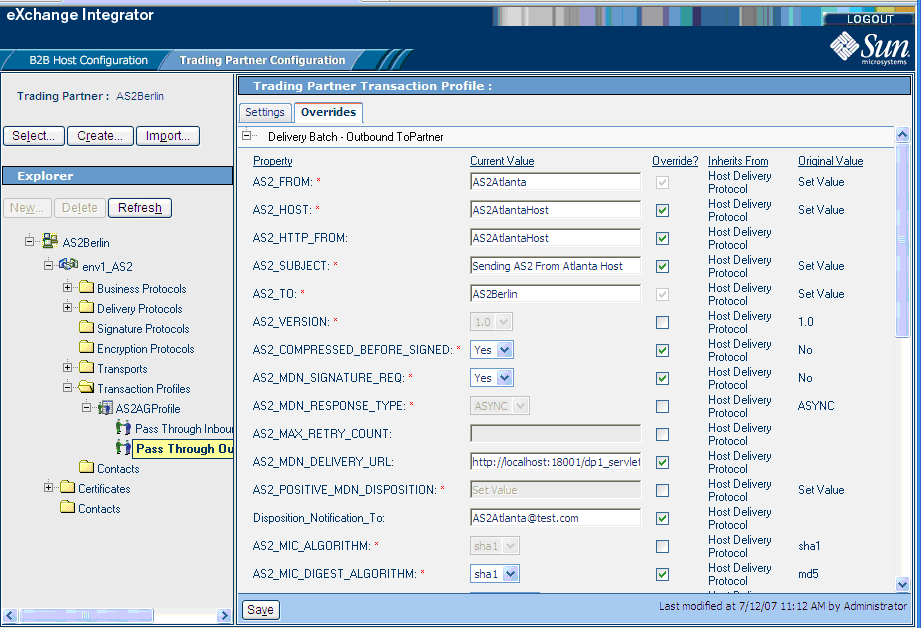
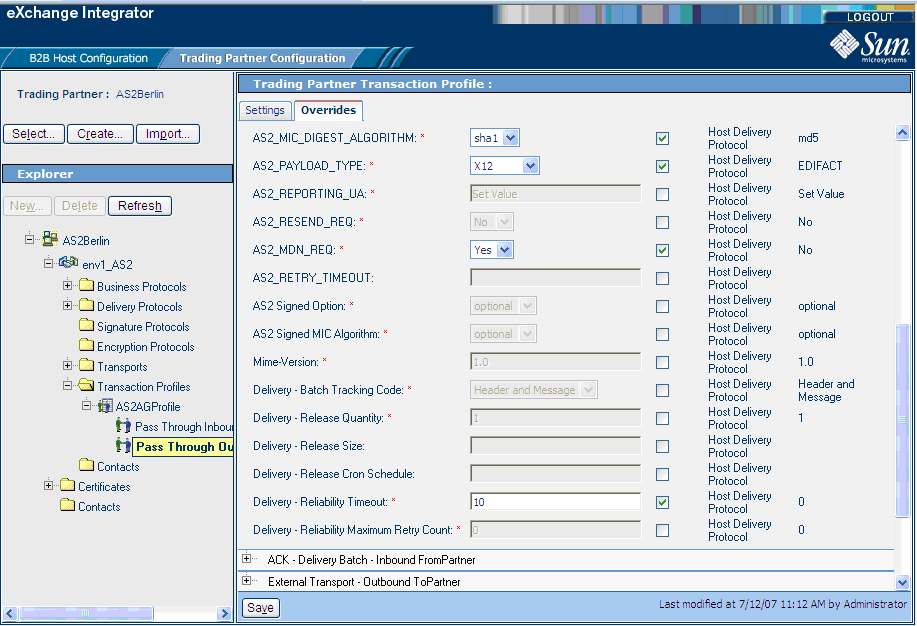
-
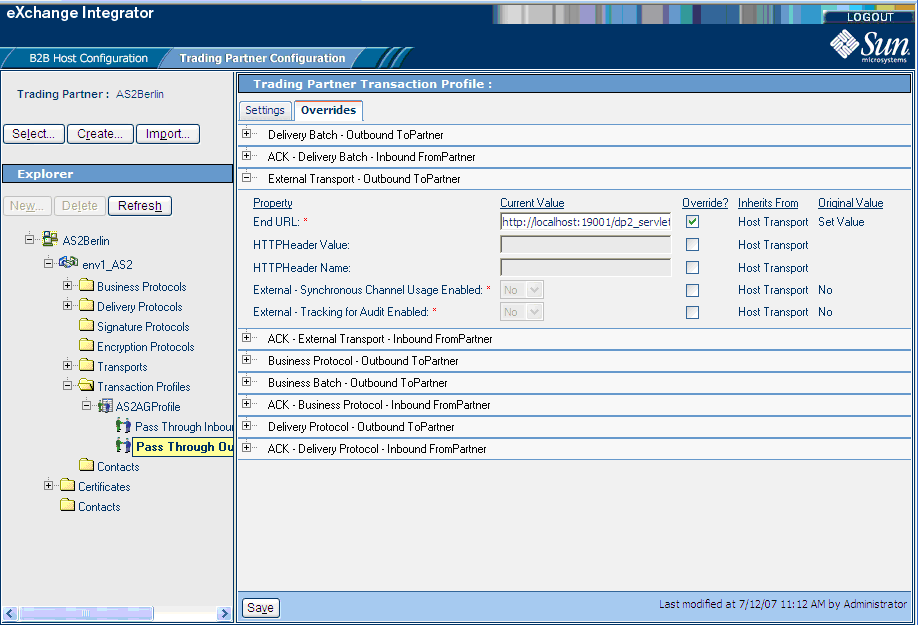
In the Overrides tab, configure additional outbound overrides as shown in the following figures:
Configuring the Berlin TP
This section explains how to configure the ePM parameters for the Berlin TP, ePM port No. 28001. Keep in mind that the Berlin TP is Atlanta, that is, Berlin (envB) trades data with its partner, Atlanta (envA).
 To Configure the Berlin TP Parameters
-
In ePM Explorer, select Transaction Profiles > AS2AGProfile > Pass Through Inbound FromPartner.
-
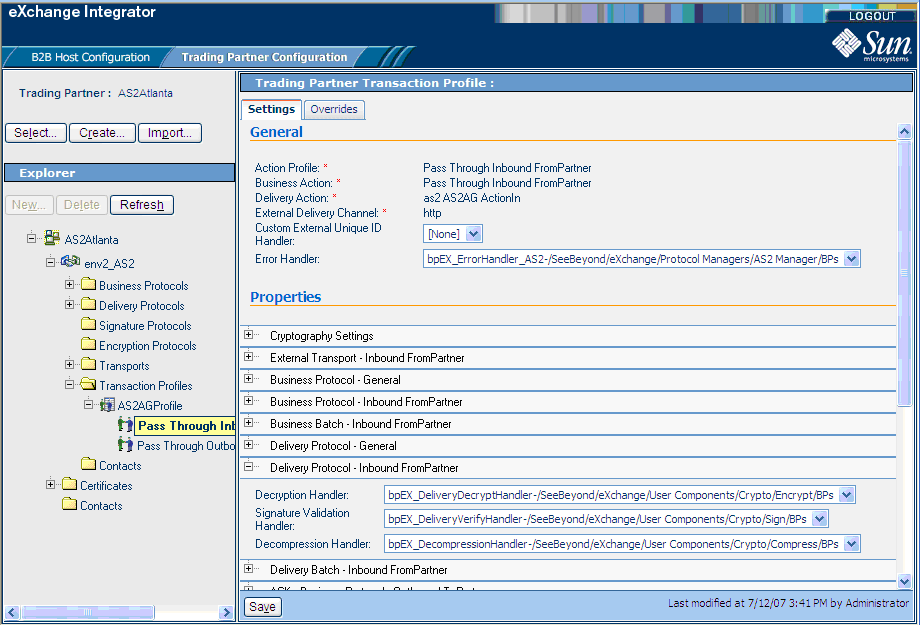
In the Settings tab under Pass Through Inbound FromPartner, configure settings for Delivery Protocol — Inbound FromPartner as shown in Figure 6–14 and as follows:
-
Decryption Handler: Decryption handler BPs
-
Signature Validation Handler: Signature validation handler BPs
-
Decompression Handler: Decompression handler BPs
For details, see Figure 6–14.
Figure 6–14 Delivery Protocol — Inbound FromPartner Settings
-
-
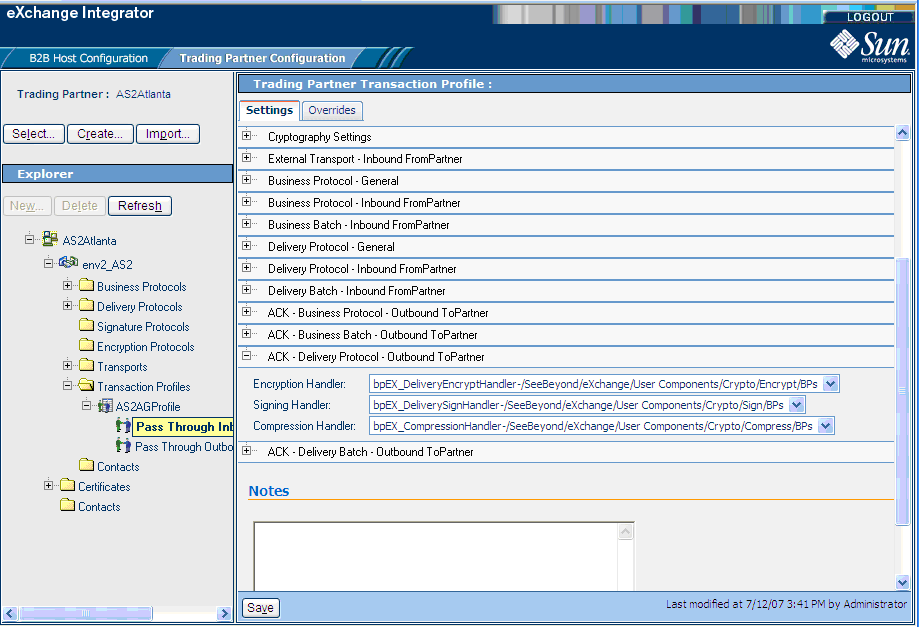
In the Settings tab, configure settings for ACK — Delivery Protocol — Outbound ToPartner as shown in Figure 6–15 and as follows:
-
Encryption Handler: Encryption handler BPs
-
Signing Handler: Signing handler BPs
-
Compression Handler: Compression handler BPs
For details, see Figure 6–15.
Figure 6–15 ACK — Delivery Protocol — Outbound ToPartner Settings
-
-
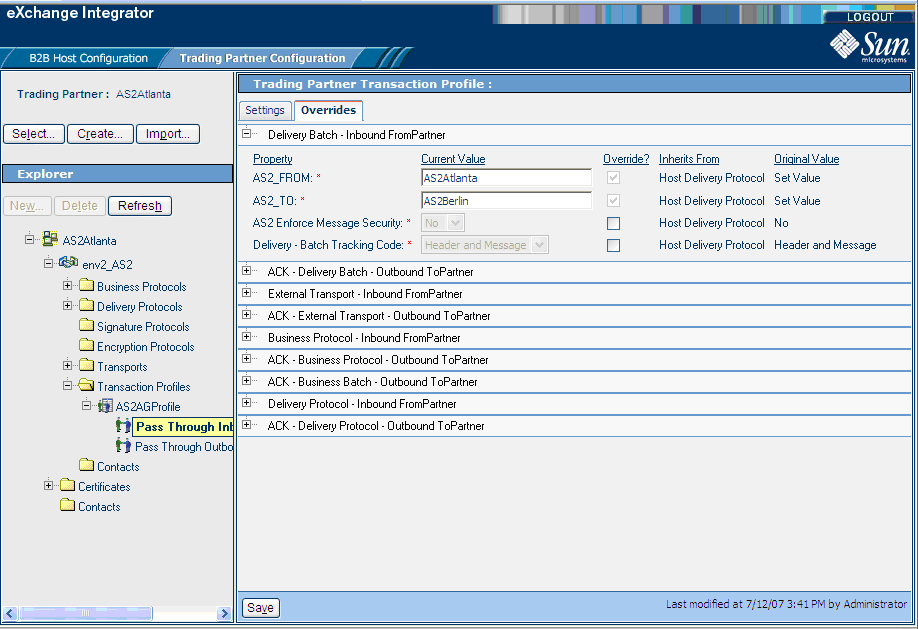
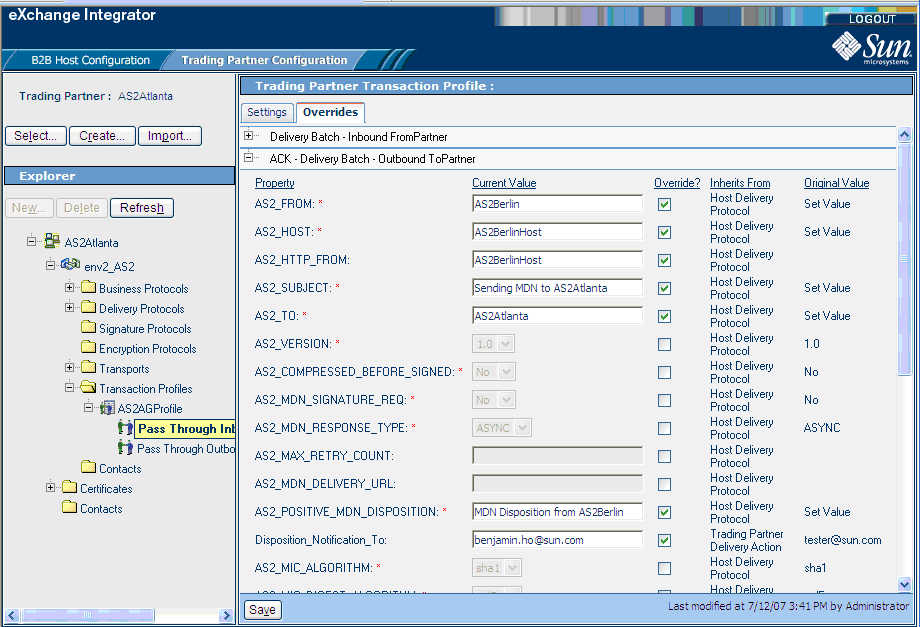
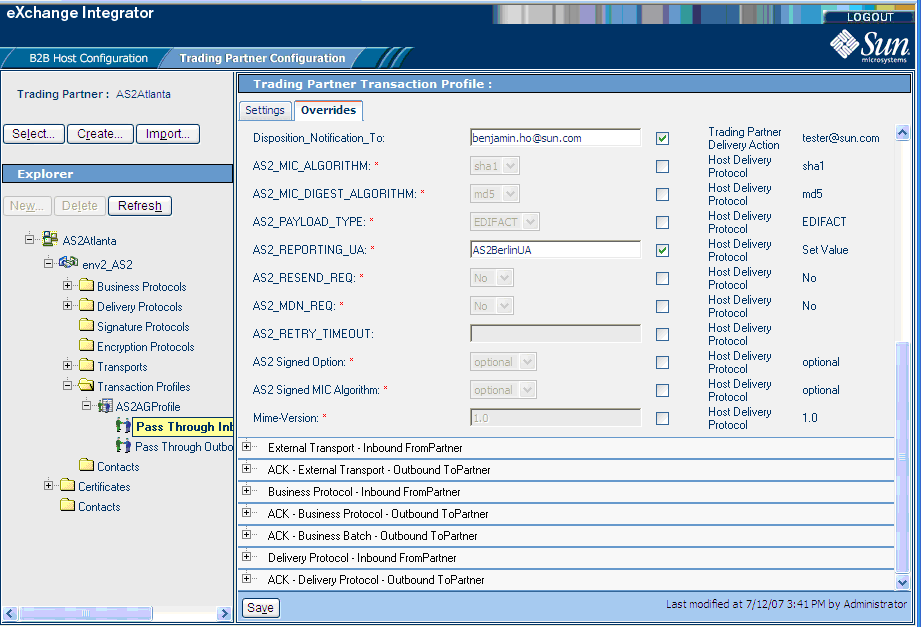
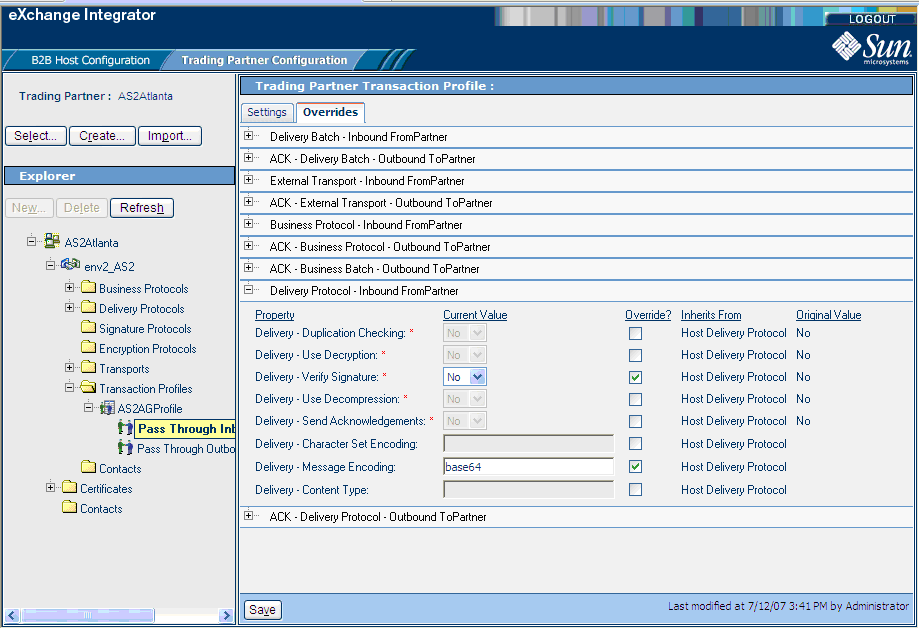
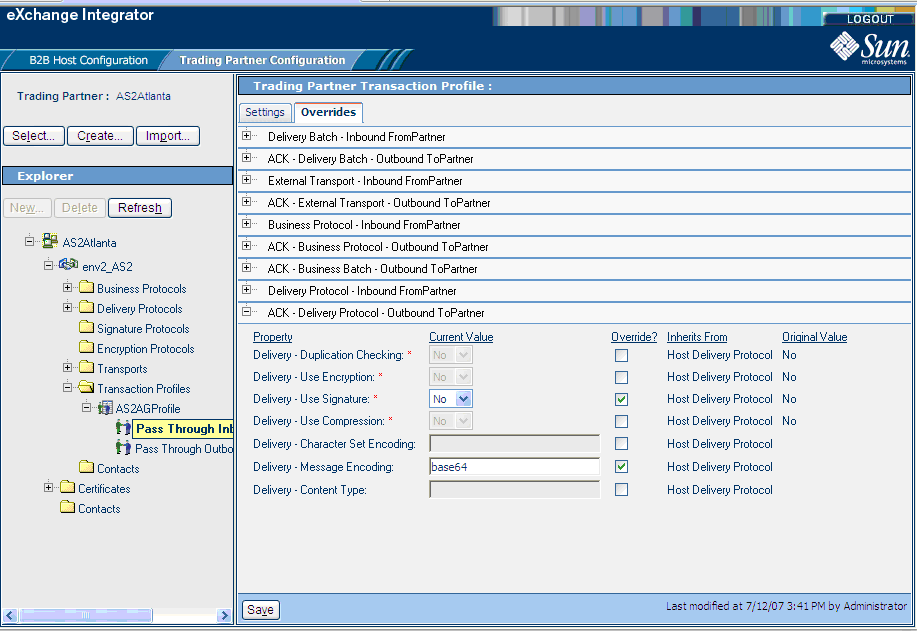
In the Overrides tab, configure inbound overrides as shown in the following figures:
-
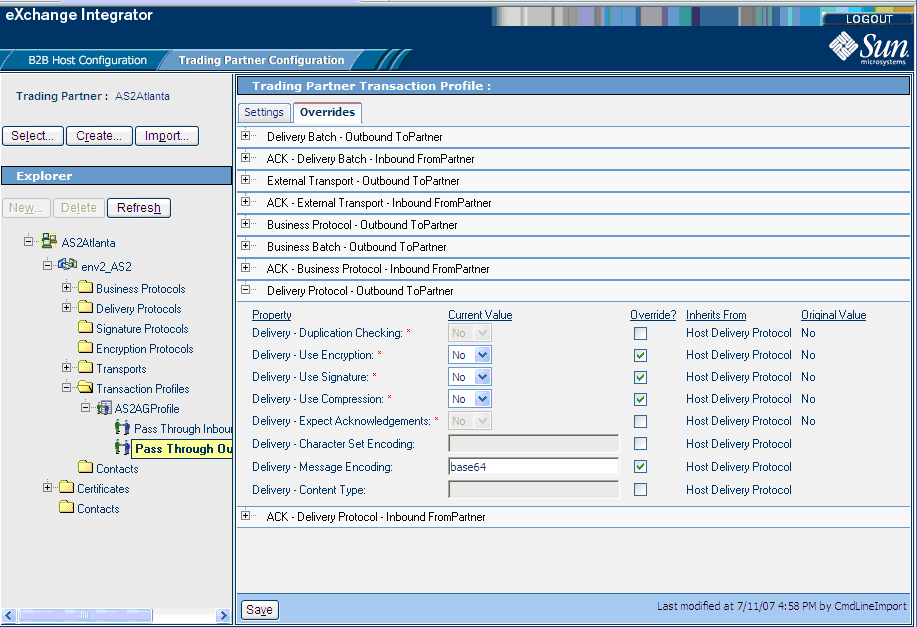
In the Overrides tab, configure TP overrides under Delivery Protocol — Outbound ToPartner as shown in Figure 6–16 and as follows:
-
Use Encryption: No
-
Use Signature: No
-
Use Compression: No
For details, see Figure 6–16.
Figure 6–16 Delivery Protocol — Outbound ToPartner Settings
-
-
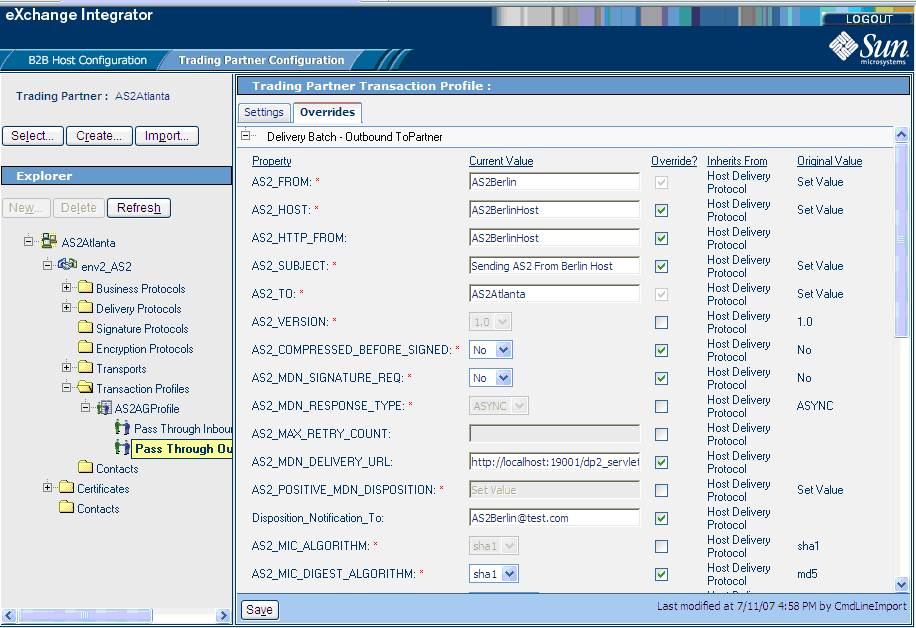
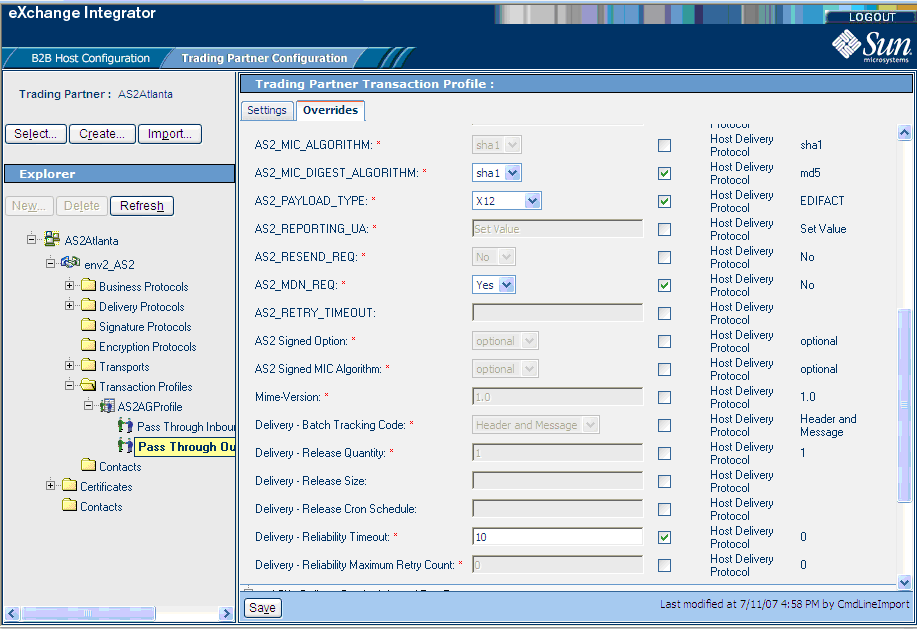
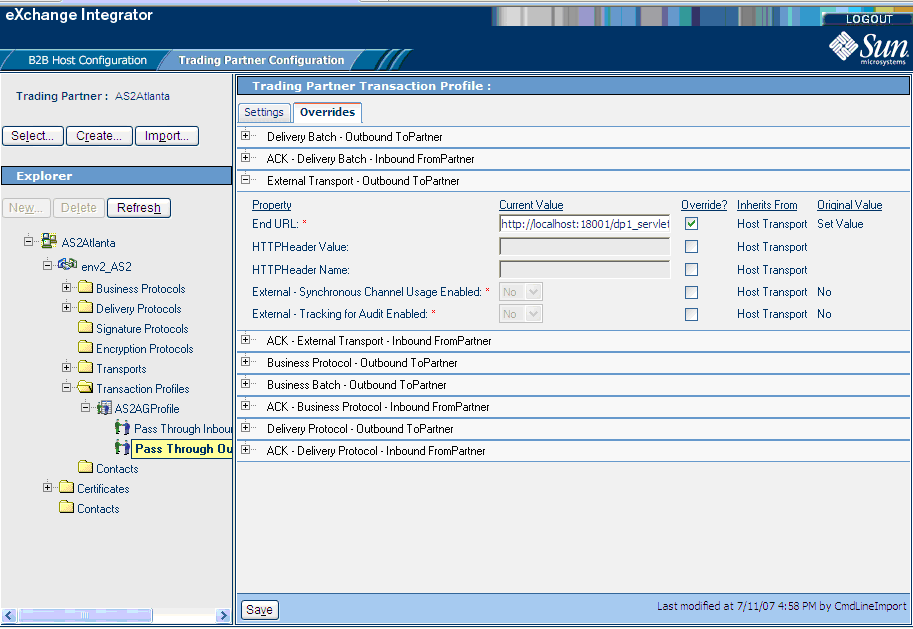
In the Overrides tab, configure additional outbound overrides as shown in the following figures:
Running the Sample
See Running the Sample Scenario for information on how to complete the passing of data between the two TPs.
- © 2010, Oracle Corporation and/or its affiliates
