Defining Task Assignment
After the BPs are created and configured, you need to connect to the LDAP server and configure the user activity. To configure a user activity, you create expressions that define which users are assigned to a task under specific conditions. You can optionally define automatic task escalation and email notifications for user activities. The task assignment panel also provides a Sun VPD page mapper so you can expose values generated by the user activity to the Sun VPD page flow.
Note –
One default expression is defined in the expression list, which cannot be deleted. This expression is used when no conditions defined for any other expression evaluate to true. At a minimum, you must configure the default expression by assigning a user to the expression; otherwise, BP validation will find a fatal error and you will be unable to deploy.
Creating a Task Assignment Expression
The flow of a specific task is defined by an expression. You can define multiple expressions for each user activity, each defining the conditions under which a task is assigned, the users to whom it is assigned, and what happens once the task is assigned.
 To create a task assignment expression
-
In the main BP, right-click the user activity to which you want to assign LDAP users, and then click Edit Task Assignment Panel.
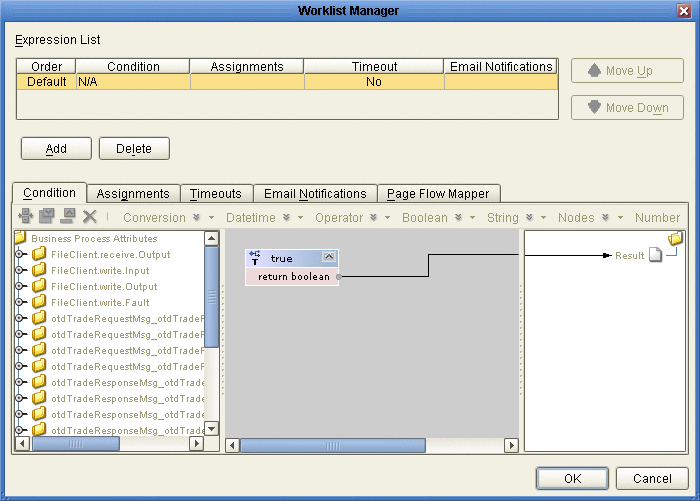
The Worklist Manager window appears, as shown in Figure 7.
Figure 7 Worklist Manager Window: Expression List
-
In the upper section of the window, click Add.
A new expression appears in the expressions list.
-
If necessary, use the Move Up and Move Down buttons to place the expression in the correct order.
-
Configure the expression as described in the following sections.
Defining Task Assignment Conditions
Conditions define how an activity is evaluated for user completion. The Conditions tab of the Worklist Manager window includes a Method Palette, similar to that of the Business Rule Designer. This step is required for all but the default expression.
 To define task assignment conditions
-
On the Worklist Manager window, click the Condition tab.
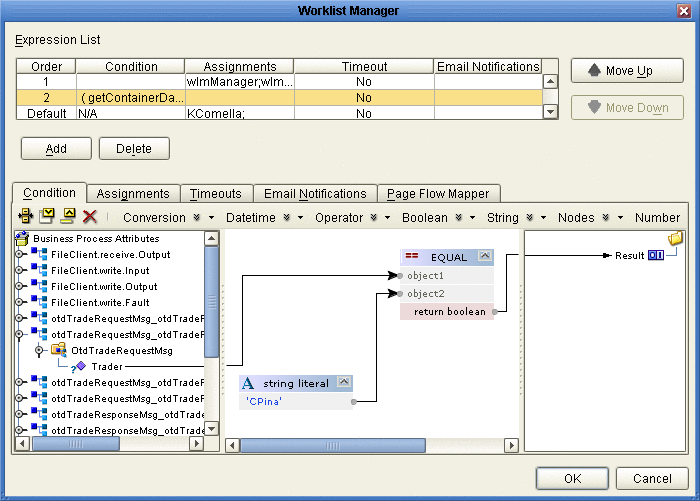
The Condition page appears, as shown in Figure 8.
-
Define the conditions under which a task will be assigned.
Figure 8 illustrates an example of using methods on the Condition page.
Figure 8 Worklist Manager Window: Condition Tab
-
Once the conditions are defined, continue to Assigning Users to the Activity.
Assigning Users to the Activity
In this step, you can create either static or dynamic assignments for the user activity. With static assignments, you specify the users to whom tasks will be assigned when the conditions you defined on the Condition page have been met. To do this, you must connect to a running LDAP server. With dynamic assignments, you specify a field in the incoming data that contains the name of the user to whom that task is assigned. You do not need to connect to the LDAP server to create this assignment. This step is required for all expressions. If a user activity includes an expression with no users assigned, the BP will fail validation.
 To assign users to an activity
-
On the Worklist Manager window, click the Assignments tab.
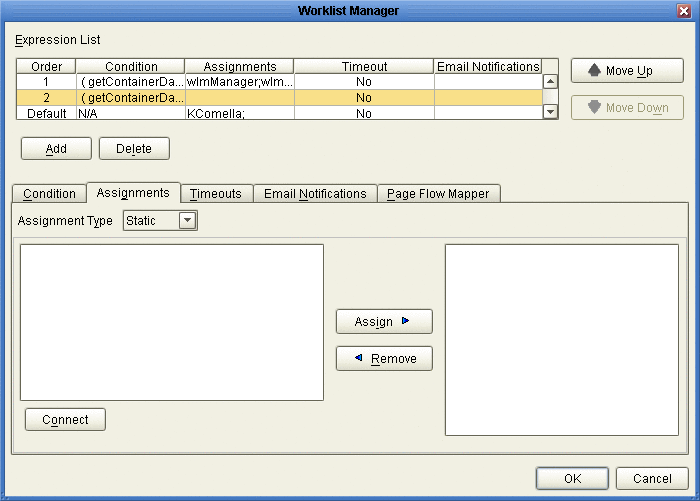
The Assignments page appears, as shown in Figure 9.
Figure 9 Worklist Manager Window: Static Assignments
-
To create static assignments, do the following:
-
On the Assignments page, make sure the Assignment Type is Static, and then click Connect.
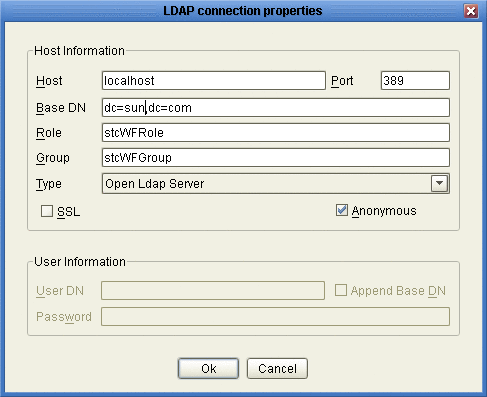
The LDAP connection properties dialog box appears.
Figure 10 LDAP connection properties Dialog Box
-
Enter the values in Figure 10, and then click OK.
The left panel of the Assignments page is populated with the roles, groups, and users defined in your LDAP directory.
-
From the list in the left panel , select the roles, groups, or users you want to include for this task assignment, and then click Assign.
-
To create dynamic assignments, do the following:
-
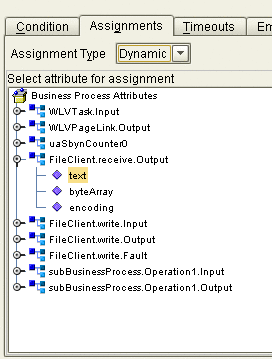
In the Assignment Type field, select Dynamic.
The Assignments page changes to display attributes, as shown in Figure 11.
Figure 11 Worklist Manager Window: Dynamic Assignments
-
In the attributes list, expand the list and select the field that will contain the name of the user to whom a task will be assigned.
-
-
Continue to Defining Task Escalation, or click OK if you are done defining the expression.
Note –Modify the properties to suit your LDAP implementation.
Description
The name of the computer on which the LDAP server resides.
The port number on which the LDAP server listens for requests.
The root Distinguished Name of the users directory; for example, dc=sun,dc=com.
The name of the role to which Worklist Manager users are assigned, if any. This field is not required.
The name of the group to which Worklist Manager users are assigned, if any. This field is not required.
The type of LDAP server you are using.
An indicator of whether to encrypt data shared between the LDAP server and the Repository. Select this option if SSL is configured.
An indicator of whether to create an anonymous bind to the LDAP server or to use specific login credentials. If you deselect this check box, the fields below become enabled.
The distinguished name of the user to use to connect to the directory server.
An indicator of whether to append the value of Base DN to the User DN for authentication.
The password associated with the User DN above.
Defining Task Escalation
The Worklist Manager provides the ability to automatically escalate tasks based on either a duration of time or a deadline. When escalation is based on duration, the task can be escalated repeatedly. When it is based on a deadline, the task is only escalated once.
For duration-based escalation, the timer starts when a task is added and when a user checks in, reassigns, or escalates a task. If the specified duration passes without the timer stopping, the task is escalated to all unique managers of the assignee. The timer stops when a task is checked out or completed and when the task has been escalated as high as it can go.
For deadline-based escalation, the timer starts when a task is inserted. The task is only escalated if the timer does not stop prior to the deadline. The timer stops when a task is checked out, completed, or manually escalated. The timer also stops when the deadline is reached and the task is escalated.
Defining task escalation is optional.
 To define task escalation
-
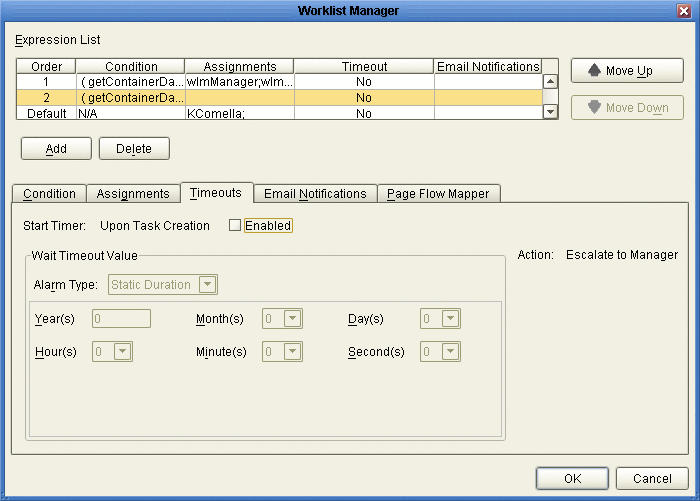
On the Worklist Manager window, click the Timeouts tab.
The Timeouts page appears, as shown in Figure 12.
Figure 12 Worklist Manager Window: Timeouts Tab
-
Click the Enabled checkbox.
-
To set a duration for escalation, do the following:
-
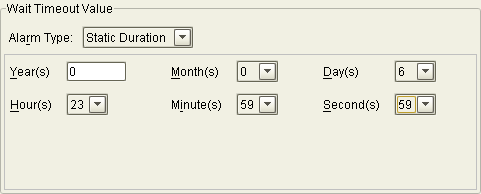
Enter the duration in the fields provided.
Figure 13. specifies that the task must be completed in just under one week before it is escalated.
Figure 13 Static Duration Fields
-
To set a deadline for the escalation, do the following:
-
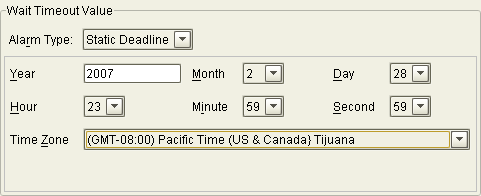
Enter the deadline in the fields provided.
Figure 14 specifies that the task must be completed before midnight on the last day of February, 2007.
Figure 14 Static Deadline Fields
-
Continue to Exposing User Activity Values to Sun VPD Pages, or click OK if you are done defining the expression.
Exposing User Activity Values to Sun VPD Pages
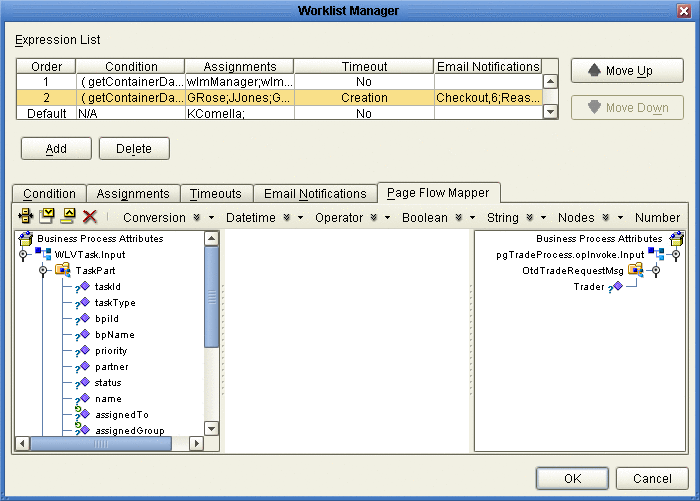
Using the Page Flow Mapper, you can expose values generated by the user activity to the associated Sun VPD pages. For example, if you map the assignedTo field, pages can be built that display the name of the task assignee.
The mapper has a Method Palette from which you can select methods to manipulate the data in the mapping.
Exposing user activities to Sun VPD pages is optional.
 To expose user activity values to Sun VPD pages
-
On the Worklist Manager window, click the Page Flow Mapper tab.
The Page Flow Mapper page appears, as shown in Figure 15.
Figure 15 Worklist Manager Window: Page Flow Mapper
-
In the mapper, map any user activity fields in the left panel to nodes in the right panel.
-
Continue to Define Email Notifications for Tasks, or click OK if you are done defining the expression.
Define Email Notifications for Tasks
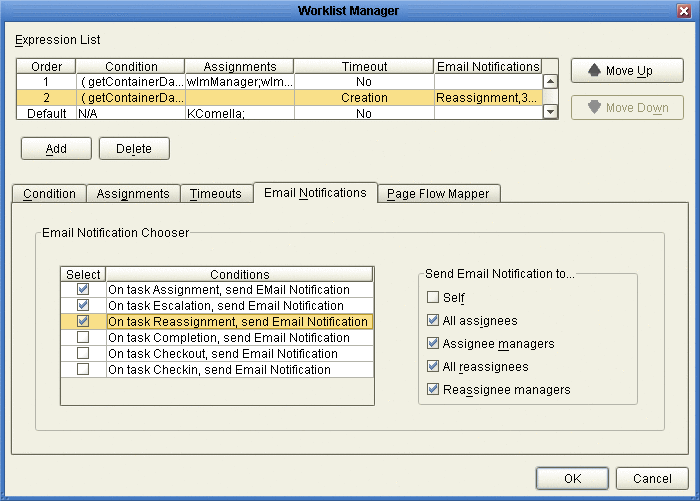
You can specify that certain users receive email notifications during different stages of task completion. For example, you might want to notify both the assignee and their managers when they are assigned a task. You can define email notifications for all types of task activities, including assignment, reassignment, escalation, check-ins, checkouts, and completion. This task is optional.
To define email notifications, complete the following tasks:
-
Make sure that the LDAP entry for each user assigned to user activity tasks includes an attribute that defines their email address.
-
Define email notification for tasks as described below (under Define Email Notifications for Tasks).
-
Configure the Worklist Manager External System in the Environment:
-
Define the email properties (described under Defining Email Notification Properties).
-
When configuring the LDAP connection properties, specify the name of the LDAP directory attribute that contains each user’s email address (this is described in Configuring an OpenLDAP Connection, Configuring a Sun Java System Directory Server Connection, or Configuring a Microsoft Active Directory Connection).
-
 To define email notification for tasks
-
On the Worklist Manager window, click the Email Notifications tab.
The Email Notifications page appears, as shown in Figure 15.
Figure 16 Worklist Manager Window: Email Notifications Tab
-
For each action for which you want to generate email notifications, do the following:
-
Click OK.
-
In the Environment Explorer, configure the Worklist Manager External System properties by doing the following:
-
Specify the email server connection properties, as described in Defining Email Notification Properties.
-
In the properties for the LDAP server, enter the name of the LDAP user attribute that contains the email address (for example, “mail”).
For more information about this property, see Figure 21, , or Figure 23 (depending on the type of LDAP directory you are using).
- © 2010, Oracle Corporation and/or its affiliates
