Installing or Replacing the Tape Drive
Take care not to damage the springfingers when installing or replacing the tape drive.
Note -
If you are replacing a faulty tape drive in the Netra 150 server, first go to "Removing the Tape Drive", then return here.
Installing the Tape Drive
-
Determine if you have the tape filler panel installed in place of the tape drive.
-
If the tape filler panel is installed, go to Step 2.
-
If the tape filler panel is not installed, go to Step 4.
-
-
If the tape filler panel is installed, remove the two phillips screws located on the bracket at the front of the tape filler panel.
-
Carefully slide the tape filler panel out of the front of the Netra 150 server.
-
Locate the SCSI target address dip switches at the bottom of the tape drive.
-
Set the jumpers to SCSI target ID 4.
Refer to the sticker underneath the tape drive to set the SCSI address to SCSI target ID 4.
-
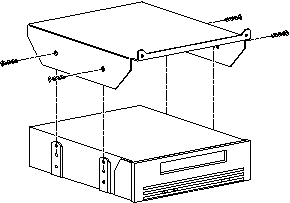
Slide the mounting bracket down onto the tape drive.
-
Install the four flat-head phillips screws to secure the mounting bracket to the tape drive (Figure 2-9).
Figure 2-9 Installing the Mounting Bracket on the Tape Drive

-
Connect the power and SCSI cables to the tape drive.
-
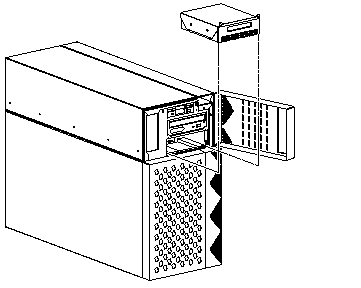
Carefully slide the tape drive into the Netra 150 server (Figure 2-10).
Figure 2-10 Installing the Tape Drive

-
Install the two phillips screws into the holes located on the top of the tape drive's front panel.
-
Go to "Finishing Up".
Removing the Tape Drive
-
Remove the two phillips screws located on the top of the tape drive's front panel.
-
Carefully slide the tape drive part way out of the front of the Netra 150's server (Figure 2-10).
-
Disconnect the power and SCSI cables from the rear of the tape drive.
-
Slide the tape drive the rest of the way out of the chassis.
-
Remove the four phillips screws securing the mounting bracket to the tape drive (Figure 2-9).
-
Slide the mounting bracket up and off the tape drive.
-
Place drive on an antistatic mat.
- © 2010, Oracle Corporation and/or its affiliates
