Installing or Replacing Bay Disk Drives
Note -
If you have the Netra NFS version of the Netra 150 server, you might have to suspend input before you can install or replace a drive. Refer to the Netra NFS SmartServe 1.1 User's Manual for more information.
Note -
If you are replacing a bay disk drive in the Netra 150 server, first go to "Removing the Bay Disk Drive", then return here.
Installing the Bay Disk Drive
-
Determine the proper location for the new bay disk drive.
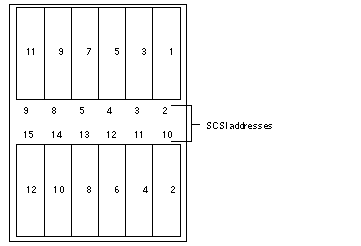
The bay disk drives should be installed from top-to-bottom, right-to-left, as shown in Figure 2-11. Figure 2-11 also shows the SCSI addresses for each drive. Note that you do not have to set the SCSI address on any of the disk drives installed in the internal disk bays because the SCSI addresses are set automatically when you install the drives in the bay.
Figure 2-11 Proper Ordering for Bay Disk Drives

-
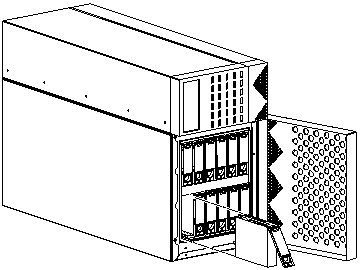
Insert the disk drive into the drive bay, aligning the connector on the drive with the connector on the backplane.
Keep the handle extended until you fully insert the drive (Figure 2-12).
Figure 2-12 Installing the Disk Drive into the Drive Bay

-
Gently push the drive in until it snaps onto the connector.
-
Swing the drive bracket handle closed until it latches.
-
Go to "Finishing Up".
Removing the Bay Disk Drive
Note -
If the disk you are replacing used to contain metadevice state replicas, you may want to clear the replica from the disk before replacing it. Refer to the Netra User's Manual for more details.
-
Unlatch the drive bracket handle (on the bottom) to release it.
-
Pull the bracket handle out and swing it open 180 degrees until it makes contact with the chassis.
Note -If you are removing a hard drive from the top of the chassis, then you will not be able to swing the bracket handle 180 degrees. Swing the bracket up and gently pull the drive out of the chassis.
-
Continue pushing the handle onto the chassis, applying mild pressure until the drive pops out from the connector.
-
Slide the drive out and set it on an antistatic mat.
- © 2010, Oracle Corporation and/or its affiliates
