Using the Administration Console
Once the Administration Console is up and running, you can click the different entries in the navigation frame to display the information in the administration frame. After changing the parameters in the administration frame, click Enter to save them.
Note -
If you change any of the parameters on this page, before you leave the page, you must click Enter to save your changes. After you have made all the changes in your editing session, you must stop and restart the web server for the changes to take effect. See the procedure "To Stop and Restart the Web Server on the i-Planet Server" in Chapter 3, Other Administrative Tasks.
If you want to cancel your changes and return to the previous settings, click the Reset button.
The navigation frame contains five labelled sections, each of which has one or more subsections that consist of links. Clicking a link to a subsection brings up the corresponding subsection in the administration frame.
Servers
Two links are available for servers: Summary and Authentication
Summary
Clicking the Summary link displays the Server Summary table, shown in Figure 2-2. This table shows the servers, status of the servers (up or down), the machines on which the servers are running, and the port numbers. You cannot edit this table nor can you reconfigure the settings from the Administration Console.
The i-Planet Server Summary page displays as the default first page for the Administration Console.
Authentication
Note -
If you change any of the parameters on this page, before you leave the page, you must click Enter to save your changes. After you have made all the changes in your editing session, you must stop and restart the web server for the changes to take effect. See the procedure "To Stop and Restart the Web Server on the i-Planet Server" in Chapter 3, Other Administrative Tasks.
Clicking the Authentication link displays the Authentication Parameters page, shown in Figure 2-6.
Figure 2-6 Authentication Parameters Page
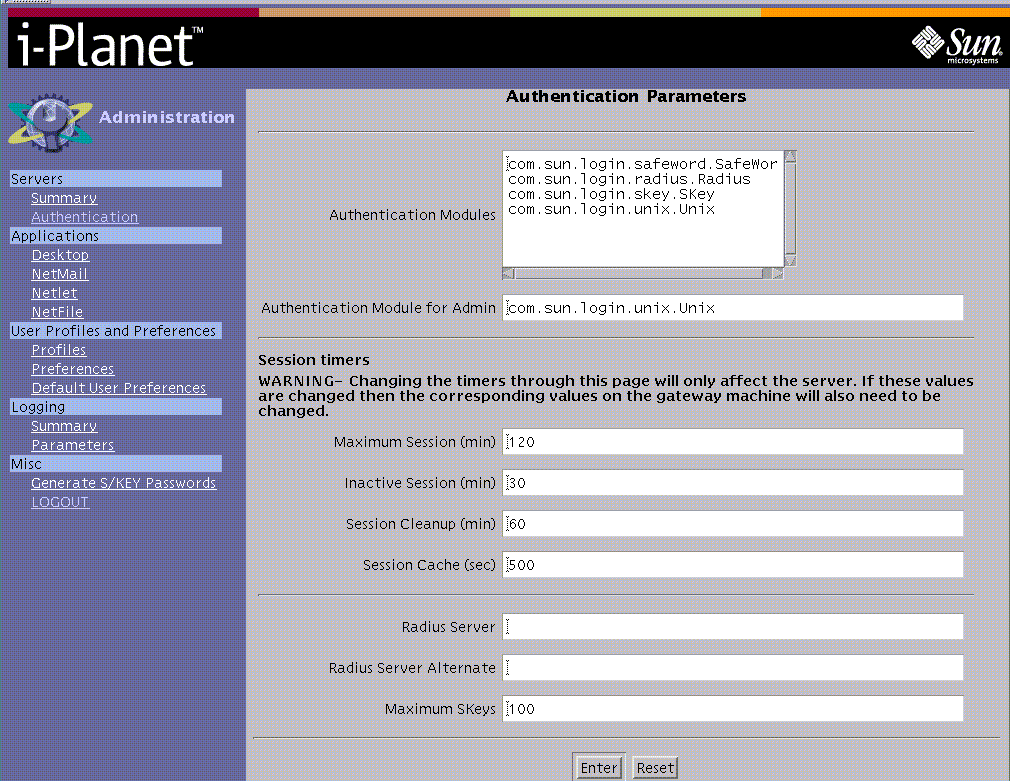
From this page, you can:
-
Add the authentication module or modules that you want end users to use.
-
Delete the authentication module or modules that you do not want end users to use.
-
Change the:
-
Authentication Module for Administration
-
Maximum Session Time (in minutes)
-
Inactive Session Timer (in minutes)
-
Session Cleanup Timer (in minutes)
-
Session Cache Timer (in seconds)
-
The authentication modules are discussed in Chapter 7, Authentication.
If you change the default setting in any or all of the four timer fields above, you must edit the file /etc/opt/SUNWstnr/platform.conf on the i-Planet gateway so that the i-Planet gateway and the i-Planet server have the same values. You must do this each time you change any setting for a timer.
To Edit i-Planet Gateway's platform.conf File
-
Edit the appropriate line in the file /etc/opt/platform.conf on the i-Planet gateway, shown in Table 2-1, to change the default setting to the same value as in the respective field in the Administration Console.
Table 2-1 Timer Field and the Equivalent Line in the platform.conf FileAdministration Console Field (unit of time)
i-Planet Gateway's platform.conf (unit of time)
Maximum Session Timer (minutes)
limCreate=(minutes)
Inactive Session Timer (minutes)
limAccess=(minutes)
Session Cleanup Timer (minutes)
limLogout=(minutes)
Session Cache Timer (seconds)
cacheSeconds=(seconds)
-
Stop and restart the reverse proxy server on the i-Planet gateway.
See the procedure "To Stop and Restart the Reverse Proxy Server on the i-Planet Gateway" in Chapter 3, Other Administrative Tasks.
On this page you also can:
-
Enter the:
-
Radius Server
-
Radius Server Alternate
For reasons of security, you set the RADIUS Shared Secret on the i-Planet server in the file /etc/opt/SUNWstnr/platform.conf.
-
To Set the RADIUS Shared Secret
-
Edit the file /etc/opt/SUNWstnr/platform.conf on the i-Planet server to set the line radius.secret= equal to the shared secret.
-
Set the maximum number of allowable sets of S/Key passwords.
The maximum number of allowable sets cannot be greater than 400, which is the absolute maximum number of sets.
-
Stop and restart the web server on the i-Planet server
For information on stopping and restarting the web server, see the procedure "To Stop and Restart the Web Server on the i-Planet Server" in Chapter 3, Other Administrative Tasks.
Applications
This section contains links that allow you to modify or set values for configuring the i-Planet Desktop, NetMail, Netlet, and NetFile applications.
Desktop
Clicking the Desktop link displays the Desktop Configuration page, shown in Figure 2-7 and Figure 2-8.
Figure 2-7 Desktop Configuration--Upper Half of the Page
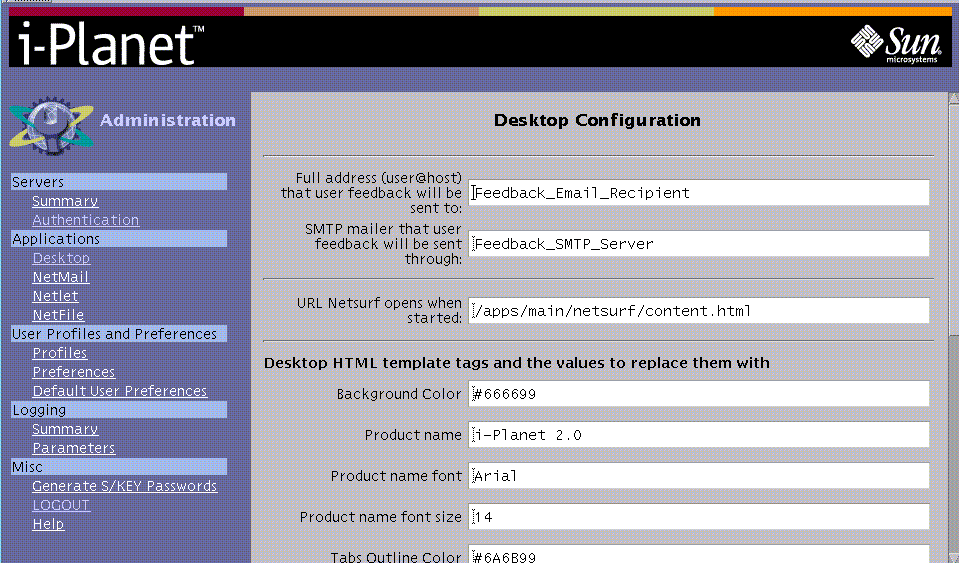
Figure 2-8 Desktop Configuration--Lower Half of the Page
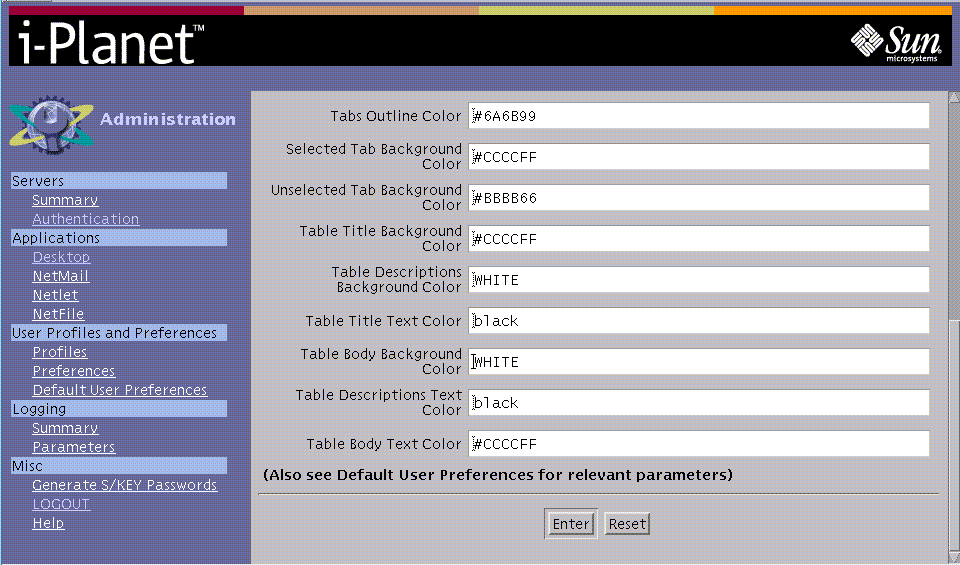
You change the user i-Planet Desktop configuration by changing the values on this page. You can specify the:
-
Mailer (SMTP_host) that is used to transmit user feedback
-
Feedback address to which the end user's feedback will be sent
-
Initial URL that NetSurf will open when it starts
-
Values for Desktop HTML template tags
Colors can be RGB hexadecimal values (for example, #0000FF for blue), or an approved HTML word for a color. The HTML names and the RGB values are generally listed in any HTML reference.
You can test the changes by making them, stopping and restarting the web server, logging out of the Administration Console and, then logging in to the i-Planet Desktop.
Note -
If you change any of the parameters on this page, before you leave the page, you must click Enter to save your changes. After you have made all the changes in your editing session, you must stop and restart the web server for the changes to take effect. See the procedure "To Stop and Restart the Web Server on the i-Planet Server" in Chapter 3, Other Administrative Tasks.
Also see Default User Preferences in the "User Profiles and Preferences Section".
NetMail
Note -
If you change any of the parameters on this page, before you leave the page, you must click Enter to save your changes. After you have made all the changes in your editing session, you must stop and restart the web server for the changes to take effect. See the procedure "To Stop and Restart the Web Server on the i-Planet Server" in Chapter 3, Other Administrative Tasks.
Clicking the NetMail link displays the NetMail Default Configuration page for new users. It consists of two sections: Default Values for New NetMail Users - Overridden by user preferences and Default Values for New NetMail Users - Not overridden by user preferences.
The mail feature of NetFile from the i-Planet Desktop uses the preferences set by NetMail. Outgoing mail will be sent using the SMTP server that is defined in NetMail. You can change the mail settings through the NetMail preference dialogue or the end user can change them on the Preference page of the i-Planet Desktop.
-
Default Values for New NetMail Users - Overridden by user preference is shown in Figure 2-9.
Figure 2-9 NetMail Default Values for New NetMail Users - Overridden by User Preferences
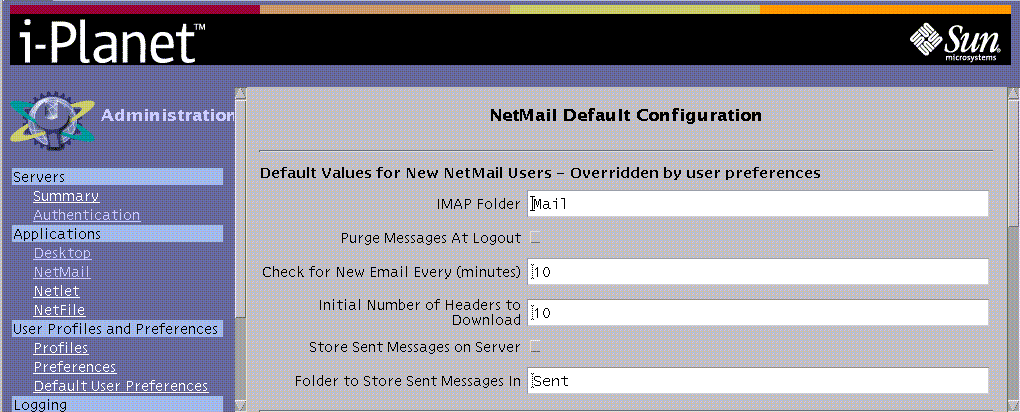
End users can override these settings with information that they enter on the Preference dialogue for NetMail.
You can change the default new users settings, including the:
-
Name of the default IMAP folder
-
Enabling purging messages at logout
-
Time in minutes to check for new email
Set the time to check for new email so that it is greater than the Inactive Session time that you set on Authentication Parameters page. This will prevent failure to time out when the end users are using NetMail and NetFile until the maximum time out for the session is reached.
If you do not want the end user to be able change the time to check for new mail parameter on the Preference page of the i-Planet Desktop, type the parameter inactivityinterval from Table 2-4 in the Names of Uneditable Preferences field.
-
Initial number of headers to download
-
Enabling storing sent messages on the server.
-
Setting the folder in which to store sent messages.
-
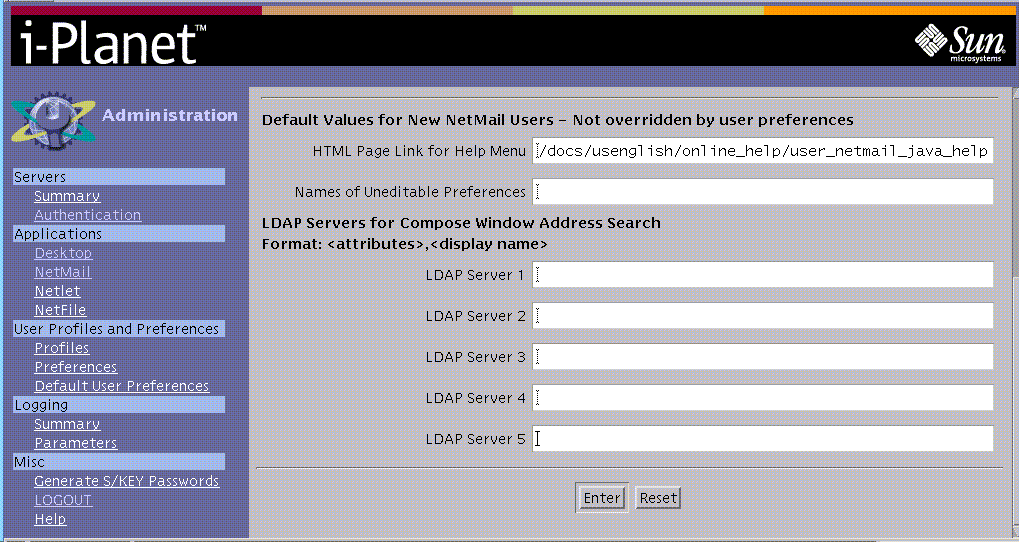
Default Values for New NetMail User - Not Overridden by user preferences is shown in Figure 2-10.
Figure 2-10 NetMail Default Values for New NetMail Users - Not Overridden by User Preferences
-
HTML page link for help menu
-
Folder in which to store sent messages
-
LDAP Server --Lightweight Directory Access Protocol (LDAP) is a protocol that allows end users to have access to information from online directory services. By configuring NetMail to use directory services, end users can use the Address Search feature in the Compose Message window of NetMail to search for email addresses.
LDAP Parameters
You configure access to up to five LDAP servers through the Administration Console. Each parameter has the following form:
attribute,display name
You replace the values in italics as follows:
attribute--Attributes used to connect to the directory server.
Each attribute:
-
Has the form argname=argvalue.
-
Is separated by an ampersand (&).
-
Is URL encoded.
display name--Name of the directory that shows up in the Address Search tab of the Compose window. This name can be any sequence of characters that does not contain a question mark (?) nor a comma (,).
Table 2-2 shows the URL encoding in the attribute value.
|
Value |
Encoded as |
|---|---|
|
space |
+ |
|
plus sign (+) |
%2B |
|
comma (,) |
%2C |
|
percent sign (%) |
%25 |
You can use the arguments shown in Table 2-3.
Table 2-3 Arguments and Their Descriptions|
Argument Names |
Descriptions |
|---|---|
|
ldapserver |
LDAP server domain name. This argument is required because it specifies the domain name of the LDAP server to be searched. |
|
ldapport |
TCP port on which the LDAP server is listening. This parameter defaults to port 389. |
|
timelimit |
The maximum time in seconds that the LDAP server should spend searching. |
|
base |
The base argument for the search. Use the base argument to narrow the search to a specific area. An example of a base argument that specifies the base LDAP search parameters using URL encoding is: base=dc=Sun%2cdc=com |
|
binddn |
The dn (username) to use when accessing the LDAP server. |
|
passwd |
The password to use when accessing the LDAP server. |
|
scope |
One of base, one, or sub. This value specifies the type of search. The default value is sub. |
|
alias |
One of never, search, find, always. This value specifies how to handle aliases. The default value is never. |
You must end the last argument with an ampersand (&) because the NetMail (Java) applet adds arguments for the search string and the count to the URL before doing the search.
Example One
The following parameter is an example that references the InfoSpace LDAP server:
ldapserver=ldap.infospace.com&,Infospace
LDAP
Because the LDAP parameters are in the Administration Console, every user gets the same LDAP server list.
Example Two
The following parameter is an example that references server x with options.
ldapserver=srver.com&ldapport=1449&binddn=username&passwd=password&alias=find,An
LDAP server
When you use Netmail's Address Search feature to obtain access to a directory service, the LDAP request is passed to the web server that runs the LDAP CGI program. The CGI program requests information from the LDAP server. The web server must be able to communicate with the LDAP server. If the web server and the LDAP server are both behind a firewall, NetMail users can still search the directory even if they are outside the firewall.
Configuring Names of Uneditable Preferences
You can enter any or all of the parameters shown in Table 2-4 in the Names of Uneditable Preferences field on the page for Default Values for New NetMail Users in the Administration Console. The end user cannot change these preferences. Multiple values are separated by commas. The preferences that you enter will not be visible as editable values in NetMail's Preferences dialogue.
Table 2-4 Names of Uneditable Preferences for NetMail
Note -
The values you specify for the parameters in the NetMail of the Administration Console override the default values.
Netlet
Note -
If you change any of the parameters on this page, before you leave the page, you must click Enter to save your changes. After you have made all the changes in your editing session, you must stop and restart the web server for the changes to take effect. See the procedure "To Stop and Restart the Web Server on the i-Planet Server" in Chapter 3, Other Administrative Tasks.
This is the client program that works together with the reverse proxy server on the i-Planet gateway to allow secure access from the Internet to TCP/IP application on your intranet. You can specify which predefined application rules will be enabled as well create rules for your own TCP/IP applications that you want to access through the Netlet.
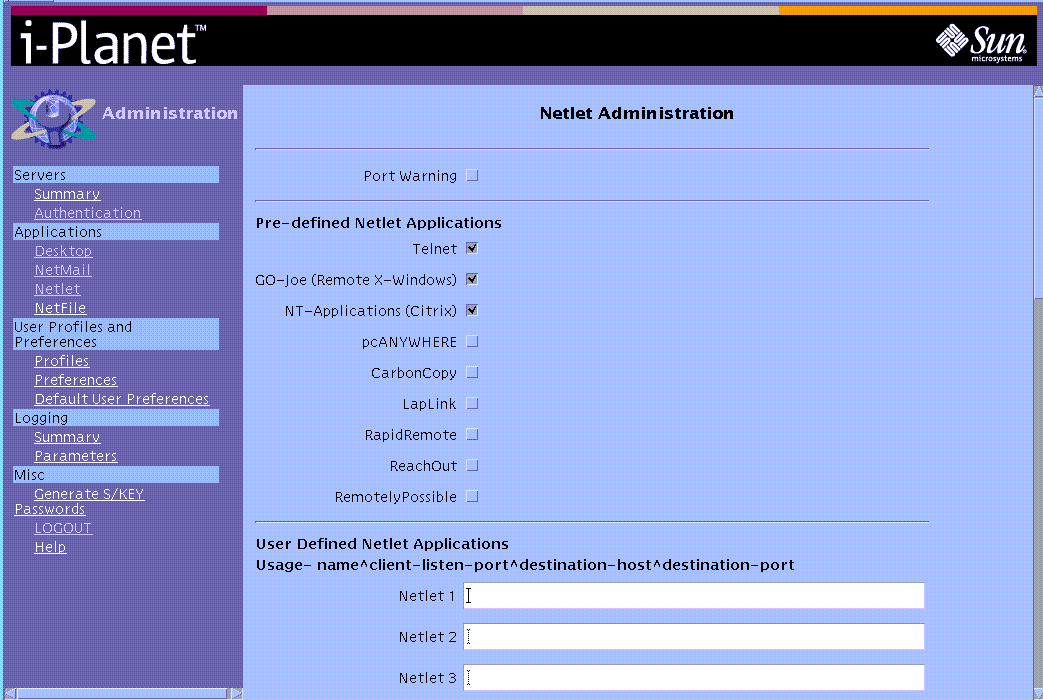
Clicking the Netlet link displays the Netlet Administration page, shown in Figure 2-11.
Figure 2-11 Netlet Administration Page
Note -
The predefined Netlet rules work in conjunction with NetFile. For them to be active, you must enable them on this page and on the NetFile Configuration page.
The Netlet Administration page shows the predefined applications and provides a the place and the means for writing user-defined Netlet rules (up to a limit of 30).
The predefined function and rules are:
-
Port Warning--Enables or disables support for a warning window that displays from the NetFile page of the i-Planet Desktop application when a connection to a Netlet port is being attempted. The Netlet Connection Attempt window also shows the number of the port. The end user can then decide to:
-
Click OK to continue
-
Cancel to stop the connection
-
Choose not to see this warning again, which disables the port warning for the current session only.
-
-
Predefined Netlet Rules--Enables or disables support for the applications listed.
The destination system is given at runtime through the NetFile application. You must also enable the Netlet functions on the NetFile Configuration page. The defined applications are:
-
Telnet--allows end users to use Telnet to have access to systems on the intranet. Addresses for Telnet are established dynamically, if you are using NetFile. The Telnet client is the one that is configured in the client browser.
-
GO-Joe (remote X-Windows)--allows end users to use GO-Joe for remote X-Window control for the Solaris operating environment. GO-Joe is a thin client X server that uses a three-star, distributed client-server architecture (X server, X client, and display applet). The GO-Joe server must be installed on the destination machine. Information on the requirements for installing GO-Joe is in the section "GO-Joe " in Appendix C, Third-Party Software.
-
NT-Applications (Citrix)--allows end users to use Citrix-based applications over the Internet. Citrix reserves port 1494. Citrix has Java and non-Java clients that support TCP/IP. i-Planet is customized to start the Citrix client (Java applet) and a Citrix-based proxy when you configure it appropriately.
Note -If your end users will be connecting to any a Microsoft Windows-based machine using NetFile, you must first install the Samba software that is on the i-Planet CD-ROM, "Contains 3rd Party Software Packages Only," on the i-Planet server.
-
pcANYWHERE (a Windows 95, 98, and NT remote-control product)--Allows users to have remote PC Microsoft Windows control. Information on installing and configuring pcANYWHERE is in the section "pcANYWHERE" in Appendix C, Third-Party Software. The pcANYWHERE client (Java applet) software is installed with i-Planet. A demonstration copy of the pcANYWHERE server software is on the i-Planet CD-ROM, "Contains 3rd Party Software Packages Only." If you enable this option, you must buy a copy of the server software and install it on the computer that your end users want to control remotely.
The i-Planet product also supports the software CarbonCopy, LapLink, RapidRemote, ReachOut, RemotelyPossible (all Microsoft Windows 95, 98, and NT remote-control products). If you want to use them, you must buy these products separately.
Table 2-5 shows the ports that are reserved for the predefined Netlet rules. Do not use these reserved ports in writing your own Netlet rules.
Table 2-5 Reserved Listen Ports for Predefined Netlet rules
loopback is required because of the Java security model. Applets are only allowed to make connections back to the server from which they were loaded. In order to make the included client applets work with the Netlet, they must appear to be downloaded from server localhost. This is accomplished by telling the Netlet to fetch the desired applet. Traffic requests on the loopback port are requests to the Netlet to go back to the i-Planet server and download the object whose path is given in the URL.
-
User-Defined Netlet rules--You define the user-defined Netlet rules in the lower half of the Netlet Administration page, shown in Figure 2-11. The end user cannot dynamically specify a destination server at run time. The destination server is fixed. You must define the whole path for them.
Note -You are limited to 30 user-defined rules.
The syntax for defining these applications is: name^client-listen-port^destination-host^destination port, in which:
-
The symbol "^" is the field separator in this syntax.
-
name--some identifier for this entry. It is only used to track the application.
-
client-listen--the port for which the Netlet listens on the end user's client machine.There can be only one entry or rule for each client-listen port
-
destination-host--the name or IP address of the destination host to which traffic will be directed.
-
destination-port--the port on the destination host to which all traffic will be directed.
Note -You cannot assign a port number greater than 64000 when you are defining your own Netlet rules.
For example, the following procedure shows how to write a Netlet rule that will allow telnet traffic to a specific system.
To Write a Netlet for Special Telnet Handling
-
Write a Netlet rule for special handling of Telnet in one of the fields for writing user-defined Netlet rules, as follows:
telnetspecial^23^machine-on-the intranet^23
-
Click the Enter button at the bottom of the page to save this Netlet rule.
This Netlet allows Telnet traffic from any remote machine and directs it to machine-on-the-intranet. Any normal Telnet traffic on port 23 (the destination Telnet port) to the machine on which the netlet is running will be redirected to machine-on-the-intranet. You can specify different names or port numbers, depending on your requirements. You must not have any other handler for port 23 for this to work (that is, no Telnet service/daemon specified).
-
As root on the i-Planet server, stop and restart the web server so that the Netlet rule you just defined will take effect.
See the procedure "To Stop and Restart the Web Server on the i-Planet Server" in Chapter 3, Other Administrative Tasks.
Note -If you monitor incoming or outgoing traffic through your firewall, you will see that all Netlet traffic on the outside actually passes on your SSL port (likely 443). The TCP protocols used by the Netlet rules are tunnelled through your SSL port.
NetFile
Note -
If you change any of the parameters on this page, before you leave the page, you must click Enter to save your changes. After you have made all the changes in your editing session, you must stop and restart the web server for the changes to take effect. See the procedure "To Stop and Restart the Web Server on the i-Planet Server" in Chapter 3, Other Administrative Tasks.
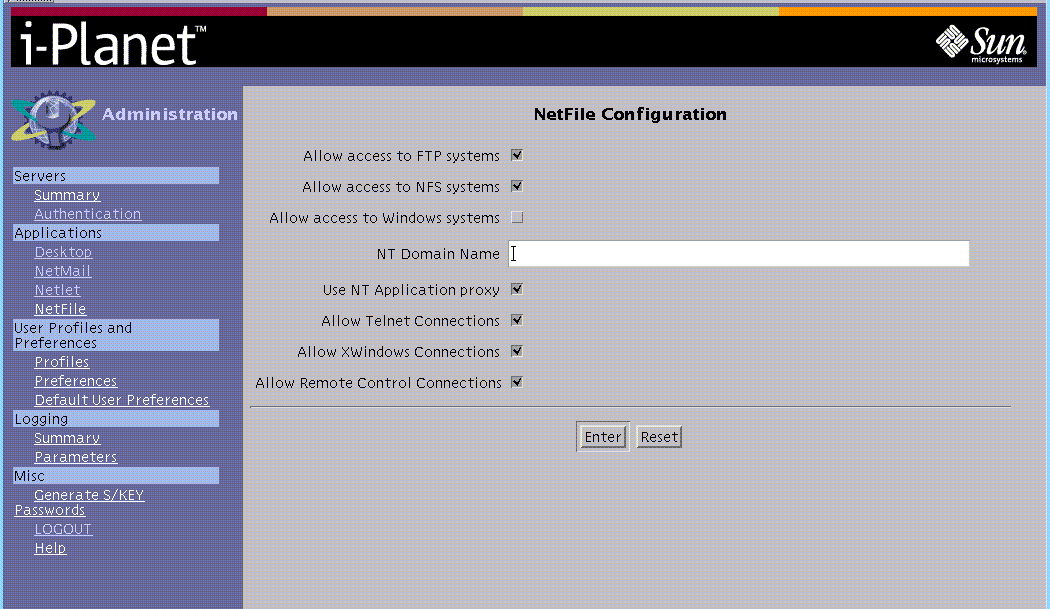
Clicking the NetFile link displays the NetFile Configuration page shown in Figure 2-12.
Figure 2-12 NetFile Configuration Page
Note -
For defined applications on the Netlet Administration page to be active, they must be turned on here and on the Netlet Administration page.
Allow Access to FTP, NFS, Microsoft Windows, and NetWare Systems
These options enable or disable support for access to FTP, NFS, Microsoft Windows, and NetWare systems. You must obtain the NetWare software separately. NetFile will automatically detect the type of file system for a selected system. Access to a system that supports multiple access types is assigned in the following order:
-
Allow access to Windows systems
-
Allow access to FTP systems
-
Allow access to NFS systems
-
Allow access to NetWare systems
Note -The information for NetWare will only appear on the NetFile Configuration page, if you have installed NetCon 7.0 from the NetCon Corporation on the i-Planet server. You can use NetCon 7.0 only with Solaris 2.5.1. and 2.6.
The machine type is determined by seeing if a connection can be established to well-known ports. For example, 139 is used for Microsoft Windows networking (for Windows `95, `98, and NT), 21 is used for FTP, and 2049 is used NFS.
If, for example, a system can be reached through Microsoft Windows networking, then it will treated as a Microsoft Windows system, regardless of whether or not it can also be reached through FTP.
Note -If you have not installed the Samba software to allow access to a Microsoft Windows network, then enabling Microsoft Windows system setting on the NetFile Configuration page will not provide end users access. The Samba software is on the i-Planet CD-ROM, "Contains 3rd Party Software Packages Only."
-
NT Domain Name--Enter the name of the NT domain that provides authentication to your Microsoft Windows network.
All of the remote windowing functions and applications below are only available through the Java version of NetFile.
-
Use NT Application proxy--Enables or disables Netlet support for a Citrix-based proxy.
-
Allow Telnet Connections--Enables or disables Netlet support for Telnet access to the hosts that the end users select.
-
Allow X Windows Connections--Enables or disables Netlet support for X Windows. It allows an end user to run an X Window session over the Internet. The GO-Joe client software is included with the i-Planet server. For more information on GO-Joe, see Appendix C, Third-Party Software.
-
Allow Remote Control Connections--Enables or disables Netlet support for remotely controlling Microsoft Windows Desktop systems. The supported remote control products are listed in "Netlet" section of this chapter.
All remote control software (except pcANYWHERE) must be configured to send all traffic to localhost. The Netlet will intercept this local traffic, encrypt it, and route it through the i-Planet proxy. If end users want to use pcANYWHERE software, they must install the pcANYWHERE host on the PCs that they want to control remotely on the private network. See the section "pcANYWHERE" in Appendix C, Third-Party Software for instructions on installing and configuring pcANYWHERE.
Note -
With pcANYWHERE's Java client, you do not need to install client software.
End users must install the appropriate client remote-control software on their local PC and appropriate server software on remote systems, if they want to use a remote-control application. (The GO-Joe server software is included on the i-Planet CD-ROM, "Contains 3rd Party Software Packages Only.") They should check the documentation of the remote-control application for any requirements.
End users should verify that the remote-control software is working properly before attempting to use it through i-Planet.
User Profiles and Preferences Section
This section contains links to the profiles of the users and their preferences as well as allowing you to edit the default preferences and parameters.
Profiles
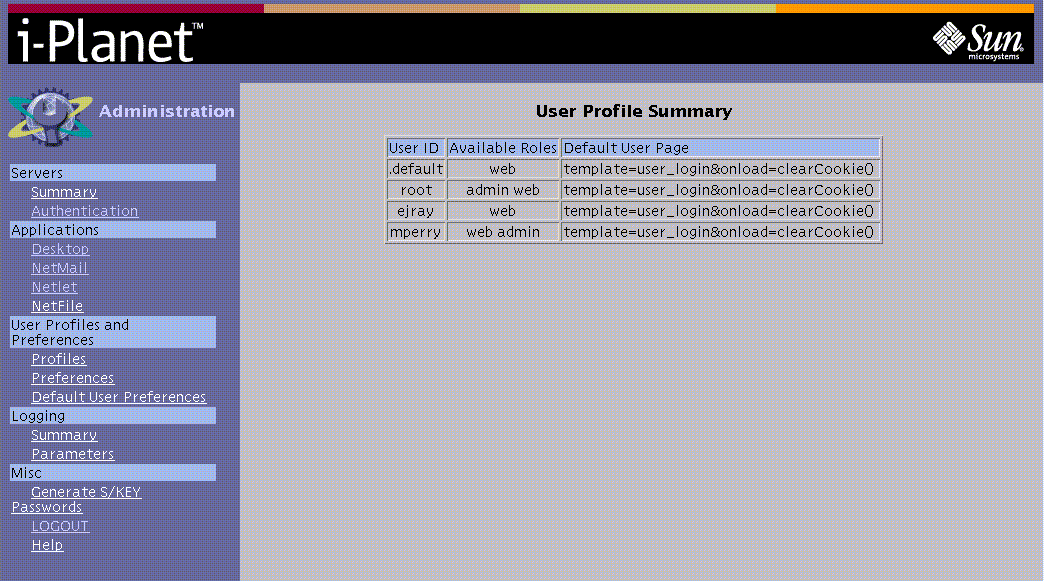
Clicking the Profiles link displays the User Profile Summary table shown in Figure 2-13. It shows user ID, available roles (admin or web or both) for each user ID, and the default user page.
You can only view the information in the User Profile Summary page.
Figure 2-13 User Profile Summary Table
Preferences
You can only view the information in the Preference page.
To view an end user's preference, you move through a series of administration pages for the initial letter or character for the end user's name, then the name of the end user at whose preferences you want to look.
-
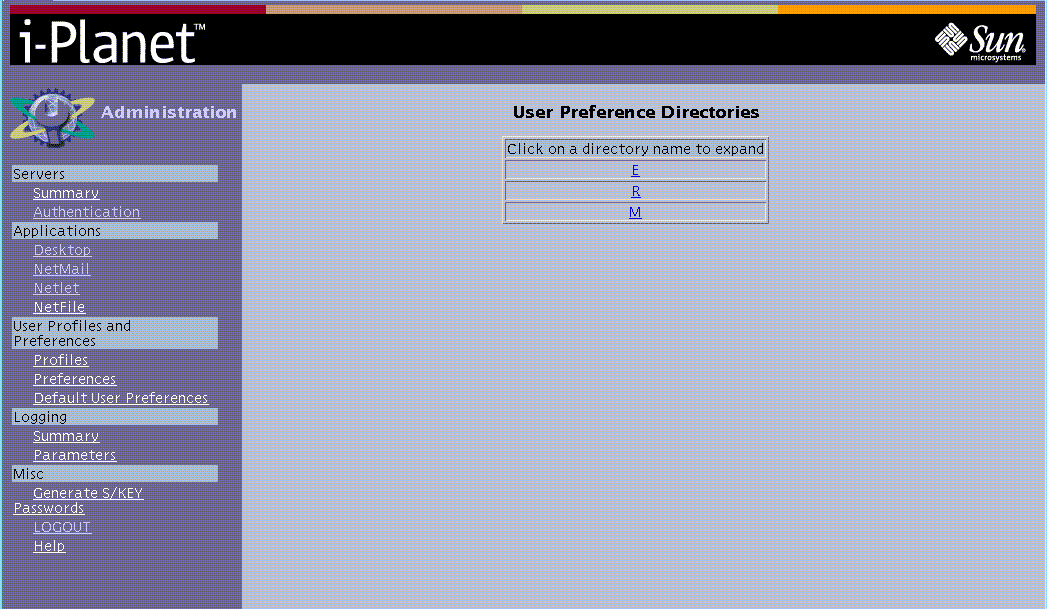
Clicking the Preferences link displays the User Preference Directories page shown in Figure 2-14.
Figure 2-14 User Preference Directories Page
-
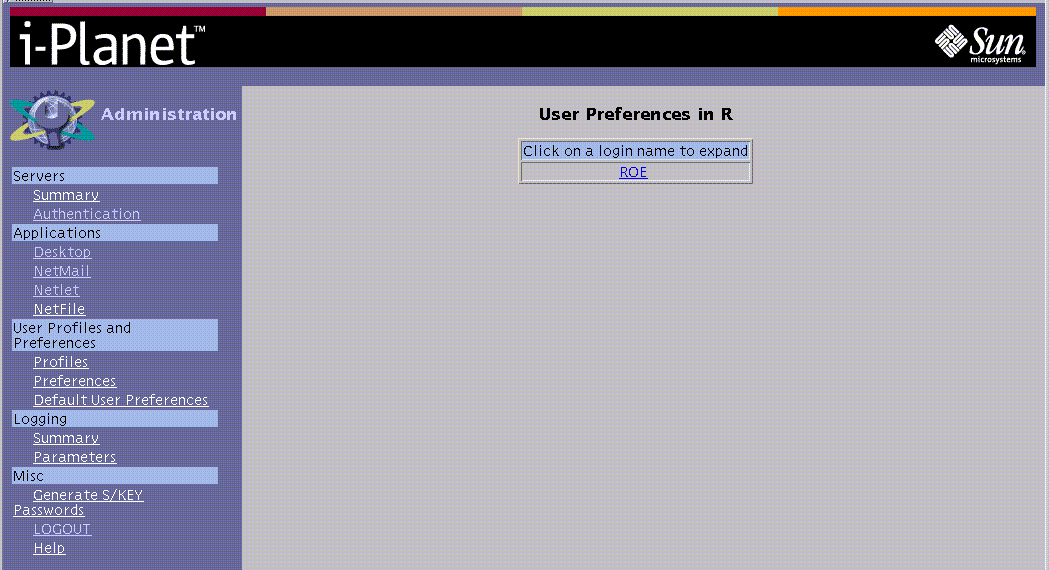
Clicking a letter (or character) displays the login names that start with that letter (or character) shown in Figure 2-15.
Figure 2-15 User Preferences for Login Names Starting With the Letter "R"
-
Clicking a user's name displays a table showing the preferences for that user shown in Figure 2-16.
Figure 2-16 User Preferences for ROE Table
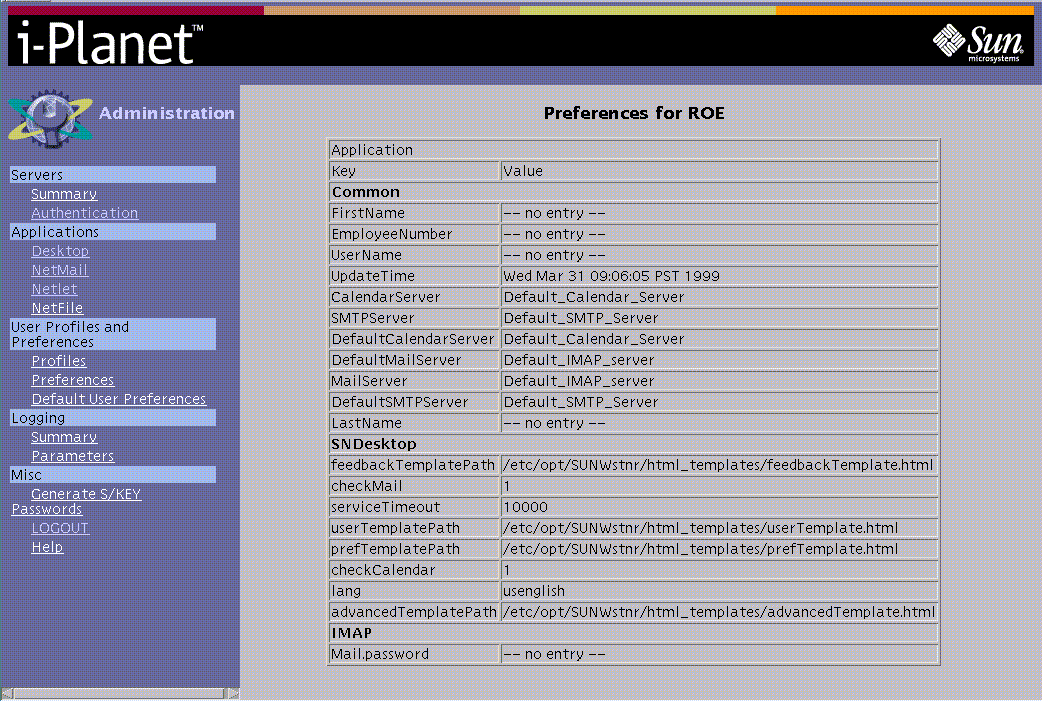
Preferences page shows the current configuration settings for each end user (both those that are controlled through the i-Planet Administration Console and those that end users can configure through their i-Planet Desktop). You can use the information contained here in debugging problems in connecting to the various applications over the Internet.
Default User Preferences
Note -
If you change any of the parameters on this page, before you leave the page, you must click Enter to save your changes. After you have made all the changes in your editing session, you must stop and restart the web server for the changes to take effect. See the procedure "To Add a Web Proxy" in Chapter 3, Other Administrative Tasks.
Clicking the Default User Preferences link displays the Default User Preferences and Profiles, shown in Figure 2-17 and Figure 2-18.
Figure 2-17 Default User Preferences and Parameters Page--Upper Half of the Page
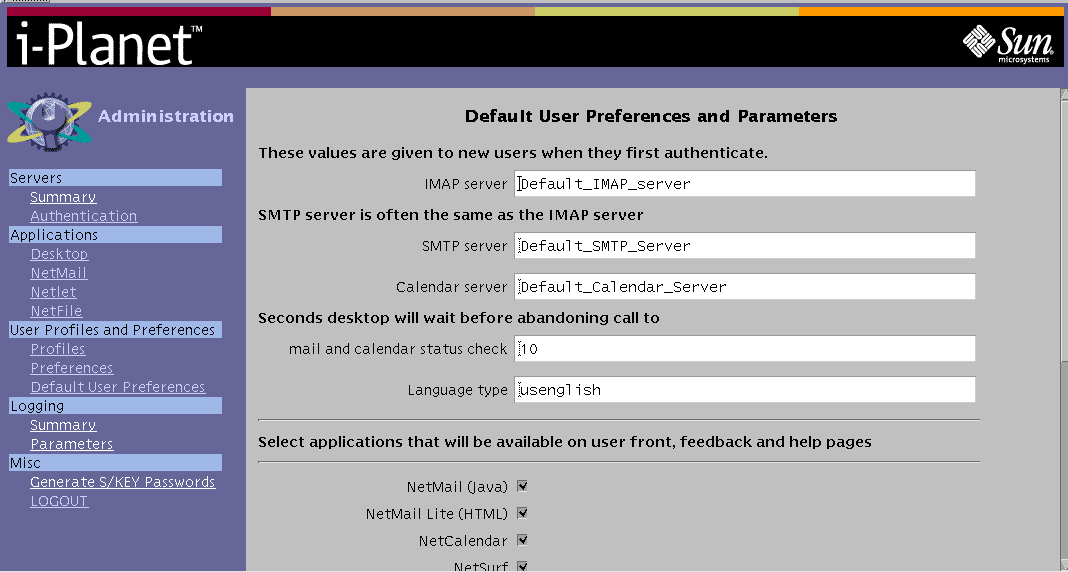
Figure 2-18 Default User Preferences and Parameters Page--Lower Half of the Page
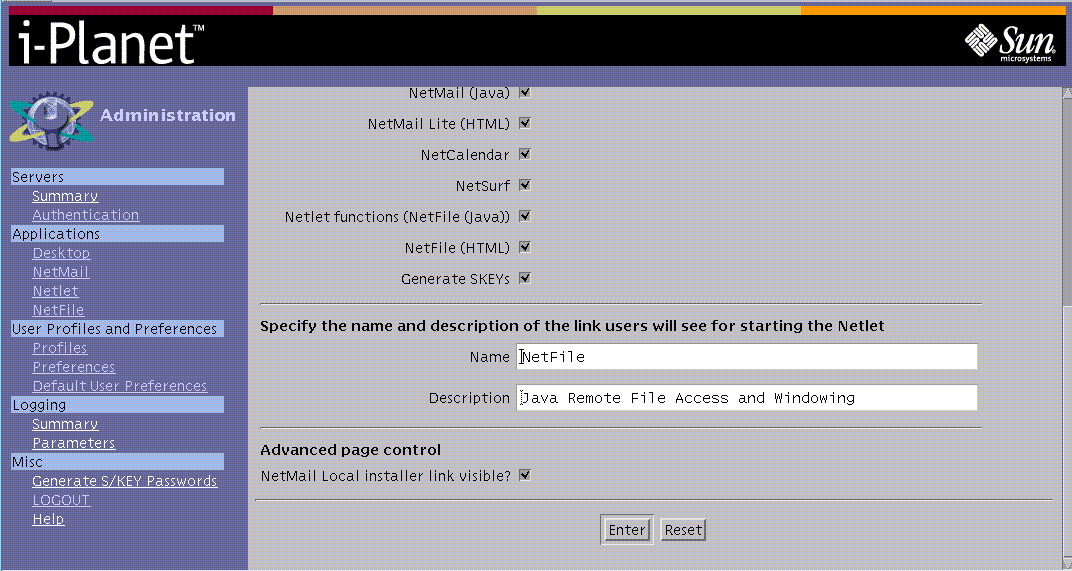
These are the values that new end users have when they first authenticate. They are reflected in the fields of the Preferences page of the i-Planet Desktop when the end users first log in. End users can edit some values on the Preferences page of the i-Planet Desktop, but not all. If an application is visible, end users have access to it.
On this page, you specify:
-
The time in seconds that the i-Planet Desktop will wait before abandoning a call to the mail and calendar servers
-
The Preferred language. The default is US English.
-
The Applications that appear on the front page of the i-Planet Desktop that end users see. Enabling an application also enables the help and the feedback pages for that application.
-
That the NetMail Local Installer Link is to be visible on advanced page control. This makes the NetMail Local Installer visible on the Advanced Options page of the i-Planet Desktop. When the end users click on the NetMail Local Installer link, a browser window appears. As explained in this window, the functionality allows end users to install the NetMail applet on their local disk so that they can use NetMail to read and compose email without being connected to the Internet. This is known as disconnected mode.
Once end users have installed the NetMail applet locally, they can connect and read their email without having to download the applet each time. They also can save their email to an encrypted file on disk, so that they can continue working while they are disconnected from the server. When they reconnect, all their changes to the local email cache will be made to the server, synchronizing their states. Any email that they have composed and want sent will also be sent when they reconnect. The end users are guided through the installation of this feature.
You can test the changes by making the changes using one browser, then viewing the results in another browser instance.
Logging Section
This section contains links to log files, allows you to turn logging on or off, and to change the log server parameters
Summary
Clicking the Summary link displays a table that contains links to the current and previous revisions of the Netlet, NetMail, Authentication, and Master Log files, as shown in Figure 2-18. The previous revisions are the most recently archived versions.
Note -
You turn logging on or off on this page. If you change the status of the logging, you must click Enter so that this change will save your changes. You must stop and restart the web server for the changes to take effect. See the procedure "To Stop and Restart the Web Server on the i-Planet Server" in Chapter 3, Other Administrative Tasks.
Figure 2-19 Links to the Various Log Files
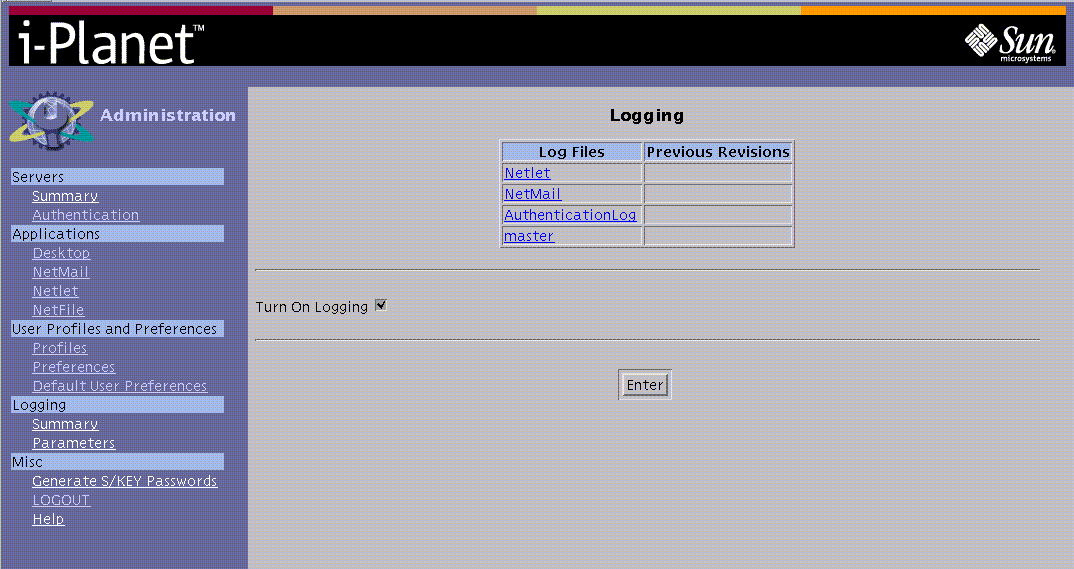
The log files are displayed for viewing only when you click the link to them. The log files are in /var/opt/SUNWstnr/logs. The log files are flat files that you can manipulate with the usual UNIX tools.
Parameters
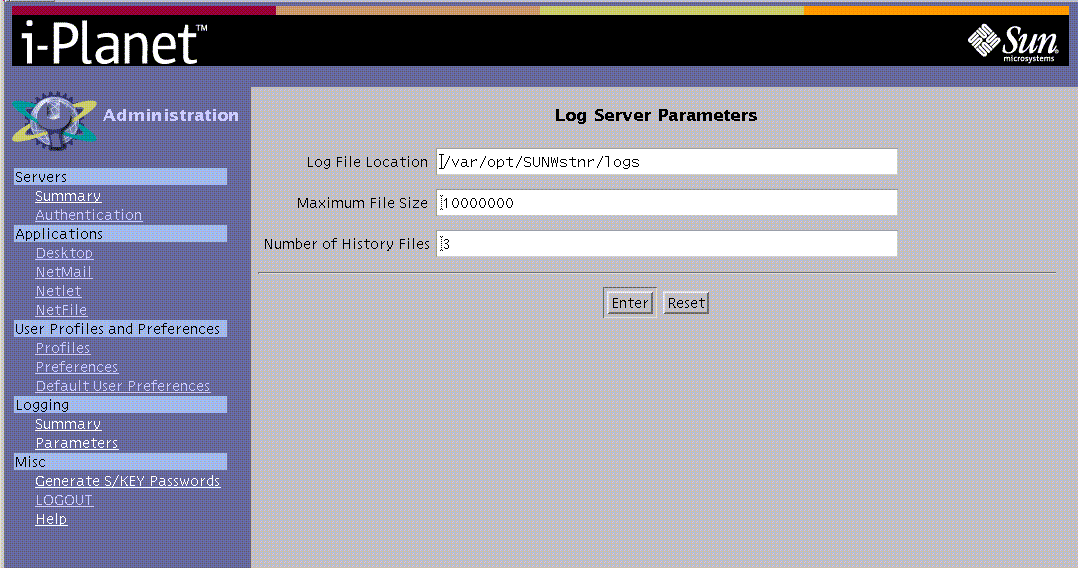
Clicking the Parameters link displays the Log Server Parameters page, shown in Figure 2-20. You can change the location of the log files, the maximum size of the log files, and the number of the history files from this page. The location of the log file is relative to the root of the server (host). The size of the log file is in bytes.
Note -
If you change any of the parameters on this page, before you leave the page, you must click Enter to save your changes. After you have made all the changes in your editing session, you must stop and restart the web server for the changes to take effect. See the procedure "To Stop and Restart the Web Server on the i-Planet Server" in Chapter 3, Other Administrative Tasks.
Figure 2-20 Log Server Parameters Page
Miscellaneous Section
This section contains the links for generating S/Key passwords for your users, logging out of the Administration Console, and displaying the online help for the Administration Console.
Note -
If you change any of the parameters on this page, before you leave the page, you must click Enter to save your changes. After you have made all the changes in your editing session, you must stop and restart the web server for the changes to take effect. See the procedure "To Stop and Restart the Web Server on the i-Planet Server" in Chapter 3, Other Administrative Tasks.
Generating S/KEY Passwords
Clicking the Generate S/Key Passwords link displays the Create S/Key Passwords page, shown in Figure 2-21. Use this page to generate new S/Key passwords for users before they become end users.
Figure 2-21 The Generate S/Key Passwords Page
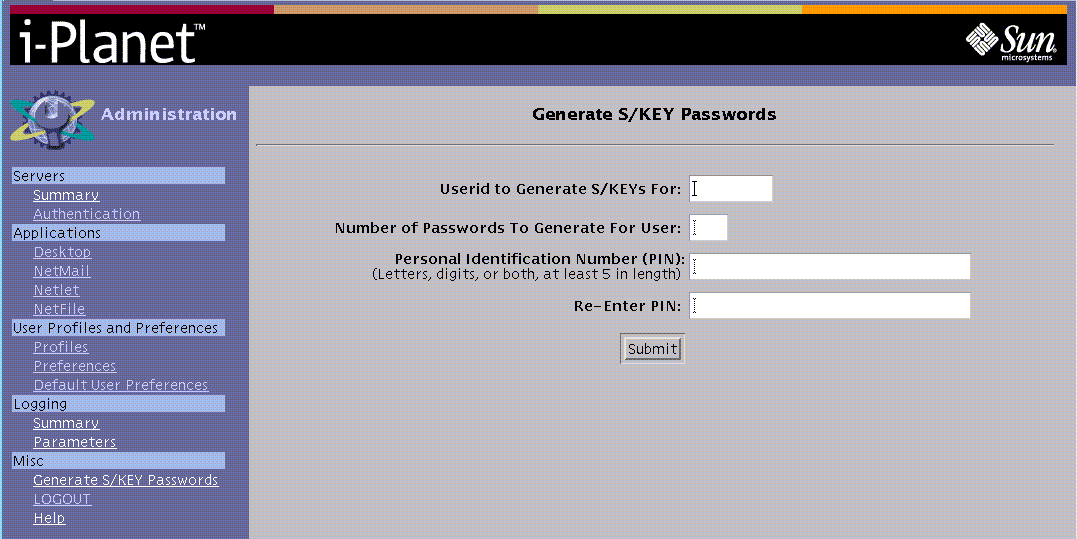
The name you enter in the Userid to Create S/Key for box must be a valid UNIX user name for the i-Planet server or the server on which the Administration Console is running.
To Generate the S/Key Passwords
-
Type the user name (Userid),
-
Type the number of passwords that you want generated.
(The maximum number of allowable sets of S/Key passwords is displayed on the Authentication Parameters Page.)
-
Type the personal identification number (PIN).
The PIN must be at least five alpha-numeric characters long.
-
Type the PIN again for confirmation.
-
Click the Submit button to generate the list of passwords for the end user
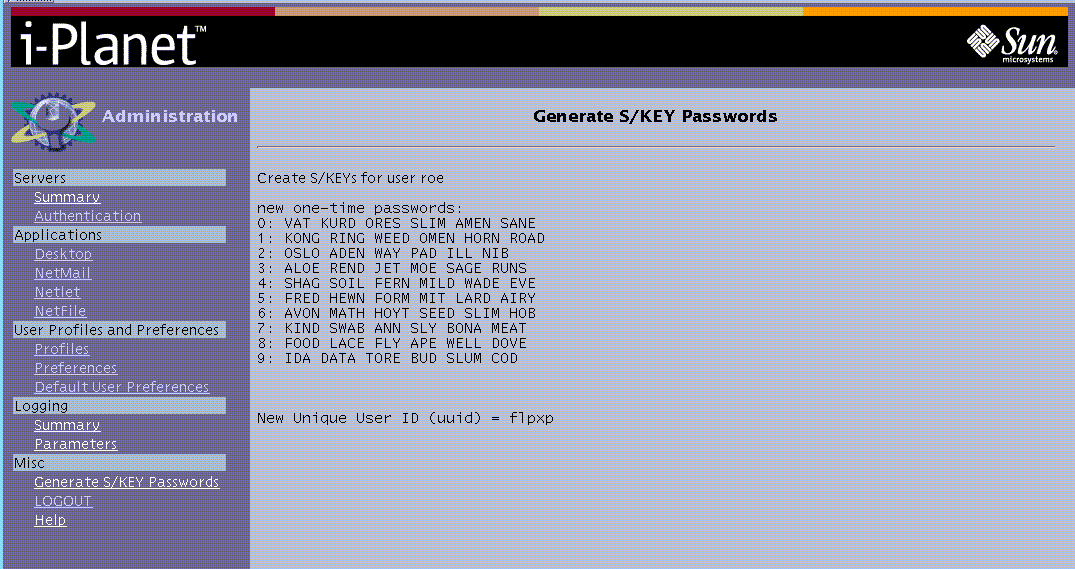
The list of passwords generated for the end user is displayed as shown in Figure 2-22.
Figure 2-22 List of S/KEY Passwords Generated
-
Give the end user the generated list of passwords, the unique user ID (uuid), and, separately, the PIN that you used in generating the list.
The end user will need the unique user ID and PIN as well as the list of passwords, in order to log in remotely.
-
Remind the end user to keep the PIN separate from the unique user ID and the list of passwords.
Logout
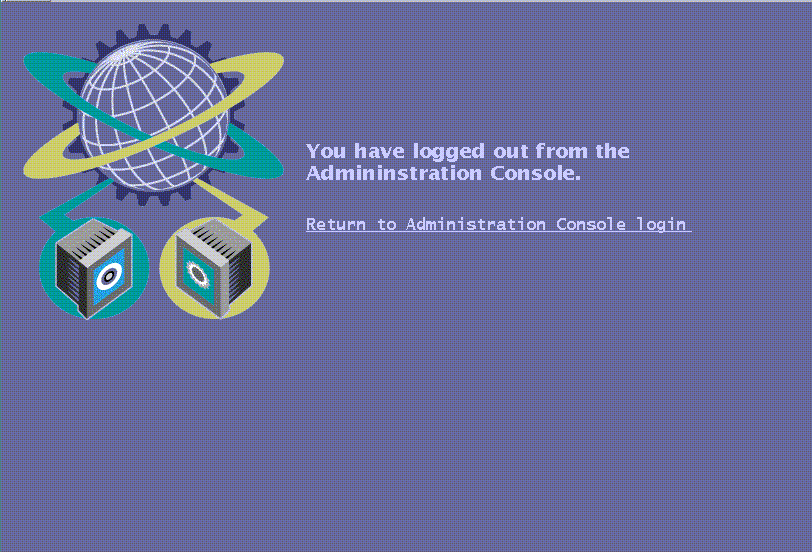
Clicking the LOGOUT link logs you out and displays the Logout Confirmation page, shown in Figure 2-23.
Figure 2-23 The Logout Confirmation Page
Help
Clicking the Help link displays the HTML page for the Administration Help Topics shown in Figure 2-24. Use the links to navigate through the online help. The help page also has links to the PostScript files of the documentation.
Figure 2-24 Administration Help Topics

- © 2010, Oracle Corporation and/or its affiliates
