Content Management in WebSynergy
Liferay Portal provides out-of-the-box content management (CMS) functionality in two major areas: document management (repositories for documents and images) and publishing.
Document management is provided through WebSynergy's Document Library and Image Gallery portlets. These portlets provide intuitive management of Microsoft Office documents, PDFs, text files, and images.
Publishing in the Project WebSynergy portal is accomplished through the Web Content portlet. It features a clean separation between content (data entry) and presentation (layout design). This allows the content to conform to a consistent "look and feel." Additionally, the Web Content portlet provides a content versioning and approval paradigm (workflow). This system allows for users involved in publishing to fall naturally into three different roles:
-
Writers create, edit, and enter content comprised of text and images.
-
Designers create layouts that display content.
-
Editors edit and approve final output and release it for publication to the portal.
As an example, consider the Project WebSynergy website. All of the static content is managed and published by the Web Content portlet. We can authorize other members of the WebSynergy community to write documentation, but we retain final editorial authority and security. This also allows for a mixture of portlets and Journal articles to coexist, enabling the designer to be more creative with what is displayed. Designers can integrate static content using the Journal Content portlet with a number of other function-rich portlets such as Navigation and Breadcrumb. All of this shows how useful and flexible publishing can be with the Web Content portlet.
Document Management portlets:
Web Content portlet:
Other portlets:
Document Library Portlet
The Document Library provides a centralized repository for various document types such as .PDF, .DOC, and .XLS, to be stored and assigns a unique URL to each of them. A company's intranet running Project WebSynergy portal can then be able to post internal documentation such as reimbursement forms and charitable donations policies for access by its employees. Alternatively, since each document has its own URL, the Asset Publisher portlet on your company's public website may display a list of PDF files of quarterly newsletters and their download links.
The Document Library supports multiple repositories that can be set with different access roles. Also, the documents in the repository are version-controlled, allowing a user to retrieve any particular revision that has been stored on the system.
 To add a Document
-
Login to WebSynergy.
-
Click Add Applications from the welcome menu.
-
Expand the Content Management folder.
-
Click Add against the Document Library Portlet.
The Document Library Portlet is added to your page.
The user interface of the portlet contains Folders, My Documents, and Recent Documents tabs. You can search documents using the Search File Entries button in the Folders tab. The Add Folder button in the Folders tab allows you to add folders. My Documents and Recent Document tabs list all the documents and the most recently accessed documents respectively.
-
Any document need to be in a folder. To add a new folder, click the Add Folder button.
-
Give a name and description to the folder. The permissions for the folder determine what users can do. Click Save.
A folder is created.
-
To add a document to that folder, click on the folder name.
-
You can either add more folders to further divide your documents into more specific categories or you can add a document to the current folder. In this example, we add a document. Click Add Document.
-
Browse and upload a document using the classic uploader.
There is a cap of 3000k on uploaded documents. After uploading the document, enter a title and description for the document.
-
Click Save when finished.
The document is added to the Document Library.
 To create Reference to a Document
-
Login to WebSynergy.
-
Click Add Applications from the welcome menu.
-
Expand the Content Management folder.
-
Click Add against the Document Library Portlet.
The Document Library Portlet is added to your page.
-
Locate a document in the Document Library.
-
Right click on the document name, then select Properties to view its Address (URL).
You can then either highlight the entire URL or click anywhere over the URL area and press Ctrl+A to select the entire link. Keep in mind that the URL is long. If you use the highlight method, you must highlight the entire URL. You can then copy this link and reference it anywhere within the portal. You can even reference this document outside of the portal as long as your portal is running and the document is still in the repository. Refer to figure below.
Document Library Display Portlet
The Document Library Display Portlet holds the display functionality for Document Library. You can navigate to the folders and document in the Document Library, even by accessing the Document Library Display Portlet.
You can add Document Library Display Portlet to your page from among Content Management portlets in the Add Applications window.
Figure 6–1 Document Library Display Portlet
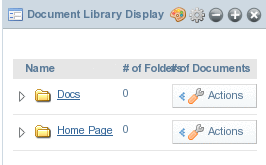
Image Gallery Portlet
Like the Document Library, the Image Gallery provides a centralized repository for images used throughout the Project WebSynergyPortal and assigns a unique URL to each image.
 To add an Image
-
Login to WebSynergy.
-
Click Add Applications from the welcome menu.
-
Expand the Content Management folder.
-
Click Add against the Image Gallery Portlet.
The portlet is added to your page.
-
Click the Add Folder button.
Specify a name and description and click Save. The folder is added to the portlet.
-
Click the folder name.
You can add a subfolder or an Image within the folder. In our example we are adding an image for the folder we have already created.
-
Click the Add Image button.
-
Use the classic uploader to upload the image.
There is a cap of 3000k on uploaded documents. After uploading the image, enter a title and description for the image.
 To create Reference to an Image
-
Login to WebSynergy.
-
Click Add Applications from the welcome menu.
-
Expand the Content Management folder.
-
Click Add against the Image Gallery Portlet.
The portlet is added to your page.
-
Locate an image in the Image Gallery.
-
Right click on the image, then select Properties to view its Address (URL).
You can then either highlight the entire URL or click anywhere over the URL area and press Ctrl+A to select the entire link. Keep in mind that the URL is long. If you use the highlight method, you must highlight the entire URL. You can then copy this link and reference it anywhere within the portal. You can even reference this document outside of the portal as long as your portal is running and the document is still in the repository.
 To View Image Slide Show
-
Login to WebSynergy.
-
Click Add Applications from the welcome menu.
-
Expand the Content Management folder.
-
Click Add against the image gallery portlet.
The portlet is added to your page.
-
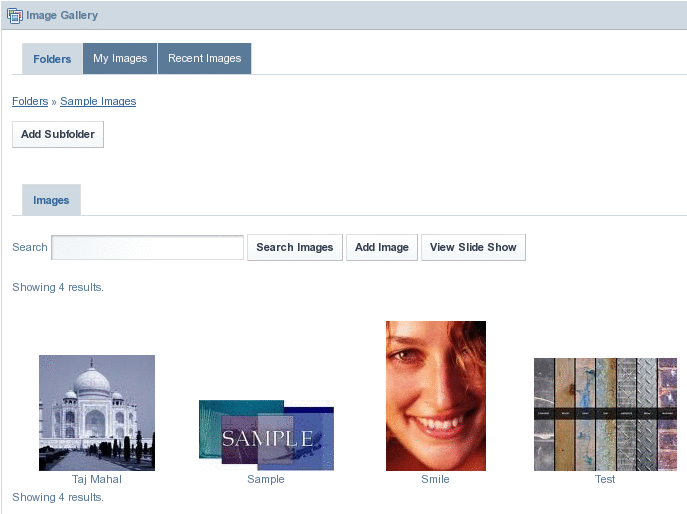
Click on a folder containing images.
Figure 6–2 To view Image Slide Show
-
Click on the View Slide Show button to have a slide show of the images contained in the folder.
A new window appears. In the new window, images are displayed in a sequence, one after the other. The slide show window has buttons for Pause, Play, Next, and Previous, which allow you to play and pause the slide show, and to view next and previous image for an image. You can set a time interval for displaying images, by using the Speed list. You can set a time interval between 1 to 10 seconds, with 3 seconds being the default time interval for the slide show.
Web Content portlets
The Web Content application is composed of four portlets:
- Web Content
-
Is an administration portlet that allows the creating, updating searching and managing contents.
- Web Content Display
-
Allows displaying of a set of contents that satisfy a set of conditions configured through the portlet preferences such as content type and community.
- Web Content List
-
Allows displaying one or more contents manually selected from the list of available portlets. If more than one content is selected only one at a time will be shown and links will be added to allow the user to navigate to the rest of the contents.
- Web Content Search
-
Allows users to search for web content.
the Web Content portlet is used to create all the CMS content and the Web Content Display and Web Content List portlets are used to display those contents. This portlet allows writers to easily edit content displayed on web pages without having to sort through complex code.
Definitions
Before getting into the details of how to use the Web Content portlet, it is useful to understand structures, templates, and articles; they are the backbone of the Web Content portlet's functionality.
-
Structures define the type and number of content pieces (e.g. text, text area, images, selection lists, etc.)
-
Templates determine how content pieces will be arranged or laid out
-
Articles are where each content piece is populated with actual text and images
The point of a structure is to unify journal articles with the same numbers and types of items. For example, a Management Bio section of a website might have ten biographies, each requiring an image for the executive headshot, a text for the headline, and a text area for the main biography. A structure would be created with one image, one text, and one text area, each named accordingly. This allows writers to create the individual biographies and other texts without needing to recreate the page structure for each biography.
Designers can create several templates for one structure to allow for a variety of presentations or they can give writers discretion in deciding the best layout.
All specific text and images are entered when a user adds or edits an article. This is also where a user chooses the layout based on the templates affiliated with a structure. Since multiple templates can be associated to a structure, the user can select the template that formats their article the way they want.
 To add a Web Content portlet to the Page
-
Login to WebSynergy.
-
Click Add Applications from the welcome menu.
-
Expand the Content Management folder.
-
Click Add against the Web Content portlet.
The Web Content portlet is added to your page.
The user interface of the portlet contains Articles, Structures, Templates, Feeds and Recent tabs. You can search documents using the Search Articles button in the Articles tab. You can add an article using the Add Article button.
-
Click the Articles tab to view all currently available Journal Articles.
Structures
 To create a Structure
-
Login to WebSynergy.
-
Click Add Applications from the welcome menu.
-
Expand the Content Management folder.
-
Click Add against the Web Content portlet.
-
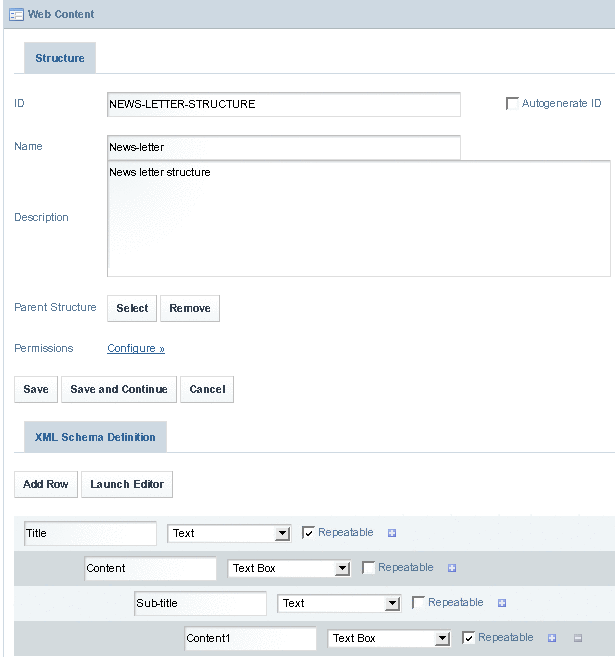
To create a structure, first click the Structures tab in the Web Content portlet, and then click on the Add Structure button. The structure creation page is displayed.
Figure 6–3 To create a Structure
-
Specify an ID, or Select the Autogenerate ID checkbox for the system to generate an ID.
It is recommended that you choose your own ID so that the structure will be easier to identify when associating it with templates and articles. The convention is to separate words in the ID with a hyphen as in “NEWS-LETTER-STRUCTURE”. The structure ID can not be changed once your structure has been saved, so be sure that the ID is exactly how you would want it to appear.
-
Enter a name and a description for the structure.
-
Design your XML Schema Definition.
You need to define an XML schema for the structure. The Add Row button is used to add the XML scheme from the user interface. On clicking the Add Row button, a new field where you can enter a name and a content type for the field (image, text, boolean flag, etc.) is displayed. Those comfortable with XML or HTML can edit the XSL directly by clicking Launch Editor. Both methods of adding/editing elements will work, and both can be used in the same session. One simple approach is to add a few elements using the GUI and then to edit the XML directly (which will contain the syntax for the already added elements and can be copy-pasted).
Empty spaces are not allowed within a field name. Rows can be moved up or down by clicking on Arrow buttons. You can use the Plus button to add multiple levels of rows nested inside one another. A field can be repeatable or non-repeatable. Selecting the Repeatable option makes a field repeatable. If a field is repeatable, you can repeat the field in an article using the structure. You will be able to add the field as many times as it is desired, by clicking a plus sign.
-
-
Click Save.
The Structure is created successfully. When you create a structure, the system generates a WebDAV URL for the structure. WebDAV (Web-based Distributed Authoring and Versioning) makes it possible to remotely access the structure using the WebDAV URL. To determine the WebDAV URL for the structure, open the structure in edit mode after creating it.
For details on WebDAV visit:
 To Edit a Structure
-
Login to WebSynergy.
-
Click Add Applications from the welcome menu.
-
Expand the Content Management folder.
-
Click Add against the Web Content portlet.
-
Click the Structures tab.
-
Click the Actions button corresponding to a structure, and select Edit from the menu.
The Structure opens in Edit mode.
In the edit screen, you can edit anything in the structure except for the structure ID, which can not be changed once the structure has been created.
Editing the name and description will not affect other features of the Web Content portlet, but adding, deleting, and modifying fields will affect the templates and articles that are associated with the structure. It is advisable to backup the current XML file first by clicking the Download button so that it will be easy to revert to your old structure if necessary.
If you add fields, the articles associated will have extra fields for additional content. If you delete fields, associated content in associated articles will be deleted.
-
Make desired changes to the Structure, and click Save to save changes.
 To Delete a Structure
-
Login to WebSynergy.
-
Click Add Applications from the welcome menu.
-
Expand the Content Management folder.
-
Click Add against the Web Content portlet.
-
Click the Structures tab.
-
To delete a structure, you must first delete all the articles and disassociate or delete all the templates associated with that structure.
To delete all articles, click on the Actions button and select View Articles from the menu.
All the articles associated with the Structure are listed.
-
Select all articles, and click on the Delete button.
-
Click the Structure tab again. Click the Actions button corresponding to a Structure, and select View Templates from the menu.
All the templates associated with the structure are listed.
You can delete all the Templates associated with the Structure. To do this, select all Templates and then click the Delete button.
-
Select the Structure and click on the Delete button to delete the structure.
Alternatively, click Delete from the menu appearing on clicking the Actions button.
Templates
 To Create a Template
-
Login to WebSynergy.
-
Click Add Applications from the welcome menu.
-
Expand the Content Management folder.
-
Click Add corresponding with Web Content portlet.
The Web Content portlet is added to your page.
-
Click the Templates tab.
Click the Add Template button to create a template. The Template page appears.
-
Specify an ID, Name and Description for the template. Click the Select button to select a Structure for the template.
The Select and Remove buttons corresponding to the Structure field can be used to associate or to disassociate a structure from the Template.
A window for selecting Structures is launched.
-
Click the name of the Structure to select it.
For example, click News-letter. The structure News-letter is selected.
-
To edit the template layout content, you can use one of two methods:
-
To create a completely new template:
-
To make use of an existing template:
-
Select a language from the Language Type list.
VM, SXL, and CSS are the available language options.
-
Click the Browse button to upload the script for an existing template.
-
Select the Format Script checkbox.
-
Click Launch Editor to open the browsed script.
-
Click Update after making changes to the script.
-
-
-
If you find it to be necessary, Add a small image to represent the template in the description field,
You can , enter the URL path for an image in the Small Image URL field, or you can browse an image using the Browse button. To use the image in the template, select the Use Small Image checkbox.
-
Click Save.
The template is created successfully. When you create a template, the system generates a WebDAV URL for the template. WebDAV (Web-based Distributed Authoring and Versioning) makes it possible to remotely access the template using the WebDAV URL. To determine the WebDAV URL for the template, open the template in edit mode after creating it.
For details on WebDAV visit:
 To Edit a Template
-
Login to WebSynergy.
-
Click Add Applications from the welcome menu.
-
Expand the Content Management folder.
-
Click Add corresponding with Web Content portlet.
-
Click the Templates tab.
-
Click the Actions button corresponding to a template, and select Edit from the menu.
Before editing the actual template, it is advisable to view the associated articles because their layout will be affected by any changes made to your template. After editing the template, you can view these articles with the new template layout. You can click View Articles from the Action menu to view associated articles.
-
Edit the template as desired.
In the edit screen, you can edit anything in the template except for the template ID, which can not be changed once the template has been created.
-
Click Save.
 To Delete a Template
-
Login to WebSynergy.
-
Click Add Applications from the welcome menu.
-
Expand the Content Management folder.
-
Click Add corresponding with Web Content portlet.
-
Click the Templates tab.
-
To delete a template, you must first delete all the articles associated with that template.
To delete all articles, click the Actions button and select View Articles from the menu.
All the articles associated with the Template are listed.
-
Select all articles, and click Delete.
A dialog-box with the message “Are you sure you want to delete the selected articles?” appears. Click OK to delete all articles.
-
Click the Templates tab once again.
-
Select the template and click Delete.
Click OK on the dialog-box for confirming deleting the template.
Articles
 To Create an Article
-
Login to WebSynergy.
-
Click Add Applications from the welcome menu.
-
Expand the Content Management folder.
-
Add the Web Content portlet to the page.
-
Click the Articles tab.
All articles are listed.
-
To create a new article, click the Add Article button.
You can create a basic or an advanced article.
-
To create a basic article:
A basic article do not make use of a template, workflow, and other sophisticated articles.
-
To create an advanced article:
An advanced article too can be created the same way as you create a basic article, but you can apply Form and Presentation, Workflow, Categorization, and Schedule options for the article.
-
Click “<< Advanced” in the top-right corner of the portlet window.
Skip this step if you are already on this page.
-
To select a Structure and a Template for the article, click the Select button besides the Template field.
The option to select a structure and a template is found under Farm and Presentation.
A dialog box appears with the message “Selecting a new template will change the structure, available input fields, and available templates? Do you want to proceed?” appears. Click OK. The “Templates” pop-up appears. You can select a template by clicking on the name of the template. In our example, click “NEWS-LETTER-TEMPLATE” to select it as the template for the article.
The structure used by the template is added to the article. You can note that the structure of the article has changed.
Note –If you want to remove the template or the structure applied to an article, click Remove corresponding to the structure.
-
Specify a name for the article.
-
Choose the Type for Categorization that the article will reside in.
Figure 6–4 To create an Article
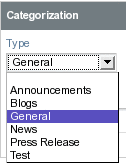
This makes it easier for users in searching for an article and to organize articles.
-
Set the Schedule details.
Set values for Display Date, Expiration Date, and Review Date fields. The default setting does not set an expiration date and review date.
-
Create the article, and click Save.
-
-
 To Edit an Article
-
Login to WebSynergy.
-
Click Add Applications from the welcome menu.
-
Expand the Content Management folder.
-
Add the Web Content portlet to the page.
-
Click the Articles tab.
All articles are listed.
-
Click on the Actions button for an article and select Edit from the menu.
The article appears in edit mode. In this screen you can edit anything in the article except for the article ID, which can not be changed once the article has been created. You can choose to increment the version every time you edit the article to help all users see how often the article has been changed. If you feel that the changes you are making are very minor, you can choose not to increment it. Note that if you set the expiration date to a date earlier to the current date, you will no longer be able to select that article for use in the Web Content Display portlet.
-
Make necessary changes and click Save.
 To Delete an Article
-
Login to WebSynergy.
-
Click Add Applications from the welcome menu.
-
Expand the Content Management folder.
-
Add the Web Content portlet to the page.
-
Click the Articles tab.
All articles are listed.
-
Click on the Actions button for an article and select Delete from the menu.
Alternatively, select the checkbox preceding the article ID and click the Delete button.
Web Content List Portlet
Admin users can configure the Web Content List portlet to display the articles associated with a community. You can have more than one instance of this portlet on a page.
 To Configure the Journal Articles Portlet
-
Login to Project WebSynergy as Admin User.
-
Click Add Applications from the welcome menu.
-
Add the Web Content List portlet to your page.
-
Choose the Configuration button from the menu controls for the portlet.
-
Choose Current tab under Setup tab, and select values for Community, Article Type and other attributes.
If you are using WebSynergy samples, you can select 'My Community' and 'General' for Community and Article Type respectively.
Note –The Community My Community is the default community, if you are using WebSynergy samples.
-
Click Save, and click the Return to Full Page link.
The portlet lists the articles available on the Community 'My Community'.
Web Content Display Portlet
You can create, configure, and display articles using the Web Content Display portlet. You can have more than one instance of this portlet on a page.
Figure 6–5 Web Content Display Portlet

The portlet embeds Edit Article, Select Article, and Add Article icons, respectively for editing an article selected for display, for selecting an article for display, and for adding a new article.
- Edit Article
-
This icon provides the interface to edit the article displayed using the portlet.
- Select Article
-
This icon provides the interface to select an article for display.
You can enable a number of settings on the articles which are displayed. Enabling printing, comments, and comment ratings are some of the settings which can be applied to an article which is displayed.
- Add Article
-
This icon provides the interface to create a new article for display.
 To Select an Article for Display
-
Login to Project WebSynergy as Admin User.
-
Click Add Applications from the welcome menu.
-
Add the Web Content Display portlet to your page.
-
Click the Select Article icon (which is the same as the Configuration button).
-
Click Search Articles.
All available articles are displayed.
-
Click on an article to select it for display.
-
Apply the Setup and Supported Client configurations.
-
Configure the display setup by selecting the options available under the Setup tab.
-
Show Available Locales
Enable this option to display all the locales which are available for the article.
-
Convert To
Enable this option to support converting the article to different document formats.
-
Enable Print
Enable this option to make it possible to print the article.
-
Enable Ratings
Enable this option to make it possible to rate the article.
-
Enable Comments
Enable this option to make it possible to add comments for the article.
-
Enable Comment Ratings
Enable this option to make it possible rate the comments received for the article.
-
-
To configure the supported clients:
-
-
Click Return to Full Screen.
Web Content Search Portlet
The Web Content Search portlet can be used to search for a word or phrase within the content of an Article.
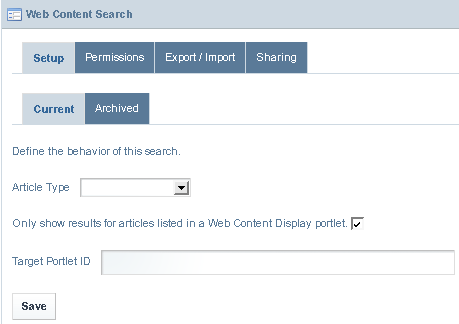
You can define the search behavior by making changes to the search configuration.
 To Customize the Search Behavior
-
Login to Project WebSynergy as Admin User.
-
Click Add Applications from the welcome menu.
-
Add the Web Content Search portlet to your page.
-
Click the Configuration button from among menu controls.
Figure 6–6 Configuring the search behavior
-
Define the search behavior using:
-
Article Type
Select the article type which need to be included in the search. The default search includes all types of articles. When you select an article type, search includes only the articles of that type.
-
Only show results for articles listed in a Web Content Display portlet
By default, search includes all the articles which are listed in any of the instances of the Web Content Display portlet.
-
Target Portlet ID
You can specify the instance ID of the Web Content Display portlet to conduct search only inside that particular instance of the portlet. You need to disable the “Only show results for articles listed in a Web Content Display portlet” option before you specify the target portlet instance ID.
-
-
Click Save.
Asset Publisher Portlet
To be done.
 To add Asset Publisher Portlet to the Page
-
Login to WebSynergy.
-
Click Add Applications and expand the Content Management folder.
-
Add the Asset Publisher portlet to your page.
The Asset Publisher portlet is added to your page.
Blogs Entry
To be done.
 To add a Blogs Entry
-
Login to WebSynergy.
-
Click Add Applications and expand the Content Management folder.
-
Add the Asset Publisher portlet to your page.
The Asset Publisher portlet is added to your page.
-
Select Blogs Entry from the list on the Asset Publisher portlet.
Figure 6–7 Page for entering the blog
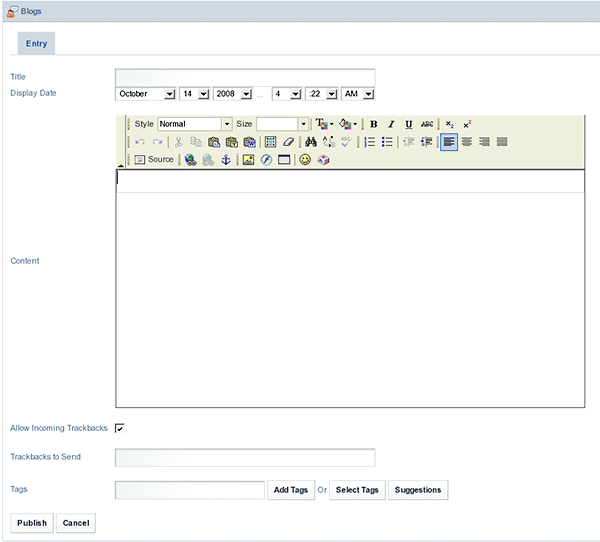
The Blogs Entry page has many sophisticated options. You can apply styles and formatting on your blog entry. You can add Tags and Suggestions to your blog
-
Make your blog entry and click Publish.
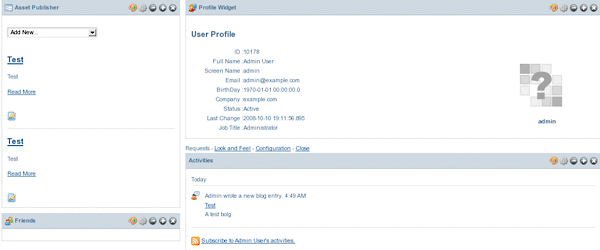
The blog entries made by you are displayed on the Asset Publisher portlet. For example, you have made two blog entries with the name Test. The two blog entries are displayed on the Asset Publisher. The Activities portlet also states that a blog entry has been made.
Figure 6–8 Blog entries
-
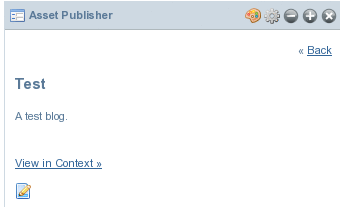
To view the blog entry, click on the blog title or on Read More.
Figure 6–9 Viewing the blog
-
You can edit the blog entry by clicking on the Edit button.
Bookmarks Entry
To be done.
 To add a Bookmarks Entry
-
Login to WebSynergy.
-
Click Add Applications and expand the Content Management folder.
-
Add the Asset Publisher portlet to your page.
The Asset Publisher portlet is added to your page.
-
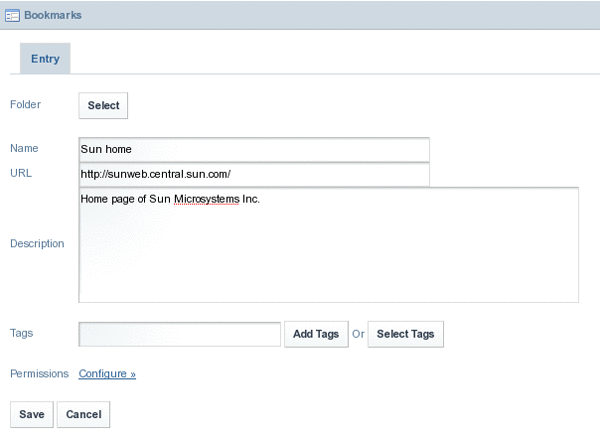
Select Bookmarks Entry from the list on the Asset Publisher portlet.
Figure 6–10 Entering a bookmark
-
Enter the bookmark
-
Click Select to select a folder.
Figure 6–11 Selecting a folder

-
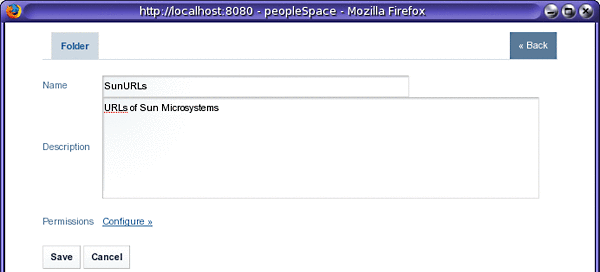
Click Add Folder.
-
Specify the name and description of the folder.
Click Configure against Permissions to view and change the configuration permissions for the folder.
Figure 6–12 Adding a folder
-
Click save to create the folder.
Figure 6–13 Choosing a folder for the bookmark

-
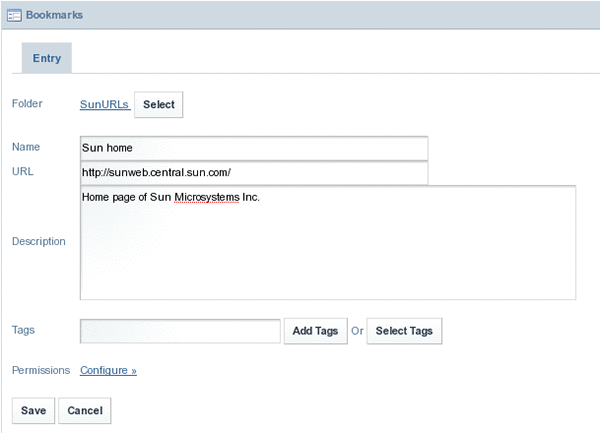
Click on the Choose button to choose the folder.
Figure 6–14 Saving the bookmark
-
Click Save.
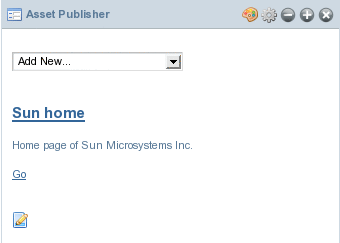
The bookmark appears on the Asset Publisher portlet.
Figure 6–15 Bookmark for a page
-
Click Go to view the bookmarked page.
Document Library Document
To be done.
 To add a Document Library Document
-
Login to WebSynergy.
-
Click Add Applications and expand the Content Management folder.
-
Add the Asset Publisher portlet to your page.
The Asset Publisher portlet is added to your page.
-
Select Document Library Document from the list on the Asset Publisher portlet.
-
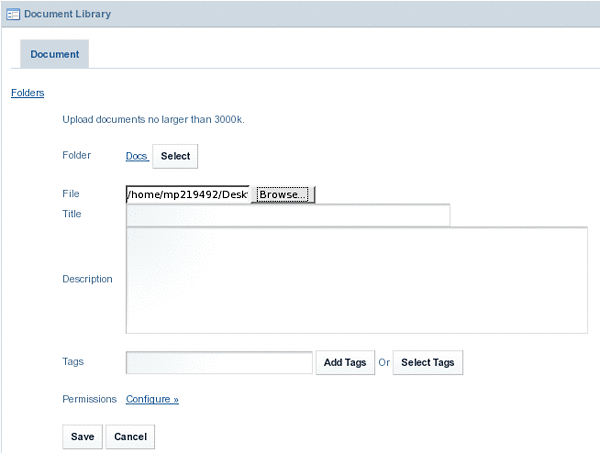
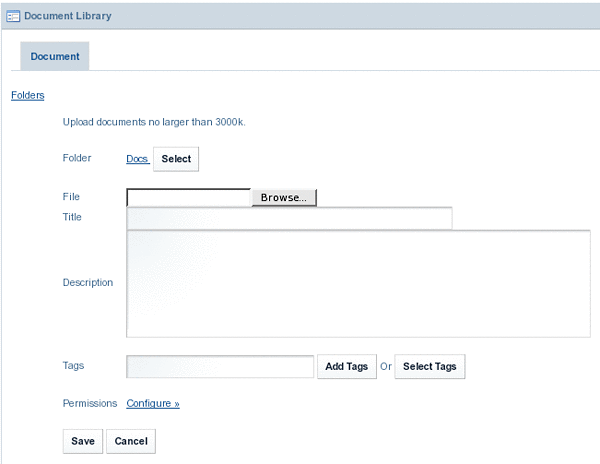
Click Select to select a folder as described in the procedure and browse a document to upload it to the Document Library.
In our example, we are creating a folder called Docs, and uploading a file named Wedding Invitation.
Figure 6–16 Adding a Document Library Document
-
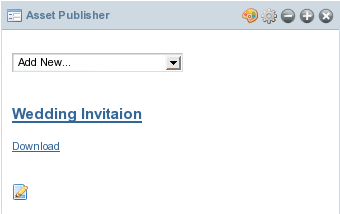
Click Save to save the document to the Document Library.
The document is displayed on the Asset Publisher portlet. You can download the document if required.
Figure 6–17 Saving the document to the Document Library
 To Delete a Document from the Document Library
-
Login to WebSynergy.
-
Click Add Applications and expand the Content Management folder.
-
Add the Asset Publisher portlet to your page.
The Asset Publisher portlet is added to your page.
-
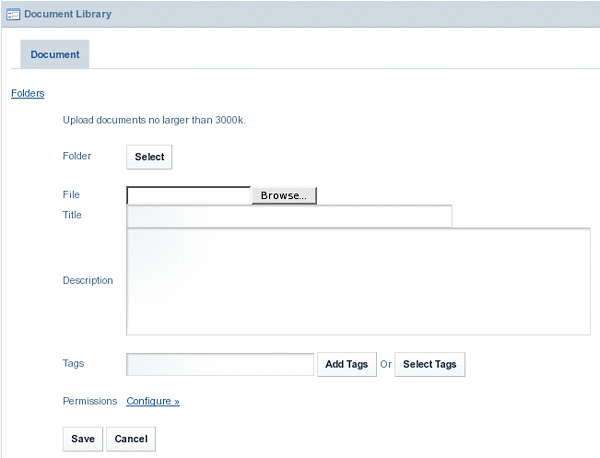
Select Document Library Document from the list on the Asset Publisher portlet.
Figure 6–18 Document Library page
-
Click Select.
All the documentation folders currently available are listed
-
Click Choose against the folder containing the document.
In our example, choose the Docs folder.
Figure 6–19 Choosing a documentation folder
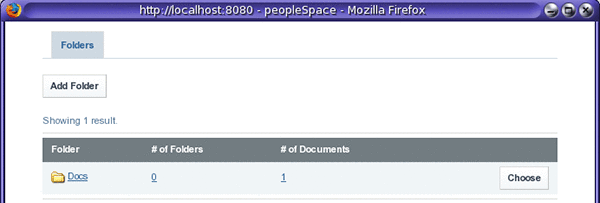
The selected folder is added to the Document Library page. Note that a link for the folder appears near the Select button.
Figure 6–20 Selected folder (containing the document which need to be deleted)
-
Click on the link for the selected folder.
-
Select Delete from Actions, to delete the document.
Figure 6–21 Deleting the document

Image Gallery Image
To be done.
 To add an Image Gallery Image
-
Login to WebSynergy.
-
Click Add Applications and expand the Content Management folder.
-
Add the Asset Publisher portlet to your page.
The Asset Publisher portlet is added to your page.
-
Select Image Gallery Image from the list on the Asset Publisher portlet.
-
The procedure to upload and delete images from the gallery are very much similar to the procedure to To add a Document Library Document and To delete a document from the Document Library respectively.
Journal Article
To be done.
 To add a Journal Article
-
Login to WebSynergy.
-
Click Add Applications and expand the Content Management folder.
-
Add the Asset Publisher portlet to your page.
The Asset Publisher portlet is added to your page.
-
Select Journal Article from the list on the Asset Publisher portlet.
Figure 6–22 Adding a Journal Article
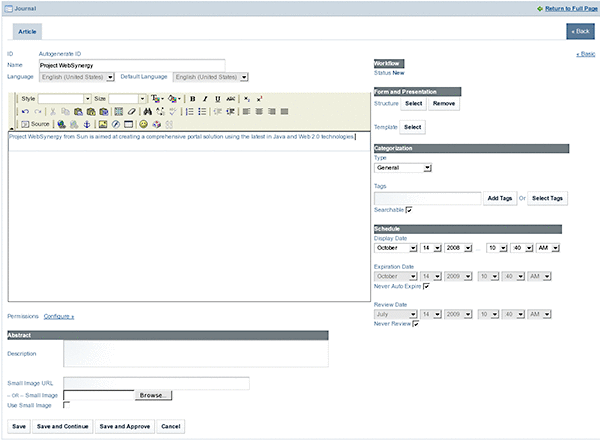
You can create a journal article using all the options available on the screen. You can set an Expiration Date and Review Date for the journal article.
-
Click Save and Approve.
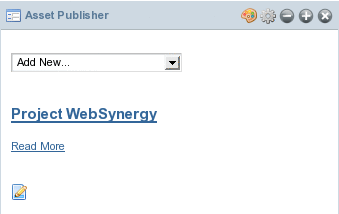
The journal article is displayed on the Asset Publisher portlet. In our example, Project WebSynergy is the name of the journal article.
Figure 6–23 Journal Article visible on the Asset Publisher
-
Click the edit button to make changes to the journal article.
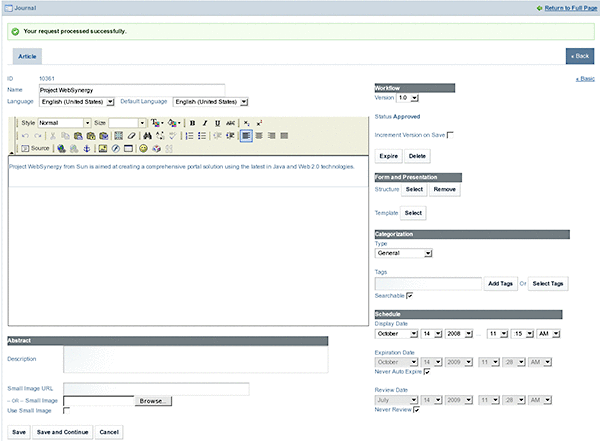
The default version number of the Journal Article is set to 1.0. You can select the Increment Version on Save option to increment the version number of the article, each time you update the article. You can use the Expire button to make the article expire immediately. You can use the Delete button to delete the article.
Figure 6–24 Editing the Journal Article
-
Click Save to save changes to the article.
-
Click Read More link for the journal article to read the article.
Breadcrumb Portlet
It displays the path for the page which you are on.
Categories Navigation Portlet
To be done.
It displays an empty portlet. Do we really have anything to document???
Navigation Portlet
To be done.
It displays an empty portlet. Do we really have anything to document???
Nested Portlets Portlet
To be done.
It displays an empty portlet. Do we really have anything to document???
Recent Documents Portlet
It displays the most recent documents.
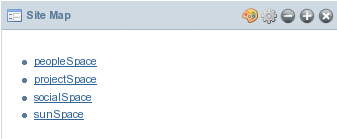
Site Map Portlet
The site map portlet provides the site mapping of your page.
Figure 6–25 Site Map Portlet
Tags Admin Portlet
To be done.
 To add Tags Admin portlet to the Page
-
Login to WebSynergy.
-
Click Add Applications and expand the Content Management folder.
-
Click Add against the Tags Admin Portlet.
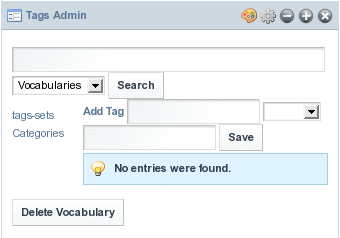
The Tabs Admin portlet is added to your page.
Figure 6–26 Tags Admin Portlet
-
Add a tag and a tag category and click Save.
Figure 6–27 Adding a tag and a tag category

The tag and the tag category are added to the vocabulary.
Figure 6–28 Tag vocabulary
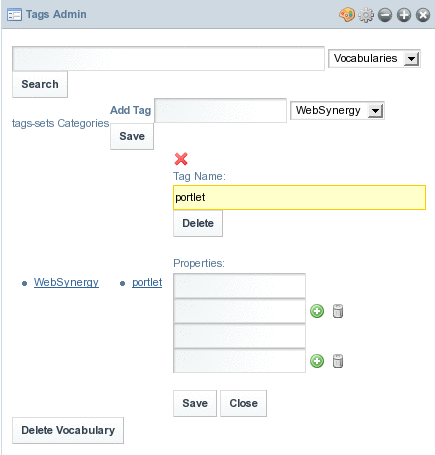
You can Add or Delete the properties associated with the tag.
XSL Content Portlet
To be done.
- © 2010, Oracle Corporation and/or its affiliates
