| Skip Navigation Links | |
| Exit Print View | |

|
Sun Blade X3-2B (formerly Sun Blade X6270 M3) Service Manual |
Sun Blade X3-2B Model Name Change
Getting the Latest Firmware and Software
About the Chassis Monitoring Module (CMM)
Replaceable Server Module Components
Preparing the Sun Blade X3-2B for Service
Obtaining the Server Module Serial Number
Powering Off the Server Module
Performing ESD and Antistatic Prevention Measures
Remove the Server Module from the Sun Blade Chassis
Remove the Server Module Top Cover
Removing or Inserting Filler Panels
Servicing Sun Blade X3-2B Components
Servicing a Storage Drive (CRU)
Replace the System Battery (CRU)
Servicing USB Flash Drives (CRU)
Servicing a Fabric Expansion Module (CRU)
Servicing a RAID Expansion Module (CRU)
Servicing a Processor and Heat Sink Assembly (FRU)
Processor Fault Remind Circuit
Clear Server Module Processor Faults
Servicing the Motherboard Assembly (FRU)
Returning Sun Blade X3-2B to Operation
Install the Server Module Top Cover
Install the Sun Blade X3-2B in the Chassis
Troubleshooting the Sun Blade X3-2B
Diagnosing Server Module Hardware Faults
Troubleshooting Using LED Status Indicators
Using the DIMM and Processor Test Circuit
Troubleshooting Server Module Power States
Firmware and Software Troubleshooting
BIOS Power-On Self-Test (POST) Checkpoints
About POST Code Checkpoint Memory Testing
POST Code Checkpoint Reference
Getting Server Firmware and Software
Firmware and Software Access Options
Available Software Release Packages
The replacement processor is not shipped with a heat sink. Reuse the original processor heat sink.
Before You Begin

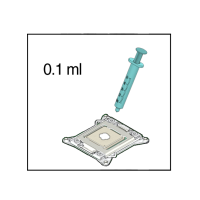
Note - Do not distribute or spread the compound; the pressure applied when attaching the heat sink performs this action.

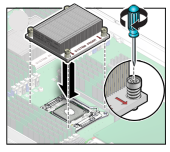
Orient the heat sink so that the screws line up with the mounting posts. The processor heat sink is not symmetrical.
 | Caution - Component damage. When handling the heat sink, do not to transfer the compound to other server components. |
 | Caution - Over-temperature condition. Avoid moving the heat sink after it has contacted the top of the processor. Too much movement could spread the layer of thermal compound, causing voids in the distribution and leading to ineffective heat dissipation and component damage. |

Refer to the Sun Blade X3-2B (formerly Sun Blade X6270 M3) Administration Guide and Setting Up Software and Firmware in Sun Blade X3-2B (formerly Sun Blade X6270 M3) Installation Guide.
Next Steps