JavaScript is required to for searching.
Skip Navigation Links
Exit Print View
Oracle Java CAPS POJO Service Engine User's Guide     Java CAPS Documentation
search filter icon
search icon

Document Information

Using the POJO Service Engine

POJO Service Engine Overview

Providing and Consuming JBI Services

Providing a JBI Service

Operation Parameter Types

Context

Consuming a JBI Service

Getting the Consumer Instance Dynamically

Consuming Services Asynchronously

Using Multiple Threads

Creating POJO Service Engine Projects

Creating a POJO Service Provider (Without Binding)

To Create a POJO Service Provider (Without Binding)

Creating a POJO Service Provider (With Binding)

To Create a POJO Service Provider (With Binding)

Creating a POJO Service Provider in an Existing Java Application

To Create a POJO Service Provider in a Java Application

Creating a POJO Service Consumer (Without Binding)

To Create a POJO Service Consumer (Without Binding)

Creating a POJO Service Consumer (With Binding)

To Create a POJO Service Consumer (With Binding)

POJO Configuration Properties

POJO Service Provider Properties

POJO Service Properties for Binding

POJO Service Consumer Properties

Creating Composite Applications for POJO Service Engine Projects

Creating a Composite Application for a POJO Service Provider (Without Binding)

To Create a Composite Application for a POJO Service Provider (Without Binding)

Creating a Composite Application for a POJO Service Provider (With Binding)

To Create a Composite Application for a POJO Service Provider (With Binding)

Creating a Composite Application for a POJO Service Consumer (Without Binding)

To Create a Composite Application for a POJO Service Consumer (Without Binding)

Creating a Composite Application for a POJO Service Consumer (With Binding)

To Create a Composite Application for a POJO Service Consumer (With Binding)

Using POJO Services With BPEL

Invoking POJO Services from a Business Process

To Invoke a POJO Service from a Business Process

To Create the Composite Application

Calling a Business Process From a POJO Service

To Call a Business Process From a POJO Service

To Create the Composite Application

Configuring Runtime Properties for the POJO Service Engine

To Configure POJO SE Runtime Properties

POJO Service Engine Runtime Property Descriptions

POJO Service Engine API Annotation and Classes

POJO Service Engine API Annotations

POJO Service Engine Non-Annotated Classes

JBI API Classes Relevant to the POJO Service Engine

Creating POJO Service Engine Projects

The POJO Service Engine offers a variety of methods to create service providers and consumers using the NetBeans IDE. You can create providers and consumers with or without binding definitions (WSDL documents), and you can create providers from a wizard or from the Java Editor Palette. Consumers can also be created from the Palette.

Perform any of the following steps to create POJO service providers and consumers:

Creating a POJO Service Provider (Without Binding)

This procedure creates a framework in a Java file for a POJO service provider using a wizard that guides you through the steps. The framework includes annotations and standard methods, and you can customize this framework to define the logic of the service. There is no WSDL document or binding involved in this procedure; a binding can be added when you create the composite application.

To Create a POJO Service Provider (Without Binding)

  1. Right-click in the NetBeans Projects window, and then select New Project.

    The New Project Wizard appears.

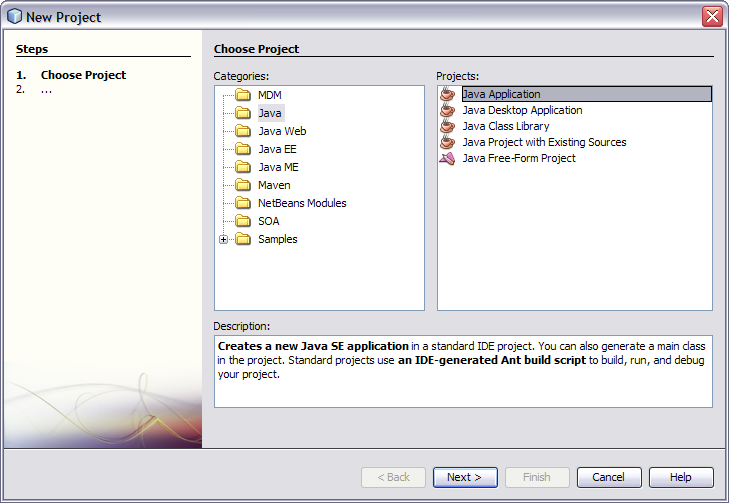
  2. Under Categories, select Java; under Projects, select Java Application.
    image:Figure shows the Choose Project window of the New Project Wizard.
  3. Click Next.

    The Name and Location window appears.
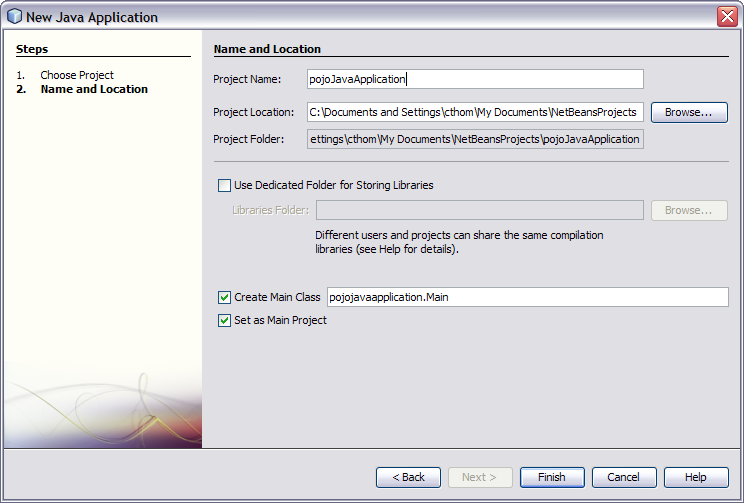
  4. Enter a unique name for the project and a name for the main Java package and class.
    image:Figure shows the Name and Location window of the New Java Application Wizard.
  5. Click Finish.

    The project structure is generated and appears in the Projects window.

  6. Right-click the project you just created, point to New, and then select Other.

    The New File Wizard appears.

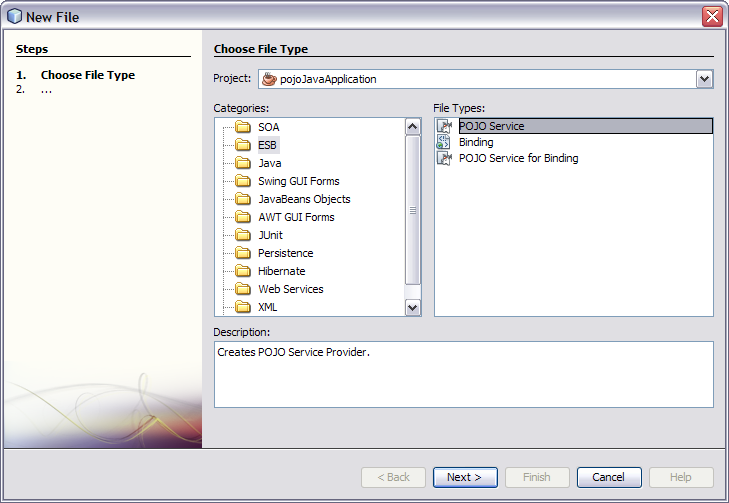
  7. Under Categories, select ESB; under Projects, select POJO Service.
    image:Figure shows the Choose Project window of the New File Wizard.
  8. Click Next.

    The Name and Location window appears.

  9. Fill in the Name and Location properties for the POJO service.

    For more information, see Table 1.

  10. To modify advanced properties for the POJO service, click Advanced.

    The POJO Provider – Advanced properties editor appears.

  11. Modify any of the properties described in Table 2, and then click OK.
  12. On the New POJO Service Wizard, click Finish.

    The new POJO class is generated in the project structure and any library JAR files needed to compile the project are added to the Libraries node of the project. The POJO file includes the @Provider, @Operation, and @Resource annotations.
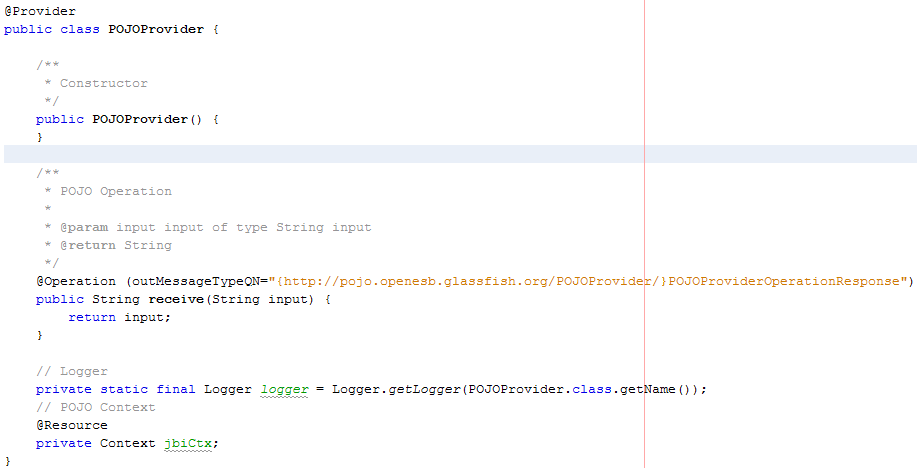

    image:Figure shows the code framework generated for the POJO service.

Next Steps

For instructions on creating a composite application for this project, see Creating a Composite Application for a POJO Service Provider (Without Binding).

Creating a POJO Service Provider (With Binding)

This procedure creates a POJO service provider using a wizard to guide you through the steps. This wizard includes the steps for configuring the binding component for the service provider and automatically generates the WSDL file.

To Create a POJO Service Provider (With Binding)

  1. Right-click in the NetBeans Projects window, and then select New Project.

    The New Project Wizard appears.

  2. Under Categories, select Java; under Projects, select Java Application.
    image:Figure shows the Choose Project window of the New Project Wizard.
  3. Click Next.

    The Name and Location window appears.
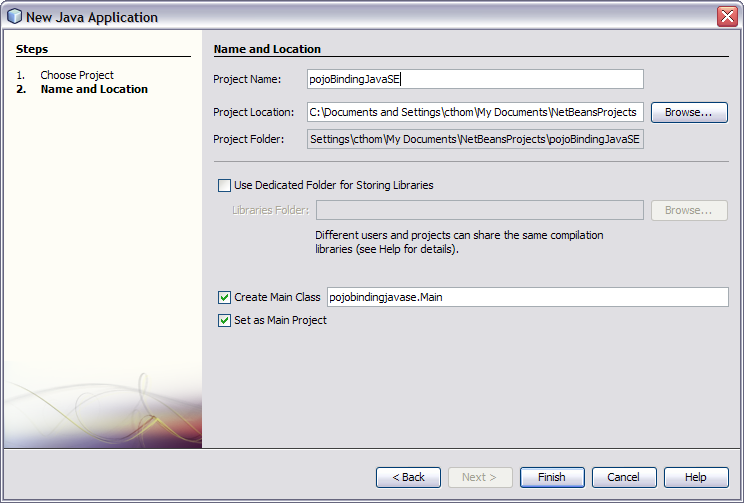
  4. Enter a unique name for the project and a name for the main Java package and class.
    image:Figure shows the Name and Location window of the New Java Application Wizard.
  5. Click Finish.

    The project structure is generated and appears in the Projects window.
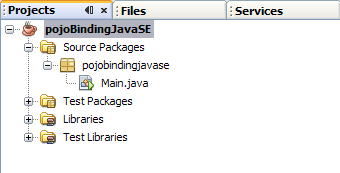

    image:Figure shows the project structure for a Java Application project.
  6. Right-click the project you just created, point to New, and then select Other.

    The New File Wizard appears.

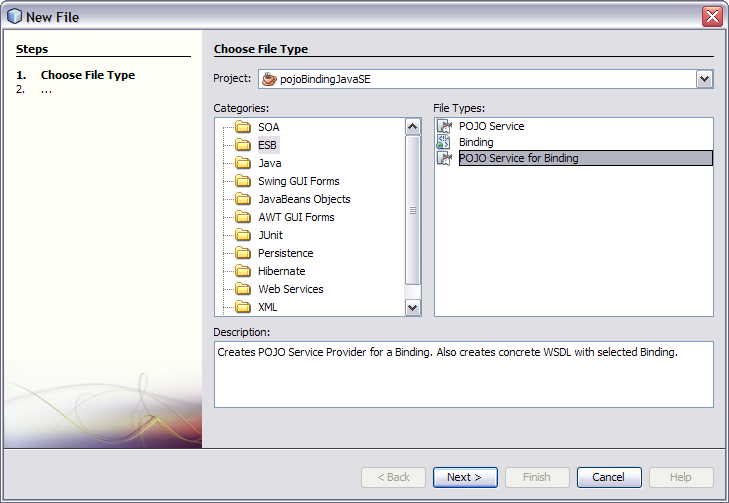
  7. Under Categories, select ESB; under Projects, select POJO Service for Binding.
    image:Figure shows the Choose File Type window of the New File Wizard.
  8. Click Next.

    The Name and Location window for the WSDL file appears.

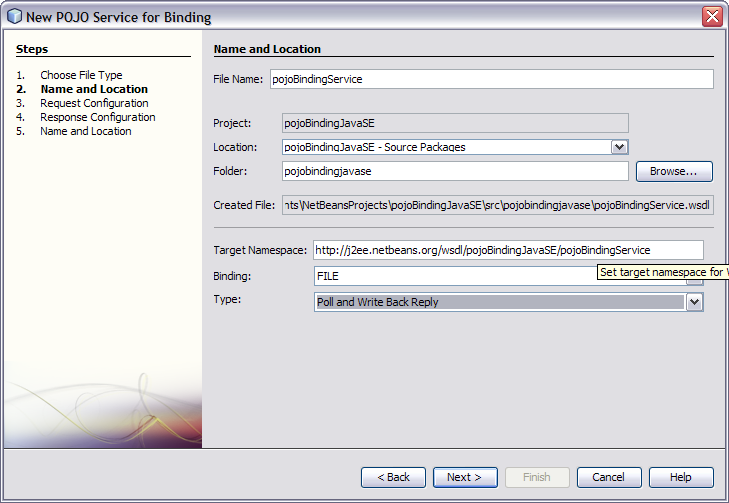
  9. Fill in the Name and Location properties for the POJO service.

    For more information, see Table 3.


    image:Figure shows the Name and Location window for the WSDL binding.

    Note - The sequence of steps changes to reflect the binding component and type you choose. The subsequent steps will vary depending on those two properties.


  10. Click Next.

    The binding configuration window appears.

  11. Enter information about the binding component and type, and then click Next.

    Note - This page varies by binding component and type. For more information about a specific binding component, refer to the user's guide for that component or refer to the property descriptions at the bottom of the window. An example for the File Binding Component is shown below.
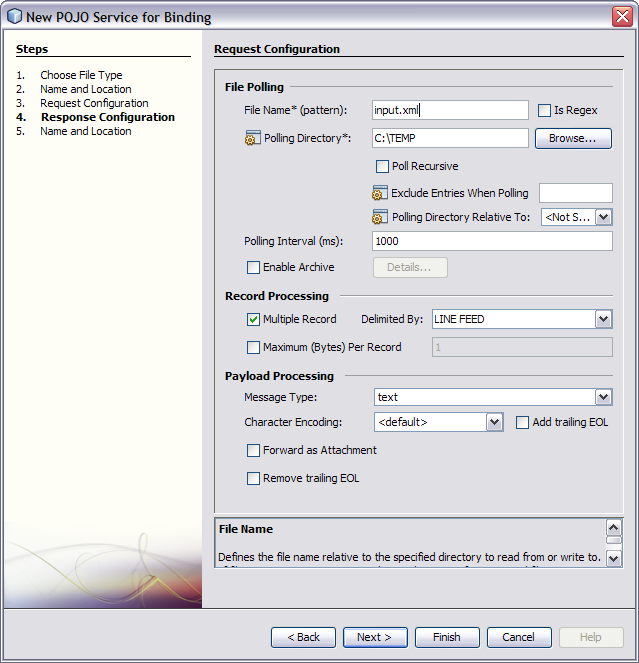


    image:Figure shows the POJO Service for Binding Wizard for a File Binding Component.
  12. If a second page of binding configuration appears, enter the required information and then click Next.
  13. On the Name and Location window for the POJO service, fill in the fields described in Table 1.
  14. On the New POJO Service Wizard, click Finish.

    The new POJO class and WSDL file are generated in the project structure and any library JAR files needed to compile the project are added to the Libraries node of the project. The POJO file includes the @Provider, @Operation, and @Resource annotations.
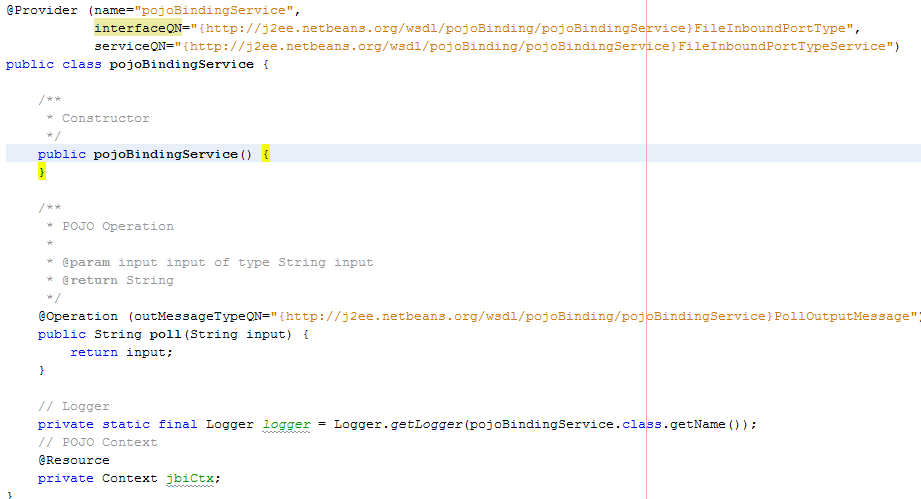

    image:Figure shows the code framework generated for a POJO service provider for binding.

Next Steps

For instructions on creating a composite application for this project, see Creating a Composite Application for a POJO Service Provider (With Binding).

Creating a POJO Service Provider in an Existing Java Application

This procedure creates a POJO service provider in an existing Java file using the Palette on the NetBeans Java Editor. Dragging and dropping a provider into the Java code creates a framework for the service provider, which you can then customize with the needed processing logic. There is no WSDL document or binding involved in this procedure; a binding can be added when you create the composite application.

To Create a POJO Service Provider in a Java Application

  1. Open the Java file to which you want to add the POJO service provider.
  2. If the Palette is not visible, click Window in the NetBeans toolbar and then click Palette.

    The Palette appears to the right of the Java Editor.

  3. Drag and drop a POJO Provider from the Palette to the location in the Java file where you want to insert to POJO service provider.

    The Name and Location Wizard appears.
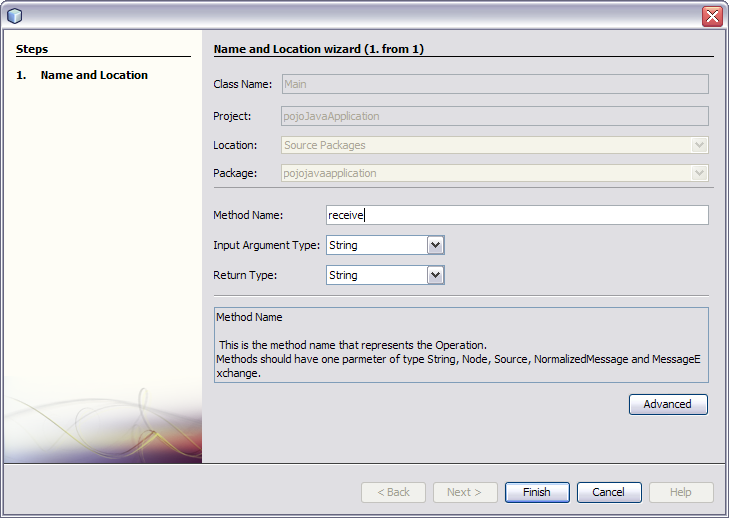

    image:Figure shows the POJO Service Provider Wizard as accessed from a Java class.
  4. Enter the method name, input type, and return type.

    For more information about these fields, see Table 1.

  5. To configure advanced properties, click Advanced.

    The Advanced properties editor appears.

  6. Modify any of the properties described in Table 2.
  7. Click Finish.

    Any library JAR files needed to compile the project are added to the Libraries node of the project. The @Provider, @Operation, and @Resource annotations are added at the insertion point.
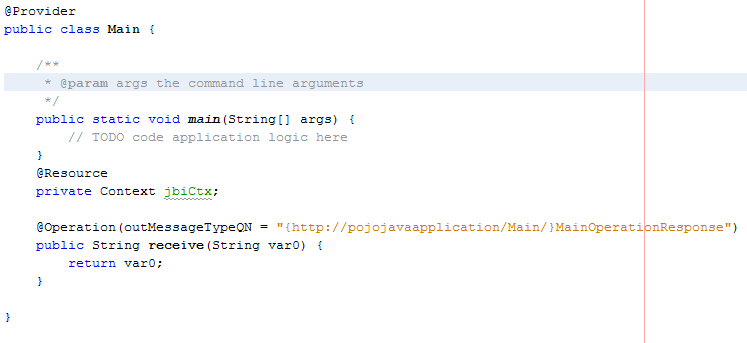

    image:Figure shows the code framework generated for the POJO service provider.

Next Steps

For instructions on creating a composite application for this project, see Creating a Composite Application for a POJO Service Provider (Without Binding).

Creating a POJO Service Consumer (Without Binding)

This procedure creates a service consumer within an existing service provider definition. Dragging and dropping a consumer into the Java code creates a framework for the service consumer, which you can then customize with the needed processing logic. There is no WSDL document or binding involved in this procedure; a binding can be added when you create the composite application.

To Create a POJO Service Consumer (Without Binding)

Before You Begin

The POJO service consumer can only be added within an existing provider. Make sure you have a provider defined in the Java class before beginning this procedure.

  1. Open the Java file to which you want to add the POJO service consumer.
  2. If the Palette is not visible, click Window in the NetBeans toolbar and then click Palette.

    The Palette appears to the right of the Java Editor.

  3. Drag and drop a POJO Consumer from the Palette to the location in the service provider in the Java file where you want to insert to POJO service consumer.

    The POJO SE Service Consumer Wizard appears.
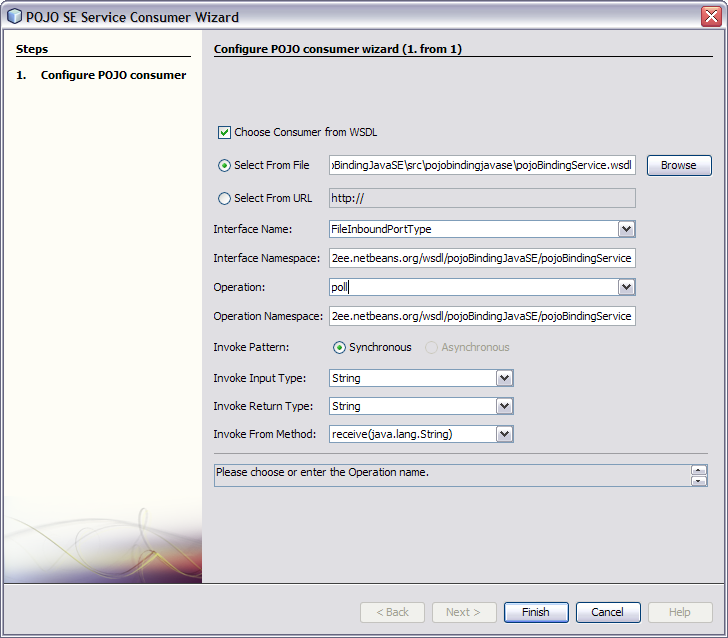

    image:Figure shows the POJO Service Consumer Wizard.
  4. Fill in the consumer properties, as described in POJO Service Consumer Properties.
  5. Click Finish.

    The @ConsumerEndpoint annotation and related methods are added at the insertion point.

Next Steps

For instructions on creating a composite application for this project, see Creating a Composite Application for a POJO Service Consumer (Without Binding).

Creating a POJO Service Consumer (With Binding)

This procedure creates a POJO service consumer in an existing Java file using the Palette on the NetBeans Java Editor. Dragging and dropping a consumer into the Java code creates a framework for the service consumer, which you can then customize with the needed processing logic. When you add the consumer, you also configure the binding component for the service consumer and the WSDL file is automatically generated.

To Create a POJO Service Consumer (With Binding)

Before You Begin

The POJO service consumer can only be added within an existing provider. Make sure you have a provider defined in the Java class before beginning this procedure.

  1. Open the Java file to which you want to add the POJO service consumer.
  2. If the Palette is not visible, click Window in the NetBeans toolbar and then click Palette.

    The Palette appears to the right of the Java Editor.

  3. Drag and drop a POJO Binding Consumer from the Palette to the location in the service provider in the Java file where you want to insert to POJO service consumer.

    The POJO SE Binding Service Consumer Wizard appears.
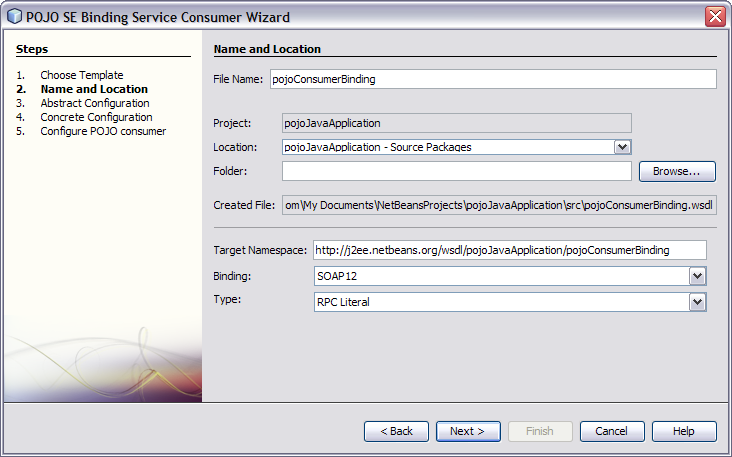

    image:Figure shows the POJO SE Binding Service Consumer Wizard.
  4. Fill in the name and location properties, as described in POJO Service Properties for Binding.

    Note - The sequence of steps changes to reflect the binding component and type you choose. The subsequent steps will vary depending on those two properties.


  5. Click Next.

    The abstract binding configuration window appears.

  6. Enter information about the binding component and type, and then click Next.

    Note - This page varies by binding component and type. For more information about a specific binding component, refer to the user's guide for that component or refer to the property descriptions at the bottom of the window. An example for the HTTP Binding Component is shown below.
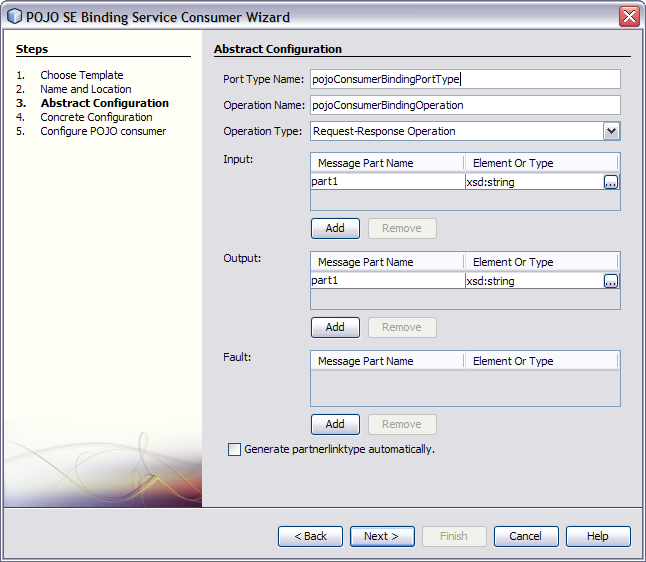


    image:Figure shows an example of an HTTP Binding Component configuration.
  7. If a second page of binding configuration appears, enter the required information and then click Next.
  8. On the Name and Location window for the POJO service, the interface and operation fields are automatically populated. Fill in the fields described in Table 4 beginning with Invoke Pattern.
  9. Click Finish.

    The @ConsumerEndpoint annotation and related methods are added at the insertion point.

Next Steps

For instructions on creating a composite application for this project, see Creating a Composite Application for a POJO Service Consumer (With Binding).

POJO Configuration Properties

When you create a POJO service consumer or provider, with or without binding, you need to configure certain properties so the POJO framework and optionally the WSDL documents can be generated correctly. The following topics describe the properties you need to configure. Note that these do not include specific binding component properties, which you need to configure if you are using bindings. For more information about these properties, see the user's guide for the specific binding component you are using.

POJO Service Provider Properties

The following tables list and describe the properties you can configure when creating a new POJO service. These properties appear on the Name and Location page of the New POJO Service Wizard and on the Advanced Properties Editor, which is accessed from the Name and Location page.

Table 1 POJO Service Provider Name and Location Properties

Property
Description
Class Name
A unique name for the Java class to create for the POJO service.
Location
The location in the project structure to create the Java class and package.
Package
A unique Java package name for the class.
Method Name
The name of the method that represents the operation. This will be automatically generated in the Java class.
Input Argument Type

The input type for the operation. This represents the parameter type for the operation method. Select one of the following values:

  • String (java.lang.string)
  • Source (javax.xml.transform.Source)

  • Normalized Message (javax.jbi.messaging.NormalizedMessage)

  • Node (org.w3c.dom.Node)

  • Document

  • Message Exchange (javax.jbi.messaging.MessageExchange)

Return Type

The output type for the operation. This represents the return type for the operation method. Select one of the following values:

  • String (java.lang.string)
  • Source (javax.xml.transform.Source)

  • Normalized Message (javax.jbi.messaging.NormalizedMessage)

  • Node (org.w3c.dom.Node)

  • Document

  • Void

Table 2 POJO Service Provider Advanced Properties

Property
Description
Endpoint Name
The name of the POJO provider's endpoint.
Interface Name
The local interface name for the POJO provider. If this property is left blank, it defaults to the class name with “Interface” appended. For example, MyPojoInterface.
Interface Namespace
Additional interface namespaces for the POJO provider.
Service Name
The local service name for the POJO provider. If this property is left blank, it defaults to the class name with “Service” appended. For example, MyPojoService.
Service Namespace
The namespace of the JBI service. If this property is left blank, the default namespace will be an HTTP URL with the package name of class reversed and the endpoint name as the path. For example, if the package is org.glassfish.openesb.pojo and the endpoint name is MyPojoProvider, the URL will be http://pojo.openesb.glassfish.org/MyPojoProvider/.
Output Message Type Name
The WSDL message type for output messages for a return type of String, Node, or Source if the consuming JBI component expects the WSDL 1.1 wrapper message to contain these attributes.
Output Message Type Namespace
The namespace of the output message type specified above.

POJO Service Properties for Binding

The following table lists and describes the properties you can configure when creating a new POJO service provider or consumer with a binding component. These properties appear on the Name and Location page of the New POJO Service for Binding Wizard and the POJO SE Binding Service Consumer Wizard.

Table 3 Name and Location Properties for Binding

Property
Description
File Name
A unique name for the binding WSDL document for the POJO service.
Location
The name of the node in the project structure in which to create the WSDL document.
Folder
The name of the folder under the above node in which to create the WSDL document.
Target Namespace
The target namespace for the binding WSDL document.
Binding
The type of binding component to use for the POJO service. This determines the template for the WSDL document.
Type
The type of binding. Note that for some binding components, only a subset of their types is supported.

POJO Service Consumer Properties

The following table lists and describes the properties you can configure when creating a new POJO service consumer. These properties appear on the POJO SE Service Consumer Wizard.

Table 4 POJO Consumer Wizard Properties

Property
Description
Choose Consumer From WSDL
An indicator of whether to create the consumer endpoint from an existing WSDL document. You can specify a local path and filename or the URL for the WSDL document.
Select From File
The path and file name of the local WSDL document to use. Pressing the Tab key after entering this value populates the interface and operation fields.
Select From URL
The URL to the remote WSDL document to use. Pressing the Tab key after entering a URL populates the interface and operation fields.
Interface Name
The name of the consumer interface.
Interface Namespace
The namespace for the consumer interface.
Operation
The type of binding operation for the consumer.
Operation Namespace
The namespace for the binding operation.
Invoke Pattern
An indicator of whether to invoke the consumer synchronously or asynchronously. Select the appropriate checkbox. Both options may not be available for some operations.
Invoke Input Type

The input type for the operation. This represents the parameter type for the operation method. Select one of the following values:

  • String (java.lang.string)
  • Source (javax.xml.transform.Source)

  • Normalized Message (javax.jbi.messaging.NormalizedMessage)

  • Node (org.w3c.dom.Node)

  • Document

  • Message Exchange (javax.jbi.messaging.MessageExchange)

Return Type

The output type for the operation. This represents the return type for the operation method. Select one of the following values:

  • String (java.lang.string)
  • Source (javax.xml.transform.Source)

  • Normalized Message (javax.jbi.messaging.NormalizedMessage)

  • Node (org.w3c.dom.Node)

  • Document

  • Void

Invoke From Method
The method from which the consumer is invoked. When you drag and drop the POJO Consumer from the Palette into a Java method, that method name is automatically populated here.