19 Complete Work Orders
This chapter contains these topics:
-
Section 19.2, "Completing a Work Order without Backflushing,"
-
Section 19.4, "Completing Partial Quantities on Work Orders,"
-
Section 19.5, "Processing Work Orders through Super Backflush,"
-
Section 19.6, "Processing Work Orders Using Quantity at Operation,"
-
Section 19.7, "Completing a Work Order with Serialized Components,"
-
Section 19.8, "Lot Status Processing at Work Order Completion."
19.1 Overview
When you finish production of items on the shop floor, you need to record the completions to inventory in the system. The completion transactions that you enter in the Shop Floor Control system update the item quantity records in the Inventory Management system.
You use the Super Backflush and Completion programs to record completions. Use these programs to perform one of two functions:
-
Report all items as complete when the entire work order is finished
-
Report partial completions as they occur throughout the production process
When you choose to report completions depends on your production cycle time. Depending on the nature of the manufactured item, you can report partial completions or report total completions in one transaction. Reporting partial completions also can indicate the stage or progress that is being made on an order in production, and identify any delays in the production process.
When you use the Completions program to complete more than the quantity ordered, the system highlights the Completed Quantity field and warns you that completing the quantity you designated will generate an overcompletion.
If a previous completion exists for a work order, the system displays information in the lot, grade or potency, and status fields. Also, if you enter a quantity, the system adds inventory to the lot at the grade or potency and the current status.
| Topic | Description |
|---|---|
| Blending, filling, and packaging | When you complete a work order to a blending, holding, or storage tank, the system checks the tank capacity and displays an error if the completion would exceed the tank's capacity.
When you complete inventory the system allows you to access the Dip Volume Calculator/Meter Readings program to enter readings. Work order completions allow you to enter ambient quantities and current temperature and/or density information. The system calculates and stores the standard quantity and weight accordingly. See JD Edwards World Bulk Stock Management Guide. |
| Quality Management test results | As you enter work order completions, including quantity completed and quantity scrapped, you can:
As you backflush labor and material for a work order, you can:
See Working with Test Results in the JD Edwards World Quality Management Guide for more information. |
| Warehouse Management system interface | If you process transactions for a branch/plant that uses warehouse control, the Location Detail window appears when you enter backflush transactions, and a second location detail information record is created. In this case, you select Location Detail Information records for processing. To ensure that the quantities in the Location Detail Information table (F4602) are consistent, you should make a selection from the window.
The original quantity being processed through this transaction program, using the Location Detail window, displays in the top of the Super Backflush window. If the item being processed has a unit of measure structure or storage containers, the system enters them in the detail area of the Location Detail window. Although you can override these values, the system performs the following edits:
The system always displays this window when adding inventory to the branch/plant, except in the following case:
|
| Receipt Routing | When using Receipt Routing at Work Order Completions activate processing option 15 on Work Order Completion (P31114). |
19.2 Completing a Work Order without Backflushing
From Shop Floor Control (G31), choose Discrete Daily Order Reporting
From Daily Order Reporting - Discrete (G3112), choose Partial Completions
Use the Partial or Full Completion program to record completions without backflushing the materials.
To complete a work order without backflushing -
-
Complete the following fields:
-
Order Number
-
Quantity Complete
-
Quantity Scrapped
-
Date Complete
-
Status
-
Lot Status (optional)
-
Memo Lot 1 (optional)
-
Memo Lot 2 (optional)
-
Reason Code (optional)
-
Shift (optional)
-
-
Complete the following fields if you are completing to a location other than the primary location:
-
Location
-
Lot
-
-
Lot/SN Potency or Lot/SN Grade (if defined for the item)
| Field | Explanation |
|---|---|
| Unit of Measure | A user defined code (system 00/type UM) that identifies the unit of measurement for an amount or quantity. For example, it can represent a barrel, box, cubic yard, gallon, an hour, and so on.
Form-specific information If you leave this field blank, the system uses the unit of measure from the Work Order Header table and updates the quantities in the Item Location table in primary units of measure. If this value is not the primary unit of measure, the system converts it to the primary unit of measure. |
19.3 Completing a Work Order through Backflush
Use the Completion with Backflush program to record full or partial completions while backflushing the materials. Running this program completes the quantity to stock.
Completing a work order through backflush consists of:
-
Completing a work order
-
Releasing sales backorders during completions (optional)
-
Managing completions using receipts routing (optional)
-
Set the appropriate processing options to access the Inventory Issues program and to identify the version to use
-
Before you release backorders during completion, set processing options to enable backordered sales orders to appear and to identify the version of the Backorder Release program to use
-
Before you can manage completions using Receipts Routing, set a processing option to initiate the receipt routing process
From Shop Floor Management (G31), choose Daily Order Reporting - Discrete (G3112)
From Daily Order Reporting - Discrete (G3112), choose Completion with Backflush
Figure 19-2 Completion with Backflush screen

Description of "Figure 19-2 Completion with Backflush screen"
-
Complete the following fields:
-
Order Number
-
Quantity Complete
-
Quantity Scrapped
-
Date Complete
-
Status
-
Lot Status (optional)
-
Memo Lot 1 (optional)
-
Memo Lot 2 (optional)
-
Reason Code (optional)
-
Shift (optional)
-
-
Complete the following fields if you are completing to a location other than the primary location:
-
Location
-
Lot
-
Lot/SN Potency or Lot/SN Grade (if defined for the item)
The Work Order Inventory Issues form appears.
Figure 19-3 Work Order Inventory Issues screen

Description of "Figure 19-3 Work Order Inventory Issues screen"
-
-
3. On Work Order Inventory Issues, issue the material by accepting the records displayed.
| Field | Explanation |
|---|---|
| UM | A user defined code (system 00/type UM) that identifies the unit of measurement for an amount or quantity. For example, it can represent a barrel, box, cubic yard, gallon, an hour, and so on.
Form-specific information If you leave this field blank, the system uses the value from the Parts List table and updates the quantities in the Item Location table in the primary unit of measure. |
To release sales backorders during completions
From Shop Floor Management (G31), choose Daily Order Reporting - Discrete (G3112)
From Daily Order Reporting - Discrete (G3112), choose Completion with Backflush
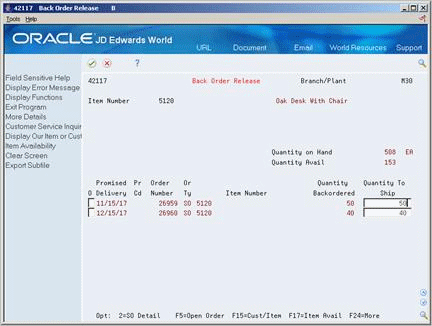
The JD Edwards World Sales Order Management system identifies items that are being manufactured as backordered items. When you complete the items in the Shop Floor Control system using the Completions program, you can release the sales order backorders.
On Completion with Backflush
-
Complete the work order by accepting the records displayed.
-
The Back Order Release form appears.
-
-
On Back Order Release, review the following default information:
-
Order Number
-
Order Type
-
Item Number
-
Quantity Backordered
-
Quantity To Ship
-
If the available quantity plus the amount being received is enough to fill any or all of the backorders, the system enters the amount for that order in the Quantity to Ship field on the Back Order Release form.
| Field | Explanation |
|---|---|
| Quantity Backordered | The number of units backordered in Sales Order Management or in Work Order Processing, using either the entered or the primary unit of measure defined for this item. |
To manage completions using receipts routing
From Stock Based Procurement (G43A), choose Receipt Routing
From Receipt Routing (G43A14), choose Routing/Analysis Revisions
You set up a receipt route in the Procurement system by specifying a unique receipts routing code name in the user defined codes (43/RC) and an operation name in user defined codes (43/OC). You enter a Y in any of the update fields on Receipt Routing Definition to have the system update the appropriate field in the Item Location table when an item arrives at the operation.
The system considers items on-hand and eligible for payment only at the end of a receipt route. You must enter a Y (Yes) in the On-Hand column for the system to assign the last operation to a route. The system assigns a Y in the Pay field on the operation to which a Y is assigned in the On-Hand column.
You enter disposition information for a route in the Procurement system when you use the Disposition Setup program. This information includes whether items dispositioned out of a receipt route are eligible for payment. If you classify a category as eligible for payment, the system creates journal entries when it dispositions items in the category. The code in the General Ledger Category field determines which account the system debits. The system credits the Received Not Vouchered account.
For the system to direct items through a receipt route, you must assign a route to each item. You assign receipt routes to items based on item/supplier relationships.
Note:
For manufactured items, the supplier must be *WO.On Routing/Analysis Revisions
Figure 19-5 Routing/Analysis Revisions screen

Description of "Figure 19-5 Routing/Analysis Revisions screen"
Complete the following fields:
-
Normal Route
-
Effective From
-
Effective Through
| Topic | Description |
|---|---|
| Issuing material from locations not listed on the parts list | After you complete the work order by accepting the records shown on Completion with Backflush, do the following:
|
| Locating the status of the receipts routing | Use Status Inquiry to locate the status of the receipts routing. You can access Operation Movement Detail to view the details of a step. You can set a processing option in the Completions program to initiate receipts routing. |
See Also:
19.4 Completing Partial Quantities on Work Orders
From Shop Floor Control (G31), choose Discrete Daily Order Reporting
From Daily Order Reporting - Discrete (G3112), choose Partial Completion
You can use the Completion program to record completed quantities for a work order in one of two ways:
-
Full completion allows you to complete all quantities for all materials on a work order.
-
Partial completion allows you to complete parts of the quantity ordered for a work order.
The form displays completed and scrapped quantities and percent complete information for a work order.
Complete the following tasks:
-
Complete partial quantities on a work order
-
Complete a work order for multiple locations (optional)
To complete partial quantities on work orders
-
Complete the following fields:
-
Order Number
-
Completed Quantities
-
Scrapped Quantities
-
-
Complete the following optional fields:
-
Date Complete
-
Memo Lot 1
-
Memo Lot 2
-
Reason Code
-
Shift
-
-
Complete the following field if you did not set it in the processing options:
-
Status
-
-
Complete the following fields if you are not completing to the primary location:
-
Location
-
Lot
-
Lot Status
-
Lot/SN Potency or Lot/SN Grade (if defined for the item)
-
To complete a work order for multiple locations
On Partial Completion
-
Complete the following fields:
-
Order Number
-
Completed Quantities
-
Scrapped Quantities
-
-
Complete the following optional fields:
-
Date Complete
-
Memo Lot 1
-
Memo Lot 2
-
Reason Code
-
Shift
-
-
Complete the following field if you did not set it in the processing options:
-
Status
-
-
Complete the following fields if you're not completing to the primary location:
-
Location
-
Lot
-
Lot Status
-
Lot/SN Potency or Lot/SN Grade (if defined for the item)
-
-
Choose Select Multiple Locations.
Note:
In order to access this window, a Completed Quantity must be entered on the completions form.
Figure 19-7 Select Multiple Locations window

Description of "Figure 19-7 Select Multiple Locations window"
-
On Select Multiple Locations, complete the following fields:
-
Quantity Completed
-
Location
-
Lot
-
-
Review the following default information:
-
Branch/Plant
-
19.5 Processing Work Orders through Super Backflush
From Shop Floor Control (G31), choose Discrete Daily Order Reporting
From Daily Order Reporting - Discrete (G3112), choose Super Backflush
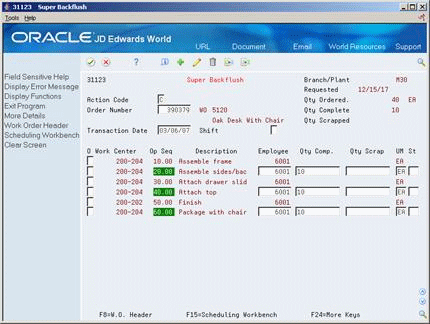
Super Backflush is a DREAM Writer batch program that creates backflush transactions against a work order or rate schedule at pay points defined in the routing. Super backflushing allows you to relieve inventory at strategic points throughout the manufacturing process.
For example, you manufacture bicycles. Not all parts are required at the first operation. As component material is brought into the production process, it is relieved from inventory at points within this process. In this example, the cycle time might be three days.
Rather than relieving all parts for the work order or rate schedule at the start date, you can define more logical points within the production process to relieve the inventory as you use it. You can define operations in the parent item's routing at which various components are needed and at which operation you want the system to record the inventory transaction.
You can enter completed and scrapped quantities by operation and employee. The system automatically completes the work order, or you can review and revise the transactions. The backflush procedure can perform the following transactions by operation:
-
Issue parts to the work order or rate schedule
-
Record hours and quantities against the work order or rate schedule at standard values
-
Record inventory completions
The system records the transactions from the pay point you indicate in the routing back to the first operation or the previous pay point, if one has been defined.
You can set processing options for the Super Backflush program to:
-
Indicate the versions of associated programs to access
-
Select document types to be used when creating transactions
-
Select update status codes for operations and the work order or rate schedule header
-
Indicate a status code beyond which entries to work orders or rate schedules cannot be made
-
Store hours and quantities in related tables for review.
-
Update hours and quantities for later processing by manufacturing accounting
-
Either access a specified version of the following programs or automatically execute the process without the form displaying:
-
Hours and Quantity
-
Material Issues
-
Work Order Completions
-
To process a work order through super backflush
-
Complete the following fields:
-
Order Number
-
Transaction Date
-
Shift
-
Employee
-
Quantity Complete
-
Status
-
-
Access the detail area.
Figure 19-9 Super Backflush screen (Detail area)

Description of "Figure 19-9 Super Backflush screen (Detail area)"
-
Complete the following optional field:
-
Pay Point Status
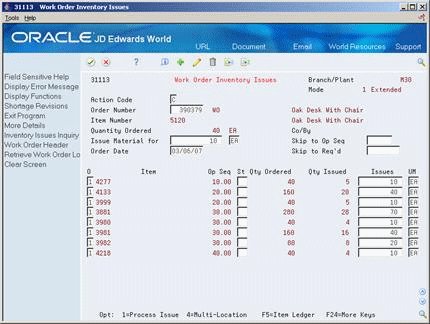
The Work Order Inventory Issues form appears.
Figure 19-10 Work Order Inventory Issues screen
Description of "Figure 19-10 Work Order Inventory Issues screen"
On Work Order Inventory Issues, the system automatically provides values in the following fields:
-
-
Process all transaction forms and the system processes the information according to the issue type code and pay point type assigned to each operation.
If an operation is defined as a pay point, and the pay point is set up to issue material and report labor, when the operation is recorded as complete, the system issues the ingredients and backflushes labor from the last defined pay point up to the previous pay point.
The W.O. Time Entry form appears.
-
On W.O. Time Entry, review the following fields:
-
Employee Number
-
Operation Sequence Number
-
Type of Hours
-
Beginning Hours
-
Ending Hours
-
Hours
-
Quantity
-
Unit of Measure
-
Status
-
Employee Name
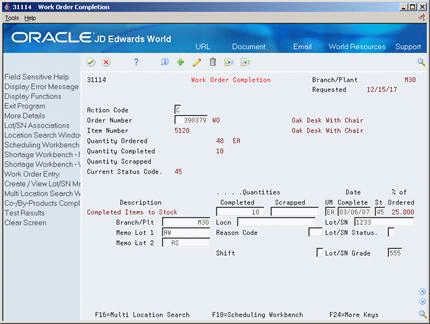
The Work Order Completion form appears.
Figure 19-12 Work Order Completion screen
Description of "Figure 19-12 Work Order Completion screen"
-
-
On Work Order Completion, accept the transaction.
| Field | Explanation |
|---|---|
| Pay Point Status | A code that indicates whether the operation should be taken to complete or partially complete status. Valid codes are:
Blank Not reported PQ – Partially complete C – Completed |
| UM | A user defined code (system 00/type UM) that identifies the unit of measurement for an amount or quantity. For example, it can represent a barrel, box, cubic yard, gallon, an hour, and so on.
Form-specific information If you leave this field blank, the system uses the value from the Parts List table and updates the quantities in the Item Location table in the primary unit of measure. |
See Also:
-
Section 17.6, "Reviewing Hours and Quantities Transactions" for information on the statuses of work orders.
19.6 Processing Work Orders Using Quantity at Operation
From Shop Floor Control (G31), choose Discrete Daily Order Reporting
From Daily Order Reporting - Discrete (G3112), choose Hours & Quantities
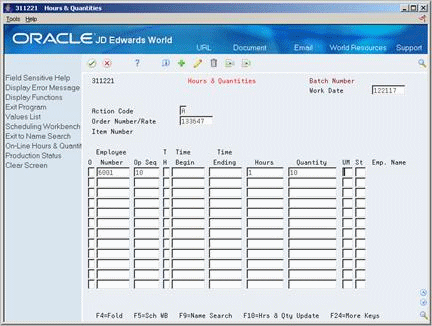
You report quantities against work order operations using either Hours and Quantities or Super Backflush. These programs differ in the following ways:
-
Hours and Quantities allows entry of different types of hours worked, in addition to quantities.
-
Super Backflush allows entry of quantities only.
-
Hours and Quantities runs in batch mode. After you enter hours and quantities, you can review and revise these hours and quantities until you update the work order routing.
-
You update Super Backflush quantities online.
You can enter completed and scrapped quantities by operation and employee. The system completes the work order if the last operation is defined as a pay point, or you can review and revise the transactions. However, quantities completed at a given operation cannot exceed the quantity completed at the preceding operation. For example, Super Backflush totals the entries for quantity completed and scrapped for the operation and compares that to the quantity at operation. If the total exceeds the quantity at operation, the system highlights the fields and displays an error message.
When you use Hours and Quantities entry, before the update process, the system verifies the quantity at operation as though the transactions were updated in the Work Order Routing table. The system uses the previously entered data to verify the quantity at operation. This only occurs for data entered on the current day or previous to the current day.
You can set a processing option for the Super Backflush program to indicate whether the system verifies, for a given operation, that the total quantity completed plus scrapped does not exceed the quantity at operation.
Set the appropriate processing option to verify the total of the quantity completed plus scrapped does not exceed the Quantity at Operation for a given operation
To complete a work order using quantity at operation
On Hours and Quantities
-
Complete the following fields:
-
Work Date
-
Shift
-
Order Number
-
Employee Number
-
Operation Number
-
Type Hours
-
Hours
-
Quantity Complete
-
-
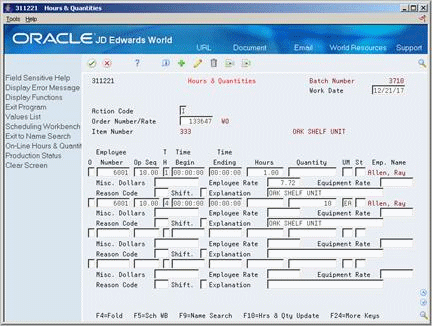
Access the detail area.
-
-
Miscellaneous Dollars
-
Reason Code
-
Employee Rate
-
The following graphic illustrates the system highlighted quantity when you enter a quantity that exceeds the Quantity at Operation:
Figure 19-15 Hours and Quantities screen (Quantity entered exceeds Quantity at Operation)

Description of "Figure 19-15 Hours and Quantities screen (Quantity entered exceeds Quantity at Operation)"
| Topic | Description |
|---|---|
| Non-pay points | Super Backflush only allows entry for pay points. To handle non-pay points, Super Backflush considers the quantity at operation for a given operation to be the total of the quantity at that operation plus the quantity at operation for all previous non-pay points since the last pay point. |
| Import/Export | This program supports Import/Export Functionality. See JD Edwards World Technical Foundation Guide for more information. |
19.7 Completing a Work Order with Serialized Components
From Shop Floor Control (G31), choose Discrete Daily Order Reporting
From Daily Order Reporting - Discrete (G3112), choose Full Completion
When you record a completion for serialized assemblies, the system accesses the Associate Issued Item LSN's program. The associations form is only accessible if you are associating serial number controlled components to serial number assemblies. The system displays the pre-assigned serial numbers and any memo lot information.
By setting a processing option appropriately, you can use one of two display modes of the Associate Issued Item LSN's program:
-
Associate components with a single assembly
-
Display all components and associates to multiple LSNs
After you generate serial numbers for your work order, you associate your serialized components to a serialized assembly. To associate a serialized component to a serialized assembly, enter the associating quantity.
In addition, the Completion program allows you to enter a memo lot number that is used when both lot and serial numbers are required for tracking assemblies. The system verifies the memo lot number and serial number if you set the Serial Number Required field on the Item Branch/Plant Information form appropriately.
Caution:
If you set the appropriate processing options in the Completion program, the system allows you to complete multiple items using the same serial number.
| Topic | Description |
|---|---|
| Completing non-serialized components | If you complete work orders with non-serialized components you cannot assign serial numbers to the assemblies at completion. |
| Associating manufactured items with component items when inventory is issued | The association between manufactured items and their components can be made when issuing inventory. This is done by pressing F10 to bring up the Assign Serial Numbers program (P3105) from within the Inventory Issues program (P31113). After making a selection, the system establishes a pending association with a sequence number that will be used when the work order is completed.
When completing the work order, ensure that the Single Format Associations window will be called by setting processing option 23 to blank on Full Completion (P31114). When completing the work order the associations will already have been made. After inquiring to view the associations, the 'pending' status will be changed to 'associated' when the screen is updated with C in the Action code. |
To complete a work order with serialized components
-
Complete the following fields to locate your order:
-
Order Number
-
Branch/Plant
-
-
Complete the following field to record a completed quantity:
-
Completed Quantity
The system displays Serial Number Associations.
Figure 19-17 Serial Number Associations screen

Description of "Figure 19-17 Serial Number Associations screen"
-
-
3. Press F17 to select a Parent Lot/SN:
Figure 19-18 Assign Serial Numbers screen

Description of "Figure 19-18 Assign Serial Numbers screen"
After a selection has been made the program returns to the Serial Number Associations window, populating the Assembly Information Lot/SN:
-
4. Press F15 to select from Serialized Items Issued:
Figure 19-19 Serialized Items Issued screen

Description of "Figure 19-19 Serialized Items Issued screen"
Pressing enter after making a selection returns to the Serial Number Associations window.
-
5. Now that both Parent and Component Lot/SN Associations have been made, complete the following fields:
-
Enter A in the Action Code
-
Optionally enter Memo Lot 1 and Memo Lot 2
-
After pressing Enter the system will default in the next available sequence number.
Figure 19-20 Serial Number Associations screen

Description of "Figure 19-20 Serial Number Associations screen"
The Full Completion screen will be displayed:
| Field | Explanation |
|---|---|
| Lot/SN | A number that identifies a lot or a serial number. A lot is a group of items with similar characteristics. |
| Memo Lot 1 | A higher classification or grouping of serial number or lot processed items, maintained within the lot master (F4108). |
| Memo Lot 2 | A higher classification or grouping of memo lot 1 maintained within the lot master (F4108). |
19.8 Lot Status Processing at Work Order Completion
The following section details how Lot Status is handled during Full, First Partial and Subsequent Work Order Completions (P31114) when Lot Processing has been activated.
19.8.1 Full Completion/First Partial Completion:
If the Lot was entered on the Work Order Header during Work Order entry, the system will retrieve the Lot Number/Lot Status from the Lot Master file (F4108) and display it on the video V31114 (field LOTN) at the time of completion. The Lot Master record is created at the time the lot is entered on the Work Order Header.
If the Lot is blank (not entered at Work Order entry), the system will retrieve the Lot Status from Item Branch File (F4102) and display it.
The user can manually override the lot status with any valid value, including blank. The Completion program will use the Lot Status that is populated on the video at the time of completion to update or create:
-
Lot Master Revisions (F4108)
-
Item Location (F41021)
-
Item Ledger (F4111)
For manual override, the processing option on Super Backflush (P31123), must be set to call the Work Order Completion program (P31114).
19.8.2 Subsequent Completions:
The Completion program will display the Location and Lot from the previous completion as stored in the F4801. It will display the Lot Status from the Item Location File (F41021)
The user can manually override the lot status with any valid value, including blank. The Completion program will use the Lot Status that is populated on the video at the time of completion to update or create:
-
Lot Master Revisions (F4108)
-
Item Location (F41021)
-
Item Ledger (F4111)
For manual override, the processing option on Super Backflush (P31123), must be set to call the Work Order Completion program (P31114).
The Lot Status on the video at the time the user presses enter, must be an allowed value as defined in processing option 7 on the Work Order Completion program (P31114).

