66 Set Up Job Information
Before you can use your system to define the jobs within your organization, you must define pay and job evaluation information. You define pay information to establish the pay ranges or amounts associated with each job.
To specify the methods that you use to evaluate jobs, you define job evaluation information. You use job evaluations to determine equitable pay ranges for jobs. To specify default job information for employees in a specific business unit, you also can set up a cross-reference table by business unit.
This chapter contains these topics:
-
Set up the user defined codes for jobs. See Section 61.1, "Setting Up User Defined Codes for Human Resources."
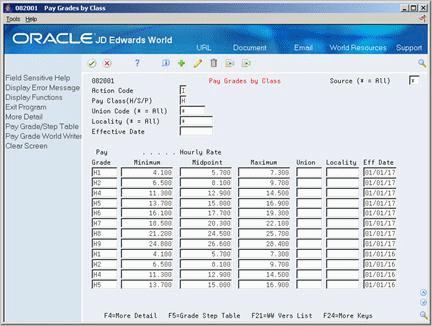
66.1 Setting Up Pay Grades
From Human Resources (G08), choose Job Specifications
From Job Specifications (G08J1), enter 29
From Job Specifications (G08J4), choose Pay Grades by Class
To establish categories for grouping employees according to pay ranges, you can define pay grades for each pay class within your organization. A pay class indicates how an employee is paid, such as salary, hourly, and so on. For example, within the pay class, salaried, you can define pay grades 1 through 10. For each of these pay grades, you define a minimum, midpoint, and maximum salary amount. These amounts define the pay range for the pay grade. For example, the pay range for pay grade 1 might be:
-
Minimum = 20,000.00
-
Midpoint = 25,000.00
-
Maximum = 30,000.00
This means that the annual salary for an employee in pay grade 1 can be any amount between 20,000.00 and 30,000.00.
For each pay grade, you can define separate pay ranges for each of the following:
-
Locality
-
Union
-
Salary data source
-
Effective date
For example, if your organization has three locations in different areas of the country, you might want the pay ranges for employees in the same job to vary according to the location where the employees work. When you create a pay grade, you can define the following pay range for each of the three locations:
| Location | Pay Range |
|---|---|
| West Area | Minimum = 25,000
Midpoint = 30,000 Maximum = 35,000 |
| Midwest Area | Minimum = 28,000
Midpoint = 33,000 Maximum = 38,000 |
| East Area | Minimum = 31,000
Midpoint = 36,000 Maximum = 41,000 |
When you define pay grades by class, you establish a permanent record of the pay ranges for your organization's pay grades. The system uses these pay ranges to calculate compa-ratios for the employees that you assign to these pay grades. When you enter employee information, the system displays either an error or a warning message when you enter a rate that is not within the pay range for the employee's pay grade.
The type of message that appears depends on how you set your system constants.
This program updates the Pay Grade and Salary Range Table (F082001).
-
Complete the following field:
-
Pay Class (H/S/P)
-
-
To specify information that applies to all (or most) of the pay grades in this pay class, complete any of the following fields:
-
Source
-
Union Code
-
Locality
-
Effective Date
-
-
To define a pay grade, complete the following fields:
-
Pay Grade
-
Minimum
-
Midpoint
-
Maximum
-
-
To enter information that varies from the information that you entered for the pay class, complete the following optional fields:
-
Union
-
Locality
-
Effective Date
-
-
Access the detail area.
Figure 66-2 Pay Grades by Class (Detail) screen
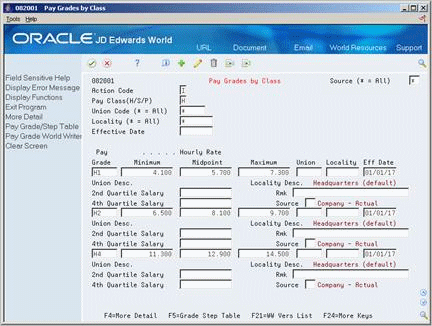
Description of ''Figure 66-2 Pay Grades by Class (Detail) screen''
-
Complete any of the following optional fields:
-
Second Quartile Salary
-
Fourth Quartile Salary
-
Remark
-
Source
-
| Field | Explanation |
|---|---|
| Pay Class (H/S/P) | A code that indicates how an employee is paid. Valid codes are:
" " – Blank H – Hourly S – Salaried P – Piecework |
| Source | A user defined code (08/SS) that identifies the source of the salary information. To display all pay grades regardless of the source, place an asterisk (*) in this field. |
| Union | A user defined code (07/UN) that represents the union or plan in which the employee or group of employees work or participate. |
| Locality | A user defined code (07/SL) that defines the different salary localities within an organization. For example, you can compare salaries for employees on the East Coast with employees in the Midwest.
Form-specific information This field appears in following two sections of this form:
|
| Effective Date | The date on which this transaction takes effect. The effective date is used generically. It can be the date of the next raise, a lease effective date, a price or cost effective date, a currency effective date, a tax rate effective date, change in well status, or whatever is appropriate. |
| Pay Grade | A code that designates a category for grouping employees according to pay ranges. For each pay grade, you enter a pay range that includes a minimum, a midpoint, and a maximum pay rate. The system uses these pay ranges to calculate compa-ratios for the employees that you assign to pay grades. After you enter a pay grade for an employee, the system displays an error or warning message if you enter a rate for the employee that is not within the pay range for the employee's pay grade.
To set up pay grades, use Pay Grades by Class (P082001). |
| Minimum | The minimum salary or hourly rate allowed for a pay grade.
The system displays a warning or error message (depending on processing options) when you enter a pay rate for an employee that is lower than the minimum rate for the pay grade. |
| Midpoint | The midpoint salary or hourly rate for a pay grade or pay range.
For job IDs with a defined pay grade, you enter the midpoint amount in the Pay Grade table (F082001). For job IDs that you evaluated by points, the system calculates the midpoint amount using a Pay Range Formula table (F08290). The system calculates a compa-ratio (data item #CRA) for an employee by dividing the employee's salary or rate by the midpoint for the employee's pay grade. |
| Maximum | The maximum salary or hourly rate for a pay grade.
The system displays a warning or error message (depending on processing options) when you enter a pay rate for an employee that is higher than the maximum rate for the pay grade. |
| Rmk | A generic field that you use for a remark, description, name, or address. |
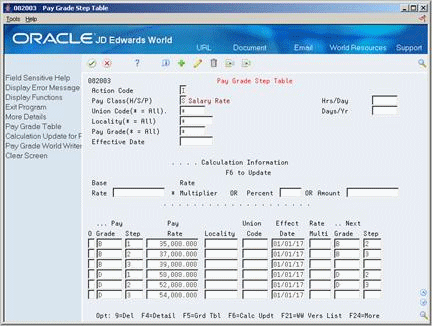
66.2 Setting Up Pay Grade Steps
From Human Resources (G08), choose Job Specifications
From Job Specifications (G08J1), enter 29
From Job Specifications (G08J4), choose Pay Grade Step Table
To ensure that all of the employees working in a job receive the same rate of pay, and to establish progression within a pay grade, you can set up pay grade steps. For example, you might have a pay grade, A, that contains pay steps A1, A2, and A3. Employees in step A1 receive 15.00 per hour, employees in step A2 receive 15.50 per hour, and employees in step A3 receive 16.00 per hour.
Setting up pay grade steps lets you automate the process of:
-
Tracking pay information for employees. When you enter employee information, the system automatically calculates the employee's salary or hourly rate, based on the pay grade step that you enter for the employee.
-
Advancing employees from one pay grade step to the next.
-
Updating pay rates for multiple pay grades and pay steps.
When you define pay grade steps, you can save time and reduce calculation errors by having the system automatically calculate the pay rates for a group of steps. You enter a base pay rate that applies to the group of steps, and then enter a pay rate multiplier for each step. The system automatically calculates the rate for each step by multiplying the base pay rate by each step's pay rate multiplier.
Setting up pay grade steps includes:
-
Setting up pay grade steps individually
-
Setting up pay grade steps using a pay rate multiplier
When you set up pay grade steps individually, you enter a pay rate for each pay grade step. When you set up pay grade steps using a pay rate multiplier, you enter a base pay rate, and apply a pay rate multiplier to each pay grade step.
This program updates the Pay Grade and Salary Range Table (F082001).
66.2.1 What You Should Know About
| Topic | Description |
|---|---|
| Setting up pay grades in the Pay Grade/Step table | You can define the pay grades at the same time that you define pay grade steps. You do not need to define a pay grade in the Pay Grade and Salary Range table (F082001) to set up pay grade steps. |
To set up pay grade steps individually
-
Complete the following field:
-
Pay Class
-
-
To specify information that applies to all (or most) of the pay grade steps, complete any of the following fields:
-
Union Code
-
Locality
-
Hours/Days
-
Days/Year
-
Effective Date
-
-
For each step that you need to set up, complete the following fields:
-
Pay Grade
-
Pay Grade Step
-
Pay Rate
-
-
Complete the following optional fields:
-
Next Pay Grade
-
Next Pay Grade Step
-
-
Access the detail area.
Figure 66-4 Pay Grade Step Table (Detail) screen
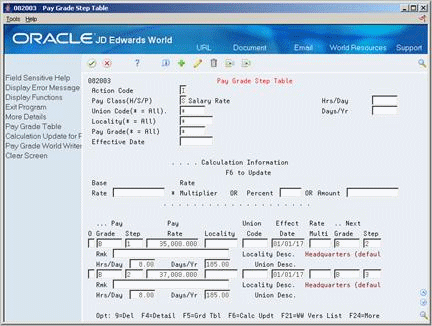
Description of ''Figure 66-4 Pay Grade Step Table (Detail) screen''
-
To specify information for this step that varies from the information that you entered for the pay class, complete the following fields:
-
Locality
-
Union Code
-
Effective Date
-
Hours/Day
-
Days/Year
-
| Field | Explanation |
|---|---|
| Pay Class(H/S/P) | A code that indicates how an employee is paid. Valid codes are:
" " – Blank H – Hourly S – Salaried P – Piecework |
| Union Code | A user defined code (07/UN) that represents the union or plan in which the employee or group of employees work or participate. |
| Locality | A user defined code (07/SL) that defines the different salary localities within an organization. For example, you can compare salaries for employees on the East Coast with employees in the Midwest. |
| Hrs/Day | The number of hours in a day that the employee's normal work schedule is different from the standard. If you leave this field blank, the default is the standard number of hours per day as defined in the payroll company constants.
For example, if the standard number of hours in a day is 8 and an employee is scheduled for 7 hours per day on a regular basis, enter 7 in this field. |
| Days/Yr | The number of work days in a year. The number of standard days per year multiplied by the number of hours per day equals the standard hours per year. When you have set up the human resources constants to use the pay grade step table as the default pay rate source, the system calculates the salary for an employee by multiplying the standard days per year by the employee's hourly rate. |
| Effect Date | The date on which this transaction takes effect. The effective date is used generically. It can be the date of the next raise, a lease effective date, a price or cost effective date, a currency effective date, a tax rate effective date, change in well status, or whatever is appropriate. |
| Pay Grade | A code that designates a category for grouping employees according to pay ranges. For each pay grade, you enter a pay range that includes a minimum, a midpoint, and a maximum pay rate. The system uses these pay ranges to calculate compa-ratios for the employees that you assign to pay grades. After you enter a pay grade for an employee, the system displays an error or warning message if you enter a rate for the employee that is not within the pay range for the employee's pay grade.
To set up pay grades, use Pay Grades by Class (P082001). |
To set up pay grade steps using a pay rate multiplier
On Pay Grade Step Table
-
Complete the following field:
-
Pay Class
-
-
To specify information that applies to all (or most) of the pay grade steps, complete any of the following fields:
-
Union Code
-
Locality
-
Hours/Days
-
Days/Year
-
Effective Date
-
-
Complete the following field:
-
Base Rate
-
-
For each step that you need to set up, complete the following fields:
-
Pay Grade
-
Pay Grade Step
-
Rate Multiplier
-
-
Complete the following optional fields:
-
Next Pay Grade
-
Next Pay Grade Step
-
-
Access the detail area.
-
To specify information for this step that varies from the information that you entered for the pay class, complete the following fields:
-
Locality
-
Union Code
-
Effective Date
-
Hours/Day
-
Days/Year
-
-
To cause the system to calculate the pay rate for each pay grade step you entered, choose the Calculation Update function.
66.3 Setting Up Pay Range Formulas
From Human Resources (G08), choose Job Specifications
From Job Specifications (G08J1), enter 29
From Job Specifications (G08J4), choose Define Pay Range Formulas
When the pay ranges for your organization's pay grades are based on variable factors, you can set up pay range formulas that the system uses to automatically calculate pay ranges for each pay grade. These formulas are based on the job evaluation points. For example, if a job pays more in one region of the country than in another, you can enter a geographic multiplier in the pay range formula. The system calculates different minimums, midpoints, and maximums for the different areas, based on the geographic multiplier.
Figure 66-5 Define Pay Range Formula screen
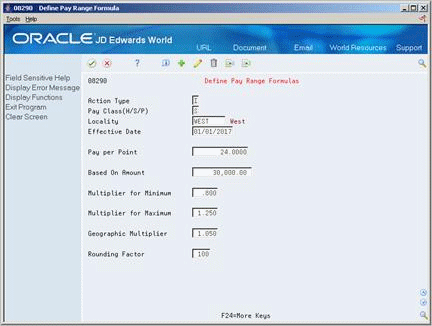
Description of ''Figure 66-5 Define Pay Range Formula screen''
-
Complete the following fields:
-
Pay Class
-
Locality
-
Effective Date
-
Pay Per Point
-
Based On Amount
-
Multiplier for Minimum
-
Multiplier for Maximum
-
Geographic Multiplier
-
-
Complete the following optional field:
-
Rounding Factor
-
| Field | Explanation |
|---|---|
| Pay per Point | The amount to be paid for each evaluation point that a job receives. For example, if a job is evaluated to have 150 points and the pay per point is 8, then the total pay from points is 1200 of the currency being used.
This amount is added to the Based on Amount to determine the job's pay range midpoint/control point. |
| Based On Amount | The baseline amount from which salary pay ranges are calculated. Enter debits with a plus sign (+) and credits with a minus sign (-). Enter a credit, for example, as 5000.01-. You can enter decimals, dollar signs, and commas. The system ignores non-significant characters.
The Human Resources system uses this field for the Hay Points Evaluation Method. It is the basic salary from which salary ranges are calculated. The amount in this field is added to the pay per point to determine the job's pay range midpoint/control point. |
66.4 Defining Job Evaluation Factors
From Human Resources (G08), choose Job Specifications
From Job Specifications (G08J1), enter 29
From Job Specifications (G08J4), choose Compensable Factors Tables
To determine equitable pay ranges for the jobs within your organization, you can evaluate jobs. Before you can evaluate jobs, you must define evaluation methods. Typical evaluation methods include:
-
Degree (Simple Subjective Point System)
-
Evalucomp
-
Factor comparison
-
Point factor
For each evaluation method, you must define the factors that you use to gauge the scope of each job. Typical evaluation factors include:
-
Problem-solving abilities
-
Technical skills
-
Working conditions
-
Leadership qualities
To make it possible to rate and compare jobs, you assign points or degrees to each evaluation factor.
To define job evaluation factors
Figure 66-6 Compensable Factors Table screen
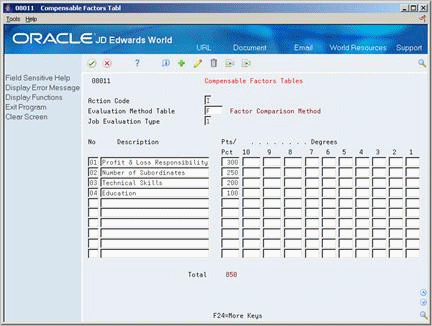
Description of ''Figure 66-6 Compensable Factors Table screen''
-
Complete the following fields:
-
Evaluation Method Table
-
Job Evaluation Type
-
Number
-
Description
-
Points/Percentage
-
-
If you are using the Factor Comparison method, complete the following field:
-
Degrees
-
| Field | Explanation |
|---|---|
| Evaluation Method Table | A user defined method or grouping (08/EM) that is used for the evaluating this job.
Suggested values are: Blank – Simple Subjective Point System E – Evalucomp Method F – Factor Comparison Method P – Point Factor Method H – Hay Method |
| Job Evaluation Type | A numeric code that determines whether job information is recorded using degrees or points.
Valid codes are: 1 – Simple, subjective assignment of job points by each of the ten user defined evaluation factors. 2 – Detailed specifications of degree of difficulty or value to each of ten evaluation factors. |
| Job Evaluation Factor Number | A sequential number that identifies each job evaluation factor. Each job evaluation factor should:
For each job evaluation method, define enough factors to ensure that a person can adequately rate the job without being overwhelmed by a large number choices. For example, you might set up the following job evaluation factors for the method, Degree:
|
| Pts/ Pct | The number of points calculated for a specific job using any job evaluation method. A job is defined as the combination of job type and job step.
You can calculate the points manually and enter them at the Job Master Information level, or you can assign points to each individual factor that has been defined within the evaluation method. |
| Degrees | For the Compensable Factors Table (P08011), enter the maximum evaluation points allowable within this degree for this factor.
For the Factor Comparison Method window (P080011), if permitted, enter the degree corresponding to this particular job. The points calculation program automatically determines the points associated with the degree you enter. For Job Comparisons By Factor (P08012), the degree you awarded the job for this factor displays with the associated points. A degree only display for the degree (type 2) evaluation method. |
66.5 Setting Up a Cross-Reference Table by Business Unit
From Human Resources (G08), choose Job Specifications
From Job Specifications (G08J1), enter 29
From Job Specifications (G08J4), choose BU/Job ID Cross-Reference
When you define a job, you can enter a benefit group, union code, and workers compensation information for it. Entering this information at the job level simplifies the process of entering employee information because it eliminates the need to enter that information for each employee who is assigned to the job. You can override this default job information for individual employees, if necessary.
In some cases, you might need to override default job information for all of the employees who work in a specific business unit. In this case, you can set up a cross-reference table for the job ID and business unit. For example, assume that:
-
Your organization has 5000 machinists.
-
Of those machinists, 4,500 work in business unit 5, union 1000, and benefit group 100.
-
The remaining 500 machinists work in business unit 6, union 1100, and benefit group 200.
To streamline the process of entering job information for employees, you can enter union 1000 and benefit group 100 when you define the job, machinist, and set up a cross-reference table for the machinists in business unit 6.
The system uses the information in the cross-reference table to automatically update the records for the employees in that business unit with the correct union, benefit group, and workers compensation information.
To set up a cross-reference table by business unit
On Business Unit/Job ID Cross-Reference
Figure 66-7 Business Unit/Job ID Cross-Reference screen

Description of ''Figure 66-7 Business Unit/Job ID Cross-Reference screen''
-
Complete the following fields:
-
Home Business Unit
-
Job Type
-
Job Step
-
-
To specify the information that applies to this job only for employees who work in the business unit you specified, complete any of the following fields:
-
Benefit Group
-
Union Code
-
Worker's Compensation Insurance Code
-
Subclass (Worker's Compensation Insurance)
-