8 Year-End Review
After you set up the year-end workfiles, you can review the information in the workfiles. If necessary, you can revise the information before you print the year-end forms. Reviewing year-end information ensures that the system prints the correct information on year-end forms.
JD Edwards World recommends that you run the Build XML and Audit Report programs on the XML Processing menu (G772475) to validate your data prior to printing the year-end forms. These programs produce an XML integrity report, which also serves as an audit report for the year-end data. The XML Integrity Reports do not perform any table updates; they only validate data so you can run them multiple times, at any time.
This chapter contains the following topics:
8.1 Reviewing Year-End Information
Before you print year-end forms, review the information in the workfiles. This ensures that the system prints the correct information on year-end forms.
You can review all of the workfile builds that you create and the status of each. You can also review the amounts in each box on the forms.
You use this information to determine when you can proceed to the next step in the process. This information can also help you determine whether any errors occurred during the processing that would require you to rerun a step.
The review programs access information in the following tables:
| Program | Tables |
|---|---|
| Employee T4 Summary Review | |
| Employee T4A Summary Review | |
| Employee Relevé 1 Summary Review | |
| Employee Relevé 2 Summary Review | |
| Employee NR4 Summary Review |
To review year-end information
Following is an example using T4 forms, to review other forms, use the same steps but choose the corresponding options.
To view additional fields for Relevé 1 forms, you can access Relevé Additional Information (P077354) from Employee Relevé Summary Review by entering 4 in the Option field.
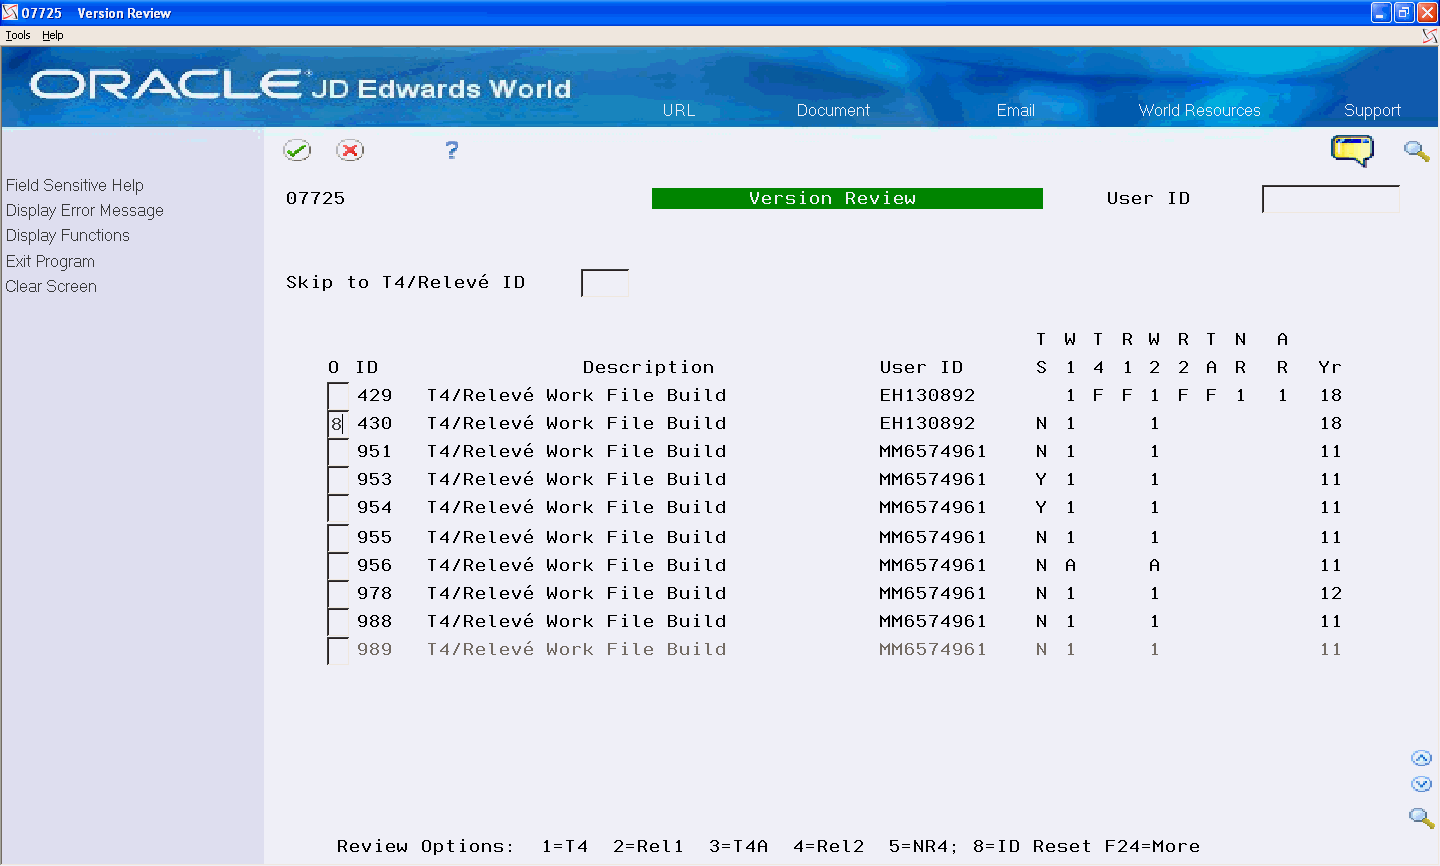
From Canadian Year End Processing (G77247), choose Version Review
-
On Version Review, review the following fields:
-
ID
-
Description
-
User ID
-
TS (Tax Identification Summation)
-
W1 (T4/Relevé 1 Workfile Build)
-
T4 (T4 Print Status)
-
R1 (Relevé 1 Print Status)
-
W2 (T4A/Relevé 2/NR4 Workfile Build)
-
R2 (Relevé 2 Print Status)
-
TA (T4A Print Status)
-
NR (NR4 Print Status)
-
AR (Archived)
-
Year
-
-
Enter 1 in the Option field next to the workfile build that you want to review.
-
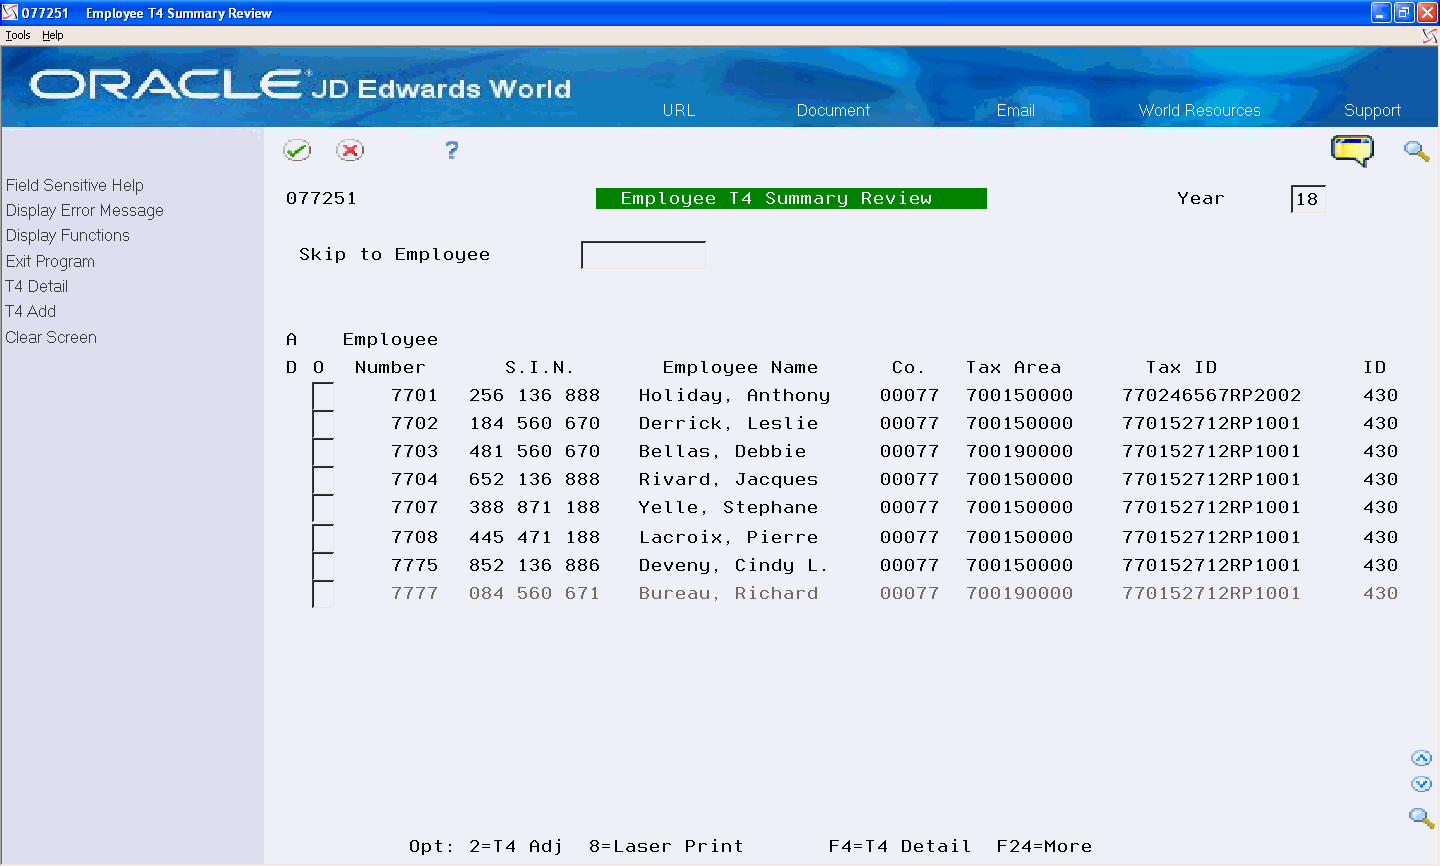
On Employee T4 Summary Review, complete the Skip to Employee field and click Enter.
-
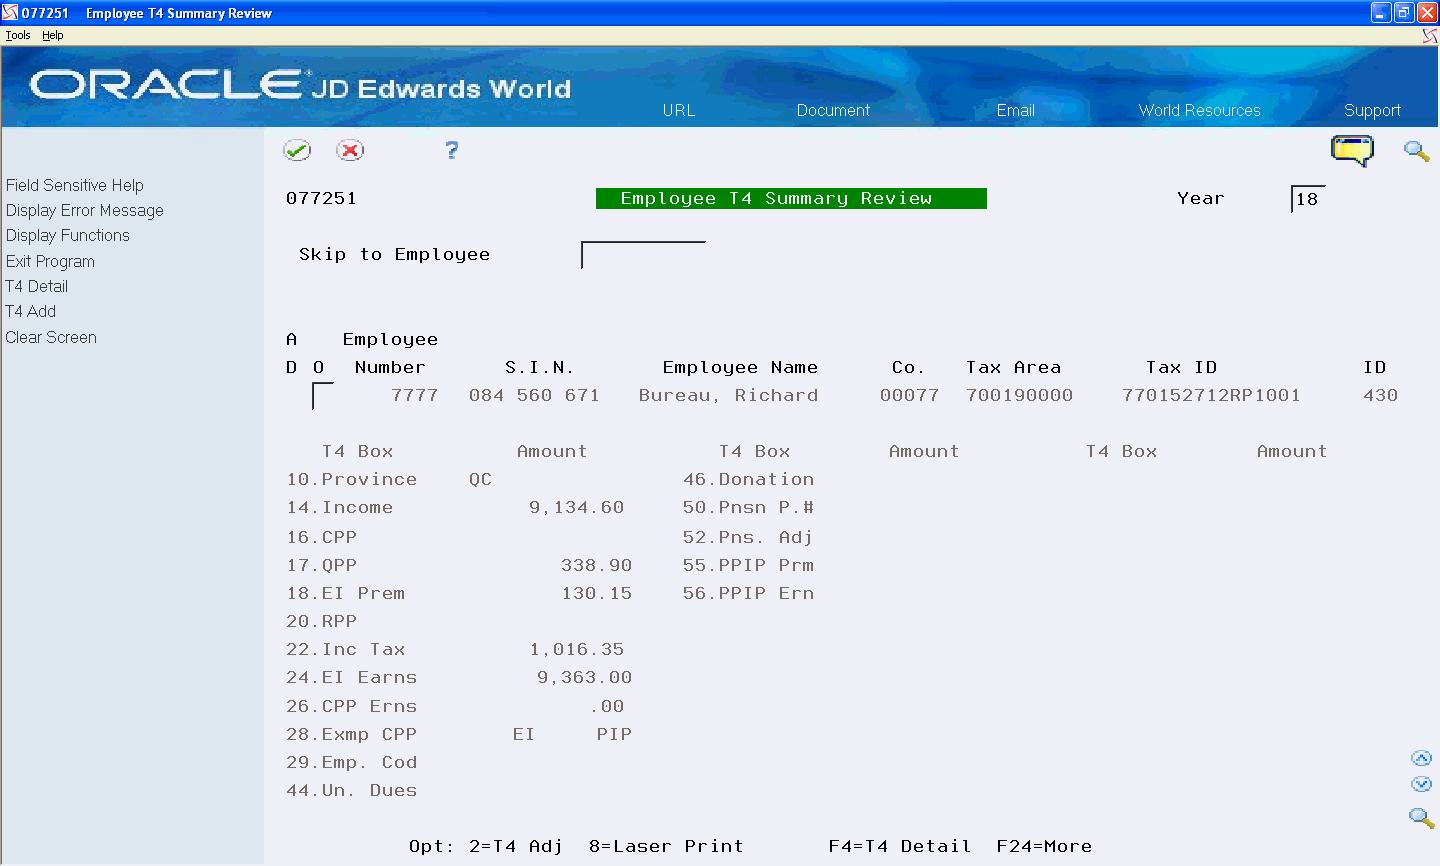
Access the detail area.
The system highlights negative values.
| Field | Explanation |
|---|---|
| Tax Identification Summation | A code that specifies whether companies with the same corporate tax ID are to be summarized into one reporting record.
To specify a parent, enter a parent company number in the detail area of the Corporate Tax ID form on the Taxes and Insurance menu, G7744. If you do not specify a parent company, the Workfile Build uses the lowest company number as the parent. Note: When summarizing by tax ID, J.D. Edwards recommends that you enter the parent company numbers in the detail area of the Corporate Tax ID form. The parent company number for the parent company is its own company number. |
| T4/ Relevé Workfile Build | A code that indicates the current status (stage) of the workfile in the Relevé 1 and T4 processing cycles. Valid values are:
|
| T4 Print Status | A code that indicates whether the form has been printed.
Valid values are: blank – The form has not been printed. A – The form is currently printing and considered active. B – The form was bypassed and will not be printed. C – The forms and XML file have been produced. F – The form has been printed. M – The magnetic media table only has been created. X – The XML file only has been produced. |
| Relevé 1 Print Status | A code that indicates whether the form has been printed.
Valid values are: Blank – The form has not been printed. A – The form is currently printing and considered active. B – The form was bypassed and will not be printed. C – The forms and XML file have been produced. F – The form has been printed. M – The magnetic media table only has been created. X – The XML file only has been produced. |
| T4A/Relevé 2/NR4 Workfile Build | A code that indicates the current status (stage) of the workfile in the Relevé 2, T4A, and NR4 processing cycles.
Valid values are: blank – The workfile build step has not been run. A – The workfile build step is currently active or on the job queue. 1 – The workfile build step has finished normally. |
| Relevé 2 Print Status | A code that indicates whether the form has been printed.
Valid values are: blank – The form has not been printed. A – The form is currently printing and considered active. B – The form was bypassed and will not be printed. C – The forms and XML file have been produced. F – The form has been printed. M – The magnetic media table only has been created. X – The XML file only has been produced. |
| T4A Print Status | A code that indicates whether the form has been printed.
Valid values are: blank – The form has not been printed. A – The form is currently printing and considered active. B – The form was bypassed and will not be printed. C – The forms and XML file have been produced. F – The form has been printed. M – The magnetic media table only has been created. X – The XML file only has been produced. |
| NR4 Print Status | A code that indicates whether the form has been printed.
Valid values are: blank – The form has not been printed. A – The form is currently printing and considered active. B – The form was bypassed and will not be printed. 1 – The form has been printed. |
| Archived | A code that indicates whether the version has been archived.
Valid values are: 0 – The version has not been archived (default). 1 – The version has been archived. |
| Year | The calendar year for the workfile build. |
8.2 Reviewing Year-End Reports
You can run year-end summary reports that print either detail or summary information. Detail reports list each employee and each box on a year-end form that contains a value. Summary reports list totals by company and do not include individual employee information.
The system prints a subtotal whenever the company number, tax area, or tax ID changes. The system can print a subtotal whenever the form count is equal to 200 within any segment (company, tax area, or tax ID). The system prints a grand total page that includes amounts from all companies, tax areas, or tax IDs.
Note:
The year-end summary reports display the salaries of employees. You can prevent unauthorized access to this information by applying business unit security to the Employee Master table (F060116) to prevent users in certain business units from printing the report.Reviewing year-end reports includes the following tasks:
-
Reviewing the T4 Summary Report
-
Reviewing the T4A Summary Report
-
Reviewing the Relevé 1 Summary Report
-
Reviewing the Relevé 2 Summary Report
-
Reviewing the NR4 Summary Report
8.2.1 Reviewing the T4 Summary Report
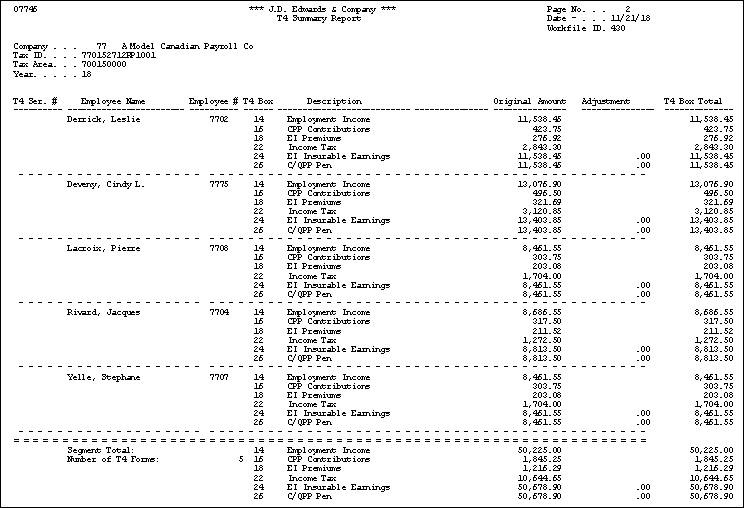
The T4 Summary Report (P07746) lists details of all information for each employee's T4. It is your printed copy of the information that the system prints on the T4 form. This program prints information from the T4 workfile build that you choose.
Note:
The Other Information area at the bottom of the T4 form includes several Box- Case and Amount boxes for the various types of additional income. There are numerous codes for additional income defined by the Canadian government. When you generate T4's, the system prints one primary slip and can print up to five "overflow" slips with additional income amounts, depending on how many amounts need to be special handled for the additional income.The T4 Summary Report reflects only the total number of T4's the employee receives for each company and tax ID. That is, one slip per employee regardless of how many overflow slips print. It does not include overflow slips in the slip count. To locate the total number of T4's, including overflow slips, use the T4 XML Audit Report (P07761X). This report reflects the total number of detail records for overflow slips.
The slip count on the T4 Summary Report never matches the total number of detail records on the XML Audit Report if an employee has more additional information amounts than the primary slip can accommodate. The totals on these reports accommodate two different numbers: slip counts vs. XML detail records.
From Canadian Year End Summary Reports (G772474), choose T4 Summary Report
8.2.2 Reviewing the T4A Summary Report
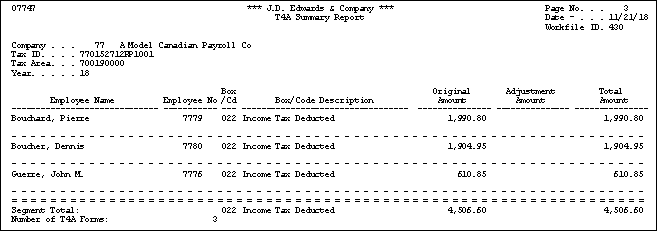
The T4A Summary report lists details of all information for each employee's T4A. It is your printed copy of the information that the system prints on the T4A form.
This program prints information from the T4A workfile build that you choose.
From Canadian Year End Summary Reports (G772474), choose T4A Summary Report
8.2.3 Reviewing the Relevé 1 Summary Report
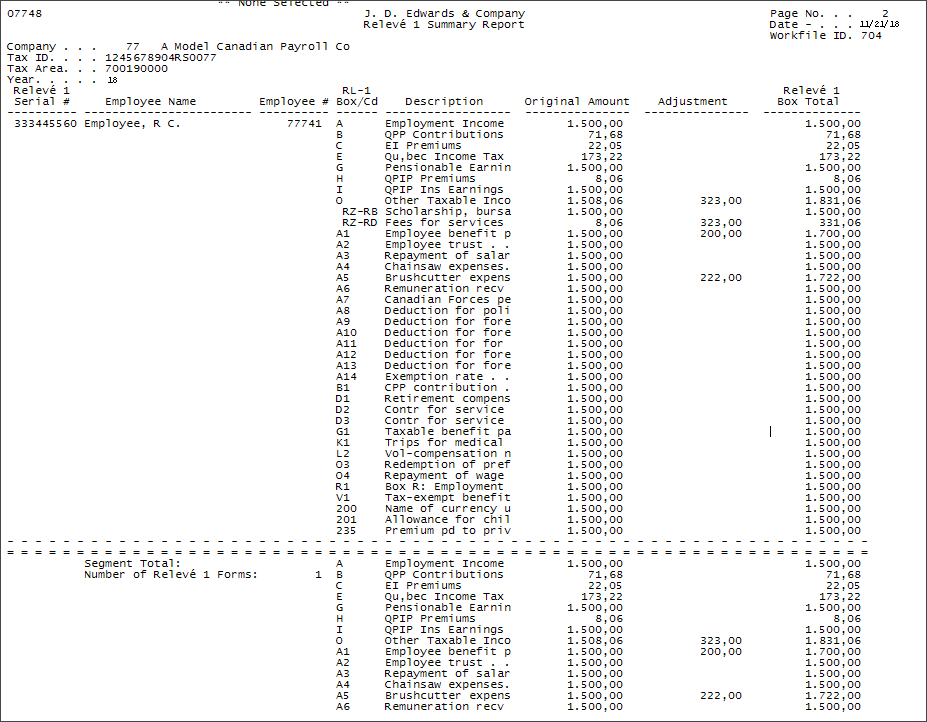
The Relevé 1 Summary report lists details of all information for each employee's Relevé 1. It is your printed copy of the information that the system prints on the Relevé 1 form.
This program prints information from the Relevé 1 workfile build that you choose.
From Canadian Year End Summary Reports (G772474), choose Relevé 1 Summary Report
8.2.3.1 Example: Relevé 1 Summary Report
Description of the illustration ''rel_1_sumry_rpt_11_2012.gif''
8.2.4 Reviewing the Relevé 2 Summary Report
The Relevé 2 Summary report lists details of all information for each employee's Relevé 2. It is your printed copy of the information that the system prints on the Relevé 2 form.
This program prints information from the Relevé workfile build that you choose.
From Canadian Year End Summary Reports (G772474), choose Relevé 2 Summary Report
8.2.5 Reviewing the NR4 Summary Report
The NR4 Summary report lists details of all information for each employee's NR4. It is your printed copy of the information that the system prints on the NR4 form.
This program prints information from the NR4 workfile build that you choose.
From Canadian Year End Summary Reports (G772474), choose NR4 Summary Report
8.3 Reviewing the XML Integrity Reports
Prior to printing the year-end forms, JD Edwards World recommends that you run the Build XML and Audit Report programs to validate your data. These programs create an XML file and produce an XML integrity report, which also serves as an audit report for the year-end data.
The reports validate the year-end data, in a similar method as the XML schemas from the government. These programs do not perform any table updates; they only validate data so you can run them multiple times, at any time.
See Also:
Section 9.2, "Creating the XML File" for more information.
Note:
The Relevé XML and Audit File Build programs display errors if they are run before the forms print because they validate the serial numbers. You can disregard these errors until you print the forms, however they must be correct before you create your final XML files to submit to the government.Reviewing the XML integrity reports includes the following tasks:
-
Reviewing the T4 XML integrity report
-
Reviewing the T4A XML integrity report
-
Reviewing the Relevé 1 XML integrity report
-
Reviewing the Relevé 2 XML integrity report
8.3.1 Reviewing the T4 XML Integrity Report
The T4 XML and Audit File Build prints a report that lists details of all errors and warnings your year-end data causes.
This program validates information from the T4 workfile build that you choose.
From XML Processing (G772475), choose Build T4 Files
8.3.1.1 Example: T4 XML Integrity Report

Description of the illustration ''t4_xml_audt_fil_build.gif''
8.3.2 Reviewing the T4A XML Integrity Report
The T4A XML and Audit File Report lists details of all errors and warnings your year-end data causes.
This program validates information from the T4A workfile build that you choose.
From XML Processing (G772475), choose Build T4A Files
8.3.2.1 Example: T4A XML Integrity Report

Description of the illustration ''t4_xml_audt_fil_build_1.gif''
8.3.3 Reviewing the Relevé 1 XML Integrity Report
The Relevé 1 XML and Audit File Report lists details of all errors and warnings your year-end data causes.
This program validates information from the Relevé 1 workfile build that you choose.
From XML Processing (G772475), choose Build Relevé 1 Files
8.3.3.1 Example: Relevé 1 XML Integrity Report

Description of the illustration ''releve1_xml_audt_fil_build.gif''
8.3.4 Reviewing the Relevé 2 XML Integrity Report
The Relevé 2 XML and Audit File report lists details of all errors and warnings your year-end data causes.
This program validates information from the Relevé 2 workfile build that you choose.
From XML Processing (G772475), choose Build Relevé 2 Files
8.3.4.1 Example: Relevé 2 XML Integrity Report

Description of the illustration ''releve2_sumry_audit_buld.gif''
8.4 Revising Year-End Information
Before you print year-end forms, you make any necessary adjustments or corrections to year-end information. This ensures that the system prints the correct information on year-end forms.
If you did not set up special handling code tables for the boxes, you can enter information manually for specific boxes that appear on the T4 form.
For example, if you need to enter information in Box 73 of the T4 form for an employee, you must enter it as an adjustment. Box 73 represents the number of days outside of Canada. You can also enter Box 29 (employment code) information here for the T4 form.
You might need to create one or more T4A records manually after the workfile build. This might be necessary if an employee contributes severance pay to a retirement plan or if a retired employee receives pension income but no employment income. You cannot manually create Relevé 1, Relevé 2, or NR4 records.
You can also delete individual year-end records from the workfile build.
Revising year-end information includes the following tasks:
-
Entering adjustments to year-end forms
-
Creating a T4 year-end form manually
-
Creating a T4A year-end form manually
-
Deleting workfile records
8.4.1 Entering Adjustments to Year-End Forms
You enter adjustments to year-end forms to correct the amounts that print in boxes on year-end forms.
The adjustment programs write information to the following tables:
The first time that you adjust an employee's record, you click Add. To make further adjustments for the same employee, click Change.
Following are related tasks for employee adjustments:
| Related Task | Description |
|---|---|
| Entering employment codes on T4 forms | You can use the Employee T4 Adjustments screen to enter employment codes (Box 29). You might need to do this if you have only a few employees for whom you must enter employment codes and if, during the T4 workfile build, you did not specify the payroll category code that contains employment code information. |
| PPIP exempt | You can use the Employee T4 Adjustments screen to indicate that an employee is exempt from PPIP for the entire year. You must enter an X in the PIP field to do so. |
See Also:
Section 7.1, "Defining Year-End Workfiles"for information about using payroll category codes to designate employment codes on the T4 form.
To enter adjustments to year-end forms
From Canadian Year End Processing (G77247), choose Version Review
The boxes that display on the Employee T4 Summary Review screen are the boxes that display on the T4 year-end form. After these boxes, any T4 boxes for which you define special handling codes also display.
For T4A, Relevé 1, Relevé 2, and NR4 forms, all boxes display.
Following is an example using T4 forms, to enter adjustments for other forms, use the same steps but choose the corresponding options.
-
On Version Review, enter 1 in the Option field for the workfile build that you want to adjust.
-
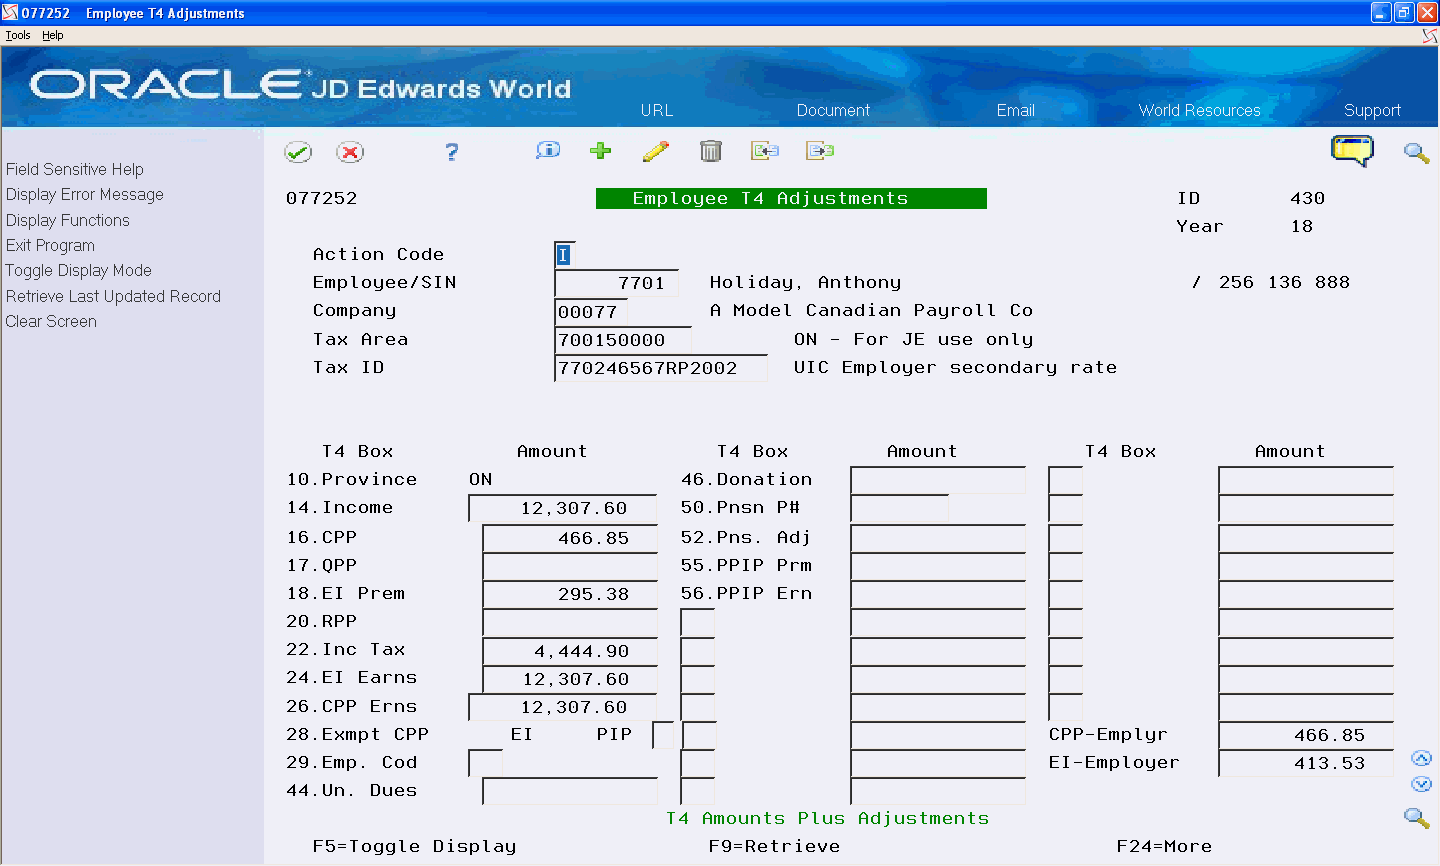
On Employee T4 Summary Review, enter 2 in the Option field for the employee record that you want to adjust and click Enter.
The program adds an * to the left of the employee number to indicate that an adjustment exists.
A # to the left of the employee number indicates that you manually added the record to the workfile, which is also known as an ad-hoc record.
-
Enter the necessary changes.
The system adds the amounts that you enter here to the amounts that exist in the boxes.
-
To enter an adjustment for a T4 box that does not display, perform one of the following:
-
Enter the box number in the first unlabeled field under the T4 Box heading.
-
Enter the amount in the corresponding Amount field.
-
-
Click Add or Change, depending on whether an adjustment already exists.
-
To toggle between Adjustments Only and T4 Amounts Plus Adjustments, choose Toggle Display Mode (F5).
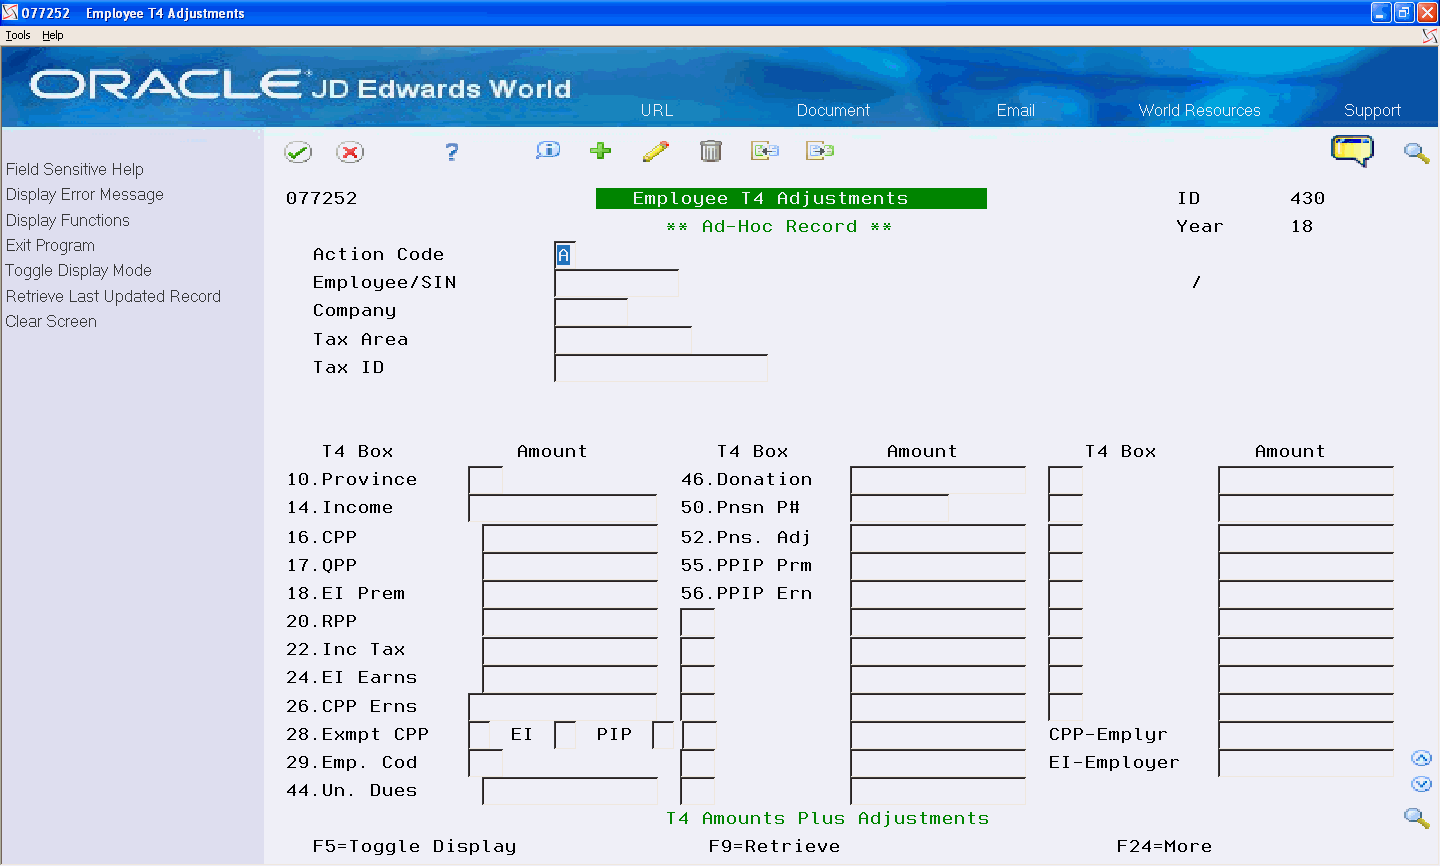
8.4.2 Creating a T4 Year-End Form Manually
You can manually create individual T4 records after you build the workfile. This might be necessary if you process T4 information for active employees that receive taxable benefits, but you are not paying them. For example, if you have employees on sick leave or long term disability. These employees do not have any CA type history records in the Taxation Summary History by Province table (F0713); therefore there are no records for the system to access and process in the T4 workfile. However, because they are receiving taxable benefits, such as a pension or medical benefits; you must report their taxable benefits on a T4.
This might also be necessary if you process T4 information on behalf of another company and you do not have the payroll history to backup the records.
When you create T4 records on an ad-hoc basis, it is considered a risk as there is no audit trail and these records do not have any history. These records do not tie to any audit reports in the F0713 or F06148 tables.
After you create these records, you can revise or delete them through the adjustment program.
This program updates the T4 Workfile (T07730) and the T4 Adjustment Workfile (T07740) tables.
8.4.2.1 What You Should Know About
To create a T4 year-end form manually
From Canadian Year End Processing (G77247), choose Version Review
-
On Version Review, enter 1 in the Option field for the workfile build that you want to revise.
-
Read the warning message and press F6 to confirm.
-
On Employee T4 Adjustments, complete the following fields:
-
Employee/SIN
-
Company
-
Tax Area
-
Tax ID
-
-
Complete any of the following fields and click Add.
-
Province
-
Income
-
CPP
-
EI Prem
-
RPP
-
Inc Tax
-
EI Earns
-
CPP Erns
-
Exmpt CPP, EI, PIP
-
Emp. Cod
-
PP Un. Dues
-
Donation
-
Pnsn P#
-
Pns. Adj
-
PPIP Prm
-
PPIP Ern
-
CPP-Emplyr
-
EI-Employer
-
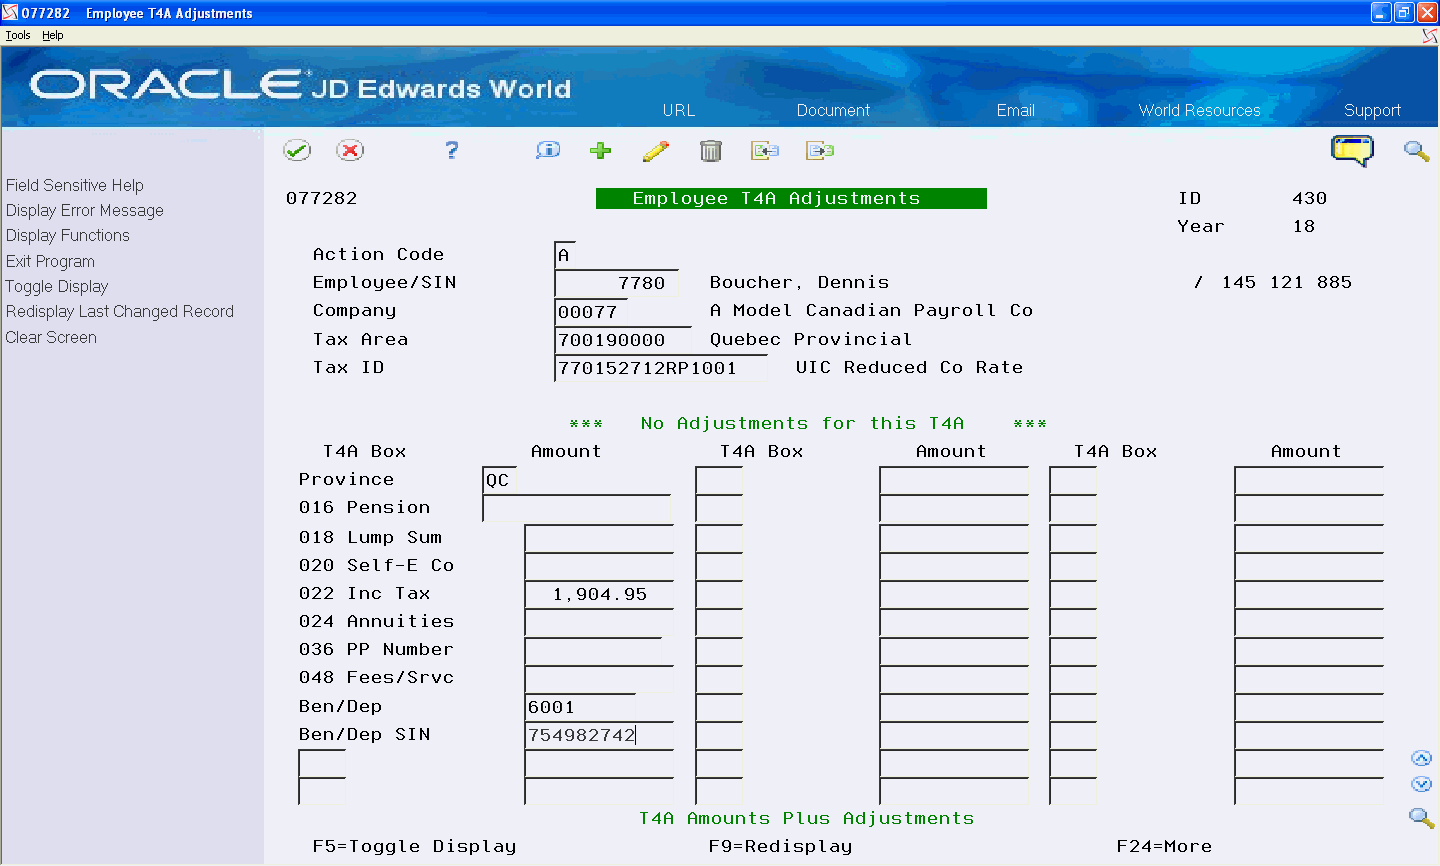
8.4.3 Creating a T4A Year-End Form Manually
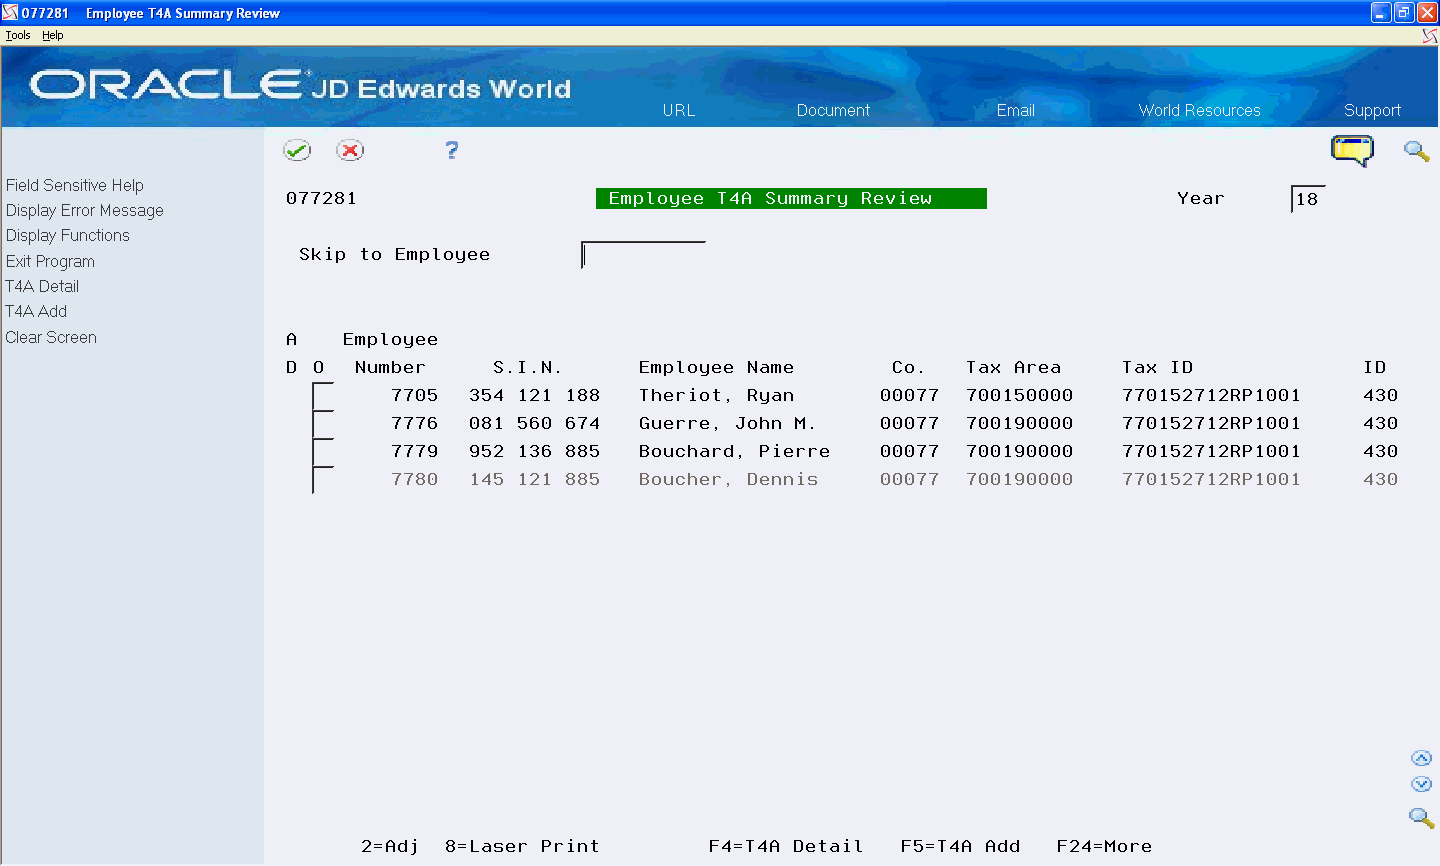
You can manually create individual T4A records after the workfile build. This might be necessary if a terminated employee contributes severance pay to a retirement plan or if a retired employee receives pension income but no employment income. You cannot manually create Relevé 1, Relevé 2, or NR4 records.
After you create T4A records manually, you can revise or delete them through the adjustment program.
This program updates the T4A Workfile (T07732) and the T4A Adjustment Workfile (T07742).
Use the Pension Batch Update program (P077271) if you need to create T4A records for several employees who are contributing severance pay to a retirement plan. See Creating Multiple Pension Records for more information.
To create a T4A year-end form manually
From Canadian Year End Processing (G77247), choose Version Review
-
On Version Review, enter 3 in the Option field for the workfile build that you want to revise, and click Enter.
-
On Employee T4A Summary Review, choose T4A Add (F5).
Description of the illustration ''empl_t4a_sumry_review.gif''
-
Read the warning and press F6 to confirm.
-
On Employee T4A Adjustments, complete the following fields:
-
Employee/SIN
-
Company
-
Tax Area
-
Tax ID
-
-
Complete any of the following fields and click Add:
-
Province
-
016 Pension
-
018 Lump Sum
-
020 Self-E Co
-
022 Income Tax
-
024 Annuities
-
036 PP Num (Pension Plan Number)
-
048 Fees/Srv
-
Ben/Dep
-
Ben/Dep SIN
-
T4A Other Information
-
See Also:
-
Section 6.5, "Setting Up Pension Records"for information about three ways to create T4A records for Non-Pensioners.
8.4.4 Deleting Workfile Records
You can delete individual T4, T4A, Relevé 1, Relevé 2, or NR4 records from the workfile. You might delete a record if you created it in error or if you want to build a new workfile for specific forms rather than trying to correct them through adjustments.
Note:
You cannot delete archived records.From Canadian Year End Processing (G77247), choose Version Review
Following is an example using T4 records, to delete other records, use the same steps but choose the corresponding options.
-
On Version Review, review the following fields:
-
ID
-
Description
-
User ID
-
Year
-
W1 (T4/Relevé 1 Workfile Build)
-
T4 (T4 Print Status)
-
R1 (Relevé 1 Print Status)
-
W2 (T4A/Relevé 2/NR4 Workfile Build)
-
R2 (Relevé 2 Print Status)
-
TA (T4A Print Status)
-
NR (NR4 Print Status)
-
AR (Archived)
-
-
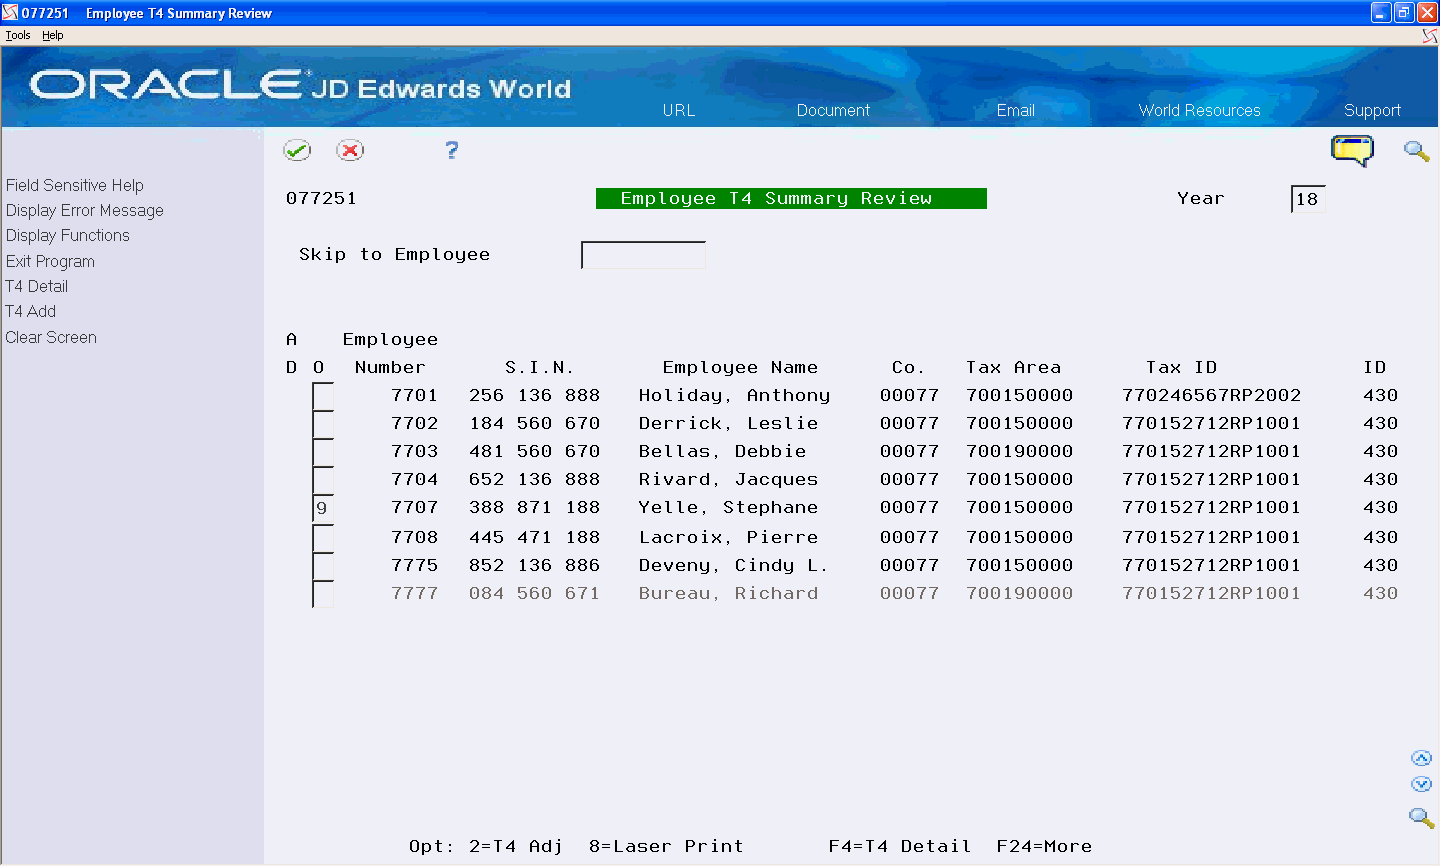
Enter 1 in the Option field for the workfile build that you want to review, and click Enter.
Description of the illustration ''emp_t4_sumry_review_1.gif''
-
On Employee T4 Summary Review, enter 9 in the Option field for any record in the detail area.
The Confirm Record Deletion window displays.
-
Perform one of the following:
-
Press F6 to confirm the deletion
-
Exit (F3) to cancel and the system does not delete the record
-
8.5 Resetting Year-End Workfile Versions
You might encounter situations during year-end processing that require you to rerun a step in the process. Depending on where you are in the process, if you need to change information in the workfile build, the system either allows you to reset a step or requires you run the entire year-end process over. Resetting removes the status code so you can rerun the step. You cannot reset archived workfiles.
When you reset a step, the system updates the Control Parameter table (F07720).
To reset year-end workfile versions
From Canadian Year End Processing (G77247), choose Version Review
-
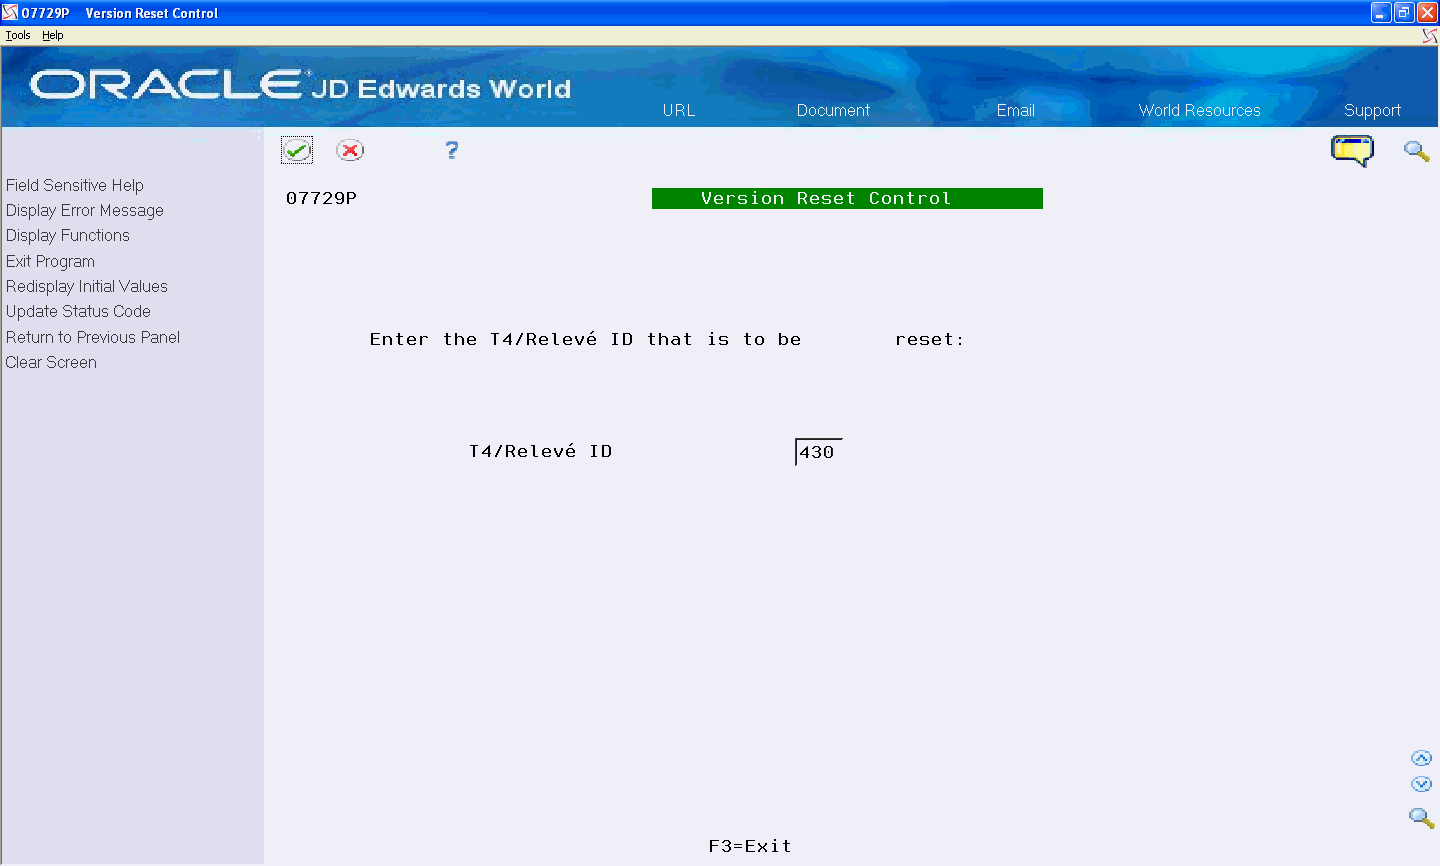
On Version Reset Control, complete the T4/Relevé ID field and click Enter twice.
Description of the illustration ''vers_ctrl_1.gif''
-
On the ID Reset Control screen, delete the status codes for any of the steps that you need to reset and click Enter.
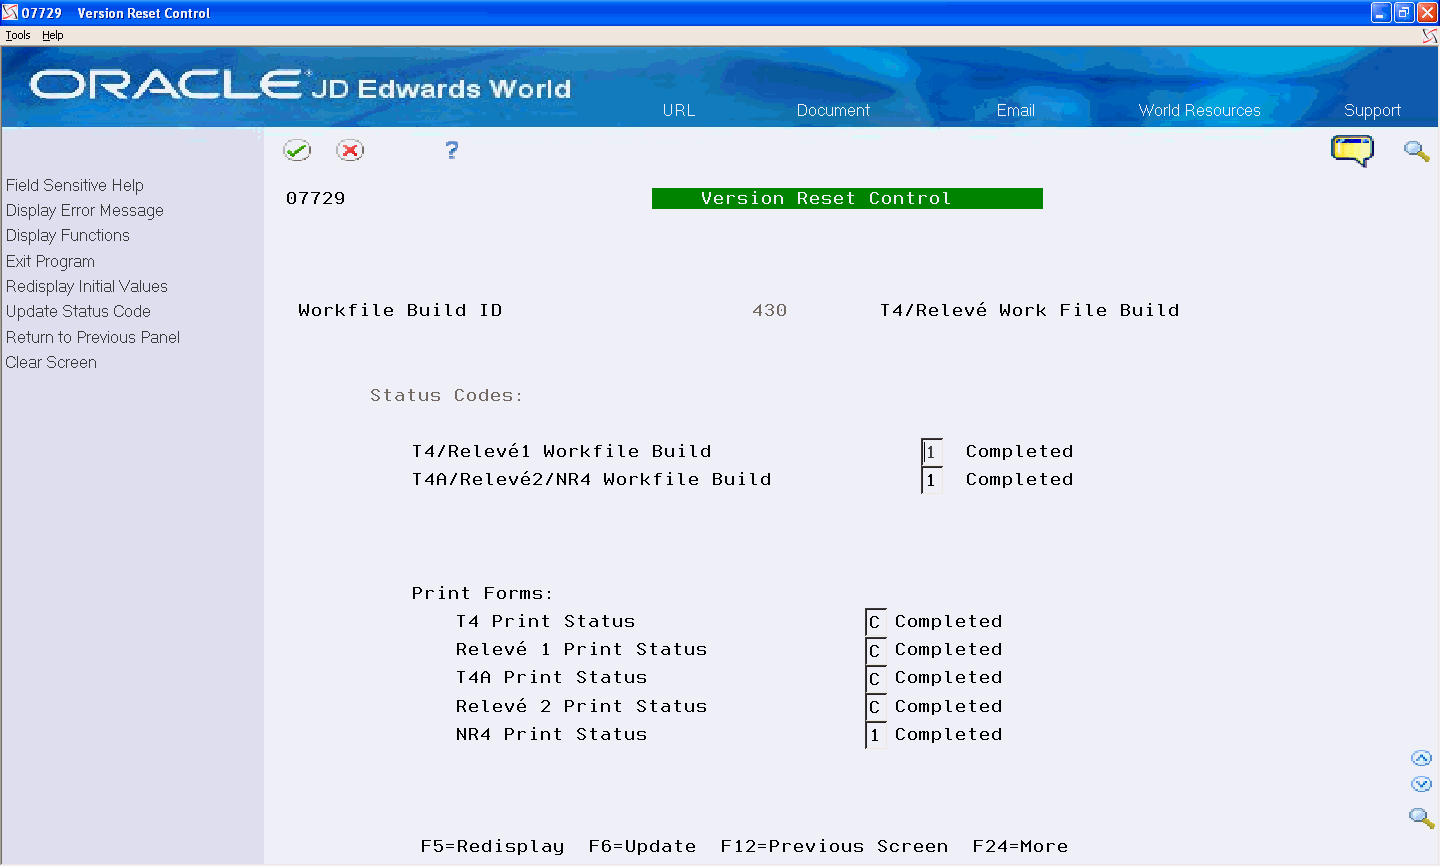
Description of the illustration ''vers_ctrl_2.gif''
-
Choose Update Status Code (F6).
