6 Year-End Setup
Before you print year-end government forms or build the XML files, verify that information in your system is set up correctly and that you assign it to the correct employees and companies. If this information is not in your system, you can set up the information and assign it to the appropriate employee or company.
This chapter includes the following topics:
-
Section 6.7, "Setting up Non-Resident Secondary/Joint Information"
-
Section 6.9, "Setting Up T4A Beneficiary/Dependent Information"
-
Section 6.10, "Setting Up Integrated File System (IFS) Directories"
6.1 Verifying Employee Names and Addresses
When you build the year-end workfile, the system uses employee names and addresses from the Address Book system. Before you build the year-end workfile, you should verify that employee names and addresses in the Address Book system are set up properly for T4, T4A, Relevé 1, Relevé 2, NR4 forms, and for electronic filing.
Although JD Edwards World does not provide a report to verify employee information for year-end reporting, you can run the Employee Roster (P074011) to print employee names and addresses or you can verify this information when you run the XML Integrity reports.
The employee name that displays on the Canadian year-end forms and in the XML files is a concatenation of the following three fields from the Address Book - Who's Who table (F0111):
-
Given Name
-
Middle Name
-
Surname
When you update the Alpha Name field in the Address Book Master table (F0101), the system updates the F0111 table.
Note:
Employee names must comply with the format that government taxing authorities require. If the format of the employee name is not correct, government agencies do not accept your year-end information. To ensure that employee names meet government formatting requirements, you can use the F0111 File Conversion - EFW2 conversion utility on menu G97U24.This conversion utility updates the Given Name, Middle Name, and Surname fields in the Address Book - Who's Who table (F0111) with the information in the Alpha Name field in the Address Book Master table (F0101).
Contact Global Support Services for assistance with this procedure.
For the employee address, the system prints the first two address lines for electronic reporting and the last three nonblank lines for printed forms, plus the city, state, and postal code fields. The system prints a maximum of 30 characters per line on the printed forms and can include a maximum of 22 characters per line in the electronic file. The information prints on these lines as follows:
-
Name
-
Address
-
For electronic file, the first two address lines (up to 22 characters each)
-
For forms, the last three nonblank address lines (up to 30 characters each)
-
-
City, state, and postal code
In order to ensure that all necessary address information is in both the electronic file and on printed forms, JD Edwards World suggests that you enter the employee's address information using a maximum of 22 characters on each of the first two address lines.
If you enter the street address, along with the apartment information on one line, the system does not include the complete address in the electronic file.
The following example illustrates which line you should use to enter each piece of address information:
Jacques Rivard
100395 Beelleville (enter this information on address line 1)
Apartment 2A (enter this information on address line 2)
Montreal Nord Québec, QC H1H 4Z8
Note:
To ensure that address information is complete for printed and electronic file year-end information, JD Edwards World recommends that you enter all of the necessary address information using the format in the previous example. If you are not processing electronic filing, you can use up to three lines to enter an employee's address. However, if in the future you plan to process the information using electronic files, you might need to edit your address book records to avoid reporting incomplete information in the electronic files6.2 Setting up Native Indian Employees
To set up the status for Native Indian employees so that their wages are not taxable in payrolls as well as on the end-of-year forms as follows:
6.2.1 For Payroll:
-
Set up the employee as non-taxable and enter the Ethnic Code for Native Indian employees from UDC 07/M in the Employee Entry program.
-
Set up a separate pay type for use with Native Indian employees. Failure to set up a separate pay type for use with Native Indian employees causes the system to enter amounts in boxes 71 (T4) and R (RL-1) when you special handle the amounts for other non-native employees.
-
Enter the Native Indian pay type as the Default Auto Pay Type on the Pay and Tax Revisions Screen for salaried Native Indian employees.
-
Use the Native Indian pay type when entering time cards for hourly Native Indian employees.
-
Performing these tasks causes the system to enter the Native Indian employee's pay in the Gross Pay as well as the Excludable amounts in history, resulting in no taxable wages because Taxable = Gross - Excludable.
6.2.2 For Year-End Processing:
-
T4: Use the Special Handle field for the Native Indian employees pay type for Box 71 and then attach Box 71 to the work file build.
-
RL-1: Use the Special Handle field for the Native Indian employees pay type for Box R and then attach Box R to the work file build.
-
Build T4/Relevé Workfiles: On the Build T4/Relevé Workfiles screen, enter the value for Native Indian employees in UDC 07/M in the Ethnic Code for Native Indian field. This allows the system to process the amounts properly for special handling to Box 71 on the T4 workfile records and Box R on the RL-1 workfile records.
6.3 Verifying Company Information
You verify company information to ensure accuracy when you process company names, addresses, and tax information for governmental reporting purposes.
You verify that tax area information is set up for any tax that your company or employees pay over the year. If tax area information is not accurate, you might not be reporting information correctly on year-end forms.
To compile the information that you report to provincial and federal government agencies, the system uses company names and addresses from the Address Book record. Before you build the T4/Relevé workfiles, verify that company names and addresses are set up properly for year-end reporting.
The system prints the company name, the first two address lines (for electronic filing) or the last three nonblank address lines (for printed forms), and the city, state, and postal code fields. The system can print a maximum of 30 characters per line on the printed forms and includes a maximum of 22 characters per line in the electronic file. The information that prints on these lines is as follows:
-
Name
-
Address
-
For electronic filing, the first two address lines (up to 22 characters per line)
-
For forms, the last three nonblank address lines (up to 30 characters per line)
-
-
City, state, and postal code
Note:
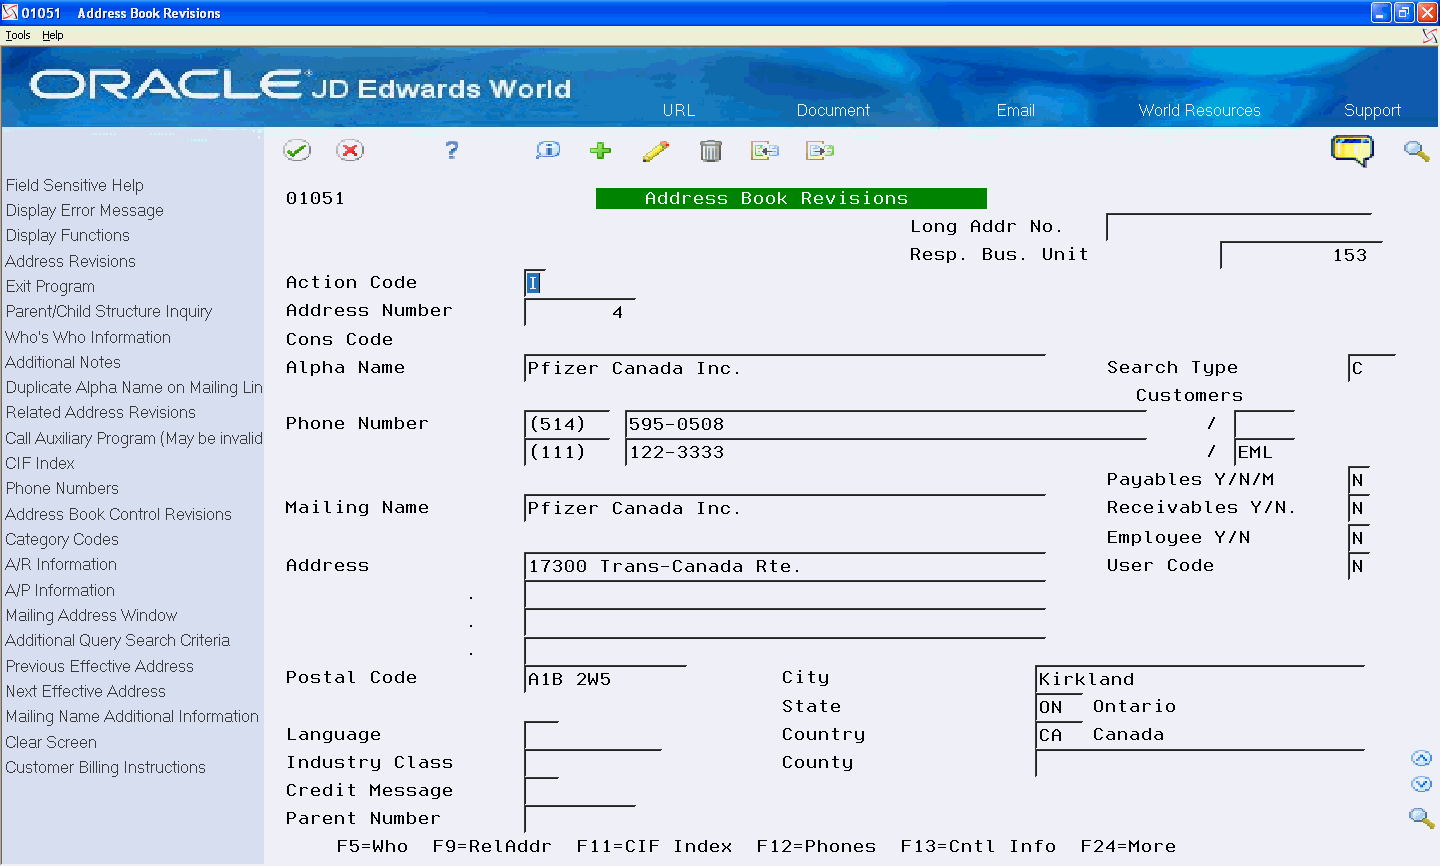
The company address that prints on year-end forms includes the last three nonblank lines of the company's address. The address that the system generates for electronic filing includes the first two lines of a company's address. To ensure that address information is complete on both the printed forms and electronic filing year-end information, JD Edwards World recommends that you enter all of the necessary address information using the format above. If you are not processing electronic filing, you can use up to three lines to enter a street address. However, if you plan to file electronically in the future, you might need to change the address to avoid reporting incomplete information in the electronic file.From Address Book (G01), choose Address Book Revisions
The following illustrates the company address information for year-end purposes.
6.4 Verifying User Defined Codes
Before you begin year-end processing, you verify that the information that you want to print on the year-end forms is set up correctly. To do this, you set up or review the appropriate user-defined code tables and make any necessary additions or changes.
You must review the user-defined codes and verify that you assigned the correct codes to print pension and special handling information.
Verifying user defined codes includes the following:
-
Verifying pension plan numbers
-
Verifying special handling pay codes
-
Verifying province of employment codes
-
Verifying T4 and T4A other information codes
-
Verifying T4 employment codes
-
Verifying RL-1 case O codes
-
Verifying RL-2 source of income codes
-
Verifying country codes
-
Setting up the EI Reduced Rate
-
Verifying Cheque Route Codes
6.4.1 Verifying Pension Plan Numbers
You must report the employee's Registered Pension Plan number or Deferred Profit Sharing Plan number as registered with Canada Revenue Agency (CRA) on all T4s and T4As.
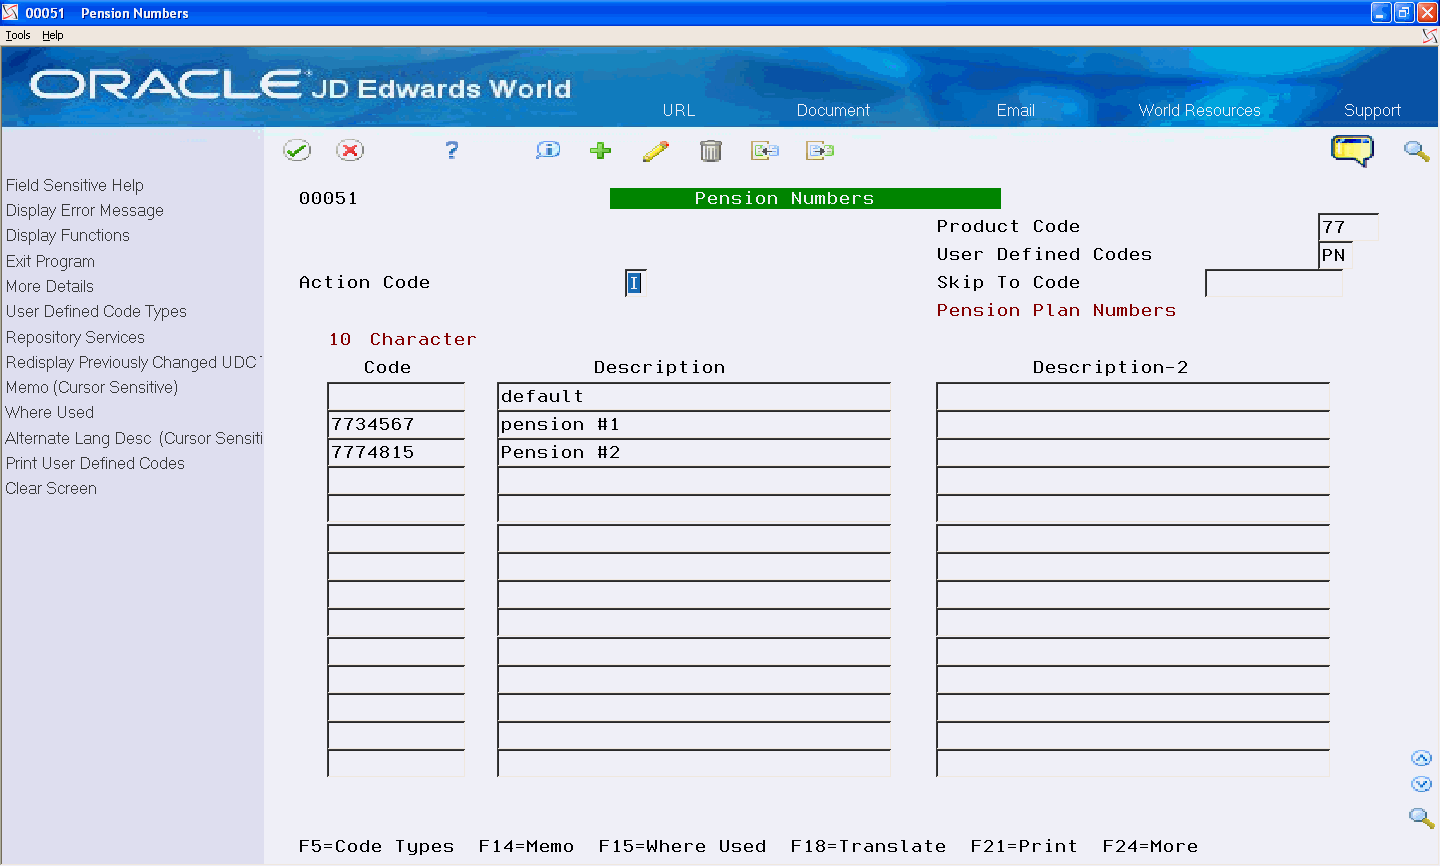
You use the Pension Plan Number codes UDC table (77/PN) to maintain a list of valid pension numbers. The Code field contains the Registered Pension Plan number or the Deferred Profit Sharing Plan number. The Description field contains a descriptive reference for your use. The system does not print the Description field on year-end forms.
Note:
Pension plan numbers must be seven numeric digits.To review pension plan numbers
From T4/Relevé Setup (G772472), choose Pension Numbers
On Pension Numbers, review the following fields:
-
Code
-
Description
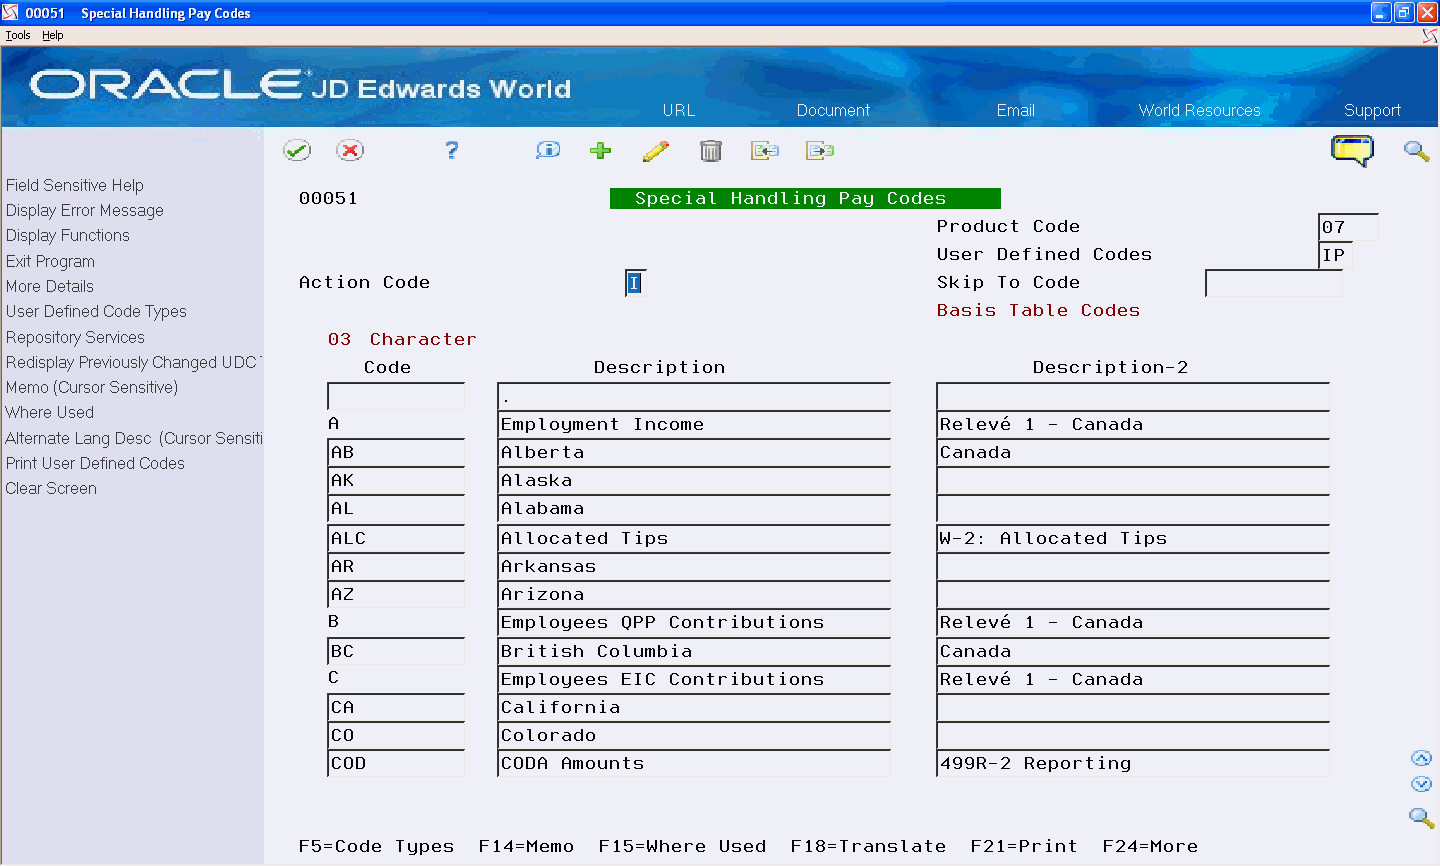
6.4.2 Verifying Special Handling Pay Codes
Special handling pay codes, UDC 07/IP correspond to the income boxes on year-end forms. You review special handling pay codes to verify that they accurately reflect the reporting requirements for the current year. For T4 special handling pay codes, you must use the box numbers on the T4 forms that the CRA requires.
Because special handling pay codes correspond to specific boxes on the year-end forms, JD Edwards World recommends that you define:
-
Two-digit numeric codes for the special handling pay codes that appear on T4 forms.
-
Three-digit codes for the special handing pay codes that appear on T4A forms.
-
Alphabetic codes for the special handling pay codes that appear on Relevé 1 and Relevé 2 forms.
To review special handling pay codes
From T4/Relevé Setup (G772472), choose Special Handling Pay Codes
On Special Handling Pay Codes, review the following fields:
-
Code
-
Description
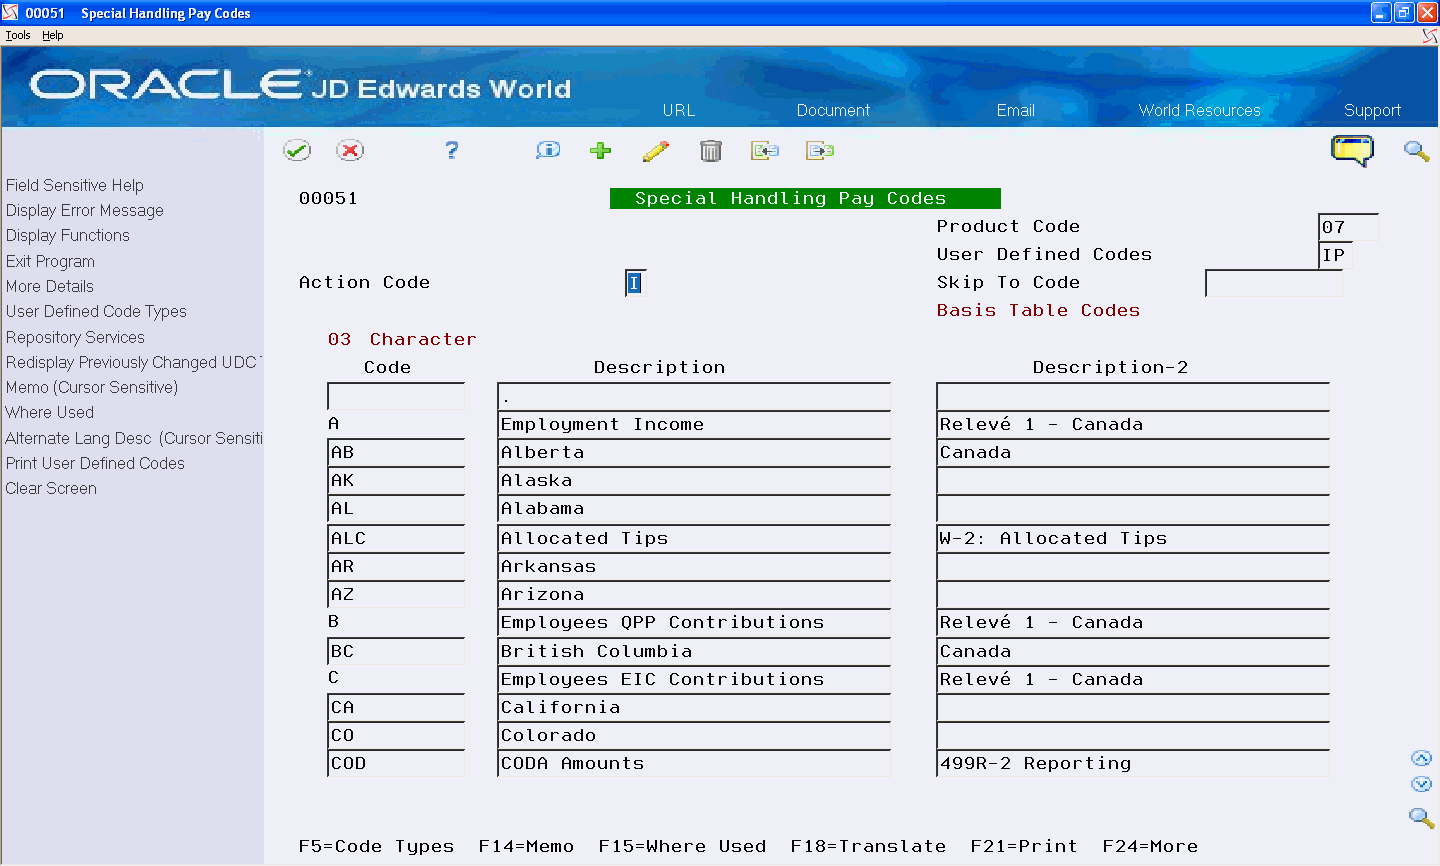
Description of the illustration ''ch6_spcl_handlng_codes.gif''
See Also:
-
Working with Special Handling for more information about creating the tables that associate PDBAs with special handling pay codes.
6.4.3 Verifying Province of Employment
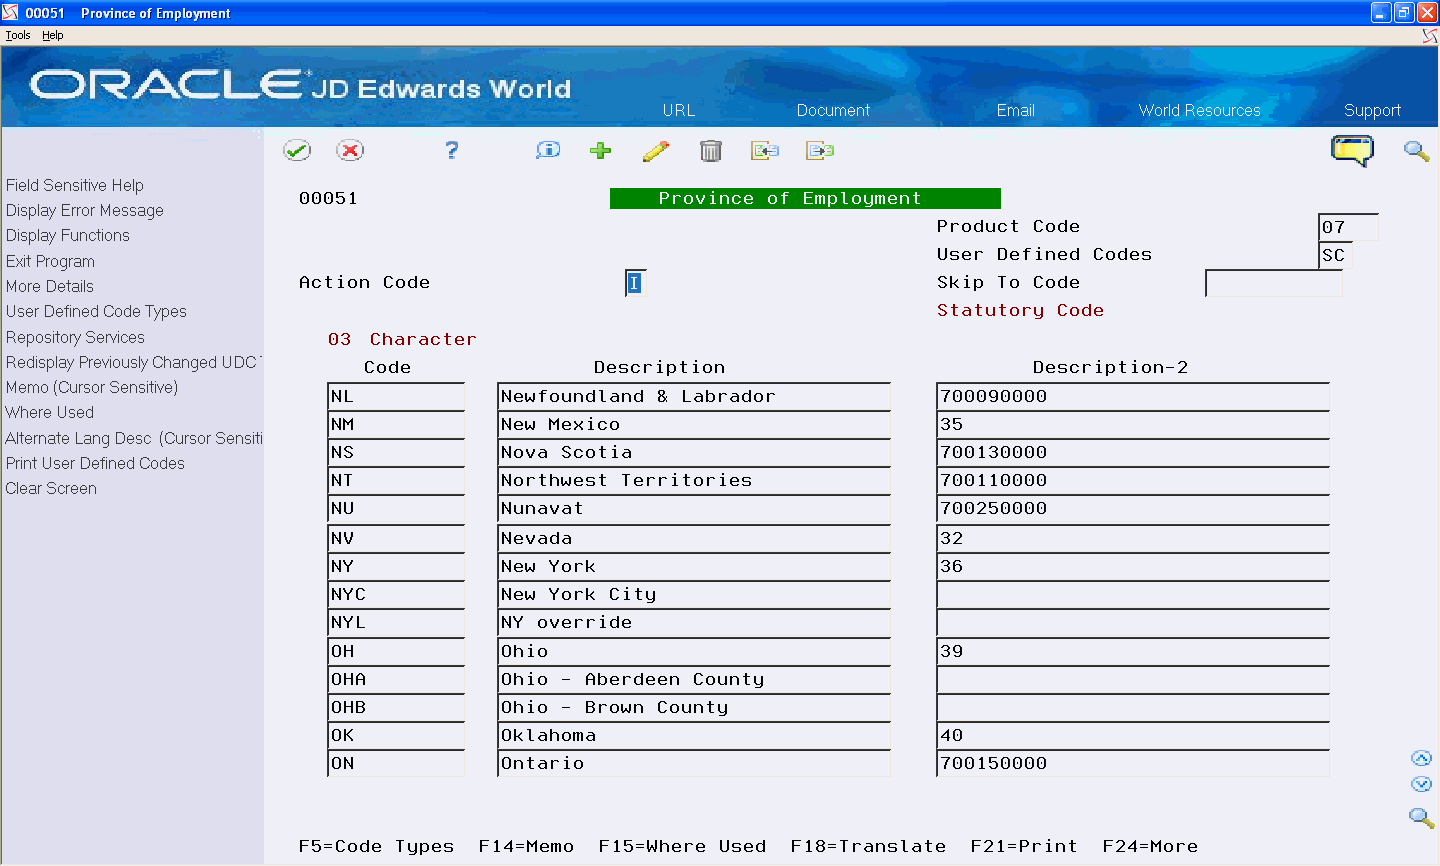
You use province of employment codes, UDC 07/SC to identify an employee's province of employment. JD Edwards World software supplies province codes that are compatible with the Vertex Payroll Tax Calculation system. The list of codes includes the codes for both Canadian provinces and U.S. states.
Verify that all province codes are correct. Each code must be two characters long, even though the table allows three characters. Do not change or delete any other codes in this table. You must the 9-digit province code in the Description-2 field, for example, 700190000 for Québec.
The two-character province code prints on T4 forms.
From T4/Relevé Setup (G772472), choose Province of Employment
On Province of Employment, review the following fields:
-
Code
-
Description
6.4.4 Verifying T4 and T4A Other Information Codes
T4 and T4A Other Information codes correspond to the special handling pay codes that appear in the Other Information boxes on T4 and T4A year-end forms.
-
T4 - UDC 77/OI
-
T4A - UDC 77/OB
You review these codes to verify that they accurately reflect the reporting requirements for the current year. You must use the box numbers on the T4 and T4A form that the CRA requires.
You must also define the T4 and T4A Other Information codes in UDC 07/IP Special Handling Codes. The codes in UDC 77/OI and 77/OB must be in 07/IP.
Following is an example of UDC 77/OI for T4 Other Information.
To review T4 and T4A other information codes
From T4/Relevé Setup (G772472), choose T4 Other Information or T4A Other Information
On T4 Other Information, review the following fields:
-
Code
-
Description
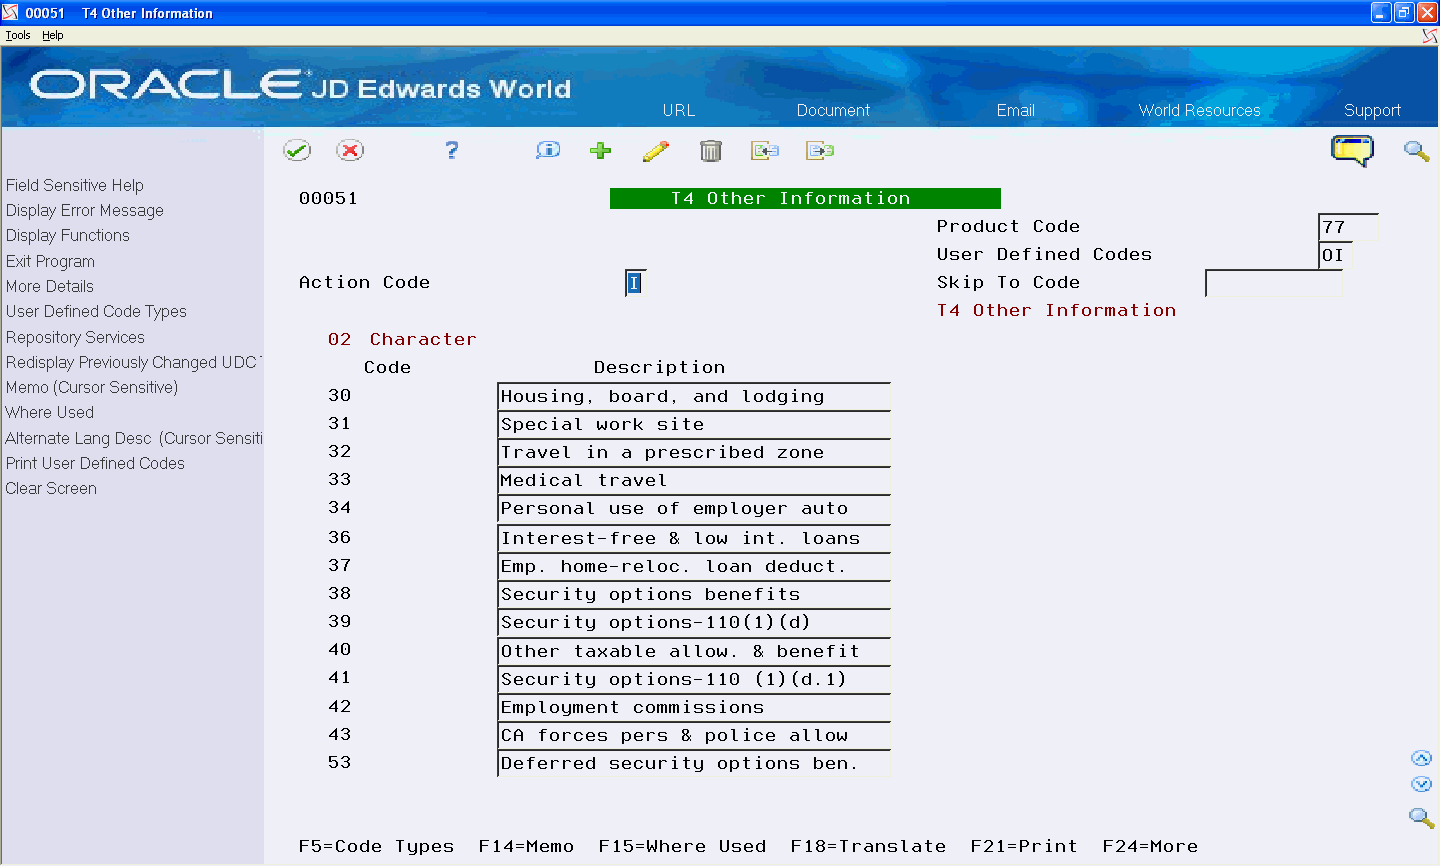
Description of the illustration ''t4_othr_info.gif''
See Also:
-
Working with Special Handling for more information about creating the tables that associate PDBAs with special handling codes.
6.4.5 Verifying T4 Employment Codes
The CRA requires that you enter employment codes for certain types of employment. UDC 77/EC contains the valid T4 employment codes. You review T4 employment codes to verify that they accurately reflect the reporting requirements for the current year.
During the workfile build, you can set up a payroll category code to designate employment codes. Alternatively, you can use the Employee T4 Adjustments form to enter employment codes for specific employees.
From T4/Relevé Setup (G772472), choose Employment Codes
-
Code
-
Description
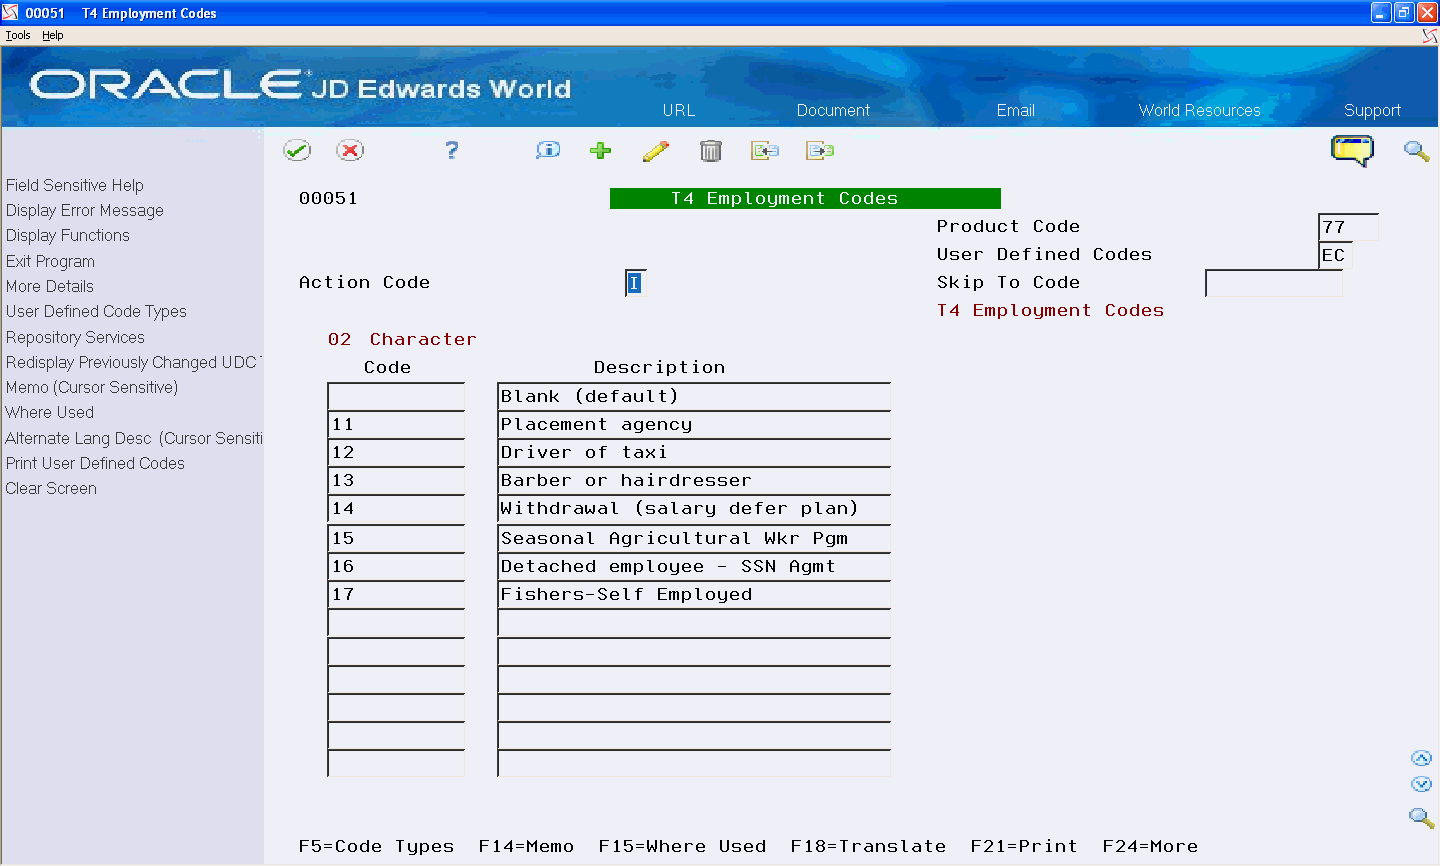
Description of the illustration ''t4_emplmnt_codes.gif''
See Also:
Section 7.1, "Defining Year-End Workfiles"for information about using payroll category codes to designate employment codes on the T4 form.
6.4.6 Verifying RL-1 Case O Codes
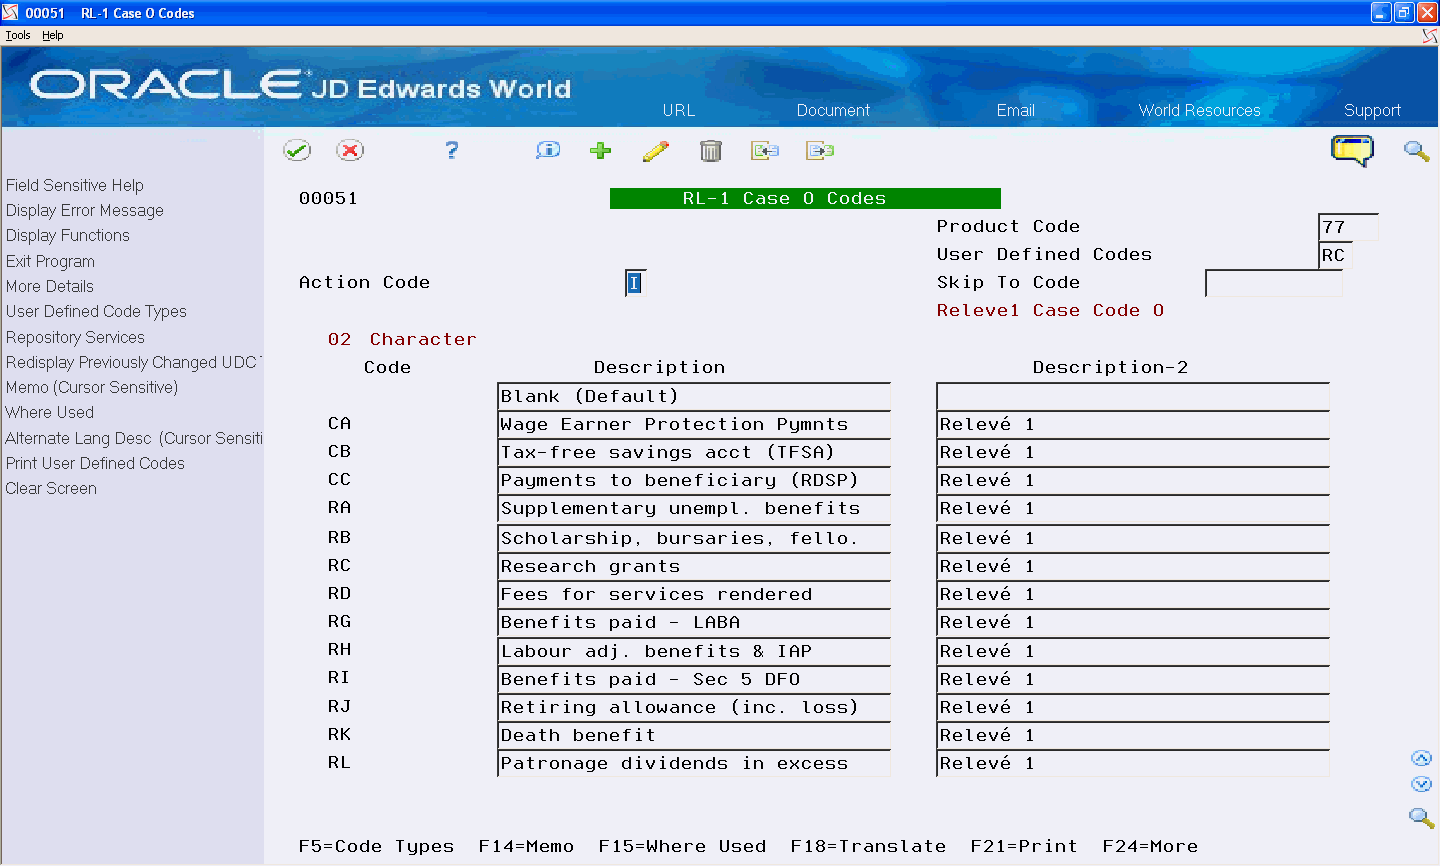
UDC 77/RC contains the codes that explain the amount in Box O (other taxable income) on the Relevé 1 form. These explanatory codes appear in Code (case O) on the Relevé 1 form. The codes are defined by Ministere du Revenu du Québec. You review these codes to verify that they accurately reflect the reporting requirements for the current year.
Note:
You use special handling codes to associate similar PDBAs to Case O codes. The system prints the amount associated with the PDBAs in Box O (other taxable income) and the explanatory code in the Code (case O) box. Alternatively, you can enter Box O information as an adjustment after the workfile build.From T4/Relevé Setup (G772472), choose RL-1 Case O Codes
On RL-1 Case O Codes, review the following fields:
-
Code
-
Description
6.4.7 Verifying RL-2 Source of Income Codes
UDC 77/SI contains the codes that explain the source of the amounts you are reporting on the Relevé 2 form. These explanatory codes appear in the Provenance des revenus box on the Relevé 2 form. The codes are defined by Ministere du Revenu du Québec. You review these codes to verify that they accurately reflect the reporting requirements for the current year.
Note:
You use special handling pay codes to associate similar PDBAs to the source of income codes. The system prints the amounts associated with the PDBAs on the RL-2 form. You enter the source of income code as an adjustment after the workfile build.To review RL-2 source of income codes
From T4/Relevé Setup (G772472), choose RL-2 Source of Income Codes
On RL-2 Source of Income Codes, review the following fields:
-
Code
-
Description

Description of the illustration ''rl_2_surc_income_cods.gif''
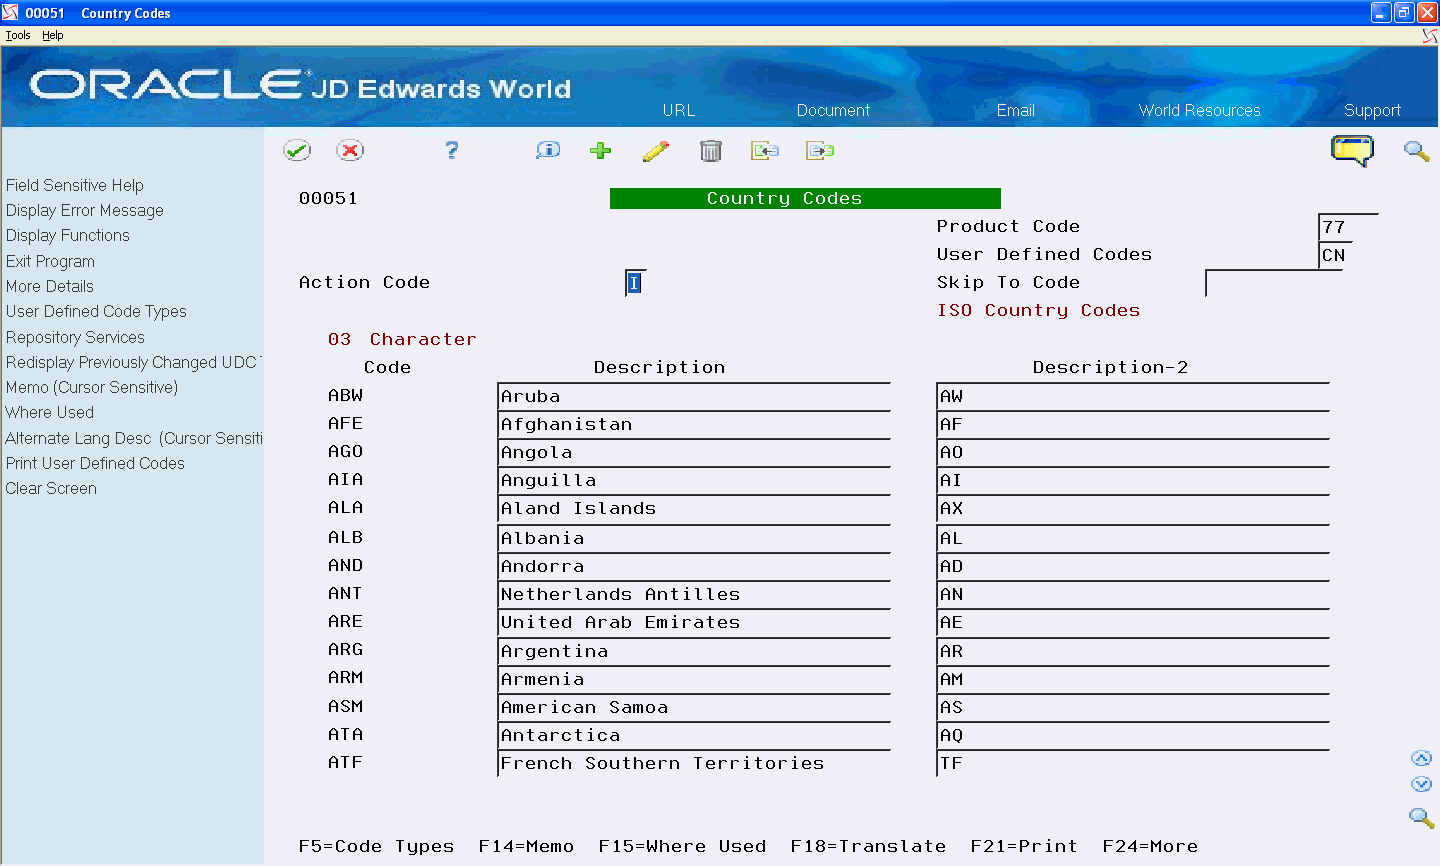
6.4.8 Verifying Country Codes
You use country codes, UDC 77/CN, to identify the alphabetic country codes in the International Standard (ISO) 3166 Codes for the Representation of Names or Countries.
Verify that you set up all country codes and that they are correct for all employees you process, especially for any employees that work outside Canada or the United States. Ensure that each of the following fields include these requirements:
-
Code field must include the valid three character ISO-3166 country code
-
Description field must contain the ISO-3166 country name
-
Description-2 field must contain the ISO-3166 2-character country code equivalent
From T4/Relevé Setup (G772472), choose Country Codes
On Country, review the following fields:
-
Code
-
Description
-
Description-2
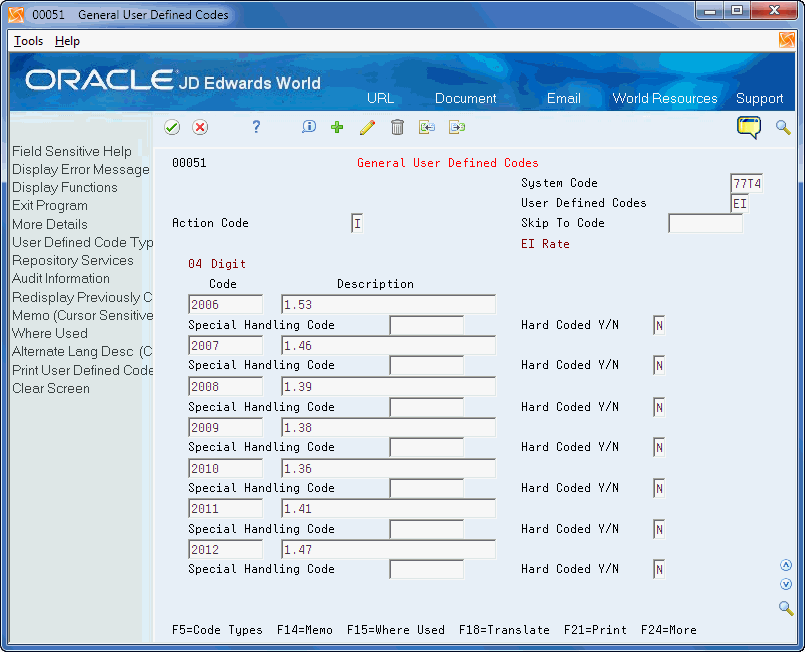
6.4.9 Setting Up the EI Reduced Rate
You must set up a new EI Reduced Rate (UDC 77T4/EI) each year. Contact the appropriate government agency to locate the rate.
From T4/Relevé Setup (G772472), choose General User Define Codes
6.5 Setting Up Pension Records
The Pension Information Maintenance programs are designed to provide a mechanism to accumulate a user's pension information for use in preparing T4A's. This is also the method to enter pension numbers and pension adjustment amounts to the T4's and Relevé 1.
JDE does not provide a method to calculate the pension information. This is only a vehicle to collect the necessary data to print and complete the year end reports.
A pension information record should be setup for each employee who will receive a T4A or will need a pension adjustment amount displayed on their T4(s). Multiple records must be setup for an employee who has different tax areas and/or different tax id's.
To print a pension number or pension adjustment on an employee's T4 or T4A form, you set up pension records. You can create pension records for groups of employees based on payroll history information. You can also enter pension information and pension adjustment amounts for individual employees.
When you build the year-end workfile, the system generates T4A records for employees for whom records exist in the Tax History File table (F0713) with a tax history type of P, J, K, or L (UDC 07/TH).
You can manually create a T4 or T4A after you run the workfile build for an employee who does not have a pension record but requires a T4 or T4A year-end form. You cannot manually create Relevé 1, Relevé 2, or NR4 records.
See Creating a T4A Year-End Form Manually or Creating a T4 Year-End Form Manually for more information.
Setting up pension records includes the following:
-
Creating multiple pension records
-
Creating individual pension records
-
Creating T4A forms for non-pensioners
6.5.1 Creating Multiple Pension Records
From T4/Relevé Setup (G772472), choose Pension Batch Update
For release A9.3 and later, users can create pension records for groups of employees based on payroll history information.
The Pension Batch Update program creates pension records in the Canadian Pension Information File table (F07727) for groups of employees by using information in the Payroll Month PDBA Summary (F06146) and Employee Master (F060116) tables. You can select groups of employees for whom you want to create pension records.
The program creates one record for each employee whose Payroll Month PDBA Summary and Employee Master information matches the selection criteria. You might create multiple records for any employee who worked in more than one tax area or under more than one tax ID.
You can use special handling codes to create T4A records automatically for employees who do not have any qualifying pension history records. See Working with Special Handling for more information.
6.5.1.2 Data Selection
You can use data selection to select groups of employees for whom you want to create pension information.
For example, you might set up a category code to designate certain employees and then use that category code as your data selection. Alternatively, you might select all employees who have history for a specific PDBA code.
You must specify the year you are processing in the data selection as well as in the processing options.
6.5.2 Creating Individual Pension Records
You can enter a pension plan number and the pension adjustment amounts that you need to report for individual employees.
You might need to enter a pension adjustment for an individual employee if the employee made voluntary contributions that exceeded the payroll deduction amount and you did not withhold tax on that amount.
When you enter a pension adjustment, you might create multiple records for any employee who worked in more than one tax area or under more than one tax ID.
The Pension Information Maintenance program creates or updates records in the Canadian Pension Information File table (F07727).
To create individual pension records
From T4/Relevé Setup (G772472), choose Pension Info. Maintenance
On Pension Info. Maintenance, complete the following fields and click Add:
-
Year
-
Employee/SIN
-
Home Company
-
Tax Area
-
Tax ID
-
Pension Plan Number
-
Pension Adjustment
-
T4A (Y/N)
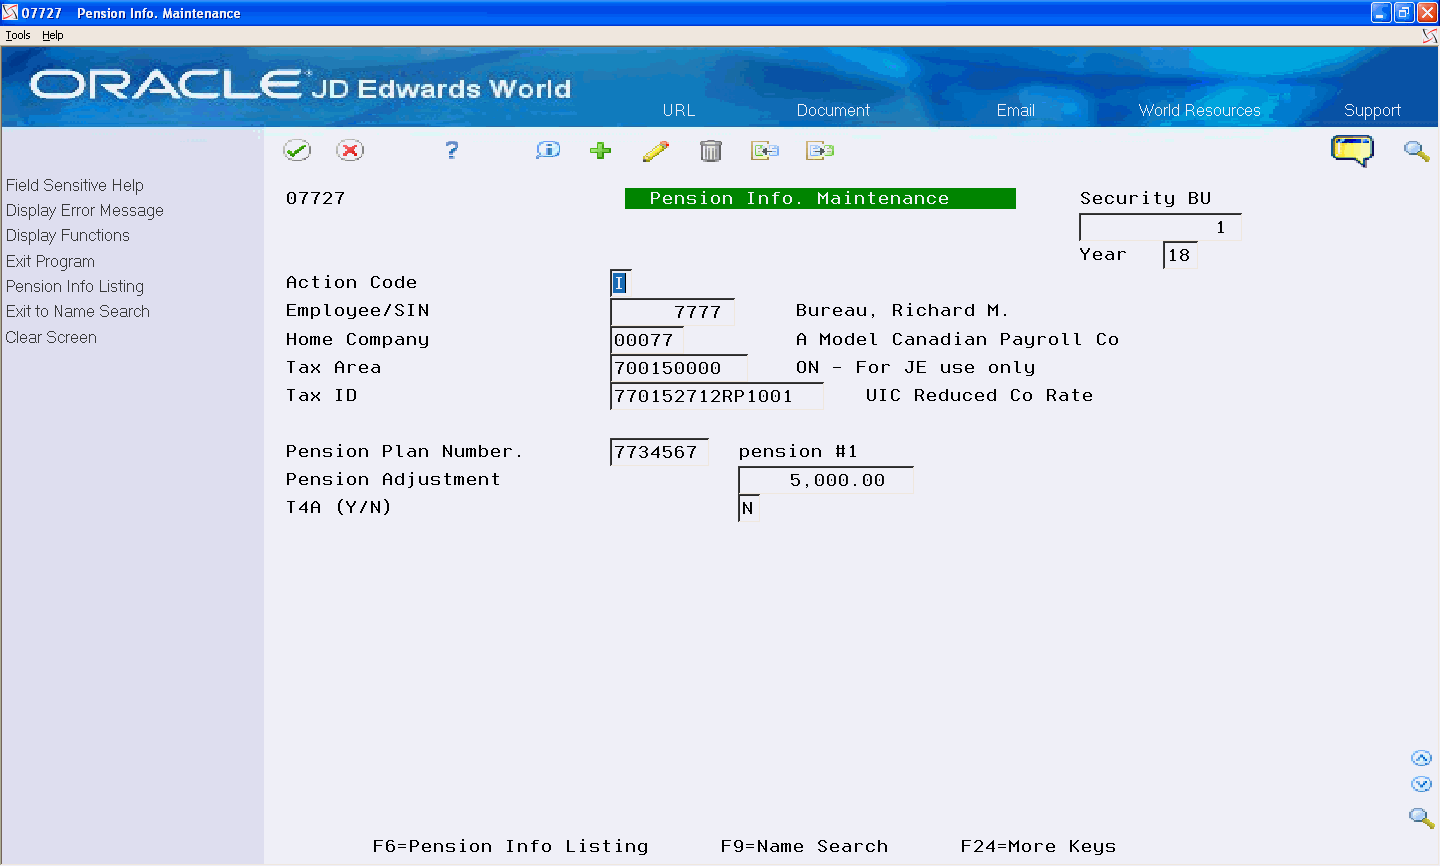
Description of the illustration ''pensn_info_maintnce.gif''
| Field | Explanation |
|---|---|
| Pension Plan Number | The seven-digit registration number that is issued for the employees' pension plan or deferred compensation profit-sharing plan.
Screen-specific information The pension plan numbers that you enter on this screen must exist in user defined code table 77/PN. |
| Pension Adjustment | The amount of the pension adjustment that you want to print on the T4 or T4A. |
| T4A (Y/N) | A code that specifies where the system prints the pension plan number and pension adjustment. Valid values are:
Y – Print the pension plan number and pension adjustment on a T4A form N – Print the pension plan number and pension adjustment on a T4 form (default) |
6.5.3 Creating T4A Forms for Non-Pensioners
There are three ways to create T4A records for Non-Pensioner:
-
Automatically during the workfile build by creating Pension records.
-
Automatically during the workfile build by special handling amounts into T4A boxes.
-
Manually after the workfile build.
6.5.3.1 To create T4A forms automatically for non-pensioners by creating pension records
Prior to running the Build T4/Relevé Workfiles program, ensure that you create individual pension records with the T4A (Y/N) field set to Y using either the Pension Info. Maintenance program or the Pension Batch Update. See Creating Individual Pension Records or Creating Multiple Pension Records
6.5.3.2 To create T4A forms automatically for non-pensioners by special handling
Prior to running the Build T4/Relevé Workfiles program, ensure that you add amounts to specific boxes on the T4A form using special handling codes.
From Canadian Year End Processing (G77247), choose Build T4/Relevé Workfiles
-
On the first Build T4/Relevé Workfiles screen, complete the following field and click Enter twice:
-
T4/Relevé ID
-
-
On the second Build T4/Relevé Workfiles screen, choose Special Handling Code Review (F15) to access special handling codes.
-
On Special Handling Code Review, choose T4A (F5) to access special handling codes for the T4A form.
-
Enter the appropriate PDBAs for the severance pay for either or both of the following boxes on the T4A form:
-
016 - Pension or Superannuation
-
028 - Other Income
-
For more information about entering special handling codes, see Section 6.6, "Working with Special Handling".
Note:
To generate T4A forms by attaching a pay type to a special handling code, you must repost pay types as well as DBAs to the Tax Area Transaction table (F06148). See Reposting Tax Area Information for more information.6.5.3.3 To create T4A forms manually after the workfile build
You can manually create individual T4A forms after the workfile build. This might be necessary if a terminated employee contributes severance pay to a retirement plan or a retired employee receives pension income but no employment income. You cannot manually create Relevé 1, Relevé 2, or NR4 records. See Section 8.4, "Revising Year-End Information" for information creating a T4A year-end form manually.
Prior to running the Build T4/Relevé Workfiles program, ensure you create an individual pension record with the T4A field set to Y.
Note:
To generate T4A forms by attaching a pay type to a special handling code, you must repost pay types as well as DBAs to the Tax Area Transaction table (F06148). See Section 5.1, "Reposting Tax Area Information" for more information.To create T4A forms manually for non-pensioners
From Canadian Year End Processing (G77247), choose Build T4/Relevé Workfiles
-
On the first Build T4/Relevé Workfiles screen, complete the following field and click Enter twice:
-
T4/Relevé ID
-
-
On the second Build T4/Relevé Workfiles screen, choose Special Handling Code Review (F15) to access special handling codes.
-
On Special Handling Code Review, enter the appropriate PDBAs for the severance pay for any or all of the following boxes on the T4A form:
-
016 - Pension or Superannuation
-
028 - Other Income
-
6.6 Working with Special Handling
You use special handling to add amounts and describe the amounts in a specific box on a year-end form.
You can add amounts to specific boxes on each year-end form using special handling codes for pay types, deductions, benefits, and/or accruals (PDBAs). This creates an association between the special handling codes and the specific boxes to which they apply. Each year-end form can have a unique special handling setup.
You use these associations to:
-
Report additional PDBA amounts for wages and taxes to existing taxable wages
-
Report separately for the detail boxes on year-end forms
JD Edwards World software does not provide any pre-existing special handling code setup. You must setup special handling codes for each form.
For each special handling code, enter all of the PDBAs that you want to add to a taxable wage or that you want to report in a particular box on the year-end form. You must enter PDBAs individually.
Special handling codes for Canadian year-end forms must correspond to the box numbers specified by the CRA or Québec.
You set up special handling codes in UDC 07/IP.
To use special handling, you must:
-
Set up the special handling code table.
-
Assign PDBAs to the special handling codes.
-
Assign special handling codes to boxes on the forms.
You can also access special handling code screens from the second Build T4/Relevé Workfiles screen. Use Special Handling Review (F15) to access the Special Handling Code Review screen and Special Handling Table (F16) to access the Special Handling Code Table screen.
Caution:
You must repost using PDBAs to Tax Area Sum. F06148 on the Data Integrity & Global Updates menu (G7731) before performing any special handling or running a workfile build. See Section 5.1, "Reposting Tax Area Information" for more information.Working with Special Handling includes the following tasks:
-
Set up the special handling codes table
-
Assign PDBAs to special handling codes
-
Assign special handling codes to boxes on the forms
To set up the special handling codes table
From T4/Relevé Setup (G772472), choose Special Handling Pay Codes
-
On Special Handling Pay Codes, complete the following fields:
-
Code
-
Description-2
-
-
Repeat these steps to enter all of the special handling codes for all forms.
| Field | Explanation |
|---|---|
| Code | A list of valid codes for a specific user defined code list.
Screen-specific information This value is user defined and corresponds to the box number on the form. |
| Description - 2 | Additional text that further describes or clarifies a field in the J.D. Edwards systems.
Program-Specific Information This column must contain a numeric value that represents the value of the alphanumeric code. Screen-specific information This value corresponds to the form with which the code is associated, as you can use the UDC table for several types of forms: Canadian Relevés, Canadian T4, Canadian T4A, and US W-2. |
To assign PDBAs to special handling codes
From T4/Relevé Setup (G772472), choose Revise Special Handling Tables
-
On Revise Special Handling Tables, complete the following field and click Enter:
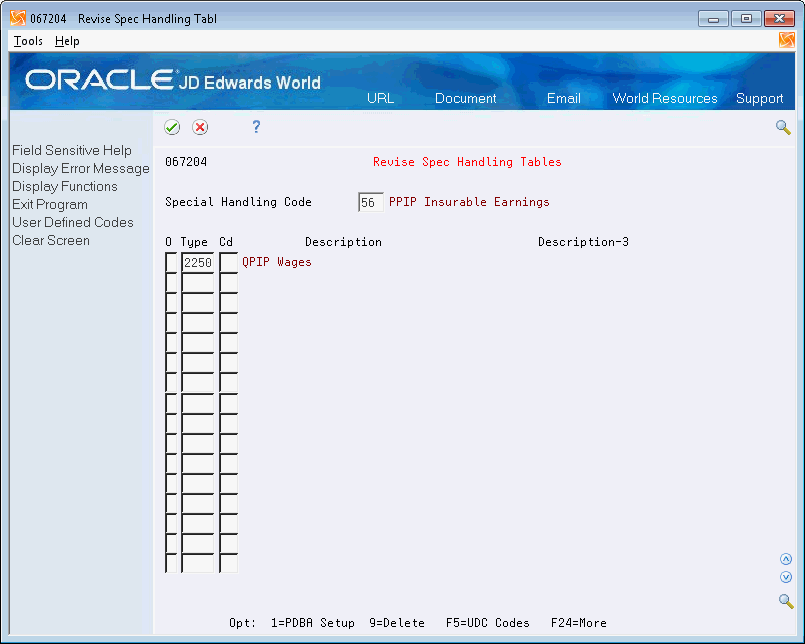
Description of the illustration ''spl_handling_cod_tbl.gif''
-
Enter a pay type, deduction, or benefit number in the following field:
-
Type (PDBA Code)
-
-
Repeat the previous step until you enter PDBAs for this special handling code.
-
For Box O on the Relevé 1 form only, to associate an explanatory code with the PDBA code, complete the following field and click Enter:
-
Cd (Box O Code)
-
| Field | Explanation |
|---|---|
| Type | The number and description of the PDBA that you want the system to use to calculate the corresponding PDBA. This number is the ending number in the range that is the basis of the calculation.
Program-Specific Information Enter the number and description of the PDBA that you want the system to calculate for the specified special handling code table. Screen-specific information To review or change the details of a specific PDBA, enter 1 in the Option field to access the Pay Type Setup screen. |
| Cd | The codes that you can enter in this field are defined by Ministere du Revenu du Québec and supplied by JD Edwards World software in user defined code table 07/S2.
You use these codes only to group similar PDBAs in Box O (other taxable income) on the Relevé 1 form. If only one code is associated with the amount in Box O, the code appears in Code (Case O) on the form. If more than one code is associated with the amount in Box O, the code RZ appears in Code (Case O) on the form and the descriptions of the codes also appear on the form. |
See Special Handling Code Table (P067204)
To assign special handling codes to boxes on the forms
From T4/Relevé Setup (G772472), choose Assign Special Handling Code Tables
The default for the Assign Special Handling Code Tables screen is the T4 form, however you can set which form displays in several ways. You can set the processing option or you can enter the form type (RL1, NR4) in the Form field. You can use the following functions to access the codes for other forms for special handling:
-
F19 to display the special handling codes for the previous form
-
F20 to display the special handling codes for the next form
-
On Assign Special Handling Code Tables, enter the associated workfile build ID version and click Enter twice.
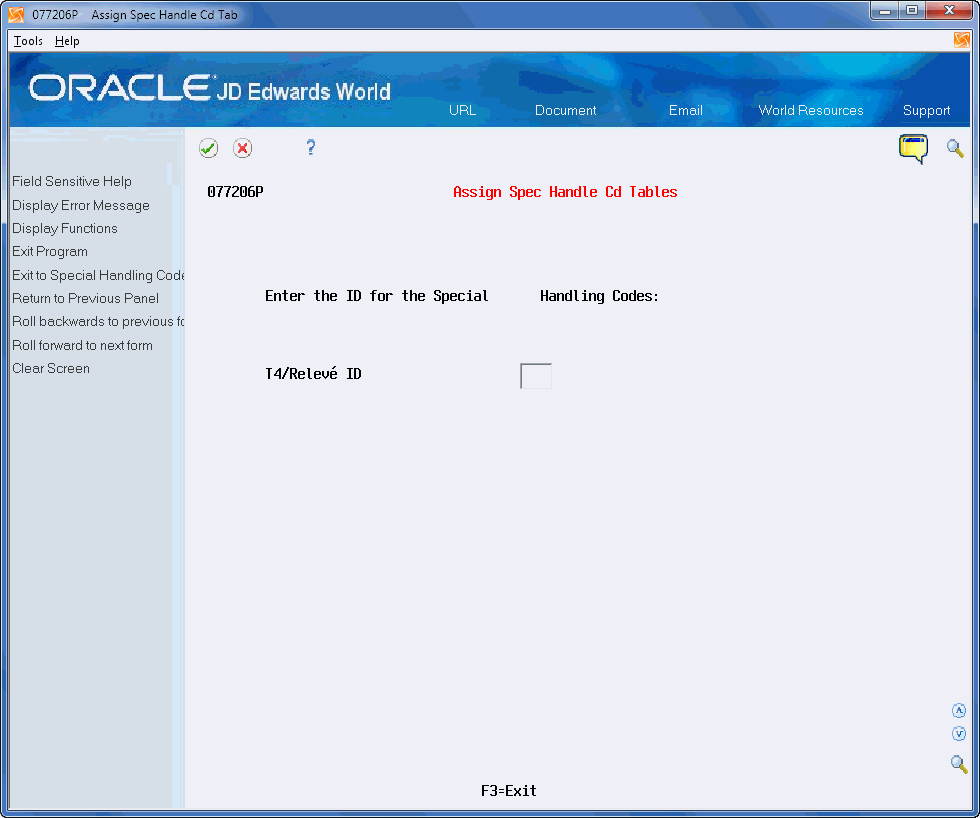
Description of the illustration ''revw_spl_hndlng_stup.gif''
-
On the second Assign Special Handling Code Tables screen, enter a special handling code in any of the fields for each form and click Enter.
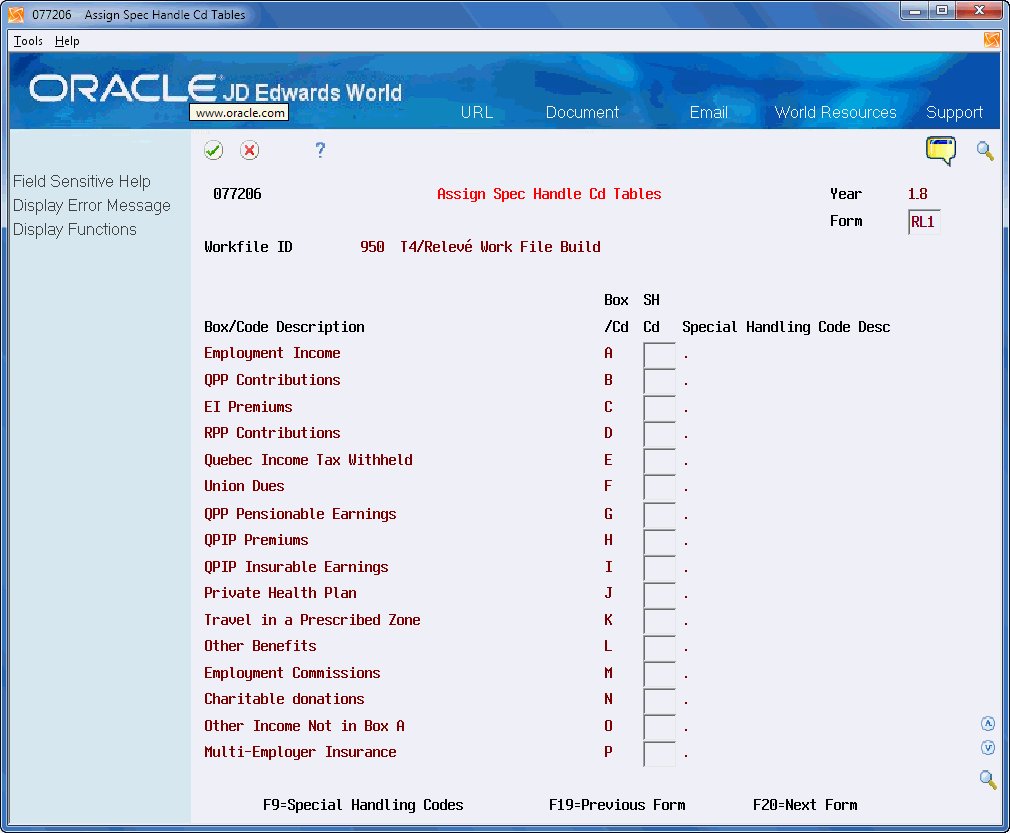
Description of the illustration ''revw_spl_hndlng_stup_1.gif''
6.7 Setting up Non-Resident Secondary/Joint Information
The NR4 form includes a box for reporting a secondary recipient, which the CRA requires when a joint account exists. Therefore, if more than one recipient is entitled to the income, you only need to complete one NR4 slip.
If there are two recipients, enter one of the names in the Individual surname, first name, and initial area and the other in the Second Individual surname area. The second area is only for a second recipient's name when you pay or credit a joint account. Omit titles, such as Mr. or Mrs.
There is not a field to store this information in the NR4 files and it is not a field that is available for update on the NR4 Version Review or Adjustment screens. This information is setup as part of each employee's profile data and the system:
-
Accesses this data when you execute year-end processing
-
Loads the data into the NR4 review screens
-
Prints the information on NR4 forms
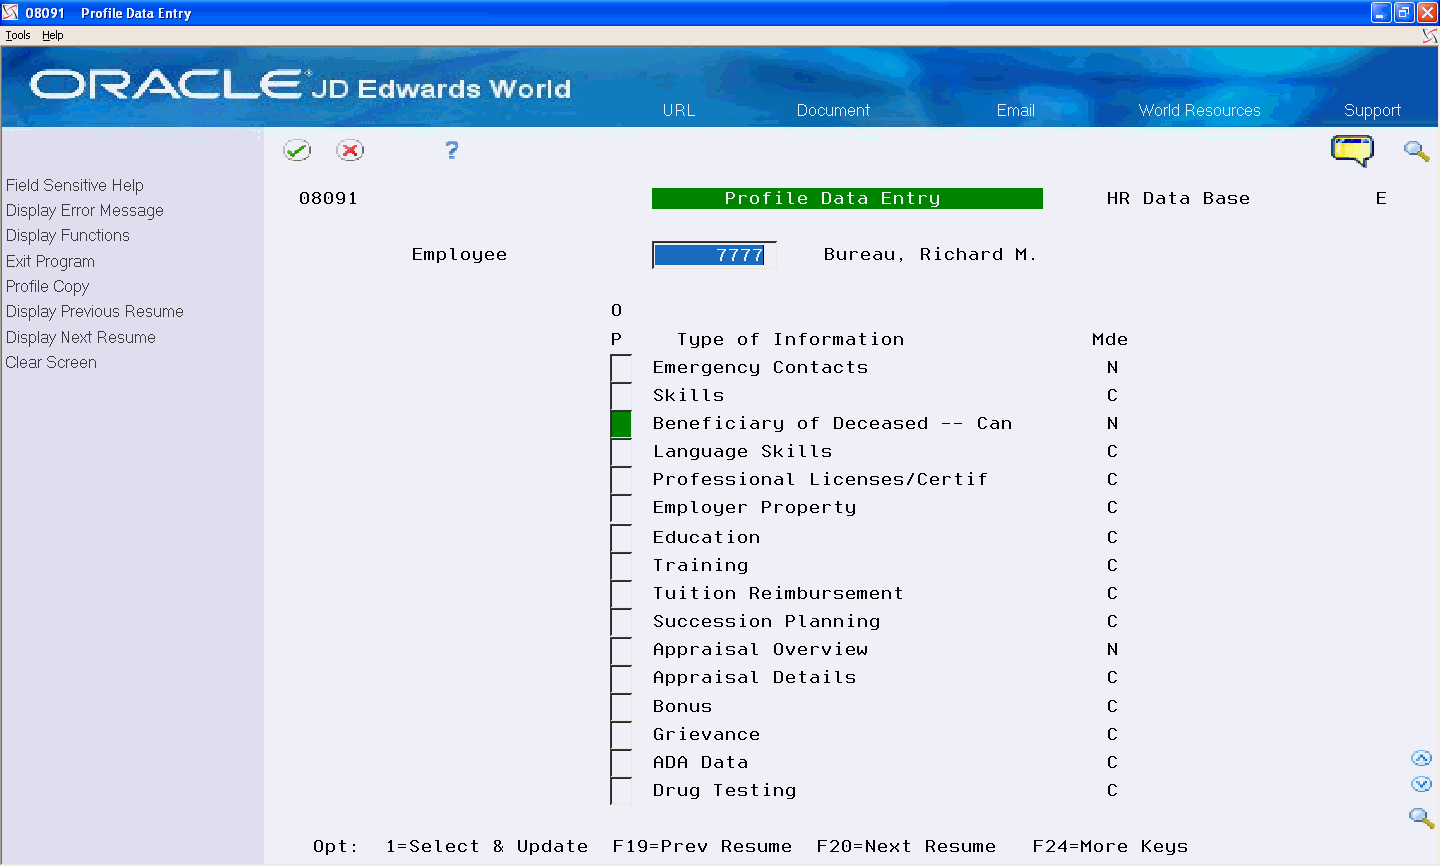
To set up non-resident secondary/joint information
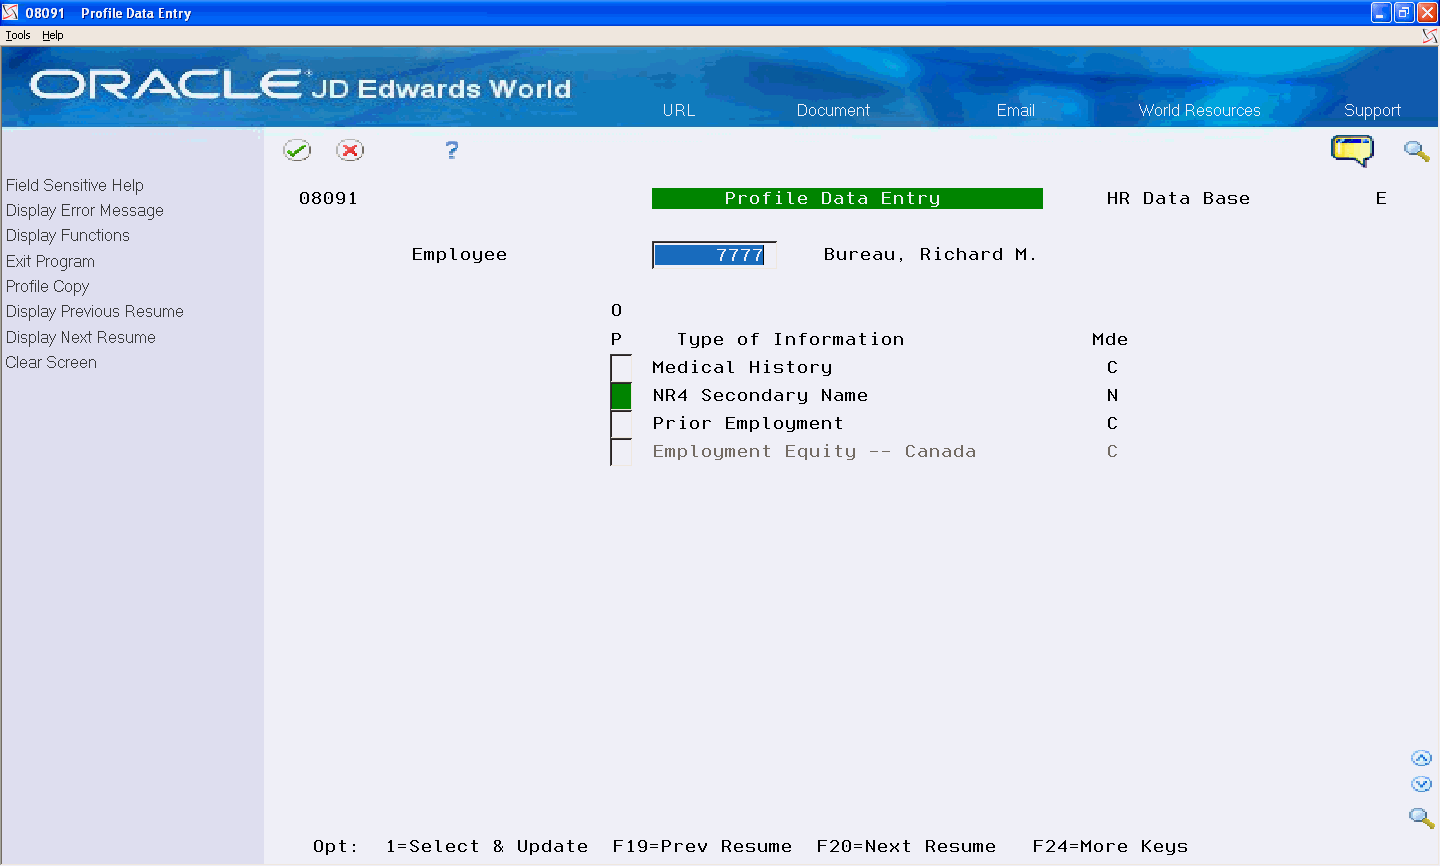
From Canadian Employee Information (G7711), choose Profile Data Entry
-
On Profile Data Entry, enter the employee number in the Employee field and click Enter.
-
Page down and enter 1 in the Option field for the NR4 Secondary Name.
-
On Employee Information, on the first blank text line, enter the last, first, and middle initial of the joint account holder's name and click Add.
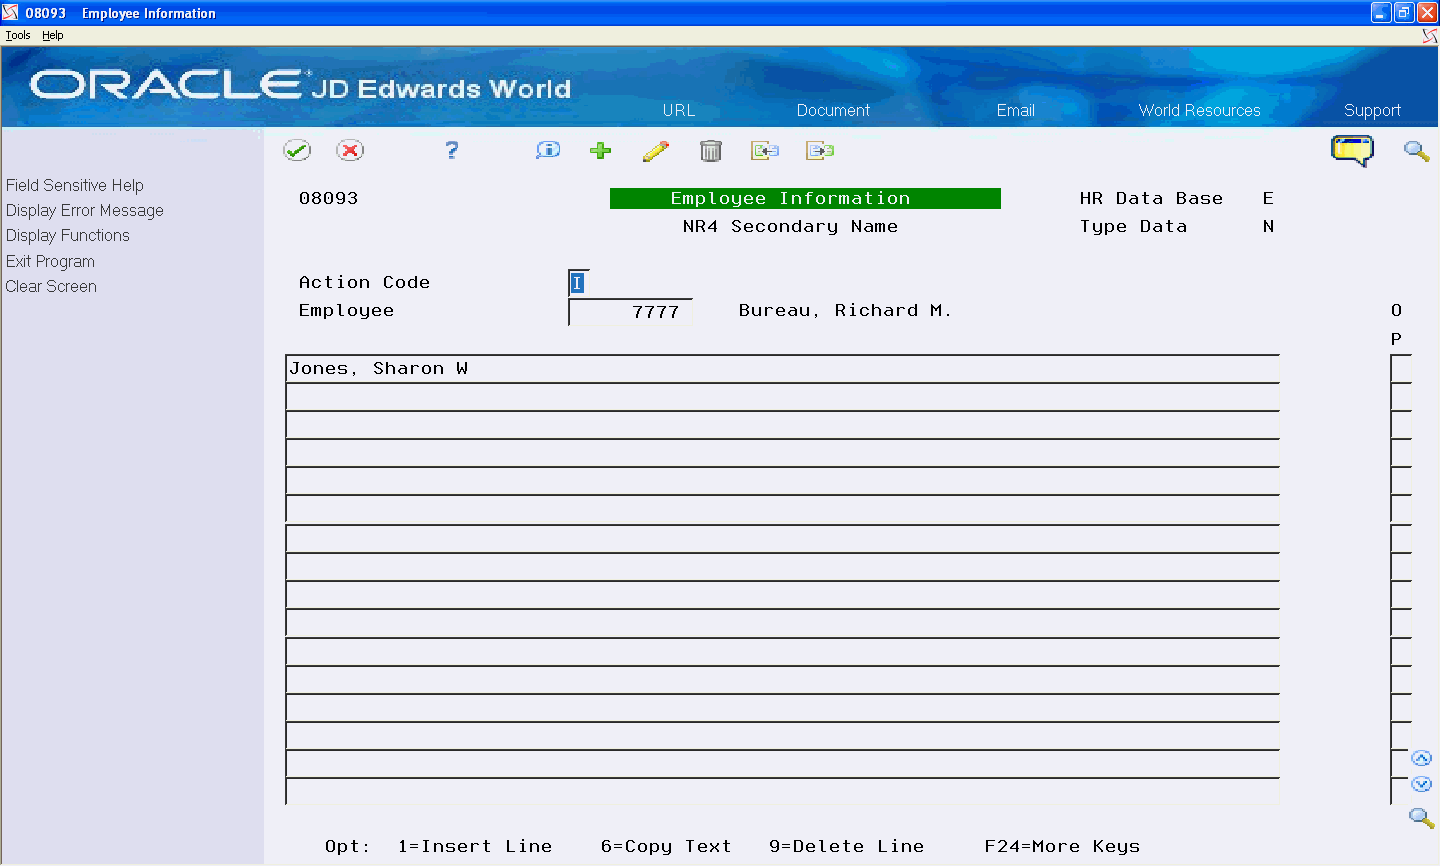
Description of the illustration ''empl_info.gif''
| Field | Explanation |
|---|---|
| Text area | A free-form text field for comments or memoranda.
Screen-specific information Enter the text on the first blank text line and not in the middle of the screen. Ensure you enter a space after the first name and that you enter a period after the middle initial. For example, you enter Smith, John N. This format is critical if the system must parse to separate the name into first, middle, last fields. The system does not edit or validate this information. It is imperative that you enter this information correctly because it follows the format that the CRA requires on the NR4 form. |
6.8 Setting Up Non-Resident Account Information
The NR4 form includes a box for reporting the non-resident account number which the CRA assigns. This must be setup in the Canadian Payroll system so that this number prints on the form.
Complete these tasks for every company that employs non-residents:
-
Create new statutory codes
-
Create new tax areas
-
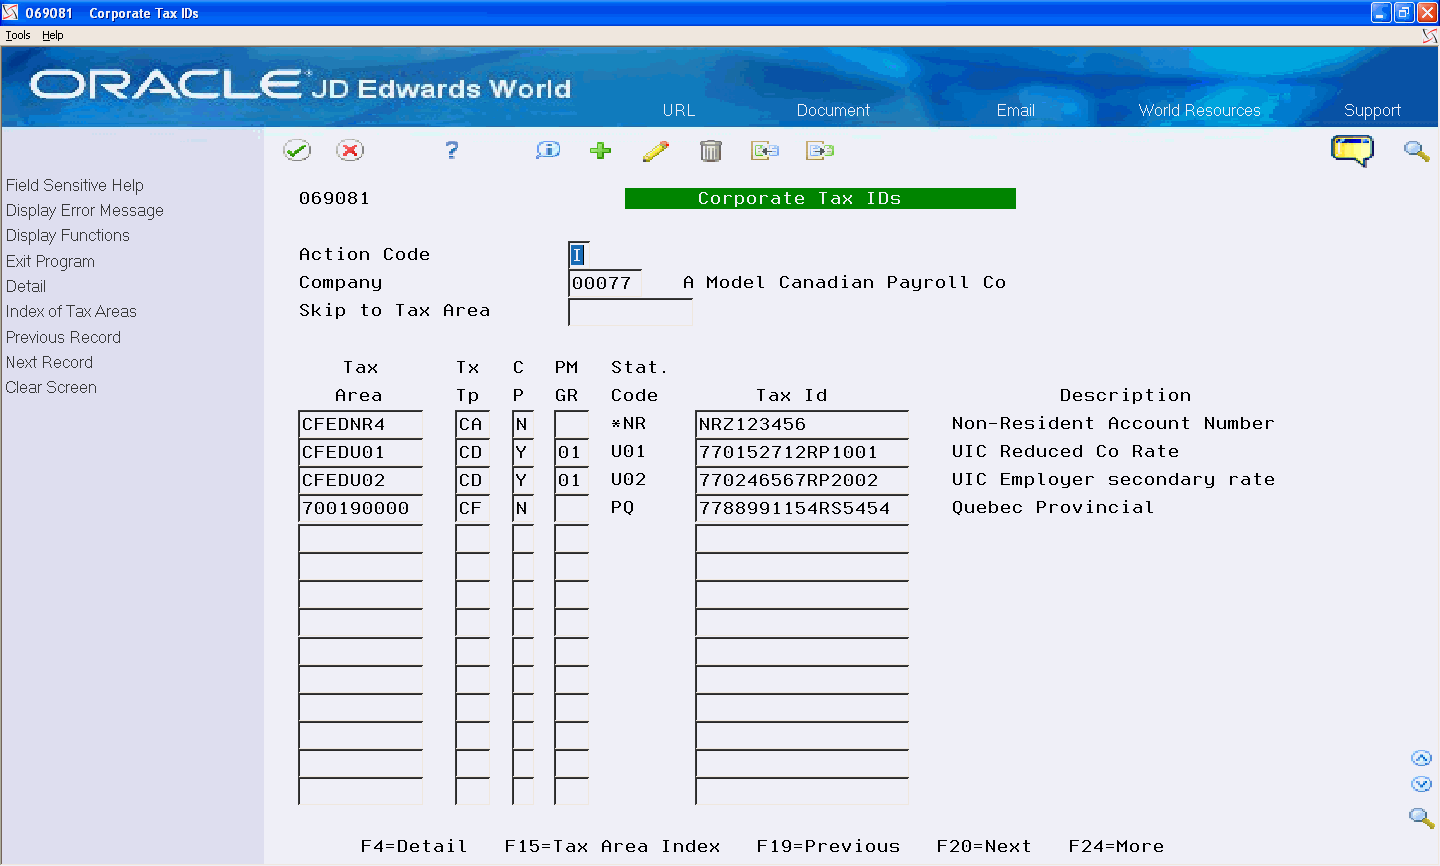
Add tax areas to the corporate tax ID table
From T4/Relevé Setup (G772472), choose General User Define Codes
-
On General User Defined Codes, locate the statutory code (SC).
-
Complete the following fields for Non-Resident Account # (Canada) and click Add:
-
Code
-
Description
-
Description 2
-
Hard Coded Y/N
-
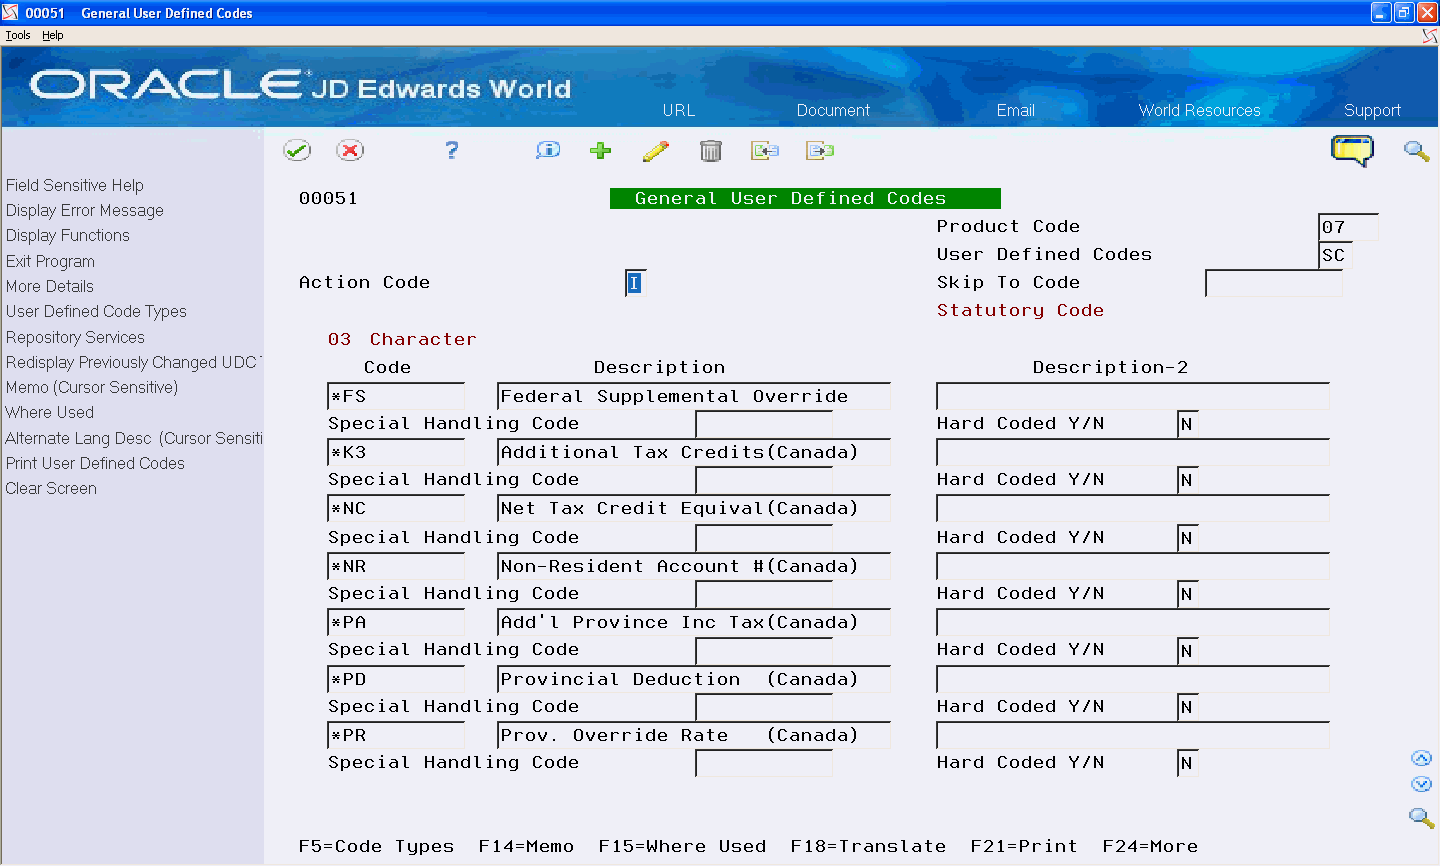
Description of the illustration ''general_udc.gif''
From Taxes & Insurance (G7744), choose Tax Area Information
-
On Tax Area Information, enter CFEDNR4 in the Tax Area field.
-
Enter CA in the Tax Type field.
-
Enter *NR in the Statutory Code field.
-
Enter C in the Company/Employee Paid field.
-
Enter N in the Print On N.P. Instructions field.
-
Leave the default values the system enters for the remaining fields and Click Add.
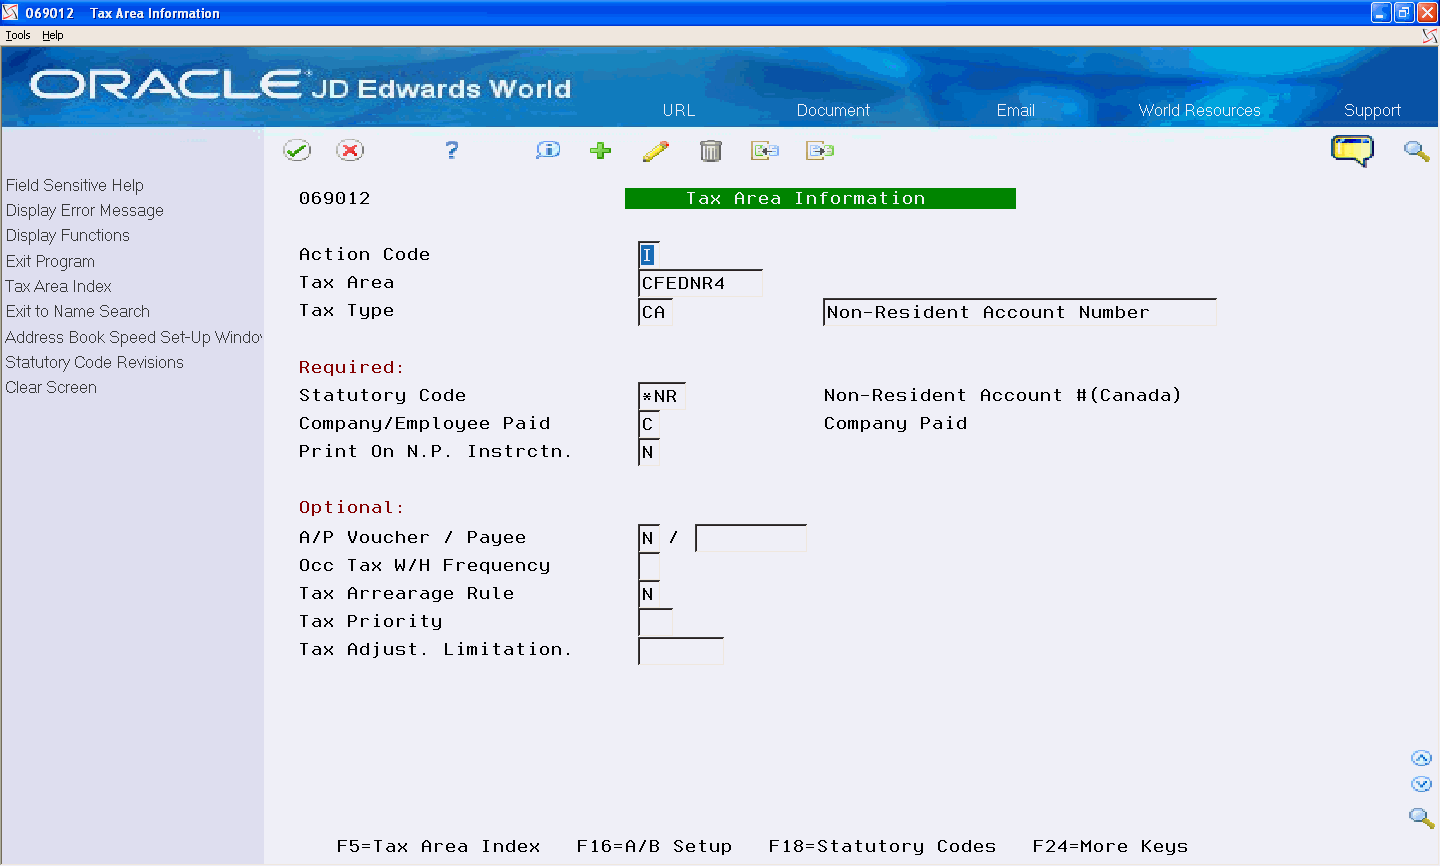
Description of the illustration ''tax_area_info.gif''
To add tax areas to the corporate tax ID table
You repeat this task for each company that employs non-residents. The system:
-
Accesses this data when you execute year-end processing
-
Loads the data into the NR4 review screens
-
Prints the information on NR4 forms
From Taxes & Insurance (G7744), choose Corporate Tax IDs
6.9 Setting Up T4A Beneficiary/Dependent Information
When an employee deceases during the tax year, you might have to issue a T4A to a beneficiary for the benefits that you pay to the beneficiary after the employee is deceased.
Likewise, when a dependent of an employee receives bursary payments during the tax year, you might have to issue a T4A to the dependent for the benefits paid to the dependent during the year.
It is likely that the beneficiary/dependent is not an employee; therefore they do not have an employee number and are not in any of the employee and payroll tables. In this case, you need to identify the beneficiary/dependent so that you can send the T4A to the beneficiary/dependent, using the beneficiary's/dependent's information.
The system stores the beneficiary/dependent information in the Address Book tables and not the Employee Master tables. The beneficiary/dependent is associated with the employee because the system stores the payroll history information in the payroll tables with the employee's number.
After you set up the T4A beneficiary/dependent information, the print and XML programs recognize that there is a value in the Beneficiary/Dependent fields and use the Address Book information for the beneficiary/dependent on the T4A form and in the XML file. You can make any other adjustments to the T4A as normal.
Setting up T4A beneficiary/dependent information includes the following tasks:
-
Creating a beneficiary/dependent address book record
-
Adding beneficiary/dependent information to the T4A of the employee
To create a beneficiary/dependent address book record
From Address Book (G01), choose Address Book Revisions
On Address Book Revisions, complete the following fields and click Add.
-
Address Book Number
-
Alpha Name
-
Mailing Name
-
Address
Include the postal code, city, province, and country
-
Tax ID
This is the SIN Number.
To add beneficiary/dependent information to the T4A of the employee
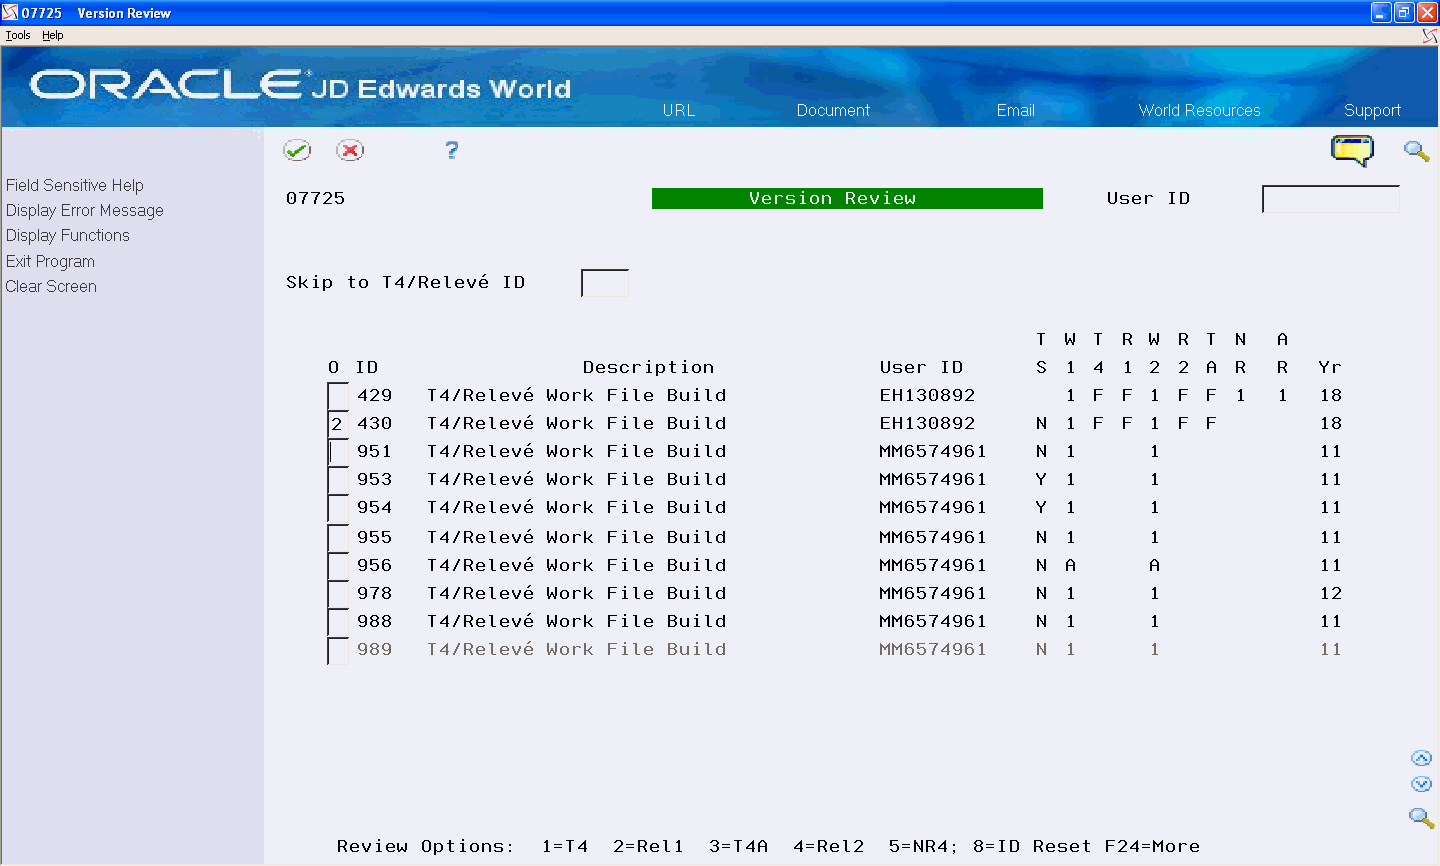
From Canadian Year End Processing (G77247), choose Version Review
-
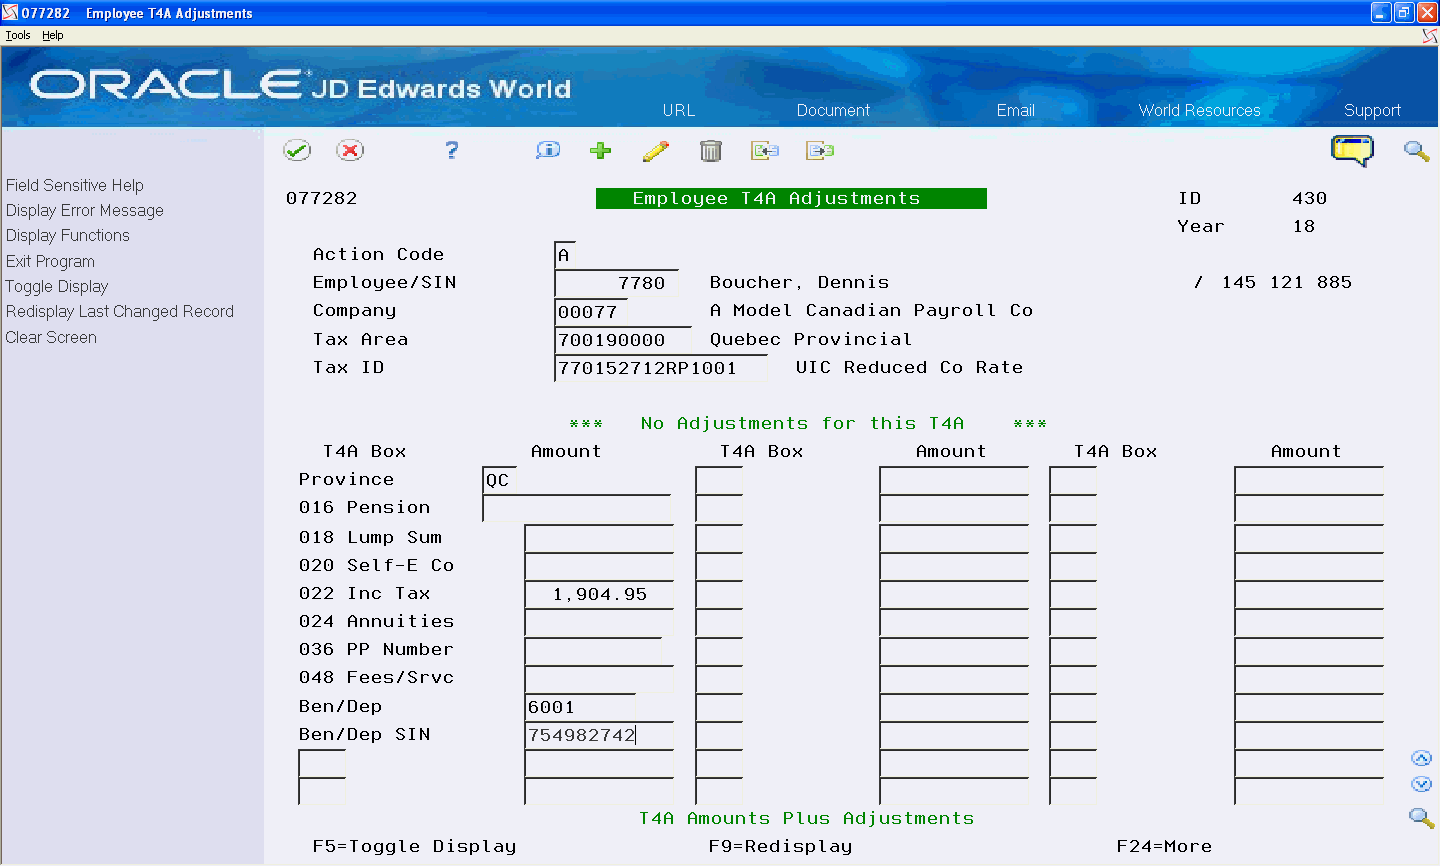
On Version Review, enter 3 in the Option field next to the version that includes the T4A of the employee.
-
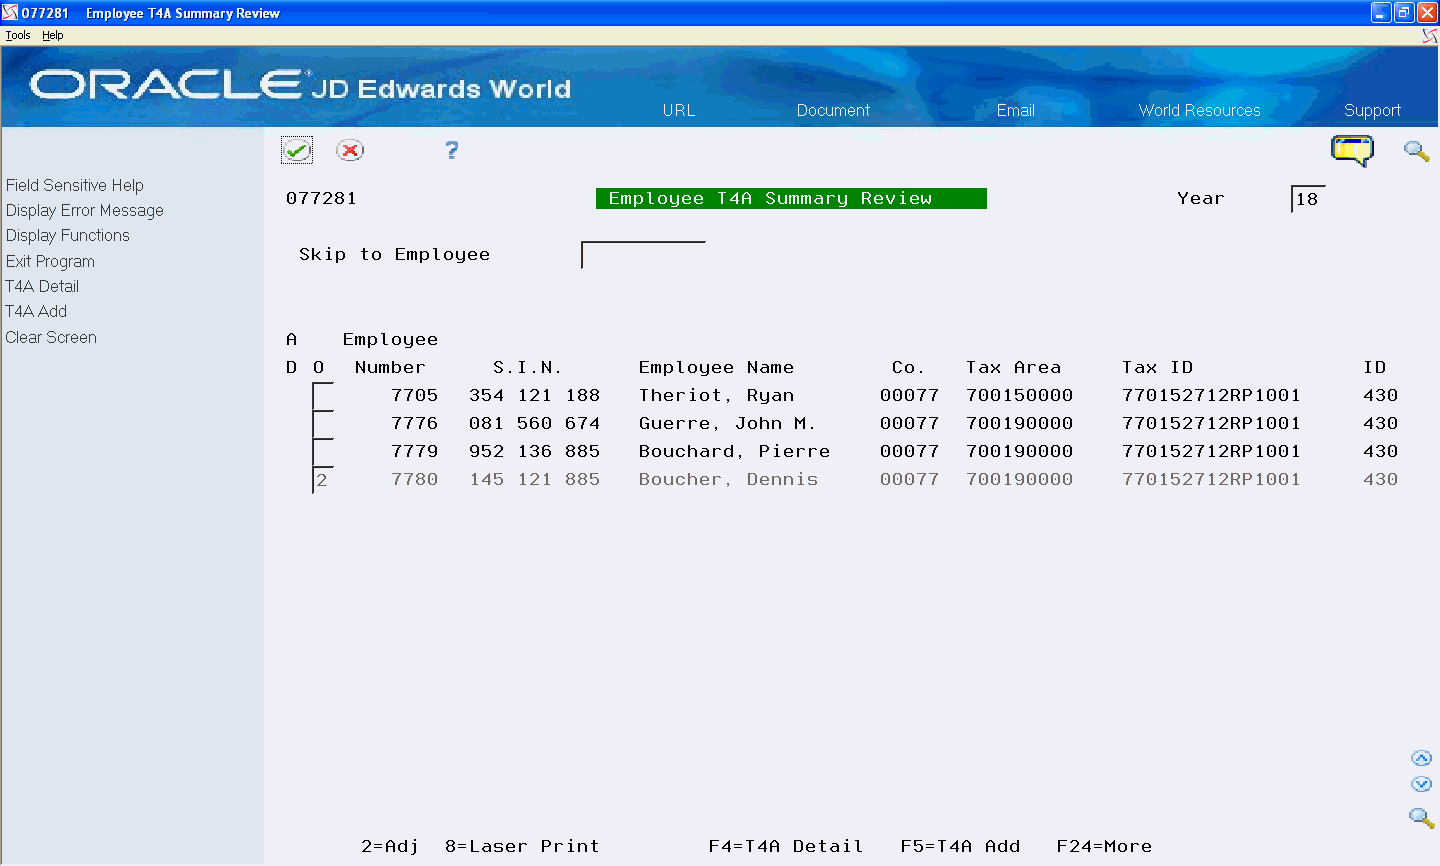
On Employee T4A Summary Review, enter 2 next to the employee's T4A.
-
On Employee T4A Adjustments, enter the beneficiary/dependent information in the following fields and click Add:
-
Beneficiary/Dep
-
Ben/Dep SIN
-
6.10 Setting Up Integrated File System (IFS) Directories
Extracting the XML file involves exporting the XML file that you create on the AS/400 (iSeries) to an XML document on the user's PC using either the File Transfer Protocol (FTP) or the IFS on your AS/400, iSeries, or System i5 server. To use FTP, see Section 9.3, "Transferring and Submitting the XML Workfile".
The IFS functionality allows users that do not have access to FTP on their production machines to export the XML file. Additionally, the PC Import/Export functionality that some users might be familiar and comfortable with uses IFS.
See Set Up Import/Export in the Technical Tools Guide for more information about setting up Import/Export and IFS directories.
When you set up the IFS for year-end Canadian payroll processes, be aware of the following:
-
Some companies prefer to create a directory for each user, using their User ID as the directory name.
-
Make it easy to identify this directory as the one you use for extracting and transmitting Canadian Year-End related XML documents. For example, a simple name such as t4xml or T4XML.
-
When you share an IFS directory using an IBM iSeries API, you must enter X00000819 for the Coded Character Set ID (CCSID) parameter so that the system translates any special French characters correctly into the XML file.
