Service Desk User Procedures
This chapter covers the following topics:
- About the Sample Service Desk User Procedures
- Creating a Service Request
- Resolving the Service Request
- Creating and Updating a Task
- Searching Service Requests
- Searching for Tasks
About the Sample Service Desk User Procedures
Because user procedures vary greatly from implementation to implementation, Oracle cannot provide step by step end-user help for the Service Desk module.
Instead, this chapter uses examples to provide application implementers and administrators with an introduction to typical user procedures for creating and resolving a service request and for searching in the Service Desk module of Oracle TeleService.
The example details how the support organization for the fictitious Vision Enterprises handles a problem on a field office e-mail server.
Vision Enterprises resolves employee problems in two steps:
-
A support representative logs the problems first and verifies the employee information.
-
The application then assigns the service request to the appropriate support group for resolution.
The support organization assigns work to the different support groups based on service territories and leaves it up to the agents to determine what they want to work on next. Agents can choose to work on any item in either their personal work queue or in the unassigned work queue.
In this section you can learn about:
Creating a Service Request
This example illustrates the creation of a service request for an existing install base item.
-
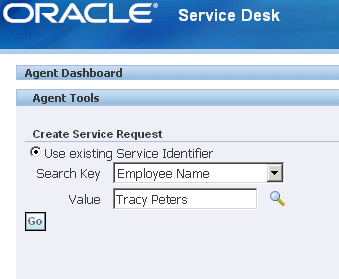
Tracy Peters, a database administrator for a field office, calls to report that users cannot receive e-mail apparently because of a faulty e-mail server.
-
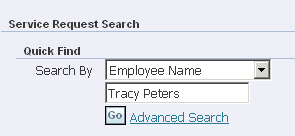
Support agent Ted Crilly chooses Employee Name as the search key in the Create Service Request region of the Agent Dashboard, enters the employee's name, and clicks Go.
Note: When you click Create Service Request button, the Create Service Request pop-up window appears. Using this window, when you a create a service request for a customer who has default contracts setup, contracts will not be created.
-
The Create Service Request page opens. The value of the Service: System Generated Service Request Number profile option determines whether the application automatically generates the service request number.

-
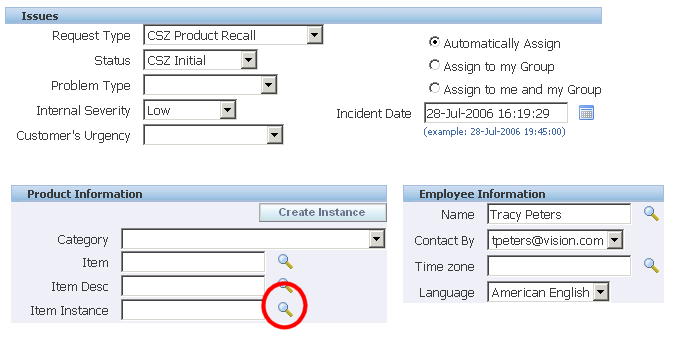
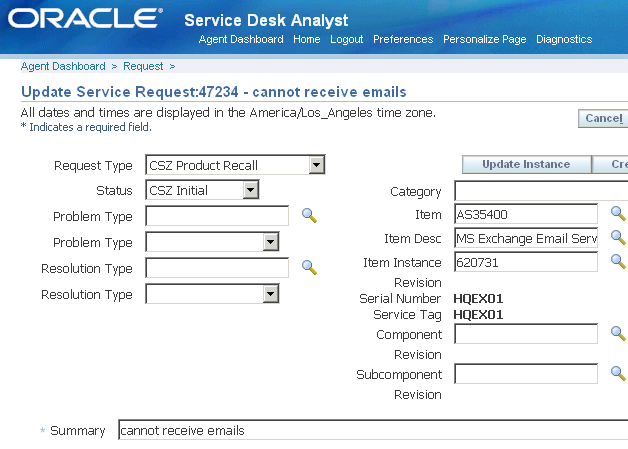
Ms. Peters gives support agent Crilly the unit's serial number.
-
To enter the item instance using the serial number, Mr. Crilly clicks Search next to the Item Instance field (highlighted in the image below).
-
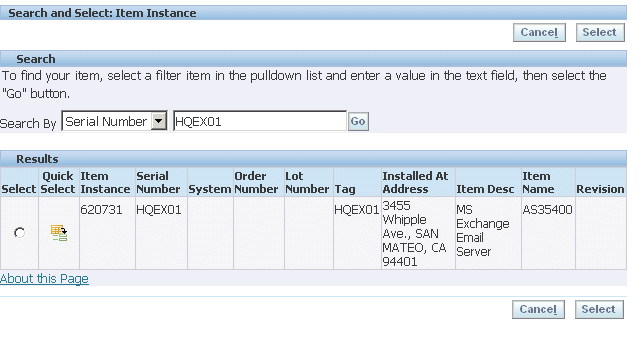
In the list of value window, he chooses Serial Number as the search key and enters the unit's serial number "HQEX01" for the search.If the Services: Check for Similar Service Requests profile is set to Yes, then a page displays similar requests that have HQEX01 as the serial number.
-
Clicking Quick Select populates the Product Information on the Create Service Request page.
Note: Your application may display different information depending on your implementation. For example, the application displays different information if the item is an Oracle Installed Base instance, an Oracle Enterprise Asset Maintenance asset, or an inventory item that is not tracked by either application. Clicking the Graphical View button will display a graphical representation of the item instance relationship. The Current Location Customer and Current Location fields are read-only and the installed base address defaults to the Current Location field.
-
In the Product Information region, Mr. Crilly enters Boston Manufacturing as the expenditure organization. He next selects the project number 5476, and "Move hard drive" as the project name. He then associates project task number 6810, and project task name "contact transporter" to the service request.
-
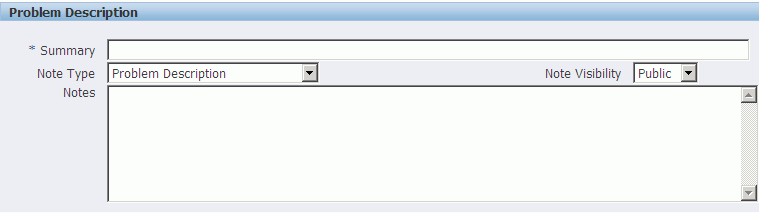
The agent returns to the Create Service Request page and enters the problem summary "Cannot receive e-mails" into the Summary field chooses "Server Problem" as the note type and retains "Public" as the note visibility. Mr. Crilly classifies the employee problem as a "Technical Problem" using the Request Type list in the Issues Region.
If the following flexfields segments are enabled, then a support agent can enter values for the flexfield segments:
-
Additional Information
-
Additional Information for Agents
When you add values to the flexfield segments and submit the charge line, the DFF segments are included in the data passed to Order Management by the charge line submission process. See Creating a Charge Line.
Note: The default Note Type and Visibility are set in the profiles Service: Default New Note Type and Note: Default Note Status respectively. Mr. Crilly can change these values, if needed while creating the service request. The value of the Service: Display All Note Types for HTML Service Requests profile option determines the note types that the Note Type list displays.
-
-
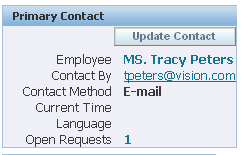
Mr. Crilly views Ms. Peters' contact information, the contact type, name of the contact, the contact's complete phone number with the country code and extension, the time zone of the contact, and the preferred language.
The agent can enter multiple contact details for the primary contact of a service request using the Email, Phone, and Phone Type fields. The value selected in the Contact By field determines the primary contact point for the service request.
The agent verifies that Ms. Peters' contact information is correct by clicking the Update Contact button. The Party Information page appears with the contact details.
Note: The Contact field can be made mandatory while creating the service request by setting the profile Service: Make Contact Mandatory to Yes.
Note: Mr. Crilly can also click the envelope icon next to Ms. Peter's email address, if email is the chosen method of contacting her.
-
The agent is now ready to save the new service request. When the agent saves the service request, if the Services: Check for Duplicate Service Requests profile is set to Yes, then all requests that are a duplicate of this request are displayed in a separate page.
-
The selection of the option in the Issues Region determines how the application assigns the service request after it is saved.
Note: The View Maintenance Plan button in the Create Service Request page and Update Service Request page gets enabled only if the primary product instance associated with the service request has scheduled planned maintenance activities. Click this button to view the preventive maintenance schedule. Service Coordinators and Call Center Agents can provide an update to customers about the next preventive maintenance visit.
The Assign Automatically option causes the application to assign the service request to the appropriate support group or to a specific agent, depending on how you set up your work assignment and distribution. If the Service: Real-Time Automatic Assignment of Service Requests in Agent-Facing Applications profile is set to Yes, then the Assign Automatically option is selected by default but if the profile is set to No, then the default value is Assign Manually. Agents can change the assignment mode.
Alternately, the agent can keep possession of the service request by choosing Assign to me and My Group option or keep ownership in her support group by choosing Assign to My Group, or may want to assign the service request manually to some other agent by choosing Assign Manually option.
If the assignment mode is manual, then the default values for Assigned Group and Individual Owner are displayed from the profiles Service: Default Group Owner for Service Requests and Service: Default Service Request Owner respectively, if they are defined.
-
Next, Mr. Crilly checks the entitlements in the Deadlines region. The application displays entitled service contracts for the server and provides the contractual response and resolution date, so Mr. Crilly can inform Mr. King when to expect the problem to be resolved.
-
Clicking Apply creates the new service request and triggers the assignment process.
-
The application automatically opens the new service request in the Update Service Request page.
Support engineers can click the More Products button to capture multiple products for a service request. For more information, see: Adding Multiple Products to a Service Request. Note that the More Products button is enabled only after a product is selected in the service request header. This button is not enabled for EAM and CMRO types and when there is no item information on the service request.
The agent can inactivate a contact by selecting the Inactive check box. However, a primary contact cannot be inactivated if it is the only contact for that service request, and the Service: Make Contact Mandatory profile option is set to Yes.
-
Because the service request is resolved by a different agent, Mr. Crilly clicks Cancel to return to the Agent Dashboard.
Note: You can have the employee automatically notified by e-mail that the service request has been created. See Setting Up Notifications. If you have implemented Oracle iSupport, employees can view the service request on their support portal.
Tracking Service Requests and Service Tasks
For information, see "Tracking Service Requests and Service Tasks."
Resolving the Service Request
This topic details how Mary Swanson, a support engineer for the corporate e-mail system, resolves the service request.
-
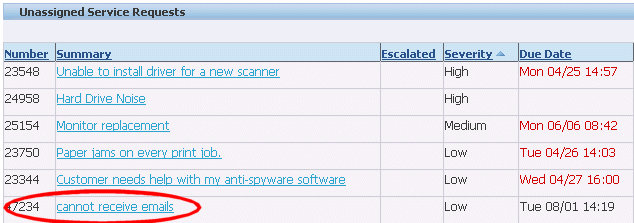
Checking the Unassigned Work queue, Ms. Swanson sees that a new service request has been created.
-
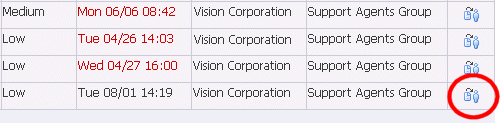
Her first action is to assign the service request to herself by selecting the Accept icon to the right of the service request (highlighted in the image below). Assigning the request to herself assures that nobody else in her support organization tries to update the service request at the same time.
-
The service request opens in the Service Request Update page.
-
Ms. Swanson clicks the Dashboard tab to check for any open tasks on the service request
-
In the Customer Profile region, she can click Customer Overview to navigate to the Customer Information page of the HTML Contact Center. This page provides details of the customer. See Customer Overview.
-
On the History tab Ms. Swanson can see that the service request was created by agent Ted Crilly.
The History tab provides the following check boxes to review the service request activity and notes.
-
View
The default view is based on the value that is set for the Service: Default View in History profile option. Select from the following values:
-
Service Request Audit: Displays details such as the request attribute name, the date of change, the resource who made a change, the original and changed value of the service request attributes.
-
Service Request Notes: Displays notes added to the service request. You can update an existing note, if your system administrator has added the relevant function that enables updates to the service request notes.
-
Knowledge: Displays details of knowledge base solution for the service request.
-
Interactions: Displays the agent interactions with the customer. If email interactions are available, then a customer support agent can view the email interaction details and click the link in the Logs region to navigate to the Oracle Email Center page.
-
Tasks: Displays task information such as the task priority, task status, task owner, task assignment, and task debrief notes. Click the link in the section to update the task and the notes accordingly.
-
Escalations: Displays escalation history details such as the escalation summary, the escalation level, the requester, the escalation status, the reason, and the target date by which the escalation is to be worked on.
-
Install Base Notes: Displays the install base notes for the instance present in the request. The Logs region displays the link to navigate to the Update Notes page.
-
-
Order
The default order for the display of logs and notes is based on the value that is set for the Service: Default Order in History profile option. To override the default value, select the appropriate value in the Order field.
-
-
On the Contacts tab, the support engineer makes sure that the service request contact information is correct. Support engineers can use this tab to view, add, or update the service request contact point details.
-
If the service request primary contact has both an email and a phone contact recorded as service request contact points, then the application displays these values in the Email, Phone, Phone Type and Contact By fields.
-
If the service request primary contact has only an email or a phone number recorded as the service request contact point, then the application displays this value in the Email or Phone and Contact By fields.
-
-
On the Problem And Diagnosis tab, she notices that this server has recently had its hard drive replaced.
The Service History region in the Problem and Diagnosis tab displays service request history by instance, instance component, instance sub-component, item and customer, item component, and item sub-component, based on the filter criteria. The two view options available are Service Requests History and Tasks History. The default view is based on the value that is set for the Service: Default view in Service History profile option. You can filter by a specific instance, instance component, instance sub-component, item and customer, item component, and item sub-component.
-
In the Related Service Requests region, she notices that the service request is linked to another service request where the SR number is 53245, Summary is "Overload crashes e-mail", type is "Server Problem", and status is "Open". If the service request is in a status that does not allow any updates to the service request, then Ms. Swanson will not be able to update it. For more information, see Service Request Statuses
-
Ms. Swanson decides to search the knowledge base for possible solutions by clicking Go in the Search Knowledge region.

-
The Simple Search Results page displays possible solutions in the database.
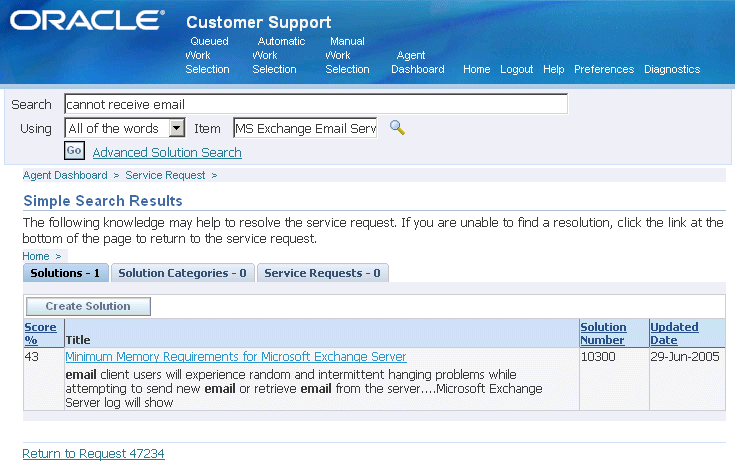
-
The displayed knowledge base solution summary suggests this may be a virtual memory problem. Ms. Swanson decides to view the solution in detail and assess its usefulness.
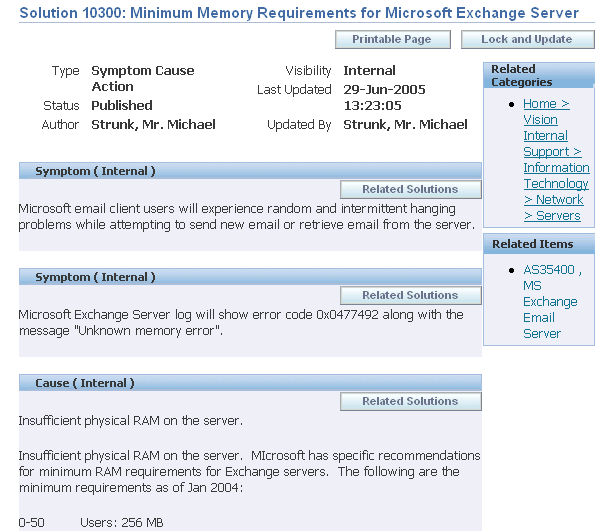
She clicks the solution link and the text of the solution displays.
The solution stipulates at least 500 megabytes of memory for an organization with 50 to 100 employees. Ms. Peter's office has almost 100 users.
-
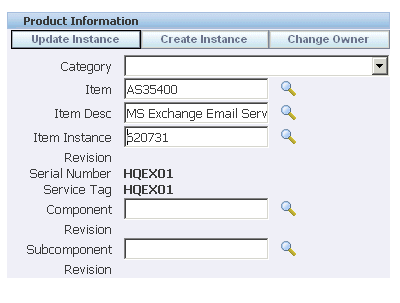
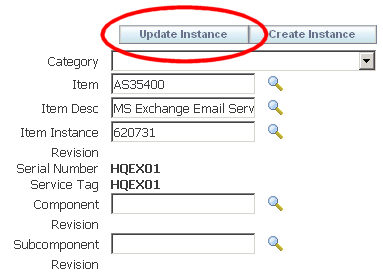
Ms. Swanson decides to check the server's configuration to see if the available memory meets this requirement. To do so, she returns to the Service Request Update page and clicks Update Instance (the button highlighted in the image below).
-
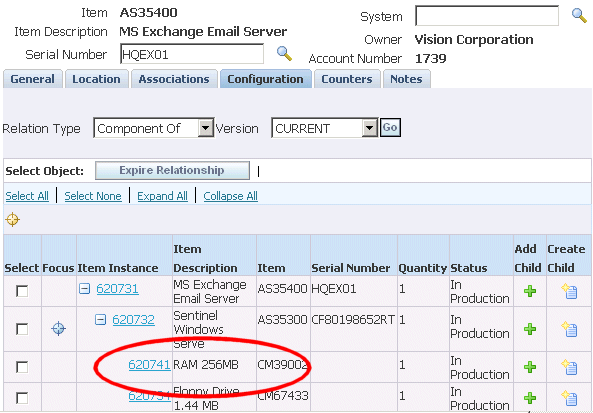
The Oracle Installed Base record shows that the server has only 256 megabytes of memory.
-
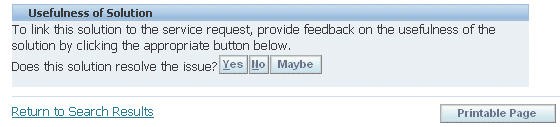
Ms. Swanson decides that this solution may prove useful to resolve this problem, so she scrolls down to the bottom of the page and clicks Maybe in the Usefulness of Solution region.
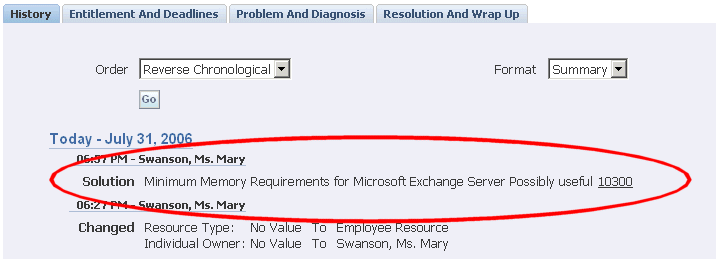
This action attaches the solution to the service request. A link to the suggested solution appears in the History tab of the service request. She can also view details related to tasks created for the service request.
-
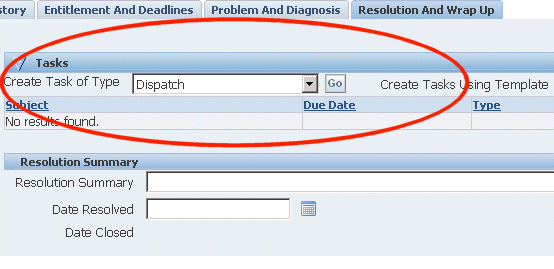
Because the field office does not have its own technicians on site to fix this type of problem, Ms. Swanson decides to dispatch one by creating a dispatch task.
Note: If you require management approval, before equipment upgrades are made, for example, you can automatically trigger an approvals process when an agent sets the service request to a specific status. The service request become read only until the approval request is accepted or rejected. See the Electronic Approvals and Records.
Ms. Swanson chooses Dispatch from the Create Task of Type drop-down list and clicks Go.
Note: Your organization can set up task templates your agents can use to create tasks to solve common problems and you can have these tasks created automatically based on the service request type, problem code and other attributes. See the Generating Tasks Automatically.
The values of the following profile options determine the default values that the Assignee related fields display on the Create Tasks Using Template page.
-
Service: Default Assignee Type for Service Request Tasks
-
Service: Default Task Assignee for Service Request Tasks
-
-
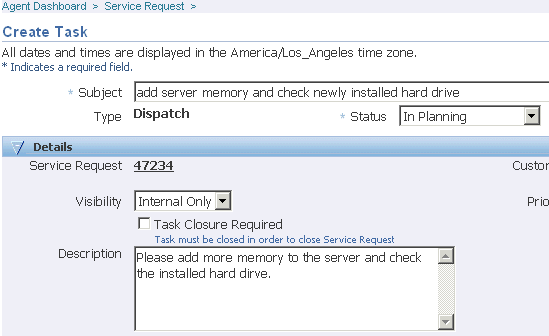
Ms. Swanson enters the task and description in the Create Task page and selects the Task Closure Required check box to ensure the service request is not closed before this task is completed. For more information, see Creating and Updating a Task.
-
Ms. Swanson clicks Apply to create the task and return to the service request.
-
. Ms. Swanson clicks the Interaction tab and views the following interactions and activities.
When Interaction Activity Mr. Crilly creates the service request Service request is created Service Request Created Ms. Swanson updates the service request Service request is updated Service Request Updated Ms. Swanson updates the instance details Service request is updated Service Request Updated Ms. Swanson adds a task on the service request Task is created A task is added She notes down the Interaction ID, Customer Name, Agent, Reason, Result, Outcome, and Start and End Dates.
To display interactions and activities, the administrator sets the Service: Interaction Logging Mode profile to Log Interactions automatically. For more information, refer to Capturing and Displaying Interactions and Activities.
-
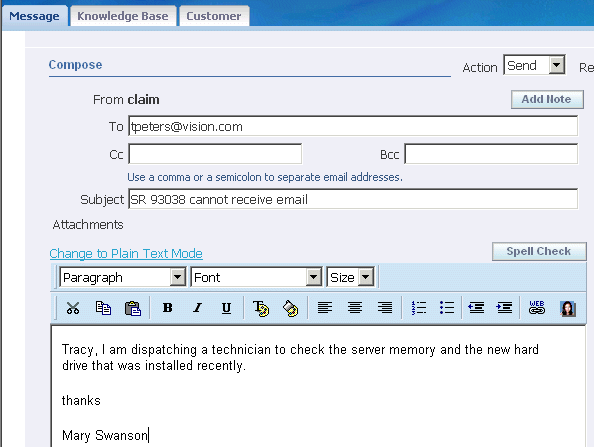
Ms. Swanson wants to send a brief e-mail to the customer about the action she has taken. To do so, she selects the e-mail address in the Primary Contact region.
Note: She can also send an email to the service request contacts by clicking the envelope icon next to the email address, if email is the chosen method of contact.
-
The application opens up the Oracle Email Center Compose page.
The application automatically fills in the subject line of the e-mail with the service request number and the text in the summary field of the service request.
You can create templates that provide the text of the e-mail body with merge fields which automatically populate customer, contact, and service request information.
-
Swanson types the body of the e-mail and clicks Go at the top of the window to send it.
Creating and Updating a Task
This topic details how Mary Swanson, a support engineer for the corporate e-mail system, creates and updates a task for the above service request.
-
Ms. Swanson clicks the Tasks tab in the Agent Dashboard to view the tasks assigned to her and her group and accepts the tasks that are assigned to her.
-
She clicks the Resolution and Wrap Up tab to create a task for the field service technician to add server memory and check the newly installed hard drive. Ms. Swanson can create the task by either selecting the type or selecting a task template. She chooses Dispatch from the Create Task of Type list and clicks Go. Note that based on the service request type and task template association, the Automatic Task Generation process creates tasks from the associated templates. See Automatic Task Generation Overview.
-
She sets the time zone to agent time zone to accurately identify the start and finish times for the job and the technician.
-
She enters "Add server memory and check newly installed hard drive" as the subject and a brief description about the task.
-
As the task may take approximately 2 hours, she enters 2 as the planned effort and selects hours from the list and changes the status of the task to Assigned.
Note: Since the profile, Service: Disable manual scheduling of field service tasks is set to No, Ms. Swanson selects the task status, task assignment status, assignee type, assignee, planned dates, schedule dates, actual dates, planned effort, actual effort, and duration.
-
Since this is a field service task, Ms. Swanson wants to confirm if the customer will available during the time when the technician will be visiting. To seek customer confirmation, she ensures that confirmation is required before assigning a task to a technician.
-
Next she selects the Task Closure Required to ensure that the service request is not closed before this task is closed.
-
. She assigns the task to Mr. Jansen, a technician belonging to the group "Employee Resource". As Mr. Jansen is already assigned another task during this time, the system throws a warning message.
An assignee cannot be used for multiple task assignments if the Service: Allow Multiple Booking of Tasks profile is set to No.
-
Then she assigns the task to Mr. Fred Bramer, another technician belonging to the Employee Resource group and schedules the task in his queue.
The resources displayed in the list are based on the value set in the Service: Filter Task Assignee LOV by the Task Owner Group profile. If this profile is set to Yes, the Assignee is filtered based on the owner group.
-
Ms. Swanson clicks Save to save the task and return to the service request.
-
In the Update Service Request page, Ms. Swanson again goes to the Resolution and Wrap Up tab and clicks the Update icon against the task to update the task.
-
Ms. Swanson clicks the Parts tab to find if an order is placed for the hard drive. To place an order for the part, she clicks Create Parts Order. She searches for the required part in the inventory and creates a requirement for 1 hard drive and attaches this requirement to the task
-
She next updates the skills associated with this task. She selects Product Skill and selects "Knowledge about computers" from the list of skills.
-
She next views the access hours for the customer that are associated with field service tasks. Access hours are automatically generated for field service tasks based on the value in the CSF: Automatic Association of Access Hours to Field Service Task profile. She selects the After Hours check box to specify that the technician can also visit after hours.
-
She is now ready to save the task and clicks Save.
-
Next, Mr. Bramer opens the Agent Dashboard to view his work on hand. To view all his work assignment locations, he clicks Show Tasks on Map at the top of the My Tasks table. This displays the Google Map showing five locations with the respective tasks that are assigned to him.
-
He opens the first task in the update mode and accepts the new task assignment.
-
He views that the service request was logged for problem in receiving emails and the resolution is to check the server memory and the new hard drive. He goes to the incident site to check the hard drive and after completing the task, clicks the Debrief icon against the first task to add information about it.
He enters data related to labor and expenses, and parts assigned for the task such as the condition of the parts assigned and updates the task status to Completed. Mr. Bramer will not be able to make any further updates to the task, as this status disables him from making any further changes to the task.
Searching Service Requests
Service Desk offers agents multiple ways of searching for service requests from the Agent Dashboard.
This topic discusses:
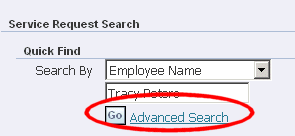
Quick Find
When an employee calls to inquire about the status of a service request and does not remember the service request number, agents can use Quick Find to locate it.
You can search by:
-
Employee Email
-
Employee Name
-
Employee Number
-
Project Number
-
Serial Number
-
Service Tag
-
System
-
Service Request Number
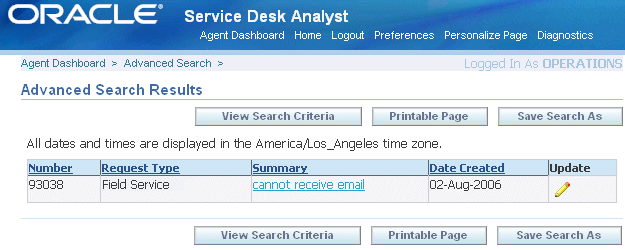
The application displays the results on the Advanced Search Results page.
Advanced Searches
Advanced searches permit complex searches with additional search criteria. For example, an agent can find all of the service requests for a customer created within the last week, all that have been escalated, or all that are in jeopardy (in danger of violating the applicable contract). You can search for service requests with multiple products.
Agents can also use an advanced search to track all service requests owned by a colleague who is away on vacation, for instance.
To start an advanced search, select the Advanced Search link below Quick Find.
On the Advanced Search page, some search criteria in the Service Request Attribute region appear as fields. Agents can add others using the Add Attribute drop-down list (highlighted as region 1 in the image below).
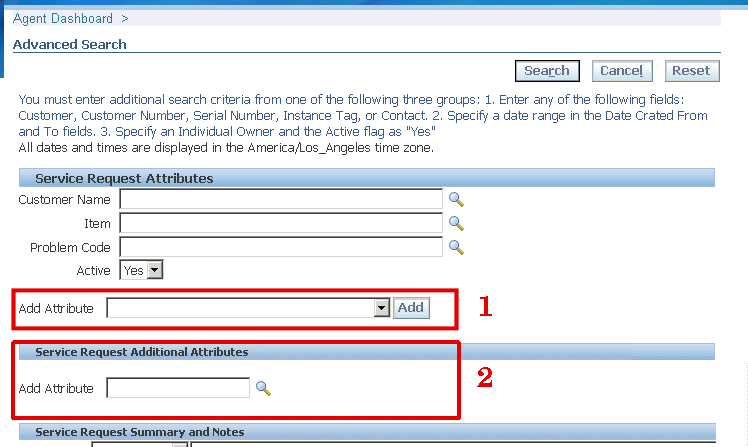
Using personalization, you can specify which criteria are available as fields and which agents must select using the Add Attribute list. See Personalizing the Advanced Search Page.
The Add Attribute list automatically includes a subset of the extensible attributes created for the service request. These indexed extensible attributes display with their attribute group display names hyphenated in front, for example: "Vehicles for Towing- Make". See Setting Up Attributes and Attribute Groups. Administrators cannot expose or remove these through personalization.
Agents can search using other non-indexed extensible attributes using the Service Request Additional Attributes region (highlighted as region 2 above).
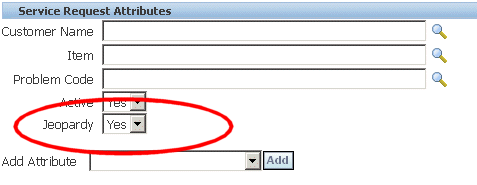
When an agent adds an attribute using the Add Attribute drop-down list, it appears as a field below the default search criteria (highlighted in the image below):
(For a complete list of search criteria please see Available Search Criteria for Service Desk.)
For performance reasons, the application requires you to use criteria from at least one of the following three groups:
-
Enter any of the following fields: Customer, Customer Number, Serial Number, Instance Tag, or Contact.
-
Specify a date range in the Date Crated From and To fields.
-
Specify an Individual Owner and the Active flag as "Yes".
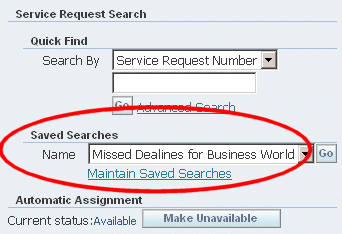
Saved Searches
You can save your advanced search criteria for reuse. Agents can use saved searches to track service requests of a colleague who left on vacation, for example, or to track escalated service requests of their support group. When you save searches, you can save service requests with multiple products.
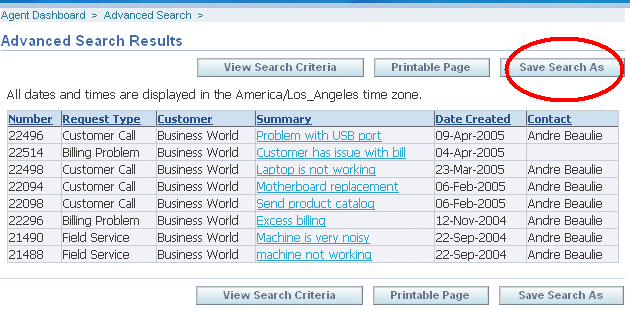
To crate a saved search, perform an advanced search and click Save Search As on the results page. You can also save the search criteria from the Maintain Saved Searches page and save it. You can choose to associate the saved search criteria either with all users or with selected responsibilities. When you associate the search with all users or selected responsibilities, the search becomes centrally defined. In the former case, the search is displayed for all users but when you map the search only to certain responsibilities, then only users under that responsibility can view the search criteria.
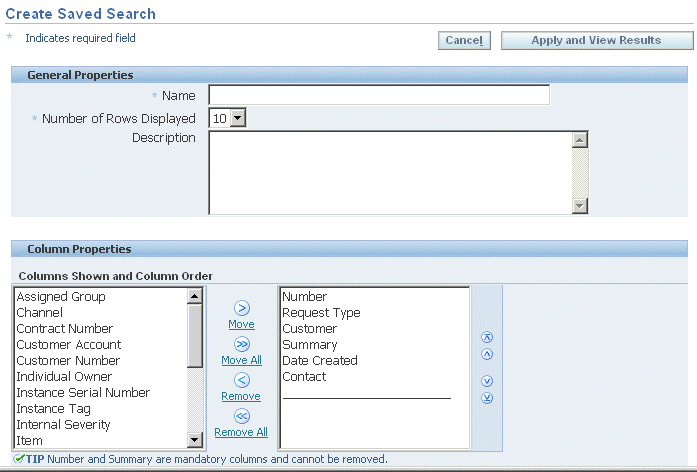
The Create Saved Search page makes it possible for you to not only name the search, but to modify the display of results and the search criteria themselves. The image below shows part of the page only.
Saved searches appear on the Agent Dashboard right underneath Quick Find.
Application Search
An agent can search for a service request from the Application Search region in the Agent Dashboard. The agent must select Service Request from the Enterprise Search LOV, enter a keyword, and click Go. The application displays the results on the Apps Search Results page. The agent can further narrow down the search by using the filter criteria provided. The agent can then click on the Service Request number, to view or update the service request details in the Update Service Request page.
Searching for Tasks
Task search offers a wide variety of search criteria to search for tasks related to a service request.
For example, an agent can use task search to find all tasks created within the last week or owned by Mary Swanson. Or the customer may call regarding tasks for service request 9909. The agent then clicks the Task Search link in the Agent Dashboard and enters 9909 as the service request number. All tasks pertaining to the service request are displayed in the results region.
To start Tasks Search, click the Task Search link in the Agent Dashboard. The Tasks Search page is displayed. You can search for tasks based on the following attributes:
-
Task Attributes
You can search for tasks based on most of the task details including the task type, service request number, task number, status, and priority. You can also view the parent task associated with a task, if any. You can also search on customer information related to a task including name, account, and number. Additionally, you can also search for tasks using criteria such as the service request type and the service request status.
You can select any of the following options to narrow the search results:
-
Show Only Open Tasks – Select this check box to display only tasks that are open
-
Show Only Escalated Tasks – Select this check box to display tasks that have been escalated. This is helpful in finding tasks on which immediate action is required.
-
Show Tasks for Escalated Service Requests Only – Select this check box to find tasks only on service requests that have been escalated. The results may include open, closed, or escalated tasks.
-
-
Subject and Description
You can search for tasks based on the subject and description of the service request.
For example, you can search for tasks related to the subject "Monitor not working". This may be helpful in identifying crucial tasks that were performed for resolving a service request in the past and using the same tasks to resolve the current service request.
-
Owner
You can find tasks based on the owner of the task. The owner may be yourself, your group or your team members, or your group or team. If you do not know the owner, you can also select the Any option.
-
Assignee
You can search tasks based on whom the task is assigned to. For example, if Mary Swanson is owner of tasks A, B, and C and she is on vacation from 12th to 20th July and has tasks that have been escalated and assigned to her, then you can select the Show Only Escalated Tasks option in the Task Attributes section and then select Others in the Assignee region and the type as Employee Resource and enter Ms. Swanson, Mary as the Name.
-
Task Dates
You can find tasks based on a specified duration. You can use the planned, scheduled and actual start and end dates to search for tasks.
Using the Task Search Results Page
Use the Task Search Results page to view details of the task that you searched. The following columns are hidden by default. Your system administrator can display these columns using personalization:
-
Problem Code
-
Incident Date
-
SR Type
-
Task Creation Date
Saving Task Search
Agents can save the advanced search criteria for reuse. They can use them to track tasks created for a specific customer or for an item, or to the person to whom the task was assigned, or tasks created during a specific period.
To create and save task search criteria, click Manage Saved Searches link on the Agent Dashboard. The Saved Task Searches page appears. Use this page to create, update, duplicate, or delete task searches.