Set Up Your Tenancy to Host Oracle E-Business Suite Environments
This chapter covers the following topics:
- Overview of Setting Up Your Tenancy to Host Oracle E-Business Suite Environments
- Create or Identify a Compartment to Host Oracle E-Business Suite Environments
- Create the Oracle E-Business Suite Administrators Group and Assign Policies
- Create Oracle E-Business Suite Environment Administrators
- Create Network Resources for Deploying Oracle E-Business Suite Environments
- Create Network Profiles
- Create Exadata Infrastructure and Associated VM Cluster for Exadata Database Service on Dedicated Infrastructure (Conditionally Required)
Overview of Setting Up Your Tenancy to Host Oracle E-Business Suite Environments
This chapter describes how to define a new compartment and create related cloud resources in order to prepare Oracle Cloud Infrastructure tenancy for deploying a new set of Oracle E-Business Suite environments managed by a new group of Oracle E-Business Suite administrators (DBAs) using Oracle E-Business Suite Cloud Manager.
The companion chapter, Deploy Oracle E-Business Suite Cloud Manager on Oracle Cloud Infrastructure, leads you through the process of deploying Oracle E-Business Suite Cloud Manager along with the compartments and resources that it requires. You must first complete the applicable steps in the companion chapter mentioned earlier before performing the tasks in this chapter.
Note: Oracle strongly recommends upgrading Oracle E-Business Suite Cloud Manager to the latest version at your earliest convenience. To upgrade Oracle E-Business Suite Cloud Manager, follow the instructions in Update Oracle E-Business Suite Cloud Manager to Latest Version.
Before using Oracle E-Business Suite Cloud Manager to provision a new set of environments (for example, for production usage), you must prepare the tenancy by identifying or creating a new network compartment and creating a new group, users, and corresponding policies to organize and control access to that compartment.
You can create additional compartments to implement separation of duties, such as separate compartments to administer production and development environments.
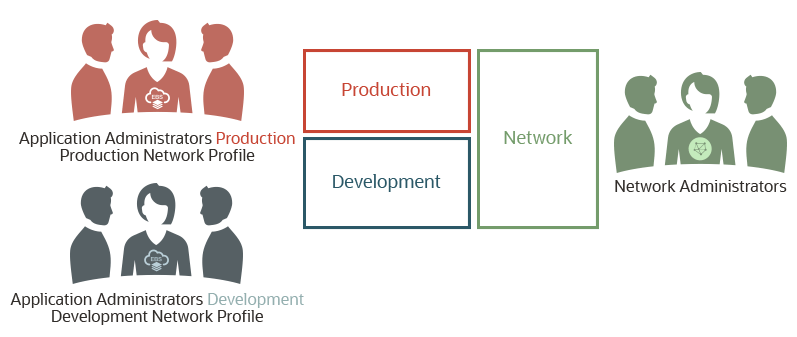
The following diagram depicts the relationship between the different categories of users and the compartments that could be defined in your tenancy. In this example, three compartments are defined: Production, Development, and Network. Each compartment has a separate group of administrators associated with it: the Application Administrators Production group for the production compartment, defined by the Production Network Profile; the Application Administrators Development group for the development compartment, defined by the Development Network Profile; and the Network Administrators group for the network compartment.
Separation of Duties Implemented with Compartments and Groups
You may choose to define a new network compartment, or use the one that was defined while deploying Oracle E-Business Suite Cloud Manager. This chapter assumes that the network compartment, called network-compartment in our example, that hosts the network resources is already in place. The production compartment is used as an example to explain how to prepare a tenancy specifically for the users of Oracle E-Business Suite production environments.
Note that Oracle E-Business Suite administrators are referenced throughout this chapter. They can access the Oracle E-Business Suite Cloud Manager user interface (UI) to provision environments and conduct lifecycle management activities. These users are usually referred to as Oracle E-Business Suite DBAs.
Process for Setting Up Your Tenancy to Host Oracle E-Business Suite Environments
Use the following steps to set up your tenancy to host Oracle E-Business Suite environments.
-
Create or identify the new compartment in Oracle Cloud Infrastructure, which we call ebsprod-compartment in this example.
-
Create a group in the Default identity domain that will operate on the ebsprod-compartment compartment.
-
Create policies that allow the previously created group to manage resources in the ebsprod-compartment compartment.
-
Create users in the Default identity domain and make them members of the previously defined group.
-
Create network resources for the new set of Oracle E-Business Suite environments.
-
Create a new network profile in Oracle E-Business Suite Cloud Manager that maps the ebsprod-compartment compartment and the network you just defined.
Create or Identify a Compartment to Host Oracle E-Business Suite Environments
When preparing the tenancy to deploy your Oracle E-Business Suite production environments, first you will determine which compartment will host the compute VMs or database services and load balancer that make up your environments. You can use an existing compartment (shared compartment) or create a new compartment (non-shared compartment), as described in this section. See Deploy Oracle E-Business Suite Cloud Manager on Oracle Cloud Infrastructure for diagrams outlining some compartment topology examples.
-
Shared Compartment - You may have already established a compartment which holds the Oracle E-Business Suite Cloud Manager Compute instance, network resources, and other Oracle E-Business Suite environments. You can choose this same compartment (for instance, demo-compartment) to host your new set of environments as well.
A shared compartment is appropriate for smaller deployments or for demonstration use.
-
Non-Shared Compartment- Oracle E-Business Suite environments and network resources are deployed in separate compartments.
Hosting your new environments in a separate (non-shared) compartment allows you to clearly separate Oracle E-Business Suite environment resources. This would allow you to use the Oracle Cloud Infrastructure Service Console to view the resource utilization for this new set of environments.
This topology option is chosen in this document to guide you through the deployment of Oracle E-Business Suite environments. A separate network compartment (called network-compartment) has already been created. You will create a new compartment (called ebsprod-compartment in this section) for hosting Oracle E-Business Suite environments.
Note: All these topology options can be used in nested compartments. However, in a non-shared scenario, the compartments cannot be children of each other.
To create a compartment called ebsprod-compartment for hosting the Oracle E-Business Suite Production environments:
-
First, use single sign-on to log in to your cloud account using your tenancy administrator credentials. Do not use Oracle Cloud Infrastructure Direct Sign-In.
-
Open the navigation menu and click Identity & Security. Under Identity, click Compartments.
-
On the Compartments page, click Create Compartment.
-
In the dialog window, enter the required details:
-
Name: Enter the compartment name. For example,
ebsprod-compartment. -
Description: Enter a description of your choice.
-
-
Click Create Compartment.
For information on creating compartments and related policies for network resources and Oracle E-Business Suite Cloud Manager, see Deploy Oracle E-Business Suite Cloud Manager on Oracle Cloud Infrastructure.
Create the Oracle E-Business Suite Administrators Group and Assign Policies
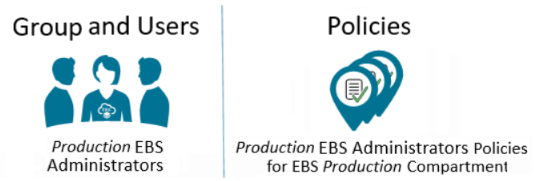
In this section, you will define a group of Oracle E-Business Suite administrators that will operate on the new compartment that you previously created and assign the required policies to allow the group to manage resources in the new compartment. Throughout the examples in this chapter, we use ebsprod-compartment for the compartment name and ebscm-proddba-grp as the group name for the Oracle E-Business Suite administrators group. As shown in the following diagram, you enable the users in this group to manage the Oracle E-Business Suite production environments by defining policies giving them access to the appropriate compartment and resources.
Production EBS Administrators Group and Policies
Perform the following steps to create the Oracle E-Business Suite administrators group and assign the required policies.
Note: The EBS administrators group and users must be created in your tenancy's default domain.
Create the Oracle E-Business Suite Administrators Group
-
In the Oracle Cloud Infrastructure Console, open the navigation menu and click Identity & Security. Under Identity, click Domains.
-
Select the root compartment in the Compartment drop-down list.
-
Within the list of domains, click the link for the "Default" domain.
-
Click Groups.
-
Click Create Group.
-
In the dialog window, enter the required details:
-
Name: Enter the name for the group. For example,
ebscm-proddba-grp. -
Description: Enter a description of your choice.
-
-
Click Create.
Assign Policies
-
Open the navigation menu and click Identity & Security. Under Identity, click Policies.
-
Create a policy for the network compartment to allow Oracle E-Business Suite administrators to use the network compartment:
-
Select the network compartment from the COMPARTMENT drop-down list on the left.
-
Click Create Policy.
-
In the dialog window, enter the required details:
-
Name: Enter a name. For example,
networkcompartment-policy. -
Description: Enter a description of your choice.
-
In the Policy Builder section, click the Show manual editor toggle switch. Add the following policy statement, substituting your own group name in place of ebscm-proddba-grp and your own network compartment in place of network-compartment, if different from our example.
Allow group ebscm-proddba-grp to use virtual-network-family in compartment network-compartment
If you plan to use the File Storage service for a shared file system for your Oracle E-Business Suite environments, then you must also add the following policy statements, substituting your own group name in place of ebscm-proddba-grp and your own network compartment in place of network-compartment, if different from our example.
Allow group ebscm-proddba-grp to manage export-sets in compartment network-compartment
Allow group ebscm-proddba-grp to use mount-targets in compartment network-compartment
Allow group ebscm-proddba-grp to use file-systems in compartment network-compartment
-
-
Click Create.
-
-
Create the policy for the Oracle E-Business Suite administrators to perform operations on Oracle Cloud Infrastructure resources at the tenancy level.
-
Select the root compartment of the tenancy from the COMPARTMENT drop-down list on the left.
-
Click Create Policy.
-
In the dialog window, enter the required details:
-
Name: Enter a name. For example,
ebsproddba-root-policy. -
Description: Enter a description of your choice.
-
In the Policy Builder section, click the Show manual editor toggle switch. Add the following policy statements, substituting your own group name in place of ebscm-proddba-grp, if appropriate.
Allow group ebscm-proddba-grp to inspect buckets in tenancy
Allow group ebscm-proddba-grp to inspect compartments in tenancy
Allow group ebscm-proddba-grp to inspect users in tenancy
Allow group ebscm-proddba-grp to inspect groups in tenancy
Allow group ebscm-proddba-grp to use tag-namespaces in tenancy where target.tag-namespace.name='Oracle-Tags'
Allow group ebscm-proddba-grp to inspect dynamic-groups in tenancy
-
-
Click Create Policy.
-
-
Create the policy for the Oracle E-Business Suite administrators to perform operations on Oracle Cloud Infrastructure resources within their own compartment.
-
Select the Oracle E-Business Suite compartment from the Compartment drop-down list on the left.
-
Click Create Policy.
-
In the dialog window, enter the required details:
-
Name: Enter a name. For example,
ebsproddba-policy. -
Description: Enter a description of your choice.
-
In the Policy Builder section, click the Show manual editor toggle switch. Add the following policy statements, substituting your own group name and compartment name if different from those in this example.
Allow group ebscm-proddba-grp to manage instance-family in compartment ebsprod-compartment
Allow group ebscm-proddba-grp to manage database-family in compartment ebsprod-compartment
Allow group ebscm-proddba-grp to manage load-balancers in compartment ebsprod-compartment
Allow group ebscm-proddba-grp to manage volume-family in compartment ebsprod-compartment
Allow group ebscm-proddba-grp to manage objects in compartment ebsprod-compartment
Allow group ebscm-proddba-grp to manage buckets in compartment ebsprod-compartment
Allow group ebscm-proddba-grp to use tag-namespaces in compartment ebsprod-compartment
Allow group ebscm-proddba-grp to manage tag-namespaces in compartment ebsprod-compartment
Allow group <Oracle E-Business Suite Cloud Manager administrators group> to manage tag-namespaces in compartment ebsprod-compartment
If you plan to use the File Storage service for a shared file system for your Oracle E-Business Suite environments, then you must also add the following policy statements:
Allow group ebscm-proddba-grp to manage file-systems in compartment ebsprod-compartment
Allow group ebscm-proddba-grp to manage export-sets in compartment ebsprod-compartment
Additionally, if you want to use a different compartment for backups, then you must also add the following policy statements, substituting your own group name and the name of the compartment where you want to enable administrators to create backups:
Allow group ebscm-proddba-grp to manage objects in compartment <compartment>
Allow group ebscm-proddba-grp to manage buckets in compartment <compartment>
To create lifecycle rules for a bucket, add the following policy statement:
Allow service objectstorage-<region_identifier> to manage object-family in tenancy
You can also define the same policy at the compartment level for a restricted access, by substituting your own object storage name and compartment name:
Allow service objectstorage-<region_identifier> to manage object-family in compartment <compartment>
If you plan to use the Disaster Recovery feature, then you must add the following policy statements:
Allow group ebscm-proddba-grp to manage vaults in compartment ebsprod-compartment
Allow group ebscm-proddba-grp to manage keys in compartment ebsprod-compartment
Allow group ebscm-proddba-grp to manage secret-family in compartment ebsprod-compartment
Allow group ebscm-proddba-grp to manage replications in compartment ebsprod-compartment
-
-
Click Create Policy.
-
-
(Conditional) If you plan to use the Default Network Profiles created by the
ProvisionOCINetwork.plscript described in Use a Default Network with Automated Scripts, then make sure the user running the script is a member of the network administrators group. Refer to Assign Policies under Create Oracle Cloud Infrastructure Accounts and Resources in the "Deploy Oracle E-Business Suite Cloud Manager on Oracle Cloud Infrastructure" chapter.
Create Oracle E-Business Suite Environment Administrators
You will create users as Oracle E-Business Suite environment administrators. These users will create and own the Oracle Cloud Infrastructure resources that run your Oracle E-Business Suite production environments.
Use the following steps to create Oracle E-Business Suite environment administrators.
-
Open the navigation menu, and click Identity & Security. Under Identity, click Domains.
-
Select the root compartment in the Compartment drop-down list.
-
Within the list of domains, click the link for the "Default" domain.
-
On the left hand side, click Users.
-
For each Oracle E-Business Suite production administrator to be added, for example the members of ebscm-proddba-grp, perform the following steps:
-
Click Create User.
-
In the Create User dialog box, enter the following:
-
First Name: First name of the user.
-
Last name: Last name of the user.
-
Username / Email: A valid email ID.
-
-
Click Create.
-
Create Network Resources for Deploying Oracle E-Business Suite Environments
In this section, the network administrator and Oracle E-Business Suite Cloud Manager administrator perform tasks as indicated.
Before Oracle E-Business Suite Cloud Manager can be used to provision environments, a network and associated network profiles must be created. A network profile maps Oracle Cloud Infrastructure network definitions with Oracle E-Business Suite environments' network requirements. You could have multiple Oracle E-Business Suite environments in the same network or a network designated for a specific purpose, such as production, test, etc.
When creating a network, the network administrator can start by defining the subnets associated with network resources either using the automated scripts provided through a default network or manually creating required resources with chosen topology.
-
Use a Default Network with Automated Scripts - The network administrator creates a default network and two default network profiles, one for One-Click Provisioning and one for Advanced Provisioning, using provided scripts. The Oracle E-Business Suite Cloud Manager administrator will subsequently upload the network profiles for One-Click Provisioning and Advanced Provisioning.
Note that the default network supports internal zones only, does not support File Storage service, and does not leverage network security groups. To take advantage of advanced options, you must create your own custom network profile.
-
Use a Custom Network - The network administrator has an option to create custom network elements and subsequently use these elements in the definition of custom network profiles.
Note that the default network supports internal zones only, does not support File Storage service, and does not leverage network security groups. To take advantage of advanced options, you must create your own custom network profile.
Note that you must use a custom network if you plan to deploy an environment with multiple application tier nodes using a shared file system, which uses the File Storage service (FSS).
Use a Default Network with Automated Scripts
This section provides guidance for the network administrator who wishes to create a default network and two default network profiles, one for One-Click Provisioning and one for Advanced Provisioning using provided scripts, and to the Oracle E-Business Suite Cloud Manager administrator who will subsequently upload the network profiles for One-Click Provisioning and Advanced Provisioning.
When creating a network through a default network, the following scripts are used prior to accessing the Oracle E-Business Suite Cloud Manager UI to create and then upload two default network profiles, one for One-Click Provisioning and one for Advanced Provisioning:
-
ProvisionOCINetwork.pl: This script creates required subnets and security lists and generates two network profile definitions (.json files). This script must be run by a network administrator user who has privileges to create network resources. See Create Default Network and Network Profiles Using ProvisionOCINetwork.pl.-
Default network profile names are DEFAULT_PROFILE_ONECLICK and DEFAULT_PROFILE_ADVANCED, respectively, for either public or private subnet access.
-
-
UploadOCINetworkProfile.pl: This script uploads network profile definitions (.json files) to a database so they can be viewed from the Oracle E-Business Suite Cloud Manager UI. This script must be run by an Oracle E-Business Suite Cloud Manager administrator. See Upload Network Profile Definitions Profiles Using ProvisionOCINetwork.pl.
Prerequisites for Default Network Creation (Conditional)
If you plan to configure the default network with private subnet access, you must first follow these steps:
-
Ensure that there is a service gateway associated with your VCN. See Create a Service Gateway (Conditional) in "Use a Custom Network" for instructions.
-
(Commercial cloud regions only) Ensure that there is a NAT gateway associated with your VCN. See Create a NAT Gateway in "Use a Custom Network" for instructions.
Create Default Network and Network Profiles Using ProvisionOCINetwork.pl
The following script will use Oracle Cloud Infrastructure API to create the network resources required by the Oracle E-Business Suite environment. When prompted for the script, you must provide authentication credentials that belong to the network administrator. We recommend that you upload the network administrator private API keys temporarily to the Cloud Manager VM to be able to run the script.
Add API Key to the Network Administrator
-
Log in to the Oracle Cloud Infrastructure Service Console as the network administrator user.
-
Click the user avatar icon.
-
Select User Settings from the context menu.
-
Under Resources in the navigation menu on the left, click API Keys. Then, click Add Public Key.
-
Select the Paste Public Keys option.
-
Paste the contents of the API public key in the dialog box and click Add. The key's fingerprint is displayed.
-
Copy the Oracle Cloud Infrastructure API private PEM key file to the Oracle E-Business Suite Cloud Manager Compute instance. The file must be placed in a directory owned by the
oracleuser, for example/u01/install/APPS/.oci. The fully qualified path to the Oracle Cloud Infrastructure API private PEM key file will be needed for runningProvisionOCINetwork.pl.
Identify Credentials Required for Network Provisioning Script
While still logged into the Oracle Cloud Infrastructure Service Console as the network administrator user, identify and record the OCID of your user. You will need to provide this credential when you run the ProvisionOCINetwork.pl script.
-
From the Oracle Cloud Infrastructure Console, click the user avatar icon on the top right side of your screen, and select User Settings.
-
Click Copy to copy the OCID of the user into your clipboard, and record this value for use in Run ProvisionOCINetwork.pl.
Run ProvisionOCINetwork.pl
The network administrator performs the tasks described in this section. This script defines security lists for controlling traffic at the packet level and deploys public subnets.
-
As the
oracleuser, runProvisionOCINetwork.pl:$ sudo su - oracle $ cd /u01/install/APPS/apps-unlimited-ebs/bin $ perl ProvisionOCINetwork.pl
-
The screen will display the name of the log file for this session in the format
ProvisionOCINetwork_<Date_and_Time_Stamp>.log, as illustrated by this example:Log File : /u01/install/APPS/apps-unlimited-ebs/out/ProvisionOCINetwork_Thu_Jul_11_13_38_17_2019.log
-
After a list of the subnets to be created is displayed, you will be prompted to select Y to proceed or N to exit. Enter Y, as shown in this example:
Enter Y to proceed or N to exit: Y
-
You will now enter your details, substituting your own values for the example values shown:
Enter OCID of network administrator user              : ocid1.user.oc1..xxxxxxxxxxxxxxxxxxxxxxxxxxxxxxxxxxxxxxxx
Enter absolute path of private key of API signing key : /u01/install/APPS/.oci/oci_api_key_network_admin.pem
Enter tenancy ocid                                    : ocid1.tenancy.oc1..xxxxxxxxxxxxxxxxxxxxxxxxxxxxxxxxxxxxx

Validating user and fetching OCI metadata...

Enter subnet access (public/private)                : private
Enter unique identifier for the EBS network         : ebscmnet
Enter EBS subnet 1 CIDR (E.g. 10.0.1.0/24)          : 10.0.59.0/28
Enter EBS subnet 2 CIDR (E.g. 10.0.2.0/24)          : 10.0.83.16/28
Enter LBaaS subnet CIDR (E.g. 10.0.3.0/24)          : 10.0.83.32/28
-
You will now be prompted to select Y to proceed or N to exit. Enter Y, as shown in this example:
Are you sure you want to proceed with the above inputs? [Y/N]: Y
-
When processing is complete, you will see a success screen with content similar to the following:
Oracle EBS Cloud related network created successfully.

List of resources created:
ebscmnet_lbaas_subnet
ebscmnet_lbaas_seclist
ebscmnet_lbaas_routetable
ebscmnet_db_subnet
ebscmnet_db_seclist
ebscmnet_db_routetable
ebscmnet_apps_subnet
ebscmnet_apps_seclist
ebscmnet_apps_routetable

Program: ProvisionOCINetwork.pl completed at Thu <DATE> <TIME> <YEAR>
Advanced Network Profile JSON Path: /u01/install/APPS/apps-unlimited-ebs/build/ebscmnet/DEFAULT_PRIVATE_PROFILE_ADVANCED.json
OneClick Network Profile JSON Path: /u01/install/APPS/apps-unlimited-ebs/build/ebscmnet/DEFAULT_PRIVATE_PROFILE_ONECLICK.json
Execute /u01/install/APPS/apps-unlimited-ebs/bin/UploadOCINetworkProfile.pl to Upload JSON into DB
-
Remove the network administrator's private key from the Cloud Manager Compute instance after running the
ProvisionOCINetwork.plscript.$ rm /u01/install/APPS/.oci/oci_api_key_network_admin.pem
Post Requisites for Default Network Creation (Conditional)
If you are using private subnets and your tenancy belongs to a commercial realm, use the following steps to complete your default network configuration.
Note that where indicated, you will substitute the name of the unique network identifier that you supplied earlier when running the ProvisionOCINetwork.pl script ("ebscmnet" in our example).
Add Route Rules to Allow Internet Access to Private Subnets
-
Navigate to the route tables for the application tier and database tier subnets, created as part of the default network.
-
From the OCI Console, open the navigation menu. Click Networking and then click Virtual cloud networks.
-
Click on the name of your VCN.
-
Under Resources, click Route Tables.
-
-
Add a new route rule to the route tables for the application tier and database tier subnets:
-
Click on the name of the route table, which will be of the form <unique network identifier>_<tier>_routetable, where tier is "apps" or "db" (for example, ebscmnet_apps_routetable or ebscmnet_db_routetable).
-
Click + Another Route Rule and enter details as follows:
-
Target Type: Select NAT Gateway.
-
Destination CIDR Block:
134.70.0.0/17 -
Compartment: Select the compartment.
-
Target NAT Gateway: Select the NAT Gateway (for example, ebs-ngw).
-
-
Add Egress Rules to Enable Private Subnets to Access Required Public Object Storage
-
Navigate to the security lists for the application tier and database tier subnets, created as part of the default network.
-
From the OCI Console, open the navigation menu. Click Networking and then click Virtual cloud networks.
-
Click on the name of your VCN.
-
Under Resources, click Security Lists.
-
-
Add a new egress rule to the security lists for the application tier and database tier subnets:
-
Click on the name of the security list, which will be of the form <unique network identifier>_<tier>_seclist, where tier is "apps" or "db" (for example, ebscmnet_apps_seclist or ebscmnet_db_seclist).
-
Under Resources, click Egress Rules.
-
Click Add Egress Rules and enter details as follows:
-
Destination Type: CIDR
-
Destination CIDR:
134.70.0.0/17 -
IP Protocol: TCP
-
Source Port Range: All
-
Destination Port Range: All
-
-
Click Add Egress Rules again to submit your changes.
-
Upload Network Profile Definitions Using UploadOCINetworkProfile.pl
The Oracle E-Business Suite Cloud Manager administrator performs the tasks described in this section.
As seen at the bottom of your success screen in step 6 of Run ProvisionOCINetwork.pl, the Oracle E-Business Suite Cloud Manager administrator now needs to run the upload script. The script needs to be uploaded twice, the first time for the One-Click Provisioning default network profile and the second time for the Advanced Provisioning default network profile.
Follow the steps as shown in this example to upload the One-Click Provisioning default network profile:
-
As the
oracleuser, run theUploadOCINetworkProfile.plscript:$ sudo su - oracle $ cd /u01/install/APPS/apps-unlimited-ebs/bin $ perl UploadOCINetworkProfile.pl
-
The screen will display the name of the log file for this session in the format
ProvisionOCINetwork_<Date_and_Time_Stamp>.log, as illustrated by this example:Log File : /u01/install/APPS/apps-unlimited-ebs/out/UploadOCINetworkProfile_Thu_Jul_11_13_55_49_2019.log
-
Enter your details, substituting your own values for the example values shown:
Enter Network profile JSON file absolute path             : /u01/install/APPS/apps-unlimited-ebs/build/ebscmnet/DEFAULT_PRIVATE_PROFILE_ONECLICK.json
Enter OCID of EBS Cloud Manager administrator user        : ocid1.user.oc1..xxxxxxxxxx
Enter EBS Cloud Manager admin password                    :
Enter Absolute path of private key of API signing key     : /u01/install/APPS/oci_api_key.pem
Enter Tenancy OCID                                        : ocid1.tenancy.oc1..xxxxxxxxxxxxxxxxx
Enter Oracle E-Business Suite Cloud Manager Admin Password:
Note: The value you enter for "Network profile JSON file absolute path" must be the same value displayed on the
ProvisionOCINetwork.plsuccess screen. Refer to step 6 of Run ProvisionOCINetwork.pl. -
When the profile has been updated, you will see a success message similar to the following:
Executing: ebscm_add_default_network_profile API for DEFAULT_PROFILE_ADVANCED
Executing Stored Procedure: ebscm_add_default_network_profile
RetCode: 0
Row count: 0

ONECLICK Network Profile uploaded successfully.
Repeat steps 1-4 for the Advanced Provisioning network profile, making sure to specify the JSON file absolute path for that profile (such as
/u01/install/APPS/apps-unlimited-ebs/build/ebscmnet/ebscmnet_DEFAULT_PROFILE_ADVANCED.json) in step 4.)Note: These two default network profiles are available to all users.
Use a Custom Network
This section describes how network administrators can manually create the minimal network resources required for Oracle E-Business Suite Cloud Manager Advanced Provisioning, which allows Oracle E-Business Suite administrators to provision an Oracle E-Business Suite environment with their chosen topology.
Note: Oracle E-Business Suite deployment on Oracle Cloud Infrastructure in a Hybrid DNS Configuration always requires access to a VCN DNS resolver. If you are using such a configuration, ensure that IP address 169.254.169.254 is listed as a DNS server in the DHCP options.
In this example, we will configure the network settings specifically for deploying Oracle E-Business Suite production environments managed by Oracle E-Business Suite Cloud Manager.
The configuration includes the following tasks:
Note: If you are using Exadata Database Service Dedicated, you should have already set up required route rules, security lists, and subnets required for the database tier. Review the corresponding resources created in this section for the database tier and add any missing resources.
Establish Your VCN
You have the option to create your own Virtual Cloud Network (VCN) or use an existing VCN (such as the VCN where Oracle E-Business Suite Cloud Manager is deployed). If you use a VCN separate from the Oracle E-Business Suite Cloud Manager VCN for your Oracle E-Business Suite environments, ensure that adequate network communication is established between the two.
Note: When VCNs reside in the same tenancy, local VCN peering is supported for communication between the VCN holding Oracle E-Business Suite Cloud Manager VM and the VCN holding Oracle E-Business Suite environments. With this configuration, you can have Oracle E-Business Suite Cloud Manager VM installed on one VCN and create instances on other VCNs in the same tenancy.
For more information about local VCN peering and how to set it up, see Local VCN Peering (Within Region).
If you decide to create a new VCN for your Oracle E-Business Suite environments, follow the instructions in Create a Virtual Cloud Network.
Create an Internet Gateway (Conditional)
Note: The resources created (including route tables, security lists, and subnets) must be sufficient to support your chosen topology, and therefore may need to be more extensive than the examples shown here.
The Oracle E-Business Suite provisioning and cloning flows create new Compute instances and update them to the latest OS patches using yum. Your compute instances use a gateway to access the public yum repository on the internet.
If you plan to use a public subnet for your Compute instances, and you created a new VCN, you will need to create an internet gateway for that VCN by following the instructions for either a public or private subnet, as found in Create Network Resources for Deploying Oracle E-Business Suite Cloud Manager.
Create a NAT Gateway (Conditional)
If you plan to use a private subnet for your Oracle E-Business Suite environments and your tenancy is in a commercial cloud region, this step is mandatory. If you want to prevent the environments from connecting to the internet, skip this section.
Note that there is a limit of one NAT gateway per VCN.
If you did not create a NAT Gateway previously, follow these steps to create one:
-
From the Oracle Cloud Infrastructure Service Console, click the menu icon at the top left to open the navigation menu. Click Networking, then click Virtual Cloud Networks.
-
On the Virtual Cloud Networks screen, click the link with the name of your VCN, such as ebscm-vcn.
-
Under Resources on the navigation menu at the left, select NAT Gateway.
-
Click Create NAT Gateway:
-
Name: Specify a suitable name (for example,
ebs-ngw). -
Create in Compartment: Select your network compartment (for example,
network-compartment). -
Click Create NAT Gateway at the bottom of the window.
-
Create a Service Gateway (Conditional)
If you plan to use a private subnet for your Oracle E-Business Suite environments, you must create a service gateway. Note that object storage, the yum repository, and other required services are enabled through this gateway when deployed in private subnets.
Note that there is a limit of one service gateway per VCN.
To create a service gateway:
-
On the Virtual Cloud Networks screen, click the link with the name of your VCN, such as ebscm-vcn.
-
Under Resources on the navigation menu at the left, select Service Gateways.
-
Click Create Service Gateway:
-
Name: Specify a suitable name (for example,
ebscm-srvgw). -
Create in Compartment: Select your network compartment (for example, network-compartment).
-
Services: Select All <XXX> Services In Oracle Services Network (where XXX is a region-specific code, such as IAD or LHR).
-
Click Create Service Gateway at the bottom of the window.
-
Create Route Tables
In this section, you will create three to four separate route tables. Their roles and example names are shown in the following table:
| Component Route Table Needed For | Example Route Table Name |
|---|---|
| Load Balancer | ebslbaas-RouteTable |
| Oracle E-Business Suite Application Tier | apps-RouteTable |
| FSS Mount Target
Note: This route table is required if you plan to implement a shared file system, which uses FSS. |
fssmt-RouteTable |
| Oracle E-Business Suite Database Tier | db-RouteTable |
The steps you will take depend on whether you are using a public subnet or a private subnet. Follow whichever of the two subsections below applies to you.
Create Route Tables for a Public Subnet
To create each of the four route tables for a public subnet, use the following steps:
-
On the Virtual Cloud Networks screen, click the link with the name of your VCN, such as ebsnetwork-vcn.
-
Under Resources on the navigation menu at the left, select Route Tables.
-
Click Create Route Table:
-
Name: Enter a name such as
ebslbaas-RouteTable,apps-RouteTable,fssmt-RouteTable, ordb-RouteTable. -
Create in Compartment: Select your network compartment (for example, network-compartment).
-
Click + Another Route Rule.
-
Enter Route Rules details as follows:
-
Target Type: Select Internet Gateway.
-
Destination CIDR Block:
0.0.0.0/0 -
Compartment: Select the previously identified compartment.
-
Target Internet Gateway: Select the previously created gateway (for example, ebscm-igw).
-
-
Click Create at the bottom of the window.
-
Create Route Tables for a Private Subnet
To create each of the three route tables for a private subnet, use the following steps:
-
On the Virtual Cloud Networks screen, click the link with the name of your VCN, such as ebscm-vcn.
-
Under Resources on the navigation menu at the left, select Route Tables.
-
Click Create Route Table:
-
Name: Specify a name such as
ebslbaas-RouteTable,apps-RouteTable,fssmt-RouteTable, ordb-RouteTable.Note: If you are creating a route table for subnet hosting load balancer and you are using private subnets, no route rules are required. You can directly skip to the last substep 7 and click Create at the bottom of the window. Additional rules are only required for subnet hosting Oracle E-Business Suite application tier or database tier nodes.
-
Create in Compartment: Select your network compartment (for example, network-compartment).
-
Click + Another Route Rule.
-
Enter Route Rules details as follows. (Note that if you have chosen to prevent your environments from having access to the public internet, you will not have a NAT gateway and therefore can skip creating this route rule.)
-
Target Type: Select NAT Gateway.
-
Destination CIDR Block: 134.70.0.0/17
-
Compartment: Select the previously identified compartment.
-
Target NAT Gateway: Select the previously created NAT Gateway (for example, ebs-ngw).
-
-
Create another route rule by clicking + Another Route Rule.
-
Enter Route Rules details as follows:
-
Target Type: Select Service Gateway.
-
Destination Service: Select All <XXX> Services In Oracle Services Network (where XXX is a region-specific code, such as IAD or LHR).
-
Compartment: Select the previously identified compartment.
-
Target Service Gateway: Select the previously created Service Gateway (for example, ebs-srvgw).
-
-
Click Create at the bottom of the window.
-
Configure Network Security
In this section, you will establish network security using one of the following options:
-
A combination of network security groups (NSGs) and security lists
-
Security lists only
Both NSGs and security lists use security rules to control traffic at the packet level. NSGs let you define a set of security rules that applies to a group of virtual network interface cards (VNICs) of your choice, while security lists let you define a set of security rules that applies to all the VNICs in an entire subnet.
Oracle recommends using NSGs instead of security lists because NSGs let you separate the VCN's subnet architecture from your application security requirements.
If you plan to use NSGs, follow the instructions in both Network Security Groups and Security Lists.
Network Security Groups
The usage of network security groups (NSGs) is introduced in Oracle E-Business Suite Cloud Manager version 23.3.1.
To use NSGs, create three to four separate NSGs. Their roles and some example names are shown in the following table:
| Component NSG Needed For | Example NSG Name |
|---|---|
| Load Balancer | ebslbaas-nsg |
| Oracle E-Business Suite Application Tier | apps-nsg |
| FSS Mount Target
Note: This NSG is required if you plan to implement a shared file system, which uses FSS. |
fssmt-nsg |
| Oracle E-Business Suite Database Tier | db-nsg |
For more information, see Network Security Groups in the Oracle Cloud Infrastructure Documentation.
To create an NSG:
-
On the Virtual Cloud Networks screen, click the link with the name of your VCN, such as ebscm-vcn.
-
Under Resources on the navigation menu at the left, select Network Security Groups.
-
Click Create Network Security Group:
-
Name: Specify a name such as
ebslbaas-nsg,apps-nsg,fssmt-nsg, ordb-nsg. -
Create in Compartment: Select your compartment name, such as network-compartment.
-
-
Click Create.
Security Lists
To use security lists, create three to four separate security lists. Their roles and some example names are shown in the following table:
| Component Security List Needed For | Example Security List Name |
|---|---|
| Load Balancer | ebslbaas-seclist |
| Oracle E-Business Suite Application Tier | apps-seclist |
| FSS Mount Target
Note: This security list is required if you plan to implement a shared file system, which uses FSS. |
fssmt-seclist |
| Oracle E-Business Suite Database Tier | db-seclist |
For more information, see Security Lists in the Oracle Cloud Infrastructure Documentation.
To create a security list:
-
On the Virtual Cloud Networks screen, click the link with the name of your VCN, such as ebscm-vcn.
-
Under Resources on the navigation menu at the left, select Security Lists.
-
Click Create Security List:
-
Name: Specify a name such as
ebslbaas-seclist,apps-seclist,fssmt-seclist, ordb-seclist. -
Create in Compartment: Select your compartment name, such as network-compartment.
-
If default rules named
Ingress Rule 1andEgress Rule 1appear, remove these rules.
-
-
Click Create Security List.
Create Subnets
In this section, you will create new subnets, specifying your own names and parameters.
The following example can be used as a reference for defining the subnets that will be used for deploying your Oracle E-Business Suite environment that could have internal and external web entry points (such as in a common DMZ configuration).
Oracle E-Business Suite Cloud Manager Network Profile Maps and Internal and External Subnets
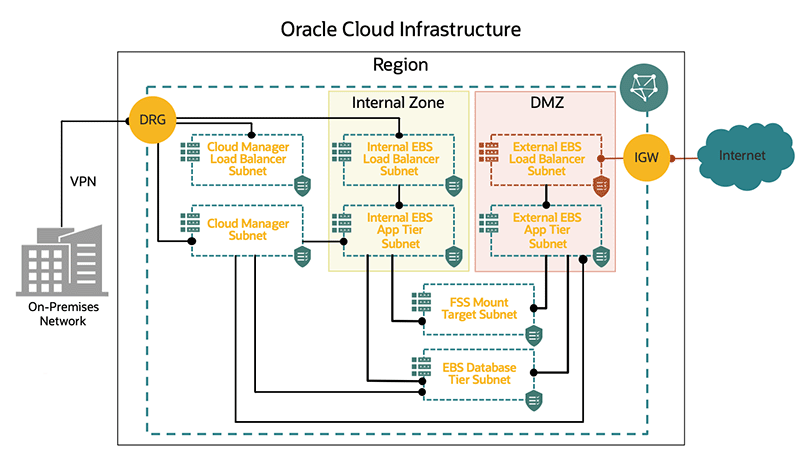
This diagram maps the network profiles of two types of users: internal users who are typically the organization's employees and using the on-premises network, and external users who are partners such as suppliers or business-to-business (B2B) customers. Each type of user has its own web entry URL and dedicated application tier nodes to handle their requests. These application tier nodes are grouped by zones.
In this example, the internal zone handles all of the requests from internal users (employees), while the DMZ zone in the example handles all requests coming from external users. From a networking standpoint, the different subnets that support this topology are shown. There is a dedicated subnet for the internal load balancer, internal application tier nodes, external load balancer, external application tier nodes, FSS mount target, and database tier. The only subnet that is public is the external load balancer subnet. In this example, all subnets belong to a single VCN.
If you choose to use regional subnets, see the following table with example values for guidance.
| Subnet Name | CIDR Block | Route Table | Subnet Access | Security List |
|---|---|---|---|---|
| internal-ebslbaas-subnet-phx | 10.0.3.0/24 | ebslbaas-RouteTable | Public or private subnet | internal-ebslbaas-seclist |
| internal-apps-subnet-phx | 10.0.4.0/24 | apps-RouteTable | Public or private subnet | internal-apps-seclist |
| external-ebslbaas-subnet-phx (optional) | 10.0.5.0/24 | ebslbaas-RouteTable | Public or private subnet | external-ebslbaas-seclist |
| external-apps-subnet-phx | 10.0.6.0/24 | apps-RouteTable | Public or private subnet | external-apps-seclist |
| fssmounttarget-subnet-phx
Note: This subnet is required if you plan to implement a shared file system, which uses FSS |
10.0.7.0/24 | fssmt-RouteTable | Public or private subnet | fssmt-seclist |
| db-subnet-phx | 10.0.8.0/24 | db-RouteTable | Public or private subnet | db-seclist |
To create each new subnet:
-
On the Virtual Cloud Networks screen, click the link with the name of your VCN, such as ebscm-vcn.
-
Under Resources in the navigation menu on the left, select Subnets.
-
Click Create Subnet, specifying your choice for the following parameters:
-
Name
-
Subnet Type: Select either Regional (Recommended) or Availability Domain-Specific. If you choose Availability-Domain Specific, select your availability domain.
-
IPv4 CIDR Block
-
Route Table: Select the route table you defined earlier.
-
Subnet Access: As mentioned for the Route Table previously, subnet access can be either public or private. Be aware that if you select a private subnet for any VM, the corresponding VM will not have a public IP address and no inbound connections to this VM from outside the current VCN will be allowed.
For more information, see VCNs and Subnets.
-
Security Lists: Select the security lists you created previously.
-
-
Click Create Subnet.
Create Mount Targets (Conditional)
You can optionally use the Oracle Cloud Infrastructure File Storage service (FSS) for a shared file system for your Oracle E-Business Suite environments. Oracle Cloud Infrastructure File Storage service provides a durable, scalable, secure, enterprise-grade network file system that you can optionally choose to use in place of block volume storage. See Overview of File Storage.
If you plan to use the File Storage service, then you must now create the mount targets that your environments will use. A mount target is an NFS endpoint that resides in a VCN subnet of your choice and provides network access for file systems. The mount target provides the IP address or DNS name that is used together with a unique export path to mount the file system. The mount target must reside in the network compartment and should use the same VCN as the network profile. You can use the same mount target for multiple Oracle E-Business Suite file systems; the mount target serves to logically group together related file systems. For detailed instructions, see Managing Mount Targets and Creating a Mount Target.
In this section, you will add the mandatory security rules shown in the following tables to the chosen security mechanism --either network security group or security list-- created in Configure Network Security.
Internal Load Balancer Security Rules
This section includes the following security rules for the internal load balancer security list:
| Source Type | Source | IP Protocol | Source Port Range / Type and Code | Destination Port Range / Type and Code |
|---|---|---|---|---|
| CIDR | CIDR that describes the IP range users will use to access your Oracle E-Business Suite environments. | TCP | All | Depends on the web entry port you will use during the provisioning of your environment. |
| Destination Type | Destination | IP Protocol | Source Port Range / Type and Code | Destination Port Range / Type and Code |
|---|---|---|---|---|
| CIDR | 0.0.0.0/0 | TCP | All | All |
| CIDR | 0.0.0.0/0 | ICMP | N/A | N/A |
| Destination Type | Destination | IP Protocol | Source Port Range / Type and Code | Destination Port Range / Type and Code |
|---|---|---|---|---|
| CIDR | <Internal application tier subnet CIDR> | TCP | All | All |
| CIDR | 0.0.0.0/0 | ICMP | N/A | N/A |
External Load Balancer Security Rules (Optional)
This section includes the following security rules for the external load balancer security list:
| Source Type | Source | IP Protocol | Source Port Range / Type and Code | Destination Port Range / Type and Code |
|---|---|---|---|---|
| CIDR | CIDR that describes the IP range users will use to access your Oracle E-Business Suite environments. | TCP | All | Depends on the web entry port you will use during the provisioning of your environment. |
| Destination Type | Destination | IP Protocol | Source Port Range / Type and Code | Destination Port Range / Type and Code |
|---|---|---|---|---|
| CIDR | 0.0.0.0/0 | TCP | All | All |
| CIDR | 0.0.0.0/0 | ICMP | N/A (leave Type and Code blank) | N/A |
| Destination Type | Destination | IP Protocol | Source Port Range / Type and Code | Destination Port Range / Type and Code |
|---|---|---|---|---|
| CIDR | <External application tier subnet CIDR> | TCP | All | All |
| CIDR | 0.0.0.0/0 | ICMP | N/A | N/A |
Application Tier Security Rules for Internal Subnets
This section includes the following security rules for the application tier security list for internal subnets:
| Source Type | Source | IP Protocol | Source Port Range / Type and Code | Destination Port Range / Type and Code |
|---|---|---|---|---|
| CIDR | <Internal application tier subnet CIDR> | TCP | All | All |
| CIDR | <EBS Cloud Manager subnet CIDR> | ICMP | N/A (leave Type and Code blank) | N/A (leave Type and Code blank) |
| CIDR | <Internal load balancer subnet CIDR> | ICMP | N/A (leave Type and Code blank) | N/A (leave Type and Code blank) |
| CIDR | <EBS Cloud Manager subnet CIDR> | TCP | All | 22 |
| CIDR | <External application tier subnet CIDR> | TCP | All | 111 |
| CIDR | <External application tier subnet CIDR> | TCP | All | 2049 |
| CIDR | <Database tier subnet CIDR> | ICMP | N/A (leave Type and Code blank) | N/A (leave Type and Code blank) |
| CIDR | <Internal application tier subnet CIDR> | ICMP | N/A (leave Type and Code blank) | N/A (leave Type and Code blank) |
| CIDR | <External application tier subnet CIDR> | TCP | All | 7001-7003 |
| CIDR | <External application tier subnet CIDR> | TCP | All | 6801-6802 |
| CIDR | <External application tier subnet CIDR> | TCP | All | 16801-16802 |
| CIDR | <External application tier subnet CIDR> | TCP | All | 12345 |
| CIDR | <External application tier subnet CIDR> | TCP | All | 36501-36550 |
| CIDR | <Internal load balancer subnet CIDR> | TCP | All | 8000 |
| CIDR | <Mount target subnet CIDR> See footnote [1] |
TCP | All | 111 |
| CIDR | <Mount target subnet CIDR> See footnote [1] |
TCP | All | 2048-2050 |
| CIDR | <Mount target subnet CIDR> See footnote [1] |
UDP | All | 111 |
| CIDR | <Mount target subnet CIDR> See footnote [1] |
UDP | All | 2048 |
Footnote for Table 3-11:
-
Only required if you plan to implement a shared file system, which uses FSS.
| Destination Type | Destination | IP Protocol | Source Port Range / Type and Code | Destination Port Range / Type and Code |
|---|---|---|---|---|
| CIDR | 0.0.0.0/0 | TCP | All | All |
| CIDR | 0.0.0.0/0 | ICMP | N/A | N/A |
| CIDR | <Mount target subnet CIDR> See footnote [1] |
UDP | All | 111 |
| CIDR | <Mount target subnet CIDR> See footnote [1] |
UDP | All | 2048 |
| CIDR | <Mount target subnet CIDR> See footnote [1] |
TCP | All | 111 |
| CIDR | <Mount target subnet CIDR> See footnote [1] |
TCP | All | 2048-2050 |
Footnote for Table 3-12:
-
Only required if you plan to implement a shared file system, which uses FSS.
| Destination Type | Destination | IP Protocol | Source Port Range / Type and Code | Destination Port Range / Type and Code |
|---|---|---|---|---|
| CIDR | 134.70.0.0/17 See footnote [1] |
TCP | All | All |
| Service | All <XXX> Services in the Oracle Services Network (XXX is a region-specific code, such as IAD or LHR) |
TCP | All | All |
| Service | All <XXX> Services in the Oracle Services Network (XXX is a region-specific code, such as IAD or LHR) |
ICMP | N/A | N/A |
| CIDR | <External application tier subnet CIDR> | TCP | All | All |
| CIDR | <Internal application tier subnet CIDR> | TCP | All | All |
| CIDR | <Database tier subnet CIDR> | TCP | All | 1521-1524 |
| CIDR | <EBS Cloud Manager subnet CIDR> | TCP | All | 443 |
| CIDR | 0.0.0.0/0 | ICMP | N/A | N/A |
| CIDR | <Mount target subnet CIDR> See footnote [2] |
UDP | All | 111 |
| CIDR | <Mount target subnet CIDR> See footnote [2] |
UDP | All | 2048 |
| CIDR | <Mount target subnet CIDR> See footnote [2] |
TCP | All | 111 |
| CIDR | <Mount target subnet CIDR> See footnote [2] |
TCP | All | 2048-2050 |
Footnote for Table 3-13:
-
Only required if you plan to provide access to public internet.
-
Only required if you plan to implement a shared file system, which uses FSS.
Application Tier Security Rules for External Subnets (Optional)
This section includes the following security rules for the application tier security list for external subnets:
| Source Type | Source | IP Protocol | Source Port Range / Type and Code | Destination Port Range / Type and Code |
|---|---|---|---|---|
| CIDR | <External application tier subnet CIDR> | TCP | All | All |
| CIDR | <EBS Cloud Manager subnet CIDR> | ICMP | N/A (leave Type and Code blank) | N/A (leave Type and Code blank) |
| CIDR | <External load balancer subnet CIDR> | ICMP | N/A (leave Type and Code blank) | N/A (leave Type and Code blank) |
| CIDR | <EBS Cloud Manager subnet CIDR> | TCP | All | 22 |
| CIDR | <Internal application tier subnet CIDR> | TCP | All | 111 |
| CIDR | <Internal application tier subnet CIDR> | TCP | All | 2049 |
| CIDR | <Internal application tier subnet CIDR> | ICMP | N/A (leave Type and Code blank) | N/A (leave Type and Code blank) |
| CIDR | <Database tier subnet CIDR> | ICMP | N/A (leave Type and Code blank) | N/A (leave Type and Code blank) |
| CIDR | <External application tier subnet CIDR> | ICMP | N/A (leave Type and Code blank) | N/A (leave Type and Code blank) |
| CIDR | <Internal application tier subnet CIDR> | TCP | All | 22 |
| CIDR | <Internal application tier subnet CIDR> | TCP | All | 5556-5557 |
| CIDR | <Internal application tier subnet CIDR> | TCP | All | 7201-7202 |
| CIDR | <Internal application tier subnet CIDR> | TCP | All | 17201-17202 |
| CIDR | <Internal application tier subnet CIDR> | TCP | All | 7401-7402 |
| CIDR | <Internal application tier subnet CIDR> | TCP | All | 17401-17402 |
| CIDR | <Internal application tier subnet CIDR> | TCP | All | 7601-7602 |
| CIDR | <Internal application tier subnet CIDR> | TCP | All | 17601-17602 |
| CIDR | <Internal application tier subnet CIDR> | TCP | All | 7801-7802 |
| CIDR | <Internal application tier subnet CIDR> | TCP | All | 17801-17802 |
| CIDR | <Internal application tier subnet CIDR> | TCP | All | 6801-6802 |
| CIDR | <Internal application tier subnet CIDR> | TCP | All | 16801-16802 |
| CIDR | <Internal application tier subnet CIDR> | TCP | All | 9999-10000 |
| CIDR | <Internal application tier subnet CIDR> | TCP | All | 1626 |
| CIDR | <Internal application tier subnet CIDR> | TCP | All | 12345 |
| CIDR | <Internal application tier subnet CIDR> | TCP | All | 36501-36550 |
| CIDR | <Internal application tier subnet CIDR> | TCP | All | 6100-6101 |
| CIDR | <Internal application tier subnet CIDR> | TCP | All | 6200-6201 |
| CIDR | <Internal application tier subnet CIDR> | TCP | All | 6500-6501 |
| CIDR | <External load balancer subnet CIDR> | TCP | All | 8000 |
| CIDR | <Mount target subnet CIDR> See footnote [1] |
TCP | All | 111 |
| CIDR | <Mount target subnet CIDR> See footnote [1] |
TCP | All | 2048-2050 |
| CIDR | <Mount target subnet CIDR> See footnote [1] |
UDP | All | 111 |
| CIDR | <Mount target subnet CIDR> See footnote [1] |
UDP | All | 2048 |
Footnote for Table 3-14:
-
Only required if you plan to implement a shared file system, which uses FSS.
| Destination Type | Destination | IP Protocol | Source Port Range / Type and Code | Destination Port Range / Type and Code |
|---|---|---|---|---|
| CIDR | 0.0.0.0/0 | TCP | All | All |
| CIDR | 0.0.0.0/0 | ICMP | N/A | N/A |
| CIDR | <Mount target subnet CIDR> See footnote [1] |
UDP | All | 111 |
| CIDR | <Mount target subnet CIDR> See footnote [1] |
UDP | All | 2048 |
Footnote for Table 3-15:
-
Only required if you plan to implement a shared file system, which uses FSS.
| Destination Type | Destination | IP Protocol | Source Port Range / Type and Code | Destination Port Range / Type and Code |
|---|---|---|---|---|
| CIDR | 134.70.0.0/17 See footnote [1] |
TCP | All | All |
| CIDR | <External application tier subnet CIDR> | TCP | All | All |
| CIDR | <Database tier subnet CIDR> | TCP | All | 1521-1524 |
| CIDR | <EBS Cloud Manager subnet CIDR> | TCP | All | 443 |
| CIDR | 0.0.0.0/0 | ICMP | N/A | N/A |
| CIDR | <Internal application tier subnet CIDR> | TCP | All | All |
| Service | All <XXX> Services in the Oracle Services Network (XXX is a region-specific code, such as IAD or LHR) |
TCP | All | All |
| Service | All <XXX> Services in the Oracle Services Network (XXX is a region-specific code, such as IAD or LHR) |
ICMP | N/A | N/A |
| CIDR | <Mount target subnet CIDR> See footnote [2] |
UDP | All | 111 |
| CIDR | <Mount target subnet CIDR> See footnote [2] |
UDP | All | 2048 |
| CIDR | <Mount target subnet CIDR> See footnote [2] |
TCP | All | 111 |
| CIDR | <Mount target subnet CIDR> See footnote [2] |
TCP | All | 2048-2050 |
Footnote for Table 3-16:
-
Only required if you plan to provide access to public internet.
-
Only required if you plan to implement a shared file system, which uses FSS.
FSS Mount Target Security Rules
The following security rules must be added for the FSS mount target security list. If you have established an external zone, these rules must be created for both your internal application tier subnet and for your external application tier subnet.
| Source Type | Source | IP Protocol | Source Port Range / Type and Code | Destination Port Range / Type and Code |
|---|---|---|---|---|
| CIDR | <Application tier subnet CIDR> | TCP | All | 111 |
| CIDR | <Application tier subnet CIDR> | TCP | All | 2048 |
| CIDR | <Application tier subnet CIDR> | TCP | All | 2049 |
| CIDR | <Application tier subnet CIDR> | TCP | All | 2050 |
| CIDR | <Application tier subnet CIDR> | UDP | All | 111 |
| CIDR | <Application tier subnet CIDR> | UDP | All | 2048 |
Database Tier Security Rules
This section includes the following security rules for database tier security list:
| Source Type | Source | IP Protocol | Source Port Range / Type and Code | Destination Port Range / Type and Code |
|---|---|---|---|---|
| CIDR | <EBS Cloud Manager subnet CIDR> | ICMP | N/A (leave Type and Code blank) | N/A (leave Type and Code blank) |
| CIDR | <Database tier subnet CIDR> | ICMP | N/A (leave Type and Code blank) | N/A (leave Type and Code blank) |
| CIDR | <EBS Cloud Manager subnet CIDR> | TCP | All | 22 |
| CIDR | <Internal application tier subnet CIDR> | TCP | All | 1521-1524 |
| CIDR | <Internal application tier subnet CIDR> | ICMP | N/A (leave Type and Code blank) | N/A (leave Type and Code blank) |
| CIDR | <External application tier subnet CIDR> | TCP | All | 1521-1524 |
| CIDR | <External application tier subnet CIDR> | ICMP | N/A (leave Type and Code blank) | N/A (leave Type and Code blank) |
| CIDR | <Database tier subnet CIDR> | TCP | All | 22 |
| CIDR | <Database tier subnet CIDR> | TCP | All | 1521-1524 |
| Destination Type | Destination | IP Protocol | Source Port Range / Type and Code | Destination Port Range / Type and Code |
|---|---|---|---|---|
| CIDR | 0.0.0.0/0 | TCP | All | All |
| CIDR | 0.0.0.0/0 | ICMP | N/A | N/A |
| Destination Type | Destination | IP Protocol | Source Port Range / Type and Code | Destination Port Range / Type and Code |
|---|---|---|---|---|
| CIDR | 134.70.0.0/17 See footnote [1] |
TCP | All | All |
| CIDR | <EBS Cloud Manager subnet CIDR> | TCP | All | 443 |
| CIDR | <Database tier subnet CIDR> | TCP | All | 1521-1524 |
| CIDR | <Database tier subnet CIDR> | TCP | All | 22 |
| CIDR | 0.0.0.0/0 | ICMP | N/A | N/A |
| Service | All <XXX> Services in the Oracle Services Network (XXX is a region-specific code, such as IAD or LHR) |
TCP | All | All |
| Service | All <XXX> Services in the Oracle Services Network | ICMP | All | All |
Footnote for Table 3-21:
-
Only required if you plan to provide access to public internet.
Oracle E-Business Suite Cloud Manager Security Rules
Note: When creating a custom network, the following security rules need to be added to the Oracle E-Business Suite Cloud Manager security list. For information on creating the security list for Oracle E-Business Suite Cloud Manager, see Create Network Resources for Deploying Oracle E-Business Suite Cloud Manager.
| Source Type | Source | IP Protocol | Source Port Range / Type and Code | Destination Port Range / Type and Code |
|---|---|---|---|---|
| CIDR | <Application tier subnet CIDR> | TCP | All | 443 |
| CIDR | <Database tier subnet CIDR> | TCP | All | 443 |
| Destination Type | Destination | IP Protocol | Source Port Range / Type and Code | Destination Port Range / Type and Code |
|---|---|---|---|---|
| CIDR | <Application tier subnet CIDR> | TCP | All | 22 |
| CIDR | <Database tier subnet CIDR> | TCP | All | 22 |
Complete Additional Network Requirements for Cross-Region Support and Disaster Recovery
Additional set up is required in order for Oracle E-Business Suite Cloud Manager to operate across multiple regions:
-
Cross-Region Support
If you are planning to leverage cross-region support to provision and manage environments in any regions other than the region where Oracle E-Business Suite Cloud Manager is deployed, you must configure the network in these remote regions with the same characteristics as the EBS Cloud Manager home region. In addition, you must establish connectivity between the regions by configuring routing between the EBS Cloud Manager network and the networks running in the remote regions. Refer to Remote VCN Peering through an Upgraded DRG for available options.
You must build your VCN in your Disaster Recovery region with a CIDR block that does not overlap with the VCN in your primary region, for example 9.0.0.0/22. The subnets within this VCN can be built with the same instructions used to create your primary VCN, substituting the appropriate CIDR blocks.
-
Disaster Recovery
In order to configure Disaster Recovery between regions, you must first establish connectivity between the regions (as described previously in "Cross-Region Support") and then establish connectivity between the subnets where your databases will reside. To establish connectivity between database subnets, you must add additional ingress and egress rules to the security lists associated with those subnets. Specifically, you must adhere to the prerequisites related to VCN and security lists in the section Prerequisites and General Information of Use Oracle DataGuard on a DB System.
In addition, you must establish connectivity between the subnets where your application tier nodes reside. To establish connectivity between the application tier node subnets, you must add specific ingress and egress rules to the security lists associated with those subnets as shown in the following example. In the example, 9.0.4.0/24 is the CIDR of the application tier subnet for the DR environment, and 10.0.4.0/24 is the CIDR of the application tier subnet for the primary environment:
-
Security List for Application Tier Subnet on Primary Environment
-
Ingress Rules
-
Stateless: No
-
Source: 9.0.4.0/24
-
IP Protocol: TCP
-
Source Port Range: All
-
Destination Port Range: 22
-
Allows: TCP traffic for ports: 22
-
-
Egress Rules
-
Stateless: No
-
Destination: 9.0.4.0/24
-
IP Protocol: TCP
-
Source Port Range: All
-
Destination Port Range: 22
-
Allows: TCP traffic for ports: 22
-
-
-
Security List for Application Tier Subnet on Disaster Recovery Environment
-
Ingress Rules
-
Stateless: No
-
Destination: 10.0.4.0/24
-
IP Protocol: TCP
-
Source Port Range: All
-
Destination Port Range: 22
-
Allows: TCP traffic for ports: 22
-
-
Egress Rules
-
Stateless: No
-
Destination: 10.0.4.0/24
-
IP Protocol: TCP
-
Source Port Range: All
-
Destination Port Range: 22
-
Allows: TCP traffic for ports: 22
-
-
-
Create Network Profiles
A network profile maps Oracle Cloud Infrastructure network definitions with the Oracle E-Business Suite environment network requirements. Before Oracle E-Business Suite Cloud Manager can be used to provision environments, a network and associated network profiles must be created.
After the network administrator creates the network, the Oracle E-Business Suite Cloud Manager administrator will use the Oracle E-Business Suite Cloud Manager UI to define related network profiles. Oracle E-Business Suite administrators can then select those network profiles when performing processes such as advanced provisioning or cloning. Only Oracle E-Business Suite Cloud Manager administrators can create network profiles.
In our example, the administrators are members of the ebs-proddba-grp group.
To create a new network profile, see Create a Network Profile.
Create Exadata Infrastructure and Associated VM Cluster for Exadata Database Service on Dedicated Infrastructure (Conditionally Required)
If you plan to use Oracle E-Business Suite Cloud Manager with Oracle Exadata Database Service on Dedicated Infrastructure, you must first create the Exadata infrastructure and associated VM Cluster.
Create Exadata Infrastructure
-
You will first create a network profile which maps to the region and availability domain which you plan to use while creating your Exadata infrastructure. This same region and availability domain will be used for all OCI resources associated with your Oracle E-Business Suite environments:
-
Then, follow the steps in Creating an Exadata Cloud Infrastructure Instance to create your new infrastructure.
-
After the Exadata infrastructure resource is provisioned and available, you must create an Exadata VM cluster.
Note: Oracle E-Business Suite Cloud Manager 23.2.1 and later support infrastructure containing multiple VM clusters. When provisioning, you will select the VM cluster on which to provision the database from the available options.
Create an Exadata VM Cluster
-
Follow the steps in To Create a Cloud VM Cluster Resource to create your VM cluster while specifying the following properties:
-
Configure Exadata storage - When configuring Exadata storage, you must select the option "Allocate storage for Exadata sparse snapshots". If you do not enable this option during the configuration of the cluster, you will need to delete the cluster and recreate it with this option enabled in order to use the Oracle E-Business Suite Cloud Manager Cloning Using Exadata Snapshots feature. A cluster with this option enabled will have "Storage for Exadata sparse snapshots" listed as Enabled on the Cluster details page under the Resource allocation section.
-
Configure the network settings - When configuring the network settings, you must ensure that your choices for VCN and subnet match what you specified in the network profile.
-