How to Configure an IPv4 Router
The following procedure assumes that you are configuring interfaces for the router after installing the router.
Before You Begin
After the router is physically installed on the network, configure the router to operate in local files mode. This configuration ensures that routers boot even if the network configuration server is down.
Ensure that your role has the appropriate rights profile to perform this procedure. See Using Rights Profiles to Perform Network Configuration.
-
Configure the IP interfaces for the NICs on the system.
$ ipadm create-ip IP-interface
-
Configure the IP interface with a valid IP address by choosing one of the
following commands:
-
To configure a static address, type the following command:
$ ipadm create-addr -a address [interface | addr-obj]
-
To configure a nonstatic address, type the following
command:
$ ipadm create-addr -T address-type [interface | addr-obj]
For detailed instruction about how to configure IP interfaces, see Chapter 3, Configuring and Administering IP Interfaces and Addresses in Oracle Solaris in Configuring and Managing Network Components in Oracle Solaris 11.4.
Make sure that each IP interface is configured with the IP address of the network for which the system must route packets. Therefore, if the system serves the 192.0.2.0 and 203.0.113.0 networks, then one NIC must be configured for each network.
Caution - Make sure you are thoroughly knowledgeable about DHCP administration before configuring an IPv4 router to use DHCP.
-
To configure a static address, type the following command:
-
Add the host name and IP address of each interface to the
/etc/inet/hosts file.
For example, assume that the names you assigned for the two interfaces of the router are krakatoa and krakatoa-1, respectively. The entries in the /etc/inet/hosts file are as follows:
192.0.2.1      krakatoa        #interface for network 192.0.2.0
203.0.113.1         krakatoa-1      #interface for network 203.0.113.0
-
To configure the router to run in local files mode, set the appropriate
SMF name service switch property.
For example:
$ svccfg -s name-service/switch setprop config/netmask = astring: "files"
$ svccfg -s name-service/switch:default refresh
-
If the router is connected to any subnetted network, add the network
number and the netmask to the /etc/inet/netmasks
file.
For example, for IPv4 address notation, such as 192.0.2.0, type the following:
192.0.2.0 255.255.255.0
-
Enable IPv4 packet forwarding on the router.
$ ipadm set-prop -p forwarding=on ipv4
- (Optional)
Start a routing protocol.
$ svcadm enable route:default
When you start a routing protocol, the routing daemon /usr/sbin/in.routed automatically updates the routing table, a process that is known as dynamic routing. For more information about the types of routing, see Routing Tables and Routing Types. For information about the routeadm command, see the routeadm(8) man page and for more information about the ipadm command, see the ipadm(8) man page.
The Service Management Facility (SMF) Fault Management Resource Identifier (FMRI) associated with the in.routed daemon is svc:/network/routing/route.
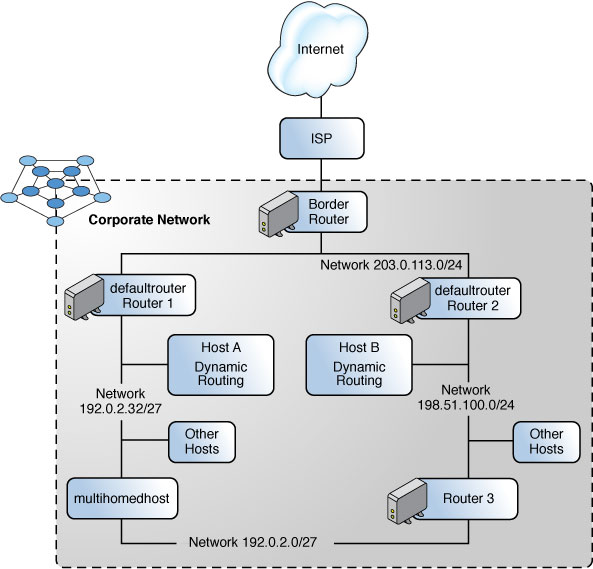
This example is based on the following figure.

Router 2 contains two wired network connections, one connection to network 198.51.100.0 and one to network 203.0.113.0. The example shows how to configure a system as a router (Router 2) of the 198.51.100.0 network.
The example begins with checking the status of the system's interfaces before proceeding with the configuration.
$ dladm show-link
LINK     CLASS     MTU     STATE   BRIDGE   OVER
net0     phys      1500    up      --       --
net1     phys      1500    up      --       --
net2     phys      1500    up      --       --
$ ipadm show-addr
ADDROBJ           TYPE     STATE        ADDR
lo0/v4            static   ok           127.0.0.1/8
net0/v4           static   ok           198.51.100.10/24

$ ipadm create-ip net1
$ ipadm create-addr -a 203.0.113.10/24 net1
$ ipadm show-addr
ADDROBJ           TYPE     STATE        ADDR
lo0/v4            static   ok           127.0.0.1/8
net0/v4           static   ok           198.51.100.10/24
net1/v4           static   ok           203.0.113.10/24

$ pfedit /etc/inet/hosts
192.0.2.1       localhost
198.51.100.10        router2        #interface for network 198.51.100
203.0.113.0          router2-out    #interface for network 203.0.113
$ pfedit /etc/inet/netmasks
198.51.100.0    255.255.255.0
203.0.113.0      255.255.255.0

$ ipadm set-prop -p forwarding=on ipv4
$ svcadm enable route:default
Next Steps
To complete the default router configuration for the network,you must also do the following:
-
Modify each system on the 198.51.100.0 network so that the system gets its routing information from the new default router. For more information, refer to Creating Persistent (Static) Routes in Configuring an Oracle Solaris 11.4 System as a Router or a Load Balancer.
-
Define a static route to the border router in the routing table of Router 2. For more details, refer to Routing Tables and Routing Types. For more information about the ipadm command, see the ipadm(8) man page.