
Creating Requisition Header Information
This section discusses how to:
Enter requisition header information.
Enter requisition header defaults.
Search for suppliers.
View address details.
Create one-time requisition default addresses.
Apply requisition header default field value changes to existing lines, schedules, and distributions.
Enter requisition header comments.
Use standard comments.
View currency exchange rate information.
Order kit items.
Order items by catalog.
View item details.
View qualifying item suppliers.
Define item aliases.
Request favorite items.
Pages Used to Create Requisition Header Information
|
Page Name |
Definition Name |
Navigation |
Usage |
|---|---|---|---|
|
Purchasing Definition - Business Unit Options |
BUS_UNIT_TBL_PM2 |
|
Create business unit options or update existing ones and activate value-added tax (VAT) defaults and calculations for the requisitions. When you use this VAT option in conjunction with the VAT option on the Purchasing Definition - Business Unit Options page, the system uses the supplier business unit, item, and ship to information to derive VAT determinants. |
|
Procurement - Requisition Authorization |
OPR_REQ_AUTH |
Click the Requisition Authorizations link on the Procurement page. |
Authorize users to create and update requisitions for applicable buyers. Define a user's requisition processing authority in relation to applicable buyers. When you use this VAT option in conjunction with the VAT option on the Requisition Authorization page, the system uses the supplier business unit, item, and ship to information to derive VAT determinants. |
|
Requisitions |
(search) |
|
Search for existing requisitions or add a new requisition. You can search for requisitions based on the requisition ID, name, or status and by requester and requester name. |
|
Maintain Requisitions - Requisition |
REQ_FORM |
|
Create requisition header information. |
|
Commitment Control |
KK_EXCPTN_OVER_SEC |
Click the Budget Status link on the Maintain Requisitions - Requisition page. |
This link is available only when the commitment control option is enabled. |
|
Requester Information |
REQ_USER_AUDIT |
Click the Requester Info (requester information) link on the Maintain Requisitions - Requisition page. |
View requester information. |
|
Requisition Defaults |
REQ_HDR_DEFAULTS |
Click the Requisition Defaults link on the Maintain Requisitions - Requisition page. |
Enter defaults that apply to the entire requisition. You can override defaults at the line, schedule, and distribution levels. |
|
Supplier Search |
VENDOR_LOOKUP_SEC |
Click the Supplier Lookup link on the Requisition Defaults page. |
Search for suppliers. |
|
Supplier Detail |
VENDOR_LOOKUP_DTL |
Click the Supplier Detail link on the Supplier Search page. |
View supplier details. |
|
Address |
VENDOR_ADDR_SEC |
Click the Address link on the Supplier Search page. |
View address details for the location relevant to the page from which this page is accessed. |
|
Req One Time Address Default (requisition one time address default) |
REQ_DFLT_ADDR |
Click the One Time Address link on the Requisition Defaults page. |
Set up a one-time ship to address for the selected transaction. The address entered serves as the default one-time address for all new lines and schedules on the transaction document. You can have the system supply the address to the existing lines by default as well. You cannot define a one-time address for direct shipment requisitions. To change the address for a direct shipment, you must go to the sales order in PeopleSoft Order Management and make the address change there. |
|
Retrofit field changes to all existing requisition lines/schedule/distributions |
REQ_DFLT_RETROFIT |
Exit the Header Defaults page after you have entered field value changes on the page or any of the pages accessed from it, and you have a transaction line that contains item description and quantity information. |
Apply changes to default values in requisition header, line, schedule, and distribution fields. |
|
Header Comments |
REQ_COMMENTS |
Click the Add Comments link on the Maintain Requisitions - Requisition page. |
Enter comments for a transaction. You can enter a unique comment or select from predefined standard comments. |
|
Standard Comments |
STD_COMM_SEC |
Click the Copy Standard Comments link on the Header Comments page. |
Add standard comments to the comments text box. You can modify the standard comments to meet the requirements of the transaction. |
|
Currency Information |
EXCH_RT_DTL_INQ |
Select 01 - Exchange Rate Detail in the Go to field on the Maintain Requisitions - Requisition page. |
Display the rules used to calculate exchange rates for the transaction. |
|
Activities |
REQ_ACTIVITY_SEC |
Click the Requisition Activities link on the Maintain Requisitions - Requisition page. |
Enter and track activities associated with a particular transaction. Keep the activity comments organized by logging the due date and by selecting the Done check box. |
|
Req DOC Status (requisition document status) |
PRCR_DOCSTAT_INQ |
|
Access and review information about procurement documents associated with a requisition. |
|
Add a Document |
CS_DOC_ADD |
Click the Add Request Document link on the Maintain Requisitions - Requisition page. |
Add a PeopleSoft Supplier Contract Management requisition document. |
|
Document Management |
CS_DOC_MAINT |
Click the Modify Request Document link on the Maintain Requisitions - Requisition page. |
Modify a PeopleSoft Supplier Contract Management requisition document. |
|
Enter Kit Items |
REQ_KIT_ITEMS |
Click the Purchasing Kit link on the Maintain Requisitions - Requisition page. |
Order an item by kit ID. The individual items in the kit will become new lines on the requisition. |
|
Item Search Criteria |
ITEM_SEARCH_SP |
Click the Item Search link on the Maintain Requisitions - Requisition page. |
Search for items. |
|
Item Supplier Priority |
ITM_VND_PRTY_HC |
Click the Item Supplier Priority link on the Item Search Criteria page. |
View qualifying suppliers that are preapproved to provide selected items. |
|
Order By Catalog |
ORD_BY_ITEM_CAT |
Click the Catalog link on the Maintain Requisitions - Requisition page. |
Search for and select items to order from a catalog. |
|
Item Details |
ITM_CAT_DETAIL |
Click the Item Details link on the Order By Catalog page. |
View details about the item. |
|
Item Supplier Priority |
ITM_CAT_VND |
Click the Item Supplier link on the Order By Catalog page. |
View the name, status, priority, and price for the supplier. |
|
Set Item Alias |
None. |
Click the link on the Order By Catalog page. |
Set up an alias for the selected item so that you don't have to remember the supplier's ID or description each time that you order the part. Aliases are stored according to user ID so that each user can have a different alias for the same item. |
|
Requester Favorite Items |
REQUESTOR_ITEMS |
Click the Requester Items link on the Maintain Requisitions - Requisition page. |
View, select for reorder, or modify all items requested by the requester. |
|
Req Change Ord Header History (requisition change tracking header history) |
REQ_CHANGE_HDR |
|
View the header history of requisition tracked changes. |
Maintain Requisitions - Requisition Page
Use the Maintain Requisitions - Requisition page (REQ_FORM) to create requisition header information.
Image: Maintain Requisitions —Requisition Page
This example illustrates the fields and controls on the Maintain Requisitions —Requisition Page. You can find definitions for the fields and controls later on this page.
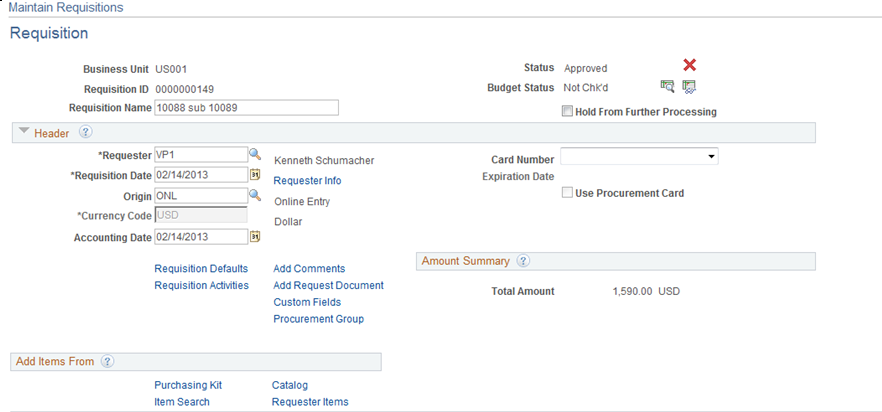
Image: Maintain Requisition - Requisition page(2of2)
This example illustrates the fields and controls on the Maintain Requisition - Requisition page(2of2). You can find definitions for the fields and controls later on this page.

Click on the Item Tab on the requisition to view the original sub item, description and item substitution search icon.
Image: Maintain Requisition — Item Information page
This example illustrates the fields and controls on the Maintain Requisition — Item Information page. You can find definitions for the fields and controls later on this page.

The Item Info Tab – shows the new item subtitute fields:
Clicking on the Item Search Icon will bring up the Substitute Item page (SUB_ITM_SRCH) that will allow the user to view all items available to substitute.
Image: Substitute Item page
This example illustrates the fields and controls on the Substitute Item page. You can find definitions for the fields and controls later on this page.
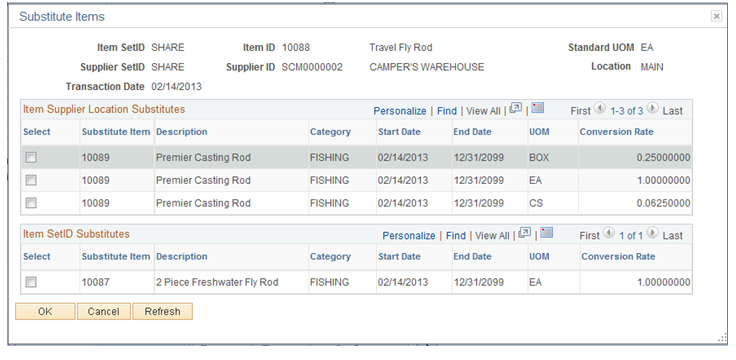
For Information on Substitute Item Search Page See Working With Substitute Items in Procurement
| Status |
Displays the requisition status: Open: Appears by default from the requester. The requisition is not eligible for the approval process until an authorized user changes this status to Pending Approval. Pending: Depending on the Initial Status setting defined for the requester in the Requester Setup component, the default status might be set to Pending. Pending Approval: The requisition has been submitted for approval. Approved: The requisition is approved. Line Approved: One or more requisition lines are approved. Note: An individual requisition line that originates in PeopleSoft eProcurement can be approved and eligible for sourcing even if the entire requisition is not fully approved. The same is true for Purchasing requisitions when the approval framework is enabled for requisitions. Note: Requisitions in Canceled and Completed statuses are not available on this page and can be viewed only using requisition inquiry pages. |
 |
Click to approve the requisition and its lines when the approval framework is enabled. |
 |
Click to cancel the requisition. Cancellation is irreversible, and you must create a new requisition. You cannot change a canceled requisition. You can only cancel a requisition if you are granted authorization on the Define User Preferences - Procurement: Requisition Authorizations page. Also, if you cancel the requisition, it terminates the approval framework process. |
 |
Click to make fields that are eligible for change request updates available for updates on this page. When a requisition is eligible for change tracking, the system makes the Create Header Change button available for use. The system makes all eligible change tracking fields available for entry. Inserting a new line or schedule or canceling an existing line or schedule can create a change request. You cannot delete a line or schedule if that line or schedule is eligible for change tracking. If you cancel a line, you also cancel its schedules and distributions. When you update the requisition and change tracking is required, the Change Reason page appears for you to define the change reason and enter comments. The system also makes the Current Change Reason link available if the change is the first change. You use this link to view the last change reason used. To review all tracked changes for a requisition, select the Change History option in the Go To field. When you click the Create Header Change button, the system checks to determine whether this is the first change request for this requisition. If so, the system inserts changed fields with the batch number and sequence number of 0 to store the original, history values for the requisition. |
| Copy From |
Click to access the Copy Requisitions page. Using this page you can use information from an existing requisition to define information for the current information. |
| Budget Status |
Displays the requisition budget checking status if budget checking is enabled. Not Chk'd (not checked): This is the requisition's initial budget checking status. The status may also return to this value after a value change that affected the budget status. Valid: The requisition has been successfully budget checked. Error: The requisition has failed budget checking. The text is enabled as a link, which you can click to access the Requisition Exceptions page, where you can view budget check exceptions for this requisition. Users with appropriate authority can override the budget exceptions on the Requisition Exceptions page. When you open a requisition that has failed a budget check, the system displays a message. Prov Valid (provisionally valid): The requisition has had a budget pre-check performed against it and it was valid. |
 |
Click to invoke budget checking to verify that funds exist in the appropriate accounts to cover the price on the requisition. This option appears if budget checking is enabled for the database. |
 |
Click to perform a pre-budget check. This button enables you to pre-budget check whether a budget exists for a requisition before the amount is committed to the pre-encumbrance or encumbrance and makes it possible to validate documents in work-in-progress mode without affecting budget balances. When performing pre-budget check processing, the Budget Processor performs all of its budget checking and edits, but does so without committing changes to the ledger or other records. The statuses of Provisionally Valid or Error on the transaction pages indicate whether a budget is available. If you click the button and if the pre-budget check is provisionally valid, then the system sets the budget header status for the requisition to Prov Valid. If the pre-budget check is not valid, then the system sets the budget header status to Error with a link to the Exception page. The button is visible only if the Purchasing check box is selected in the Enable Commitment Control section on the Installation Options - Products page and the Purchasing check box is selected in the Enable Budget Pre-check section on Installation Options - Commitment Control page. The button is not visible if the budget status is Valid. See Checking Budget Journals and Transactions Without Posting. |
| Requisition ID |
If you are adding a requisition, enter an identifier for the requisition. If you are using automatic numbering, the field displays NEXT. |
| Track Batch |
Displays the last batch number used to generate a tracked changes for the requisition. Change order numbers identify the batches of changes that you make to a requisition. |
| Requisition Name |
If you are adding a requisition, enter a description of the request to help you identify this requisition as it flows through the system. If you are using PeopleSoft eProcurement, this value is carried from the eProcurement requisition to the Purchasing requisition when the requisition is created in eProcurement. |
| Hold From Further Processing |
Select to temporarily prevent further processing of the requisition. The requisition will not be eligible for approval, unapproval, cancellation, closure, or sourcing to a purchase order. In addition, budget checking is determined by the selection criteria that you define as part of the Source Transaction definition for the Commitment Control Budget Processor process and whether you have selected the Hold From Further Processing check box for the requisition. If the HOLD_STATUS = N for the selection criteria for the source transaction, the Hold From Further Processing check box is selected, and you perform budget checking, no budget checking will occur for the requisition. If the HOLD_STATUS is not entered as Selection Criteria for the Source Transaction, and the Hold From Further Processing check box is selected, and you perform budget checking the budget checking process will execute for the requisition. If the HOLD_STATUS = Y for the selection criteria for the source transaction, the Hold From Further Processing check box is selected, and you perform budget checking, the budget checking process will run but will process only the requisitions that are marked on hold. |
Header
| Procurement Group Add Update |
Click to access the Procurement Groups page where you can create or update a procurement group ID. |
| Requester |
Select the ID of a user who will be the requisition's requesting party. |
| Requisition Date |
Select the creation date of the requisition. |
| Requester Info (requester information) |
Click to view the phone and facsimile number of the requester who appears in the Requester ID field. |
| Origin |
Select the origin of the requisition. Origin codes are defined on the Origin Codes page. |
| Currency Code |
Displays the requisition transaction currency. This value is supplied from the Requester Setup page (REQUESTOR_TBL) by default if the business unit allows multicurrency requisitions. If a currency is not set up in the requester table, it appears by default from the business unit. If the business unit does not allow multicurrency requisitions, the currency field value is supplied from the business unit and cannot be overridden on this page. |
| Accounting Date |
Determines the open period or allowable open date range for budget checking a requisition when you are using commitment control. If the requisition's accounting date falls before or after the open period date range, the system provides a message or warning to prevent you from running budget checking. This field is available only if commitment control is enabled. |
| Current Change Reason |
Click to view the last change reason used to track change requests for this requisition. |
| Add Request Document |
Click to access the Add a Document page. The page appears with information about the requisition. You then select the document type that you want to use to create the document and respond to wizard questions concerning the new requisition document. A requisition document is one that contains responses to wizard questions. Contract specialists can use these responses to determine proper terms and conditions for a contract document when the requisition becomes a contract. This link is available when PeopleSoft Supplier Contract Management has been installed and the application installation options have been set to use document types and to use documents with purchase order requisitions. You must also set up document types to use only with purchase order requisitions. After you create the document, use the Modify Request Document link to update and edit the document. |
| Procurement Group |
This link appears in the header area of the Requisition page if you enabled the Purchasing Group Option field on the Purchasing Options Page. Click to access the Procurement Groups page to add or update a procurement group ID. The Procurement Groups page is launched in a new instance of the browser so you can perform the necessary maintenance to the procurement group IDs. When changes are complete, you can close the browser instance and continue with the requisition transaction. You can select the Procurement Group ID for an item within the Attributes tab of the Requisition page. See Procurement Groups PageUnderstanding Procurement Groups in PeopleSoft |
| Custom Field |
The user definable fields in this Custom Fields link are available when you check the Enable Custom Fields checkbox on the Purchasing Installation Options page. You can customize these fields for your use. The custom fields are informational only. For more information, See Understanding User-Definable Fields |
| Modify Request Document |
Click to access the Document Management page. Using this page, you can open and review responses to the wizard questions provided by the requestor. The responses can assist contract specialists in defining contract conditions. |
| Card Number and Card Type |
The requester procurement card and type appears by default from the Requester Setup page. You can override the procurement card that appears. Only the valid procurement cards for this requester are available for selection. Note: All the procurement card fields on this page are controlled by the users assigned roles and the access rights assigned to those roles that you define using the Security menu for procurement cards. |
| Expiration Date |
Displays the expiration date of the procurement card. |
| Use Procurement Card |
The setting of this check box appears by default from the Requester Setup page. You can override the setting. If you select this check box, the procurement card will be used as the payment method for the requisition. |
| Procurement Group Add/Update |
Click to access the Procurement Groups page where you can create or update a procurement group ID. |
Amount Summary
If you're using VAT, the Merchandise Amount, Tax, and Total Amount fields appear in the Amount Summary group box.
Add Items From
Select Lines to Display
For Information on Advanced Line Search page using the Search for Lines SeeWorking with Large Requisitions
Additional Information
Requisition Defaults Page
Use the Requisition Defaults page (REQ_HDR_DEFAULTS) to enter defaults that apply to the entire requisition.
You can override defaults at the line, schedule, and distribution levels.
When you change the default requisition header information and exit this page, whether you use the Default or Override option, the system prompts you with the Retrofit Field Changes to All Existing Requisition Lines/Schedule/Distributions page.
Default Options
Line
Schedule
| One Time Address |
Click to access the Req One Time Address Default page, where you can temporarily assign a supplier address. |
Distribution
| SpeedChart |
Select a default SpeedChart. The SpeedChart feature enables you to use a code that contains preset distributions. |
Details
| Budget Date |
If you are using commitment control, the system supplies the budget date from the accounting date, but you can override it. |
Asset Information
Select the Asset Information tab.
| Business Unit (PeopleSoft Asset Management business unit) |
Select a PeopleSoft Asset Management business unit to associate with the asset item. Note: If you consider an item to be an asset and plan to pass it to PeopleSoft Asset Management through the PeopleSoft Receiving business process, you must populate both the PeopleSoft Asset Management business unit and Profile ID fields. If both fields contain values, data is written to the PeopleSoft Asset Management staging tables. If only one of the fields is populated, the system does not consider the item an asset. |
| Profile ID |
Select an asset profile ID. |
| Capitalize |
Designates a capitalized item. A PeopleSoft Asset Management business unit must be selected for this check box to be enabled. If the item is capitalized, it can be depreciated before being paid. |
| Cost Type |
Select the cost type associated with the item purchase, if applicable. Cost types represent components of the cost of an asset, such as materials, labor, and overhead. For example, you can differentiate between the cost of building an asset and its market value by allocating production cost to one cost type and the profit margin to another. Cost type, in combination with asset category and transaction code, determines into which accounts the costs are entered in the general ledger. See Understanding the Manufacturing Standard Cost Foundation. |
Supplier Search Page
Use the Supplier Search page (VENDOR_LOOKUP_SEC) to search for suppliers.
Address Page
Use the Address page (VENDOR_ADDR_SEC) to view address details for the location relevant to the page from which this page is accessed.
When this page functions as a ship to address page, the address that appears is the address where the items will be shipped to. When this page functions as a supplier address page, the address that appears is the address that appears on the purchase order for the supplier.
The information on this page is supplied by the system from the address information entered on either the Location - Location Definition page or the Supplier Information - Address page.
Req One Time Address Default (requisition one time address default) Page
Use the Req One Time Address Default (requisition one time address default) page (REQ_DFLT_ADDR) to set up a one-time ship to address for the selected transaction.
The address entered serves as the default one-time address for all new lines and schedules on the transaction document. You can have the system supply the address to the existing lines by default as well.You cannot define a one-time address for direct shipment requisitions. To change the address for a direct shipment, you must go to the sales order in PeopleSoft Order Management and make the address change there.
The fields on this page are identical to those on the Supplier Information - Address page. However, no Effective Date or Status fields are on this page because the address information on this page is used only for a one-time shipping address and is not retained by the system.
If you have added address information on this page, upon exiting the page, you'll be prompted with the Retrofit Field Changes To All Lines page, where you can select the default field changes that you want to apply to all applicable areas of the selected transaction document.
You cannot define a one-time address for direct shipment requisitions. To change the address for a direct shipment you must go to the sales order in PeopleSoft Order Management and make the address change there.
Retrofit field changes to all existing requisition lines/schedule/distributions Page
Use the Retrofit field changes to all existing requisition lines/schedule/distributions page (REQ_DFLT_RETROFIT) to apply changes to default values in requisition header, line, schedule, and distribution fields.
Exit the Header Defaults page after you have entered field value changes on the page or any of the pages accessed from it, and you have a transaction line that contains item description and quantity information.
When accessed from the requisition-related Header Defaults page, this page enables you to retrofit the header default field value changes to lines, schedules, and distributions on a requisition without having to manually apply them to each area. You can make the changes once and apply as many of them as you want to the transaction.
The option to apply these defaults is available depending on whether you select the Default or Override option on the requisition-related Header Defaults page.
Category and unit of measure defaults can be applied at the line level only for ad hoc (description-only) item requests.
Header Comments Page
Use the Header Comments page (REQ_COMMENTS) to enter comments for a transaction.
You can enter a unique comment or select from predefined standard comments.
Associated Document
Use the fields in this group box to attach files to the transaction. You can attach any type of file. The documents that you choose to attach do not transmit with the purchase order to the supplier.
Standard Comments Page
Use the Standard Comments page (STD_COMM_SEC) to add standard comments to the comments text box.
You can modify the standard comments to meet the requirements of the transaction.
Currency Information Page
Use the Currency Information page (EXCH_RT_DTL_INQ) to display the rules used to calculate exchange rates for the transaction.
Select 01 - Exchange Rate Detail in the Go to field on the Maintain Requisitions - Requisition page.
Enter Kit Items Page
Use the Enter Kit Items page (REQ_KIT_ITEMS) to order an item by kit ID.
The individual items in the kit will become new lines on the requisition.
PeopleSoft Purchasing kits are defined on the Purchasing Kit Definition page as a single item ID, representing two or more component items.
Order By Catalog Page
Use the Order By Catalog page (ORD_BY_ITEM_CAT) to search for and select items to order from a catalog.
Item Details Page
Use the Item Details page (ITM_CAT_DETAIL) to view details about the item.
The field values on this page appear by default from the Item Definition - General: Common page and the Purchasing Attributes page. The manufacturer description information appears by default from the Manufacturer page.
Item Supplier Priority Page
Use the Item Supplier Priority Page (ITM_CAT_VND) to view the name, status, priority, and price for the supplier.
Set Item Alias Page
Use the Set Item Alias page (None.) to set up an alias for the selected item so that you don't have to remember the supplier's ID or description each time that you order the part.
Aliases are stored according to user ID so that each user can have a different alias for the same item.
Requester Favorite Items Page
Use the Requester Favorite Items page (REQUESTOR_ITEMS) to view, select for reorder, or modify all items requested by the requester.
This page lists all items that have been requested by the requester. You can also manually add or remove items from this list of favorites.
Select item check boxes to transfer the items to the requisition when you click OK.