4 Starting and Using the Oracle Privileged Account Manager Console
This chapter describes how to start and work with Oracle Privileged Account Manager's web user interface, known as the Console.
This chapter includes the following sections:
-
Section 4.2, "Invoking Oracle Privileged Account Manager's Web-Based Console"
-
Section 4.3, "Navigating Oracle Privileged Account Manager's Console"
Note:
You can also manage Oracle Privileged Account Manager from the command line or by using Oracle Privileged Account Manager's RESTful interface.-
Refer to Appendix A, "Working with the Command Line Tool" for information about using the command line tool.
-
Refer to Appendix B, "Working with Oracle Privileged Account Manager's RESTful Interface" for information about using the RESTful interface.
4.1 Before You Begin
This chapter assumes that you have finished configuring Oracle Privileged Account Manager as described in Chapter 3, "Getting Started with Managing Oracle Privileged Account Manager."
4.2 Invoking Oracle Privileged Account Manager's Web-Based Console
You can access Oracle Privileged Account Manager's Console by opening a browser window and entering the following URL:
http://managedserver_host:managedserver_port/oinav/opam
When the Oracle Privileged Account Manager page is displayed with the Sign In screen, log in with the appropriate administrator or end user credentials.
Note:
If you prefer using Oracle Privileged Account Manager's command line tool or Oracle Privileged Account Manager's RESTful interface, refer to Appendix A, "Working with the Command Line Tool" or Appendix B, "Working with Oracle Privileged Account Manager's RESTful Interface" (respectively) for detailed information about using those interfaces.4.3 Navigating Oracle Privileged Account Manager's Console
This section provides a high-level overview of the Oracle Privileged Account Manager Console. The this section includes the following topics:
When you log in to Oracle Privileged Account Manager, the Console is displayed.
Access to certain features in the Console is based on your administration role (Admin Role), credentials, or delegated administrative privileges. For example, Figure 4-1 shows all of the features available in Oracle Privileged Account Manager. However, the Administration, Reports, and Configuration accordions, described later in this section, are not available to end users or to users with the Security Administrator role.
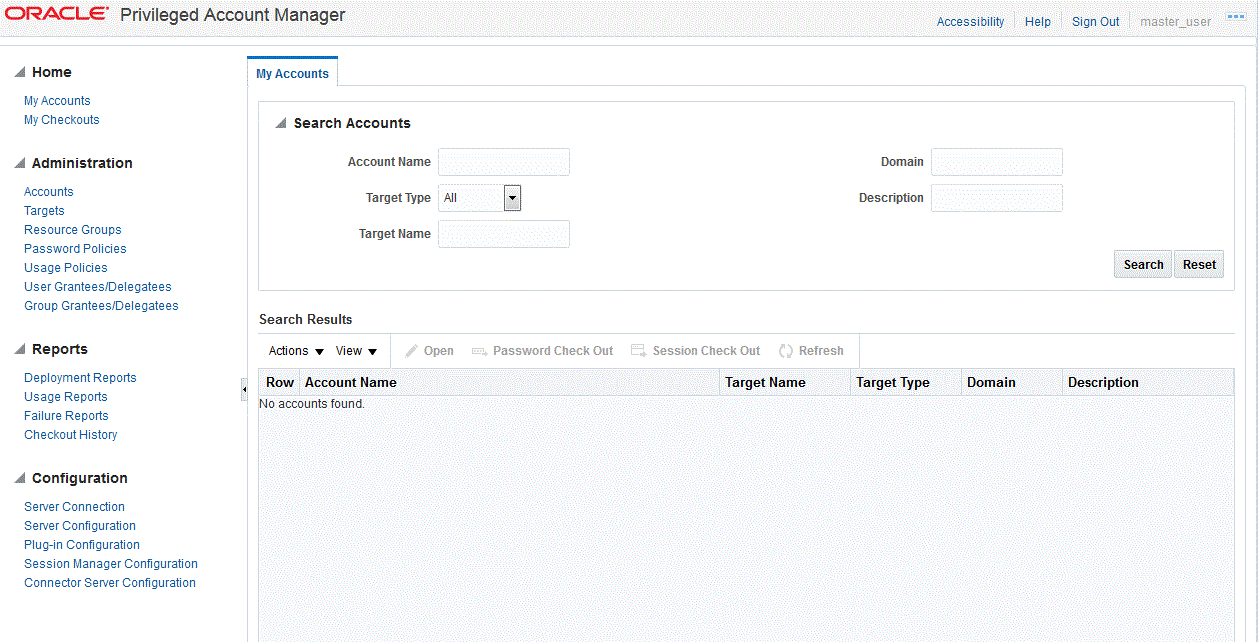
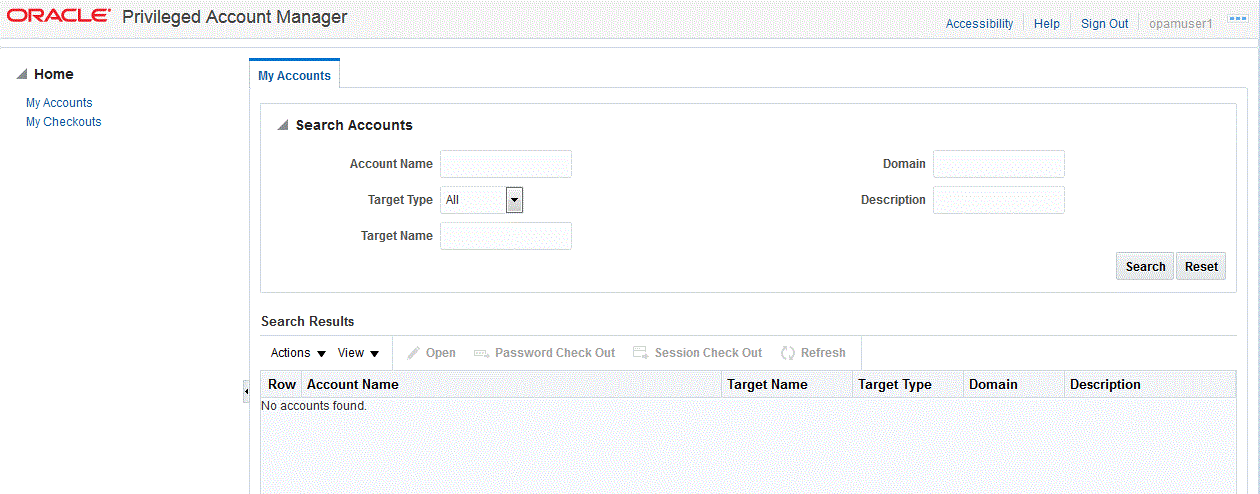
Figure 4-2 shows the Console when you log in as a Self-Service user with no administrator privileges.
Note:
-
Refer to Section 2.3, "Understanding Oracle Privileged Account Manager Authorization" for more information about Admin Roles.
-
Refer to Section 12.3.1, "Understanding Delegation" for more information about delegated administration privileges.
Tip:
Hover your mouse over elements in the Oracle Privileged Account Manager interface (such as parameter fields or information icons4.3.1 Working with the Home Accordion
The Home accordion contains the following nodes:
-
My Accounts: Select this node to access the My Accounts page where you can search, view, open, and check out accounts where you are a grantee.
-
My Checkouts: Select this node to access the My Checkouts page where you can view your checked out accounts, view the password for those accounts, and check in your checked out accounts.
You must check out a privileged account to use it. Oracle Privileged Account Manager enables you to check out an account as a password or as a session. Refer to Section 9.5, "Checking Out Privileged Accounts" for more information.
Clicking either node opens a new page on the right side of the Console. Use these pages to manage your accounts.
Note:
-
The My Accounts page is displayed by default when any user logs in, regardless of privileges.
-
For detailed information about working with the My Accounts page or with the My Checkouts page, refer to Chapter 14, "Working with Self-Service."
4.3.2 Working with the Administration Accordion
Based on your Admin Role and credentials, the Administration accordion contains some or all of the following nodes:
-
Accounts: Select to open the Accounts page, where you can search, open, add, and remove accounts.
-
Targets: Select to open the Targets page, where you can search, open, add, and remove targets.
-
Resource Groups: Select to open the Resource Groups page, where you can search, open, create, and delete resource groups.
-
Password Policies: Select to open the Password Policies page, where you can search, open, create, and delete Password Policies.
-
Usage Policies: Select to open the Usage Policies page, where you can search, open, create, and delete Usage Policies.
-
User Grantees / Delegatees: Select to open the User Grantees page, where you can search, open, and view information about individual user grantees and delegatees.
-
Group Grantees / Delegatees: Select to open the Group Grantees page, where you can search, open, and view information about a group of grantees and delegatees.
Clicking any of these nodes opens a new page on the right side of the Console. Use these pages to configure and manage Oracle Privileged Account Manager.
Note:
-
For detailed information about configuring and managing Oracle Privileged Account Manager, refer to Chapter 3, "Getting Started with Managing Oracle Privileged Account Manager."
-
For detailed information about configuring and managing an Oracle Privileged Account Manager server, refer to Section 5.2, "Managing an Oracle Privileged Account Manager Server."
4.3.3 Working with the Reports Accordion
Based on your Admin Role and credentials, the Reports accordion contains some or all of the following nodes:
-
Deployment Reports: Select to open the Deployment Report page, where you can view information about how targets and privileged accounts are currently deployed in your deployment.
-
Usage Reports: Select to open the Usage Reports page, where you can view information about how privileged accounts are being used in your deployment.
-
Failure Reports: Select to open the Failure Reports page, where you can view information about the current state of target and account failures.
-
Checkout History: Select to open the Checkout History page, where you can search for and review information about account checkouts.
Note:
For detailed information about these reports, refer to Chapter 15, "Working with Reports."4.3.4 Working with the Configuration Accordion
Based on your Admin Role and credentials, the Configuration accordion contains some or all of the following nodes, which represent the common global configuration properties that apply to all Oracle Privileged Account Manager servers in a cluster:
-
Server Connection: Select to configure a connection to the Oracle Privileged Account Manager server.
Note:
Refer to Section 5.2.2, "Configuring a Connection to the Oracle Privileged Account Manager Server" for more information. -
Server Configuration: Select to manage the following server properties:
-
Usage Policy enforcement interval
-
Password Policy enforcement interval
-
Target connection timeout
-
Resource lock wait timeout
-
Oracle Database TDE Mode (Transparent Data Encryption)
-
User's password retrieval options
-
Identity Store search filter
Note:
Refer to Section 5.2.3, "Managing Oracle Privileged Account Manager Server Properties" for more information. -
-
Plug-in Configuration: Select to create, edit, and manage plug-in configurations for Oracle Privileged Account Manager.
Note:
Refer to Chapter 13, "Working with Plug-Ins" for more information. -
Session Manager Configuration: Select to configure the Session Manager properties, configure Oracle Privileged Account Manager server URLs, and SSH configuration.
Note:
Refer to Section 5.3.3, "Managing the Oracle Privileged Session Manager Properties" for more information. -
Connector Server Configuration: Select to create, edit, and manage Connector Server properties.
Note:
Refer to Section 5.4.3.1, "Managing a Connector Server Configuration" for more information.
4.3.5 Working with the Search Portlet
Use Oracle Privileged Account Manager's Search portlet to search for accounts, targets, policies, users, groups, and plug-ins.
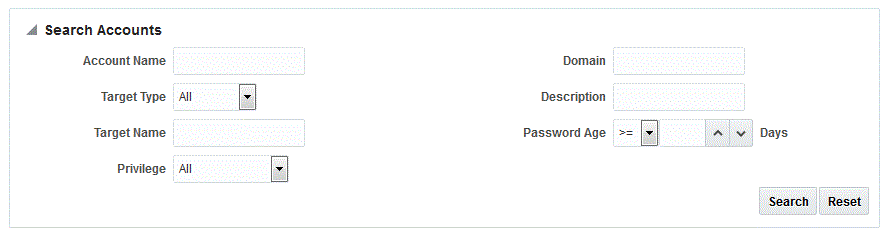
You configure searches by using one or more of the parameters displayed in the portlet. The availability of different search parameters depends on the type of search you are going to perform. For example, Figure 4-3 shows the Search Accounts portlet that you use to search for privileged accounts.
The following table describes the different search parameters and for which search types they are available:
Table 4-1 Search Portlet Parameters
| Parameter Name | Description | Search Type |
|---|---|---|
|
Account Name |
Enter one or more letters of the account name. |
Accounts, My Accounts, Checkout History |
|
Target Type |
Select All to search all target types or limit the search to only, database, ldap, lockbox, sapum, sapume, ssh, windows, or unix target types. |
Accounts, My Accounts |
|
Target Name |
Enter one or more letters of the target name. |
Accounts, My Accounts, Checkout History |
|
Domain |
Enter one or more letters of the domain name. |
Accounts, My Accounts, Targets |
|
Description |
Enter one or more letters of the account, target, resource group, or plug-in description. |
Accounts, My Accounts, Resource Groups, Plug-in Configuration |
|
Password Age |
Use the menu and Days field to search for accounts by password age. Choose the greater than, equal symbol (>=) or the less than symbol (<) from the menu, and enter the number of days. For example, you can use this option to search for accounts with passwords that are older than 30 days. |
Accounts, Targets |
|
Host |
Enter one or more letters of the host name on which to search. |
Targets |
|
Policy Name |
Enter one or more letters of the policy name. |
Password Policies, Usage Policies |
|
Policy Status |
Select All to search all policies or limit the search to only Active or only Disabled policies. |
Password Policies, Usage Policies |
|
User Name |
Enter one or more letters of the user name. |
User Grantees, Checkout History |
|
Group Name |
Enter one or more letters of the group name. |
Group Grantees |
|
Start Date and End Date |
Use the Calendar/Time icon to specify a date range and time in which to search. |
Checkout History |
|
Enter one or more characters of a string in the recording of a checkout event. For example, |
Checkout History |
|
|
Query Size |
Use the counter to limit how many query results are returned. |
Checkout History |
|
Name |
Enter one or more letters of a resource group or plug-in name. |
Resource Groups, Plug-in Configuration, Targets |
|
Privilege |
Select All to search all privileges or select the desired privilege from the drop-down list to limit the search to only the selected privilege. |
Accounts, Targets, Resource Groups |
|
Type |
Select All to search all target types or select the desired target type from the drop-down list to select only database, only ldap, or any specific target type. |
Targets |
|
Resource Type |
Select All to search all resource types or limit the search to only account, only server, or only target resource types. |
Plug-in Configuration |
|
Status |
Select All to search all plug-in statuses or limit the search to only Active or only Disabled plug-ins. |
Plug-in Configuration |
|
Timing |
Select All to search all plug-in timings or limit the search to only pre timing plug-ins or only post timing plug-ins. |
Plug-in Configuration |
|
Operation |
Select All to search all plug-in operations or limit the search to only accountpasswordchange, add, autocheckin, checkin, checkout, passwordcycle, remove, resetpassword, retrieve, sessioncheckout, showpassword, showpassordhistory, test, or update operations. |
Plug-in Configuration |
The Search Portlet also supports the use of wildcards, as follows:
-
Use the percentage symbol (
%) to search for character strings of any length. You can also use multiple wildcards in the same search string. For example,-
If you enter
person%, then the results might includeperson1,person_2, andperson1234. -
If you enter
%person%, then the results might includedsperson,hrperson1, andhrperson2.
-
-
Use an underscore symbol (
_) to search for a single character. You can also use multiple wildcards in the same search string. For example,-
If you enter
person_, then the results might includeperson1,person2, andpersons. -
If you enter
o_m_, then the results might includeoam1,oem1,oem2,oem3, andoim1.
-
The general steps for performing a search are as follows:
-
Select the appropriate node in the Home, Administration, Reports, or Configuration accordion.
For example, to search for an account, select Accounts.
-
When the Search portlet is displayed, configure a search as follows:
-
To search for all available results, such as all accounts, do not specify any search parameters in the portlet.
-
To refine your search, use one or more of the search parameters described in Table 4-1.
For example, to see a list of the privileged accounts on a particular LDAP target, enter one or more letters of the target's name in the Target Name field and select ldap from Target Type menu.
-
-
Click Search.
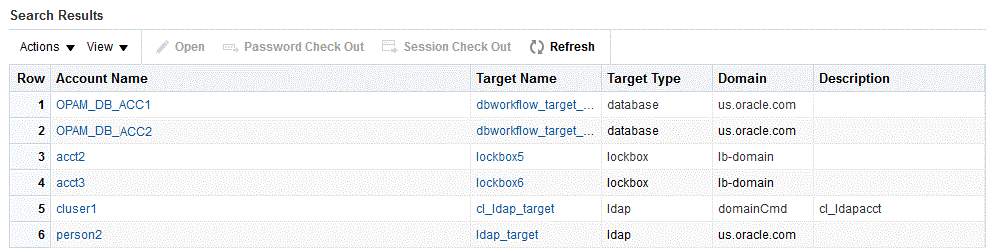
The results are displayed in a Search Results table, similar to the one shown in Figure 4-4.
Note:
You can use the View menu, located above the Search Results table, to manage how the search results are displayed in the table. Refer to Table 4-2 in Section 4.3.6, "Working with a Search Results Table" for more information. -
To perform another search, click Reset.
4.3.6 Working with a Search Results Table
Every Search Results table has menus and icons located along the top of the table. For example, Figure 4-5 shows the menus and icons that are available after searching for targets.

You can use these features to perform different tasks that relate to the items listed in the table.
Note:
The availability of these features will change, based on what type of search was performed and on your Admin Role or administrative privileges.-
Refer to Section 2.3.1, "Administration Role Types" for information about Admin Roles.
-
Refer to Section 12.3.1, "Understanding Delegation" for information about delegated administrative privileges.
Table 4-2 describes which features are available based on the type of search performed.
Table 4-2 Search Results Table Features
| Feature Name | Search Type | Description |
|---|---|---|
|
Actions |
All |
Click this menu and select an action to perform. Note: The options on this menu duplicate the task icons displayed above the table. |
|
View |
All |
Click this menu and select one of the following options to control how columns are displayed in the Search Results table:
|
|
Open |
All |
Click this option to open the selected account, target, policy, user grantee, group grantee, or plug-in configuration. |
|
Password Check Out |
My Accounts |
Select a row in the Search Results table and click this option to check out the account's password. |
|
Session Check Out |
My Accounts |
Select a row in the Search Results table and click this option to check out a session. |
|
Refresh |
My Accounts, My Checkouts, Accounts, Targets, Checkout History, Resource Groups, Plug-in Configuration, Connector Server Configuration |
Click this option to re-display (refresh) the Search Results. |
|
Check In |
My Checkouts only |
Click this option to check in the selected checked-out account. Refer to Section 9.6, "Checking In Privileged Accounts" for more information. |
|
Show Password |
My Checkouts, Accounts, Targets |
Click this option to open the Show Current Password dialog box where you can view the current password information about a selected account or target service target.
|
|
Password History |
Accounts, Targets |
Click this option to open the Show Password History dialog box where you can view the password history for an account or a target.
|
|
Status |
Accounts only |
Click this menu and select one of the following options to limit which account results are displayed in the table:
|
|
Add |
Accounts, Targets |
Click this option to add a new account or a new target to the Oracle Privileged Account Manager repository. |
|
Remove |
Accounts, Targets |
Click this option to remove the selected account or target from the Oracle Privileged Account Manager repository. |
|
Reset Password |
Accounts, Targets |
Click this option to open the Reset Password dialog box where you can manually reset the password for a selected account or target service account.
|
|
Force Check In |
Accounts only |
Click this option to check in privileged accounts that have been checked-out by other users. |
|
Create |
Password Policies, Usage Policies, Connector Server Configuration |
Click this option to create a Password Policy, Usage Policy or Connector Server Configuration. Refer Section 10.2.4, "Creating a Password Policy" for more information. Refer Section 10.3.5, "Creating a Usage Policy" for more information. Refer Section 5.4.1, "Installing and Configuring a Connector Server" for more information. |
|
Delete |
Resource Groups, Password Policies, Usage Policies, Plug-in Configuration, Connector Server Configuration |
Click this option to delete a selected policy from the Oracle Privileged Account Manager repository. |
|
Create |
Resource Groups, Plug-in Configuration |
Click this option to create a plug-in configuration. Refer to Section 13.3, "Creating a Plug-In Configuration" for more information. |
|
Recording |
Checkout History |
Click this option to view a recording, in transcript format, of the actions taken during an account checkout. |
|
Query By Example |
Resource Groups, checkout History, Plug-in Configuration, Connector Server Configuration |
Enter a value in a text field for a column. For example, to refine the search by name enter a value in the Name column. |