
|
|
|
Task Assignment
When the ROOMS MANAGEMENT > TASK ASSIGNMENT application function is set to Y, the Task Assignment menu option is visible and allows you to generate daily Task Assignment reports for one or more Housekeeping employees. The report includes information on assigned rooms, detailed task instructions, and employee identification. Manual changes to the room distribution can be made should they be necessary before printing the assigned Task Sheets. This report can then be distributed in hard copy to the individual employees on a daily basis.
Note: For a simplified version of the Task Assignment feature, set the ROOMS MANAGEMENT > TASK ASSIGNMENT application function to N, and set the ROOMS MANAGEMENT > SIMPLE TASK ASSIGNMENT application function is set to Y. The Expanded button from the Housekeeping screen allows you to automatically generate daily task Task Assignment sheets by number of attendants, by facility tasks, or by maximum number of credits. Rooms are listed in numerical order on each separate Task Sheet. This is driven by the room status and FO status filters. See Housekeeping Management for details.
Use the Housekeeping Task Assignment process to generate Task Sheets for an individual attendant, a group of attendants, or all available attendants on a daily basis. The sheets may be generated automatically in which case the rooms may be evenly distributed to the available attendants or distributed based on a maximum number of credits per attendant. Alternatively, new Task Assignment sheets can be created manually by selecting attendants and individual rooms.
Select Rooms Management > Housekeeping > Task Assignment. The Task Assignment Overview screen appears.
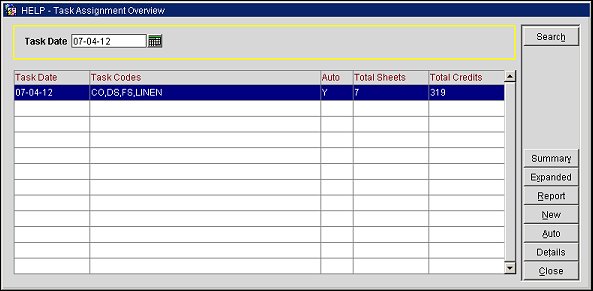
This screen displays all of the existing Task Assignments for the current business date.
Task Date. Populated with the current business date by default, manually enter, or select the Calendar button to choose, the date to see the Task Assignment Overview for.
Task Date. Date assigned for the task.
Task Codes. Task codes included in this Task Sheet.
Auto. Displays a Y if the Task Assignment was automatically generated or an N if the Task Assignment was created manually.
Total Sheets. Total number of Task Sheets included with his Task Assignment.
Total Credits. Total number of credits that the Task Assignment is worth.
Summary. Available when the ROOMS MANAGEMENT > FACILITY MANAGEMENT or ROOMS MANAGEMENT > TASK ASSIGNMENT application functions are active, the application setting for ROOMS MANAGEMENT > ADDITIONAL TASK ASSIGNMENT is set to NSR and/or DND and an Auto Generation of tasks has been generated, select to access the Task Assignment Summary report.
Expanded. Highlight a Task Sheet entry and select this button to display the Housekeeping Task Sheet Grid. (The Expanded button is available when task codes are defined in the Task Codes search field.)
Report. To print a Task Assignment sheet, select this button. The Task Sheet Report screen appears. For those properties with the ROOMS MANAGEMENT > SIMPLE TASK ASSIGNMENT application function is set to Y, the Report button is on the Expanded Task Assignment Overview screen.
New. To create a new Task Sheet manually, select this button. See Creating Tasks Sheets Manually for details.
Auto. The Automatic Generation of Tasks screen is displayed when you select the Auto button. See Creating Task Sheets Automatically for details.
Complete. Highlight a Task Sheet entry and select this button to mark it as completed.
Details. Highlight a Task Sheet entry and select the Details button to display the Task Assignment Sheet Details.
Delete. Highlight the Task Sheet and select this button to delete the Task Sheet. A prompt is displayed for confirmation. Select No to cancel the deletion or select Yes to continue with the deletion. When Yes is selected, a reason for the deletion will need to be specified for the following prompt.
Save. Select to save any changes that were made.
Close. Select to close the screen. If changes were made and not saved, then a prompt is displayed to save the changes or not.
See Also