Using the Communication Generation Process
This section provides overviews of the Communication Generation (Comm Gen) process and the sample templates, lists prerequisites, and discusses how to:
Enter selection parameters.
Enter process parameters.
Enter email parameters.
Enter checklist parameters.
Important! Mass Change is a deprecated product. Support will be maintained for this product, but no new development will be produced for Mass Change. It is strongly recommended that you use Application Engine instead. For more information on PeopleSoft Application Engine, see PeopleTools: Application Engine.
The Communication Generation process (SCC_COMMGEN) is an application engine process that enables you to select specific fields from which to extract critical data for a letter code assigned to individual and organization IDs for whom you want to generate the communication. If your institution sets up and supports multiple languages and multiple methods for communications, you can generate communications for individuals in the language and method preferred by each recipient ID.
For communicating with organizations, the Communication Generation process enables you to select multiple contacts of multiple types as recipients of the communication for an organization. You can use contact names or organization departments and locations or any combination thereof.
Note: The preferred communication language and method features apply only to person communications. You cannot set preferences for recipients of organization communications.
The Communication Generation process supports enclosures, joint communications, communication recipients, checklist extract and status update, usages (names, address and salutation), print communication comment, and so on. Oracle BI Publisher is a PeopleTools feature that enables you to manage and merge communication templates and data source files for the Communication Generation process to generate letters or emails. The process uses standard letter codes from the Standard Letter Table page in PeopleSoft Campus Community.
Note: Both the Letter Generation and the Communication Generation processes use the letter codes set in the Standard Letter Table CS component. The only difference is that you must set up some additional aspects of a letter code specifically for the Communication Generation process. The Letter Generation uses the same letter codes, but ignores the Communication Generation-specific settings.
To use the Communication Generation process, you must first assign a communication record for the desired letter code to the intended recipients. For joint communications, you should assign the communication to only one of the individuals. If you assign it to both, the Communication Generation process extracts the data for both IDs and generates two joint communications for the same two people. The record must include the appropriate administrative function, communication category, and communication context and the direction of Outgoing.
You can assign communications to individuals or organizations manually, or you can use the 3C engine to assign them using the Population Selection process, the Trigger Event process, or the Mass Change process.
The Communication Generation extract process uses an Oracle BI Publisher data source for merging data from your system into templates. The PeopleSoft system provides samples of Oracle BI Publisher templates for the Communication Generation process. Templates are objects stored in the PeopleSoft database that are associated with report definitions starting with QA_CS and have a data source type of XMLDoc Object. You can use the sample templates as delivered, modify them unless otherwise indicated, or create your own templates. The sample report definition and template names begin with QA_CS, but you can rename them.
See PeopleTools: BI Publisher for PeopleSoft.
This table lists the letter codes and corresponding report definitions.
|
Letter Code |
Description |
Report Definitions |
|---|---|---|
|
CG |
Communication Generation Test |
QA_CSCGREPO QA_CSXTRADMA |
|
CG1 |
Comm Generation Org Test 1 |
QA_CSCG1REPO QA_CSXTRAVIN |
|
CG2 |
Comm Generation Org Test 2 |
QA_CSCG2REPO QA_CSXTRAVIN |
|
CGO |
Comm Generation Org Test |
QA_CSCGOREPO QA_CSXTRAVIN |
|
F01 |
Frosh Application Acknlgment |
QA_CSF01REPO QA_CSXTRADMA |
|
F02 |
Frosh Missing Requirements |
QA_CSF02REPO QA_CSXTRADMA |
|
REC |
Admit Recipient |
QA_CSRECREPO QA_CSXTRADMA |
|
RM1* |
Reminder Letter - 1st Request |
QA_CS_SF_RMD |
|
RM2* |
Reminder Letter - 2nd Request |
QA_CS_SF_RMD |
|
RM3* |
Reminder Letter - 3rd Request |
QA_CS_SF_RMD |
|
XT1 |
Extract Enclosure 1 |
QA_CSXTRGEN |
|
XTR |
Extract Data testing - CommGen |
QA_CSXTRGEN |
*Before modifying these letter codes, consult your student financials department or system administrator. Modifications to these could cause failure of processes that depend on them.
Before identifying data to extract into a template, design your Campus Community structure, including names and address usages. Before specifying checklist items data to extract, set up checklists and tracking groups. Before running the Communication Generation process to generate and print letters, configure your printer for printing PDF format, and before running the process to generate and send emails, set your Process Scheduler SMTP settings.
See:
PeopleTools: Process Scheduler, "Managing PeopleSoft Process Scheduler, Using PSADMIN with PeopleSoft Process Scheduler.”
PeopleTools: BI Publisher for PeopleSoft
|
Page Name |
Definition Name |
Navigation |
Usage |
|---|---|---|---|
|
Selection Parameters |
SCC_CG_RUNCTL1 |
|
Specify general parameters for extracting letter data, including the recipient IDs for which data is to be extracted, the letter code, and report name. Also define the language and the method for the Communication Generation process to use to generate a specific letter or email. |
|
Process Parameters |
SCC_CG_RUNCTL2 |
|
Specify usages and dates for the Communication Generation process to use, identify how the process is to handle missing critical data, and specify where the process is to place and sort the output when generating a specific letter or email. |
|
Email Parameters |
SCC_CG_RUNCTL_EMAL |
|
Enter email data for the Communication Generation process to use when generating an email. |
|
Checklist Parameters |
SCC_COMM_CHKLST |
|
Specify any checklist items to extract and use in a letter or an email. |
Access the Selection Parameters page ().
Image: Selection Parameters page (1 of 2)
This example illustrates the fields and controls on the Selection Parameters page (1 of 2). You can find definitions for the fields and controls later on this page.
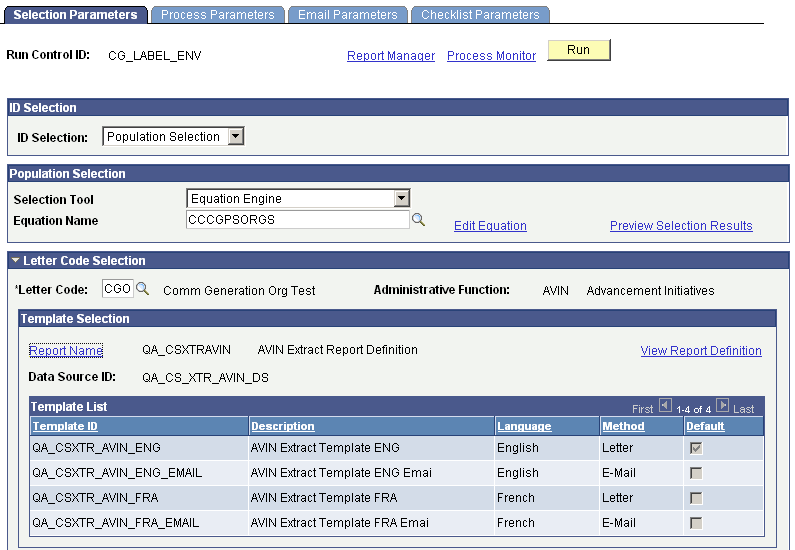
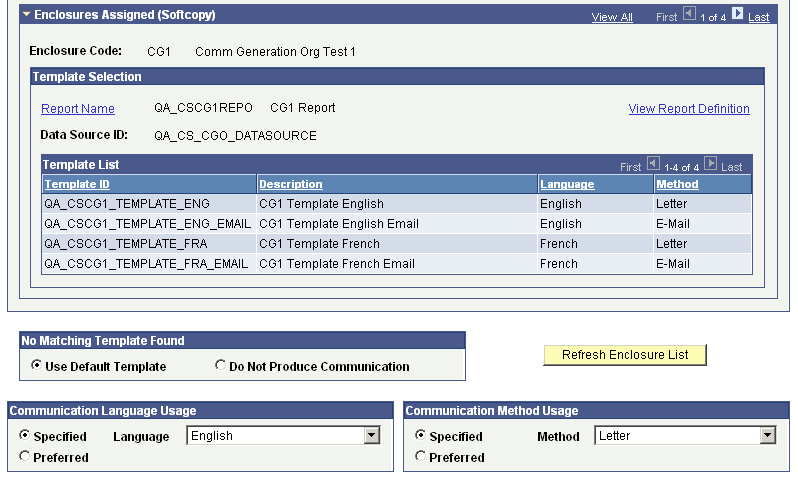
Image: Selection Parameters page (2 of 2)
This example illustrates the fields and controls on the Selection Parameters page (2 of 2). You can find definitions for the fields and controls later on this page.
ID Selection
|
Field or Control |
Definition |
|---|---|
| ID Selection |
Select the type of IDs to process: All IDs, All Person IDs, One Person ID, All Org IDs, One Org ID or Population Selection. These are translate values and should not be modified. Note: When the Population Selection value is selected, the IDs selected will be processed only if they have a communication assigned to them using the specified letter code, are within the communication date range, and are not yet completed. To assure that selected IDs have the desired letter code assigned, consider using the same population selection tool (same PS Query name, Equation Engine equation, or external file) inside the 3C Engine process to assign the desired letter code communication to the IDs. |
| Person ID |
Available only when the ID Selection is One Person ID. You must enter the specific person ID to process here. |
| Organization ID |
Available only when the ID Selection is One Org ID. You must enter the specific organization ID to process here. |
Population Selection
This group box appears only when the ID Selection of Population Selection is selected.
Population selection is a method for selecting the IDs to process for a specific transaction. The Population Selection group box is a standard group box that appears on run control pages when the Population Selection process is available or required for the transaction. Selection tools are available based on the selection tools that your institution selected in the setup of the Population Selection process for the application process and on your user security. Fields in the group box appear based on the selection tool that you select. The fields behave the same way from within the group box on all run control pages and application processes
If your institution uses a specific selection tool (PS Query, Equation Engine equation, or external file) to identify IDs for a Communication Generation transaction, you must use it.
The PeopleSoft system delivers predefined sample queries to enable you to select person IDs, organization IDs, or both. The predefined queries are:
QA_CS_CC_PS_COMMGEN - Population Selection and CommGen for PER.
QA_CS_CC_PS_COMGEN_ORG - Population Selection and CommGen for ORG.
QA_CS_CC_PS_COMMGEN_BOTH - Population Selection and CommGen for P+O.
The PeopleSoft system also delivers predefined sample equations to enable you to select person IDs, organization IDs, or both. The predefined equations are:
CCCBPSPERS - Person only.
CCCBPSORGS - Organizations only.
CCCGPSBOTH - Person and organizations.
Letter Code Selection
|
Field or Control |
Definition |
|---|---|
| Letter Code |
Enter the letter code to use. Only letter codes set up for the Communication Generation process and that are currently assigned to the specified IDs are available. For example, if you select All Person IDs and the FAN letter code is not assigned to any ID, the FAN letter code is not available. Note: If you select the ID Selection of Population Selection or All IDs, all letter codes enabled for the Communication Generation process are available. This is because the IDs to select are still unknown at this point |
| Administrative Function |
Displays the administrative function associated with the letter code. |
| Report Name,Data Source ID, and Template List |
Only the reports to which the report definition gives you security access, are available. If the letter code is associated with only one report, the system displays the report name, the data source file, and a list of the templates associated with that report. If the letter code is associated with more than one report, click Report Name to select the additional reports to use. When you select a report, the system displays the list of templates associated with that report along with the language and method for which the template is created. The Template List group box shows which template the system will use as a default template if there is no specified template. Note: An error message appears if two or more template IDs have the same combination of language and method inside one report definition. The combination of method and language must be unique for the Communication Generation process to know which template to use for each ID generated. See Creating a Template. See PeopleTools: BI Publisher for PeopleSoft. |
| View Report Definition |
Click to open a new browser window displaying the Report Definition search page. In the new browser window, enter the report name or other information about the definition that you want to view and click Search to access the Report Definition component for the report. View the definition to confirm that it is the definition that you want to make available and to preview the templates. You can make changes to the report definition if you have security access to the page. |
Enclosures Assigned (Softcopy)
|
Field or Control |
Definition |
|---|---|
| Enclosure Code,Data Source ID, and Template List |
If the letter code includes softcopy enclosures for the IDs, the system displays each enclosure code and its relevant information. Enter the report name to use for each enclosure. If no softcopy enclosures are included, the system collapses the group box. Note: If you select the ID Selection of Population Selection, you must select a report definition for all the enclosure codes that were included in the Person/Org Communication Management component when the letter code was assigned. This is because the IDs to select are still unknown at this point. |
| Refresh Enclosure List |
Click to cause the Enclosures Assigned (Softcopy) section to include all available softcopy enclosures including enclosures that were added to the system since the last refresh of the process run control ID. Refresh the list of enclosures periodically to make sure you are processing the communications appropriately in scheduled runs of the process. Failure to refresh the list could result in producing missing enclosures for some IDs. For example, assume that you schedule a run control ID of AAA to run every night to generate a communication for all IDs that have the letter code ABC assigned. The next day, an administrator assigns letter code ABC to John Smith and includes enclosure XYZ. XYZ is not already included in the Enclosures Assigned (Softcopy) group box for run control AAA. If you don't refresh the list to cause XYZ to be included before the next run, the process will not generate the XYZ letter for John Smith. |
| Report Name, Data Source, and Template List |
These fields behave the same in the Enclosures Assigned (Softcopy) group box as in the Letter Code Selection group box |
No Matching Template Found
|
Field or Control |
Definition |
|---|---|
| Use Default Template or Do Not Produce Communication |
Select an option to specify what to do if the language and method combination to use for an ID is not listed in the template list for the report name selected. Select Use Default Template to use the template set as the default inside the report ID, or select Do Not Produce Communication to not produce the communication for an ID where no template is found. For example, if in the Communication Language Usage section the language to use is Preferred and the preferred language of the ID is Italian but no Italian template is associated with the specified report, do you want the system to use the default template, which in this case is the English Letter template, or do you want the system to skip the communication for that ID? Note: The option that you select applies to the main letter code, not to the enclosures. The process assumes that the report definition contains an enclosure code with at least one language and method combination that is the same as the one set for the main letter code. If the system does not find at least one that is the same, a message appears when you try to save the run control component or when the process runs and encounters the problem. |
Communication Language Usage
Select options in this group box and in the Communication Method Usage box, to identify the template for the Communication Generation process to use.
|
Field or Control |
Definition |
|---|---|
| Specified and Language, or Preferred |
The system selects the Specified option by default and sets the Language field to the base language that was set at installation. You can change the language to use, however, the Template List group box for the main letter code must include a template that uses the language that you specify. If your institution supports language preferences, you can select Preferred to cause the system to evaluate and use the preferred language of each ID if any. When Preferred is selected, the Language field becomes unavailable. If your institution did not set communication preferences to Support multiple languages on the Installation CC page, then the system automatically selects the Specified option and makes both the Specified and Preferredoptions unavailable. You must specify the language to use. |
Communication Method Usage
Select options in this group box and in the Communication Language Usage group box, to identify the template for the Communication Generation process to use.
|
Field or Control |
Definition |
|---|---|
| Specified and Method, or Preferred |
The system selects the Specified option by default and sets the Method field to Letter. You can change the specified method, however the Template List group box for the main letter code must include a template that uses the method that you specify. If your institution supports method preferences, you can select Preferred to cause the system to evaluate and use the preferred method of each ID. When Preferred is selected, the Method field is unavailable. If your institution did not set communication preferences to Support multiple methods on the Installation CC page, then the system automatically selects the Specified option and makes both the Specified and Preferredoptions unavailable. You must specify the method to use. |
Access the Process Parameters page ().
Image: Process Parameters page
This example illustrates the fields and controls on the Process Parameters page. You can find definitions for the fields and controls later on this page.
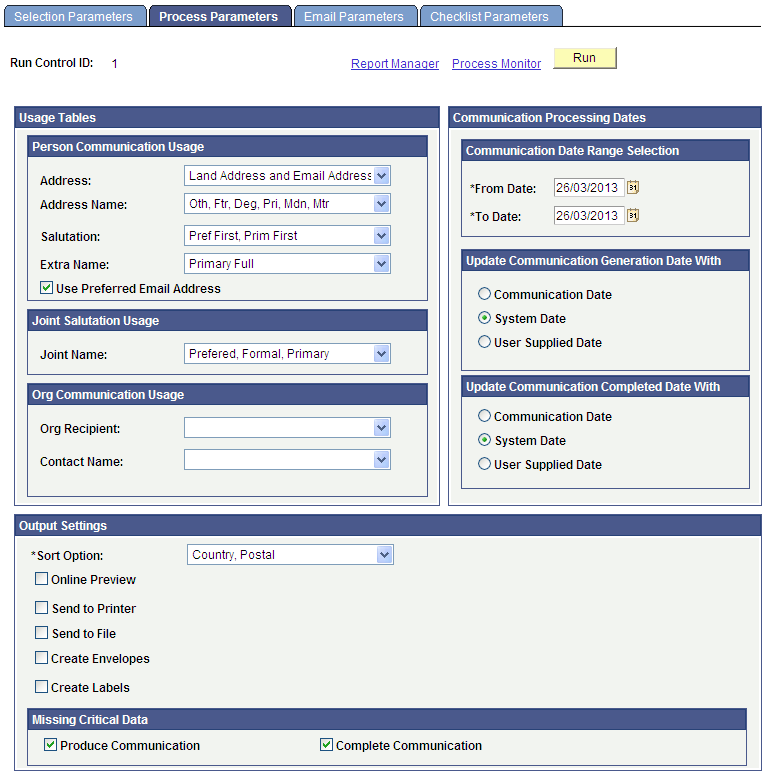
Person Communication Usage
Fields in this group box are available for input only if the ID Selection field on the Selection Parameters page is set to All IDs, All Person IDs, One Person ID, or Population Selection.
If the field is available, you must enter the usage to use for searching for data for that field.
|
Field or Control |
Definition |
|---|---|
| Address |
Enter the type of address, from the Address Usage page, to extract for this communication. You can list address types in a preferred search-and-use order. For example, if you list an address usage that contains mailing, billing, and home address types, the system searches for the mailing address first; if none exists, then for the billing address; if none exists, for the home address last. Warning! If the Communication Generation process encounters IDs that are set to receive an email but the address usage does not include email types, the process cannot send the email and therefore will not generate the communication for those IDs. When the method selected on the Selection Parameters page is Email or Preferred, then the address usage must include email types or a combination of address types and email types; at least one template for the main letter code must be for emails. |
| Address Name |
Enter the type of name, from the Name Usage page, to extract for the address section of this letter. As with addresses, you can list address name types in a preferred search-and-use order. |
| Salutation |
Enter the type of name, from the Name Usage Table page, that the system should extract for use in the opening or salutation of this communication. For example, you might want to use the individual's primary full name in the address section of the letter, but use his preferred first name in the salutation (Dear Dave). As with addresses, you can list salutation name types in a preferred search-and-use order. |
| Extra Name |
The extra name is an additional way to extract name data using the name usage. For example, you might want to use the individual's primary full name in the address section of the letter (Mr. Juan M. Dominguez), his preferred first name in the salutation (Dear Juan), and his last name in the text to say "We are sure the Dominguez family will enjoy participating in this event." As with addresses, you can list ID name types in a preferred search-and-use order. |
| Use Preferred Email Address |
Select this check box to use the preferred email address (as indicated on the Electronic Addresses page) for this communication. |
Joint Salutation Usage
The Joint Name field is available for input only if the ID Selection field on the Selection Parameters page is set to All IDs, All Person IDs, One Person ID, or Population Selection, and only if the letter code is set to permit joint communications. The available Joint Name values are applicable values from the Name Usage Table.
If the field is available, you must enter the name type to use in the salutation for joint communications.
Org Communication Usage
Fields in this group box are available for input only if the ID Selection field on the Selection Parameters page is set to All IDs, All Org IDs,One Org ID, or Population Selection.
If the field is available, you must enter the usage to use for searching for data for that field.
|
Field or Control |
Definition |
|---|---|
| Org Recipient |
Enter the usage for the process to evaluate. The process evaluates this usage to find and retrieve the recipients to use for the organization communication. |
| Contact Name |
Enter the usage for the process to evaluate. The process evaluates this usage to find and the name type to use in the output for each organization recipient contact. |
Communication Date Range Selection
Enter the date range of the communication records from which to extract data. For example, you might want to extract data only from IDs to which you assigned a specific letter code and set the communication date to between January 1 and March 1 of the current year.
The From and To date ranges are inclusive of the dates that you enter.
Update Communication Generation Date With
Select the date to use as the date when the communication is generated. When the Communication Generation process finishes, it enters this date in the Communication Generation Datefield in the Communication Management component for persons or organizations as appropriate.
|
Field or Control |
Definition |
|---|---|
| Communication Date |
Select to use the communication assignment date from the Person Communication page for individuals or the Organization Communication page for organizations, to use as the date of generation. |
| System Date |
Select to extract the current system date to use as the date of generation. |
| User Supplied Date |
Select to use the specified date as the date of generation. You must supply the desired date. |
Update Communication Completed Date With
Select the date for the system to use as the communication completed date on the communication record.
|
Field or Control |
Definition |
|---|---|
| Communication Date |
Select to use the date when the communication was assigned as the communication completed date. |
| System Date |
Select to use the current system date as the communication completed date. |
| User Supplied Date |
Select to use the specified date as the communication completed date. You must supply the desired date. |
Output Settings
Specify how to sort the generated outputs. You can choose to preview a sample of the outputs before running the process, or if the communication is a letter, you can choose to send the output directly to the printer for printing.
Warning! If you do not select either Preview Online or Send to Printer, when the process runs it generates the communication. If, in the Standard Letter Table CS component, Letter Printed Data is set to either Name/Address Only or All for the letter code, then the process saves the data indicated and inserts the View Generated Communication link in the Person or Organization Communication Management components. You must manually navigate to the Communication Management component for each of the processed IDs to view or print the final outputs individually. If the Letter Printed Data is set to None for the letter code, the process generates the communications, but does not save data or make the output retrievable. If the communication is an email, the process sends the email to the specified IDs.
|
Field or Control |
Definition |
|---|---|
| Sort Option |
Enter how to sort the generated outputs. Available options are: All Alphabetically by ID Type to sort first, organization communications sorted alphabetically by the first letter of each recipient's name, contact, department, or location name depending on how the output is addressed, and then individual communications alphabetically by each recipient's last name/first name. Country, Postal (default value) to sort by each recipient's postal or zip code. Use this sort option to streamline mass mailings sent through the postal service. Country, Postal by ID Type to sort first, organization communications by each recipient's country and postal address, and then individual communications by each recipient's country and postal address. |
| Online Preview |
Select to preview the output online in PeopleSoft Report Manager. When selected, the system sends a sample of all related outputs to PeopleSoft Report Manager with corresponding links for you to click to preview each output. For example, if an ID has two enclosures and three communication recipients, Report Manager displays a total of 12 document links labeled with the report definition name for each letter code and the name of each recipient. One document link is for the main letter code output and two links are for the enclosures associated with the main ID. The same links appear for each of the three recipients. Note: Previews do not cause communications to be marked Completed and no information is entered in the Person or Organization Communication Management components for the communication. When generating communications for multiple IDs, the online preview functionality extracts data for previews of only the first 10 IDs and their enclosures and recipients. |
| Email Address |
If the communication method usage is either Email or Preferred on the Selection Parameters page and the Online Preview check box is selected, then the Email Address field appears. Enter an email address whose inbox you can access to see how the emails will be sent. When you provide an email address for online previewing, the generated outputs do not appear in the PeopleSoft Report Manager. Continuing with the example from the Online Preview field, the email address that you enter will receive four different emails: one for the main ID and one for each of the three recipients. The enclosures will be attachments to the emails. If an email is missing for a specific recipient, it is probably because no email address exists in the Related ID (or Name) field in the Relationships component. Note: The Communication Generation process uses the main letter code template as the body of the email text. To do so, the process automatically converts the format of the main letter template to HTM format. Enclosures, if assigned, are not converted. The process includes them as attachments using the default output format set in the report definition. See Entering Relationship Addresses. See PeopleTools: Process Scheduler, "Using Report Manager." |
| Send to Printer and Destination Printer |
If the communication method usage is either Letter or Preferred on the Selection Parameters page, then the Send to Printer option is available. Select the check box to send letter communications directly to the printer. When selected, the Destination Printer field appears. You must enter the path to the printer. When you are generating letters, you can retrieve the output at the specified printer or by clicking the View Generated Communication link in each processed ID's Person or Organization Communication component (if the letter code is set to save the data to the communication record), or both. Note: If, on the Selection Parameters page, the communication method usage is Email or the Online Preview check box is selected, then the Send to Printer option is unavailable. You cannot send an email to the printer, nor can you send communications set to Online Preview to the printer. See PeopleTools: BI Publisher for PeopleSoft |
| Send to File and File Path |
If the communication method usage is either Letter or Preferred on the Selection Parameters page, then the Send to File option is available. Select the check box to save the generated letter communications as a single file. When selected, the File Path field appears. You must specify the file path to use. When the process runs, it sorts and merges all the final letters into one file and saves it to the file path that you entered. The filename is CommGen_<process instance nbr>.pdf, where <process instance nbr> is the unique process instance number assigned by the Communication Generation process for that run. You can use the file to make last-minute changes to the communications or send to a third-party vendor such as a mailing company. Note: If, on the Selection Parameters page, the communication method usage is Email or the Online Preview check box is selected, then the Send to File option is unavailable. You cannot save an email to a file, nor can you save communications set to Online Preview to a file. When you are generating letters, you can retrieve the output from the file at the destination you specify or by clicking the View Generated Communication link in each processed ID's Person or Organization Communication component (if the letter code is set to save the data to the communication record), or both. Note: The file created is a .pdf file regardless of the format type defined in the report definition associated with the letter code. See PeopleTools: BI Publisher for PeopleSoft. |
| Create Envelopes, Create Labels and Report Name |
If the communication method usage is either Letter or Preferred on the Selection Parameters page, then the Create Envelopes and Create Labels options are available. Select the appropriate check box to generate envelopes or address labels for the letter communications. When selected, the Report Name link appears. You must select the report definition for the Communication Generation process to use. The report definition enables the process to retrieve address information from the associated data source to merge into the appropriate envelope or label template. Only the report definitions that are created with a data source configured with the same administrative function used in the main letter code are available. For example, if the main letter code has a data source configured for the ADMA administrative function, then only the report definitions created with a data source set up for administrative function ADMA are available for envelopes and labels. Warning! The Communication Generation process does not re-extract data for envelopes and labels. It reuses the data extracted for the main letter code report definition to merge inside the envelope or label template. This ensures consistency between the address, the salutation information printed on the letter, and the name and address on the envelopes and labels. If you need to extract additional data to include on the envelopes or labels (for example, you might want to print the name of the admissions recruiting center for the ID on the envelope or label), then you must include the data inside the data source of the report definition for the main letter code. If the data is not in the data source for that report definition, it will not be extracted. When the Send to File option is selected and you select Create Envelopes or Create Labels, the process sorts and merges all the address data into one file and saves it to the file path that you entered. The process applies the salutation, address, and sort order specified for the main letter to the corresponding envelopes and labels. The filename for envelopes is CommGenENV_<process instance nbr>.pdf and the filename for labels data is CommGenLBL_<process instance nbr>.pdf, where <process instance nbr> is the unique process instance number assigned by the Communication Generation process for that run. Note: When Send to File is selected, the file format is always .pdf regardless of the format type defined in the Report Definition used for generating the labels or envelopes When the letter code is set to save data to the communication record and the Create Envelopes option is selected, the Communication Generation process saves the respective envelope inside each processed ID's Person or Organization Communication Management component. Click the View Generated Communication link, and then the View Envelope link to view and reprint the envelope if needed. Note: The Create Labels option does not make the generated label available inside the Person or Organization Communication Management component for the IDs processed. Use the Create Envelopes option to recreate the label if needed. |
| Envelope Printer and Label Printer |
If the Send to Printer check box is selected and you select the Create Envelopes or Create Labels options, the Envelope Printer or Label Printer field appears. Enter the path to the printer that is set up to print envelopes or to the printer that is set up to print labels. |
Report Definitions for labels and envelopes must use the same administrative function as the administrative function associated with the main letter code. Consider creating report definitions and data sources for each administrative function that you use. The following table provides an example of delivered elements for labels and envelopes for three sample administrative functions.
|
Admin Function |
Data Source |
Label Template |
Envelope Template |
Label Report Definition |
Envelope Report Definition |
|---|---|---|---|---|---|
|
ADMA |
QA_CS_LBLENV_ADMA |
QA_CS_CC_LABEL.rtf |
QA_CS_CC_ENVELOPE.rtf |
QA_CSLBLADMA |
QA_CSENVADMA |
|
AVIN |
QA_CS_LBLENV_AVIN |
QA_CS_CC_LABEL.rtf |
QA_CS_CC_ENVELOPE.rtf |
QA_CSLBLAVIN |
QA_CSENVAVIN |
|
GEN |
QA_CS_LBLENV_GEN |
QA_CS_CC_LABEL.rtf |
QA_CS_CC_ENVELOPE.rtf |
QA_CSLBLGEN |
QA_CSENVGEN |
See Creating a Data Source File.
See PeopleTools: BI Publisher for PeopleSoft, "Creating Report Templates."
Warning! When generating letters, you must select either Send to File or Send to Printer to ensure the ability to retrieve and view the letter outputs. If you do not select either Send to File or Send to Printer, you must manually navigate to each processed ID's communication component to retrieve and view the output. However, the output is in the communication record only if the assigned letter code is set to save it there.
For emails, the process automatically sends the generated communication to each processed ID. You cannot retrieve and view an email output before sending. You can however, select Send to File or Send to Printer to retrieve and view the email that was sent.
Missing Critical Data
|
Field or Control |
Definition |
|---|---|
| Produce Communication |
Select this check box for the process to produce the communication even if critical data is missing, for example, even if address information or name of the recipient is missing. |
| Complete Communication |
Select this check box for the process to set the status to Complete on the communication record, even if critical data is missing. Critical data is set in the Communication Data Source component. Note: If Email Address for Person for individuals or Organization Recipient Email and URL information for organizations, is not marked as critical data, the process considers the email address to be critical data for generating an email. |
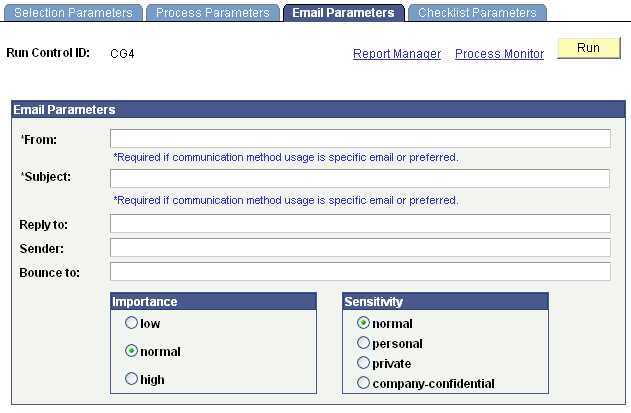
Access the Email Parameters page ().
Image: Email Parameters page
This example illustrates the fields and controls on the Email Parameters page. You can find definitions for the fields and controls later on this page.
|
Field or Control |
Definition |
|---|---|
| From |
Enter the email address of the person or entity that is sending the email. This email address will replace any default email address that your institution's server might use to indicate from whom an email was sent. You can use this for cosmetic appearance. For example, if the Registrar Office sends the email, you might enter Registrar_Office@university.com. The email address may be valid or not. If it is not, your template should include text similar to: This email was sent by an automated system. Do not reply to this email address. This field is required if the communication method usage is Specific Email or Preferred. |
| Subject |
You can enter email subjects for each email template language encountered on the Template Selection group box on the Selection Parameters page. If the Communication Language Usage option is set to Preferred on the Selection Parameters page then the system generates subject fields for each email template language encountered in the Template Selection group box. If zero or one email template is found, or if the Communication Language Usage option is set to Specific, then a single Subject field appears on this page. All Subject fields require a value when the Communication Language Usage option is set to Preferred and the Communication Method Usage option is set to either Preferred or Email Specific. When you click the Run button, the Communication Generation process (SCC_COMMGEN) retrieves the appropriate subject field from the SCC_CG_EML_RCTL table based on the email template language used to generate the communication. |
| Reply to, Sender, and Bounce to |
(Optional) Enter values if your institution's email service uses these fields when sending emails. The Reply to email address must be valid. This is the email address that will appear when the recipient replies to the sender. It overrides the Fromemail address. The Bounce To address is a valid email address set to receive all emails that do not send successfully. |
Importance and Sensitivity
Options that you select in these group boxes appear in the email transmission for the recipient to see.
Access the Checklist Parameters page ().
Image: Checklist Parameters page
This example illustrates the fields and controls on the Checklist Parameters page. You can find definitions for the fields and controls later on this page.
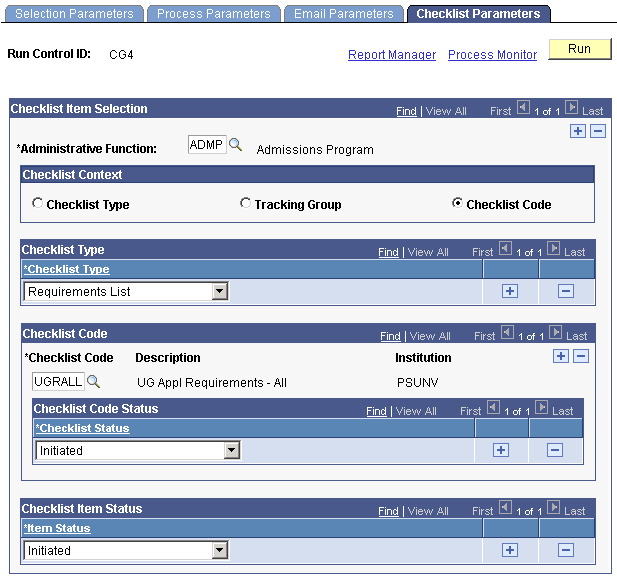
Checklist Item Selection
|
Field or Control |
Definition |
|---|---|
| Administrative Function |
Enter the administrative function associated with the checklists to use. If the checklists that you want to use are associated with different administrative functions, use the add button to enter each administrative function and select the checklists and items associated with that function. |
Checklist Context
|
Field or Control |
Definition |
|---|---|
| Checklist Type, Tracking Group, or Checklist Code |
Select the context by which to select the checklists to extract. The fields on the page change based on the checklist context that you select. |
Checklist Type
This group box appears regardless of which context you select.
|
Field or Control |
Definition |
|---|---|
| Checklist Type |
Enter the types of checklists from which the process should extract data for this letter or email. You can select more than one checklist type for an administrative function. For example if you select Requirement List, the process extracts checklist information for checklist codes set up with that checklist type. |
Checklist Code and Checklist Code Status
This group box appears only if you select a Checklist Context of Checklist Code.
If you select Checklist Code, then you must select a checklist status to use. The process will include only checklist codes with the status that you specify. You can select more than one checklist code for an administrative function and more than one checklist status for each checklist code.
|
Field or Control |
Definition |
|---|---|
| Institution |
Enter the institution related to the desired checklist. Often the same checklist codes are shared by more than one institution, and the system needs to use the correct one. |
| Checklist Code |
Enter the specific checklist codes whose checklist item data should be extracted for this letter or email. You can specify more than one checklist code. |
| Checklist Status |
Select the status of the checklists from which to extract data for this letter or email. You can select either the status of Completed or Initiated, or you can add a row to list both. |
Tracking Group and Tracking Group Status
This group box appears only if you select a Checklist Context of Tracking Group.
If you select Tracking Group, then you must select a group status to use. The process will include checklist items assigned to the tracking group and tracking group status that you specify. You can select more than one tracking group for an administrative function and more than one group status for each tracking group.
|
Field or Control |
Definition |
|---|---|
| Tracking Group |
Enter the tracking group codes whose checklist item data should be extracted for this letter or email. You can enter more than one tracking group for an administrative function. |
| Group Status |
Select the group status from which to extract checklist data for this letter or email. You can select Completed or Initiated, or you can add a row to select both. |
Checklist Item Status
Regardless of the context that you select, you must specify the checklist item status to use. You can select more than one checklist item status for an administrative function.
Available checklist item status values include: Completed, Waived, Notified, Second Notification, and so on.