6 Work with Employee Profile Data
This chapter contains these topics:
Profile data is any type of additional information that you want to track, such as the person to contact for an employee in an emergency situation, or certifications and job skills for employees.
When you set up your Time Accounting system, you specify the types of profile information you want to track for your employees for reporting purposes. It has no effect on time entry.
-
Define your types of profile data and associated user defined codes. See Chapter 42, "Set Up Employee Profile Information."
| Topic | Description |
|---|---|
| Functionality for the Time Accounting system | If you have the Time Accounting system and do not have the Human Resources system, you can track profile data for employees only. |
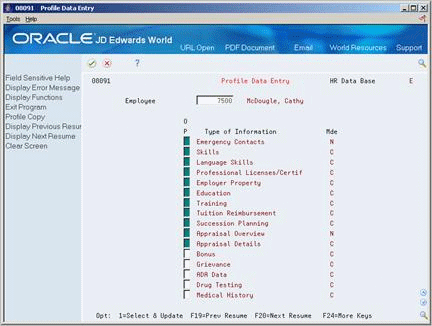
6.1 Entering Profile Data
Profile data is any type of additional information that you want to track. Profile information is not required by the system.
For employees, typical types of profile data might include:
-
Emergency contacts
-
Job skills
-
Foreign language competencies
-
Work history
When you set up your system, you specify the types of profile data (data types) that you want to track. For each data type, you specify the format in which you want to track information. Valid formats include:
-
Narrative
-
Code
For narrative format data types, you enter free-form text. For code format data types, you enter information in predefined columns. When you enter information in code format, you also can associate narrative information with it.
Entering profile data consists of the following tasks:
-
Entering profile data in narrative format
-
Entering profile data in code format
6.1.1 What You Should Know About
| Topic | Description |
|---|---|
| Entering multiple types of information | To save time during data entry, you can choose multiple types of profile data to update. The data types can be all narrative format, all code format, or a combination of these formats. The system displays, in data type sequence, the form for each type of data you chose. When you exit the current form, the system automatically displays the form for the next type of data that you chose, until you complete updating all profile data. |
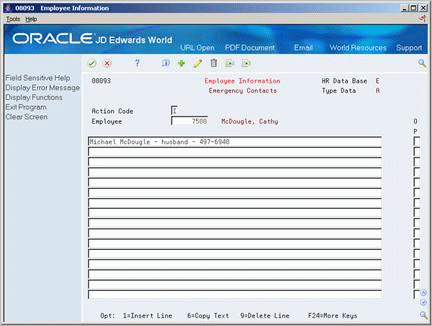
6.1.2 Entering Profile Data in Narrative Format
From Time Accounting System (G05), choose Employee Information
From Employee Information (G0511), choose Profile Data Entry
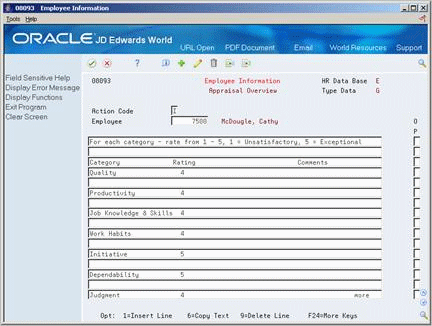
When you enter profile data in narrative format, you enter free-form text. You typically use narrative format for general information that is unique for each employee. For example, you might use narrative format for performance appraisal information.
To enter profile data in narrative format
On Profile Data Entry
-
To locate the employee for whom you want to enter profile data, complete the following field:
-
Employee
-
-
To determine which types of profile data are in narrative format, review the information in the following field:
-
Mode
-
-
Choose the Select and Update option for one or more types of narrative format information and press Enter.
The system displays the form for the first type of data.
-
Enter the appropriate information and press Enter.
-
Choose the Field Exit function to advance to the next type of data you chose.
| Field | Explanation |
|---|---|
| Mde | The format of a data type. This code determines the display mode for supplemental data. Valid codes are:
C – Code format, which displays the form for entering code-specific information. These codes are associated with User Defined Codes table (F0005). N – Narrative format, which displays the form for entering narrative text. P – Program exit, which allows you to exit to the program you specified in the Pgm ID field. M – Message format, which displays the form for entering code-specific information. However, the system can edit the code values you enter against values in the Generic Rates and Messages table (F00191). This code is not used by the Human Resources or Financials systems. |
6.1.3 What You Should Know About
| Topic | Description |
|---|---|
| Deleting narrative format information | To delete an entire form of narrative information, use the Delete action. To delete only some information from a form, use the change action. To delete selected information, choose the Delete Line option. |
| Revising narrative format information | To change selected information, use the Change action. Type over the information or choose the Field Exit function to remove all information from a line. |
| Information display | The system displays any text on the form exactly as you enter it. |
6.1.4 Entering Profile Data in Code Format
From Time Accounting System (G05), choose Employee Information
From Employee Information (G0511), choose Profile Data Entry
When you enter profile data in code format, you enter information in predefined columns. For example, the form for entering job skills information might have columns for skill code, number of years of experience, and proficiency level.
To ensure consistency of data entry, code fields are typically associated with user defined code tables. Any value that you enter in one of these fields must be included in the associated user defined code table. For fields that are associated with a user defined code table, the length of the field and the user defined code description display above the column.
When you enter information in code format, you also can associate narrative information with it.
To enter profile data in code format
On Profile Data Entry
-
To locate the employee for whom you want to enter profile data, complete the following field:
-
Employee
-
-
To determine which types of profile data are in code format, review the information in the following field:
-
Mode
-
-
Choose the Select and Update option for one or more types of code format information.
The system displays the form for the first type of data you choose.
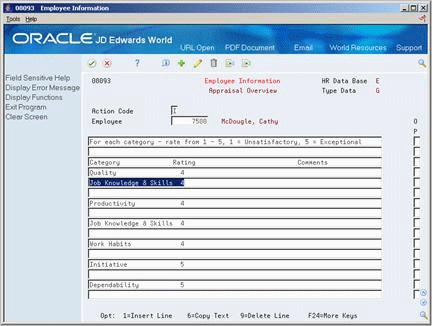
Figure 6-3 Employee Information (Code Format) screen
Description of "Figure 6-3 Employee Information (Code Format) screen"
-
Enter the appropriate code information for each column defined in the code format.
-
To add additional information in narrative format, use the Change action and choose the Narrative Text Option.
-
Enter the narrative text and press Enter twice.
-
Choose the Field Exit function to advance to the next type of data you chose.
6.1.5 What You Should Know About
6.2 Copying Profile Data
When you need to enter the same profile data for two or more employees, you can save time and reduce keying errors by copying information from one employee's record to another employee's record. You can copy all of one employee's profile data to another employee's record.
You can choose specific types of narrative information, including information that is associated with code format information, to copy from one employee's record to another employee's record. For example, if two employees share the same emergency contact information, but do not have any other profile data in common, you can copy only emergency contact information.
After you copy profile data, you can revise it if necessary.
Copying profile data consists of the following tasks:
-
Copying narrative text
-
Copying all profile data for an employee
6.2.1 Copying Narrative Text
From Time Accounting System (G05), choose Employee Information
From Employee Information (G0511), choose Profile Data Entry
When you need to enter the same profile data for two or more employees, you can save time and reduce keying errors by copying information from one employee's record to another employee's record.
You can copy narrative information by data type. For example, if two employees have the same emergency contact, you can enter this information for one of the employees and then copy it into the other employee's record.
You can copy any narrative information that is associated with a code format data type. For example, assume that:
-
A group of employees attended the same training class
-
You track training information in code format
-
You need to enter a description of the class as narrative text
In this case, you do not need to enter the class description for each employee. Instead, you can enter the class description for one employee and then copy it into the training records for all the other employees who attended the class.
On Profile Data Entry
-
To locate the employee for whom you want to copy information, complete the following field:
-
Employee
-
-
Choose the Select and Update option to access the data type into which you want to copy narrative format information.
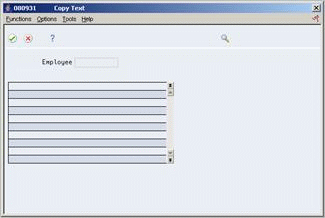
Figure 6-4 Employee Information (Copy Text) screen
Description of "Figure 6-4 Employee Information (Copy Text) screen"
-
For the first non-blank line in the lower portion of the form, choose the Copy Text option.
-
Use the Change action.
-
On Copy Text, complete the following field with the employee number of the employee from whom you want to copy information:
-
Employee
The system lists the types of profile data that contain narrative information for that employee.
-
-
Choose the Select option to specify the data type from which you want to copy information.
The system displays the narrative information for that employee and data type.
-
On the data type form, choose the Select option to specify the lines of text you want to copy.
Caution:
You must select and add lines for each display of the text one form at a time. Otherwise, if the text exceeds one form length and you select specific lines on multiple forms, and then press Enter, the system only adds the lines that are currently displayed.The system copies the text.
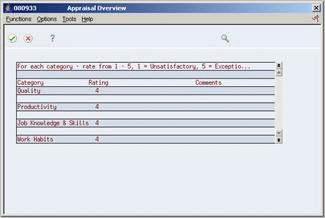
Figure 6-8 Employee Information (Copied Text) screen
Description of "Figure 6-8 Employee Information (Copied Text) screen"
6.2.2 What You Should Know About
| Topic | Description |
|---|---|
| Using the roll keys | You can scroll through the lines of information to locate the lines you want to copy. However, you cannot select text in one form, scroll up, and then select text from another form. You can select to copy text from only one form at a time. |
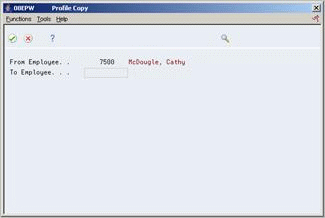
6.2.3 Copying All Profile Data for an Employee
From Time Accounting System (G05), choose Employee Information
From Employee Information (G0511), choose Profile Data Entry
In some cases, you might want to copy all of the profile data for one employee into the record for another employee. You might do this when you need to enter very similar information for two employees. After you copy profile data, you can revise it as necessary.
To copy all profile data for an employee
On Profile Data Entry
-
To locate the employee whose profile data you want to copy, complete the following field:
-
Employee
-
-
On Profile Copy, complete the following field to specify the employee to whom you are copying profile data:
-
To Employee
-
-
Choose the Update function to copy all of the profile data.
The system adds the profile data to the employee's record and redisplays Profile Data Entry with the information of the From Employee.
6.3 Reviewing Profile Data
After you enter profile data, you can review that information to determine whether one or more people meet certain criteria. For example, you might be looking for someone who speaks French, or you might need a list of the employees that have completed CPR training.
You can review complete profile information for a particular employee, or you can review all employees who have information in one or more data types.
Reviewing profile data consists of the following tasks:
-
Reviewing profile data for a specific employee
-
Reviewing profile data by data type
-
Working with multi-skill search
6.3.1 Reviewing Profile Data for a Specific Employee
From Time Accounting System (G05), choose Employee Information
From Employee Information (G0511), choose Profile by Employee
You can review complete information for a specific employee in an easy-to-read, resume-style format.
You can also print employee resumes for internal use.
To review profile data for a specific employee

Complete the following field:
-
Employee
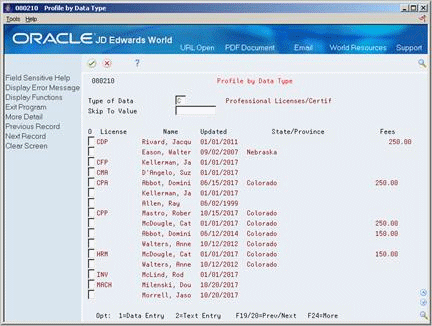
6.3.3 Reviewing Profile Data by Data Type
From Time Accounting System (G05), choose Employee Information
From Employee Information (G0511), choose Profile by Data Type
You can review all employees who have information for a specific data type. For example, you can review training profile information to identify employees who have had management training. Or, you can review professional licenses information to identify which employees need to renew their licenses within the next month.
To review profile data by data type
-
Complete the following field:
-
Type of Data
-
-
To locate a specific value within a list of data types, complete the following field:
-
Skip To Value
-
-
Access More Detail (F4).
Figure 6-12 Profile by Data Type (Detail) screen
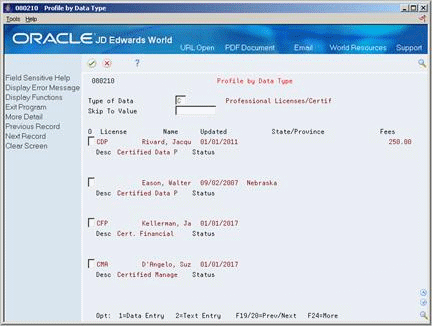
Description of "Figure 6-12 Profile by Data Type (Detail) screen"
6.3.5 Working with Multi-Skill Search
From Time Accounting System (G05), choose Employee Information
From Employee Information (G0511), choose Profile Multiskill Search
You can search your database for employees who meet multiple criteria. You typically use this type of search when you are looking for a person to fill a vacancy within your organization.
For example, you can search for all employees who:
-
Have an MBA degree
-
Speak French
-
Are certified public accountants
When you perform the search, the system lists all the people who meet the multiple criteria. You can enter up to 20 search criteria.
For the Time Accounting system, you can search the Employee database only. For full functionality, the performance depends on the Human Resources system.
To work with multi-skill search
On Profile Multiskill Search
Figure 6-13 Profile Multiskill Search screen
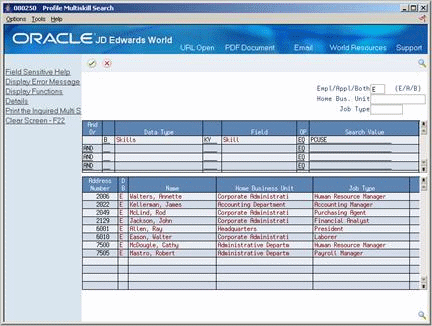
Description of "Figure 6-13 Profile Multiskill Search screen"
-
To choose the database to search, complete the following field:
-
Employee/Applicant/Both
-
-
To limit the search, complete the following optional fields:
-
Home Business Unit
-
Job Type
-
-
To determine the search criteria, complete the following fields:
-
And/Or
-
Data Type
-
Field
-
Operator (OP)
-
Search Value
-
-
Access Details (F4).
Figure 6-14 Profile Multiskill Search (Detail) screen

Description of "Figure 6-14 Profile Multiskill Search (Detail) screen"
| Field | Explanation |
|---|---|
| And Or | A code that designates whether the test parameters or criteria are based on an AND condition or an OR condition.
Form-specific information For example, to identify employees who are either CPAs or who have MBAs, enter the code for professional licenses and certificates in the Data Type field and CPA in the Search Value field. On the second line, enter the code for education in the Data Type field and MBA in the Search Value field. Link the two lines by entering Or in the And/Or field of the second line. As another example, to identify employees who are both CPAs and who have MBAs, enter the code for professional licenses and certificates in the Data Type field and CPA in the Search Value field. On the second line, enter the code for education in the Data Type field and MBA in the Search Value field. Link the two lines by typing And in the And/Or field of the second line. To search for applicants who speak Spanish and German, enter Spanish as the first search value, German as the second search value, then enter And in this field. To search for applicants who speak Spanish or German, enter Spanish as the first search value, German as the second search value, then enter Or in this field. |
| Data Type | The type of data from the profile database that the system uses in a multiple information search. |
| OP | A code the identifies the operands in Boolean logic. You can specify any of the following:
EQ – Equal to LT – Less than LE – Less than or equal to GT – Greater than GE – Greater than or equal to NE – Not equal to NL – Not less than NG – Not greater than |
| Search Value | You must enter a search value based on the data you entered in the profile for the selected field.
This field is case sensitive. For example, assume that you want to search for the word Active. If the data was originally entered into the database as Active, then you must enter the value into the search field as Active. Do not enter ACTIVE or active. You can also use the % wildcard character to search for data starting with, ending with, or containing one or more consecutive characters. For example:
|
6.4 Reviewing Profile Reports
You can run reports to review employee profile information by:
-
Individual employee summary
-
A summary of all your employees and their related profile data
-
Profile data type
Reviewing employee profile reports consists of the following tasks:
-
Reviewing the Employee Profile Data report
-
Reviewing the Employees by Data Type report
-
Reviewing the Employee Profile Workfile
6.4.1 Reviewing the Employee Profile Data Report
From Time Accounting System (G05), choose Employee Information
From Employee Information (G0511), choose Employee and Master Profile Reports
From Employee Master and Profile Reports (G05111), choose Employee Profile
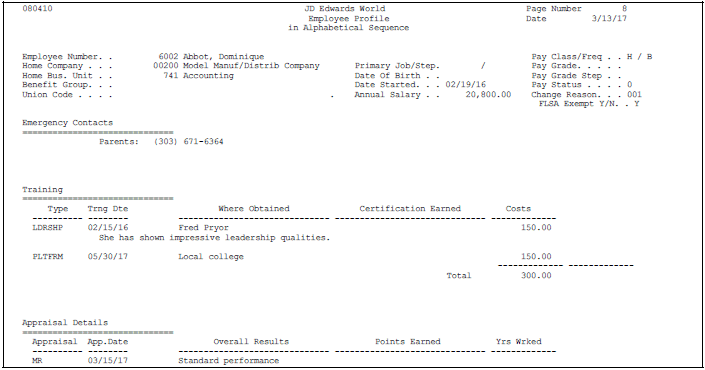
When you need to review complete profile information for one or more employees, print the Employee Profile Data report. This report compiles all of an employee's profile information into a resume-style format.
The information that prints on this report is the same information that you can review online using Profile by Employee. However, the report allows you to print information for multiple employees at one time.
6.4.3 Reviewing the Employees by Data Type Report
From Time Accounting System (G05), choose Employee Information
From Employee Information (G0511), choose Employee and Master Profile Reports
From Employee Master and Profile Reports (G05111), choose Employees by Data Type
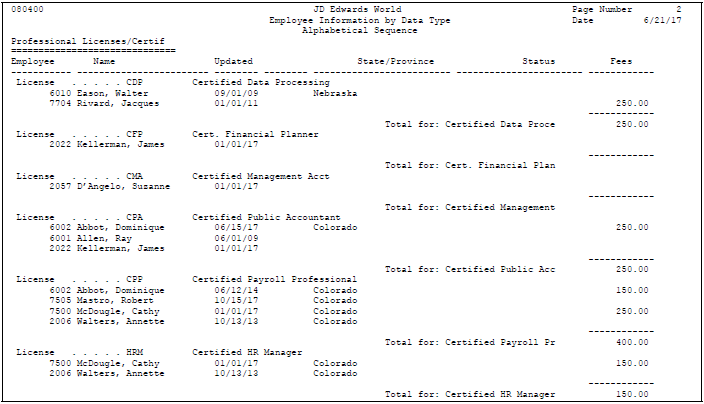
When you need to review a list of all employees for whom you have entered information in a particular profile data type, you can print the Employees by Data Type report. For example, you can review employees whose profile data includes job skills information. The information that prints on this report is the same information that you can review online using Profile Data Entry. You can review information by either data type or by employee.
For each employee, the system lists data types in alphabetical order.
Figure 6-16 Employee Information by Data Type report
Description of "Figure 6-16 Employee Information by Data Type report"
6.4.5 Reviewing the Employee Profile Workfile
From Time Accounting System (G05), choose Employee Information
From Employee Information (G0511), choose Employee and Master Profile Reports
From Employee Master and Profile Reports (G05111), choose Employee Profile Workfile
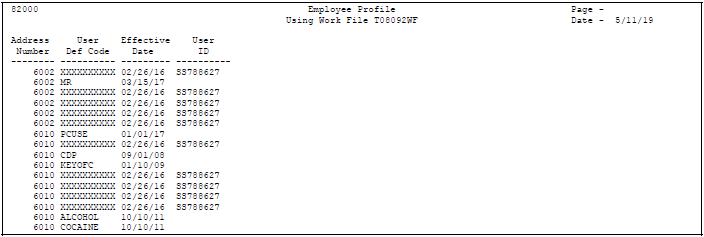
You can print a World Writer report that lists employees by one or more profile data types. For example, a report that lists employees by foreign language proficiency might show that one employee knows French and another knows German. However, this report does not include records for the employees who do not know any foreign languages (and, therefore, have no information entered in the data type for foreign language proficiency). To include these employees on the report, you must build the Employee Profile Workfile (T08092WF) before you run the World Writer report. The build program:
-
Searches the employee master records to locate employees with no profile data
-
Creates a table with Xs in place of actual profile data values
After you build the Employee Profile Workfile, you can create the associated World Writer report that lists employees by profile data types. For employees who have values in the profile data types you specified, the profile data type codes appear in the User Defined Code field. For employees who have no profile data of that type, Xs appear in the User Defined Code field.
Figure 6-17 Employee Profile (World Writer) report
Description of "Figure 6-17 Employee Profile (World Writer) report"