36 Setup Requirements for Electronic Notas Fiscais
This chapter contains these topics:
36.1 Set Up Document Types for Notas Fiscais
Before you enter sales orders for which you will use the electronic nota fiscal process, set up these UDC tables.
36.1.1 Document Type (00/DT)
Add a document type for each type of nota fiscal that you process/issue (Paper nota fiscal and Electronic nota fiscal) and set up the Special Handling Code field (SHC) to indicate whether the document type is used for a general consumer or an end consumer.
Add document types for each type of XML, i.e., XM (regular NFe), XC (Cancel NFe). The system uses these document types to generate the XML file name.
Use these values in the SHC field:
-
First position: indicates the type of nota fiscal:
-
Paper Nota Fiscal
-
Sao Paulo Nota Fiscal (Future Use)
-
Electronic Nota Fiscal
-
Telephone Services (Purchasing Nota Fiscal only)
-
-
Second and third positions: Nota Fiscal Model (Defined by the Brazilian government). This information is part of the Legal Access Key field that prints in the nota fiscal videos, in the XML infNFe ID element, and in the DANFE (Documento Auxiliar da Nota Fiscal Eletronica).
55 - Electronic Nota Fiscal (NFe)
65 - Final Consumer Electronic Nota Fiscal (NFCe)
See Also: Section 37.2, "Validations for Electronic Notas Fiscais for Final Consumers"
This image shows examples of document types and special handling code values:
Figure 36-1 General User Defined Codes screen (UDC 00/DT)
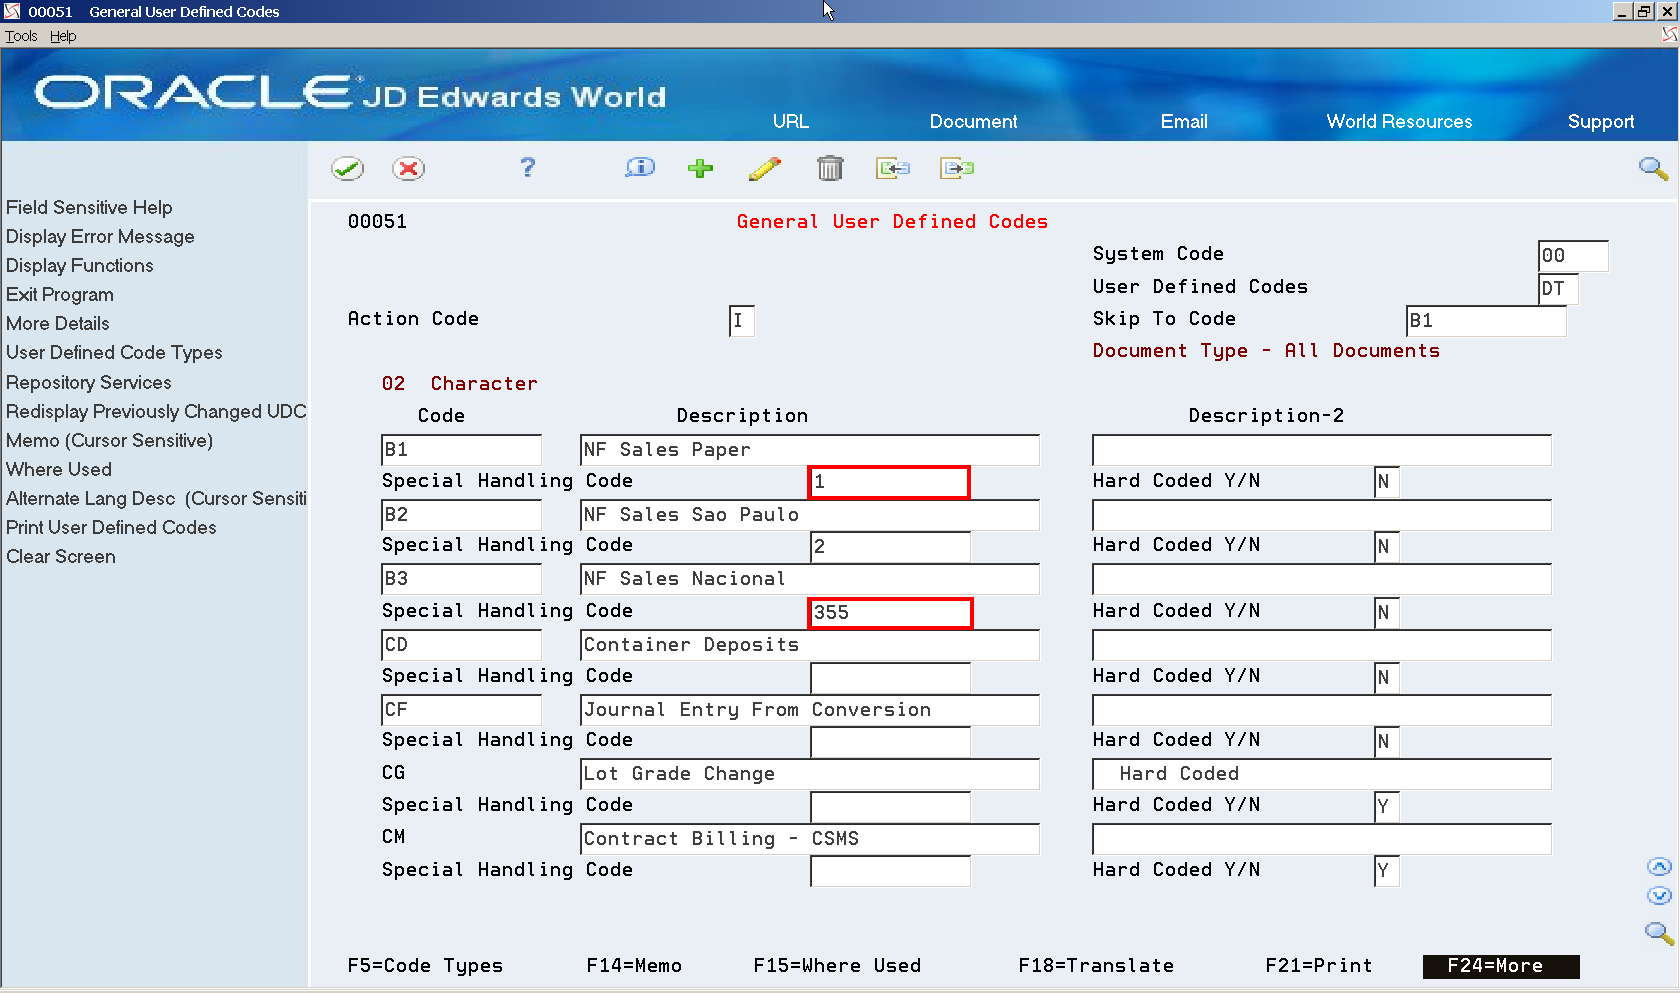
Description of ''Figure 36-1 General User Defined Codes screen (UDC 00/DT)''
36.2 Set Up Next Numbers
Next Numbers are used to retrieve:
-
Temporary nota fiscal Document Number (BNNF)
-
Sequential Numbers for XML files
-
Sequential Numbers for XML records
-
Invoice Document Number (DOC)
From menu G76B41B (Localization Setup - Brazil)
-
Choose Next Numbers (P0002).
-
Inquire on system 76B (Brazil).
Next Number 9 (N009) is used to retrieve NFe Lot Number (idLote).
Next Number 10 (N010) is used to retrieve Legal Access Key numeric code (cNF).
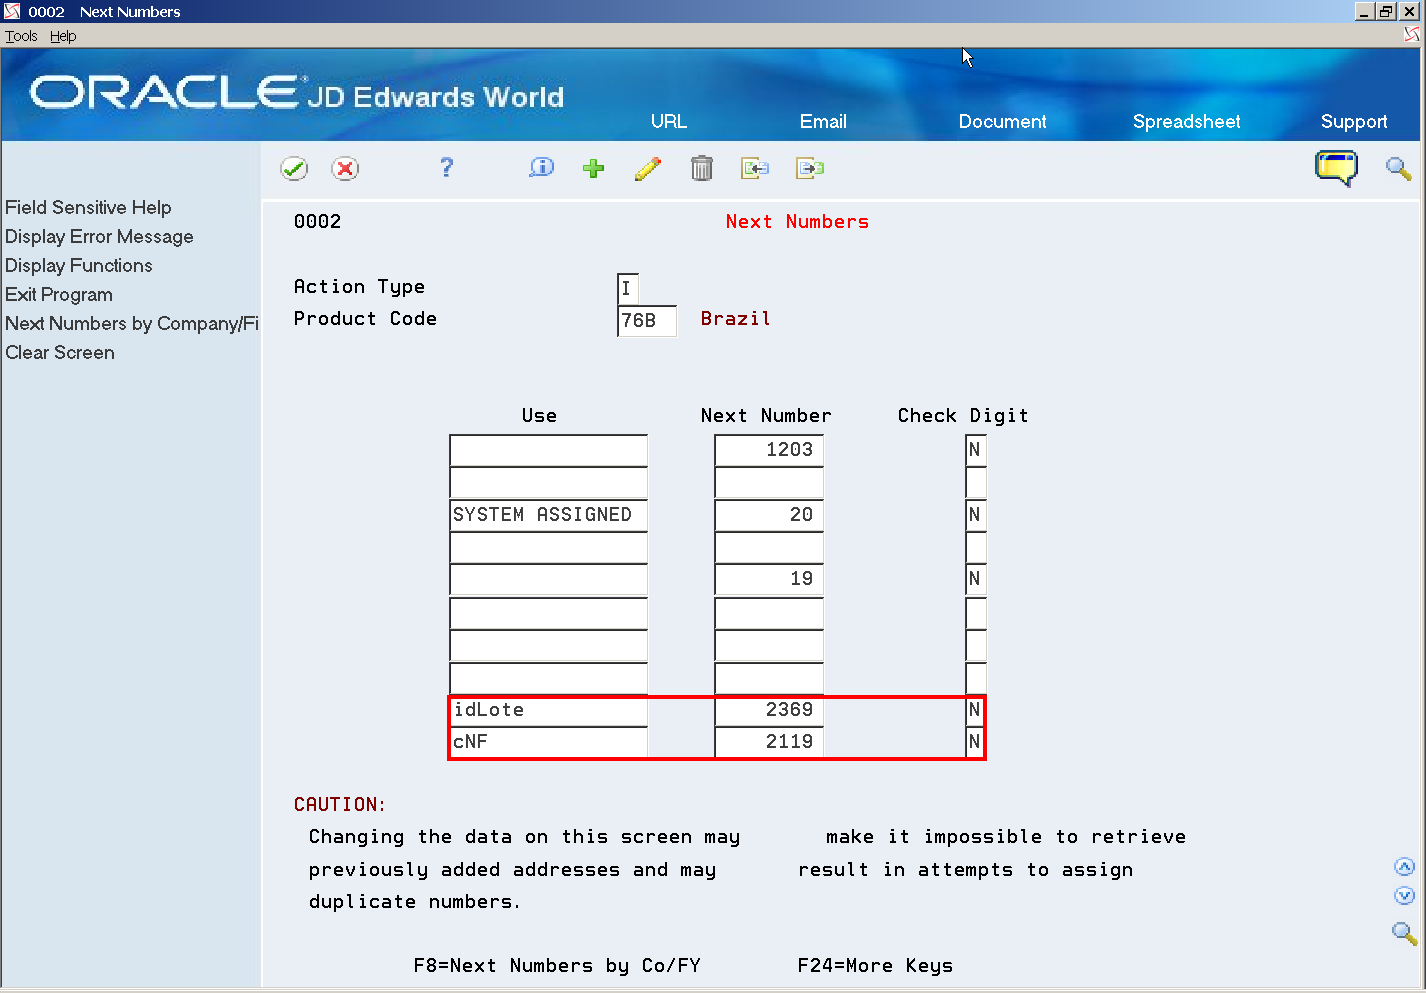
-
Press F8 to exit to Next Numbers by Company/Fiscal Year (P00021):
-
Define next numbers for each combination of:
-
company/nota fiscal document type
-
company/XML document type
-
Figure 36-3 Next Numbers by Company/Fiscal screen
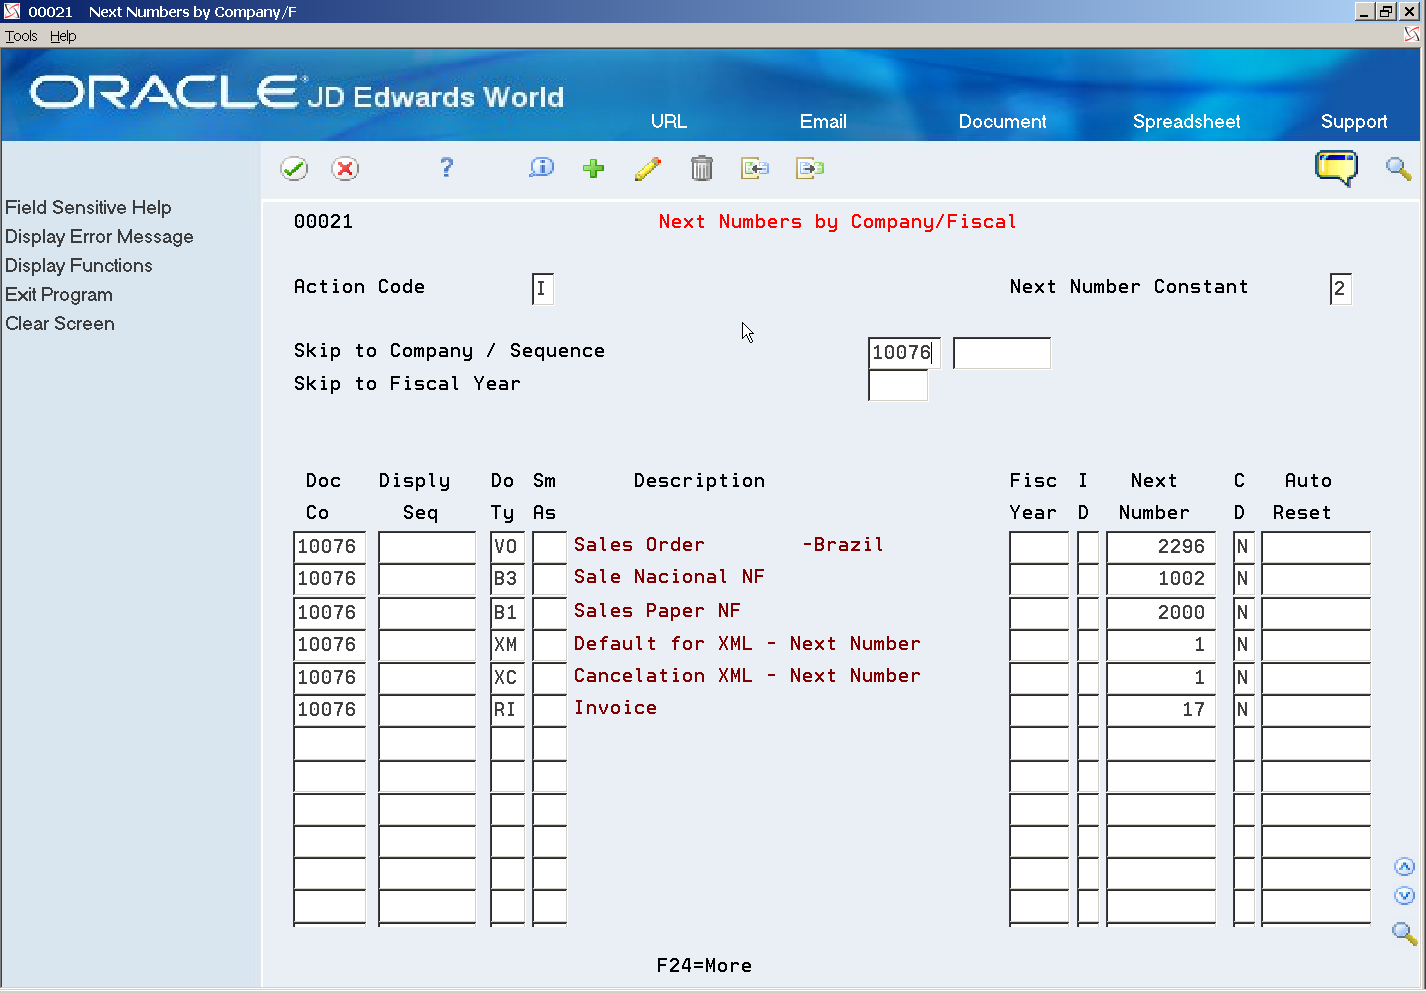
Description of ''Figure 36-3 Next Numbers by Company/Fiscal screen''
Nota Fiscal Next Number (P7600B):
This program generates the official/government nota fiscal number.
-
From menu G76B41B (Localization Setup - Brazil)
-
Choose Next Number - Nota Fiscal (P7600B).
-
Set up the next number for each combination of Fiscal Company/Document Type used for Electronic Nota Fiscal (NFe).
NF Series (BSER) and NF Number (BNNF) are validated according to the document type.
Figure 36-4 Next Numbers - Nota Fiscal screen
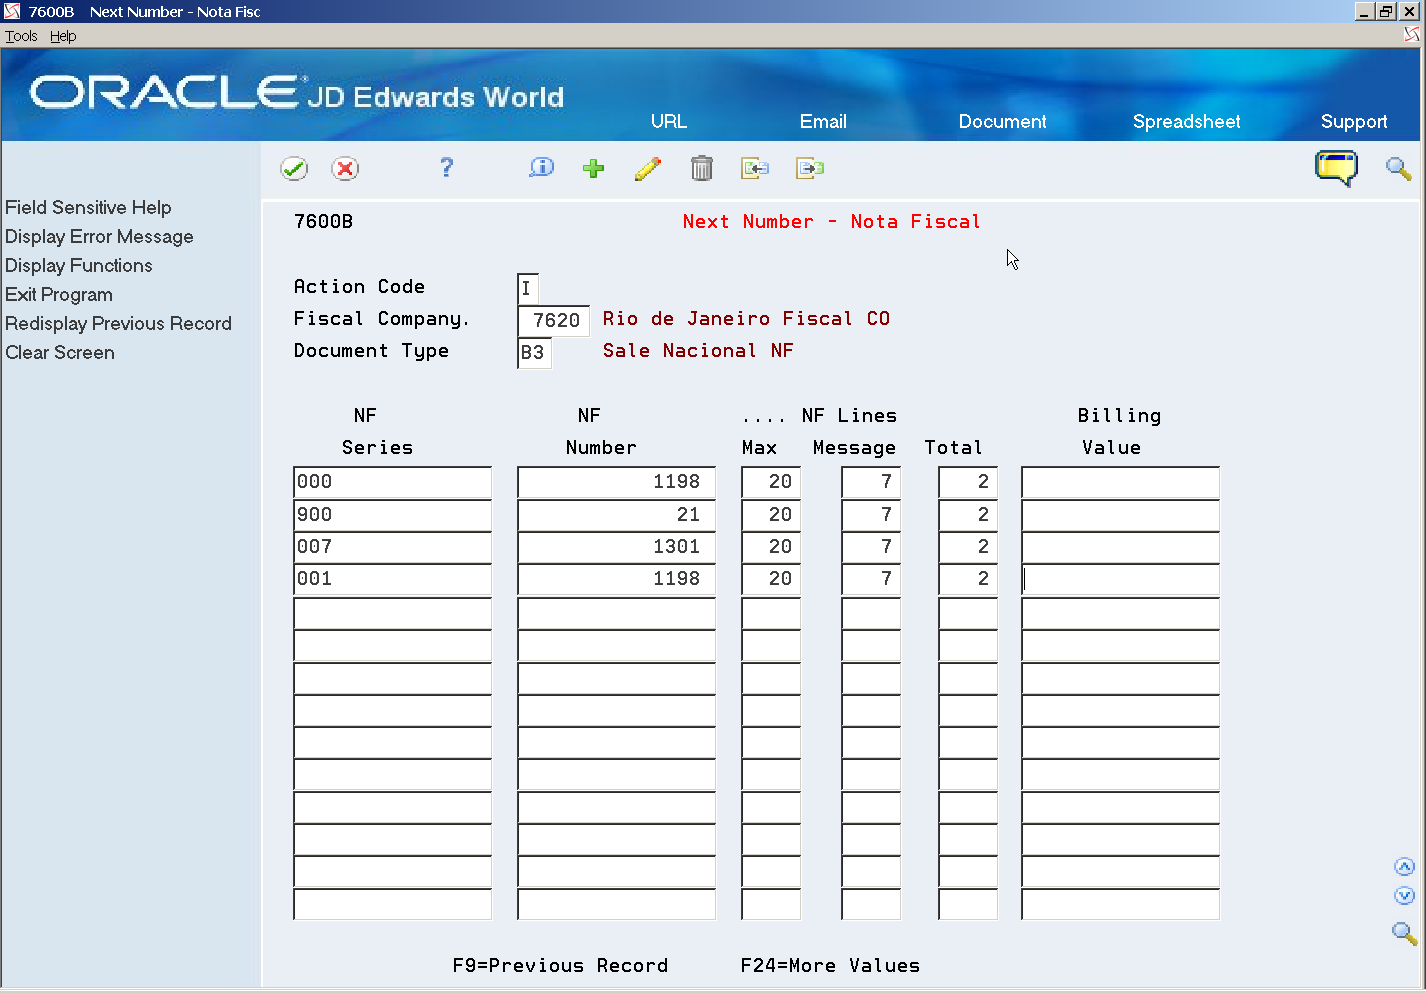
Description of ''Figure 36-4 Next Numbers - Nota Fiscal screen''
For additional information regarding Next Number - Nota Fiscal (P7600B), see Chapter 4, "Work with Next Numbers for Brazil".
|
Note: Sales Order Detail (F4211) Invoice Document Number (DOC) for Electronic Nota Fiscal (NFe) records no longer stores the nota fiscal Document Number (BNNF) and nota fiscal Series (BSER) information.The reason is that NFe Document Number is 9-digit long and the NFe Series is 3-digit long. This information does not fit in Sales Order Detail (F4211) Invoice Document Number (DOC) field that is just 8-digit long. Reference 2 (VR02) started being used to store the nota fiscal information. Document (DOC) is now retrieved using regular Next Numbers setup. |
36.3 Set Up Statuses and Order Activity Rules
-
On Activity/Status Codes user defined code, system 40/type AT, enter new statuses for NFe processing.
-
From menu G76B41B (Localization Setup - Brazil), choose Order Activity Rules (P40204) to enter new order activity rules for NFe processing.
|
Note: A summary of the statuses that must be defined for NFe processing follow. (In case the NFe XML file is accepted/approved by the fiscal authority):
|
Additional statuses are required for Electronic Nota Fiscal processing if the NFe XML file is not accepted/approved by the fiscal authority (Error, Deny or Contingency) or if you need to cancel an approved Electronic Nota Fiscal or notify the fiscal authority that a document number has been skipped (Unused).
The Brazilian government provides a manual called Manual do Contribuinte with specifications to create the NFe. This manual is available at:
36.4 Set Up User Defined Codes for Electronic Notas Fiscais
Before you generate the XML files for electronic notas fiscais, review these UDC tables to verify that required information is set up in the UDC tables.
-
Taxpayer Class (76/CC)
-
Credit Card Type (76B/A1)
-
Freight Mode-Tipo do Frete (76B/FM)
-
Import Declaration Mode (76B/IB)
-
Event Type (76B/ET)
-
IBGE - Municipal Code. Brazil (76B/MU)
-
Distribution Namespace (76B/NE)
-
Sequence Process (76B/OP)
-
BCB - Country Code. Brazil (76B/PA)
-
DANFE Format Fit (76B/PF)
-
Presence Indicator Code (76B/PR)
-
Payment Instrument Relationship (76B/PY)
-
Response Status Code (76B/RS)
-
IPI Tributary Situation Codes (76B/SI)
-
ICMS Tributary Situation Codes (76B/SM)
-
COFINS Tributary Situation Codes (76B/SO)
-
PIS Tributary Situation Codes (76B/SP)
-
Nota Fiscal Electronic Status (76B/ST)
-
Issue Type (76B/TE)
-
Tax Types (76B/TT)
-
Transportation Mode (76B/TW)
-
UTC-Univ. Coordinated Time (76B/TZ)
-
Branch Plant State (76B/UF)
-
Layout Version Number (76B/VN)
36.4.1 Taxpayer Class (76/CC)
Use the values in UDC 76/CC to indicate the type of taxpayer.
Values in UDC 76/CC are hard-coded. You enter a taxpayer class when you enter sales orders or stand-alone Notas fiscais. Use a value that includes 0 in the Special Handling Code field for general taxpayers/consumers. Use a value that includes 1 in the Special Handling Code field for final consumers.
The system writes the value for this field to the Sales Order Header Tag File (F76B4201) and includes it in the electronic nota fiscal XML file.
36.4.2 Credit Card Type (76B/A1)
Set up this UDC table to specify credit card details. If the taxpayer is the final consumer, the system uses the values in UDC table 76B/A1 to determine the code to write to the NFe XML file. The codes in the SHC field is the code written to the NFCe XML file. The NFCe XML file is the file that you generate when the electronic nota fiscal if for a final consumer.
To set up this UDC table:
-
In the Code field, enter the first 6-digits of the credit card, which is the first 6 digits from the SHCACT field in the F4201 file.
-
In the Description 1 field, enter the name of the credit card issuer, such as Visa or American Express.
-
In the Description 2 field, enter the address book number of the financial institution that issued the credit card.
The system uses the value to retrieve the CNPJ number of the issuer.
-
In the Special Handling Code field, enter the government-required code for the credit card types. The following values are the allowable values:
-
01: Visa
-
02: Master Card
-
03: American Express
-
04: Sorocred
-
99: Outros (other)
-
36.4.3 Event Type (76B/ET)
Verify that the code 110140 for the EPEC contingency exists in this UDC table. You select a value from this UDC table when you complete the Event Type processing option in the Contingency EPEC program (P76B627).
36.4.4 Freight Mode-Tipo do Frete (76B/FM)
This user defined code is used in conjunction with the Freight Handling Code (42/FR) UDC table to specify the type of freight. Enter a valid freight handling code from 42/FR in the Code field.
In the Description (DL01) field, enter the corresponding Brazilian Government code for freight type. This information prints in the modFrete element of the XML file.
This list shows the Brazilian freight types:
0 - Paid by Ship From (CIF)
1 - Paid by Ship To (FOB)
2 - Paid by Other
9 - No Freight
Figure 36-5 General User Defined Codes screen (76B/FM)
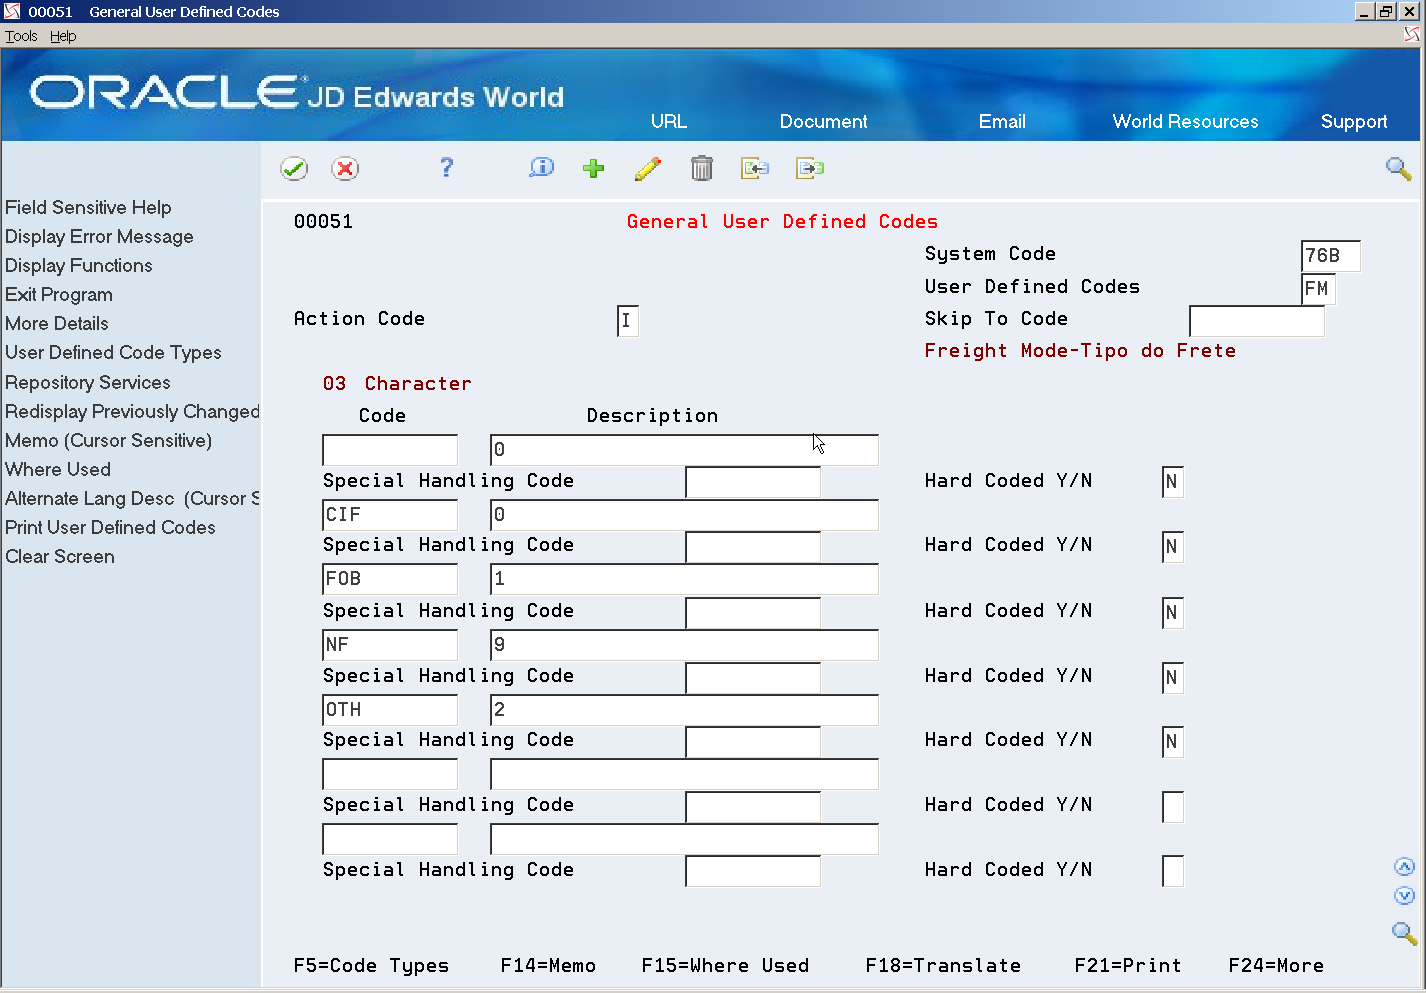
Description of ''Figure 36-5 General User Defined Codes screen (76B/FM)''
36.4.5 Import Declaration Mode(76B/IB)
Set up values in this UDC table to describe the import type according to who buys the items and for whom. Enter 1 in the Special Handling Code field for the values that are used when you import for another person (Importação por conta e ordem) or when you import through the postal service (Importação por encomenda).
You assign a value from this UDC table to import notas fiscais on the NF Entry-Importation - DI and the NF Entry - Importation - Additional screens.
This image shows examples of values:
Figure 36-6 General User Defined Codes screen (76B/IB)

Description of ''Figure 36-6 General User Defined Codes screen (76B/IB)''
36.4.6 IBGE - Municipal Code. Brazil (76B/MU)
The Brazilian government provides a list with all city codes that must print in the NFe (IBGE Codes).
Complete this table with the following information:
-
Code column (KY) = Zip Code without spaces or special characters.
-
Description column (DL01) = City Name. This information prints in the xMun element of the XML file.
-
Description-2 column (DL02) = IBGE City Code
The values that you enter here are included in the cMunFG and cMun elements of the XML file.
This image shows examples of values for the IBGE - Municipal Code. Brazil (76B/MU) UDC table.
Figure 36-7 General User Defined Codes screen (76B/MU)
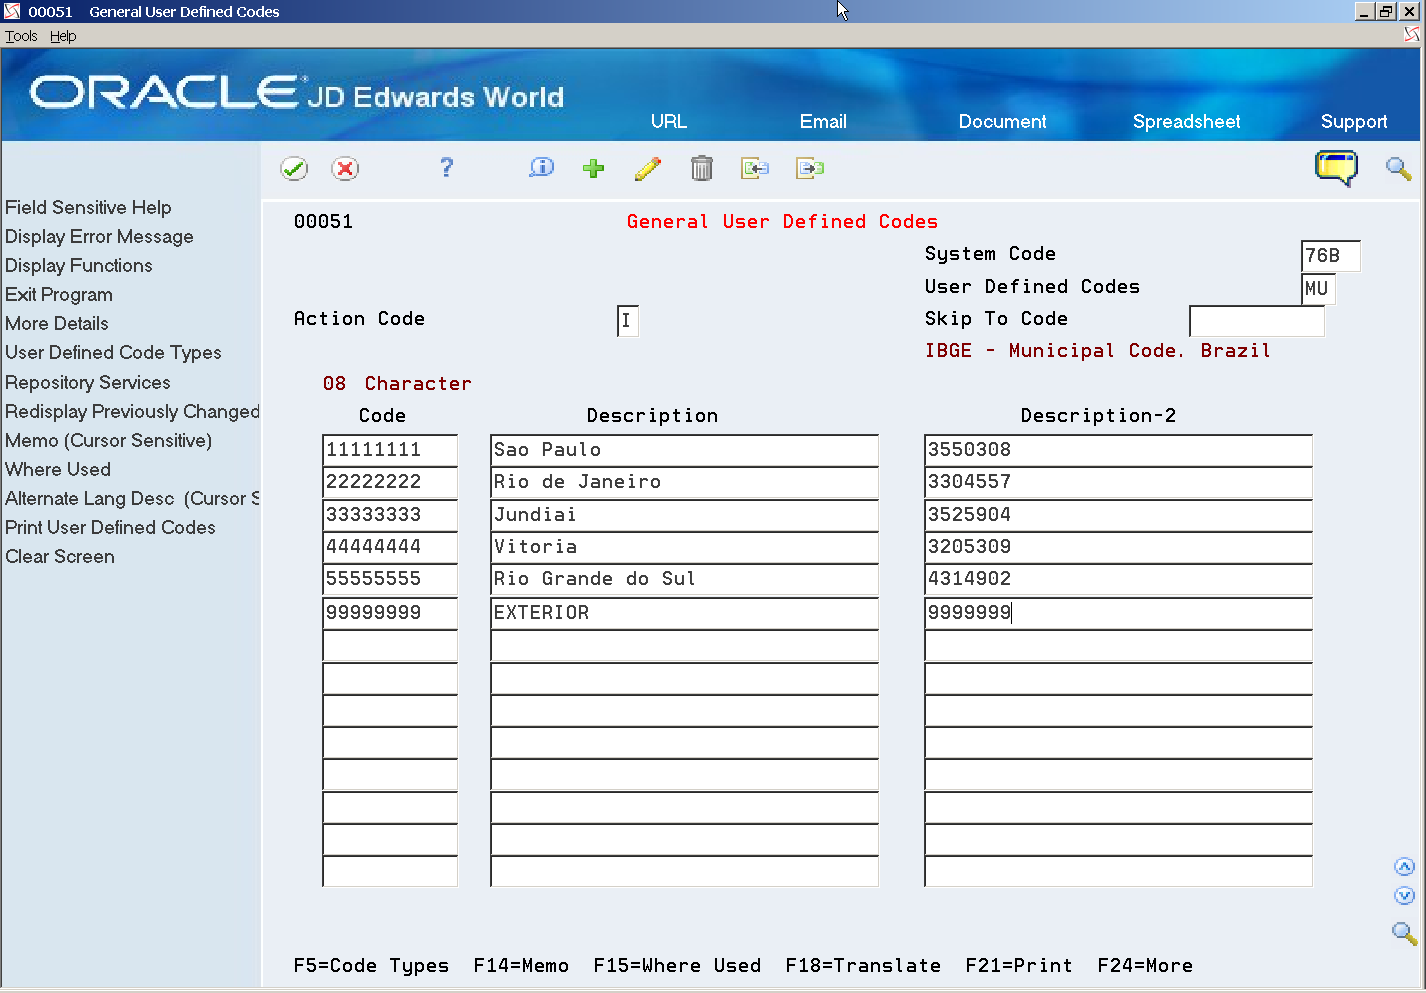
Description of ''Figure 36-7 General User Defined Codes screen (76B/MU)''
36.4.7 Distribution Namespace (76B/NE)
Enter the namespace to print in the root element of the XML file.
For example, you might enter:
portalfiscal.inf.br.nfe
Do not enter www in front of the website name.
36.4.8 Sequence Process (76B/OP)
Verify that the value 234156789CEFG exists in this UDC table in the Description field for a "blank" Code field.
The value in this UDC includes the codes from the 76B/TE and 76B/ST UDC tables. The system uses the value in this UDC table when you run the P76B651 program.
Figure 36-8 General User Defined Codes screen (76B/OP)
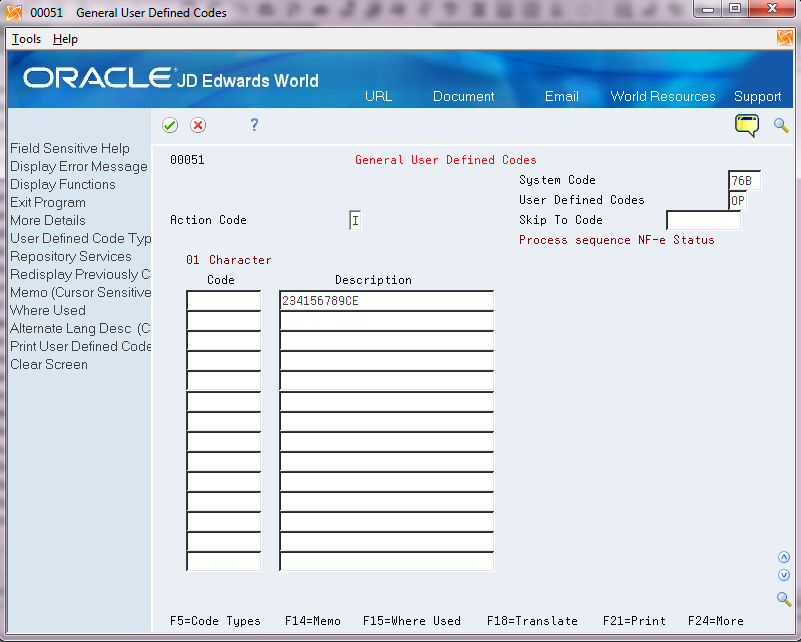
Description of ''Figure 36-8 General User Defined Codes screen (76B/OP)''
36.4.9 BCB - Country Code. Brazil (76B/PA)
The Brazilian government provides a list with all country codes that must print in the NFe (IBGE Codes).
In the Code column enter the BGE Country code. The system prints the code in the cPais element of the XML.
In the Description 01 field, enter the description for the code. This information prints in xPais element of the XML file.
Figure 36-9 General User Defined Codes screen (Country Code Brazil)
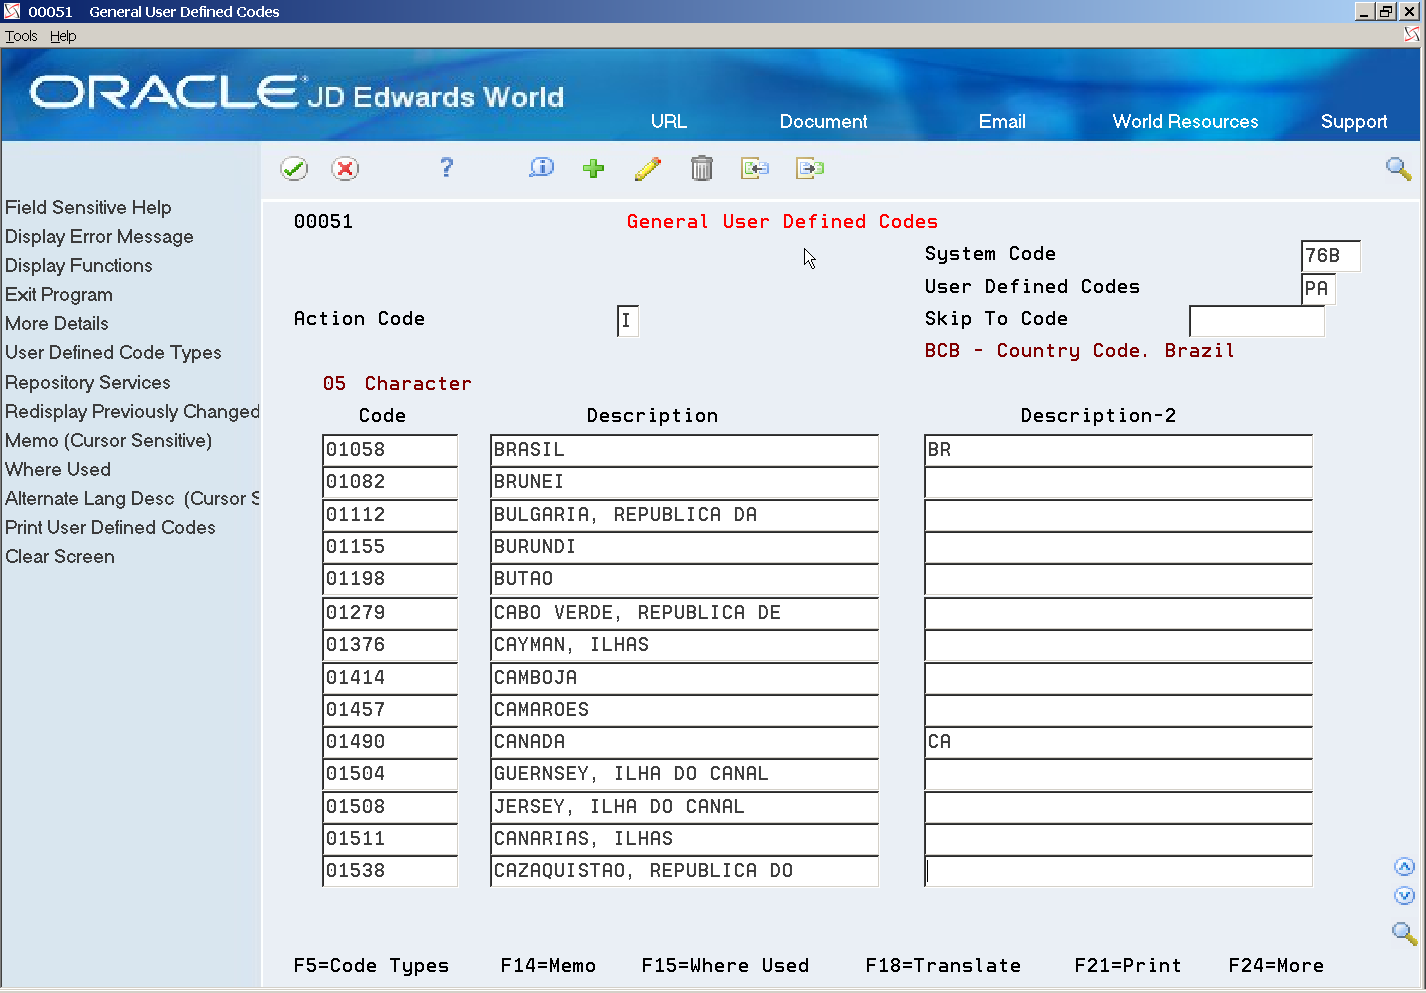
Description of ''Figure 36-9 General User Defined Codes screen (Country Code Brazil)''
36.4.10 DANFE Format Fit (76B/PF)
Set up codes in this UDC table to specify the format of the DANFE to use. You enter a value from this UDC table in processing option 22 (DANFE Format Fit) of the XML Generator program (P76B601). Values are:
-
0: Sem geração de DANFE (Do not generate)
-
1: DANFE normal, Retrato (DANFE Normal, Portrait)
-
2: DANFE normal, Paisagem (DANFE normal, Landscape)
-
3: DANFE Simplificado (Simplified DANFE)
-
4: DANFE NFCe (DANFE for consumers)
-
5: DANFE NFCe em Mensagem Eletrô (DANFE for consumer and electronic message)
36.4.11 Presence Indicator Code (76B/PR)
Verify that this UDC table is set up with values that identify the customer presence at the point of sale. You enter a value from this UDC table when you enter sales orders, and when you enter stand-alone outbound notas fiscais. The system writes the value from the sales order to the B25b field (indPres) in the NFe.
A value of 1 in the Special Handling Code field indicates that the system uses this UDC value to identify transactions with final consumers. If the transaction is for a final consumer, then the system generates the electronic fiscal notes for transactions with end consumers (NFCe).
|
Note: Only values 1-4 are included in the NFCe XML file. |
Values are:
0: Não se aplica (por exemplo, para a Nota Fiscal complementar ou de ajuste (Not applicable (such as for the supplementary invoice or adjustment))
1:Operação presencial (Operation at desk)
2: Operação não presencial, pela Internet (Operation not in person, over the Internet)
3:Operação não presencial, Teleatendimento (Operation not face-to-face (call center))
4: NFCe em operação com entrega em domicílio (NFC-operation and home delivery)
9: Operação não presencial, outros (Operating without attending; other)
36.4.12 Payment Instrument Relationship (76B/PY)
Set up this UDC table to associate payment instruments in UDC 00/RY with the government provided codes for the form of payment. To set up values in the 76B/PY UDC:
-
In the Code field, enter the payment instruments from UDC 00/RY.
-
In the Description 1 field, enter a description of your choice.
-
In the Description 2 field, enter the code established by the government for the payment type. Values are:
-
01: Dinheiro
-
02: Cheque
-
03: Cartão de Crédito
-
04: Cartão de Débito
-
05: Crédito Loja
-
10: Vale Alimentação
-
11: Vale Refeição
-
12: Vale Presente
-
13: Vale Combustível
-
-
In the Special Handling Code field, enter 1 for the payment types that are for credit cards. The system uses the SHC field to identify the payment types to include in the Credit Group section of the NFe XML file for end consumers.
36.4.13 Response Status Code (76B/RS)
Set up all fiscal authority response statuses. You use this UDC table to associate the government code with internal JD Edwards World software statuses.
In the Code and Description 01 fields, enter the government codes. In the Description 02 field, enter the corresponding JD Edwards status codes from the 76B/ST UDC table.
This images shows examples of values for the 76B/RS UDC table:
Figure 36-10 General User Defined Codes screen (76B/RS)
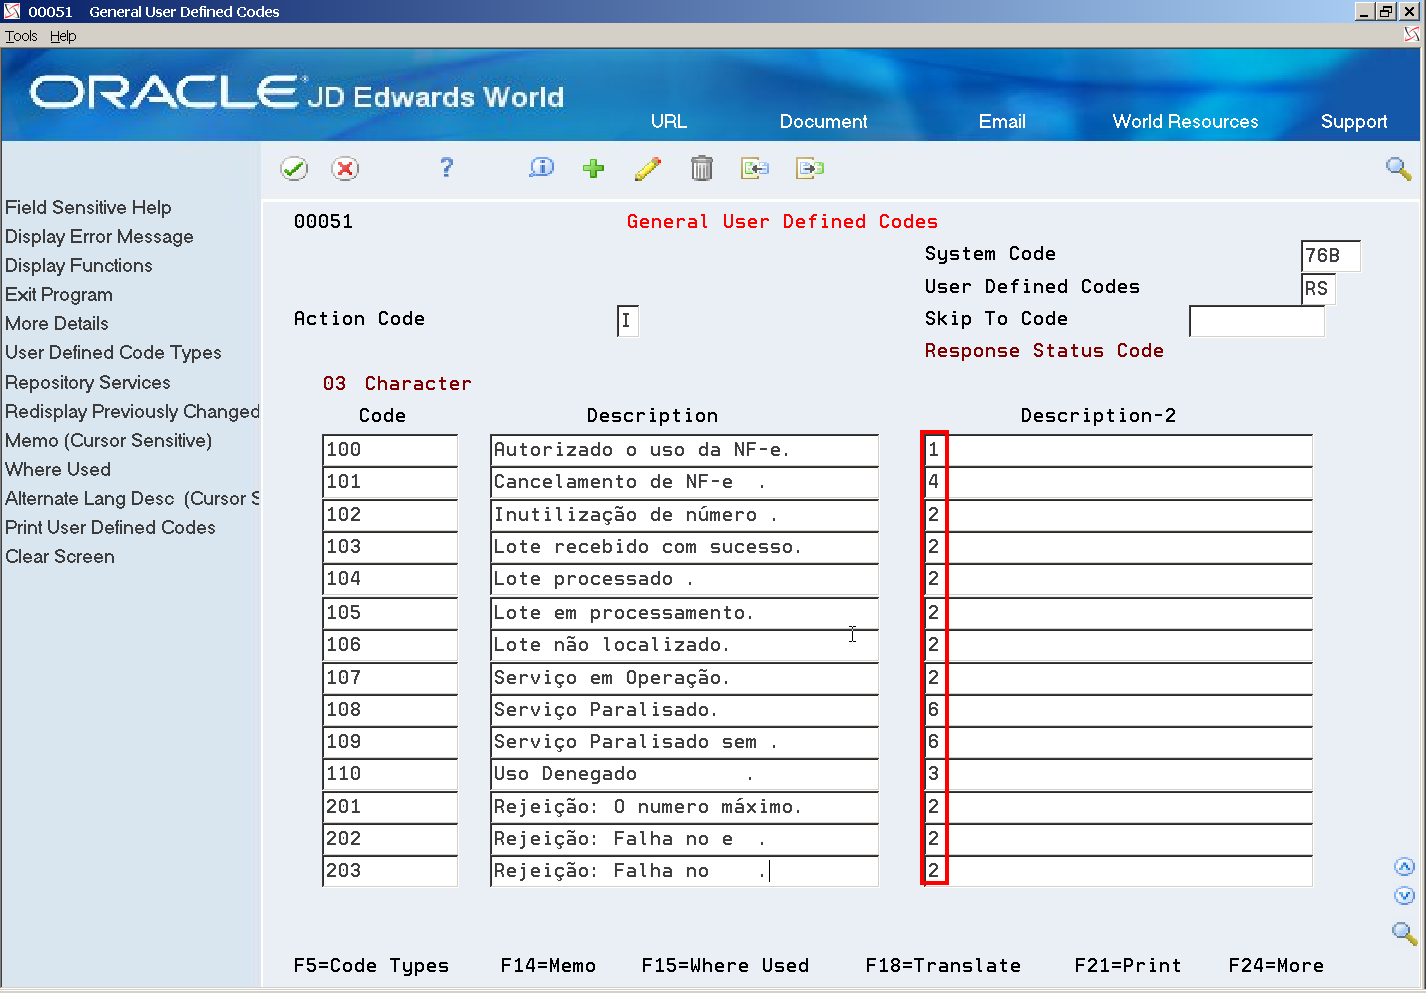
Description of ''Figure 36-10 General User Defined Codes screen (76B/RS) ''
36.4.14 IPI Tributary Situation Codes (76B/SI)
Set up Tax Classification Codes (Código de Situação Tributária) for IPI. The Brazilian government provides the codes that you must use.
This graphic illustrates examples of values for the 76B/SI UDC table:
Figure 36-11 General User Defined Codes screen (76B/SI)
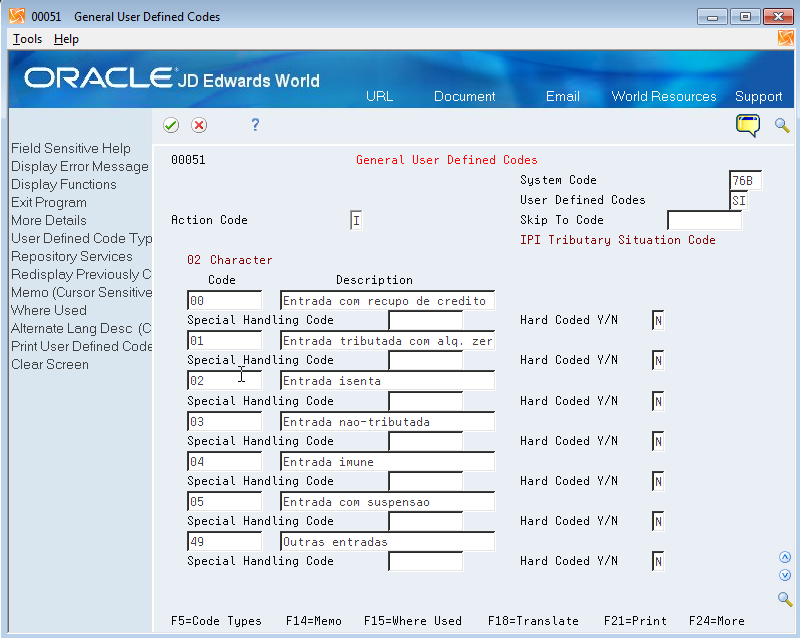
Description of ''Figure 36-11 General User Defined Codes screen (76B/SI) ''
36.4.15 ICMS Tributary Situation Codes (76B/SM)
Set up Tax Classification Codes (Código de Situação Tributária) for ICMS. The Brazilian government provides the codes that you must use.
This graphic illustrates examples of values for the 76B/SM UDC table:
Figure 36-12 General User Defined Codes screen (76B/SM)
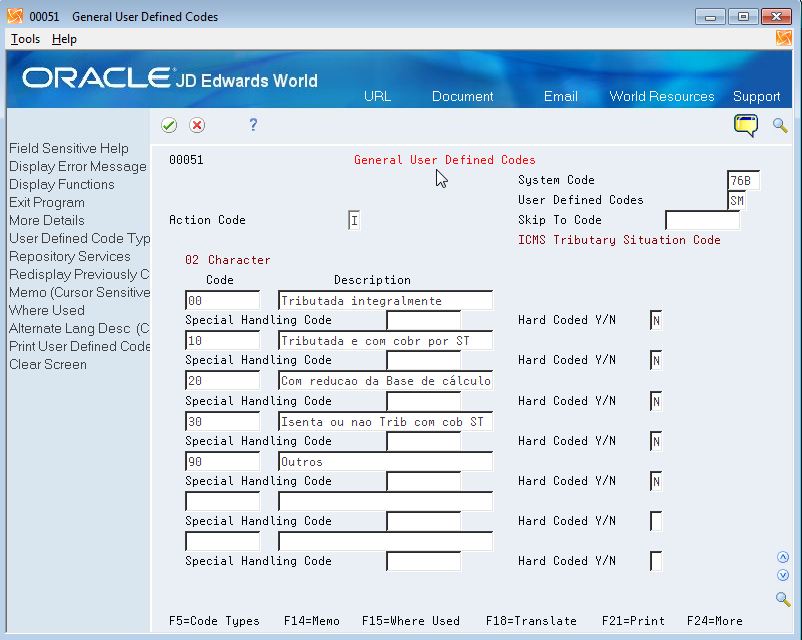
Description of ''Figure 36-12 General User Defined Codes screen (76B/SM) ''
36.4.16 COFINS Tributary Situation Codes (76B/SO)
Set up Tax Classification Codes (Código de Situação Tributária) for COFINS. The Brazilian government provides the codes that you must use.
This graphic illustrates examples of values for the 76B/SO UDC table:
Figure 36-13 General User Defined Codes screen (76B/SO)
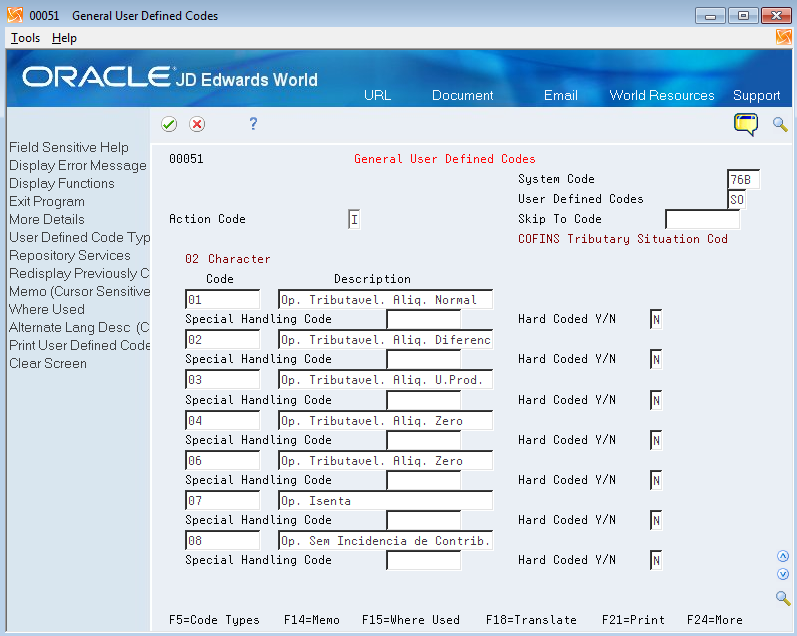
Description of ''Figure 36-13 General User Defined Codes screen (76B/SO) ''
36.4.17 PIS Tributary Situation Codes (76B/SP)
Set up Tax Classification Codes (Código de Situação Tributária) for PIS. The Brazilian government provides the codes that you must use.
This graphic illustrates examples of values for the 76B/SP UDC table:
Figure 36-14 General User Defined Codes screen (76B/SP)

Description of ''Figure 36-14 General User Defined Codes screen (76B/SP) ''
36.4.18 Nota Fiscal Electronic Status (76B/ST)
The nota fiscal electronic status is used internally by the system to track the status of file. All values in the UDC table are hard-coded.
The system uses these values:
A: Contingency cancelled
B: Contingency unused
C: Contingency SVC AN
D: Unused
E: Contingency SVC RS
F: Contingency Offline
G: Contingency EPEC
1: Accepted
2: In Error
3: Denied
4: Cancelled
5: Cont. SCAN
6: Cont. Form
7: Cont El 7 DPEC
8: Cont El 8 DPEC
9: Cont Form FS-DA
36.4.19 Issue Type (76B/TE)
The issue type describes the type of file.
|
Note: No value 8 exists for the issue type. |
The JD Edwards World software for Brazil includes hard-coded values:
-
0: Version 1.10
-
1: Normal
-
2: Contingency FS
-
3: Contingency SCAN
-
4: Contingency DPEC
-
5: Contingency FS-DA
-
6: SVC - AN
-
7: SVC-RS
-
9: Contingency offline NFCe
36.4.20 Tax Types (76B/TT)
Set up tax types, and enter a value in the Special Handling Code (SHC) field to specify whether the tax type is for PIS or COFINS. For PIS tax types, enter 1 in the SHC field. For COFINS tax types, enter 2 in the SHC field. The values in the SHC field enable the system to correctly group PIS and COFINS withholding in the XML file.
This image shows examples of codes for the 76B/TT UDC table:
Figure 36-15 General User Defined Codes screen (76B/TT)
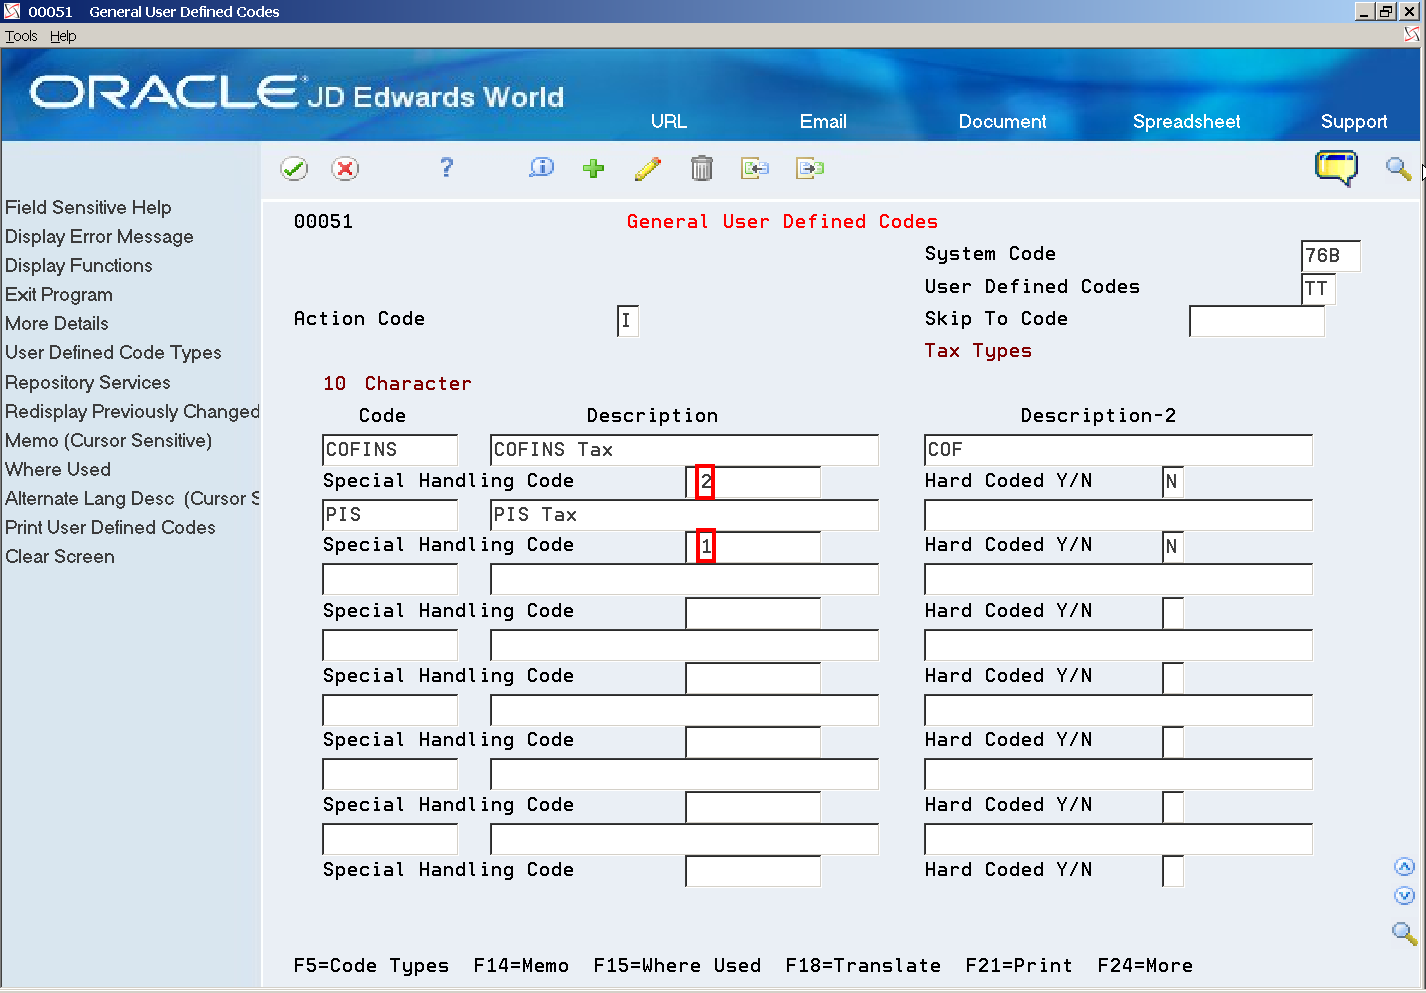
Description of ''Figure 36-15 General User Defined Codes screen (76B/TT)''
36.4.21 Transportation Mode (76B/TW)
Set up codes in this UDC table to identify the nature of the carrier being used to transport items to the customer. For example, you might set up codes for by seaway (Maritime), by air, and by road. Enter 1 in the Special Handling Code field for the value that you set up for "by seaway". Import transactions for which the transportation mode is by seaway include an additional freight amount for the renewal of merchant navy services.
Figure 36-16 General User Defined Codes screen (76B/TW)
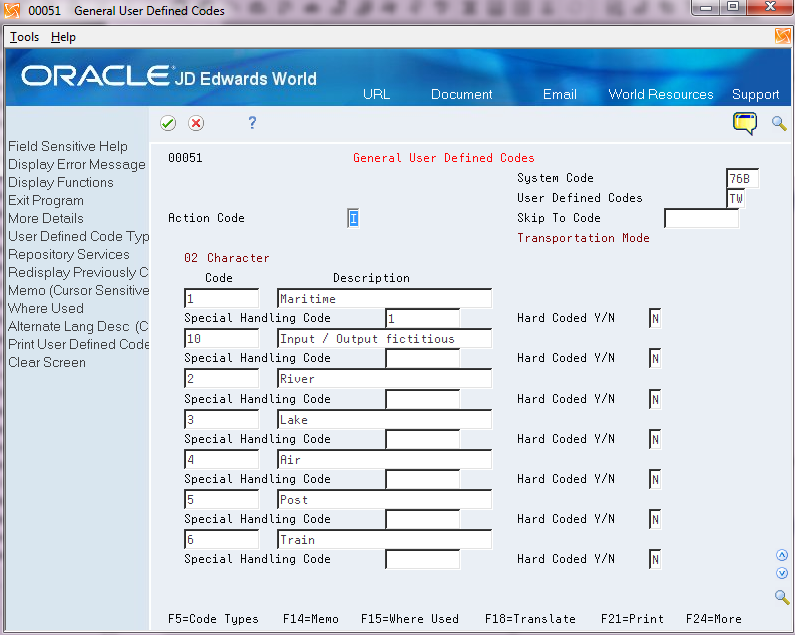
Description of ''Figure 36-16 General User Defined Codes screen (76B/TW)''
36.4.22 UTC - Univ. Coordinated Time (76B/TZ)
Use this UDC table to associate codes to UTC time zones. For example, you might set up code 01 for UTC-03:00, which is the universal time zone for São Paulo. The system uses this time zone when determining the time frame for electronic nota fiscal contingencies.
36.4.23 Branch Plant State (76B/UF)
Set up this UDC table with codes for the states in which you do business. The system uses this UDC table to validate that the state of the transaction is the same as the state of the final consumer. The Special Handling Code field must include the value 1 for the states in which you create sales transactions for final consumer.
36.4.24 Layout Version Number (76B/VN)
Set up this UDC table with codes for the layout version of the electronic nota fiscal (NFe) or electronic nota fiscal for an end consumer (NFCe). You use a value from this UDC table in the processing options for the Generate XML program (P76B601).
For example, you might set up these codes:
-
2.10: Layout version 2.10
-
3.10: Layout version 3.10.
|
Note: Layout versions prior to 3.10 are not valid for an NFCe. |
36.5 Set Up Authorized Persons (Optional)
From Sales Order Management - Brazil (G76B42), choose Authorized Person Setup or Authorized Person by NF
Beginning with version 3.10 of the NFe XML file, you can include an additional optional section in the XML file to specify additional person authorized to access the XML file. You use the Authorized Person Setup program (P76B0112) to specify who is authorized to identify those who can access the XML file. Then, use the Authorized Person by NF program (P76B1020) to restrict the authorized access to a specific nota fiscal. Authorized persons can access the XML file from the SEFAZ website after the XML file is sent from your company to SEFAZ.
For example, you might specify in the Authorized Person Setup program that a manager (authorizing person) can authorize specific employees (authorized persons) to review the XML file. You could then use the Authorized Person by NF program to indicate by nota fiscal number the records that each authorized person can access.
|
Note: The Authorized Person Setup and the Authorized Person by NF programs expose tax ID numbers. Companies using these programs should consider restricting access to the programs. |
Both the Authorized Person Setup program and the Authorized Person by NF program include a processing option in which you specify the maximum number of authorized persons. Be sure to set the limit in the processing option no higher than the limit enforced by SEFAZ.
See Section 67.1, "Processing Options for Authorized Person Setup (P76B0112)" and Section 67.2, "Processing Options for Authorized Person by NF (P76B1020)".
The system saves the setup information from the Authorized Person Setup program to the NFe Access Authorized Person file (F76B0112) and the setup information from the Authorized Person by NF program to the Authorized Person by Nota Fiscal file (F76B1020). When you generate the NFe or NFCe XML file, for each nota fiscal in the XML file, the system first determines if a record for the nota fiscal exists in the F76B1020 file. If a record exists, the system validates that the CNPJ [(Cadastro Nacional da Pessoa Jurídica) (National Registry of Legal Entities)] or CPF [(Cadastro de Pessoas Físicas) (Natural Persons Register) numbers of the authorized persons is not the CNPJ or CPF number of the ship-to, ship-from, or carrier associated with the nota fiscal. Because the company that ships or receives the goods, and the carrier of the goods is already authorized to access the XML file, the system does not include them in the additional optional section of the XML file; they would be included in the standard sections. If the record passes validations, then the system includes the CNPJ or CPF of the authorized person in the XML file.
If no record for the nota fiscal exists in the F76B1020 file, then the system accesses the F76B0112 file to determine if an authorized person is specified. If authorized persons are located in the F76B1020 or F76B0112 file, then the system includes in the XML file the CNPJ or CNF of the authorized persons.
Including information about authorized persons is optional. If you do not set up the information, then the system does not include in the XML file the section for authorized persons.
36.5.1 Processing Options for Authorized Persons
Both the Authorized Person Setup program and the Authorized Person by NF program include a processing option in which you specify the maximum number of authorized persons. Be sure to set the limit in the processing option no higher than the limit enforced by SEFAZ, which can change.
The Authorized Person by NF program also include a processing option that places a limit on the status at which the nota fiscal can be changed.
See Section 67.1, "Processing Options for Authorized Person Setup (P76B0112)" and Section 67.2, "Processing Options for Authorized Person by NF (P76B1020)".
36.6 Address Book Considerations
Information used by the electronic nota fiscal process resides in address book records.
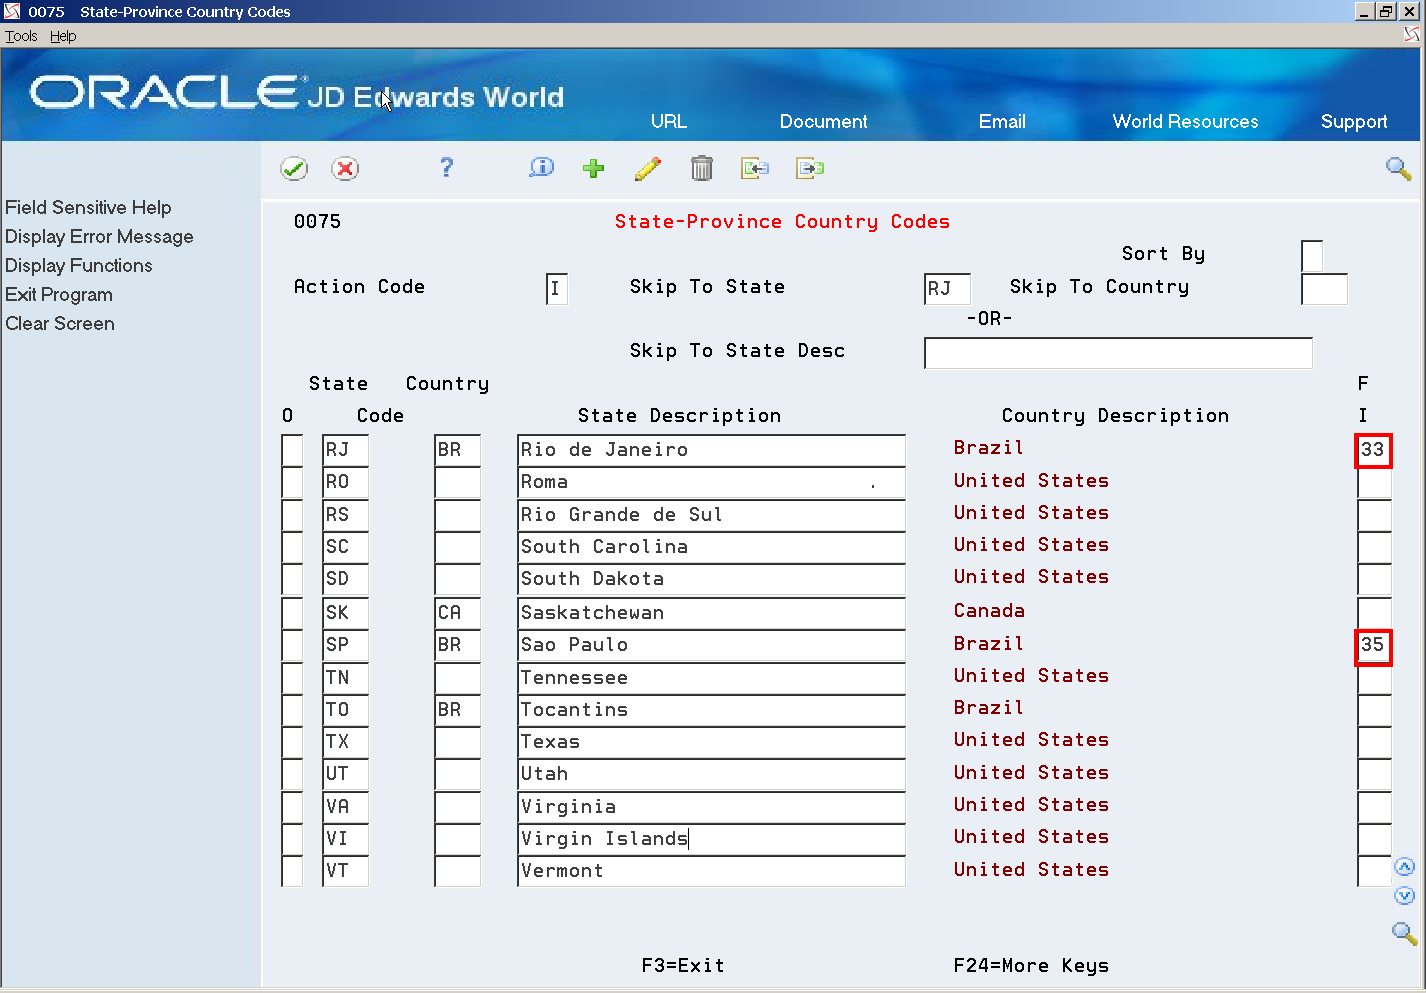
36.6.1 Set Up IBGE UF Codes (State Codes)
The Brazilian government provides a list with State Codes (IBGE UF Codes).
Enter this information in the State-Province Country Codes (P0075), State Fiscal Identification field (FQ03), as in the following screen.
Figure 36-17 State -Province Country Codes screen
Description of ''Figure 36-17 State -Province Country Codes screen''
36.6.2 Review Address Book Information
Make sure that you enter Address Book information in the Address Book Revisions program (P01051) for each address book number using the same pattern, for example:
-
Address: address line 1
-
Number: address line 2
-
Complement: address line 3
-
Neighborhood: address line 4
The XML Generator SEFAZ program (P76B601) accesses this information and prints it in different elements of the XML file.
Avoid the use of special characters such as N½ in names or addresses. These characters might not be accepted in the XML file that is transmitted to the fiscal authority.
Figure 36-18 Address Book Revisions screen

Description of ''Figure 36-18 Address Book Revisions screen''
36.7 Set Up Distribution Lists and Templates for EPEC
Before you generate the EPEC XML files, you must set up the users who will work with the programs, the distribution lists, and the templates used by the process. The setup includes these tasks:
-
Set up the email information for the address book record of the user who will access the files.
-
Create the distribution profile for the email address.
-
Create transformation templates.
-
Define database export parameters.
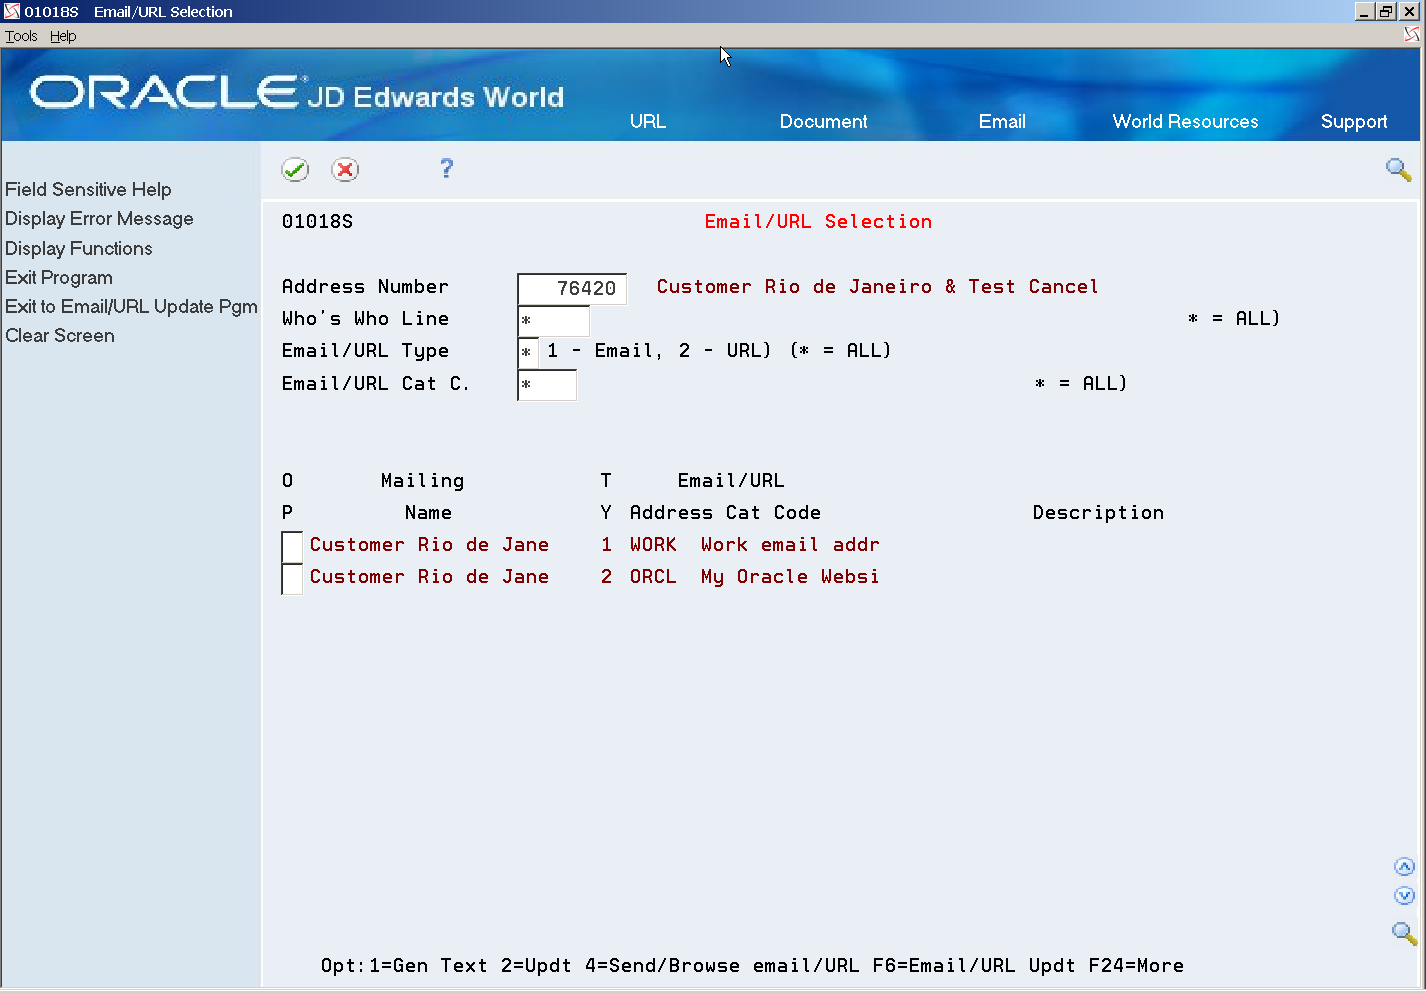
36.7.1 Set Up Address Book Records
In the address book record of the users who will work with the BI Publisher reports generated by the EPEC XML process, complete this setup:
-
In the Who's Who record, enter the Mailing Name of the user.
You access the Who's Who record using option 5 (Who) on the Address Book Revision screen.
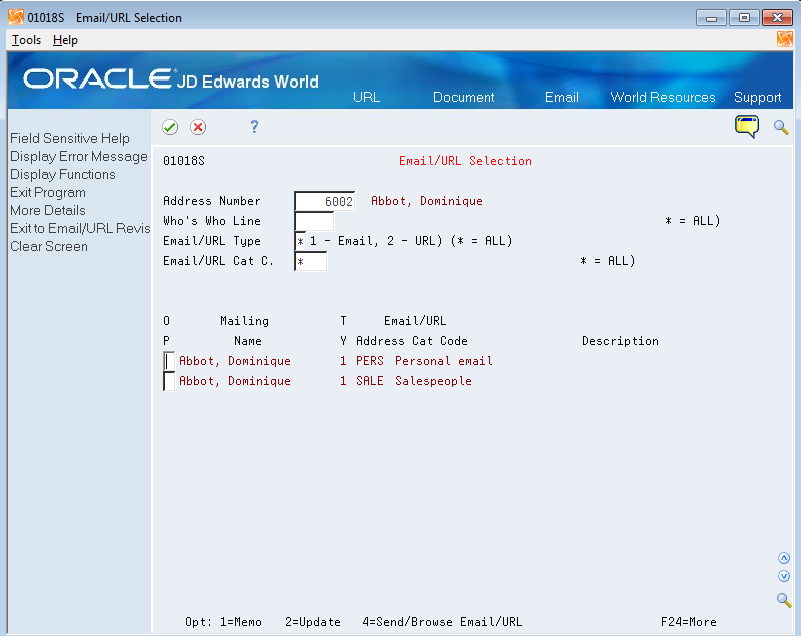
-
Set up the Email/URL record for the Who's Who record.
You access the Email/URL record using option 6 (Email/URL) on the Who's Who screen.
-
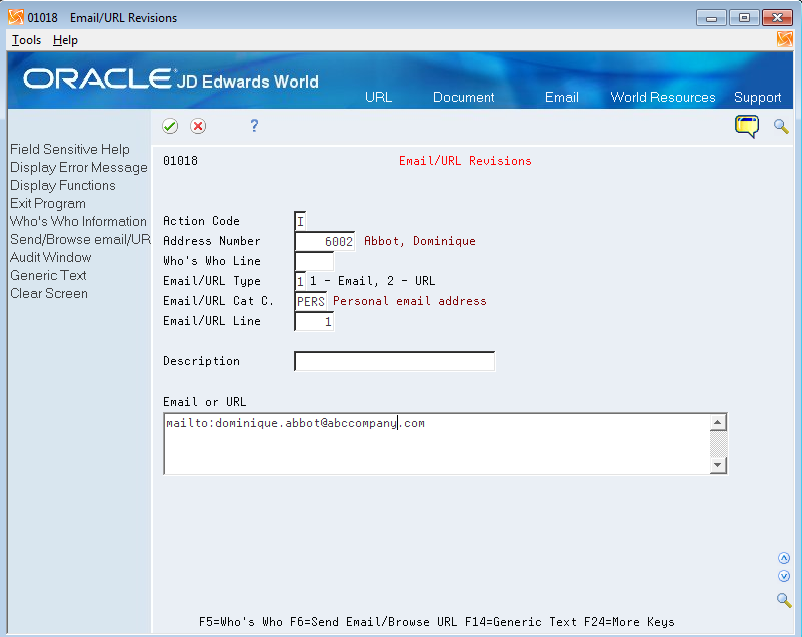
On the Email/URL Selection screen, use option 2 (Update) for the selection that you want to update, then enter the email or URL for the employee and click OK.

36.7.2 Create Distribution Profile
To create the distribution profile:
-
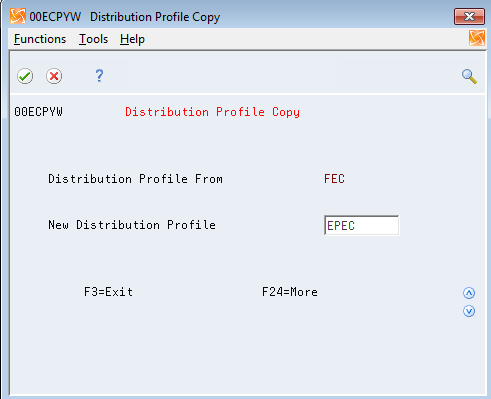
From the Electronic Document Delivery menu (G00E), choose option 3 (Distribution Profiles).
-
On the Distribution Profiles screen, enter 2 to update a selection, or enter 3 to copy an existing profile to create a new distribution list. If you are creating a new list, enter the new distribution profile name.
Figure 36-23 Distribution Profile Copy screen
Description of ''Figure 36-23 Distribution Profile Copy screen''
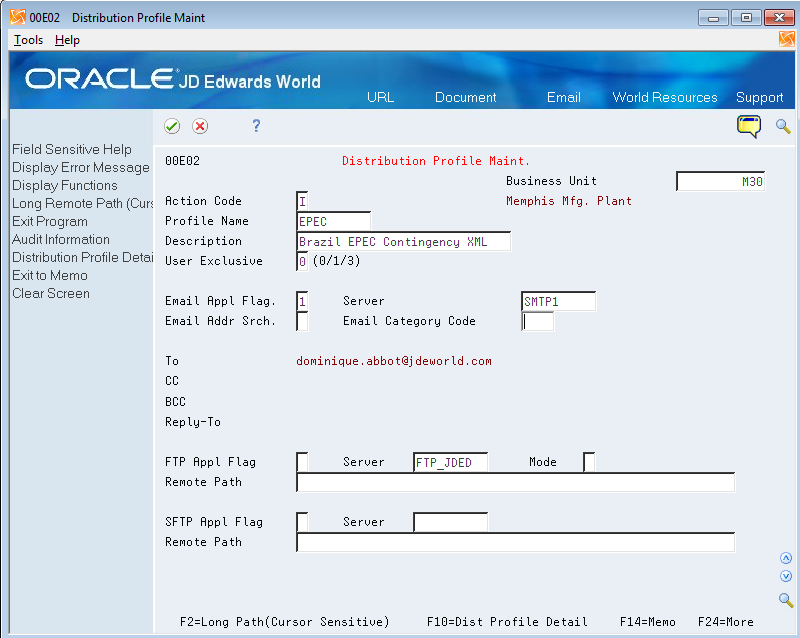
-
On the Distribution Profile screen, enter 2 (Update) for the distribution profile you want to work with.
-
On the Distribution Profile Maint. screen, enter the description of the profile and complete fields as necessary and save your changes.
Figure 36-24 Distribution Profile Maint. screen
Description of ''Figure 36-24 Distribution Profile Maint. screen''
Note: Use the same name here as you will use for the transformation templates. For example, if you name the distribution profile EPEC, then name both of the transformation templates EPEC.
-
On the Distribution Profile Maint. screen, press F10 (Dist. Profile Detail) to access the Distribution Profile Detail screen.
-
On the Distribution Profile Detail screen, add the users to the distribution list and save your changes.
Figure 36-25 Distribution Profile Detail screen
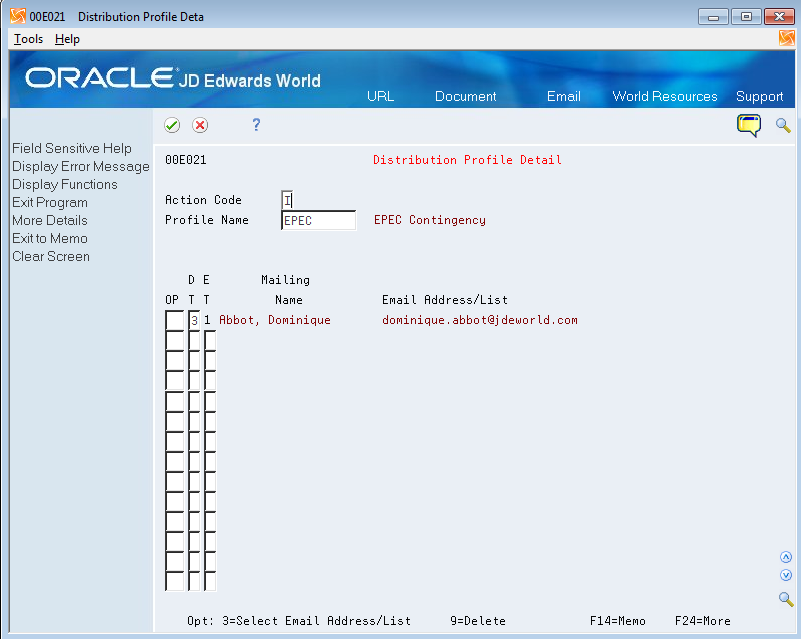
Description of ''Figure 36-25 Distribution Profile Detail screen''
36.7.3 Set Up Transformation Templates
You must set up two transformation templates to work with the DANFE NFCe files. You set up a Type 1 template to transform the generated XML file to an XML file format required by the Brazilian government. The Type 1 template converts the XML file using the Extensible Stylesheet Language (XSL) template. You set up a Type 2 template to convert the XML file generated by the Type 1 template to a non-XML format such as PDF or .rtf. The template Type 1 and Type 2 that you set up must have the same name.
|
Note: Before you set up the transformation templates, verify that these required files were downloaded and exist in the IFS directory of each user who will use the Brazil EPEC contingency process:
You must set up the transformation templates using the names of these provided files. |
To set up the Type 1 transformation template:
-
From the Electronic Document Delivery menu (G00E), choose 5. Transformation Templates.
-
On the Transformation Templates screen, enter 2 for a selection to update an existing template, or enter 3 to copy from an existing template to create a new template.
Figure 36-26 Transformation Template Maint. screen (Type 1 Template)
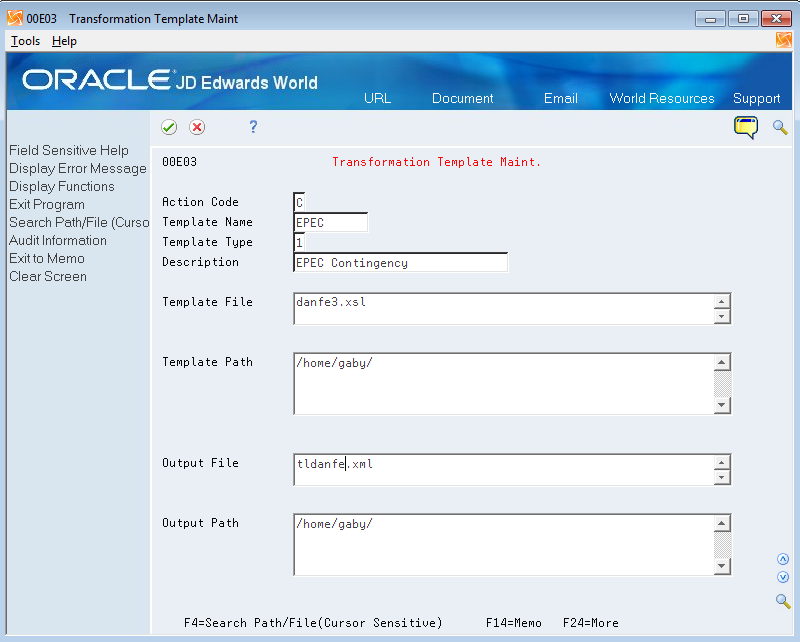
Description of ''Figure 36-26 Transformation Template Maint. screen (Type 1 Template)''
-
On the Transformation Template Maint screen:
-
Enter 1 for the Template Type.
-
In the Template File field, enter the name of the XSL template that you use to transform the original XML output file to the formatted XML. For the Brazil EPEC contingency process, you must enter danfe3.xsl.
-
Enter values for the Template Path and the Output Path fields.
-
In the Output File field, enter the name that you want to assign to the formatted XML file. You must assign a file name with the extension of .xml.
-
Save your record.
-
To set up the Type 2 transformation template:
-
From the Electronic Document Delivery menu (G00E), choose 5. Transformation Templates.
-
On the Transformation Templates screen, enter 2 for a selection to update an existing template, or enter 3 to copy from an existing template to create a new template. For example, you can copy the type 1 template that you created.
Figure 36-27 Transformation Template Maint. screen (Type 2 Template)
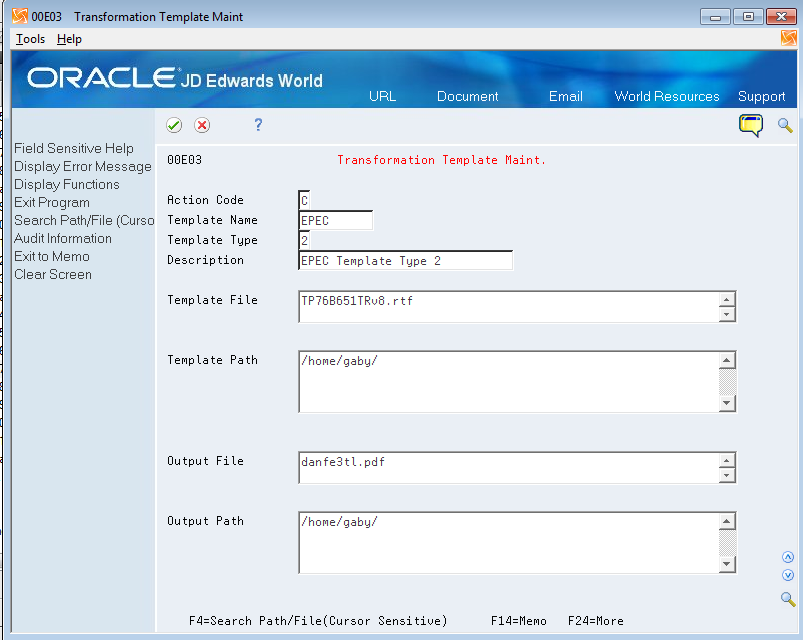
Description of ''Figure 36-27 Transformation Template Maint. screen (Type 2 Template)''
-
On the Transformation Template Maint screen:
-
In the Template Name field, enter the same name as you used in the Type 1 template.
-
In the Template Type field, enter 2.
-
In the Template File field, enter the name of the template that you use to transform the formatted XML output file to another file type. For the Brazil EPEC contingency process, you must enter TP76B651TRv8.rtf.
-
Enter values for the Template Path and the Output Path fields.
-
In the Output File field, enter the name that you want to assign to the file. The file extension can be either .txt or .rtf.
-
Save your record.
-
36.7.4 Set Up Database Export Parameters
Before you run the Nota Fiscal Update program (P76B651), you must set up the database export parameters. Generally, you perform this setup once, unless you want to change the location of the file.
By defining the Database Export Parameters, you engage the Distribution Profile and the Transformation Templates that you set up for the EPEC contingency process to obtain the automatic .txt generation. To set up the batch export parameters, you access a World Writer version of the program P76B665W. Access menu G82, inquire under any basic operation, and once in this video, change the group to Q76B. Then complete the following steps.
To set up the spooled file export parameters:
-
From World Writer (G82), navigate to the P76B665W program.
-
From World Writer (G82), select any operation.
-
Enter Q76B in the Group field.
-
Enter P76B665W in the Skip to Version field, and then click OK.
-
Enter 8 (DB EXport) for the P76B665W option, and then click OK.
Figure 36-28 Database Export Parameters screen
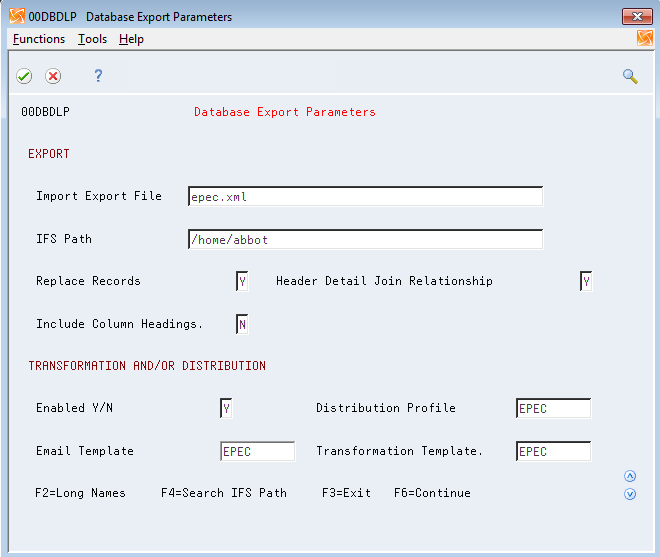
Description of ''Figure 36-28 Database Export Parameters screen''
-
On Database Export Paremeters, complete the following fields:
-
Import Export File
-
IFS Path
-
Enabled Y/N
You must enter Y in this field.
-
Distribution Profile
Enter the name of the distribution profile that you set up for EPEC contingency processing.
-
Transformation Template
Enter the name of the transformation template that you set up for EPEC contingency processing.
-
-
Complete other fields as desired and save your changes.
36.8 Technical Considerations
You must set up your system to enable reports.
36.8.1 Set Up Integrated File System (IFS)
It is necessary to set up an Integrated File System area (IFS) in your iSeries to store XML files.
See "Work with Import/Export" in the JD Edwards World Technical Tools Guide.
36.8.2 Set Up Dream Writer Batch Export Parameters
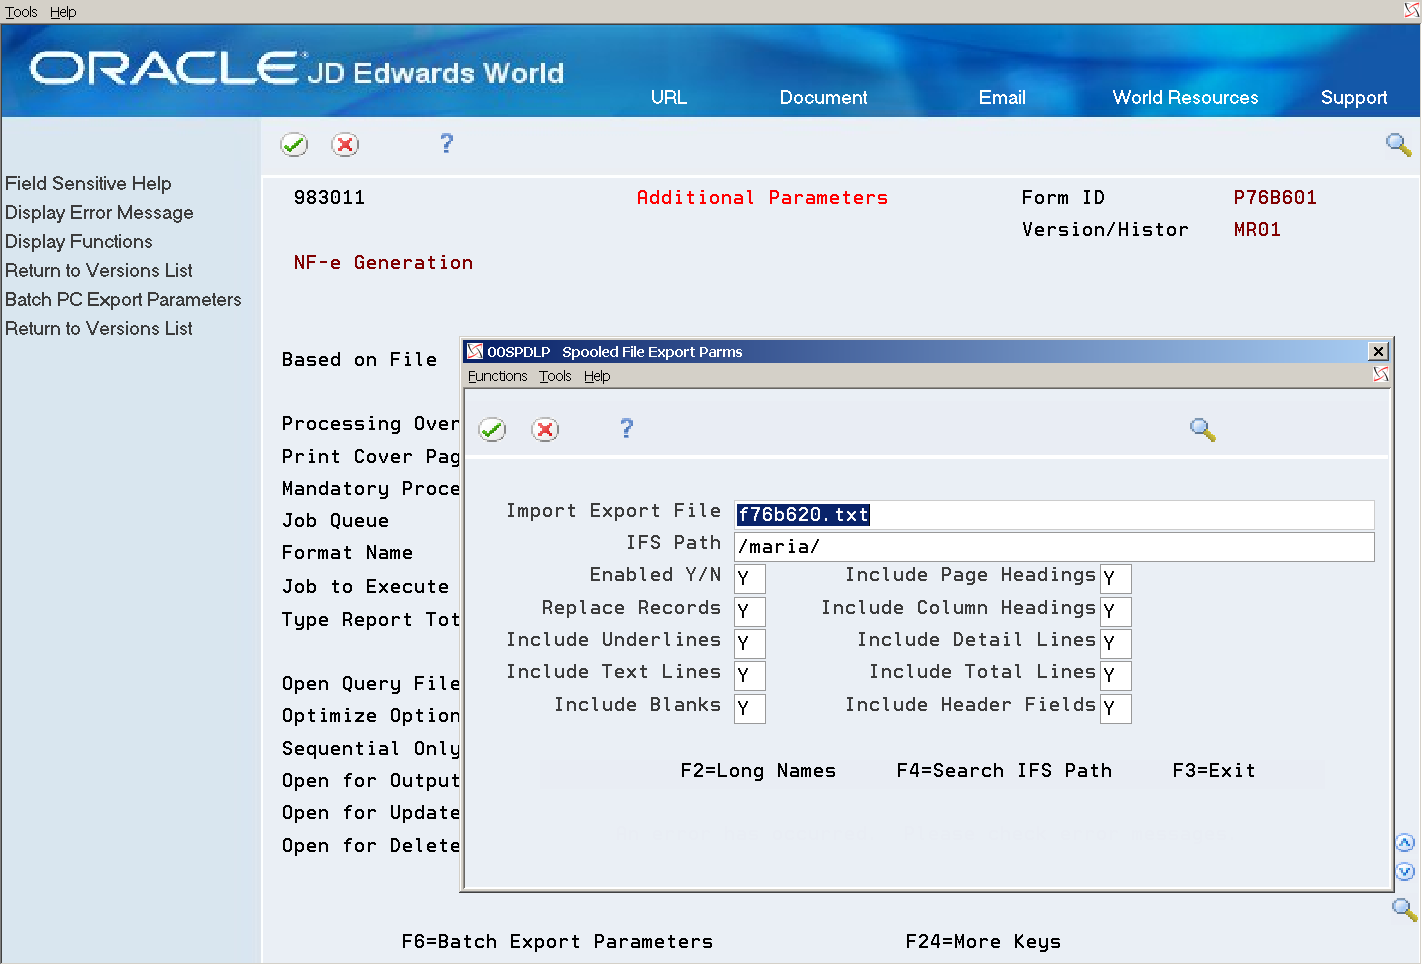
Users that execute XML Generator (P76B601), Cancelled/Unused Nota Fiscal (P76B670), and Unused NFe Numbers (P76B678) programs need to set up Batch Export Parameters (P00SPLP) in their dream writer versions.
Several users can run the same version, but they must each set up batch export parameters for the dream writer versions.
On Versions List (P98300)
-
Inquire on Form P76B601 (XML Generator) and version.
-
Select option 2 (Change).
-
Select Additional Parameters.
-
On Additional Parameters (P983011), select F6 (Batch Export Parameters).
-
On Spooled Files Export Parameters (00SPDLP), complete these fields:
-
IFS Path field (IPTH)
-
Import Export file (IEFN)
-
36.8.2.1 Valid Export File Names
| Program | Version | Export File Name |
|---|---|---|
| XML Generator (P76B601) | NFe Generation (ZJDE0001)
NFe Generation - Without Ñ (ZJDE0002) |
P76B620.TXT
NFe XML Flat File |
| XML Generator (P76B601) | NFe Generation - Cont. DPEC 8 (ZJDE0004)
NFe Generation - Cont. DPEC 7 (ZJDE0005) |
P76B625.TXT
NFe XML Contingency DPEC |
| Cancelled/Unused NFe (P76B670) | ZJDE0001 | P76B671.TXT
NFe XML Cancel/Unused Flat File |
| Unused NFe Numbers (P76B678) | ZJDE0001 | P76B671.TXT
NFe XML Cancel/Unused Flat File |
Figure 36-29 Archived Parameters Search screen
Description of ''Figure 36-29 Archived Parameters Search screen''
36.8.3 Set up Electronic Nota Fiscal Status Update Trigger
-
Use Add Physical File Trigger command (ADDPFTRG) to add a trigger to Nota Fiscal Status Update Transactions (F76B652).
This command calls ZJDE0001 version of Nota Fiscal Electronica Status Add Trigger (X76B653).
The trigger automatically updates the statuses of the sales order and nota fiscal detail lines whenever the statuses of the electronic nota fiscal change.
-
Use Add Physical File Trigger command (ADDPFTRG) command:
ADDPFTRG FILE(F76B652) TRGTIME(*AFTER) TRGEVENT(*INSERT) PGM(*LIBL/X76B653) RPLTRG(*YES)
36.8.3.1 Before You Begin
-
Make sure that the following DREAM writers are properly set up:
-
Add Trigger (X76B653/ZJDE0001)
-
Nota Fiscal Update (P76B651)
-
Cancelled/Unused NFe (P76B670)
-
-
Display File Description (DSPFD) command can be used to check the trigger status.
Figure 36-30 Display Spooled File report
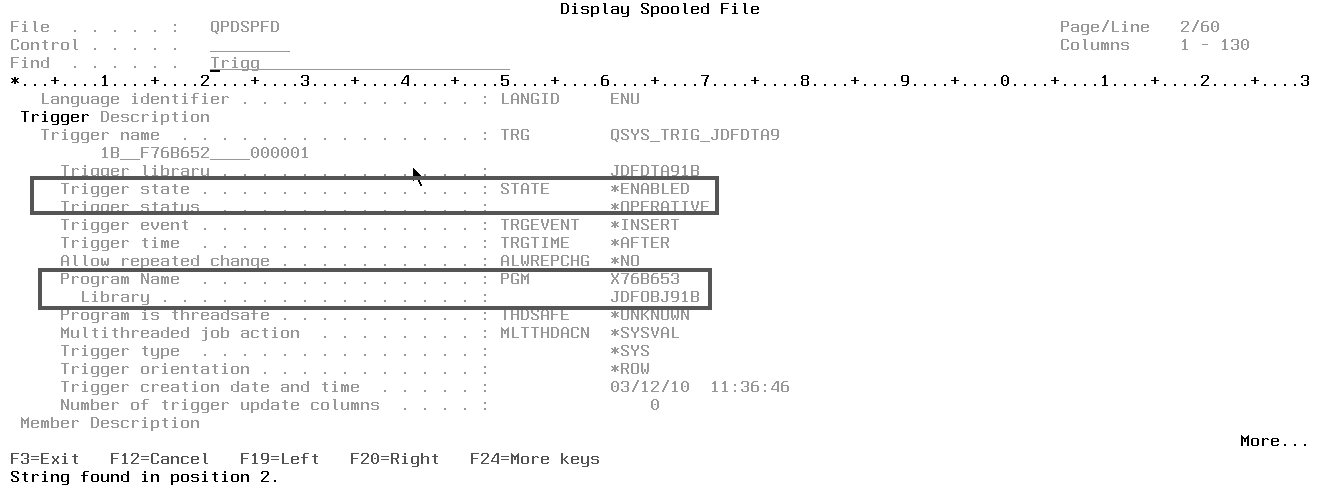
Description of ''Figure 36-30 Display Spooled File report''
Display Spooled File report
36.8.4 Set up Generic Text Application Windows
From menu G9362 (Developer's Workbench)
-
Choose Generic Text Definition (P00161).
-
Set up the following Generic Text Application Windows for contingency:
-
*CONTINGENCY05
-
*CONTINGENCY06
-
*CONTINGENCY07
-
*CONTINGENCY08
-
*CONTINGENCY09
-
*CONTINGENCYD
-
*NFEUNUSED
-
*CONTINGENCY10
-
*CONTINGENCY11
-
*CONTINGENCY12
-
*CONTINGENCY13
These Application Windows are called by Contingency and Unused process programs. They allow you to add messages required by Contingency and Unused processes.
Contingency/Unused messages are stored in the Generic Text file (F0016).
Figure 36-31 Generic Text Definition screen for *CONTINGENCY05
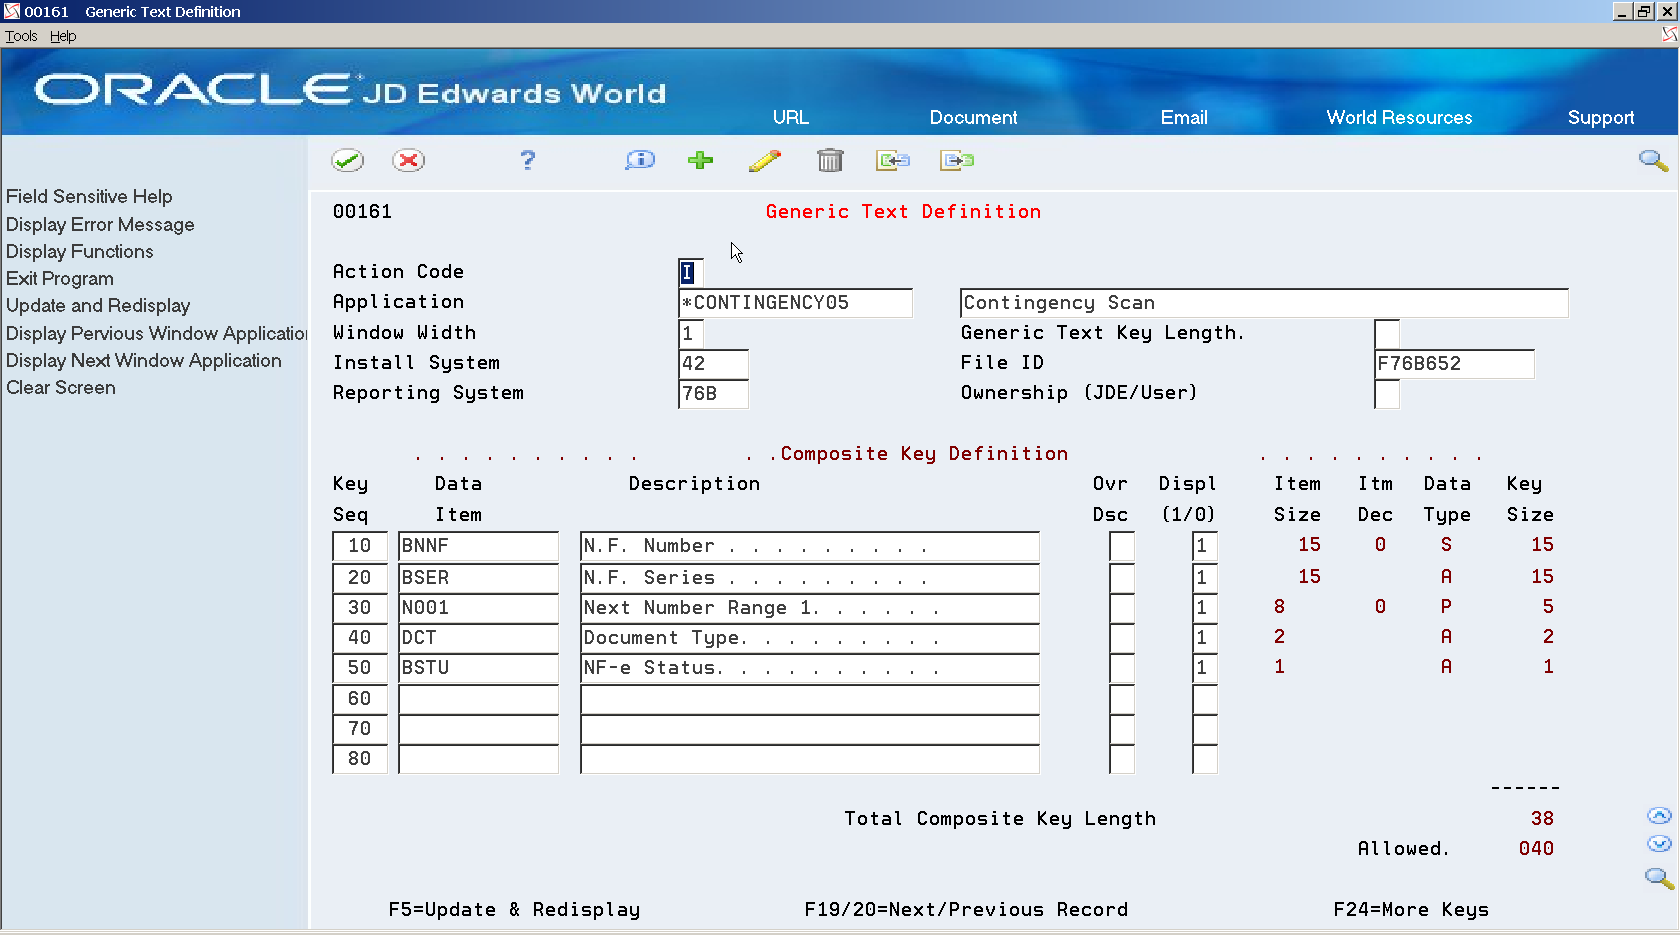
Description of ''Figure 36-31 Generic Text Definition screen for *CONTINGENCY05''
Figure 36-32 Generic Text Definition screen for *CONTINGENCY06
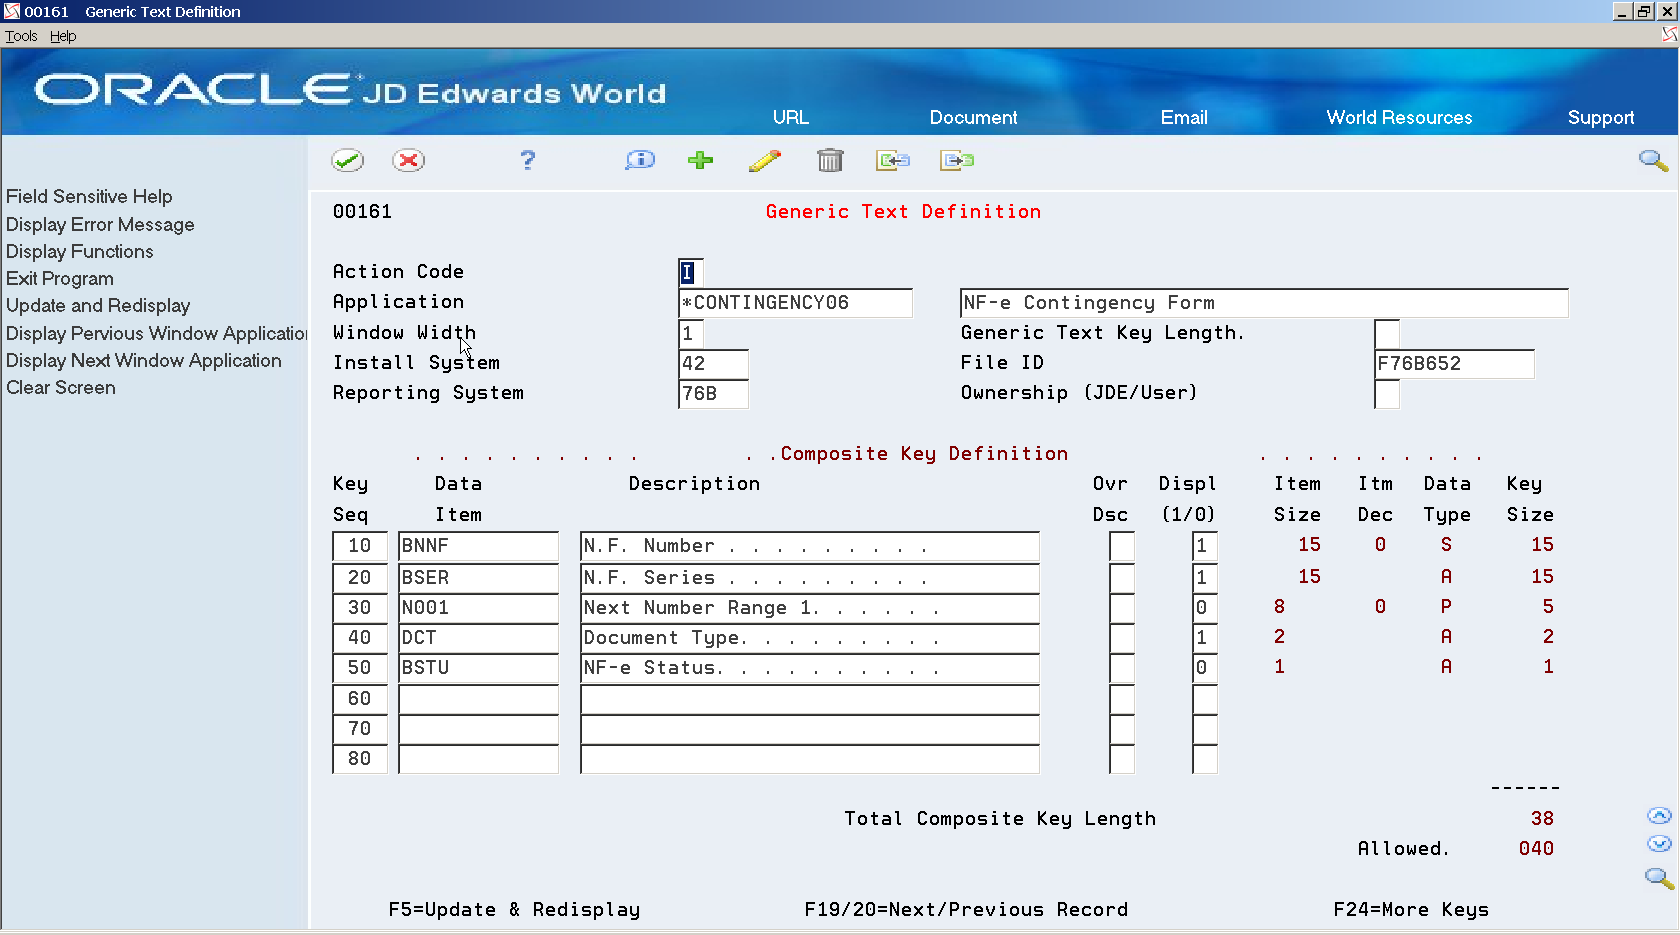
Description of ''Figure 36-32 Generic Text Definition screen for *CONTINGENCY06''
Figure 36-33 Generic Text Definition screen or *CONTINGENCY07
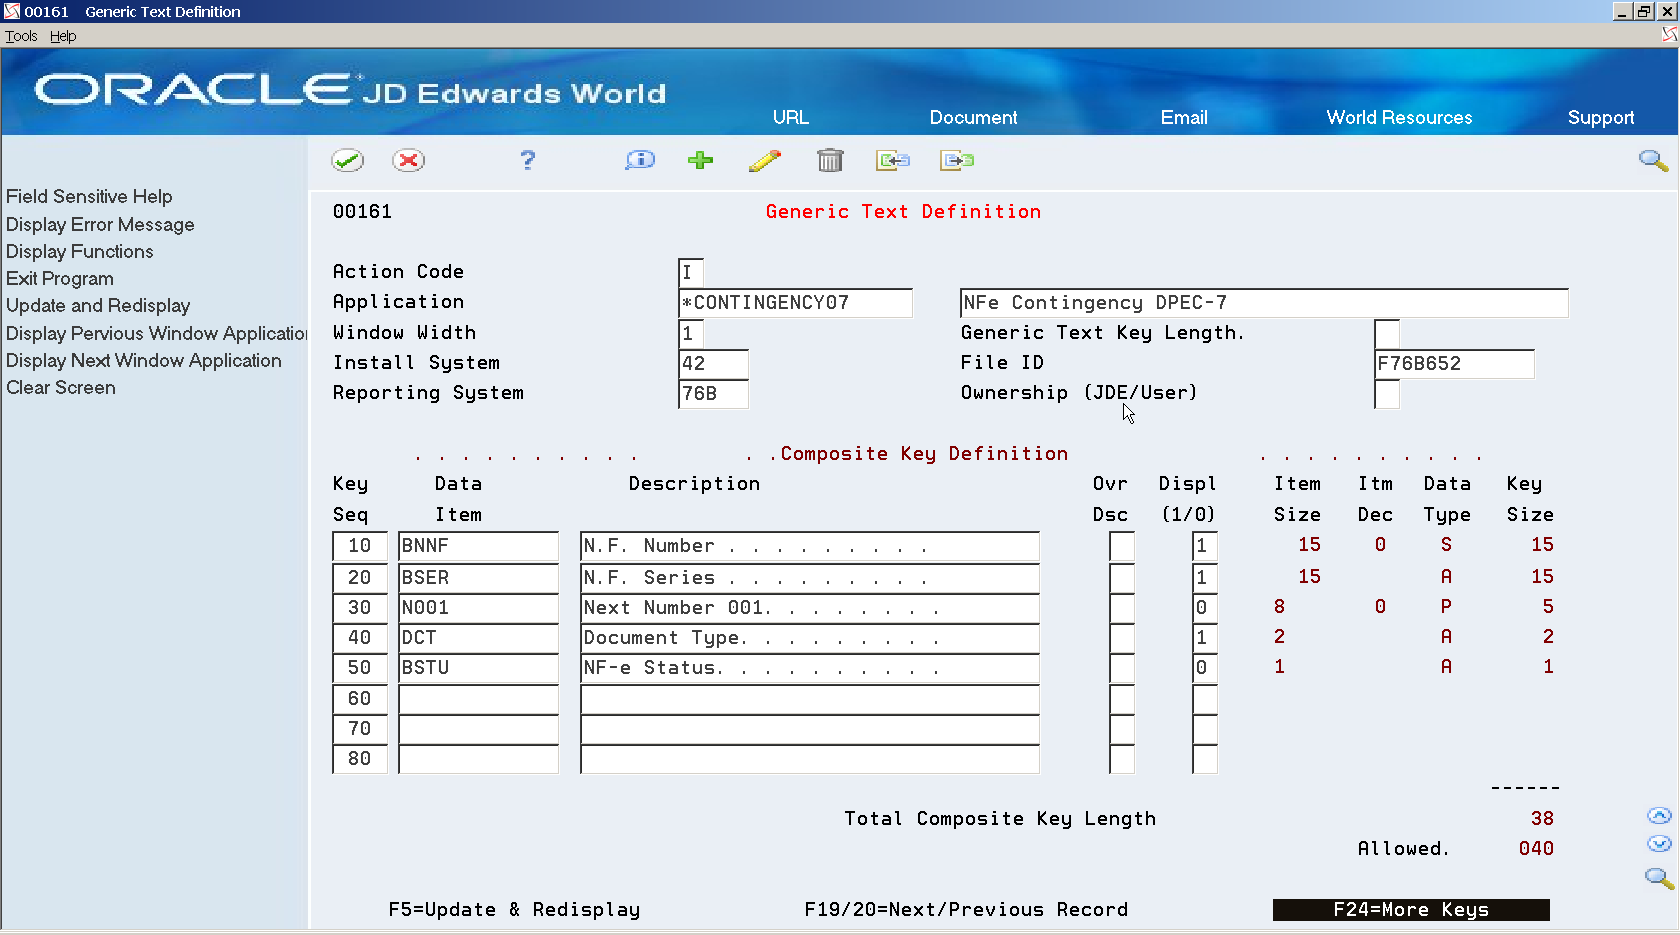
Description of ''Figure 36-33 Generic Text Definition screen or *CONTINGENCY07''
Figure 36-34 Generic Text Definition screen or *CONTINGENCY08

Description of ''Figure 36-34 Generic Text Definition screen or *CONTINGENCY08''
Figure 36-35 Generic Text Definition screen or *CONTINGENCY09

Description of ''Figure 36-35 Generic Text Definition screen or *CONTINGENCY09''
Figure 36-36 Generic Text Definition screen for *CONTINGENCY10
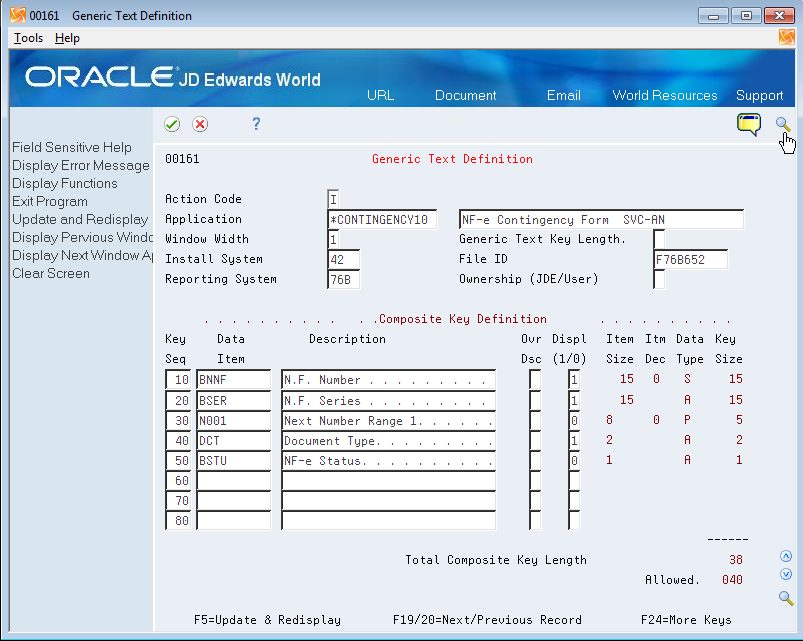
Description of ''Figure 36-36 Generic Text Definition screen for *CONTINGENCY10''
Figure 36-37 Generic Text Definition screen for *CONTINGENCY11, *CONTINGENCY12, and *CONTINGENCY13
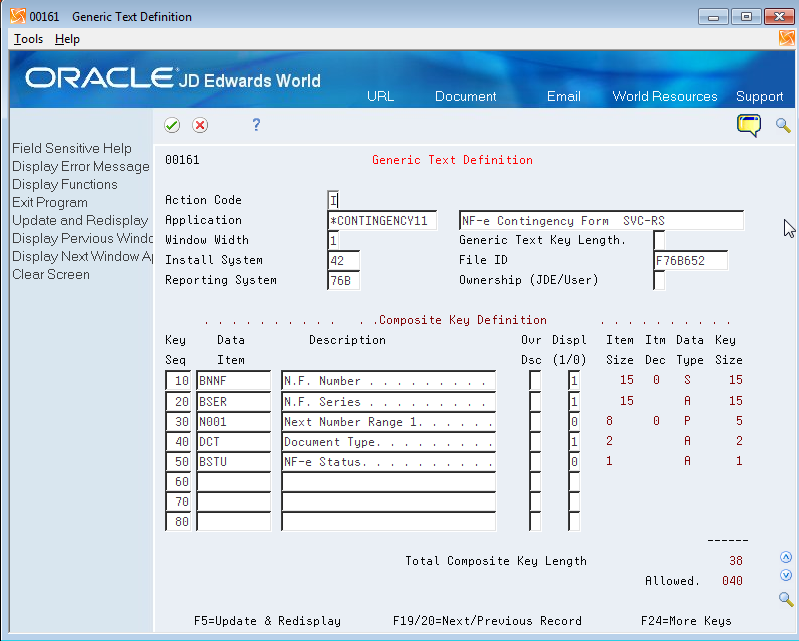
Description of ''Figure 36-37 Generic Text Definition screen for *CONTINGENCY11, *CONTINGENCY12, and *CONTINGENCY13''
You will use a different title for the generic text definition for contingencies 11, 12, and 13, but the Key Sequence, Data Item, and Description fields are the same.
Figure 36-38 Generic Text Definition screen or *CONTINGENCYD

Description of ''Figure 36-38 Generic Text Definition screen or *CONTINGENCYD''
Figure 36-39 Generic Text Definition screen for *NFEUNUSED
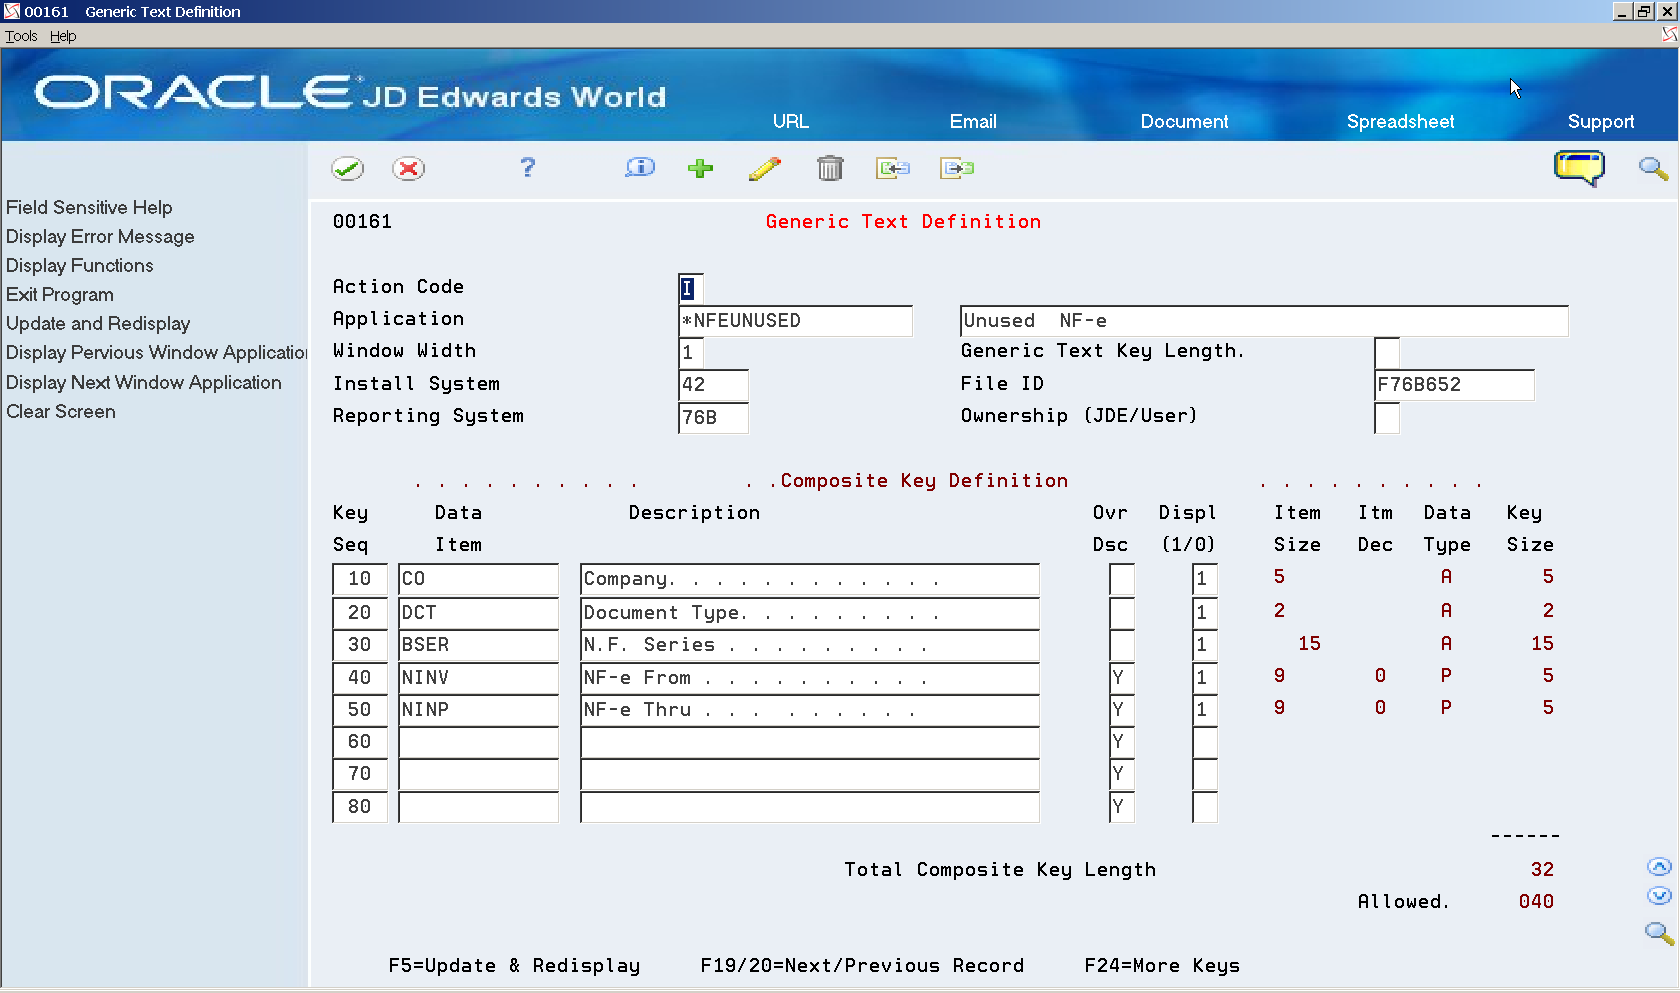
Description of ''Figure 36-39 Generic Text Definition screen for *NFEUNUSED''
36.8.5 Setup for DANFE Barcode
The DANFE prints the Legal Access Key using the barcode font Code 128. This font is included in the iSeries.
-
Run the following command to set up DANFE- Generation print file (R76B660) for barcode:
CHGPRTF (R76B660) DEVTYPE(*AFPDS)
-
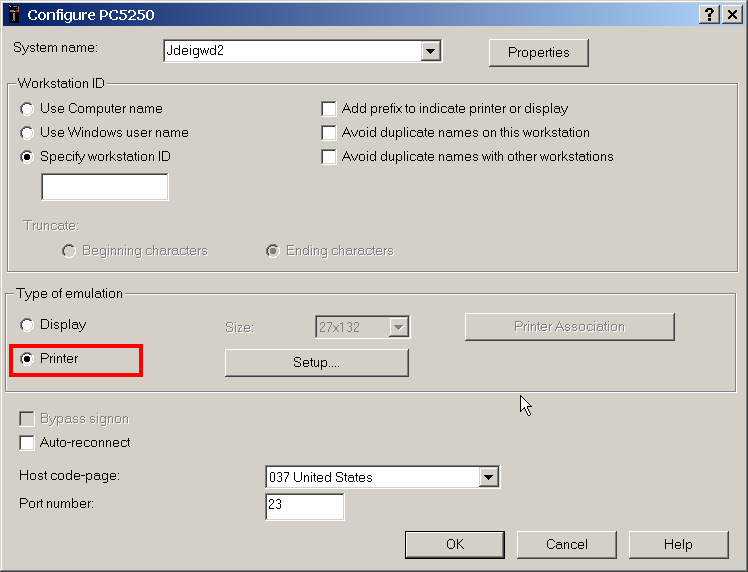
Set up iSeries Navigator:
-
Open an iSeries Navigator session
-
Select Communication, then Configure
Figure 36-40 iSeries Navigator Session Configure Menu

Description of ''Figure 36-40 iSeries Navigator Session Configure Menu''
-
-
Select Printer and then click on the Setup button:
-
Check Transform Print Data to ASCII on ISERIES option.
-
Select Print model *IBM3912HP.
Figure 36-42 Printer Emulation Setup screen's Transform Print Data section
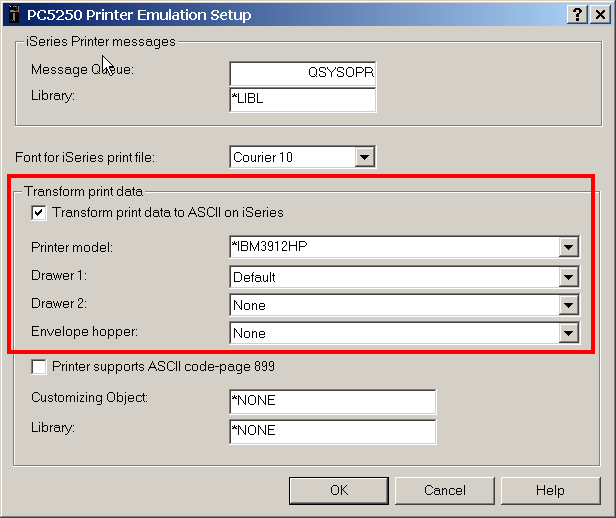
Description of ''Figure 36-42 Printer Emulation Setup screen's Transform Print Data section''
36.8.6 Sales Order Detail (F4211) and Sales Order Detail History (F42119) Data Conversion
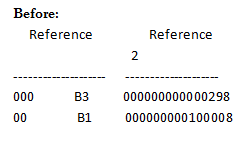
The way that Electronic Nota Fiscal (NFe) programs populate Sales Order Detail (F4211) and Sales Order Detail Ledger file (F42199) Reference (VR01) and Reference 2 (VR02) fields has changed. Before, Localization Brazil programs used to populate both Reference (VR01) and Reference 2 (VR02) fields with nota fiscal information.
This logic changed and Reference (VR01) field is no longer updated by Localization Brazil programs. Reference2 (VR02) should store all the information regarding the nota fiscal.
Figure 36-43 Logic for Populating Sales Order Detail (F4211) and Sales Order Detail Ledger file (F42199) Reference (VR01) and Reference 2 (VR02) fields BEFORE changes
Description of ''Figure 36-43 Logic for Populating Sales Order Detail (F4211) and Sales Order Detail Ledger file (F42199) Reference (VR01) and Reference 2 (VR02) fields BEFORE changes''
Figure 36-44 Logic for Populating Sales Order Detail (F4211) and Sales Order Detail Ledger file (F42199) Reference (VR01) and Reference 2 (VR02) fields AFTER changes
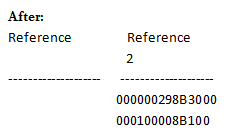
Description of ''Figure 36-44 Logic for Populating Sales Order Detail (F4211) and Sales Order Detail Ledger file (F42199) Reference (VR01) and Reference 2 (VR02) fields AFTER changes''
You may need to execute these programs to convert Sales Order Detail (F4211) and Sales Order Ledger (F42199) files to the new format.
-
Conversion - Change Doc -F4211 VR01/VR02 (P76B42CNV)
-
Conversion - Change Doc-F42199 VR01/VR02 (P76B429CV)