As we have seen, the high-level workflow for creating a basic cartridge is:
Step 2 is necessary during development in order to have a cartridge instance with which to test. However, once the cartridge is complete, the business user is typically responsible for creating and maintaining cartridge instances in Experience Manager.
In the following sections, we'll describe each of these elements of the cartridge in greater detail.
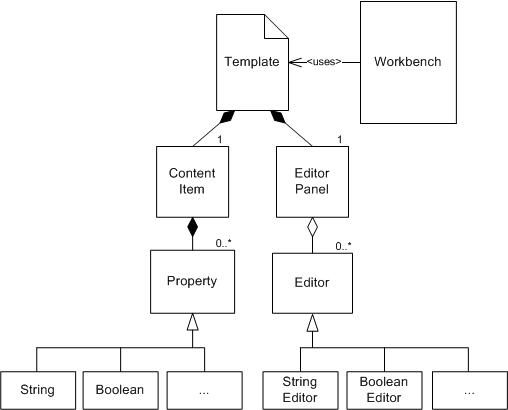
The template defines the configuration that the business user can specify in Workbench using Experience Manager.
The
template contains two main sections: the
<ContentItem> element and the
<EditorPanel> element.
The
content item is a core concept in Assembler applications
that can represent both the configuration model for a cartridge and the
response model that the Assembler returns to the client application. A content
item is a map of properties, or key-value pairs. The
<ContentItem> element in the template defines the
prototypical content item and its properties, similar to a class or type
definition.
The
<EditorPanel> defines the interface that can be
used in Experience Manager to configure the properties of the content item. The
editor panel is composed of a number of
editors. The editors provide the UI controls that the
business user can use to specify the property values for a particular instance
of that cartridge.
In our example template, we defined two string properties named
message and
messageColor and attached two simple string editors to
those properties. The result looks like this in Experience Manager:
For more information about creating and managing cartridge templates, see About creating templates.
The business user creates and configures instances of cartridges in Experience Manager based on a template. During cartridge development you need to create at least one instance of a cartridge for testing.
Experience Manager writes this cartridge instance configuration as XML. You can view the XML representation of the configuration using the XML View tab in Experience Manager. The following shows the XML that corresponds to the configured instance of our example cartridge:
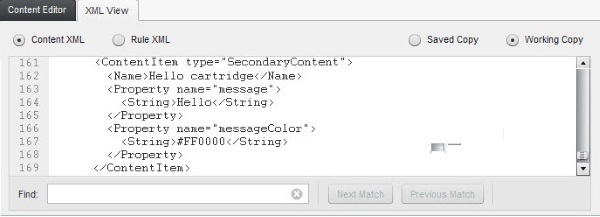
Note the similarities to the
<ContentItem> portion of the template that we
created. At this stage, the values of the string properties have been filled in
based in the input in the
Content Editor pane.
The Assembler retrieves this configuration at runtime and uses it to build the response model that it returns to the client application.
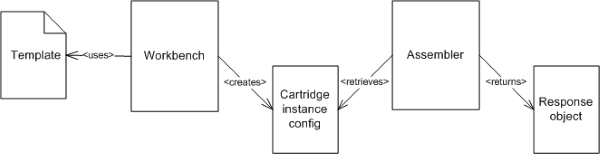
For any given cartridge, the default behavior is for the Assembler to do no processing on the configuration and simply return the configuration content item as a map of properties. That is, the response object is the same as the configuration object unless specific processing logic is defined in the Assembler for that cartridge.
As a best practice, the client application should be composed of modular rendering components, each corresponding to a particular cartridge.
Recall the contents of the Assembler response object corresponding to the example cartridge:
{
    "@type": "Hello",
    "name": "Hello cartridge",
    "message": "Hello, World!",
    "messageColor": "#FF0000"
}
For each cartridge, the
@type of the response object corresponds to the
id of the template that was used to create it. The
Discover Electronics application uses this type to identify the appropriate
renderer to use for this content item.
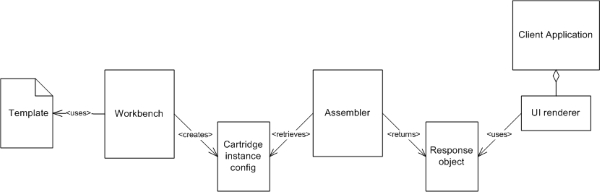
The logic for mapping response objects to the appropriate renderer is
contained in
include.tag in the reference application.
